OVENS USER INSTRUCTIONS HDO 889 HDO 885
|
|
|
- Oswald Horton
- 5 years ago
- Views:
Transcription
1 OVENS USER INSTRUCTIONS HDO 889 HDO 885
2 General warnings Thank you for choosing one of our products. To get the most out of your oven we recommend that you: Read the notes in this manual carefully: they contain important instructions on how to install, use and service this oven safely. Keep this booklet in a safe place for easy, future reference. When the oven is first switched on it may give out acrid smelling fumes. This is because the bonding agent for insulating panels around the oven has been heated up for the first time. This is a completely normal, if it does occur you merely have to wait for the fumes to clear before putting the food into the oven. An oven by its very nature becomes very hot. Especially the glass of the oven door. Do not allow children to go near the oven when it is hot, especially when the grill is on. A specially designed protector shield (some models only) which reduces considerably the surface temperature of the oven door can be obtained through our service organization. This shield is recommended for households with young children. Declaration of compliance. The parts of this appliance that may come into contact with foodstuffs comply with the provisions of EEC Directive 89/109. This appliances complies with Directives 89/336/EEC, 73/23/EEC and following changes. When you have unpacked the oven, make sure that it has not been damaged in any way. If you have any doubts at all, do not use it: contact a professionally qualified person. Keep packing materials such as plastic bags, polystyrene, or nails out of the reach of children because they are dangerous for children. IMPORTANT The oven must be used only for the purpose for which it was designed: it must only be used for cooking food. Any other use, e.g. as a form of heating, is an improper use of the oven and is therefore dangerous. The manufacturers cannot be held responsible for any damage caused by improper, incorrect or unreasonable use. When using any electrical appliance you must follow a few basic rules. Do not pull on the power cable to remove the plug from the socket. Do not touch the oven with wet or damp hands or feet. Do not use the oven unless you are wearing something on your feet. Do not allow children on irresponsible people to use the oven unless they are carefully supervised. It is not generally a good idea to use adapters, multiple sockets for several plugs and cable extensions. If the oven breaks down or develops a fault switch it off at the mains and do not touch it. If the cable is at all damaged it must be replaced promptly. When replacing the cable, follow these instructions. Remove the power cable and replace it with one of equal length that has been insulated in rubber. The cable must be able to bear the electrical current required by the oven. Cable replacement must be carried out by properly qualified technicians. The earthing cable (yellow-green) must be 10 mm longer than the power cable. Use only an approved service centre for repairs and ensure that only original parts are used. If the above instructions are not adhered to the manufacturers cannot guarantee the safety of the oven.
3 Grilling USEFUL TIPS Grilling makes it possible to give food a rich brown colour quickly. For browning we recommend that you insert the grill onto the fourth level, depending in the proportions of the food (pag.8). Almost all food can be cooked under the grill except for very lean game and meat rolls. Meat and fish that are going to be grilled should first be lightly doused with oil. Cooking times For recommended cooking times and temperatures the first time you use the oven, refer to the tables on pages 14,15,16, and 17 You may then wish to vary these times and settings in the light of your own experience. Cleaning and maintenance Clean the stainless steel and enamelled surfaces with warm, soapy water or with suitable brand products. On no account use abrasive powders that may damage surfaces and ruin the oven s appearance. It is very important to clean the oven each time that it is used. Melted fat is deposited on the sides of the oven during cooking. The next time the oven is used this fat could cause unpleasant odours and might even jeopardise the success of the cooking. Use hot water and detergent to clean; rinse out thoroughly. To make this chore unnecessary all models can be lined with catalytic self-cleaning panels: these are supplied as an optional extra (see the section SELF- CLEANING OVEN WITH CATALYTIC LINING). Use detergents and abrasive metal pads like «brillo pads» for the stainless steel grills. The glass surfaces as the top, oven door and warming compartment door must be cleaned when they are cold. Damage that occurs to them because this rule was not adhered to are not covered by the guarantee. To replace the interior light: switch off the mains power supply and unscrew bulb. Replace with an identical bulb that can withstand very high temperatures. Self-cleaning oven with catalytic Special self-cleaning panels covered in a micro-porous coating are available as optional extras for all models. If they are fitted, the oven no longer needs to be cleaned by hand. The fat that is splattered onto the sides of the oven during roasting is eliminated by the microporous coating which breaks the fat down by catalysis and transforms it into gas. Excessive splattering may nevertheless block the pores and therefore hinder self-cleaning. The self-cleaning capacity may be restored by switching on the empty oven to maximum for about minutes. Do not use abrasive products, metal cleaning wads, sharp objects, rough cloths, or chemical products and detergents that may permanently damage the catalytic lining. It is a good idea to use deep roasting trays to roast fatty foods such as joints of meat etc. and to put a tray underneath the grill to catch surplus fat. These simple precautions will ensure the correct temperature and ideal conditions for catalytic cleaning to take place. If the walls of the oven are so thickly coated in grease that the catalytic lining is no longer effective remove surplus grease with a soft cloth or sponge soaked in hot water. The lining must be porous for self-cleaning to be effective. N.B.: All catalytic linings currently on the market have a working life of about 300 hours. They should therefore be replaced after about 300 hours.


4 Service centre Before calling the Service Centre If the oven is not working, we recommend that: you check that the oven is properly plugged into the power supply. If the cause of the fault cannot be detected: disconnect the oven from the mains, do not touch the oven and call the after sales service. Before calling the Service Centre remember to make a note of the serial number on the serial number specifications plate. The oven is supplied with a guarantee certificate that ensures that it will be repaired free of charge at the Service Centre. Grill reflector The piece concurs the reflection of the infrared beams increasing the efficiency of the baking. For having always a good efficiency of the grill reflector it is necessary to have always clean the reflecting surface. Place the grill reflector in the oven upper the grill heat element. The positioning is completed inserting the reflector in the appropriate centers.
5 TELESCOPIC SHELF KIT B A C INSTRUCTION FOR ASSEMBLY A PLACE THE TELESCOPIC RUNNERS A IN THE OVEN ENSURE THE RUNNERS A ARE FIRMLY PUSHED TO THE WALL OF THE OVEN B SLIDE OUT THE RUNNERS AND POSIZION THE SHELF SUPPORT B BEHIND THE SHELF SUPPORT B BEHIND THE SHELF STOP LOCATED AT THE FRONT SIDE OF THE KIT. COMPLETE ASSEMBLY BY INSERTING PLAIN SHELF B AND DRIP TRAY C B C
6 OPERATING INSTRUCTIONS * Tested in accordance with the CENELEC EN ** Tested in accordance with the CENELEC EN used for definition of energy class. Our range includes many different styles and colours. To find the technical specifications and functions of the model which you have bought, study the diagrams below. UPPER OVEN The ovens is fitted with: a bottom element; a top element for infra-red heating, or grilling Turn the control dial to the light will remain on during all the following phases. Temperature setting and the oven s top and bottom elements. 50 MAX Function/thermostat dial 50 MAX Grill regulator Lower heating element. This particular function is ideal for warming meals or for slow cooking. Variable grill Select the grilling function and set the required power by turning the regulator dial between the position from 1 to 6. The amber light will switch off once the correct setting has been achieved. 1 6
7 LOWER OVEN Electronic programmer The ovens is fitted with: a bottom element; a top element for infra-red heating, or grilling MAX Function/thermostat dial Turn the control dial to following phases. the light will remain on during all the Fan oven Air that has been heated to a temperature between 50 and 240 is blown by the fan onto the different levels. It is ideal for cooking different types of food at the same time (e.g. meat and fish) without mixing tastes and smells. It cooks very gently and is ideal for sponge cakes, pastries, etc. 50 MAX
8 LOWER OVEN Electronic programmer The ovens is fitted with: a bottom element; a top element for infra-red heating, or grilling Turn the control dial to the light will remain on during all the following operations. The cooling fan is also switched on. Defrosting When the dial is set to this position. The fan circulates air at room tempe-rature around the frowen food so that it defrosts in a few minutes without the protein content of the food being changed or altered. Fan oven Air that has been heated to a temperature between 50 and 240 is blown by the fan onto the different le-vels. It is ideal for cooking different types of food at the same time (e.g. meat and fish) without mixing tastes and smells. It cooks very gently and is ideal for sponge cakes, pastries, etc. Door closed fan grill The air is heated by the grill element and the fan blows the air onto the food at the required temperature. This ranges from 50 C to 200 C. The grill/fan is an excellent alternative to roasting on the spit. It is ideal for roasting even large quantities of poultry, sausages and red meats. Fan plus lower element This function is ideal for delicate dishes (pies-souffle). Natural convection Bottom and top oven elements are used. This is the traditional form of baking and roasting. It is ideal for roasting joints of meat and game, baking biscuits and apples and making the food nice and crunchy. You will get the best results if you put the food on the same shelf and set the temperature between 50 C and 240 C. Door closed Grilling The setting of this function switches on the infrared grill element. This function is ideal for cooking meats of medium thickness (sausages and bacon). Pastry function The intense heat generated when using this function is similar to that produced in traditional wood-fired ovens. C 50 MAX Thermostat dial 50 MAX MAX 50 MAX 50 MAX 50 MAX Function dial
9 OVEN: GRILLING The grill can be used either with door closed, or ajar, according to the type of cooking being done. Below are some guidelines when using the grill. Personal experience will allow you to adapt these guidelines according to your preferences. Position 3 : use of grill with door closed. For keeping plates or cooked foods warm. Position 4 : use of grill with door closed. Ideal for browning items already cooked, such as endives, hamburgers etc. Position 5 : use of grill with door closed. Ideal for cooking white meats. Position 6 : use of grill with door ajar. Ideal for toasting bread, grilling sausages etc. When the oven is operating, the power-on indicator light comes on. The head indicator light goes on and off throughout cooking time. SETTING THE CORRECT TIME WARNING : the first operation to carry out after the oven has been installed or following the interruption of power supply (this is recognizable the display pulsating and showing ) is setting the correct time. This is achieved as follows Press and hold the TIMER and buttons Set time with buttons Release all buttons ATTENTION the oven only operates if set on manual function or preset time.
10 PROGRAMMING THE LOWER OVEN Programming the oven for a period and immediate start. The oven must be in Manual position (Auto symbol off): if not, press the button. Select a cooking method and the appropriate temperature. The indicator lamps come on. Program a cooking period:. Press the button 2. The symbol is displayed.. Set a period using the + and - buttons (maximum 24 hours).. The programmer records the period and automatically calculates the end-of-cooking time. The oven is in Auto mode (Automatic). The current time is displayed. During the cooking period, you can view or change:. The programmed period: press the button 2.. The end time: press the button 3. The oven stops automatically once the time has elapsed. The symbol " " disappears. The lighting in the oven and the indicator lamps go off. An audible beep sounds as a warning. To interrupt it, press one of the buttons «1», «2», «3» or «4». The Auto symbol blinks; to stop it, reset to Manual position by pressing button. Return the two selectors to the stop position.
11 PROGRAMMING THE LOWER OVEN Programming the oven for an end time and immediate start. The oven must be in Manual position (Auto symbol off): if not, press the button. Select a cooking method and the appropriate temperature. The indicator lamps come on. Program a cooking end time. Press the button 3. The symbol is displayed.. Press the button + : the programmer displays the current time and the Auto symbol.. Set an end-of-cooking time using the buttons - and + (current time + maximum 24 hours)..the programmer records the end-of-cooking time and automatically calculates the cooking period. It is in Auto mode (Automatic). The current time is displayed. During the cooking period, you can view or change:. The programmed period: press the button 2.. The end time: press the button 3. The oven stops automatically once the end-of-cooking time is reached. The symbol " " disappears. The lighting in the oven and the indicator lamps go off. An audible beep sounds as a warning. To interrupt it, press one of the buttons «1», «2», «3» or «4». The Auto symbol blinks; to stop it, reset to Manual position by pressing button. Return the two selectors to the stop position.
12 PROGRAMMING THE LOWER OVEN Programming the oven for a delayed start. The oven must be in Manual position (Auto symbol off): if not, press the button. Select a cooking method and the appropriate temperature. The indicator lamps come on. Program a cooking period:. Press the button 2, then set a period with the buttons - and +. Program an end-of-cooking time:. Press the button 3 then the button + : the programmer displays the current time and the Auto symbol.. Set an end-of-cooking time using the buttons - and + (current time + maximum 24 hours). The Auto symbol is steady. The symbol " displayed. " disappears. The current time is The programmer calculates the cooking start time. It automatically starts the cooking and then displays the symbol " ". At any time, you can view or change the programmed period (press the button 2 ), or the end time (press the button 3 ). The oven stops automatically once the end-of-cooking time is reached. The symbol " " disappears. The lighting in the oven and the indicator lamps go off. An audible beep sounds as a warning. To interrupt it, press one of the buttons 1, 2, 3 or 4. The Auto symbol blinks; to stop it, reset to Manual position by pressing the button " ". Return the two selectors to the stop position.
13 PROGRAMMING THE LOWER OVEN THE TIMER Timer operation is independent and does not affect oven operation. It is just an audible reminder. However, you can use it when cooking. Press the button 1 and then release. The symbol is displayed and the clock shows: Display the time required using the + and - buttons (maximum 24 hours). The display again shows the time of day with the Timer symbol. When the set time has elapsed, an audible beep sounds for 60 seconds. To interrupt the beep, press one of the buttons 1, 2, 3 or 4. The display disappears. Whenever you want to check or change the programmed time, press again on the button 1.

14 COOKING TIPS Temperatures and cooking times are given for information only to facilitate using the oven. Personal experience should then let you adapt these settings to your taste and habits. Remember that cooking at higher temperatures causes more spattering, and the oven can become dirty and smoky. It is better to slightly reduce the cooking temperature, even if it means increasing the cooking time. The sides of the oven are equipped with different positions numbered from the bottom.
15 COOKING TIPS MEAT It is better not to salt meats until after cooking as salt encourages the meat to spatter fat. This will dirty the oven and make a lot of smoke. Joints of white meat, pork, veal, lamb and fish can be put into the oven cold. The cooking time is longer than in a preheated oven, but it cooks through to the centre better as the heat has more time to penetrate the joint. Correct preheating is the basis of successful red meat cookery. GRILLS Before loading the grill: Remove the meat from the refrigerator a few hours before grilling. Lay it on several layers of kitchen paper: this improves seizing, making it tastier and avoids it staying cold at the centre. Add pepper and spices to the meat before grilling, but add any salt after cooking. This way it will seize better and stay juicy. Baste all the food to be cooked with a little oil. This is best done with a wide flat basting brush. Then sprinkle with more pepper and herbs (thyme, etc.). Load the grill. During cooking: Never pierce the food during cooking even when you turn it. This lets the juice out and it becomes dry.
16 Recipes Cooking Quantity Cooking Cooking Tips method C time Beef with carrots Duck Turkey Goose Leg of lamb Roast chicken Roast beef Roast rabbit Roasted white meat Veal / poultry Veal / poultry Beef Lamb / Mutton Pork Kebabs Conv cooking Conv cooking Conv cooking Conv cooking Conv cooking Conv cooking Conv cooking Fan cooking Fan cooking Rotisserie Rotisserie Rotisserie Rotisserie Rotisserie Grill Pork chop Grill All cooking was done at shelf position "1".
17 Recipes Cooking Quantity Cooking Cooking Tips method C time Braised cabbage Conv cooking for C 1 hour Pâté en croûte Conv cooking C 1 hour/kg Chicory with gruyere Fan cooking for C min Potatoes in their jackets Fan cooking for about 1 hour Soufflé savoury/sweet Fan cooking for C min Ø 22 Stuffed tomatoes Fan cooking 6-8 pieces C min Leek Fan + lower flan element for C min Quiche Lorraine Fan + lower element for C min Toast with crottin* Turbo grill 6 pieces 210 C 3 min to toast Flat steak one side + pan 4 min/crottin Dauphiné cheese- Oval topped dish Turbo grill 6 portions 200 C 45 min earthenware Toulouse 2 x 10 min sausages* Turbo grill 4 pieces 210 C turn over in Flat steak mid cookin pan All the cooking was done at shelf position "1" except cooking marked thus "*", which rquires cooking at a middle position.
18 Avoid using shiny tins, they reflect the heat and can spoil your cakes. If your cakes brown too quickly, cover them with grease-proof paper or aluminium foil. Caution: the correct way to use foil is with the shiny side in towards the cake. If not the heat is reflected by the shiny surface and does not penetrate the food. Avoid opening the door during the first 20 to 25 minutes of cooking: soufflés, brioches, sponge cakes, etc. will tend to fall. You can check if cakes are done by pricking the centre with a knife blade or metal knitting needle. If the blade comes out nice and dry, your cake is ready and you can stop cooking. If the blade comes out moist or with bits of cake attached, continue baking but slightly lower the thermostat so that it is finished off without burning. Recipe Cooking Quantity Cookin Cooking Shelf Tips method C time level Cake Conv cooking 1,5 kg C min 1 Fruit tart in batter Conv cooking for C min 1 Ø 27 Pound cake Conv cooking 1,5 kg C min 1 Filled pie Conv cooking for C min 1 Ø 27 Brioche Fan cooking 800 grs 200 C min 1 Sponge cake Fan cooking C min 1 mould Ø27 Genoese cake Fan cooking C mi 1 mould Ø27 Choux pastry Fan cooking 40 piece 190 C 35 mi 1/3 2 trays Pastry base Fan cooking for C min 1 Ø 27 Puff pastry Fan cooking 6 pieces 200 C min 1 e.g. Bouchée Meringues Fan + Lower element* 1 tray C 4 hours 1 Øprofiteroles Fruit tart St Honoré Fan + Lower element* for 220 C min 1 Fan + Lower element* 6 piece 190 C min 1 * with fan and lower element, we recommend preheating with fan cooking to save time.
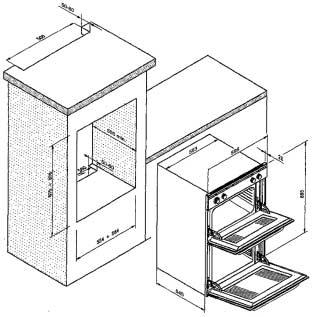
19 INSTALLATION Installing a domestic appliance can be a complicated operation which, if not carried out correctly, can seriously affect consumer safety. It is for this reason that the task should be undertaken by a professionally qualified person who will carry it out in accordance with the technical regulations in force. In the event that this advice is ignored and the installation is carried out by an un qualified person, Hoover declines all responsibility for any technical failure of the product whether or not it results in damage to goods or inyury to individuals. Installation is the customer s responsibility. The manufacturers have no obligation to carry this out. If the assistance of the manufacturer is required to rectify faults arising from incorrect installation, this assistance is not covered by the guarantee. The installation instructions for professionally qualified personnel must be followed. Incorrect installation may cause harm or injury to people, animals or things. The manufacturer cannot be held responsible for such harm or injury. FITTING THE OVEN INTO THE KITCHEN UNIT Fit the oven into the space provided in the kitchen unit: it may be fitted underneath a work top or into an upright cupboard. Fix the oven in position by screwing into place, using the four fixing holes in the frame. To locate the fixing holes, open the oven door and look inside. To allow adequate ventilation, the measurements and distances indicated in the diagram on page 21 be adhered to when fining the oven. IMPORTANT If the oven is to work properly, the kitchen housing must be suitable. The panels of the kitchen unit that are next to the oven must be made of a heat resistant material. Ensure that the glues of units made of veneered wood can withstand temperatures of at least 120 C. Plastics or glues that cannot withstand such temperatures will melt and deform the unit. Once the oven has been lodged inside the unit, the electrical parts must be completely insulated. This is a legal safety requirement. All guards must be firmly fixed into place so that it impossible to remove them without using spe cial tools. Remove the back of the kitchen unit to ensure an adequate current of air circulates around the oven. INSTALLATION: ELECTRICAL CONNECTION The mains electricity supply connected to the appliance should comply with the norms in force in the country of installation. Hoover declines all responsibility for any damage that may be caused by unsuitable or unreasonable use. Warning: Always check before any electrical operation, the supply voltage shown on the electricity meter, the adjustment of the circuit-breaker, the continuity of the connection to earth of the installation and that the fuse is suitable.
20 The electrical connection to the installation should be made via a socket with a plug with earth, or via an omnipole cut-out switch with an opening gap of at least 3 mm. The yellow/green wire of the power supply cable must be connected to the earth of both power supply and appliance terminals. Hoover cannot be held responsible for any accidents resulting from the use of an appliance which is not connected to earth, or with a faulty earth connection continuity. Any queries regarding the power supply cord should be referred to After Sales Service or a qualified technician. The yellow-green earthing cable must not be governed by the ON/OFF switch. The socket or the ON/OFF switch used for connecting to the power supply must be easily accessible when the oven has been installed. Important: During installation, position the power cable in such a way that it will not subjected to temperatures of above 50 C at any point. The cabling and wiring system must be able to bear the maximum electric power required by the oven. This is indicated on the specifications plate. If you are in any doubt at all, use the services of a professionally qualified person. WARNING: the voltage and the supply frequency are showed on the rating plate - Operations to be carried out to make a new connection: Choose the supply cord in accordance with the recommendations in the table The oven must be in situation as shown: Pass the supply cord into the clamp. Strip the end of each conductor of the supply cord a 10 mm length, by taking in account the cord for the connection on the terminal block. According to the installation and with the help of should have recovered in the first operation, fix the conductor as shown on the chart. Engage the earth wire yellow/green on the earth terminal, tighten the nut and verify the continuity of the earth. Secure the cable clamp. Fix the cover.
21 CABLE Area 3 G 2,5 mm 3 G 2,5 mm Connection to the terminal block To shunt : make a bridge with a shunt bar PH N 1 rst Phase Shunt 1-2 Shunt 2-3 Neutral Shunt 4-5 E PH N 1 rst Phase Shunt 1 Neutral Shunt 2 E Earth Earth IMPORTANT: Blue wire = Neutral Yellow/green wire = Earth For the connection to the terminal block, you must: respect the n 1,2,3,4, and 5, tighten the screws, do not forget to fix the earth wire (yellow/green) on the earth terminal n 6
22
23 This appliance is marked according to the European directive 2002/96/EC on Waste Electrical and Electronic Equipment (WEEE). By ensuring this product is disposed of correctly, you will help prevent potential negative consequences for the environment and human health, which could otherwise be caused by inappropriate waste handling of this product. The symbol on the product indicates that this product may not be treated as household waste. Instead it shall be handed over to the applicable collection point for the recycling of electrical and electronic equipment. Disposal must be carried out in accordance with local environmental regulations for waste disposal. For more detailed information about treatment, recovery and recycling of this product, please contact your local city office, your household waste disposal service or the shop where you purchased the product Cod
OVENS USER INSTRUCTIONS
 OVENS USER INSTRUCTIONS General warnings Thank you for choosing one of our products. To get the most out of your oven we recommend that you: Read the notes in this manual carefully: they contain important
OVENS USER INSTRUCTIONS
 OVENS USER INSTRUCTIONS General warnings Thank you for choosing one of our products. To get the most out of your oven we recommend that you: Read the notes in this manual carefully: they contain important
Grafica RB Cod Imprimè en Italie OVENS USER INSTRUCTIONS
 Grafica RB - 04-2004 - Cod. 41011749 - Imprimè en Italie EN OVENS USER INSTRUCTIONS General warnings Thank you for choosing one of our products. To get the most out of your oven we recommend that you:
BUILT-IN OVENS USER MANUAL
 BUILT-IN OVENS USER MANUAL EN GENERAL WARNINGS Thank you for choosing one of our products. To get the most out of your oven we recommend that you: Read the notes in this manual carefully: they contain
OVENS USER INSTRUCTIONS
 OVENS USER INSTRUCTIONS GB CANDY HOOVER GROUP S.R.L. Via Privata Eden Fumagalli 0047 Brugherio Milano Italy CONTENTS GB Safety Instructions...03. General Warnings...04. Declaration Of Compliance...04.
OVENS USER INSTRUCTIONS
 OVENS USER INSTRUCTIONS GB CANDY HOOVER GROUP S.R.L. Via Privata Eden Fumagalli 0047 Brugherio Milano Italy CONTENTS Safety Instructions. General Warnings. Declaration Of Compliance. Safety Hints.3 Installation.4
Uno xl electronic. Turnspit.
 EN ZH KO ID TH VI Uno xl electronic Turnspit www.tefal.com DESCRIPTION A Interior light B Non-stick walls C Convection fan D Heating elements E Double glass door F Control panel F1 Left rotating knob
Built in Electric Fan Oven
 Built in Electric Fan Oven LAM3400 LAM3402 LAM3403 User & Installation Guide LAMONA The user manual will help you use your product quickly and safely. Index 01 - Before using the oven 05 07 - Cooking and
instructions COFFEE GRINDER KG 79/89
 instructions COFFEE GRINDER KG 79/89 DESCRIPTION OF APPLIANCE The following terms are used throughout the instruction manual Coffee-bean hopper lid Removable upper burr Coffee-bean hopper ON/OFF switch
1. IMPORTANT SAFEGUARDS When using electrical appliances, basic safety precautions should always be followed to reduce the risk of fire, electric
 1. IMPORTANT SAFEGUARDS When using electrical appliances, basic safety precautions should always be followed to reduce the risk of fire, electric shock, and/pr injury to persons including the following:
MARQUE REFERENCE CODIC
 MARQUE REFERENCE CODIC : KALORIK : TKG OT 00BCRL : 50 EN ANGLAIS PROVISOIREMENT NOTICE LOGO 00L ELECTRIC OVEN WITH ROTISSERIE & LAMP & CONVECTION INSTRUCTION MANUAL Model No. TY000BCL 0-0V~ 50/60Hz 800W
ELECTRIC DOUBLE OVEN. User Manual. Model Numbers: DC60W DC60SS
 ELECTRIC DOUBLE OVEN User Manual Model Numbers: DC60W DC60SS REGISTER TO ACTIVATE YOUR 2 YEAR GUARANTEE NOW SERVIS.CO.UK 0800 0124382 Parts & Labour for 2 years. Go to www.servis.co.uk for more information
Coffee Grinder Instruction Manual
 Coffee Grinder Instruction Manual CoffeeGrinder Manual-English Only.indd 1 07/01/2016 14:14:39 Savisto Home Coffee Grinder Voltage Supply: 220-240V~ 50/60Hz Power Consumption: 150W Eng Please read through
USING THE OVEN BAKE. Displays for the BAKE mode. Changing Bake Temperature while Cooking (example changing from 375 F to 425 F):
:") 16 USING THE OVEN USING THE OVEN BAKE The oven can be programmed to bake at any temperature from 170 F (80 C) to 550 F (288 C). The default temperature is 350 F (177 C). Setting the Oven to Bake at 375
16 USING THE OVEN USING THE OVEN BAKE The oven can be programmed to bake at any temperature from 170 F (80 C) to 550 F (288 C). The default temperature is 350 F (177 C). Setting the Oven to Bake at 375
AS450, AS600, G1, SG630
 Grill Range Operating Manual Grill Range AS450, AS600, G, SG60 Product Range Also Includes: Induction Hobs / Combination Ovens / Pizza Ovens / Mixers Salamander Grills / Contact Grills / Pie Warmers /
5KEK1322 W A_v08.indd 1 5/13/16 2:25 PM
 5KEK1322 W10878653A_v08.indd 1 PARTS AND FEATURES PARTS AND ACCESSORIES Tea steeper lid (center section of lid with handle) Kettle lid (outer section) Stainless steel lime scale filter Removable stainless
TOASTER OVEN USER MANUAL MODEL: PKMFT039
 TOASTER OVEN USER MANUAL MODEL: PKMFT039 IMPORTANT SAFETY INSTRUCTION When using electrical appliances, basic safety precautions should always be followed, including the followings: 1 Don t touch hot surfaces
OVEN c o l l e c t i o n
 OVEN c o l l e c t i o n Instructions for Use and Warranty Details Multifunction Ovens TO90S - Stainless Steel TO91W - White TO92B - Black C ongratulations on the purchase of your new Kleenmaid appliance.
DAILY REFERENCE GUIDE
 DAILY REFERENCE GUIDE EN Before using the appliance, carefully read the Health and Safety guide. PRODUCT DESCRIPTION 6 7 8 9. Control panel. Fan. Lamp. Shelf guides (the level is indicated on the wall
Contact Grill. User's manual
 Contact Grill User's manual EN SBG 2050SS / SBG 2051BK SBG 2052RD / SBG 3050SS SBG 3051BK / SBG 3052RD Prior to using this appliance, please read the user's manual thoroughly, even in cases where you have
IMPORTANT INSTRUCTIONS MODE D EMPLOI IMPORTANT INSTRUCIONES IMPORTANTES ISTRUZIONI IMPORTANTI
 MOKA 22-04-2003 10:10 Pagina 1 IMPORTANT INSTRUCTIONS SAVE THESE INSTRUCTIONS MODE D EMPLOI IMPORTANT CONSERVEZ LES PRESENTES INSTRUCTIONS INSTRUCIONES IMPORTANTES GUARDE ESTAS INSTRUCCIONES ISTRUZIONI
MODEL# GCM4500 COFFEE MAKER WITH GRINDER. PHOTO OF PRODUCT
 MODEL# GCM4500 COFFEE MAKER WITH GRINDER www.gourmia.com PHOTO OF PRODUCT 2016 Gourmia www.gourmia.com The Steelstone Group Brooklyn, NY Welcome to Delicious and Aromatic world of Coffee Makers from Gourmia!
OPERATING MANUAL. Sample PRO 100 Series. Electric Heating. Applies to Versions: SPE1*, SPE2, SPE4, SPE6
 OPERATING MANUAL Sample PRO 100 Series Electric Heating Applies to Versions: SPE1*, SPE2, SPE4, SPE6 NOTE: All electrically heated roasters in the Sample PRO 100 Series are modular and this manual applies
AMÉRICA 90 ELÉCTRICO D
 AMÉRICA 90 ELÉCTRICO D Voltage 220V-240V 1. INTRODUCTION... 3 2. INSTRUCTION FOR USE... 6 3. OVEN VIEW... 7 4. OVEN PROGRAMMING... 13 5. HOW TO KEEP YOUR OVEN IN SHAPE?... 15 6. HOW TO REMOVE OVEN DOORS?...
5KEK1522 W A_01_EN.indd 1 11/16/12 1:22 PM
 5KEK1522 Water Kettle INSTRUCTIONS Table of Contents water KEttle SAFETY Important safeguards...6 Electrical requirements...7 Electrical equipment waste disposal...7 PARTS AND FEATURES Parts and accessories...8
1.5 L Slow Cooker 7644 Instructions for Use
 PARTS PLEASE SAVE THESE INSTRUCTIONS FOR FUTURE REFERENCE. Lid Cooking pot Base Power indicator Control knob TECHNICAL DETAILS: POWER DETAILS: 230V A.C. POWER FREQUENCY: 50Hz WATTAGE: 120W SAFETY INSTRUCTIONS:
NOTICE D'EMPLOI ET D'INSTALLATION DES FOURS ENCASTRABLES
 FR GB ES BE NL NOTICE D'EMPLOI ET D'INSTALLATION DES FOURS ENCASTRABLES INSTRUCTIONS FOR THE USE AND INSTALLATION OF BUILT-IN OVENS INSTRUCCIONES DE FUNCIONAMIENTO E INSTALACIÓN HORNO EMPOTRABLE GEBRUIKS-
MODEL: POD BREWER AURORA SAF 68 HOMEMAKER ESPRESSO MAKER WITH COFFEE POD
 INSTRUCTION MANUAL Please read this Instruction Manual and the safety instructions before operating the appliance! MODEL: POD BREWER AURORA SAF 68 HOMEMAKER ESPRESSO MAKER WITH COFFEE POD Congratulation
User Guide WINE CELLAR. Contents I GB F. Installation, 2 Location and power connection Technical information D E P
 User Guide WINE CELLAR I F English D E P WC 24 X NA Contents Installation, 2 Location and power connection Technical information Product Description, 3 Interior Parts Using the Wine Cellar 4 Bottle ageing
IMPORTANT SAFEGUARDS. 3. To protect against fire, electric shock and injury to persons do not immerse cord, plug or unit in water or other liquid.
 IMPORTANT SAFEGUARDS When using electrical appliances, basic precautions should always be followed, including the following: 1. Read all instructions. 2. Make sure that your outlet voltage corresponds
INSTRUCTION MANUAL DOUBLE PIE MAKER
 INSTRUCTION MANUAL DOUBLE PIE MAKER Contents Introduction 2 Double Pie Maker Features 3 Before using your Double Pie Maker 4 Operating your Double Pie Maker 5 Cleaning your Double Pie Maker 6 Pie & Pastry
MODEL# GCG165 COFFEE GRINDER. PHOTO OF PRODUCT
 MODEL# GCG165 COFFEE GRINDER www.gourmia.com PHOTO OF PRODUCT 2016 Gourmia www.gourmia.com The Steelstone Group Brooklyn, NY Welcome to Delicious world of Coffee Grinders from Gourmia! All rights reserved.
QUALITY MILK FROTHER INSTRUCTION MANUAL MODEL NO. MMF005
 QUALITY MILK FROTHER INSTRUCTION MANUAL MODEL NO. MMF005 MILK FROTHER INSTRUCTION MANUAL Model No.: MMF005 READ ALL INSTRUCTIONS BEFORE USING THE FROTHER. KEEP THESE INSTRUCTIONS FOR FUTURE REFERENCE.
A IMPORTANT SAFEGUARDS
 instructions 2 Read the instructions, keep them safe, pass them on if you pass the appliance on. Remove all packaging before use. A IMPORTANT SAFEGUARDS Follow basic safety precautions, including: 1 This
PIZZA OVEN & MULTI-GRILL
 INSTRUCTION MANUAL PIZZA OVEN & MULTI-GRILL Contents Introduction 2 Pizza Oven & Multi-Grill Parts 3 Before using your Pizza Oven & Multi-Grill 4 Cleaning your Pizza Oven & Multi-Grill 4 Recipes & Suggestions
1550W DIGITAL FRENCH DOOR OVEN Instruction Manual MODEL CCFD19
 1550W DIGITAL FRENCH DOOR OVEN Instruction Manual MODEL CCFD19 1 WHAT S INCLUDED French Door Oven & Instruction Manual Rotisserie Hle Two Wire Racks Baking Pan Rotisserie Tray Hle Crumb Tray 2 IMPORTANT
ELECTRONIC OVEN CONTROL GUIDE
 GUIDE Typical Control Pad Functions (READ THE INSTRUCTIONS CAREFULLY BEFORE USING THE OVEN) OVEN LIGHT - Use the oven light on the control panel to turn the oven lights on and off when doors are closed.
Cucina HD2423, HD2422, HD2421, HD2420
 Cucina HD2423, HD2422, HD2421, HD2420 2 2 3 2 3 4 ENGLISH 6 16 24 33 HD2423, 2422, 2421, 2420 6 ENGLISH Important Always follow basic safety precautions when using electrical appliances. Read these directions
EASY COOK EASY COOK EASY COOK EASY COOK Y COOK EASY COOK EASY COOK EASY CO OOK EASY COOK EASY COOK EASY COOK EASY COOK EASY COOK EAS
 99629241 livret easy cook KLEENMAID.qxd 16/06/03 10:35 Page 1 EASY COOK by OK EASY COOK OK EASY COOK EASY COO EASY COOK EASY COOK EASY COOK EASY COOK EASY COOK EASY COOK EASY CO COOK EASY COOK EASY COOK
PROGRAMMABLE COFFEE MAKER
 PROGRAMMABLE COFFEE MAKER KM 7280 KM 7280 W ENGLISH EN A B C D E F G H I J K L M N O P 3 SAFETY AND SET-UP Please read this instruction manual thoroughly prior to using this appliance! Follow all safety
DAILY REFERENCE GUIDE
 DAILY REFERENCE GUIDE THANK YOU FOR PURCHASING AN HOTPOINT PRODUCT To receive more comprehensive help and support, please register your product at www. hotpoint. eu/ register EN You can download the Safety
Instructions for use EEB and installation instructions FC1
 Instructions for use and installation instructions EEB 9640.0 53 73 15 FC1 For your information Please read the information in this leaflet carefully. It contains important instructions for the safety,
12 CUP COFFEE MAKER User Guide
 BRAND 12 CUP COFFEE MAKER User Guide Item: 740553 Ginnys.com 800-544-1590 Facebook.com/GinnysBrand Pinterest.com/GinnysBrand Ginnys.com/Blog Welcome to the world of full-flavored coffee with the Ginny
Baby Belling 321R. Installation and User Instructions
 Baby Belling 321R Installation and User Instructions Installing Your Cooker Your Belling Cooker Even if you have used an electric cooker before, it is important that you read these instructions thoroughly
MODEL# GMF245 MILK FROTHER CAPPUCCINOS & LATTES. PHOTO OF PRODUCT
 MODEL# GMF245 MILK FROTHER CAPPUCCINOS & LATTES www.gourmia.com PHOTO OF PRODUCT 2016 Gourmia www.gourmia.com The Steelstone Group Brooklyn, NY Welcome to Delicious and Aromatic of Milk Frothers from Gourmia!
INSTRUCTION MANUAL WAFFLE MAKER
 INSTRUCTION MANUAL WAFFLE MAKER Contents Introduction 2 Retro Diner Waffle Maker Features 3 Before using your Retro Diner Waffle Maker 4 Operating your Retro Diner Waffle Maker 4 Cleaning your Retro Diner
10,000 prize draw. instructions. EXTRA year guarantee FREE rewards gallery. Register online now!
 r instructions 10,000 prize draw EXTRA year guarantee FREE rewards gallery www.productregister.co.uk/rhobbs Register online now! See back for details Read the instructions, keep them safe, pass them on
User guide supplement. Built-in oven NZ AU. Soft Touch electronic models
 User guide supplement Built-in oven Soft Touch electronic models NZ AU Contents 1 Introduction 2 Clock and timer 3 Operating the oven 4 Cooking functions 5 One Touch Cooking (OTC) 7 Automatic cooking
User Manual. Stainless Steel Coffee Urns. Models: 177CU55ETL, 177CU110ETL 10/2016. Please read and keep these instructions. Indoor use only.
 Intertek Stainless Steel Coffee Urns Models: 177CU55ETL, 177CU110ETL 10/2016 Please read and keep these instructions. Indoor use only. www.avantcoequipment.com 1 NOTE: Save these instructions for future
Getting to Know Your Bananza
 User Guide Thank you for purchasing Bananza from JML. To get the best results from this frozen dessert maker, please read these instructions in full and retain for future reference. Contents Safety Warnings
Read the instructions, keep them safe, pass them on if you pass the appliance on. Remove all packaging before use.
 instructions 2 Read the instructions, keep them safe, pass them on if you pass the appliance on. Remove all packaging before use. A IMPORTANT SAFEGUARDS Follow basic safety precautions, including: 1 This
STAINLESS STEEL MILK FROTHER. Model: PKFMR11BK
 STAINLESS STEEL MILK FROTHER Model: PKFMR11BK WARNING! To reduce the risk of fire, electrical shock or injury to persons or property: Carefully read all instructions before operating your new product for
GAS BARBECUE MODEL NO: BBQ4 USER GUIDE PART NO: /11
 GAS BARBECUE MODEL NO: BBQ4 PART NO: 6925305 USER GUIDE 2/11 INTRODUCTION Thank you for purchasing this CLARKE product Before attempting to use this product, please read this manual thoroughly and follow
IF THERE IS ANY QUESTION ABOUT A CONDITION BEING SAFE OR UNSAFE, DO NOT OPERATE THIS PRODUCT!
 RO18BT 18 Quart Roaster Oven Operating Instructions READ ALL INSTRUCTIONS AND WARNINGS BEFORE USING THIS PRODUCT. This manual provides important information on proper operation & maintenance. Every effort
MODEL# GMF255 MOKA POT MILK FROTHER. PHOTO OF PRODUCT
 MODEL# GMF255 MOKA POT MILK FROTHER www.gourmia.com PHOTO OF PRODUCT 2016 Gourmia www.gourmia.com The Steelstone Group Brooklyn, NY Welcome to the World of Espresso & Milk Frothers from Gourmia! All rights
STAINLESS STEEL GAS BARBECUE MODEL NO: SSBBQ4 USER GUIDE PART NO: /11
 STAINLESS STEEL GAS BARBECUE MODEL NO: SSBBQ4 PART NO: 6925310 USER GUIDE 2/11 INTRODUCTION Thank you for purchasing this CLARKE product. Before attempting to use this product, please read this manual
Instruction Manual Coffee Grinder. Kaffeemühle / Coffee grinder CM 70 Serie
 Instruction Manual Coffee Grinder Kaffeemühle / Coffee grinder CM 70 Serie Table of content Safety Instructions... 3 Before the first use... 4 Unpacking... 5 Requirements for the installation location...
10,000 prize draw. instructions. EXTRA year guarantee FREE rewards gallery. Register online now!
 r instructions 10,000 prize draw EXTRA year guarantee FREE rewards gallery www.productregister.co.uk/rhobbs Register online now! See back for details 2 Read the instructions, keep them safe, pass them
START STOP. Manuale d'uso del vostro forno Le guide d'utilisation de votre four Gebruikshandleiding van uw oven
 99634242_ML_pyro.qxd 19/11/04 14:25 Page 1 IT FR NL DE GB ES PT Manuale d'uso del vostro forno Le guide d'utilisation de votre four Gebruikshandleiding van uw oven Bedienungsanleitung Ihres Backofens Your
COFFEE MAKER INSTRUCTION MANUAL CM4682-V
 COFFEE MAKER INSTRUCTION MANUAL CM4682-V IMPORTANT SAFEGUARDS Before using the electrical appliance, the following basic precautions should always be followed including the following: 1. Read all instructions.
User Manual. Stainless Steel Coffee Urns. Models: 177CU30, 177CU55, 177CU110 04/2018. Please read and keep these instructions. Indoor use only.
 Stainless Steel Coffee Urns Models: 177CU30, 177CU55, 177CU110 04/2018 Please read and keep these instructions. Indoor use only. www.avantcoequipment.com 1 NOTE: Save these instructions for future reference.
Instructions for Installation and Use. Built-under double oven
 Instructions for Installation and Use Built-under double oven SAFETY INSTRUCTIONS Before using the appliance, read these safety instructions. Keep them nearby for future reference. These instructions
S m a rtset Control for Convection Models
 S m a rtset Control for Convection Models C O N T E N T S Features of your Oven Control.....................1 Setting the Clock...............................2 Setting the Minute Timer.........................2
左边 :SAFTY NOTES 右边 : Please follow the safety precautions to avoid any harm to yourself and cause any damages Never Always Warning Attention
 封面 Multi-functional Soymilk Maker Instruction Manual Please read all instruction carefully before operating the machine 第一页 Contents Safety notes 2 Usage notes 3 Product description and specification 4
WELCOME TO THE PARTY!
 WELCOME TO THE PARTY! Congratulations on your purchase of the Party Grill and welcome to the world of interactive culinary experiences! This unique and versatile grill gives you endless opportunites to
Instruction Manual Coffee grinder. CM 90 Serie
 Instruction Manual Coffee grinder CM 90 Serie Table of content Safety Instructions... 3 Before first use... 4 Unpacking... 4 Requirements for the installation location... 5 Operating and speed settings...
BLT-E ELECTRIC FLOOR MODEL BRAISING PAN WITH MANUAL TILT INSTALLATION OPERATION MAINTENANCE
 BLT-E ELECTRIC FLOOR MODEL BRAISING PAN WITH MANUAL TILT INSTALLATION OPERATION MAINTENANCE BLODGETT OVEN COMPANY www.blodgett.com 44 Lakeside Avenue, Burlington, Vermont 05401 USA Telephone: (802) 658-6600
SAFETY INSTRUCTIONS FOR USE
 INTRODUCTION Thank you for choosing this De Longhi Coffee machine. We hope you enjoy your new appliance. Please take a few minutes to read these instructions. This is the only way to ensure optimum results
User Manual. Stainless Steel Coffee Urn. Models: 177CU30 11/2018. Please read and keep these instructions. Indoor use only.
 Stainless Steel Coffee Urn Models: 177CU30 11/2018 Please read and keep these instructions. Indoor use only. www.avantcoequipment.com 1 NOTE: Save these instructions for future reference. Index Important
Built-In Oven. user manual. imagine the possibilities
 NV70F57 Series NV66F57 Series Built-In Oven user manual This manual is made with 100 % recycled paper. imagine the possibilities Thank you for purchasing this Samsung product. To receive more complete
INSTRUCTION MANUAL ICE CREAM MAKER
 INSTRUCTION MANUAL ICE CREAM MAKER Congratulations on the purchase of your Vintage Tea Party Ice Cream Maker from Gourmet Gadgetry. Create fresh homemade ice cream, sorbets and frozen yoghurt in minutes!
Instruction Booklet for ZX710. Slow. Innovative products since 1919
 Instruction Booklet for ZX710 Slow Innovative products since 1919 W a h l k i t c h e n i n n o v a t i o n s 1 IMPORTANT SAFEGUARDS When using electrical appliances, basic safety precautions should always
Matic / THa. Operating instructions COFFEE BREWER. Mode d emploi MACHINE À CAFÉ. Gebrauchsanleitung KAFFEEBRÜHMASCHINE
 Operating instructions COFFEE BREWER Mode d emploi MACHINE À CAFÉ Gebrauchsanleitung KAFFEEBRÜHMASCHINE Gebruiksaanwijzing KOFFIEZETAPPARAAT Bruksanvisning KAFFEBRYGGARE Bruksanvisning KAFFEMASKIN GB FR
FROZEN DRINKS & SLUSH MAKER
 INSTRUCTION MANUAL FROZEN DRINKS & SLUSH MAKER Contents Introduction 2 Retro Diner Frozen Drinks & Slush Maker Parts 3 Before using your Frozen Drinks & Slush Maker 4 Cleaning your Frozen Drinks & Slush
TYPE AESTHETICS CONTROLS PROGRAMS / FUNCTIONS OPTIONS TECHNICAL FEATURES
 EAN13: 8017709212230 Product Family: Oven Aesthetic: Classic Power supply: Electric Category: 70cm Cooking Method: Thermo-ventilated Colour: Fingerproof Stainless Steel Energy efficiency class: A TYPE
ICE CREAM MAKER DE LUXE INSTRUCTION MANUAL & RECIPE BOOK ICE-1611
 ICE CREAM MAKER DE LUXE INSTRUCTION MANUAL & RECIPE BOOK ICE-1611 TABLE OF CONTENTS IMPORTANT SAFEGUARDS GENERAL DESCRIPTION INSTRUCTIONS FOR USE Before the first use Preparation of the mixture To use
DAILY REFERENCE GUIDE
 DAILY REFERENCE GUIDE THANK YOU FOR PURCHASING AN INDESIT PRODUCT To receive more comprehensive help and support, please register your product at www.indesit.com/register EN You can download the Safety
A N F I M Srl. Caimano: Timer / Automatico / Manuale Super Caimano: Timer / Automatico Caimano SPecial 450: Timer / Automatico
 ANFIM A N F I M Srl Via B. Verro, 33/5-204 - Tel. (+39) 02/8465054 e-mail: info@anfim.it MILANO ITALY - Fax.(+39) 02/846440 web site: www.anfim.it GB INSTRUCTIONS MANUAL mod: Caimano: Timer / Automatico
Preparing your electric oven for use: Setting the clock. Using the oven. Temperature
 Oven Systems Electric All ILVE electric ovens are multifunctional and feature up to eleven cooking s. This enables you to choose from a variety of pre-set functions depending on your cooking needs. Selection
Conv. Pre Heat. Speed. bake. clean. Conv. Bake time. Clean. convert. Maxx clean. Conv. Broil. roast. Oven
 ELECTRONIC OVEN CONTROL Control Pad Functions Read the instructions carefully before using the oven. For satisfactory use of your oven, become familiar with the various functions of the oven as described
Burr Grinder. Automatic burr grinder with 17-position grind selector. Instruction Booklet EM0430
 Burr Grinder Automatic burr grinder with 17-position grind selector Instruction Booklet EM0430 Please read these instructions carefully and retain for future reference. Contents Sunbeam s Safety Precautions
INSTRUCTION MANUAL AND RECIPE BOOK CORN DOG MAKER CDM-1 SMART PLANET PLEASE READ THESE INSTRUCTIONS CAREFULLY AND RETAIN FOR FUTURE REFERENCE.
 INSTRUCTION MANUAL AND RECIPE BOOK CORN DOG MAKER CDM-1 SMART PLANET PLEASE READ THESE INSTRUCTIONS CAREFULLY AND RETAIN FOR FUTURE REFERENCE. IMPORTANT SAFEGUARDS Read all instructions before using the
Chicken Rotisserie. Model LM-8A LM-12A LM-8M LM-12M Instruction Manual
 Chicken Rotisserie Model LM-8A LM-12A LM-8M LM-12M Instruction Manual 735 Rossiter, St-Jean-sur-Richelieu, Quebec, Canada, J3B 8A4 E-Mail : info@resfab.com Website : www.resfab.com 2007-05 TABLE OF CONTENTS
Operating instructions
 Operating instructions Oven H 387-1 B H 387-2 B To prevent accidents and machine damage, read these instructions before installation or use. UV M.-Nr. 05 644 991 Contents IMPORTANT SAFETY INSTRUCTIONS
BLANCO BSO 633 MULTIFUNCTIONAL OVEN INSTRUCTIONS
 BLANCO BSO 633 MULTIFUNCTIONAL OVEN INSTRUCTIONS HEATING POSITIONS AND TEMPERATURE ADJUSTMENET The handles for the selector and the thermostat controls allow to select the various cooking temperatures,
Instruction Manual for 60cm Electric Oven BOSE6511X
 Instruction Manual for 60cm Electric Oven BOSE6511X 1 Thank you for your choosing Blanco. You will find that the clean lines and modern look of your Blanco appliance blends perfectly with your kitchen
3.5L Slow Cooker / GVALSC40. Instruction Manual
 3.5L Slow Cooker / GVALSC40 Instruction Manual Important Safety and General Instructions Please keep this user manual in a safe place along with your purchase receipt and carton for future reference. The
DAILY REFERENCE GUIDE
 DAILY REFERENCE GUIDE THANK YOU FOR PURCHASING AN INDESIT PRODUCT To receive more comprehensive help and support, please register your product at www.indesit.com/register EN You can download the Safety
EN Multi-purpose Contact Grill
 SBG 5000BK EN Multi-purpose Contact Grill - 1 - EN Multi-purpose Contact Grill Important safety instructions READ CAREFULLY AND STORE FOR FUTURE USE. This appliance may be used by children 8 years of age
12 CUP COFFEEMAKER User Guide
 BRAND 12 CUP COFFEEMAKER User Guide Item: 757147 Ginnys.com 800-544-1590 Facebook.com/GinnysBrand Pinterest.com/GinnysBrand Welcome to the world of full-flavored coffee with the Ginny s Brand 12-Cup Coffeemaker!
Built-In Electric Oven. Model No. XOU178 INSTALLATION AND USER INSTRUCTIONS
 Built-In Electric Oven Model No. XOU178 INSTALLATION AND USER INSTRUCTIONS 2 CONTENTS INTRODUCTION page 3 INSTRUCTIONS FOR THE INSTALLER pages 4-6 FOR YOUR OWN SAFETY page 7 DESCRIPTION OF THE APPLIANCE
Waffle Maker Instruction Manual. Waffeleisen
 Waffle Maker Instruction Manual Waffeleisen 1 5 9 13 2 6 3 4 7 8 11 12 = 10 14 = 15 Table of content Safety...4 Before the first use...5 Unpacking...5 Requirements for the installation location...5 Operation...6
SF140E. SMEG S.p.A. Via Leonardo da Vinci, Guastalla (RE) Tel Functions. linea. Main Oven Plus Main Oven
 Tel Functions. linea. Main Oven Plus Main Oven") SF140E ELECTRIC THERMOVENTILATED OVEN, VAPOR CLEAN, 60 CM, LINEA, STAINLESS STEEL AND SILVER GLASS ENERGY RATING: A+ EAN13: 8017709212131 FUNCTIONS: Gross capacity: 79 lt Net volume of the cavity: 70 l
SF140E ELECTRIC THERMOVENTILATED OVEN, VAPOR CLEAN, 60 CM, LINEA, STAINLESS STEEL AND SILVER GLASS ENERGY RATING: A+ EAN13: 8017709212131 FUNCTIONS: Gross capacity: 79 lt Net volume of the cavity: 70 l
OWNERS MANUAL. My Rotisserie Pro Warranty. Please read and save this manual. PROFESSION AL SERIES MRP_MAN_QVC_ENG_V1_ FOR HOUSEHOLD USE ONLY.
 My Rotisserie Pro Warranty The manufacturer warrants that your My Rotisserie Pro is free of defects in materials and workmanship and will, at its option, repair or replace any defective rotisserie that
CAIMANO SPECIAL450 BARISTA
 ANFIM ANFIM Srl Via B. Verro, 33/5-20141 - MILANO ITALY Tel. (+39) 02/8465054 - Fax.(+39) 02/8464401 e-mail: info@anfim.it web site: www.anfim.it COFFEE GRINDER INSTRUCTIONS MANUAL mod: CAIMANO SPECIAL450
IMPORTANT SAFEGUARDS. When using electrical appliances, basic safety precautions should always be followed, including the following:
 IMPORTANT SAFEGUARDS When using electrical appliances, basic safety precautions should always be followed, including the following: 1.Read all instructions. 2.Do not touch hot surfaces. Use handles or
DAILY REFERENCE GUIDE
 DAILY REFERENCE GUIDE THANK YOU FOR PURCHASING AN ARISTON PRODUCT To receive more comprehensive help and support, please register your product at www.aristonchannel.com EN You can download the Safety Instructions
Electric built in Double oven. Instructions for installation and use FID20 Mk2 FIDM20 Mk2
 Electric built in Double oven Instructions for installation and use FID20 Mk2 FIDM20 Mk2 Contents Introduction 3 Safety Information 4 Features 6 Temperature Conversion Chart 8 Controls 9 Multifunction
This appliance can be used by children aged from 8 years and above and persons with
 IMPORTANT SAFEGUARDS Symbols used in these instructions Important warnings are identified by these symbols. It is vital to respect these warnings. Failure to observe the warning could result in life threatening
G F I M J K L B C D E S O T H Q P U N R D 4
 1 2 3 4 G F I A M J K L 5 6 7 B C D E 8 9 10 S O T H Q P U N R 11 12 D 4 Equipment GB A B C D E Text display (main menu) Rotary control knob Button > Button exit Height-adjustable coffee spout CafeRomatica