CLEAR BEER DRAUGHT SYSTEM INSTRUCTIONS FOR USE
|
|
|
- Merilyn Allison
- 6 years ago
- Views:
Transcription
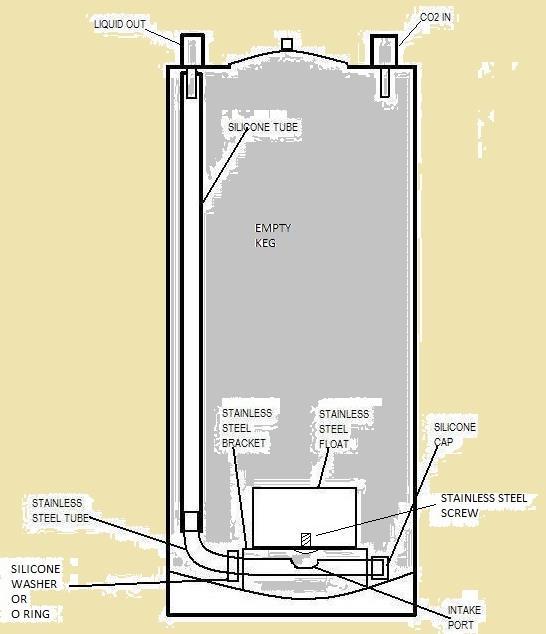
1 CLEAR BEER DRAUGHT SYSTEM Thank you for purchasing the Clear Beer Draught System. This product will provide a lifetime of trouble free service and enhance the quality of your homebrewed beer. A lot of thought, effort and trials went into the development and production of this device. The inspiration was simple: Why am I drinking beer that is drawn off of the dregs at the bottom of the keg? Why not drink the clear, great tasting beer that is available from near the top surface of the beer. Depending on the brewing parameters and the yeast used, it could literally take months for the entire keg to clear. I am not that patient. I have used the Clear Beer Draught System for some time now and the availability, quality and taste of my draught beer has been greatly improved. We submerge ourselves into this great hobby to produce great tasting, visually appealing beer. The Clear Beer Draught System will help you achieve this. William Broderick Owner Brew Products, LLC INSTRUCTIONS FOR USE You will find the Clear Beer Draught System very easy to use and incorporate into your draught beer system if you follow these simple instructions. They may seem lengthy, but get through them one time, and just like your other brewing processes, it will become second nature. After all, the goal is to improve the quality and availability of your draught beer. (Scroll to the bottom for pictures when needed) The first step is to be sure the keg has no residual pressure. Either pop the relief valve if your keg is so equipped, or bleed pressure by depressing the center pin on the CO2 port. Once all the pressure is relieved, remove the service port from the keg. The next step is to remove the existing dip tube from the keg. The out port, which secures the dip tube, must be unscrewed in a counter clock wise direction. On the inside of the removed fitting there will be a rubber check valve attached to a spring. This is a good time to clean and check the condition of the valve assembly. If it wasn t leaking previously, it should be OK. If the rubber is in bad condition, most homebrew shops carry replacements. The dip tube can now be slid out of the port. Thoroughly clean the dip tube for storage. Thoroughly clean all parts of the Clear Beer Draught System using hot water and soap. This initial cleaning is very important! All of the parts have been through industrial manufacturing processes. Take your time and be thorough. Do not boil the silicone parts! It is not necessary. Boiling or steam sanitizing pure silicone rubber can possibly increase its size and cause it to become gummy. Boiling of the stainless steel parts is not necessary either. Also, do not worry about scratches and dings the parts will acquire over time. Remember, the Clear Beer Draught System will be in contact with beer, not wort. The alcohol that is present, the low PH, and the colder temperatures are all deterrents to bacterial growth. A thorough cleaning and sanitation using an acid base sanitizer is all that is needed. After cleaning, rinse all parts inside and out completely with hot water. Now clean the keg and the service port lid using your regular procedures and cleaner/sanitizer of choice. Note: if you use an alkaline based cleaner, (B-Brite, PBW etc.) the keg must have a final rinse with an acid based cleanser. If not, the surface of the metal is in a condition that will support/attract the buildup of mineral deposits. Five Star Saniclean works best and will keep your kegs in the proper condition. Follow directions for dilution ratios. Completely coat the inside of the keg. If you already have mineral deposits, do not try to remove them mechanically. An overnight soak in a solution of 2oz. Saniclean per 5 gallons should do the job. Any remaining deposits will now easily be removed using a sponge or soft nylon brush. Thoroughly rinse with cold water, coat all surfaces with an acid based sanitizer. Clean and sanitize the out port on the keg, the out port fitting, the supplied short dip tube and the check valve assembly. Slide the o ring to the top of the short dip tube and install into the out port on the keg. Install the check valve assembly into the out port fitting. Screw the out port fitting onto the keg and tighten.
2 Using an acid based sanitizer such as Star San, sanitize all the parts of the Clear Beer Draught System. A soak of all the parts in the sanitizer would be best. (Do not use bleach containing sanitizers on stainless steel parts). Keeping a spray bottle of Star San (mixed in the proper ratios) around the brewery is very useful. Use it to spray fittings, the inside of kegs, tap faucet parts, etc. Assemble the clean/sanitized Clear Beer Draught System. Insert the screw through the bottom of the stainless steel bracket and thread the float onto the screw hand tight. This ensures that you are not cross threading the screw. Tighten lightly with a screwdriver if necessary. For proper operation, the base must have a snug fit to the float. If the base rotates deg. in each direction before stopping, that is ok. Slide the longer leg of the stainless intake tube through 1 hole in the bracket. Slide the silicone o ring on to the end of the tube. Now align the tube with the other hole in the bracket and push it through far enough so the silicone end cap can be installed. Install the silicone end cap. Be sure the float base rotates freely about the stainless pick up tube. Do not attach the silicone tubing at this time. Now it s time to install the Clear Beer Draught System. Caution: Be careful when inserting or removing your hand from the service port opening. Many kegs, especially new ones, have sharp edges that could cut your hand or wrist. The following steps are important for optimal performance. Stand the keg upright on the floor with the out port closest to you. The supplied silicone tubing will have a natural curvature. Slide one end of the tube onto the out port dip tube so the curvature will point the other end of the tube towards the in port side of the keg when hanging freely. The tubing should be slid onto the dip tube at least 3/8 of an inch. Pull the other end of the tubing out of the keg. Now hold the float assembly so the end of the stainless tube that the silicone tubing will attach is pointing straight down and the other end with the silicone cap on it is pointing straight at the out port. Ensure the tubing is in a relaxed state, (not twisted), then slide it about 3/8 of an inch on to the stainless tube. Lower the float into the keg. This positioning will allow the float to rotate properly and land upright in the middle of the keg as it empties. Rack your beer into the keg with whatever method you have been using. With the Clear Beer Draught System assembled as described and the keg is full, the top of the float will be facing upwards and be near the center of the keg. Install the service port, purge oxygen, chill and carbonate as usual. If you carbonate at regular serving pressure and temperature, by the time the keg is fully carbonated, you will be pouring acceptable beer. As mentioned above, some yeast strains do not flocculate as well as others. Some fining agents will drop the yeast out if done properly. If you need to get your beer ready very quickly for an upcoming event, chilling the beer to near freezing while carbonating at an elevated level should produce acceptable results. Some trial and error will be required. Try PSI for F. Let the beer warm to serving temperatures or chill haze could be evident. Remember to dial the pressure down before serving. This is when you will really enjoy the benefits of the Clear Beer Draught System. Dry hopping can be done by simply pouring pellets directly into the keg. Do this at room temperature for best hop flavor and aroma. Be ready to install the service port in case the beer foams up. Do not use whole hops for this method. After 4-7 days, gently rock or tap the sides of the keg which will drop the remaining hop solids to the bottom. Chill, carbonate and serve. Highly dry hopped beers will generally remain a little cloudy due to the massive amounts of hop oils. Be aware, you might pick up some hop particles when pouring the last pint or two (it s good for you!) Be sure to clean the out port, check valve, tubing and dispense faucet after using this method. 2oz of dry hop pellets or more can affect the landing of the float on the bottom. It will still work, and you will get all of the beer out of the keg. It just might not be upright when the keg pops. To remove the Clear Beer Draught System, bleed pressure, open the service port and slide the hose off of the dip tube. Careful, this is when injury can occur. If the hose does not easily come off, remove the out port and check valve and remove the dip tube. This will slide the hose off of the tube on the way out. Clean all parts and tubing with hot soapy water, rinse thoroughly, let dry. The silicone hose is going to pick up some color with use. But the color, flavor or aromas from one brew will not leach into subsequent brews. Cream ales have followed chocolate stouts using the same tubing without a trace of the former brew. Now it s time to enjoy yeast free, sediment free beer. This is how the beer you brewed should taste. After all the thought and hard work involved in producing your beer, you deserve it.
3

4 First installation step is to install the silicone tube onto the out port dip tube. Slide the tubing onto the dip tube at least 3/8. With a gentle tug, the tubing should stay put, if not, remove the tubing and dry the dip tube with a clean cloth. As you can see, the natural curvature of the hose is pointing towards the sidewall. This is not what you want. Rotate the tubing on the dip tube until it is positioned as seen in the next photo.

5 This is the correct positioning of the tubing. When hanging freely, the natural curvature points towards the opposite side of the keg.

6 Now remove the lower end of the tubing from the keg so it can be attached to the stainless tube. The float assembly positioning in this picture is very important. Note that the end where the tubing will attach is pointing straight down and the end with the silicone cap on it is pointing straight at the out port. This how the assembly must be positioned before attaching the silicone hose. Being sure the silicone tubing is in a relaxed state (not twisted), slide it at least 3/8 onto the stainless tube. Again, give a gentle tug to check security. That s it, ready to lower the assembly into the keg.

7 The float assembly gently lowered into the keg. How the float is oriented when it settles on the bottom of the keg is not extremely important as it will find its correct orientation as the keg fills. The tubing looks to be too long, but it will shrink considerably when chilled to serving temperatures.

8 Gravity filling 2 kegs via the out port. This is the preferred method as it fills the keg from the bottom up, reduces the risk of oxidation, and keeps the silicone tubing full of the current beer during the carbonation process. But, whichever fermentation system you use, and however you chose to fill the keg, the Clear Beer Draught System will still do its thing and improve your enjoyment of the draught beer you created.
 Once the level rises enough so that the intake is submerged,")
9 This picture shows the initial transfer into the keg. This is done at a very slow rate. Notice there are very few bubbles present. That is what you want (if there is a lot of C02 in the beer, some foaming is inevitable, but that s fine, it s not introducing oxygen) Once the level rises enough so that the intake is submerged, open the gates and let it fill as fast as your system allows. The float will orientate its self correctly and rotate about the stainless tubing on its way to the top of the keg. Notice when the stainless tubing is on the bottom, the intake port faces upward. This is intentional so you don t draw the sediment from the bottom on the last pint or two.

10 Here you go, 5 gallons of goodness ready for carbonation. The Clear Beer Draught System is positioned perfectly on top. This is where the beer should be drawn from, not the bottom. This was a Belgian Pale Ale racked to the keg after 6 days in the fermenter. No need for a secondary fermenter and all the work that involves. After installing the service port and purging oxygen with C02, it will sit at room temp for 3-4 days to allow the yeast to consume any remaining sugar and oxygen, and for a diacetyl rest. Then on to the kegerator. By the time it s fully carbonated, you will be pouring acceptable, if not outstanding beer. Again, that depends on your brewing processes and the type of beer brewed. The example above has a non-flocculent yeast strain and wheat as part of the grain bill. The expectations will be in line with what was brewed. As has been stated, what s being drawn from the top will always be better than what would be drawn from the bottom. This particular beer would take at least 2-3 months before acceptable beer could be drawn from the bottom of the keg.

11 Perfect landing! This is a view of a keg that gave up its last beer. This is how the system will position its self when the keg is finished. The dimension of the legs on the bracket and the fact that the intake port faces upwards when on the bottom combine to deliver clear, clean beer to the last pour, yet leaving a minimum amount of beer behind. The exception is if you really pound the keg with dry hops, but it s worth a little loss for all that hoppy goodness.
MR.BEER Hard Cider. You ll need the following:
 Instructions These instructions will familiarize you with the HARD CIDER BREWING PROCEDURES of the MR.BEER Home Brewing System. The included recipe will produce about 2 gallons (8 quarts) of 3.0% alc/vol
Debris on equipment can harbor micro-organisms that could spoil your homemade ginger beer, even with proper sanitation.
 Homepage Brewing Steps Preparation Alcoholic Ginger Beer Non-Alcoholic Ginger Beer Cooling Fermentation Bottling BREWING PREPARATION Debris on equipment can harbor micro-organisms that could spoil your
Heron Bay Ultra Premium 6 Week Wine Kit
 Heron Bay Ultra Premium 6 Week Wine Kit 1. PRIMARY FERMENTER: Food grade plastic bucket of at least 30 litres (8 US GAL.) capacity. Use a lid to cover. 2. CARBOY: 23 litre (6 US GAL.) glass, narrow necked
Natural quality pure enjoyment
 DRAUGHT BEER GUIDE Natural quality pure enjoyment Since 1872, Schneider Weisse has been brewed with highest diligence according to the recipe of the brewery s founder, Georg Schneider Ist. For Schneider
Mad Millie Beer Kit Instructions KIT. Approx time. 1 HOUR (hands on time, ready in 4 weeks).
.") BREW IT YOURSELF KIT Approx time 1 HOUR (hands on time, ready in 4 weeks). Make your own refreshing lager with Mad Millie. It ll go down even smoother knowing you made it yourself. This kit includes all
BREW IT YOURSELF KIT Approx time 1 HOUR (hands on time, ready in 4 weeks). Make your own refreshing lager with Mad Millie. It ll go down even smoother knowing you made it yourself. This kit includes all
Necessary equipment. - Food grade fermenter or bucket with airtight lid - Airlock - Syphon tube - Bottles or a pressure barrel (keg) with S30 valve
 with S30 valve") Available from www.home-brew-online Necessary equipment - Food grade fermenter or bucket with airtight lid - Airlock - Syphon tube - Bottles or a pressure barrel (keg) with S30 valve A fermenter/bucket
Available from www.home-brew-online Necessary equipment - Food grade fermenter or bucket with airtight lid - Airlock - Syphon tube - Bottles or a pressure barrel (keg) with S30 valve A fermenter/bucket
KettlePizza Gas Pro Assembly & Operating Instructions
 KettlePizza Gas Pro Assembly & Operating Instructions Important Safety Warning: THANK YOU for buying a KettlePizza Oven Kit! As with many cooking grill accessories, there can be some risks involved and
Deluxe Hand Pump Pressurized Beer Line Cleaning Kit Instruction Manual
 Deluxe Hand Pump Pressurized Beer Line Cleaning Kit Instruction Manual 1. Cleaning Bottle 6. Siphon Tube 2. Pump 7. Screw Cap 3. Duplex Coupler 8. Faucet Brush 4. Plastic Hose Barb 9. 3/16" I.D. Plastic
5 Litre Party Keg Manual
 5 Litre Party Keg Manual These compact party kegs let you keg your beer and serve it on tap without the need for gas bottles, pressure regulators, cooler plates with ice and a mess of hose pipes and couplers.
MBAA DISTRICT ST. LOUIS. Home Brewing System. Rev 1.5 3/6/2010
 MBAA DISTRICT ST. LOUIS Home Brewing System Rev 1.5 3/6/2010 This document is a guide to use and cleaning of the brewing system. Comments on safe use of this system are included to make you aware of many,
Lusso / Espresso Si' Models:PL-16 PAB-16. Made In Italy
 Lusso / Espresso Si' Models:PL-16 PAB-16 Made In Italy la pavoni - PL-16 & PAB-16 We recommend using freshly roasted espresso beans ground medium to fine. Fresh coffee will produce better tasting espresso.
COUNTRY-STYLE WINE MAKING by an old female wine maker
 COUNTRY-STYLE WINE MAKING by an old female wine maker. 5-1-2012 PART 1 EQUIPMENT Fruit or juice A gallon glass jug or other fermentation vessel, or 4 liter wine jug. An air (fermentation) lock for each
User Guide GLASS TRAVEL TEA INFUSER. Read and save these instructions
 GLASS TRAVEL TEA INFUSER User Guide Read and save these instructions SilverOnyx LLC 14807 S Heritagecrest Way, Ste B Bluffdale, Utah 84065 USA support@silveronyx.com www.silveronyx.com ver 0.2 PARTS &
OWNER S MANUAL GRAVITY FEED MODELS FOR OUTDOOR USE ONLY WARNING DO NOT STORE OR USE COMBUSTIBLE MATERIALS NEAR THIS UNIT
 OWNER S MANUAL GRAVITY FEED MODELS FOR OUTDOOR USE ONLY WARNING DO NOT STORE OR USE COMBUSTIBLE MATERIALS NEAR THIS UNIT Myron Mixon Smokers 179 Cross Road Waterford, CT 06385 (855) 464-7853 Table of Contents
WORLD VINYARDS WINE KITS
 WORLD VINYARDS WINE KITS INSTRUCTIONS PRIMARY FIRMENTATION Ensure that your primary fermenter is capable of holding at least 30 litres (7.9 US gallons) of volume. Pre-mark the primary fermenter at 23 litres
Manual Spark Ignition (MSI) Kit For Use only with Thermocouple Manual Safety (TMSI) UL Approved Fire Pit Pans with Burning Spur
 Kit For Use only with Thermocouple Manual Safety (TMSI) UL Approved Fire Pit Pans with Burning Spur") AAA Battery MODEL: MSI-BSTMSI Manual Spark Ignition (MSI) Kit For Use only with Manual Safety (TMSI) UL Approved Fire Pit Pans with Burning Spur Installation and Operating Instructions IF YOU CANNOT READ
AAA Battery MODEL: MSI-BSTMSI Manual Spark Ignition (MSI) Kit For Use only with Manual Safety (TMSI) UL Approved Fire Pit Pans with Burning Spur Installation and Operating Instructions IF YOU CANNOT READ
June Cleaning Manual Pro
 June 2018 Cleaning Manual Pro CLEANING USING YELLOW TABS 1 2 3 1 OPEN THE STAINLESS STEEL DOOR Open the hinged stainless steel door by pushing the right side until it pops out and pull it towards you.
Learn to Home Brew: A Series of Tutorials Using Mead
 Learn to Home Brew: A Series of Tutorials Using Mead I wanted to learn to make red wine, but since I had never done so and did not have nearby friends to brew with, I decided to teach myself using online
Clean and sanitize hot sundae topping pumps Weekly SS 1 W3
 Clean and sanitize hot sundae topping pumps Weekly SS 1 W3 Why To break the bacteria cycle Time required 5 minutes to prepare 30 minutes to complete Time of day During 14 day brush cleaning During 14 day
Equipment Guide For Malt Extract Brewing
 Equipment Guide For Malt Extract Brewing Legal Notice No part of this ebook may be reproduced or transmitted in any form or by any means, electronic or mechanical, including photocopying, recording, or
Scanomat TopBrewer Daily Cleaning
 Scanomat TopBrewer Daily Cleaning You will need 1x TopBrewer Long Handled Brew Unit Brush 1x TopBrewer Small Foamer Head Brushes 1x TopBrewer Cleaning Tablet 1x Bowl of clean warm water, damp cloth & dry
Wine, Dry Red Recipe for 20 gallons, SteveG revised 2016-Sep-1
 Wine, Dry Red Recipe for 20 gallons, SteveG revised 2016-Sep-1 This recipe is for using 3 boxes of juice (called WineKit on Amazon.com). Each box of juice produce ~6+ gallons of wine. This recipe will
OWNER S MANUAL. Cabo. Adventurer Series Gas Grill Model A10-703
 OWNER S MANUAL Cabo Adventurer Series Gas Grill Model A10-703 For questions regarding performance, assembly, operation, parts, or returns, contact the experts at MAGMA by calling (562) 627-0500 7:00 a.m.
5KEK1322 W A_v08.indd 1 5/13/16 2:25 PM
 5KEK1322 W10878653A_v08.indd 1 PARTS AND FEATURES PARTS AND ACCESSORIES Tea steeper lid (center section of lid with handle) Kettle lid (outer section) Stainless steel lime scale filter Removable stainless
InfuSsion Mash Tun. Quick Reference Guide
 InfuSsion Mash Tun Quick Reference Guide Stainless Steel Prep Pre-Clean: Prior to first time use, thoroughly wash all surfaces of the mash tun, including all valves and fittings, with Tri-Sodium Phosphate
FAMILY HERITAGE(TM) HOME TOWN GINGERBREAD MOLD INSTRUCTIONS
 HOME TOWN GINGERBREAD MOLD INSTRUCTIONS") FAMILY HERITAGE(TM) HOME TOWN GINGERBREAD MOLD INSTRUCTIONS PREPARING YOUR STONEWARE MOLD FOR USE Before using for the first time, follow these simple steps: Rinse the mold in warm water, then towel dry.
FAMILY HERITAGE(TM) HOME TOWN GINGERBREAD MOLD INSTRUCTIONS PREPARING YOUR STONEWARE MOLD FOR USE Before using for the first time, follow these simple steps: Rinse the mold in warm water, then towel dry.
Features. Before first use
 Round Dutch Oven Features Colorful exterior enamel is shock-resistant to prevent chipping and cracking Sand-colored interior enamel has a smooth finish that promotes caramelization, prevents sticking and
IMPORTANT: Do Not Use Big Top Cookie Bakeware Before Reading the Following:
 IMPORTANT: Do Not Use Big Top Cookie Bakeware Before Reading the Following: When using any bakeware handle all hot surfaces with dry cooking mitts or potholders (wet cooking mitts may produce steam and
Smart Valve Cold Brew Coffee Maker { Instruction Manual
 Smart Valve Cold Brew Coffee Maker { Instruction Manual Table of Contents Important Safeguards... 2 Glass Decanter Safety Precautions... 3 Getting to Know Your Cold Brew Coffee Maker... 4 Easy-Grab Tab
ACETALDEHYDE High amount of fermentable sugars
 ALCOHOLIC overpowering alcohol flavor, acetone, paint thinner, sharp ACETALDEHYDE High amount of fermentable sugars High fermentation temperature green apples, grassy, acetic(vinegar), cidery Underpitching
assembly guide ELECTRIC Model Numbers: Estimated time required for assembly: 1 Hour (English) /05/09
 /05/09") assembly guide Model Numbers: 08601559 10601578 10601585 10601514 Estimated time required for assembly: 1 Hour ELECTRIC (English) 42804372 11/05/09 2 ASSEMBLY GUIDE A, B, C, Assembly: CAUTION: For your
assembly guide Model Numbers: 08601559 10601578 10601585 10601514 Estimated time required for assembly: 1 Hour ELECTRIC (English) 42804372 11/05/09 2 ASSEMBLY GUIDE A, B, C, Assembly: CAUTION: For your
LUCKENBACH MODEL Assembly Instructions Rev
 LUCKENBACH TM MODEL 03301800 Assembly Instructions Rev. 03-27-03 P/N: 42802113 WARNING! CAUTION! This unit is heavy. Tools needed: 2 adjustable wrenches, a flat screwdriver and hammer. DO NOT assemble
BrewKeg25 TM User Manual
 BrewKeg25 TM User Manual OVERVIEW 0 PROCESS SUMMARY 02 SETTING UP YOUR BREWKEG25 TM SET UP 03 EQUIPMENT 03 STEP : CLEAN 04 STEP 2: MIX 06 STEP 3: ADJUST 07 STEP 4: DISPENSE 0 RECEIVE OUR 3 MOST POPULAR
Fountain Program IN GENERAL PRODUCTION STEPS
 The Fountain Drink Program is one of the best money making programs in your store. To keep it going it is important to serve the best fountain drink possible to your customers. The following steps will
Hints 02. Previous Hints
 Caring for your yeast Sanitising your equipment How to do a wet run Adding the yeast Keeping the temperature right Using the lid clips Signs of fermentation De-gassing a sample More Hints Hints 02 How
Canning and Preserving the Harvest FALL 2018
 Canning and Preserving the Harvest FALL 2018 Course Objectives Demonstrate how to safely and properly extend the shelf life of foods. Demonstrate use of various preservation methods including canning,
INTRODUCTION. Your new smoker comes almost completely assembled. You will need to complete the assembly which includes:
 INTRODUCTION Congratulations on your purchase of this Smith & Wesson SMOKER, Model SWS032. With proper set-up, operation and maintenance, this smoker will provide you with years of cooking enjoyment. Your
INSTRUCTIONS & RECIPES
 EASY CUT INSTRUCTIONS & RECIPES WWW.KUHNRIKON.COM CONTENTS INHALTSVERZEICHNIS TABLE DE MATIÈRES ÍNDICE INDICE English...00 Deutsch...14 Français... 28 Español... 42 Italiano... 56 Feed Tube Feed Tube Divider
ITALIAN SAUSAGES Copyright 2016 The Mobile Home Gourmet, MobileHomeGourmet.com, all rights reserved.
 ITALIAN SAUSAGES Makes 10 to 18 links, depending on size. By Dennis W. Viau; modified from a recipe in Mastering the Craft of Making Sausages by Warren R. Anderson. I had been wanting to experiment with
INSTRUCTION MANUAL MODELS: RT-30, RT-36, RT-48, RT-60 & RT-72 REVISED APRIL, 2003 *PLEASE RETAIN FOR FUTURE REFERENCE
 INSTRUCTION MANUAL MODELS: RT-30, RT-36, RT-48, RT-60 & RT-72 REVISED APRIL, 2003 *PLEASE RETAIN FOR FUTURE REFERENCE THANK YOU for purchasing this quality product. Your Crown Verity Inc. rotisserie will
All in One Wine Pump. Rack-Bottle-Degas-Filter
 All in One Wine Pump Rack-Bottle-Degas-Filter Thank you for purchasing the All in One Wine Pump. We are confident this unit will make racking, bottling, degassing and filtration operations quick, simple
WINE ON TAP. Draft Guide
 WINE ON TAP Draft Guide WHY WINE-ON-TAP? BETTER FOR BUSINESS. BETTER FOR THE ENVIRONMENT. PROFITABILITY See a return on investment within 6 months. SPEED No corks to pull or bottles to stock. More time
2 (20 oz.) cans crushed pineapple, lightly drained 2 (3-ounce) pouches liquid pectin. 5 cups sugar 1 cup chopped roasted macadamia nuts
 cans crushed pineapple, lightly drained 2 (3-ounce) pouches liquid pectin. 5 cups sugar 1 cup chopped roasted macadamia nuts") Coconut-Pineapple Conserve (Makes about 7 half-pint jars.) 2 (20 oz.) cans crushed pineapple, lightly drained 2 (3-ounce) pouches liquid pectin ¼ C. bottled lemon juice 1 ¼ cups shredded or flaked coconut
Coconut-Pineapple Conserve (Makes about 7 half-pint jars.) 2 (20 oz.) cans crushed pineapple, lightly drained 2 (3-ounce) pouches liquid pectin ¼ C. bottled lemon juice 1 ¼ cups shredded or flaked coconut
Draught System Troubleshooting & Reference Manual
 Draught System Troubleshooting & Reference Manual BeerTech.ca Parts Of A Basic System Beer Line Keg Coupler High Pressure Gauge Regulator Low Pressure Gauge Regulator Coupling Nut Drum Valve Set Screw
Honey Stick Machine Complete Kit HH-100
 Honey Stick Machine Complete Kit HH-100 501 1st St S, Hackensack, MN 56452 500 Santa Anita Dr., Woodland, CA 95776 485 Stewart Rd, Wilkes-Barre, PA 18706 1600 Commerce Street, Marshall, TX 75672 Telephone:
Installation & Parts Manual 2" & 3" High Capacity Strainers For Class 1, Petroleum Applications
 Installation & Parts Manual 2" & 3" High Capacity Strainers For Class 1, Petroleum Applications Installation: M200-20 www.lcmeter.com Table of Contents Description Page Number Introduction... 2 What LC
TILT-HEAD STAND MIXER FEATURES
 ENGLISH TILT-HEAD STAND MIXER FEATURES Speed Control Knob Motor Head Attachment Hub Attachment Knob Motor Head Locking Lever (not shown) Beater Shaft Flat Beater Beater Height Adjustment Screw Wire Whip
INTRODUCTION TO CUSTOM FABRICATED STRAINERS
 INTRODUCTION TO CUSTOM FABRICATED STRAINERS Nothing Too Big, Too Small or Too Special When unwanted solid material has to be removed from flowing fluids in order to protect equipment, a HAYWARD Strainer
Honey Wheat Ale The Home Brewery All Grain Ingredient kit
 Honey Wheat Ale The Home Brewery All Grain Ingredient kit This ingredient kit is designed to produce 5 gallons of our Honey Wheat Ale using the All Grain method. All-grain brewing is a little more involved
3 Gallon. User Manual
 3 Gallon EN User Manual Congratulations on your FastFerment Purchase! Now you will be able to make the best beer, wine, cider or mead in the comfort of your own home with the least amount of effort. Thank
HYGIENIC MANAGEMENT OF CELLARS AND CLEANING OF BEER DISPENSE LINES
 HYGIENIC MANAGEMENT OF CELLARS AND CLEANING OF BEER DISPENSE LINES 1. General Cellar Management Beer is classified as a food under The Food Safety (General Food Hygiene) Regulations 1995. The same standards
User Manual. Beer Keg Dispenser User s Manual. Beer Kegs KEGERATRB, KEGERATRS
 Beer Keg Dispenser User s Manual Beer Kegs KEGERATRB, KEGERATRS 05/2015 Recommended for household use only. Please read the manual thoroughly prior to equipment set-up, operation and maintenance. - 1 -
GAS BARBECUE MODEL NO: BBQ4 USER GUIDE PART NO: /11
 GAS BARBECUE MODEL NO: BBQ4 PART NO: 6925305 USER GUIDE 2/11 INTRODUCTION Thank you for purchasing this CLARKE product Before attempting to use this product, please read this manual thoroughly and follow
For Jura parts, repairs & tech support, contact: Services Unlimited, Inc./ Parts Guru
 For Jura parts, repairs & tech support, contact: Services Unlimited, Inc./ Parts Guru 209 Walnut street, Lansdale, PA 19446 Phone: 215-362-7000 Fax: 215-361-7434 email: sales@partsguru.com Online store
VICTORIO. Multi-Use. Steam Juicer VKP1140. Instruction Manual
 VICTORIO Multi-Use Steam Juicer VKP1140 Instruction Manual Table of Contents Parts Diagram...1 Operating Precautions...2 Product Overview...2 Care Instructions...3 Preparing Fruit for Juicing...3 Preparing
Canning 101: Safe and Healthy Preserving. Lunch & Learn 12 noon to 1 pm June 9, 2014
 Canning 101: Safe and Healthy Preserving Lunch & Learn 12 noon to 1 pm June 9, 2014 Why Canning? Canning preserves foods in a form that makes meal preparation a snap Canning captures peak-of-season flavor
CANNING OF FRUITS AND VEGETABLES. Talha Saeed Roll # 37 B.Sc.(Hons). Food Science and Technology 5 th Semester (Regular)
. Food Science and Technology 5 th Semester (Regular)") Assignment title CANNING OF FRUITS AND VEGETABLES Submitted by Subject Submitted to Talha Saeed Roll # 37 B.Sc.(Hons). Food Science and Technology 5 th Semester (Regular) FST 502 (Fruits and Vegetables
Assignment title CANNING OF FRUITS AND VEGETABLES Submitted by Subject Submitted to Talha Saeed Roll # 37 B.Sc.(Hons). Food Science and Technology 5 th Semester (Regular) FST 502 (Fruits and Vegetables
Clean grill Daily GR 1 D1
 Clean grill Daily GR 1 D1 Why To maintain food quality standards Time required 5 minutes to prepare 90 minutes to complete Time of day During low-volume periods For 24-hour restaurants: during low-volume
Rotisserie Burner Replacement Parts Needed: Phillips head screwdriver #2 Standard Pliers or Adjustable Crescent Wrench
 Rotisserie Burner Replacement Parts Needed: Phillips head screwdriver #2 Standard Pliers or Adjustable Crescent Wrench Nexgrill Industries Inc. 800-913-8999 customerservice@grillservices.com www.nexgrill.com
phd Pitcher UltraWater Owner s Manual Delicious Great Tasting Antioxidant Alkaline Energized
 Owner s Manual UltraWater phd Pitcher Delicious Great Tasting Antioxidant Alkaline Energized READ ME FIRST! 1. Be sure to flush your UltraWater filter before using the first time. (See Instructions for
Cask or keg. Out of the cask
 The Beginners Guide to the Pub Cellar Starting out in the pub trade can be a daunting experience, particularly when facing the complicated arrangement of equipment behind the scenes. Even those that have
IMPORTANT SAFEGUARDS. When using electrical appliances, basic safety precautions should always be followed, including the following:
 IMPORTANT SAFEGUARDS When using electrical appliances, basic safety precautions should always be followed, including the following: 1.Read all instructions. 2.Do not touch hot surfaces. Use handles or
Pressure Canning Wort and Yeast Starters SFHG Meeting Anchor Brewing Company April 16, 2013 Matt
 Pressure Canning Wort and Yeast Starters SFHG Meeting Anchor Brewing Company April 16, 2013 Matt Murray mhm@mac.com @mhm Disclaimer: I'm no expert, I've only pressure canned once so far, but I have done
3,000 POUND CAPACITY AUTO BODY ROTISSERIE UNIT
 3,000 POUND CAPACITY AUTO BODY ROTISSERIE UNIT INSTALLATION / OWNERS MANUAL ROTISSERIE (R3000G) 1 IN50016 Rev. B 03/30/2009 TABLE OF CONTENTS IMPORTANT INFORMATION...pg 2 OWNER / EMPLOYER RESPONSIBILITIES...pg
COFFEE GRINDER. Owner s Manual
 COFFEE GRINDER Owner s Manual 4 4 FEATURES Bean Hopper Lid Bean Hopper Grinder Start/Stop Button Bean Hopper Holder Bean Hopper Release Button Grinding Timer Dial Coffee Powder Outlet 0 Grind Thickness
Wood- and Barrel-Aging. Part 2: Small Barrel Handling
 Wood- and Barrel-Aging Part 2: Small Barrel Handling A quick primer Barrels come in a variety of sizes, from homebrewer-sized 5, 8 and 10 gallons, to commercial 59 gallon wine and whiskey barrels and beyond.
22 Kettle Charcoal Grill SAFE USE, CARE AND ASSEMBLY MANUAL
 22 Kettle Charcoal Grill SAFE USE, CARE AND ASSEMBLY MANUAL 85-1448-8 ST22022D Read and save this manual for future reference. If pre-assembled, leave this manual with unit for consumer s future reference.
THE GR THER A AINF AINF A THER THE GR
 Craft beer has taken the world by storm. Now, the Grainfather offers you endless possibilities to brew craft beer just like the professional brewer at home. Featu All in one Mash, sparge, boil and cool
Upflow Carbon Installation & Start-Up Guide
 Clean Water Made Easy www.cleanwaterstore.com Upflow Carbon Installation & Start-Up Guide For Up-Flow Carbon filters with Vortech Distributor Screen Thank you for purchasing a Clean Water System! With
Aluminum STEAM CANNER VKP1054. Instruction Manual
 Aluminum STEAM CANNER VKP1054 Instruction Manual Table of Contents Parts Diagram...1 Operating Precautions...2 Product Overview...3 Care Instructions...4 Jar Sterilization...4-5 Indicator Knob Instructions...5
INFRARED BURNER KIT INSTRUCTIONS
 3 INFRARED BURNER KIT INSTRUCTIONS (HOT SURFACE IGNITION) 5 1 4 NOTE: This unit has been retrofi tted with an infrared burner. Model # 3050 # 3060 Included parts 2 6* PARTS INCLUDED 1. Infrared burner
STAINLESS STEEL GAS BARBECUE MODEL NO: SSBBQ4 USER GUIDE PART NO: /11
 STAINLESS STEEL GAS BARBECUE MODEL NO: SSBBQ4 PART NO: 6925310 USER GUIDE 2/11 INTRODUCTION Thank you for purchasing this CLARKE product. Before attempting to use this product, please read this manual
MODELS 1315 & 1315-S La Pavoni CLUB COMBO
 IMPORTANT WARNINGS MODELS 1315 & 1315-S La Pavoni CLUB COMBO DUET Never operate your espresso machine without water in the tank. This may cause premature pump failure. Do not allow the power cord to come
Micro Casa a Leva Training Manual
 Micro Casa a Leva Training Manual Contents Overview 1 Models 1 Specifications 1 Features 1 Available accessories 1 Package contents 2 Leva parts 3 Assembly 4 Operating instructions 4 Making coffee 5 Procedure
Introduction. No Hassle Guarantee
 Pro Grill MANUAL Introduction Thank you for selecting West Marine s Pro Grill. Your unit has been carefully inspected and tested. The Pro Grill is one of the finest barbecues manufactured for marine use.
The recipes included are based on a watt microwave oven.
 NORDIC WARE toll free 1-877-466-7342 MICROWAVE TENDER COOKER PAMPHLET The recipes included are based on a 600-700 watt microwave oven. 1. Wash Tender Cooker with hot, soapy water. Rinse and dry. 2. Before
Homebrewer's Guide to Kegging A MoreManual
 Homebrewer's Guide to Kegging A MoreManual www.morebeer.com 1-800-600-0033 This is a simple guide to properly and effectively cleaning, sanitizing, filling, carbonating and serving homebrew beer using
21. Copyright 2010 The Mobile Home Gourmet, MobileHomeGourmet.com, all rights reserved.
 CHICKEN STOCK Makes 7 to 8 cups By Dennis W. Viau; a standard recipe Homemade chicken stock is inexpensive because you make it with the parts of the chicken you throw away, the trim. How much does it cost
OPERATING INSTRUCTIONS FOR YOUR SAFETY CAREFULLY READ THE OPERATING INSTRUCTIONS. FOR HOUSEHOLD USE ONLY
 OPERATING INSTRUCTIONS FOR YOUR SAFETY CAREFULLY READ THE OPERATING INSTRUCTIONS. FOR HOUSEHOLD USE ONLY 2 Opening Congratulations on choosing this high quality espresso machine and thank you for your
pico interactive instruction manual
 pico interactive instruction manual Pro You can navigate through chapters by clicking on the tabs here. Clicking on the PicoBrew logo will take you back to the Table of Contents. Pro pico instruction manual
Info. The Beer Machine. 1. Short Instruction 2. Assembly 3. Cleaning 4. Brewing. 1.Short Instruction:
 Info holzeis Kellereibedarf GmbH Aussermanzing 28 3033 Altlengbach info@holzeis.com www.holzeis.com Tel +43 2774 20470 Fax +43 2774 20470-50 The Beer Machine 1. Short Instruction 2. Assembly 3. Cleaning
September is NATIONAL PREPAREDNESS MONTH
 Sources of Water in a Disaster Water will become your most precious commodity during any disaster event. Because of our susceptibility to major flooding incidents and the possibility of earthquake, it
Cask Conditioning. Eric Kraus twitter: lbbrewery homebrewtalk: laughingboysbrew
 Cask Conditioning Eric Kraus twitter: lbbrewery homebrewtalk: laughingboysbrew topics definition, history, terminology, myths fermentation conditioning priming conditioning venting serving more resources
Rapha Virgin Coconut Oil A Product of Dominica
 Rapha Virgin Coconut Oil A Product of Dominica Presented by: Mr. Delbert Telemaque Production Manager 1(767)616-2166 OUR PRODUCT BMC Rapha Virgin Coconut Oil is extracted from mature coconuts without the
Unit 3: Water Treatment
 Unit 3: Water Treatment 11. The Importance of Treating Your Water in the Home (at the Point of Use) There are often germs in our household water that can cause us to become sick and get many illnesses,
Cooking Terms. *indicates terms that are very important for you to know
 Cooking Terms *indicates terms that are very important for you to know Barbecue To cook over, or in front of direct source of heat. Boil To cook a liquid until the bubbles rise and break the surface BROIL
When cooking time has elapsed, unplug the machine and let sit 15 minutes before releasing any remaining pressure and removing lid.
 15 Bean Soup by Alison DuBois Scutte 16 oz. dried 15 Bean Soup Mix 10 cups water 2 Tbs. Oil 8 oz. ham cubes 7 cups water 1 small onion, chopped fine 1 cup celery ribs and leaves, sliced 1 cup carrots,
Forward Sealing Beer Faucets
 Forward Sealing Beer Faucets 1 Forward Sealing Faucets Perlick s Forward Sealing Stainless Steel Faucets feature a revolutionary ball and floating O-ring design, which eliminates the need for a valve.
Wi-Fi Coffee Maker. Model# GCMW-4750 USER MANUAL
 Wi-Fi Coffee Maker Model# GCMW-4750 USER MANUAL Read this manual thoroughly before using and save it for future reference Model: GCMW-4750 2018 Gourmia www.gourmia.com The Steelstone Group Brooklyn, NY
Micro Casa Semiautomatica
 Micro Casa Semiautomatica Training Manual Contents Overview 1 Models 1 Specifications 1 Features 1 Available accessories 1 Package contents 2 Semiautomatic parts 3 Assembly 4 Operating instructions 4 Starting
BeerGun. Bottle Filler. Assembly, Operation & Maintenance
 BeerGun Bottle Filler Assembly, Operation & Maintenance Congratulations on your purchase, and thank you for selecting the BeerGun bottle filler from Blichmann Engineering. We are confident that it will
EQUIPMENT FOR MAKING BABCOCK TEST FOR FAT IN MILK
 }L~c ~ ~Babcock Test T HE for Fat in Mi~k By J. ~ JJ R Professor of Dairy Chemistry Research....,) ~ '( li: )..-djg's BABCOCK TEST is the most satisfactory and practical method for determining the percentage
Coffee Burr Grinder. Model #559. Instructions. Warranty
 Coffee Burr Grinder Model #559 Instructions Warranty IMPORTANT SAFEGUARDS When using electrical appliances, basic safety precautions should always be followed, including the following: 1. Read all instructions.
BREWING WITH EXTRACT FERMENTATION BOTTLING
 BREWING WITH EXTRACT FERMENTATION BOTTLING WELCOME TO THE WORLD OF MAKING HOME-BREWED BEER! Everything you need to know to turn water, malt, hops, and yeast into a delicious beer to enjoy and share with
PickYourOwn.org. Where you can find a pick-your-own farm near you!
 PickYourOwn.org Where you can find a pick-your-own farm near you! Click on the printer icon that looks like this: (at the top left, to the right of save a copy ) to print! See www.pickyourown.org/alllaboutcanning.htm
Shotmeister Owner s Manual. The Sleekest Design, Pouring the Coldest Shots
 Shotmeister Owner s Manual The Sleekest Design, Pouring the Coldest Shots Thank you for purchasing a Jägermeister Shotmeister! REGISTRATION INFORMATION Register your Jägermeister Shotmeister Online: at
THE GR THER A AINF AINF A THER THE GR
 The finest craft beers are made from hops, malted grain and yeast. The Grainfather offers you infinite possibilities just like the professional brewer. Featu All in one Mash, sparge, boil and cool all
VICTORIO. Aluminum STEAM JUICER VKP1148. Instruction Manual
 Aluminum VICTORIO STEAM JUICER VKP1148 Instruction Manual Table of Contents Steam Juicer Breakdown...3 Operating Precautions...4 Product Overview...4 Care Instructions...5 Preparing Fruit for Juicing...6
IMPORTANT SAFEGUARDS. 3. To protect against fire, electric shock and injury to persons do not immerse cord, plug or unit in water or other liquid.
 IMPORTANT SAFEGUARDS When using electrical appliances, basic precautions should always be followed, including the following: 1. Read all instructions. 2. Make sure that your outlet voltage corresponds
VICTORIO. Deluxe Multi-Use. Steam Juicer VKP1150. Instruction Manual
 VICTORIO Deluxe Multi-Use Steam Juicer VKP1150 Instruction Manual Table of Contents Parts Diagram...1 Operating Precautions...2 Product Overview...2 Care Instructions...3 Preparing Fruit for Juicing...3