Sage by Heston Blumenthal Customer Service Centre
|
|
|
- Meghan Harrington
- 5 years ago
- Views:
Transcription
1 Sage by Heston Blumenthal Customer Service Centre Phone: Register your product and get more from your purchase Product registration takes only a few minutes and ensures both a record of your purchase and your warranty. Registration also makes it easier to get support and advice on any questions or issues that you might have in the future. If you wish, we can also send you free recipes and additional hints and tips on making the best of your appliance. What s on your mind? Our constant aim is to improve the quality and features of our appliances. We welcome your comments and ideas in assisting our ongoing development. Go to and click on Support. Go to and click on Product Registration. Registered in England & Wales No Due to continued product improvement, the products illustrated or photographed in this document may vary slightly from the actual product. Copyright BRG Appliances BTM800UK Issue - C13


2 the Tea Maker Instruction Booklet BTM800UK
3 PAge Contents header... 3 We recommend safety first 9 Getting to know your new appliance 11 Tea insights 11 Tea types 11 Tea storage 12 Tips for optimal tea brewing 13 Before first use 13 Preparing the Tea Maker for use Operating your new appliance 15 Use as a Tea Maker for brewing tea 15 Selecting the tea type 16 Selecting the tea strength 17 Selecting the 'Keep Warm' feature 18 Selecting the 'Basket Cycle' feature 18 Use as a variable temperature kettle Additional features 20 Customising brew temperature 20 Customising brew time 21 Auto Start feature 22 Resetting default setting 23 Standby mode 23 Moving the tea basket when not in the brewing cycle 24 A note on temperature conversion ( C to F) 25 Care and cleaning 25 Cleaning the glass jug 26 Cleaning the jug lid and integrated scale filter 27 Cleaning the tea basket lid, tea basket and tea scoop 27 Cleaning the power base 27 Storage 28 Troubleshooting 2
4 PAge We recommend header... safety first At Sage by Heston Blumenthal we are very safety conscious. We design and manufacture consumer products with the safety of you, our valued customer, foremost in mind. In addition we ask that you exercise a degree of care when using any electrical appliance and adhere to the following precautions. Important safeguards READ ALL INSTRUCTIONS BEFORE USE AND SAVE FOR FUTURE REFERENCE Before using for the first time please ensure that your electricity supply is the same as shown on the rating label on the underside of the appliance. If you have any concerns please contact your local electricity company. Your Sage by Heston Blumenthal appliance includes a BS 13 amp moulded mains plug on the supply cord. Should you need to change this plug, please complete the rewiring as follows (after safe disposal of the moulded plug). Please note that a cut off plug inserted into a socket is a serious danger risk. Wires are coloured as follows: Blue = Neutral Brown = Live Green & Yellow = Earth As the colours of the wire may not correspond with the coloured markings which identify the terminals in your plug, please refer to the following: The Blue wire must be connected to the terminal which is marked N. The Brown wire must be connected to the terminal which is marked with the letter L. The Green & Yellow wire must be connected to the terminal which is marked with the letter E or the earth symbol. Please note that if a 13 amp plug is used, a 13 amp fuse should be used. 3
5 PAge We recommend header... safety first Carefully read all instructions before operation and save for future reference. Remove and safely discard any packaging material and promotional labels before using the appliance for the first time. To eliminate a choking hazard for young children, remove and safely discard the protective cover fitted to the power plug of this appliance. This appliance has been designed specifically for the purpose of heating and boiling quality drinking water and tea only. Under no circumstances should this product be used to heat or boil any other liquids or foodstuffs. Do not place the appliance near the edge of a bench or table during operation. Ensure that the surface is level, clean and free of water. Do not place the appliance on or near a hot gas burner, electric element or where it could touch a heated oven. Keep the appliance clear of walls, curtains and other heat or steam sensitive materials. Keep a minimum 20cm of space on both sides of the appliance. Do not operate the appliance on a sink draining board. Always ensure the appliance is properly assembled before connecting to a power outlet and operating. Follow the instructions provided in this book. The glass jug must be used only with the power base supplied. Do not use on a range top. The appliance is not intended to be operated by means of an external timer or separate remote control system. Do not touch hot surfaces. Use the handle for lifting and carrying the glass jug. Attach the jug lid securely to the glass jug before operation. Do not place anything on top of the jug lid. Do not open the jug lid during operation as scalding may occur. 4
6 PAge We recommend header... safety first Extreme caution must be used when moving the glass jug containing hot liquid. Use caution when pouring water from the glass jug as boiling water and steam will scald. Do not pour the water too quickly. To avoid scalding, never fill the glass jug past the WATER MAX (when heating water) or TEA MAX (when brewing tea) line markings. Do not operate the appliance without water. Always fill the glass jug to at least the MIN marking. Should it be operated without water, the boil-dry protection will shut the power off automatically. Allow the appliance to cool before refilling. WARNING To protect against electric shock, do not immerse the glass jug base, power base, power cord or power plug in water or allow moisture to come in contact with these parts. Please refer to cleaning instructions on page 25 of the instruction booklet. Do not remove the glass jug from the power base during heating or when the basket is in operation. Ensure the appliance has completed the water heating or tea brewing cycle before removing the glass jug from the power base. The use of accessory attachments not recommended by Sage by Heston Blumenthal may result in fire, electric shock or injury to persons. To turn OFF the appliance, press the TEA Cancel button (when brewing tea) or the HOT WATER Cancel button (when heating water) on the power base. The appliance is OFF when the button surround illumination goes out. 5
7 PAge We recommend header... safety first To disconnect from the wall outlet, first turn OFF the appliance then remove the power plug from the wall outlet. When the appliance is not in use or when left unattended, disconnect the power cord from the wall outlet. Before attempting to move the appliance or before assembling or disassembling parts, cleaning or storing, turn OFF the appliance, allow to cool and disconnect from the wall outlet. Allow the appliance to cool down in between brewing cycles. Strictly follow the Care and Cleaning instructions on page 25. Do not use harsh abrasives or caustic cleaners when cleaning this appliance. Do not operate the Tea Maker on a sink or draining board. Young children should be supervised to ensure that they do not play with the appliance. The glass jug has been specially treated to make it stronger, more durable and safer than ordinary glass, however it is not unbreakable. If dropped or struck extremely hard, it may break or weaken, and could at a later time shatter into many small pieces without apparent cause. This appliance can be used by children aged from 8 years and above and persons with reduced physical, sensory or mental capabilities or lack of experience and knowledge if they have been given supervision or instruction concerning use of the appliance in a safe way and understand the hazards involved. Children shall not play with the appliance. Cleaning and user maintenance shall not be made by children without supervision. Always disconnect the appliance from the supply if it is left unattended and before assembling, disassembling and cleaning. Misuse may cause injury. 6
8 We recommend safety first WARNING Never immerse the glass jug, power base, power cord or power plug in water or allow moisture to come in contact with these parts. WARNING Do not wash jug exterior under running water. IMPORTANT SAFEGUARDS FOR ALL ELECTRICAL APPLIANCES This appliance is for household use only. Unwind the power cord fully before use. Do not let the cord hang over the edge of a table or counter, or touch hot surfaces. Do not use the appliance for anything other than its intended purpose as described in this booklet. Do not use outdoors. Do not use in moving vehicles or boats. Close supervision is necessary when any appliance is used by or near children. Do not use the appliance if power cord, power plug or appliance becomes damaged in any way. If damaged or maintenance other than cleaning is required, please contact Sage by Heston Blumenthal Customer Service on or go to sageappliances.co.uk SAVE THESE INSTRUCTIONS 7
9 We recommend safety first Consult a qualified electrician if the grounding instructions are not completely understood, or if doubt exists as to whether the appliance is properly grounded. Consult a qualified electrician if the grounding instructions are not completely understood, or if doubt exists as to whether the appliance is properly grounded. The symbol shown indicates that this appliance should not be disposed of in normal household waste. It should be taken to a local authority waste collection centre designated for this purpose or to a dealer providing this service. For more information, please contact your local council office. WARNING Do not operate the appliance on an inclined surface. Do not move the appliance while it is switched on. 8
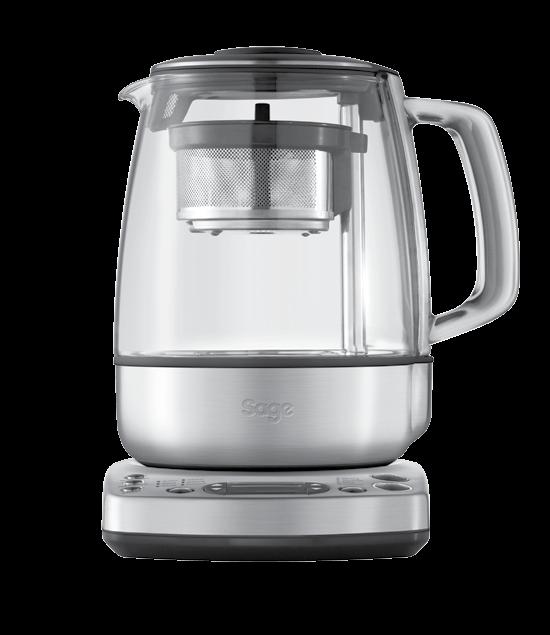
10 PAge Getting header... to know your new appliance A B C D E F G J H I A. Jug lid B. Stainless steel scale filter C. Tea basket lid D. Stainless steel tea basket E. Jug post Magnetically attaches the tea basket. F. Glass jug 1500ml water max, 1200ml tea max. G. Immersed temperature sensor H. Tea scoop I. Power base J. Cord storage Concealed on the underside of the power base. 9
11 PAge Getting header... to know your new appliance K L M S T N O P Q R K. AUTO START button Set the Tea Maker to automatically begin brewing at a pre-selected time. L. KEEP WARM button Keeps the brewed tea or heated water warm for up to 60 minutes. M. BASKET button Auto lifts & lowers the tea basket. The movement allows water to circulate freely around the tea leaves for maximum infusion. N. TEA TYPE button Preset brew temperatures recommended for green, black, white, herbal & oolong tea. O. Variable temperature control Overrides the preset brew temperatures. P. Backlit LCD Q. Variable time control Overrides the preset brew times. R. TEA STRENGTH button Preset brew times recommended for strong, medium and mild brews. S. HOT WATER CANCEL button For use as a variable temperature kettle. T. TEA CANCEL button Activates the tea brewing cycle. 10
12 TEA INSIGHTS Tea Types There are four main types of tea from the tea plant camellia sinensis. The picking and processing methods determine the type of tea finally produced. Black Tea Black tea is the most common type of tea worldwide. It is made by fermenting the harvested leaves for a couple of hours before heating or drying. This oxidation darkens the leaves and increases the amount of caffeine. Of all the teas, black tea has the strongest colour and flavour. White Tea White tea is the rarest and the most exclusive tea. White tea consists of the whitish buds of the tea plant which are steamed then left to dry naturally. This tea is low in caffeine and has a slightly sweet flavour. Green Tea Green tea makes up approximately ten percent of the world s tea. The leaves are picked, rolled and dried before they can go brown. Green tea has a distinctive aroma and has a slight astringent taste. Oolong Tea Oolong Tea is semi fermented, which means leaves are processed immediately after picking. They only have a short period of oxidation which turns the leaves from green to red/brown. Its leaves have a floral, fruity quality and hence have a delicate fruity taste. It is recommended not to drink Oolong tea with milk, sugar or lemon. Herbal Infusions or Tisanes Herbal infused teas are not produced from the tea plant, but from flowers, leaves, roots or seeds. Common herbal beverages are chamomile, peppermint, fennel, rose hip, and lemon verbena. Herbal infusions that do not contain tea will generally not become bitter with extended brews. These can often be brewed with boiling water 3 times without jeopardising the taste. Blends Tea producers make blends by combining different types of teas, often in order to achieve flavour consistency from one season to the next. Common black tea blends include English Breakfast, Earl Grey, Irish Breakfast, and Russian Caravan. TIP Brewed tea leaves make an ideal garden fertiliser and help condition the soil. Tea Storage Teas stored inside a vacuum sealed bag can be stored for up to two years, depending on the quality and grade of tea. Once opened, tea should be stored in an airtight container and kept in a dry and dark place. Once opened, black teas will last longer than green and oolong teas but all tea needs to be stored in ideal conditions. You can tell when tea is past its best if it has lost its aroma and will create either a bitter or dull tasting cup. 11
13 TEA INSIGHTS Tips for optimal Tea BREWING Water quality affects taste. For best results, use filtered water. Finer tea particles and leaves will infuse more quickly than whole leaves. As a result, finer tea particles often release too much tannin too quickly, creating a harsher taste. Adjust the brewing time until desired strength is achieved. Using the tea scoop provided, use roughly one scoop of tea per cup/250ml of water. Water to Tea Scoop Ratio Glass Jug Marking 500mL 750mL 1000mL 1200mL Cups / ML Approx. 2 Cups/500ml Approx. 3 Cups/750ml Approx. 4 Cups/1000ml Approx. 5 Cups/1200ml Tea Scoops 2 Scoops 3 Scoops 4 Scoops 5 Scoops 12
14 BEFORE FIRST USE Preparing THE Tea Maker for use In order to remove any dust or protective residues from the manufacturing process, it is recommended to run a boiling cycle then discard the water. 1. Remove and safely discard any packing material, promotional labels and tape from the Tea Maker. 2. Remove the jug lid then remove the tea basket from the magnetic post within the glass jug. Wash the jug lid, tea basket, basket lid and tea scoop in warm soapy water with a soft sponge, rinse and dry thoroughly. WARNING Never immerse the base of the glass jug, the power base, power cord or power plug in water or allow moisture to come in contact with these parts 3. Place the power base on a flat, dry surface. 4. Without the tea basket in place, fill the glass jug to the water maximum mark (1500mLWATER MAX) and place on the power base. Securely fit the jug lid onto the glass jug. WARNING Filling past the 'MAX' line may result in serious burns or injuries as a result of overflowing hot or boiling water. Filling below the 'MIN' line will result in the Tea Maker switching off before the water has boiled or reached the selected temperature. 5. Unwind the power cord completely and insert the power plug into a grounded wall outlet. 6. The LCD screen will illuminate with the default brew temperature and brew time display. 7. Press the left ARROW UP button until the LCD screen displays 100 C. The 'Custom' LED will automatically illuminate. WARNING Never fill the glass jug with chilled water. Allow the Tea Maker to cool before refilling. 13
15 BEFORE FIRST USE 8. Press the HOT WATER Cancel button to start the cycle. The button surround will illuminate and the LCD screen will display 'ON' and the real-time heating progress in increments of 5 C. 9. Once the water reaches 100 C, the tea alert will sound three times and the HOT WATER Cancel button surround will cease to illuminate. 10. Discard the water. The Tea Maker is now ready to use. 14
16 BREWING TEA Use as a Tea Maker for brewing tea 1. Remove the glass jug from the power base and remove jug lid. When brewing tea, fill with desired amount of water. Ensure you do not fill past the tea maximum mark (1200mL TEA MAX). WARNING Filling past the MAX line may result in serious burns or injuries as a result of overflowing hot or boiling water. Filling below the MIN line will result in the Tea Maker switching off before the water has boiled or reached the selected temperature. 2. Place the basket on a flat, dry surface. Remove basket lid by lifting from the sides. 3. Use the provided tea scoop to fill the basket with tea leaves. As a general guide, use 1 scoop of tea leaves per cup / 250ml of water, however this will depend on the instructions on tea packaging and your personal preference (See page 12, Water to Tea Scoop Ratio). 4. Replace the basket lid on top of the basket. Ensure lid is securely snapped in place by pressing firmly on the centre of the lid. 5. Slide the assembled basket on to the magnetic post located within the glass jug. The assembled basket will attach itself to the top of the magnetic post. Replace jug lid. Selecting the Tea Type The tea type determines brew temperature. The Tea Maker has 5 preset tea types recommended for optimal brewing of Green, Black, White, Herbal or Oolong tea. It also features a customisable tea type temperature setting for other tea varieties or to suit your personal taste (see page 20, Customising Brew Temperature). 1. To select a preset tea type: a) Press the TEA TYPE button and toggle through until the desired tea 'Green', 'Black', 'White', 'Herbal' or 'Oolong' illuminates. b) The LCD screen will display the preset brew temperature recommended for optimal brewing of the selected tea type. This is displayed on the left hand side of the LCD screen. 15
17 BREWING TEA TEA TYPE GREEN TEA WHITE TEA OOLONG TEA HERBAL TEA BLACK TEA PRESET BREW TEMP 80 C 85 C 90 C 100 C 100 C PRESET BREW TIME 3:00 3:00 3:00 4:00 2:00 Selecting the Tea Strength The desired tea strength determines the brew time. The correct brew time depends on the tea type and your personal tea strength preference. The Tea Maker has 3 preset tea strengths recommended to achieve Strong, Medium or Mild tea brews. It also features a customisable brew time setting to suit your personal taste (see Page 20, Customising Brew Time). 1. To select a preset tea strength: a) Press the TEA STRENGTH button and toggle through until the desired tea strength 'Strong', 'Medium' or 'Mild' illuminates. b) The LCD screen will display the preset brew time recommended to achieve the selected brew strength for the tea type selected. This is displayed as the right figure on the LCD screen. 2. Press the TEA Cancel button to start the tea brewing cycle. The button surround will illuminate and the LCD screen will display 'ON' and the real-time heating progress in increments of 5 C. Once the water temperature reaches 50 C, 'ON' will be replaced by the selected brew time. The BREW TIME can be adjusted during the heating process but BREW TEMP cannot be changed once the heating cycle commences. To change the brew time press the right ARROW UP button to increase the time, or the right ARROW DOWN button to decrease the time. The brewing time can be adjusted in 30 second increments up to a maximum of 10 minutes. 3. Once the selected brew temperature is reached the assembled basket will automatically lower into the heated water. 4. Once the basket reaches the bottom of the glass jug, the LCD screen will indicate the brewing progress, automatically counting down in one second increments. This is displayed on the right hand side of the LCD screen. 5. At the end of the tea brewing cycle, the basket will automatically rise to the top of the glass jug to prevent over-brewing. The tea alert will sound three times. 16
18 BREWING TEA WARNING The tea basket is hot to touch after tea is brewed. Ensure the tea basket handle has cooled before handling. Selecting the Keep Warm Feature This feature allows the brewed tea or heated water to remain warm for up to 60 minutes. The Keep Warm temperature ranges between C depending on the original brew temperature selected. The lower the brew temperature, the lower the Keep Warm temperature. Original Brew Temp. 70 C - 80 C 85 C 90 C C Approximate Keep Warm Temp. 70 C 75 C 80 C During the Keep Warm cycle, brewed tea will continue to develop flavour. Depending on how long you intend to keep the brewed tea warm, you may consider reducing the initial tea strength/brew time (see page 16). Keep Warm will only maintain temperature during the 60 minute Time Since Brew feature at the end of the Tea or Hot Water function. 2. Once the tea brewing or water heating cycle is complete, the LCD screen will automatically display the Time Since Brew count-up. The KEEP WARM button surround will remain illuminated, indicating the Keep Warm cycle is active for up to 60 minutes during Time Since Brew while the glass jug remains on the power base. 3. During this time, the glass jug can be removed from the Power Base, however the Keep Warm feature will automatically switch off. You can re-select the Keep Warm feature by pressing the KEEP WARM button. The Keep Warm cycle will remain active for the duration of the 60 minute Time Since Brew feature. Keep Warm feature will not activate and will not function if water temperature is below 50 C. To activate the Keep Warm feature: 1. Press the KEEP WARM button before, during or after completion of the tea brewing or water heating cycle. The button surround will illuminate, indicating the Keep Warm feature has been selected. 17
19 BOILING OR HEATING WATER Selecting the Basket Cycle Feature This feature continuously auto lifts and lowers the basket during the tea brewing cycle. This movement loosens the tea leaves within the basket, allowing the heated water to circulate freely around the tea leaves for maximum infusion. The Basket Cycle can significantly increase the rate of infusion and affect the tea strength. You may consider reducing the initial tea strength / brew time (see page 17) when using the Basket Cycle feature. It is recommended that the Basket Cycle feature is used only when making between 1000mL (approx. 4 cups) to 1200mL (approx. 5 cups). 1. To activate the Basket Cycle feature, press the BASKET button once. The button surround will illuminate and the LCD screen will display BASKET CYCLE. 2. During the brewing cycle, the BASKET button surround will flash while the basket slowly lifts and lowers within the heated water. 3. The Basket Cycle feature can be cancelled anytime during the tea brewing cycle. Press the BASKET button once. The button surround will cease to illuminate and the LCD screen will no longer display BASKET CYCLE. The basket will return to the bottom of the glass jug for the remaining brewing time. Use as a variable temperature kettle The Tea Maker can be used for boiling or heating water to a customisable temperature. If you have used the glass jug for making tea we recommend thoroughly cleaning the interior of the jug and removing the tea basket before boiling or heating water. See Care & Cleaning instructions on page Fill the glass jug with the desired amount of water. Do not fill over the water maximum mark (1500ml WATER MAX). 2. a) To boil water (100 C): Press the left ARROW UP button to increase the temperature to 100 C. The Custom LED will automatically illuminate. b) To heat water to a customised temperature: Press the left ARROW UP button to increase the temperature, or the left ARROW DOWN button to decrease the temperature. The temperature can be adjusted in 5 C increments from 70 C to a maximum of 100 C (or in the Fahrenheit mode, 5 F increments from 160 F to a maximum of 212 F). The Custom LED will automatically illuminate. 18
20 BOILING OR HEATING WATER Once a customised temperature has been selected and once tea making or water heating cycle has been activated, the customised temperature setting will remain in the memory of the Tea Maker until you change it. To return to default settings, see page Press the HOT WATER Cancel button to start the cycle. The button surround will illuminate and the LCD screen will display ON and the real-time heating progress in increments of 5 C. 4. The brew temperature cannot be changed once the heating cycle commences. To change the brew temperature, press the HOT WATER Cancel button to cancel the heating cycle. Re-select the brew temperature (see Page 23). 5. Once the selected temperature is reached, the tea alert will sound three times. The LCD screen will automatically display the Time Since Brew function. This function counts up to a maximum of 60 minutes, allowing you to monitor when the water heating cycle was complete. It does not activate the heating elements. 6. The Tea Maker has a Keep Warm feature that allows brewed tea or heated water to remain warm for up to 60 minutes. This feature can be activated before, during or after the water heating cycle (see page 17, Selecting the Keep Warm feature). Keep Warm will only maintain temperature during the 60 minute Time Since Brew feature at the end of the Tea or Hot Water function. 19
21 PAge CUSTOMISING header... BREW TEMPERATURE & TIME Customising Brew Temperature In addition to the 5 preset brew temperatures (see page 15, Selecting the Tea Type), the Tea Maker also features a customisable brew temperature setting for other tea varieties or to suit your personal taste. To customise a brew temperature: 1. Press the left ARROW UP button to increase the temperature, or the left ARROW DOWN button to decrease the temperature. The brewing temperature can be adjusted in 5 C increments from 50 C to a maximum of 100 C (or in the Fahrenheit mode, 5 F increments from 160 F to a maximum of 212 F). 2. The LCD screen will display the customised brew temperature. This is displayed as the left figure on the LCD screen. Pressing the left ARROW UP or the ARROW DOWN button while Green, Black, White, Herbal or Oolong are illuminated, will override the tea type options and illuminate Custom. Customising Brew Time In addition to the 5 preset brew times (see Page 16, Selecting the Tea Strength), the Tea Maker also features a customisable brew time setting to suit your personal taste. To customise a brew time: Ensure the brew temperature (tea type) has been selected (see Page 16 and 20). Brew time less than 10 minutes i) Press the right ARROW UP button to increase the time, or the right ARROW DOWN button to decrease the time. The brewing time can be adjusted in 30 second increments up to a maximum of 10 minutes. ii) Once the Tea Maker is activated and the correct water temperature is reached, the basket will automatically lower and the brew time counter will count down the selected time. iii) Once the brewing is complete, the basket will automatically rise and the LCD screen will display the Time Since Brew function. This function counts up to a maximum of 60 minutes, allowing you to monitor the freshness of your brew. It does not activate the heating elements. This product is not calibrated for commercial or scientific use. Temperatures may vary ± 3 C, which is within range for optimal brewing for each tea variety. 20
22 PAge AUTO header... START Manual mode-brew times over 10 minutes In this mode, once the correct water temperature is reached, the assembled basket will automatically lower and commence brewing. However, it will not automatically lift the basket, allowing you to manually lift it once the desired brew time has elapsed. i) Press the right ARROW UP button to increase the time up to the maximum 10 minutes. ii) Continue to press the right ARROW UP button. The LCD screen will display MANUAL LIFT and - - : - - on the right side of the LCD. iii) Once the Tea Maker is activated and the correct water temperature is reached, the basket will automatically lower. iv) In the manual lift mode, the LCD screen will automatically commence the Brew Time feature. This feature counts up to a maximum of 60 minutes, allowing you to monitor how long the basket has been submerged. v) Once the desired brew time has elapsed, press and hold the BASKET button for 2 seconds. The basket will rise. vi) Once the brewing is complete, the LCD screen will automatically display the Time Since Brew function. This function counts up to a maximum of 60 minutes, allowing you to monitor the freshness of your brew. It does not activate the heating elements. Once a customised time has been selected and one tea making or water heating cycle has been activated, the customised time will remain in the memory of the Tea Maker until you change it. To return to default settings, see page 22. Auto Start Feature This feature allows you to program the specific time when the Tea Maker will automatically turn on and start either a tea brewing cycle or water heating cycle. Setting the Auto Start Feature 1. Press and hold the AUTO START button for 2 seconds. The button surround will illuminate and the tea alert will sound. 2. The LCD screen will display the AUTO START clock symbol and a blinking CURRENT TIME and START TIME. 3. To set the CURRENT TIME, press the left ARROW UP button to increase the time, or the left ARROW DOWN button to decrease the time in 1 minute increments. Ensure the correct AM or PM is displayed. 21
23 PAge RESETTING header... DEFAULT SETTINGS/STANDBY MODE Pressing and holding the ARROW UP button or ARROW DOWN button will increase the scrolling speed. 4. To set the START TIME, press the right ARROW UP button to increase the time, or the right ARROW DOWN button to decrease the time in 1 minute increments. Ensure the correct AM or PM is displayed. 5. Once current time and start time are programmed, press either the flashing HOT WATER Cancel or TEA Cancel button to select which feature you would like to start at the programmed time. 6. The LCD screen will display the current time and start time, in addition to the AUTO START symbol. The AUTO START button surround will illuminate and remain illuminated until the START TIME is reached, indicating that the Auto Start feature has been activated. 7. Ensure that the Tea Maker is prepared with: a) Sufficient water in the glass jug and tea leaves in the basket for the tea brewing cycle or, b) Sufficient water in the glass jug for the water heating cycle. Insufficient water may discolour your Tea Maker base! 8. Once the selected START TIME is reached, the Tea Maker will automatically commence the tea brewing or water heating cycle. During this time, the AUTO START button surround will no longer illuminate until the cycle is complete. Re-selecting the Auto Start feature using previous START TIME 1. Press the AUTO START button once. The HOT WATER Cancel and TEA Cancel buttons will flash. 2. Press either the HOT WATER Cancel or TEA Cancel button to re-select the desired function. The Auto Start feature has now been re-set. The Auto Start feature can be canceled anytime by pressing the AUTO START button. The LCD screen will no longer display the AUTO START symbol and the AUTO START button surround will cease to illuminate. RESETTING DEFAULT SETTINGS Even when unplugged from the power outlet, the Tea Maker will remember the last setting used for each setting. To restore the Tea Maker s default settings for each function, simultaneously press and hold AUTO START and KEEP WARM buttons for 2 seconds. 22
24 PAge MOVING header... THE TEA BASKET STANDBY MODE When the Tea Maker is plugged into a wall outlet, the LCD screen will illuminate for 3 minutes before entering standby mode. To re-activate the Tea Maker out of standby mode, press any button, except the HOT WATER Cancel or TEA Cancel button on the power base. The LCD screen will re-illuminate. Pressing either the HOT WATER Cancel or TEA Cancel button will start the respective operation immediately. MOVING THE TEA BASKET WHEN NOT IN THE BREWING CYCLE After the brewing cycle is complete, you may wish to lower the tea basket again for extra infusion to produce a stronger tasting tea. To do this, press and hold the BASKET button for 2 seconds. The button surround will flash and the tea basket will automatically lower to the bottom of the glass jug. Once the desired strength has been reached, press and hold the BASKET button for 2 seconds. The button surround will flash and the tea basket will automatically rise to the top of the glass jug. If the glass jug is removed from the power base and the tea basket is in the lowered position, it will automatically return to the top -upon return of the glass jug to the power base. 23
25 PAge TEMPERATURE header... CONVERSION ( C TO F) A ON TEMPERATURE CONVERSION ( C to F) The temperature reading on the Tea Maker is preset to Celsius but can be converted to Fahrenheit. Simultaneously press and hold the TEA TYPE and TEA STRENGTH buttons for 2 seconds. The corresponding C or F symbol will be displayed on the LCD screen. PRESS & HOLD FOR 2 SECONDS Once the Celsius default has been changed to Fahrenheit and once tea brewing or water heating cycle has been activated, the Fahrenheit setting will remain in the memory of the Tea Maker until you change it. To return to default settings, see page
26 Care & cleaning Cleaning the Glass Jug 1. After each use, empty the glass jug. Do not allow brewed tea to stand overnight. 2. Wipe the interior of the glass jug with a soft damp sponge or rinse with warm water. Tea deposits will enhance the flavour of the brewed tea, so if only using as a Tea Maker do not wash with soapy water. 3. Wipe the exterior of the glass jug with a soft damp cloth to clean. WARNING Never immerse or wash exterior of glass jug under running water. 4. To remove the build-up of tannin, the astringent chemical constituent of tea, fill the glass jug with water up to the water maximum mark (1500mL WATER MAX) and either: a) Bring water to boil and allow water to cool for one minute. Add contents of tea cleaner packet and allow to stand for 5 minutes. Empty Tea Maker, refill with fresh water and boil. Repeat this step again. Empty Tea Maker and rinse thoroughly. b) Add the juice of one lemon, as well as the lemon and boil. Leave to soak overnight then discard the solution. Fill the glass jug with clean water, boil, then discard the water. Repeat if necessary. or, c) Add 6 tablespoons of white vinegar and boil. Leave to soak overnight then discard the solution. Fill the glass jug with clean water, boil, then discard the water. Repeat if necessary. 5. Dry thoroughly with a soft, lint-free cloth before using. Do not use chemicals, steel wool, or abrasive cleaners to clean the inside or outside of the glass jug as these may scratch the surface. 25
27 PAge Care header... & cleaning Through regular use over time, scale build-up can affect the performance and the life of the Tea Maker. Lime and phosphate are common forms of scale that can damage your Tea Maker. Lime scale, a harmless mineral, comes in the appearance of white-coloured or rusty looking build up on the inner walls and inner base of the glass jug. Phosphate scale can t be seen, however, it can cause the water to appear cloudy when heated. To prevent scale from damaging your Tea Maker, ensure to de-scale the glass jug regularly. Use a commercial de-scaling agent and follow the instructions that come with the agent. Ensure the Tea Maker is turned OFF by pressing the TEA Cancel button (when brewing tea) or the HOT WATER Cancel button (when heating water) on the power base. The Tea Maker is OFF when the button surround illumination goes out. Remove the power plug from the wall outlet. Allow all parts of the Tea Maker to cool completely before disassembling and cleaning. Only the jug lid, tea basket, tea basket lid and tea scoop are dishwasher safe. WARNING Never immerse the BASE OF THE GLASS JUG, POWER BASE, POWER CORD or POWER PLUG in water or allow moisture to come in contact with these parts. Cleaning the Jug Lid and integrated scale filter 1. Wash the jug lid in warm soapy water with a soft sponge, rinse and dry thoroughly. The integrated scale filter can be cleaned by placing under running hot water and rubbing with a cleaning cloth or brush. 2. Alternatively, the jug lid is dishwasher safe. Position the jug lid vertically so the scale filter is facing upwards. This will allow water to drain properly. 3. Let all surfaces dry thoroughly prior to using. 26
28 Care & cleaning Cleaning the Tea Basket Lid, Tea Basket and Tea Scoop 1. Wash the tea basket lid, tea basket and tea scoop in warm soapy water with a soft sponge, rinse and dry thoroughly. A non-abrasive liquid cleanser or mild spray solution may be used to avoid build-up of stains. Apply the cleanser to the sponge, not the accessory surfaces, before cleaning. 2. Alternatively, these accessories are dishwasher safe. 3. Let all surfaces dry thoroughly prior to using. Cleaning the Power Base 1. Wipe the power base with a soft damp sponge. 2. Let all surfaces dry thoroughly prior to inserting the power plug into a wall outlet. Storage 1. Ensure the Tea Maker is switched off, cleaned and dried before storing. 2. Ensure that the assembled tea basket is securely attached to the magnetic post within the glass jug. 3. Ensure that jug lid is securely in place. 4. Wrap the power cord around the power cord storage under the power base. 5. Stand the Tea Maker upright on the power base. Do not store anything on top. 27
29 TROUBLESHOOTING Problem Tea Maker will not switch ON The Tea Maker will not work The LCD light has gone out I cannot select a certain function The LCD screen displays RESET The LCD screen displays ERROR Possible Cause Check the power plug is securely inserted into the outlet. Insert the power plug into an independent outlet. Insert the power plug into a different outlet. Reset the circuit breaker if necessary. For additional safety the Tea Maker is fitted with a thermal cut out. In the event of severe overheating, the Tea Maker will automatically shut down to prevent further damage. Should this continue, call the Sage by Heston Blumenthal Customer Service Centre Check the glass jug is securely positioned on the power base. The Tea Maker goes into standby mode if not used for 3 minutes. To re-activate the Tea Maker out of standby mode: - Remove then replace the glass jug from the power base. - Press any button on the power base except the HOT WATER Cancel or TEA Cancel buttons. The LCD screen will re-illuminate. Certain features cannot be selected or changed during the heating or brewing cycle. The LCD screen may temporarily change or a sound alert may be heard, but no changes to the cycle will be made. The LCD screen will display a flashing RESET when there is a resettable electronic issue. Remove the plug from the wall outlet, wait 5 seconds, then plug back in. Call Sage by Heston Blumenthal Customer Service if the RESET message continues. The LCD screen will display a flashing ERROR when there is a non-resettable issue with the appliance. Should this occur, call the Sage by Heston Blumenthal Customer Service Centre
30 TROUBLESHOOTING Problem I would like to have the Tea Maker s default settings back The BASKET CYCLE feature / BASKET button does not work After boiling water, bubbles appear around the temperature sensor My tea tastes too weak or too strong There is a rattling noise inside the glass jug What to Do Even when unplugged from the wall outlet, the Tea Maker will remember the last setting used for each function. To restore the Tea Maker s default settings for each function, simultaneously press and hold AUTO START and KEEP WARM buttons for 2 seconds. The basket cycle is only operational during brewing cycles that are under 10 minutes. The tea basket cannot be lowered during the heating up phase of normal operation. This is normal for the functionality of the Tea Maker. Tea taste is a personal preference and may require experimentation to get it to your liking. For stronger tasting tea, increase the amount of tea or brew time (see Page 16 and 20). For a weaker tasting tea, decrease the amount of tea or brew time (see page 16 and 20). This is normal. The noise is from the magnet located inside the jug post and may be heard when the tea basket is not attached. 29
31 S 30
32 S 31
AUTOMATIC TEA MAKER &KETTLE TM Instructions for use
 AUTOMATIC TEA MAKER &KETTLE Instructions for use TM 8010 AUTOMATIC TEA MAKER & KETTLE CONTENTS 4 Congratulations 6 Catler recommends safety first 8 Know your Tea Maker TM 8010 10 Tea insights 11 Tea types
5KEK1322 W A_v08.indd 1 5/13/16 2:25 PM
 5KEK1322 W10878653A_v08.indd 1 PARTS AND FEATURES PARTS AND ACCESSORIES Tea steeper lid (center section of lid with handle) Kettle lid (outer section) Stainless steel lime scale filter Removable stainless
STAINLESS STEEL MILK FROTHER. Model: PKFMR11BK
 STAINLESS STEEL MILK FROTHER Model: PKFMR11BK WARNING! To reduce the risk of fire, electrical shock or injury to persons or property: Carefully read all instructions before operating your new product for
INSTRUCTION MANUAL. Coffee Maker CMCM-100
 INSTRUCTION MANUAL Coffee Maker CMCM-100 CONTENTS Cusimax recommends safety first....1-2 Know your Cusimax product...3 Operating your Cusimax product 4 Care & cleaning 5 Cusimax Recommends Safety First
the Smart Grinder Sage by Heston Blumenthal Customer Service Centre Phone:
 Sage by Heston Blumenthal Customer Service Centre Phone: 0844 334 5110 www.sageappliances.co.uk customerservice@sageappliances.co.uk the Smart Grinder Instruction Booklet Register your product and get
1. IMPORTANT SAFEGUARDS When using electrical appliances, basic safety precautions should always be followed to reduce the risk of fire, electric
 1. IMPORTANT SAFEGUARDS When using electrical appliances, basic safety precautions should always be followed to reduce the risk of fire, electric shock, and/pr injury to persons including the following:
Aroma Fresh. Instructions for use Includes recipes. Model BCM120
 Aroma Fresh Instructions for use Includes recipes Model BCM120 Contents Page Breville recommends safety first 4 Know your Breville Aroma Fresh Coffee Maker 5 Operating your Breville Aroma Fresh Coffee
Coffee Grinder Instruction Manual
 Coffee Grinder Instruction Manual CoffeeGrinder Manual-English Only.indd 1 07/01/2016 14:14:39 Savisto Home Coffee Grinder Voltage Supply: 220-240V~ 50/60Hz Power Consumption: 150W Eng Please read through
Wi-Fi Coffee Maker. Model# GCMW-4750 USER MANUAL
 Wi-Fi Coffee Maker Model# GCMW-4750 USER MANUAL Read this manual thoroughly before using and save it for future reference Model: GCMW-4750 2018 Gourmia www.gourmia.com The Steelstone Group Brooklyn, NY
Kambrook - Australia Ground Floor, Suite 2, Bourke Rd Alexandria NSW 2015, Australia
 Kambrook - Australia Ground Floor, Suite 2, 170-180 Bourke Rd Alexandria NSW 2015, Australia Locked Bag 2000 Botany NSW 1455 Customer Service Line 1300 139 798 Customer Service Fax 1800 621 337 www.kambrook.com.au
IMPORTANT SAFEGUARDS. 3. To protect against fire, electric shock and injury to persons do not immerse cord, plug or unit in water or other liquid.
 IMPORTANT SAFEGUARDS When using electrical appliances, basic precautions should always be followed, including the following: 1. Read all instructions. 2. Make sure that your outlet voltage corresponds
Stainless Steel Milk Frother N3 User Manual
 Stainless Steel Milk Frother N3 User Manual Voltage: 110V~60Hz Power: 500W READ AND SAVE THESE INSTRUCTIONS IMPORTANT Read and follow the instructions in this user manual even if you feel you are familiar
VARIABLE TEMPERATURE KETTLE
 VARIABLE TEMPERATURE KETTLE CONTENTS 4 Congratulations 6 Catler Recommends Safety First 8 Know Your Variable Temperature Kettle KE 8010 9 Features of Your Variable Temperature Kettle KE 8010 12 Operating
5KCG0702 W A_Final.indd 1 8/4/15 8:35 AM
 5KCG0702 PARTS AND FEATURES PARTS AND ACCESSORIES Hopper lid Easy access stainless steel burrs 200 g glass hopper 15 grind settings Die cast metal body Grind control dial Power switch Faceplate assembly
the Smart Kettle Instruction Booklet BKE820
 the Smart Kettle Instruction Booklet BKE820 BKE820_IB_A11.indd 2 CONGRATULATIONS on the purchase of your new Breville Smart Kettle BKE820_IB_A11.indd 2 Contents 4 Breville recommends safety first 6 Know
BarAroma Coffee & Spice Grinder
 Breville is a registered trademark of Breville Pty. Ltd. ABN 98 000 092 928 Breville Customer Service Centre Australian Customers Breville Customer Service Centre PO Box 22 Botany NSW 2019 AUSTRALIA Customer
Thank you for your purchase!
 CM4200S Thank you for your purchase! www.prodprotect.com/blackanddecker Should you have any questions or concerns with your new product, please call our Customer Service Line at 1-800-465-6070 (US and
Automatic Coffee Machine Instruction Manual
 Instruction Manual Page 1 of 17 8212-0 Automatic Coffee Machine Instruction Manual Instruction Manual Page 2 of 17 IMPORTANT INFORMATION For safety purposes please read these instructions carefully before
5KEK1522 W A_01_EN.indd 1 11/16/12 1:22 PM
 5KEK1522 Water Kettle INSTRUCTIONS Table of Contents water KEttle SAFETY Important safeguards...6 Electrical requirements...7 Electrical equipment waste disposal...7 PARTS AND FEATURES Parts and accessories...8
COFFEE GRINDER. Owner s Manual
 COFFEE GRINDER Owner s Manual 4 4 FEATURES Bean Hopper Lid Bean Hopper Grinder Start/Stop Button Bean Hopper Holder Bean Hopper Release Button Grinding Timer Dial Coffee Powder Outlet 0 Grind Thickness
Caffeo. Italian style espresso machine. INSTRUCTIONS FOR USE. Breville Customer Service Centre
 Breville is a registered trademark of Breville Pty. Ltd. ABN 98 000 092 928 Breville Customer Service Centre Australian Customers Breville Customer Service Centre Locked Bag 2000 Botany NSW 2019 AUSTRALIA
WE CAN HELP. Smart Coffee Maker User Manual. Can t connect? Need help? DO NOT RETURN THIS PRODUCT TO THE STORE
 Can t connect? Need help? Wi-Fi Date Code: 01/19 Smart Coffee Maker User Manual WE CAN HELP DO NOT RETURN THIS PRODUCT TO THE STORE Call 1-800-757-1440 Mon-Fri 9:00-5:00 EST (US) or email info@atomiusa.com
INSTRUCTION MANUAL AND RECIPE BOOK CORN DOG MAKER CDM-1 SMART PLANET PLEASE READ THESE INSTRUCTIONS CAREFULLY AND RETAIN FOR FUTURE REFERENCE.
 INSTRUCTION MANUAL AND RECIPE BOOK CORN DOG MAKER CDM-1 SMART PLANET PLEASE READ THESE INSTRUCTIONS CAREFULLY AND RETAIN FOR FUTURE REFERENCE. IMPORTANT SAFEGUARDS Read all instructions before using the
5KCM0512A W A_ENv10.indd 1 10/13/15 12:41 PM
 5KCM0512A PARTS AND FEATURES PARTS AND ACCESSORIES Scale readout display Timer readout display Plunger handle Power button Lid Plunger (stainless steel mesh filter with silicone seal not shown) Timer button
Read the instructions, keep them safe, pass them on if you pass the appliance on. Remove all packaging before use.
 instructions 2 Read the instructions, keep them safe, pass them on if you pass the appliance on. Remove all packaging before use. A IMPORTANT SAFEGUARDS Follow basic safety precautions, including: 1 This
MARQUE REFERENCE CODIC
 MARQUE REFERENCE CODIC : KALORIK : TKG OT 00BCRL : 50 EN ANGLAIS PROVISOIREMENT NOTICE LOGO 00L ELECTRIC OVEN WITH ROTISSERIE & LAMP & CONVECTION INSTRUCTION MANUAL Model No. TY000BCL 0-0V~ 50/60Hz 800W
12 CUP COFFEE MAKER User Guide
 BRAND 12 CUP COFFEE MAKER User Guide Item: 740553 Ginnys.com 800-544-1590 Facebook.com/GinnysBrand Pinterest.com/GinnysBrand Ginnys.com/Blog Welcome to the world of full-flavored coffee with the Ginny
Read the instructions, keep them safe, pass them on if you pass the coffee maker on. Remove all packaging, but keep it in case you ever need to
 instructions 2 Read the instructions, keep them safe, pass them on if you pass the coffee maker on. Remove all packaging, but keep it in case you ever need to return the coffee maker. important safeguards
instructions COFFEE GRINDER KG 79/89
 instructions COFFEE GRINDER KG 79/89 DESCRIPTION OF APPLIANCE The following terms are used throughout the instruction manual Coffee-bean hopper lid Removable upper burr Coffee-bean hopper ON/OFF switch
10,000 prize draw. instructions. EXTRA year guarantee FREE rewards gallery. Register online now!
 r instructions 10,000 prize draw EXTRA year guarantee FREE rewards gallery www.productregister.co.uk/rhobbs Register online now! See back for details 2 Read the instructions, keep them safe, pass them
Instruction Booklet for ZX710. Slow. Innovative products since 1919
 Instruction Booklet for ZX710 Slow Innovative products since 1919 W a h l k i t c h e n i n n o v a t i o n s 1 IMPORTANT SAFEGUARDS When using electrical appliances, basic safety precautions should always
A IMPORTANT SAFEGUARDS
 instructions 2 Read the instructions, keep them safe, pass them on if you pass the appliance on. Remove all packaging before use. A IMPORTANT SAFEGUARDS Follow basic safety precautions, including: 1 This
IF THERE IS ANY QUESTION ABOUT A CONDITION BEING SAFE OR UNSAFE, DO NOT OPERATE THIS PRODUCT!
 RO18BT 18 Quart Roaster Oven Operating Instructions READ ALL INSTRUCTIONS AND WARNINGS BEFORE USING THIS PRODUCT. This manual provides important information on proper operation & maintenance. Every effort
Electric Two-Speed Drink Mixer
 Electric Two-Speed Drink Mixer MS2090 Series Before use, please read this manual thoroughly and save for future reference. ovente.com Electric Two-Speed Drink Mixer MS2090 Series 2 ovente.com ELECTRIC
Sage by Heston Blumenthal Customer Service Centre
 Sage by Heston Blumenthal Customer Service Centre Freephone (UK Landline): 0808 178 1650 Mobile Calls (National Rate): 0333 0142 970 www.sageappliances.co.uk customerservice@sageappliances.co.uk Register
PROGRAMMABLE COFFEE MAKER
 PROGRAMMABLE COFFEE MAKER KM 7280 KM 7280 W ENGLISH EN A B C D E F G H I J K L M N O P 3 SAFETY AND SET-UP Please read this instruction manual thoroughly prior to using this appliance! Follow all safety
BEVERAGE&TEA MAKER. Instructions for use BEVERAGE&TEA MAKER BM 8010
 BEVERAGE&TEA MAKER Instructions for use BEVERAGE&TEA MAKER BM 8010 BEVERAGE&TEA MAKER CONTENT 5 Catler recommends safety first 10 Know your Beverage&Tea Maker BM 8010 14 Tea 16 Operating your Beverage&Tea
45-Cup Coffee Urn Big Brew Classic. Instruction Manual. Model ACU-045
 45-Cup Coffee Urn Big Brew Classic Instruction Manual Model ACU-045 Congratulations! Your Big Brew Classic will surely become one of the most practical appliances in your home or office. Enjoy fresh brewed
User Manual. Stainless Steel Coffee Urn. Models: 177CU30 11/2018. Please read and keep these instructions. Indoor use only.
 Stainless Steel Coffee Urn Models: 177CU30 11/2018 Please read and keep these instructions. Indoor use only. www.avantcoequipment.com 1 NOTE: Save these instructions for future reference. Index Important
IMPORTANT SAFEGUARDS. When using electrical appliances, basic safety precautions should always be followed, including the following:
 IMPORTANT SAFEGUARDS When using electrical appliances, basic safety precautions should always be followed, including the following: 1.Read all instructions. 2.Do not touch hot surfaces. Use handles or
the Coffee & Spice Breville Customer Service Centre Instruction Booklet
 Breville Customer Service Centre the Coffee & Spice Instruction Booklet Australian Customers Mail: PO Box 22 Botany, NSW, 2019 AUSTRALIA Phone: 1300 139 798 Fax: (02) 9384 9601 Email: Customer Service:
Burr Grinder. Automatic burr grinder with 17-position grind selector. Instruction Booklet EM0430
 Burr Grinder Automatic burr grinder with 17-position grind selector Instruction Booklet EM0430 Please read these instructions carefully and retain for future reference. Contents Sunbeam s Safety Precautions
10,000 prize draw. instructions. EXTRA year guarantee FREE rewards gallery. Register online now!
 r instructions 10,000 prize draw EXTRA year guarantee FREE rewards gallery www.productregister.co.uk/rhobbs Register online now! See back for details Read the instructions, keep them safe, pass them on
Coffee Burr Grinder. Model #559. Instructions. Warranty
 Coffee Burr Grinder Model #559 Instructions Warranty IMPORTANT SAFEGUARDS When using electrical appliances, basic safety precautions should always be followed, including the following: 1. Read all instructions.
PLEASE READ THIS MANUAL BEFORE USE. SAVE FOR FUTURE REFERENCE.
 8-CUP STAINLESS STEEL CARAFE Coffee Brewer Model: BV1900TS HOUSEHOLD USE ONLY Customer Service Line: 1-855-664-1252 2-year limited warranty bonavitaworld.com Simple to operate Optional pre-infusion cycle
12 CUP COFFEEMAKER User Guide
 BRAND 12 CUP COFFEEMAKER User Guide Item: 757147 Ginnys.com 800-544-1590 Facebook.com/GinnysBrand Pinterest.com/GinnysBrand Welcome to the world of full-flavored coffee with the Ginny s Brand 12-Cup Coffeemaker!
Double Coffeemaker Instruction Manual
 BRAND Double Coffeemaker Instruction Manual Item 710431 Ginnys.com 1.800.544.1590 Thank you for purchasing a Ginny s Brand Double Coffeemaker. With two 12-cup carafes, you ll easily keep enough piping-hot
User Manual. Stainless Steel Coffee Urns. Models: 177CU55ETL, 177CU110ETL 10/2016. Please read and keep these instructions. Indoor use only.
 Intertek Stainless Steel Coffee Urns Models: 177CU55ETL, 177CU110ETL 10/2016 Please read and keep these instructions. Indoor use only. www.avantcoequipment.com 1 NOTE: Save these instructions for future
SG120 Model # Cup Stainless Steel Coffee Maker. Operating Instructions Product Registration Warranty
 SG120 Model #494 12-Cup Stainless Steel Coffee Maker Operating Instructions Product Registration Warranty IMPORTANT SAFEGUARDS When using electrical appliances, basic safety precautions should always be
Half-Pint Soft Serve Ice Cream Maker
 CAUTION: READ OPERATOR S MANUAL BEFORE USE Visit www.hamiltonbeach-me.com for our complete line of products and Use and Care Guides as well as delicious recipes and tips! Half-Pint Soft Serve Ice Cream
Oven Toaster Grill with Convection
 READ BEFORE USE Oven Toaster Grill with Convection Visit www.hamiltonbeach.in for our complete line of products and Use and Care Guides as well as delicious recipes, tips, and other useful information!
Single-Serve Coffee Maker
 840251801 Single-Serve Coffee Maker IMPORTANT SAFEGUARDS When using electrical appliances, basic safety precautions should always be followed to reduce the risk of fire, electric shock, and/or injury to
Model # Instructions Warranty. 950 Watts / 120 Vac / 60 Hz. Read this manual thoroughly before using and save it for future reference
 Perk Model #405.05 Instructions Warranty 950 Watts / 120 Vac / 60 Hz Read this manual thoroughly before using and save it for future reference IMPORTANT SAFEGUARDS When using electrical appliances, basic
QUALITY MILK FROTHER INSTRUCTION MANUAL MODEL NO. MMF005
 QUALITY MILK FROTHER INSTRUCTION MANUAL MODEL NO. MMF005 MILK FROTHER INSTRUCTION MANUAL Model No.: MMF005 READ ALL INSTRUCTIONS BEFORE USING THE FROTHER. KEEP THESE INSTRUCTIONS FOR FUTURE REFERENCE.
1.5 L Slow Cooker 7644 Instructions for Use
 PARTS PLEASE SAVE THESE INSTRUCTIONS FOR FUTURE REFERENCE. Lid Cooking pot Base Power indicator Control knob TECHNICAL DETAILS: POWER DETAILS: 230V A.C. POWER FREQUENCY: 50Hz WATTAGE: 120W SAFETY INSTRUCTIONS:
User Manual. Stainless Steel Coffee Urns. Models: 177CU30, 177CU55, 177CU110 04/2018. Please read and keep these instructions. Indoor use only.
 Stainless Steel Coffee Urns Models: 177CU30, 177CU55, 177CU110 04/2018 Please read and keep these instructions. Indoor use only. www.avantcoequipment.com 1 NOTE: Save these instructions for future reference.
Let s get brewing. K Quick Start Guide
 Let s get brewing. K-1500 Quick Start Guide IMPORTANT SAFEGUARDS - READ ALL INSTRUCTIONS BEFORE USING When using electrical appliances, basic safety precautions should be followed, including the following:
Coffeemaker. Coffeemaker Safety... 2 Parts and Features... 3 Using Your Coffeemaker... 4 Cleaning Your Coffeemaker... 4 Customer Service...
 Coffeemaker Coffeemaker Safety... 2 Parts and Features... 3 Using Your Coffeemaker... 4 Cleaning Your Coffeemaker... 4 Customer Service... 6 In USA: 1-800-851-8900 In Canada: 1-800-267-2826 840069400 Coffeemaker
The Scoop 2-Way Brewer
 READ BEFORE USE The Scoop 2-Way Brewer Visit www.hamiltonbeach.in for our complete line of products and Use and Care Guides as well as delicious recipes, tips, and other helpful information! Questions?
MODEL# GCM4500 COFFEE MAKER WITH GRINDER. PHOTO OF PRODUCT
 MODEL# GCM4500 COFFEE MAKER WITH GRINDER www.gourmia.com PHOTO OF PRODUCT 2016 Gourmia www.gourmia.com The Steelstone Group Brooklyn, NY Welcome to Delicious and Aromatic world of Coffee Makers from Gourmia!
Programmable Conical Burr Mill CBM-18
 Programmable Conical Burr Mill CBM-18 IMPORTANT SAFEGUARDS When using electrical appliances, basic safety precautions should always be followed, including the following: 1. Read all instructions. 2. To
OWNERS MANUAL. My Rotisserie Pro Warranty. Please read and save this manual. PROFESSION AL SERIES MRP_MAN_QVC_ENG_V1_ FOR HOUSEHOLD USE ONLY.
 My Rotisserie Pro Warranty The manufacturer warrants that your My Rotisserie Pro is free of defects in materials and workmanship and will, at its option, repair or replace any defective rotisserie that
Keurig Vue V500 Brewer Use & Care Guide
 Keurig Vue V500 Brewer Use & Care Guide IMPORTANT SAFEGUARDS Safe Operation & Use When using electrical appliances, basic safety precautions should be followed, including the following: 1. Read all instructions
the Duo-Temp Pro Sage by Heston Blumenthal Customer Service Centre Instruction Booklet
 Sage by Heston Blumenthal Customer Service Centre Freephone (UK Landline): 0808 178 1650 Mobile Calls (National Rate): 0333 0142 970 www.sageappliances.co.uk customerservice@sageappliances.co.uk the Duo-Temp
3.5L Slow Cooker / GVALSC40. Instruction Manual
 3.5L Slow Cooker / GVALSC40 Instruction Manual Important Safety and General Instructions Please keep this user manual in a safe place along with your purchase receipt and carton for future reference. The
MILL & BREW 12-CUP PROGRAMMABLE COFFEE MAKER CM5000
 TM MILL & BREW 12-CUP PROGRAMMABLE COFFEE MAKER u s e & c a re m a n u a l CM5000 CONTENTS Important Safeguards 1 Getting to know your Mill & Brew Coffee Maker 2 3 Mill & Brew Coffee Maker Product Benefits
the Smart Grinder Pro
 the Smart Grinder Pro Instruction Booklet Suits all BCG820 models CONGRATULATIONS on the purchase of your new Breville product 2 Contents 3 Breville recommends safety first 9 Know your Breville product
COFFEE MAKER INSTRUCTION MANUAL CM4682-V
 COFFEE MAKER INSTRUCTION MANUAL CM4682-V IMPORTANT SAFEGUARDS Before using the electrical appliance, the following basic precautions should always be followed including the following: 1. Read all instructions.
Downloaded from Quick Start Guide D512. Smart Decanter
 Quick Start Guide D52 Smart Decanter Contents Safety Precaution Cleaning Technical Data Correct Disposal of This Product Connecting Power Rechargeable Battery Installation Your isommelier 0 04 05 isommelier
Grind & Brew Automatic DGB625BCU
 Grind & Brew Automatic DGB625BCU Important Safeguards When using electrical appliances, basic safety precautions should always be followed, including the following: 1. The appliance is not intended to
SG Cup Coffee Maker. Model # W / 120Vac / 60 Hz. Operating Instructions Warranty
 SG220 12-Cup Coffee Maker Model #427.05 Operating Instructions Warranty 900W / 120Vac / 60 Hz IMPORTANT SAFEGUARDS When using electrical appliances, basic precautions should always be followed, including
MODEL# GMF235 MILK FROTHER CAPPUCCINOS & LATTES. PHOTO OF PRODUCT
 MODEL# GMF235 MILK FROTHER CAPPUCCINOS & LATTES www.gourmia.com PHOTO OF PRODUCT 2016 Gourmia www.gourmia.com The Steelstone Group Brooklyn, NY Welcome to Delicious and Aromatic of Milk Frothers from Gourmia!
COLD BREW COFFEE MAKER. Model# GCM-7800 USER MANUAL
 COLD BREW COFFEE MAKER Model# GCM-7800 USER MANUAL Read this manual thoroughly before using and save it for future reference FOR CUSTOMER SERVICE QUESTIONS OR COMMENTS VISIT US @ GOURMIA.COM INFO@GOURMIA.COM
TABLE OF CONTENTS HAND MIXER SAFETY
 5KHM926 2 HAND MIXER INSTRUCTIONS TABLE OF CONTENTS HAND MIXER SAFETY...2 Important Safeguards...3 Electrical Requirements...3 PARTS AND FEATURES...4 ACCESSORY GUIDE...5 SETTING UP YOUR HAND MIXER Attaching
coffee maker flavor select HD7606 / HD7610 / HD7612
 coffee maker flavor select HD7606 / HD7610 / HD7612 IMPORTANT SAFEGUARDS When using electrical appliances, basic safety precautions should always be followed including the following: Read all instructions
Keurig Vue V600 Brewer Use & Care Guide
 Keurig Vue V600 Brewer Use & Care Guide IMPORTANT SAFEGUARDS Safe Operation & Use When using electrical appliances, basic safety precautions should be followed, including the following: 1. Read all instructions
the Quick Stack Instruction Book - LPC140SIL
 the Quick Stack Instruction Book - LPC140SIL Contents 2 Breville Recommends Safety First 7 Components 8 Functions 10 Care & Cleaning 11 Recipes BREVILLE RECOMMENDS SAFETY FIRST At Breville we are very
Instruction Manual Item No.: V~, 60Hz, 900W
 by Start your day off right with freshbrewed coffee, ready and waiting! by 12-Cup Digital Coffeemaker MODEL: FCZD15R_CT, FCZD127S_CT Montgomery Ward Customer Service 1112 7th Avenue, Monroe, WI 53566 8:00
IMPORTANT INSTRUCTIONS MODE D EMPLOI IMPORTANT INSTRUCIONES IMPORTANTES ISTRUZIONI IMPORTANTI
 MOKA 22-04-2003 10:10 Pagina 1 IMPORTANT INSTRUCTIONS SAVE THESE INSTRUCTIONS MODE D EMPLOI IMPORTANT CONSERVEZ LES PRESENTES INSTRUCTIONS INSTRUCIONES IMPORTANTES GUARDE ESTAS INSTRUCCIONES ISTRUZIONI
DIGITAL WINE CHILLER & WARMER
 DIGITAL WINE CHILLER & WARMER PC1000 Series For your safety and continued enjoyment of this product, always read the instruction book carefully before using. WINE CHILLER & WARMER The Waring Wine Chiller
Getting to Know Your Bananza
 User Guide Thank you for purchasing Bananza from JML. To get the best results from this frozen dessert maker, please read these instructions in full and retain for future reference. Contents Safety Warnings
2016 Gourmia The Steelstone Group Brooklyn, NY
 2016 Gourmia www.gourmia.com The Steelstone Group Brooklyn, NY All rights reserved. No portion of this manual may be reproduced by any means whatsoever without written permission from The Steelstone Group,
Custom Grind Deluxe Coffee Grinder
 READ BEFORE USE Visit www.hamiltonbeach.in for our complete line of products and Use and Care Guides as well as delicious recipes, tips, and other useful information! Custom Grind Deluxe Coffee Grinder
PROFESSIONAL WC400. For your safety and continued enjoyment of this product, always read the instruction book carefully before using.
 PROFESSIONAL Wine Center WC400 For your safety and continued enjoyment of this product, always read the instruction book carefully before using. IMPORTANT SAFEGUARDS When using electrical appliances, basic
aerolatte ltd. Unit 1 The Corn Works Station Road Radlett WD7 8JY UK
 aerolatte ltd. Unit 1 The Corn Works Station Road Radlett WD7 8JY UK www.aerolatte.com Safety Instructions and WARNINGS When using electrical appliances basic safety precautions should always be followed
10-Cup Thermal Programmable Coffee Maker Instruction Manual
 10-Cup Thermal Programmable Coffee Maker Instruction Manual Styled for Life Designed & Engineered in New York City SZ-314291_CRUX005 CRUX 10C_CM IM_R7.indd 1 Thank you for Purchasing this Product You may
Customer Care Guide 1
 Customer Care Guide 1 12-cup capacity Rotational Steam Brewing More exquisite coffee flavors Steam & Hot Water Jets Steams and stirs your favorite coffee producing an exquisite coffee crema Saves money
K Mini Plus. Use & Care Guide. Get the most from your new Keurig brewer
 K Mini Plus Use & Care Guide Get the most from your new Keurig brewer STRONG STRONG Before You Brew 1 Plug & Power 2 Fill & Place Remove packing tape from brewer. Pull plug and extend cord from cord storage
SPECIAL BREW COFFEE MAKER INSTRUCTION MANUAL MODEL: BVCLDCG1
 SPECIAL BREW COFFEE MAKER INSTRUCTION MANUAL MODEL: BVCLDCG1 1 TABLE OF CONTENTS Important Safeguards 3 Polarized Plug 4 Product Diagram 5 Usage instructions 1. Preparing Your Special Brew Coffee Maker
Coffeemaker User's manual
 Coffeemaker User's manual EN Prior to using this appliance, please read the user's manual thoroughly, even in cases where you have previously familiarised yourself with the operation of similar types of
MODEL: POD BREWER AURORA SAF 68 HOMEMAKER ESPRESSO MAKER WITH COFFEE POD
 INSTRUCTION MANUAL Please read this Instruction Manual and the safety instructions before operating the appliance! MODEL: POD BREWER AURORA SAF 68 HOMEMAKER ESPRESSO MAKER WITH COFFEE POD Congratulation
Automatic Cold Brewer
 Automatic Cold Brewer Model# GCM-6800 USER MANUAL Read this manual thoroughly before using and save it for future reference Model: GCM-6800 2017 Gourmia www.gourmia.com The Steelstone Group Brooklyn, NY
the Compact Smart Oven
 the Compact Smart Oven Instruction Booklet BOV650 CONGRATULATIONS On the purchase of your new Breville Compact Smart Oven Contents 4 Breville recommends safety first 7 Know your Breville Compact Smart
MINI MAKER GRILL. Model DMG001. Instruction Manual & Recipe Guide
 MINI MAKER GRILL Instruction Manual & Recipe Guide Model DMG001 TABLE OF CONTENTS MINI MAKER GRILL Important Safeguards...4-5 Parts & Features...6 Using Your Grill...7-9 Maintenance & Cleaning...10 Troubleshooting...
Coffee Burr Grinder. Model #591. Instructions. Warranty. 110W/120Vac/60 Hz. Read this manual thoroughly before using and save it for future reference
 Coffee Burr Grinder Model #591 Instructions Warranty Read this manual thoroughly before using and save it for future reference 110W/120Vac/60 Hz IMPORTANT SAFEGUARDS When using electrical appliances, basic
Keurig Vue Brewer Use & Care Guide
 Keurig Vue Brewer Use & Care Guide IMPORTANT SAFEGUARDS Safe Operation & Use When using electrical appliances, basic safety precautions should be followed, including the following: 1. Read all instructions
Use & Care. All about the. of your Coffee Maker TA B L E O F C O N T E N T S. Brewing Your First Pot of Coffee USA and Canada
 All about the Use & Care of your Coffee Maker TA B L E O F C O N T E N T S Important Safeguards...2 Brewing Tips... 8 Coffee Maker Safety Instructions... 2 Cleaning the Coffee Maker... 8 Parts and Features...3
K35 Use & Care Guide. Get the most from your new Keurig coffee maker
 K35 Use & Care Guide Get the most from your new Keurig coffee maker K35 COFFEE MAKER A. Water Reservoir Lid B. MAX Fill Line C. Water Reservoir D. Water Reservoir Lock Tab Slots E. Power Cord F. Handle
coffee for one Instructions Doc. Size: 5 W x 4.75 H Output at 100% Prints 1/0 Black _INS_coffeemaker
 coffee for one B E T T E R B Y B R O O K S T O N E W E C R E A T E P R O D U C T S T O M A K E L I F E B E T T E R. T H R O U G H I N N O V A T I V E D E S I G N, B E S T - I N - C L A S S P R O D U C
Cucina HD2423, HD2422, HD2421, HD2420
 Cucina HD2423, HD2422, HD2421, HD2420 2 2 3 2 3 4 ENGLISH 6 16 24 33 HD2423, 2422, 2421, 2420 6 ENGLISH Important Always follow basic safety precautions when using electrical appliances. Read these directions