CafeRomatica. Fully automatic coffee centre Operating Instructions and Useful Tips. A passion for coffee.
|
|
|
- Annabella Logan
- 6 years ago
- Views:
Transcription

1 CafeRomatica 605 Fully automatic coffee centre Operating Instructions and Useful Tips A passion for coffee.
2 605 1 A B C D E M N O P Q F G H I J K L R S T U
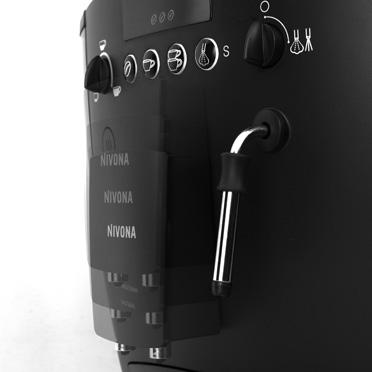
3 Equipment A B C D E F G H I J K L M N O P Q R S T U Bean container with lid Symbol display screen Removable water tank Water quantity control knob On / Off button Coffee strength button 1-cup button 2-cup button Height-adjustable coffee spout Drip grill Fill level indicator for drip tray Drip tray Pre-ground coffee chamber Cup holding plate Steam warm-up / rinse button Steam / hot water valve control knob Grinder settings (on rear) Steam / hot water jet Nameplate with model name Power cord storage compartment (on rear) Used coffee tray (inside) 32

4 Equipment
5 Symbols Symbol Number Brief description 11 Coffee strength MILD 12 Coffee strength NORMAL 13 Coffee strength STRONG Flashing Not enough coffee beans fill container Fill water tank 16 Pre-ground coffee 17 Hot water / steam, open / closed 18 Empty used coffee tray / drip tray 19 Descale machine 20 Clean machine 34
6 Operating Instructions and Useful Tips Dear Customer, Congratulations and many thanks for choosing a high-quality NIVONA product. To get the most out of your NIVONA machine, please read this manual carefully before use. Please start by reading the safety notes. Please keep this manual in a safe place. You may want to use it as reference guide or hand it on to any further users of your machine. Purchase made at Place, date 35
7 Contents 1. Safety instructions Set up Preparing the machine Getting started Grinder settings Making coffee Selecting coffee strength Selecting water quantity Making one cup Making two cups Using pre-ground coffee Drawing hot water Drawing steam / frothing milk Programming functions Filter Inserting filter Operating without a filter Water hardness Temperature Automatic switch off ECO mode Maintenance and care Changing filter Cleaning program Manual cleaning Descaling Manual descaling General cleaning Cleaning the brewing unit System messages Troubleshooting Further instructions
8 1. Safety instructions The machine is for domestic use only and is not suitable for commercial applications. Otherwise, claims under the guarantee will not be accepted. Operating voltage must be the same as mains voltage. Please note the model nameplate / sticker on the underside of the machine (fig. 1/S). Do not operate the machine if the power cord or machine case is damaged. Keep the power cord away from hot parts. Do not unplug the machine by pulling on the power cord. Observe the cleaning & descaling instructions provided. Otherwise, claims under the guarantee will not be accepted. Make sure to switch off and unplug the machine before maintenance or cleaning. Place the machine on a firm, level surface and use it indoors only. Do not place the machine on a hot surface or near open flames. Keep out of reach of children and ensure that they do not play with the appliance. Always unplug the machine during extended periods of absence. Do not leave the machine switched on unnecessarily. Do not submerge the machine in water. Do not put the machine or individual parts in the dishwasher. Otherwise, claims under the guarantee will not be accepted. Unplug immediately if there is a defect (do not pull the cord or machine to unplug). Liability for damages cannot be accepted if the machine is incorrectly operated, subject to improper use or non-professional servicing. In such cases, services will not be provided under the guarantee. Use the coffee grinder for grinding roasted coffee beans only do not use with other foods. Always make sure there is nothing but coffee beans in the beans container otherwise the guarantee will not apply. This machine is not suitable for individuals (including children) 37
9 Safety instructions with physical, sensory or mental impairments, including individuals who do not have sufficient experience or knowledge, unless they are shown how to operate the machine or initially supervised by someone responsible for their safety. If repair services are required, including replacement of the power cord, please first contact your dealer or the service-hotline. Afterwards send the machine to the dealer from whom it was purchased or to NIVONA national customer services. Caution! Electrical appliances must be repaired by qualified personnel! Non-professional repairs can expose the user to significant risks. Liability for damages cannot be accepted if the machine is used for any other than the in - tended purpose, incorrectly maintained or serviced. Caution! Using the on/off switch (fig. 1/E) while the machine is brewing can cause damage! Only switch off the appliance when it is in passive state. Caution! Risk of scalding! Then you produce steam or hot water, watch out for splashes from the jet (fig. 1/R): risk of scalding! Only touch the plastic parts of jet (fig. 1/R) and never point it at people! The steam jet (fig. 1/R) becomes VERY HOT during use. Leave to cool for a few minutes before touching. CE This machine conforms to EC guidelines. Specifications Mains voltage: 230 V Power input: 1400 W Note: Your fully automatic coffee centre has a cord storage compartment if the power cord is too long, any surplus can be accommodated in the storage area on the rear of the machine (fig. 1/T). 38
10 2. Set up 2.1 Preparing the machine Carefully remove the machine and all parts from the packaging. Note: If you need to return your machine for servicing, it can be sent by post in the original packaging. Please keep all packag ing and protective material for this pur - pose. Remove the water reservoir (fig. 1/C and 2) and wash it out with clean, cold tap water. Then fill the reservoir up to the max. mark and replace it in the machine. Make sure that it clicks into place. Note: Only ever fill the reservoir with fresh, cold water. Do not use carbonated water or other liquids! Open the lid of the coffee container (fig. 1/A) and fill it with coffee beans. Note: Do not use beans which have been treated with supplements, such as sugar, during or after the roasting. Supplements can damage the grinding mechanism and any repair costs arising as a result are not covered by the guarantee. Please make sure the steam / hot water valve control knob (fig. 1/P and 5) is turned to 0! 2.2 Getting started Plug the machine in. Press the On / Off button (fig. 1/E). In the display light up the symbols, and one after another (otherwise, please see the following Note below). After a short time the steam / rinse button S (fig. 1/O) light flashes. Place a cup under the heightadjustable coffee spout (fig. 1/I and 3) and press the steam / rinse button S (fig. 1/O). The system is then filled with water and completely rinsed out via the coffee spout. This operation must always be carried out when the machine is started from cold to preserve the aroma of the coffee. It ensures that no stale water or coffee left over from previous brews is used. All four operating buttons (fig. 1/F, G, H, O) then light up, and the selected coffee strength is shown in the display by the cor responding number of beans. The machine is now operational. 39
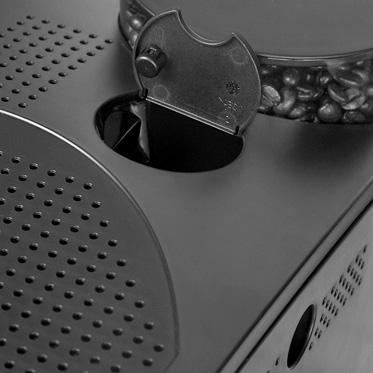
11 Set up Note: As a protective measure, the pipes are not filled with water when the machine is first operat ed. The machine indicates this as follows: When the machine has been turned on with the On / Off button (fig. 1/E), Symbol. Place a cup under the steam / hot water jet (fig. 1/R). Turn the steam / hot water valve control knob (fig. 1/P and 5) to the right to open the valve. The system then fills up and some water may come out of the jet (fig. 1/R). As soon as the symbol lights up without flashing and the filling operation has stopped automatically, you can turn the valve control knob (fig. 1/P and 5) back again to close it. Then follow the steps in 2.2 Getting started. The machine is now operational. Slide the regulator on the rear side (fig. 1/Q) into the desired position while the grinder is runn - ing. The smaller the dot, the finer the coffee is ground. Remember: a light roast requires a finer grind a dark roast requires a coarser grind Try out the different settings to find the one that best meets your personal preferences. 2.3 Grinder settings Caution: Grinder settings can only be adjusted when the grinder is in operation. You can adjust the grinder settings to suit the roast of your coffee beans. We recommend that you leave the grinder on a medium setting. 40
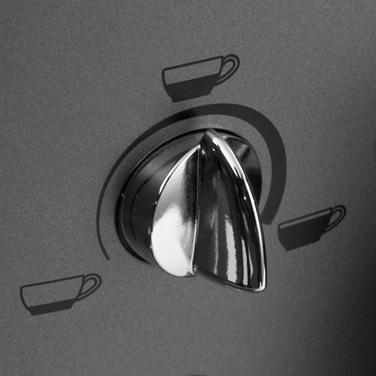
12 3. Making coffee Note: The machine is preset for immediate use. However, we re - commend that first you adjust the most important settings to suit your personal needs. Please follow the instructions in chapter 4 (Pro gramming functions) for filter, temperature and water hardness settings. Note: When the machine is brand new or has not been used for an extended period, the first cup of coffee does not have the full aroma and should not be drunk. 3.1 Selecting coffee strength There are three levels of coffee strength. They are shown in the display as follows: MILD, Symbol uses about 7g of ground coffee e.g. for cafe latte or cappuccino NORMAL, Symbol uses about 9g of ground coffee e.g. for American coffee STRONG, Symbol uses about 11g of ground coffee e.g. for espresso or very strong coffee. As soon as the machine is operational, the display shows the default setting (Symbol ). You can change this by pressing coffee strength button (fig. 1/F) until the desired coffee strength appears in the display (fig. 1/B). 3.2 Select water quantity You can freely select the quantity of water used by turning the water quantity control knob (fig. 1/D and 4). The little cup bottom left re - presents less water, the large cup bottom right represents more water. Tip: The water quantity can be ad - justed while the machine is runn - ing. Try out various cup sizes and quantities to find the setting that best suits your personal preferences. 3.3 Making one cup Place your cup under the coffee spout (fig. 1/I and 3). The coffee spout is height-adjustable and can be raised or lowered to suit the cup size. Select the water quantity sett ing as described in 3.2. Press the coffee strength button (fig. 1/F) until the desired coffee strength appears. Press the 1-cup button (fig. 1/G). The machine now starts the grinding, pre-brewing and brewing operation. It can be stopped at any time by pushing any button. Caution: The first time you brew coffee, the grinding chamber is still empty. The symbol for not 41
13 Making coffee enough beans (Symbol ) may therefore start to flash after the first grinding and no coffee is produced. If this occurs, press the 1-cup button (fig. 1/G) a second time and the operation is repeated. Tip: To determine the ideal quantity of water for your taste or cup size, make your first cup of coffee as follows: Turn the water quantity control knob (fig. 1/D and 4) to one of the following positions: middle for an espresso cup, far right for a large cup. Press the 1-cup button (fig. 1/G). The machine starts brewing. Shortly before the desired amount of coffee is reached, turn the water quantity control knob (fig. 1/D and 4) slowly to the left, until the machine stops brewing. For future use, note where the water quantity control knob is now pointing. 3.4 Making two cups of coffee In the 2-cup operation, two cups of coffee are produced conse cutively. Place both cups under the coffee spout (fig. 1/I and 3). Select the desired water quant ity 42 and coffee strength settings for one cup (fig. 1/D and 1/F). Press the 2-cup button (fig. 1/H). The machine now starts the grinding, pre-brewing and brewing operations and produces two consecutive cups of coffee. Tips: Brewing can be stopped at any point by pressing any button. If the water or beans supply runs out or the trays need emptying be - tween brewing the first cup and the second, the appropriate symbol will appear in the display (Symbol, or ) and the second coffee will no longer be made. Follow the display screen and then press the 1-cup button (fig. 1/G) for the second cup. 3.5 Using pre-ground coffee First turn the water quantity control knob (fig. 1/D and 4) to the desired level for 1-cup. Open the lid of the pre-ground coffee chamber (fig. 1/M and 7). Symbol flashes. Add a level measuring spoon of ground coffee and close the lid again (Symbol and the 1-cup button lit up). Place a cup under the coffee spout (fig. 1/I and 3) and press
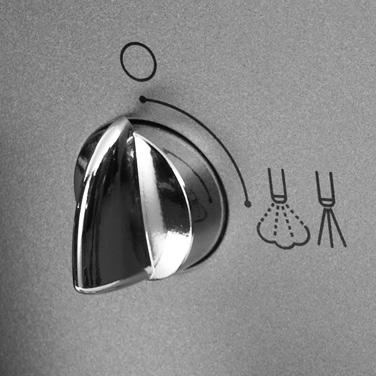
14 Making coffee the 1-cup button (fig. 1/G). A cup of coffee is now brewed without grinding. Note: If the pre-ground coffee chamber is left open by accident or no button is pressed after coffee is added, the machine will automatically ask to be rinsed out a minute after the lid is closed. Press the flashing rinse button (fig. 1/O) to confirm, and the machine will be rinsed out via the coffee spout. It is then operational again. Caution: The pre-ground coffee chamber is not a storage container. Never add more than one measure at a time to the chamber, and use only fresh grinded or vacuumpacked coffee ground. Do not use instant coffee powder. 3.6 Drawing hot water Hold a cup under the steam / hot water jet (fig. 1/R). Turn the steam / hot water valve control knob (fig. 1/P and 5) to the right. Fill the cup up to the desired level and turn the valve control knob back to 0. Caution: Risk of scalding! Watch out for splashes. The jet be comes very hot during use. Leave to cool for a few minutes before touching, or only touch the plastic parts. 3.7 Drawing steam / frothing milk Press the steam warm-up button (fig. 1/O). The steam warm-up button (fig. 1/O) flashes for a brief warm-up period. As soon as the steam warm-up button stops flashing (after a few seconds) and the symbol flashes, steam can be drawn. Dip the jet (fig. 1/R) into the cup / container with the milk to be frothed. Make sure the control knob is in the central position. Now turn the steam / hot water valve control knob (fig. 1/P and 5) to the right. Caution: A little water comes out before the steam. The steam warm-up button (fig. 1/O) flashes while you draw steam. Turn the valve control knob (fig. 1/P and 5) back to the left, to the 0 position, to stop drawing steam. Press the steam warm-up button again (fig. 1/O and 5) to switch the machine back to normal coffee brewing mode. Note: Steam can be drawn for about 2 minutes. Then the machine will 43
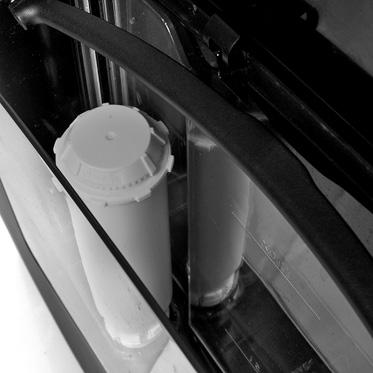
15 Making coffee automatically switch the operation off. You can prolong the operation by turning the control knob back and forth (fig. 1/P and 5). Caution: It is hard to remove dried milk left on the jet after frothing. Please therefore clean the equipment as soon as it has cooled down! To froth milk, the metal pipe of the steam jet must be in the lowest position. It is difficult to remove dried milk left on the jet after frothing. Therefore clean the equipment as soon as it has cooled down ideally repeat the steam drawing operation with a cup filled with fresh, cold water. 4. Programming functions The following buttons are used for programming: Coffee strength button (fig. 1/F) 1-cup button (fig. 1/G) 2-cup button (fig. 1/H) Steam warm-up button (fig. 1/O) 4.1 Filter Inserting filter You can purchase a special filter for the water reservoir in specialist shops. If you use this filter correctly, you will not need to descale your coffee machine as often. After the filter was inserted, please adjust the water hardness setting on level 1 (see chapter 4.2). 44 Empty the water tank (fig. 1/C and 2). Set the insertion and replacement date on the date ring (months) at the top end of the filter cartridge. Screw the filter into the bracket provided in the water reservoir us ing the assembly tool on the end of the measuring spoon (fig. 6). Fill up the reservoir with fresh water and put it back in the machine. Hold a container under the steam / hot water jet (fig. 1/R) and turn the valve control knob (fig. 1/P and 5) to the right to open. The system will now be rinsed through. If the machine was in ECO-mode please repeat operation. The system will be rinsed (ca. 0,3 L).
16 Programming functions Wait until no more water comes out of the jet and turn the valve control knob (fig. 1/P and 5) back to the left to close. The system can briefly heat up and is then operational again. Note: Make sure to remove the filter when the expiry date set on the date ring is reached. Also make sure to take the filter out the machine for descaling when instructed to do so (see 5.3). Operating without a filter If you no longer wish to use the filter, do not forget to adjust the water hardness settings. Important: Please note that the following programs can only be set if the mashine is switched to ON. You can program the following settings: water hardness, temperature level, automatic switch off, ECO-mode. 4.2 Water hardness According to the water hardness in your region, or if you have not inserted a filter (see chapter 4.1), sooner or later the machine needs descaling. So that the system can indicate accurately when descal - ing is necessary, you must enter the correct water hardness sett - ings before first use. The default setting is level 3. First, test your water with the test strips provided: Dip the strip into the water and then shake it lightly off. After about a minute you can read the result by counting the red dots on the test strip. The settings corresponding to the different levels of hardness are as follows: Test strip Hardness level Symbol for setting 1 red dot 1 7 Coffee strength is lit up Level 1 2 red dots 8 14 Coffee strength + 1-cup button are lit up Level 2 3 red dots Coffee strength + 1-cup button + 2-cup button are lit up Level 3 4 red dots >21 Coffee strength + 1-cup button + 2-cup button + S/steam button are lit up Level 4 45
17 Programming functions Note: If none of the dots turn red on the test strip, please set to level 1. Switch your machine ON. Press the steam warm-up button (fig. 1/O) for about 5 seconds. The water hardness is indicated by the number of buttons lit up as detailed below. Press the steam warm-up button repeatedly until the buttons which indicate your level of water hardness light up. Press the coffee strength button to confirm. To confirm your settings, the buttons which indicate the level selected flash twice consecutively. The programming operation is then complete and the system is restored to coffee-brewing mode. Note: If you interrupt your programming operation for more than 1 1 /2 minutes, your machine goes automatically back into coffeebrewing mode. 4.3 Temperature You can change the coffee temp - er ature as desired (the default sett ing is high ): Normal = Coffee strength button is lit up 46 High = Coffee strength button and 1-cup button are lit up Maximum = coffee strength button and 1-cup button and 2-cup button are lit up Press and hold the 1-cup button (fig. 1/F) for about 5 seconds. The buttons which indicate the current temperature setting light up as detailed above. You can change to the other temperature setting by pressing the 1-cup button. Press the coffee strength button to confirm the desired temperature sett ing. The buttons which indicate the setting flash twice to confirm the selection. Note: If you interrupt your programming operation for more than 1 1 /2 minutes, your machine automatically switches back into coffeebrewing mode. 4.4 Automatic switch off This function allows you to program the machine to switch OFF automatically given number of hours after the last brewing operation. The follow ing settings are possible. After: 5 minutes = coffee strength button is lit up.
18 Programming functions 30 minutes = coffee strength button + 1-cup button are lit up. 70 minutes = coffee strength button + 1-cup button + 2-cup button are lit up. The default setting is level 1, 5 minutes. To change this setting, follow the instructions below: Press and hold the 2-cup button (fig. 1/H) for about 5 seconds. The buttons which indicate the current automatic switch off sett - ings light up. You can select a different automatic switch off setting by press - ing the 2-cup button. Press the coffee strength button to confirm the desired automatic switch off setting. The buttons which indicate the setting flash twice to confirm the selection. Note: If you interrupt the pro - gramm ing operation longer than 1 1 /2 minutes, the machine will switch automatically back into the coffee-brewing mode. 4.5 ECO Mode Your appliance is equipped with a modern, programmable power saving function (ECO Mode). This is factory-set and means that the appliance switches on powersaving ECO Mode with minimal heat output 3 minutes after its last use therefore using less electricity. If the coffee maker is started from power-saving ECO Mode, this can take a few seconds longer (heating time). You can also deactivate the ECO Mode, so that the appliance is on full stand-by while switched on: You can program the following settings: ECO Mode active = 1-cup button + 2-cup button are lit up ECO Mode inactive = 1-cup button is lit up The default setting is ECO Mode active. To change this setting, follow the instructions below: Press and hold the coffee strength button (fig. 1/F) for about 5 seconds. The buttons which indicate the current settings light up. You can select setting by press - ing the steam button. Press the coffee strength button to confirm the desired setting. The buttons which indicate the setting flash twice to confirm the selection. 47
19 5. Maintenance and care 5.1 Changing filter The filter loses its efficiency and must be replaced after at most two months. To change filter, empty the water reservoir (fig. 1/C and 2) and un screw the old filter from the bracket in the water reservoir. It can be discarded with the usual household rubbish. Set the insertion and replacement dates on the date ring (months) at the upper end of the new filter cartridge. Screw the new filter into the bracket provided in the water re - servoir using the assembly tool on the end of the measuring spoon (fig. 6). Refill the water reservoir with fresh water and replace it in the machine. Hold a container under the steam / hot water jet (fig. 1/R) and turn the valve control knob (fig. 1/P and 5) to the right to open. The system will now be rinsed out. Wait until no more water comes out of the jet and then turn the valve control knob (fig. 1/P and 5) back to the left to close. The system can briefly heat up and is then operational again. 5.2 Cleaning program When the machine must be cleaned, Symbol ap pears in the display. Note: You can continue to brew coffee and draw hot water or steam. However, we recommend that you carry out the cleaning program as soon as possible, otherwise operation may be ad versely affect - ed and the guarantee may be invalidated. Caution: Once running, the clean - ing program must not be inter - rupted. Symbol flashes during the whole cleaning operation. Please follow the in structions in the exact order given below: Press and hold the coffee strenght button and 1-cup button simul taneously for about 5 seconds. The machine is rinsed twice through the coffee spout. Symbol lights up and Symbol continues to flash. Remove the drip and used coffee trays (fig. 1/L) and clean thoroughly. Replace the drip and used coffee trays. Symbol now also lights up. Open the lid of the pre-ground coffee chamber. Symbol starts flashing. 48
20 Maintenance and care Add the cleaning tablet to the pre-ground coffee chamber and shut the lid. Symbol flashes and the 1- cup button also flashes. Remove the water reservoir (fig. 1/C and 2), fill it with fresh water and replace it in the machine. The symbols given above continue to flash at first. Place a fairly large container (about 0.5 l) under the coffee spout. Press the flashing 1-cup button. The machine starts the cleaning operation. The cleaning cycle is automatic and lasts about 10 minutes. As soon as it is completed, Symbol lights up. Remove, empty and replace the drip tray. The machine warms up briefly. When the bean symbol in the display and all operating buttons are lit up without flashing, the machine is operational again. Manual cleaning If required, the cleaning programme can be started and run as des - cribed above even if no indication has been displayed by the machine that this is necessary. 5.3 Descaling If the machine needs to be des - caled, Symbol ap pears in the display. You can continue to brew coffee and draw hot water or steam. However, we recommend that you carry out the descaling program as soon as possible, otherwise operation may be adversely affected and the guarantee may be in - validated. Make sure to take the filter out the machine for descal - ing when instructed to do so. Caution! Once running, the descaling program must not be interrupted. Never use vinegar or acetic acid based agents for descaling. Use standard liquid products available in specialist retailers and recommended for use on fully automatic coffee centres. Symbol flashes during the whole descaling operation. Please follow the instructions in the exact order given below: Press and hold the coffee strength button and 2-cup button simul taneously for about 5 seconds. Symbol lights up and Symbol con tinues to flash. 49
21 Maintenance and care Remove the drip tray and used coffee tray (fig. 1/L and 1/U) and clean thoroughly. Replace the drip tray and used coffee tray. Symbol and the 1-cup button flash. First remove and fill the water reservoir with fresh water up to the 0.5 l mark. Replace the water reservoir in the machine. Then add the descaling agent to the water (never the other way round please note the manu - facturer s instructions). Now press the flashing 1-cup button. The machine starts the des - caling program (water flows in). The first stage of the descaling program lasts about 12 minutes. Symbol flashes. Now place a fairly large container (about 0.5 l) under the steam / hot water jet. Turn the steam / hot water valve control knob right to open. The second stage of the des - caling program starts and runs for about 10 minutes. As soon as the cycle is com - pleted, Symbol lights up. Remove, empty and replace the drip tray. 50 Symbol and the 1-cup button both flash. Remove and clean the water reservoir and fill it up with fresh water. Replace the water reservoir. Now place a fairly large container (about 0.5 l) under the steam / hot water jet. Press the flashing 1-cup button. The rinsing operation via the hot water jet begins. When the rinsing operation is completed, Symbol flashes. Turn the hot water / steam knob to the left to close. The internal rinsing operation begins and lasts about 1 minute. Symbol lights up. Remove and empty the drip and used coffee trays. Clean them and replace them in the machine. The machine warms up briefly and is operational again when the bean symbol in the display and all operating buttons light up without flashing. Manual descaling If required, the descaling program can be started and run as described above even if no indication has been displayed by the machine that this is necessary. See point 5.3.
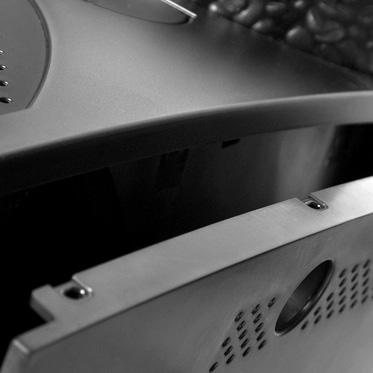
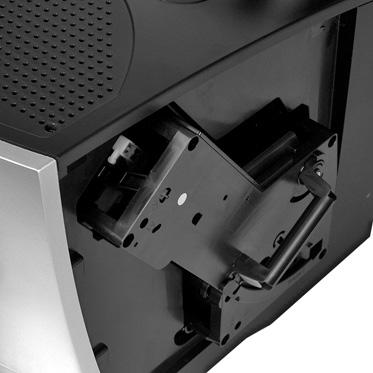
22 Maintenance and care 5.4 General cleaning Caution: Never submerge the machine in water! Do not use abrasive materials to clean the machine. Do not put the re - movable components of the machine in the dishwasher. Wash the case inside and out with a soft, damp cloth only. Empty the drip tray (fig. 1/L) and the used coffee tray (fig. 1/U) only when instructed to do so by the display. Always empty the used coffee compartment when it is removed. Occasionally use soapy water to clean. When the red fill level indicator for the drip tray (fig. 1/K) becomes visible, please remove, empty, clean and replace the drip tray. The water reservoir (fig. 1/C and 2) should be rinsed out and filled up with fresh cold water on a daily basis. It is hard to remove dried milk left on the jet (fig. 1/R) after frothing. Please therefore clean the equipment as soon as it has cooled down ideally repeat the steam drawing operation in a cup with fresh, cold water and wipe with a damp cloth. Note: From time to time, the steam jet should be completely unscrewed, dismantled into pieces and given a thorough clean under flowing water. Cleaning the brewing unit If required, the brewing unit can be removed and cleaned under runn - ing water. Please only use water to do this, not cleaning agents! It is recommended to remove and clean the brewing unit after each completed cleaning program. The machine must be switched off for this operation. Remove the right cover by un - fixing it at the opening (fig. 8). Unlock the brewing unit by pressing the red switch and turn - ing the handle to the left until it blocks (fig. 9). Withdraw the brewing unit carefully by the handle (fig. 9). If machine was not switched off it will now automatically do so. Wash the brewing unit under running water and then let it dry. Carefully replace the brewing unit and lock by pressing the red lever switch and turning the handle to the right until it clicks. Replace the cover. Press the on/off button to switch the machine to normal operating mode. 51
23 6. System messages Message Symbol 17 flashes Meaning Fill or rinse out water pipes What to do Turn hot water control knob (fig. 1/P and 5) to the right to open valve Symbol 15 flashes Symbol 14 flashes Symbol 18 flashes Water reservoir (fig. 2) empty Water reservoir absent or incorrectly positioned Not enough coffee beans or beans not yet in the grinding chamber Used coffee tray (fig. 1/U) full Fill reservoir with fresh water Position water reservoir correctly Add beans to the container (fig. 1/A) or press button to restart brewing operation Empty trays Symbol 18 lights up Symbol 20 lights up Drip tray (fig. 1/L) and Used coffee tray (fig. 1/U) absent or incorrectly positioned Cleaning required Position drip tray and used coffee tray correctly Clean the machine (see point 5.2) Symbol 19 lights up Descaling required Descale the machine (see point 5.3) Symbol 16 flashes Ground coffee chamber (fig. 1/M) open Close lid
24 7. Trouble-shooting Fault No hot water or steam comes out of the jet Too little milk froth or froth too liquid Coffee only comes out in drips Coffee without crema Grinder makes loud noise Button 1F and 1O flashes alternating Reason Jet is blocked / stuck Unsuitable milk Jet is blocked / stuck Grinder setting too fine Pre-ground coffee too fine Unsuitable coffee type Beans not freshly roasted Grinder settings not adjusted to coffee beans used Other substances in grinder, e.g. little stones Brewing unit incorrectly positioned or locked What to do Take jet (fig. 1/R) apart and clean thoroughly Use cold milk Take jet (fig. 1/R) apart and clean thoroughly Select a coarser grinder setting Use coarser pre-ground coffee Change coffee type Use fresh beans Optimise grinder settings Call service hotline, meanwhile pre-ground coffee can be used Check brewing unit positioning and lock. Switch ON machine If you are unable to correct a fault yourself, call the service hotline please consult the notes in the accompanying guarantee and customer service information booklet. 53
.")
25 8. Further instructions Transport and storage The steam must be evacuated from the machine if it is to be transport - ed or stored in cold rooms. Remove water reservoir. Press steam warm-up button and wait until it lights up without flash ing. Turn steam / hot water valve control knob to the right (fig. 1/P and 5). When no more steam comes out, turn steam / hot water valve control knob to the left (fig. 1/P and 5). Turn off the machine. Please keep the original packaging and protective material for storage and transport purposes. Replacement parts / accessories You can purchase new water filters, cleaning tablets and descaling agents from any well-stocked specialist retailer. Customer service NIVONA products are designed to meet the highest quality standards. However, if questions do arise while you operate your machine, we would like to hear from you. Your support is essential to our mission to further develop and improve our products so that they fully meet your needs. Guarantee and customer service conditions Please consult the detailed guar - antee and customer service conditions in the appropriate information booklet. Protecting the environment Electric and electronic ap - pliances often contain valuable or harmful materials which should not be processed in the same way as normal household waste. If incorrectly processed, they can harm human health and the environment. Please therefore do not put your machine in the dustbin with normal waste. Instead submit it to the collection point for the disposal and recycl - ing of electric and electronic ap - pliances provided by your local council. You can obtain further in - formation from your local council, the waste collection services or the specialist retailer who sold you the product. 54


26 Original NIVONA accessories Professional care and maintenance Your love of coffee is here to stay. The CLARIS filter cart ridge NIRF 700 is filled with purely organic material, without chemical ad ditives, if changed regularly, it ensures that you will have to descale your NIVONA machine less often. Liquid cleaner CreamClean NICC 705 can easily rid all milk-frothing-devices of high quality fully automatic coffee centres of milk residues. Cleaning tablets NIRT 700 Your fully auto matic coffee centre provides an integrated cleaning programme. Cleaning tablets are specifically designed for this purpose and completely loosen staining such as coffee residues. MilkCooler NICT 500: Standard accessory for the NICR770, optional for all NIVONA fully automatic coffee centres with milk frothing devices: The high-quality, stainless steel thermos milkcooler keeps the milk fridge cold for longer, to obtain the best milk frothing results. Fluid descaler NIRK 703 Your fully automatic coffee centre provides an integrated de scaling programme. The descaler will reliably remove limescale without damaging the machine. You can purchase new accessories from any wellstocked specialist retailer. Subject to replacement with similar designs and technical alterations. 55
27
CafeRomatica. Fully automatic coffee centre Operating Instructions and Useful Tips. A passion for coffee.
 CafeRomatica Fully automatic coffee centre Operating Instructions and Useful Tips 610 620 A passion for coffee. Operating Instructions and Useful Tips Dear Customer, Congratulations and many thanks for
CafeRomatica. Fully automatic coffee centre Operating Instructions and Useful Tips. A passion for coffee.
 CafeRomatica Fully automatic coffee centre Operating Instructions and Useful Tips 710 A passion for coffee. Operating Instructions and Useful Tips Dear Customer, Congratulations and many thanks for choosing
G F I M J K L B C D E S O T H Q P U N R D 4
 1 2 3 4 G F I A M J K L 5 6 7 B C D E 8 9 10 S O T H Q P U N R 11 12 D 4 Equipment GB A B C D E Text display (main menu) Rotary control knob Button > Button exit Height-adjustable coffee spout CafeRomatica
CafeRomatica NICR7.. Fully automatic coffee centre Operating Instructions and Useful Tips. Neue Lust auf Kaffee.
 CafeRomatica NICR7.. Fully automatic coffee centre Operating Instructions and Useful Tips Neue Lust auf Kaffee. NICR7.. 1 A B C D E F G H I J K L M N O P Q R S T U V W X Y Z Equipment A B C D E F G H I
CafeRomatica NICR7.. Fully automatic coffee centre Operating Instructions and Useful Tips. A passion for coffee.
 CafeRomatica Fully automatic coffee centre Operating Instructions and Useful Tips NICR7.. GB A passion for coffee. 1 G F A M J / K A B C D E Display screen Left rotary knob Right rotary knob Bean symbol
IMPORTANT SAFEGUARDS. 3. To protect against fire, electric shock and injury to persons do not immerse cord, plug or unit in water or other liquid.
 IMPORTANT SAFEGUARDS When using electrical appliances, basic precautions should always be followed, including the following: 1. Read all instructions. 2. Make sure that your outlet voltage corresponds
1. IMPORTANT SAFEGUARDS When using electrical appliances, basic safety precautions should always be followed to reduce the risk of fire, electric
 1. IMPORTANT SAFEGUARDS When using electrical appliances, basic safety precautions should always be followed to reduce the risk of fire, electric shock, and/pr injury to persons including the following:
STAINLESS STEEL MILK FROTHER. Model: PKFMR11BK
 STAINLESS STEEL MILK FROTHER Model: PKFMR11BK WARNING! To reduce the risk of fire, electrical shock or injury to persons or property: Carefully read all instructions before operating your new product for
5KEK1322 W A_v08.indd 1 5/13/16 2:25 PM
 5KEK1322 W10878653A_v08.indd 1 PARTS AND FEATURES PARTS AND ACCESSORIES Tea steeper lid (center section of lid with handle) Kettle lid (outer section) Stainless steel lime scale filter Removable stainless
Automatic Coffee Machine Instruction Manual
 Instruction Manual Page 1 of 17 8212-0 Automatic Coffee Machine Instruction Manual Instruction Manual Page 2 of 17 IMPORTANT INFORMATION For safety purposes please read these instructions carefully before
10,000 prize draw. instructions. EXTRA year guarantee FREE rewards gallery. Register online now!
 r instructions 10,000 prize draw EXTRA year guarantee FREE rewards gallery www.productregister.co.uk/rhobbs Register online now! See back for details 2 Read the instructions, keep them safe, pass them
Read the instructions, keep them safe, pass them on if you pass the appliance on. Remove all packaging before use.
 instructions 2 Read the instructions, keep them safe, pass them on if you pass the appliance on. Remove all packaging before use. A IMPORTANT SAFEGUARDS Follow basic safety precautions, including: 1 This
Coffee Burr Grinder. Model #559. Instructions. Warranty
 Coffee Burr Grinder Model #559 Instructions Warranty IMPORTANT SAFEGUARDS When using electrical appliances, basic safety precautions should always be followed, including the following: 1. Read all instructions.
Get Started. Better Everyday ECAM23260
 Better Everyday Get Started This short guide is not intended to explain all the functions of the appliance. Please read all the owner s instruction booklet before use. Video available on www.youtube.com/delonghiusa
A IMPORTANT SAFEGUARDS
 instructions 2 Read the instructions, keep them safe, pass them on if you pass the appliance on. Remove all packaging before use. A IMPORTANT SAFEGUARDS Follow basic safety precautions, including: 1 This
QUALITY MILK FROTHER INSTRUCTION MANUAL MODEL NO. MMF005
 QUALITY MILK FROTHER INSTRUCTION MANUAL MODEL NO. MMF005 MILK FROTHER INSTRUCTION MANUAL Model No.: MMF005 READ ALL INSTRUCTIONS BEFORE USING THE FROTHER. KEEP THESE INSTRUCTIONS FOR FUTURE REFERENCE.
COFFEE MAKER INSTRUCTION MANUAL CM4682-V
 COFFEE MAKER INSTRUCTION MANUAL CM4682-V IMPORTANT SAFEGUARDS Before using the electrical appliance, the following basic precautions should always be followed including the following: 1. Read all instructions.
Burr Grinder. Automatic burr grinder with 17-position grind selector. Instruction Booklet EM0430
 Burr Grinder Automatic burr grinder with 17-position grind selector Instruction Booklet EM0430 Please read these instructions carefully and retain for future reference. Contents Sunbeam s Safety Precautions
PROGRAMMABLE COFFEE MAKER
 PROGRAMMABLE COFFEE MAKER KM 7280 KM 7280 W ENGLISH EN A B C D E F G H I J K L M N O P 3 SAFETY AND SET-UP Please read this instruction manual thoroughly prior to using this appliance! Follow all safety
PLEASE READ THIS MANUAL BEFORE USE. SAVE FOR FUTURE REFERENCE.
 8-CUP STAINLESS STEEL CARAFE Coffee Brewer Model: BV1900TS HOUSEHOLD USE ONLY Customer Service Line: 1-855-664-1252 2-year limited warranty bonavitaworld.com Simple to operate Optional pre-infusion cycle
Quick Reference Guide
 Impressa Z5 Quick Reference Guide This Guide does not replace the Operating Instructions. For details and cautions you must read all instructions. Watch the DVD instructions! Traces of Coffee Grounds in
MODEL: POD BREWER AURORA SAF 68 HOMEMAKER ESPRESSO MAKER WITH COFFEE POD
 INSTRUCTION MANUAL Please read this Instruction Manual and the safety instructions before operating the appliance! MODEL: POD BREWER AURORA SAF 68 HOMEMAKER ESPRESSO MAKER WITH COFFEE POD Congratulation
MODELS 1315 & 1315-S La Pavoni CLUB COMBO
 IMPORTANT WARNINGS MODELS 1315 & 1315-S La Pavoni CLUB COMBO DUET Never operate your espresso machine without water in the tank. This may cause premature pump failure. Do not allow the power cord to come
Coffee Grinder Instruction Manual
 Coffee Grinder Instruction Manual CoffeeGrinder Manual-English Only.indd 1 07/01/2016 14:14:39 Savisto Home Coffee Grinder Voltage Supply: 220-240V~ 50/60Hz Power Consumption: 150W Eng Please read through
EN Electric Coffee Grinder
 SCG 5050BK EN Electric Coffee Grinder - 1 - EN Electric Coffee Grinder Important safety instructions READ CAREFULLY AND STORE FOR FUTURE USE. This appliance may be used by persons with physical or mental
5KEK1522 W A_01_EN.indd 1 11/16/12 1:22 PM
 5KEK1522 Water Kettle INSTRUCTIONS Table of Contents water KEttle SAFETY Important safeguards...6 Electrical requirements...7 Electrical equipment waste disposal...7 PARTS AND FEATURES Parts and accessories...8
Read the instructions, keep them safe, pass them on if you pass the coffee maker on. Remove all packaging, but keep it in case you ever need to
 instructions 2 Read the instructions, keep them safe, pass them on if you pass the coffee maker on. Remove all packaging, but keep it in case you ever need to return the coffee maker. important safeguards
USER MANUAL TECHNICAL DATA
 USER MANUAL TECHNICAL DATA Model: Easy Touch Operating Voltage: 240V AC Frequency: 50 Hz Power con, MAX : 1500W Water tank cap.: 700ml (0.7L) Weight: 5.0 kg Size: L 350 * W 155 * H 245 mm This appliance
12 CUP COFFEE MAKER User Guide
 BRAND 12 CUP COFFEE MAKER User Guide Item: 740553 Ginnys.com 800-544-1590 Facebook.com/GinnysBrand Pinterest.com/GinnysBrand Ginnys.com/Blog Welcome to the world of full-flavored coffee with the Ginny
Grind & Brew Automatic DGB625BCU
 Grind & Brew Automatic DGB625BCU Congratulations on your purchase of the Cuisinart Grind & Brew Automatic. For over 30 years Cuisinart s aim has been to produce the very finest kitchen equipment so that
IMPRESSA XJ5 Professional Instructions for Use. Original instructions for use Before using the machine read the instructions for use.
 IMPRESSA XJ5 Professional Instructions for Use KE Original instructions for use Before using the machine read the instructions for use. JURA Type 684 Table of contents Your IMPRESSA XJ5 Professional Control
User Manual. Stainless Steel Coffee Urns. Models: 177CU55ETL, 177CU110ETL 10/2016. Please read and keep these instructions. Indoor use only.
 Intertek Stainless Steel Coffee Urns Models: 177CU55ETL, 177CU110ETL 10/2016 Please read and keep these instructions. Indoor use only. www.avantcoequipment.com 1 NOTE: Save these instructions for future
Coffeemaker User's manual
 Coffeemaker User's manual EN Prior to using this appliance, please read the user's manual thoroughly, even in cases where you have previously familiarised yourself with the operation of similar types of
Instruction Manual Coffee grinder. CM 90 Serie
 Instruction Manual Coffee grinder CM 90 Serie Table of content Safety Instructions... 3 Before first use... 4 Unpacking... 4 Requirements for the installation location... 5 Operating and speed settings...
Instructions for use for A1/A100
 de en fr it nl es pt Instructions for use for A1/A100 ru Your A1/A100 Control elements 28 Important information 30 Proper use...30 For your safety...30 1 Preparing and using for the first time 32 Setting
Z6 Instructions for Use
 Z6 Instructions for Use Table of contents Your Z6 Control elements 4 Important information 6 Proper use...6 For your safety...6 1 Preparing and using for the first time 10 JURA on the Internet...10 Setting
Quick Guide Cappuccinatore
 Quick Guide Cappuccinatore en - US, CA To prevent accidents and machine damage read the instructions provided with the machine. M.-Nr. 07 382 380 Cappuccinatore Before using the cappuccinatore for the
10,000 prize draw. instructions. EXTRA year guarantee FREE rewards gallery. Register online now!
 r instructions 10,000 prize draw EXTRA year guarantee FREE rewards gallery www.productregister.co.uk/rhobbs Register online now! See back for details Read the instructions, keep them safe, pass them on
Instructions for use for ENA Micro 5
 de en fr it nl es pt Instructions for use for ENA Micro 5 ru Table of contents Your ENA Micro 5 Control elements 30 Important information 32 Proper use...32 For your safety...32 1 Preparing and using for
AS450, AS600, G1, SG630
 Grill Range Operating Manual Grill Range AS450, AS600, G, SG60 Product Range Also Includes: Induction Hobs / Combination Ovens / Pizza Ovens / Mixers Salamander Grills / Contact Grills / Pie Warmers /
SAFETY INSTRUCTIONS FOR USE
 INTRODUCTION Thank you for choosing this De Longhi Coffee machine. We hope you enjoy your new appliance. Please take a few minutes to read these instructions. This is the only way to ensure optimum results
DE MANUAL BENUTZERHANDBUCH SM7683, SM7680 SM6080/SM6081/SM7080/SM7081 USER MANUAL BENUTZERHANDBUCH BENUTZERHANDBUCH
 SM7686, USER MANUAL SM7685, SM7684 SM7683, SM7680 SM6080/SM6081/SM7080/SM7081 BENUTZERHANDBUCH USER MANUAL MANUAL IT MANUALE DEL USUARIO UTENTE DE MANUAL BENUTZERHANDBUCH DEL USUARIO MODE NL GEBRUIKSAANWIJZING
EP3559, EP3558 EP3551, EP3550
 Super automatic espresso machine 3100 series EP3559, EP3558 EP3551, EP3550 EN USER MANUAL DE BENUTZERHANDBUCH ES MANUAL DEL USUARIO FR MODE D EMPLOI IT MANUALE UTENTE NL GEBRUIKSAANWIJZING 1 EP3558, EP3550
HD8847 HD8848 USER MANUAL. Super automatic espresso coffee machine 4000 series. Read carefully before using the machine.
 Super automatic espresso coffee machine 4000 series 02 USER MANUAL Read carefully before using the machine. HD8847 HD8848 02 English EN Register your product and get support at www.philips.com/welcome
IMPRESSA XJ9 Professional Instructions for Use. Original instructions for use Before using the machine read the instructions for use.
 IMPRSSA XJ9 Professional Instructions for Use K Original instructions for use Before using the machine read the instructions for use. JURA Type 683 Table of contents Your IMPRSSA XJ9 Professional Control
Triple Brew. Model #352. Coffee & Tea Maker. Instructions Warranty
 Triple Brew Coffee & Tea Maker Model #352 Instructions Warranty IMPORTANT SAFEGUARDS When using electrical appliances, basic safety precautions should always be followed, including: 1. Read all instructions.
E8/E80 Instructions for Use
 8/80 Instructions for Use Table of contents Your 8/80 Control elements 4 Important information 6 Proper use...6 For your safety...6 1 Preparing and using for the first time 10 JURA on the Internet...10
User Manual. Stainless Steel Coffee Urn. Models: 177CU30 11/2018. Please read and keep these instructions. Indoor use only.
 Stainless Steel Coffee Urn Models: 177CU30 11/2018 Please read and keep these instructions. Indoor use only. www.avantcoequipment.com 1 NOTE: Save these instructions for future reference. Index Important
CAIMANO SPECIAL450 BARISTA
 ANFIM ANFIM Srl Via B. Verro, 33/5-20141 - MILANO ITALY Tel. (+39) 02/8465054 - Fax.(+39) 02/8464401 e-mail: info@anfim.it web site: www.anfim.it COFFEE GRINDER INSTRUCTIONS MANUAL mod: CAIMANO SPECIAL450
E6/E60 Instructions for Use
 6/60 Instructions for Use Table of contents Your 6/60 Control elements 4 Important information 6 Proper use...6 For your safety...6 1 Preparing and using for the first time 10 JURA on the Internet...10
Using your Grinder: Fig.1 Fig. 2
 Using your Grinder: 1. Check the bean container (B) for presence of foreign objects before using. 2. Make sure the bean container is completely clean and dry before using. 3. Always operate the appliance
Operating and Installation Instructions
 Operating and Installation Instructions Coffee System CVA 2660 To prevent accidents en - US, CA and machine damage read these instructions before installation or use. M.-Nr. 07 173 890 2 Contents IMPORTANT
Stainless Steel Milk Frother N3 User Manual
 Stainless Steel Milk Frother N3 User Manual Voltage: 110V~60Hz Power: 500W READ AND SAVE THESE INSTRUCTIONS IMPORTANT Read and follow the instructions in this user manual even if you feel you are familiar
HD8828 HD8834 USER MANUAL. Super automatic espresso coffee machine 3100 series. Read carefully before using the machine.
 Super automatic espresso coffee machine 3100 series 02 USER MANUAL Read carefully before using the machine. HD8828 HD8834 English 02 EN Register your product and get support at www.philips.com/welcome
MODEL# GCM4500 COFFEE MAKER WITH GRINDER. PHOTO OF PRODUCT
 MODEL# GCM4500 COFFEE MAKER WITH GRINDER www.gourmia.com PHOTO OF PRODUCT 2016 Gourmia www.gourmia.com The Steelstone Group Brooklyn, NY Welcome to Delicious and Aromatic world of Coffee Makers from Gourmia!
TURNING THE APPLIANCE OFF...10
 contents INTRODUCTION...7 Symbols used in these instructions... 7 Letters in brackets... 7 Troubleshooting and repairs... 7 SAFETY...7 Fundamental safety warnings... 7 DESIGNATED USE...7 INSTRUCTIONS...8
Wi-Fi Coffee Maker. Model# GCMW-4750 USER MANUAL
 Wi-Fi Coffee Maker Model# GCMW-4750 USER MANUAL Read this manual thoroughly before using and save it for future reference Model: GCMW-4750 2018 Gourmia www.gourmia.com The Steelstone Group Brooklyn, NY
User Manual. Stainless Steel Coffee Urns. Models: 177CU30, 177CU55, 177CU110 04/2018. Please read and keep these instructions. Indoor use only.
 Stainless Steel Coffee Urns Models: 177CU30, 177CU55, 177CU110 04/2018 Please read and keep these instructions. Indoor use only. www.avantcoequipment.com 1 NOTE: Save these instructions for future reference.
COFFEE GRINDER. Owner s Manual
 COFFEE GRINDER Owner s Manual 4 4 FEATURES Bean Hopper Lid Bean Hopper Grinder Start/Stop Button Bean Hopper Holder Bean Hopper Release Button Grinding Timer Dial Coffee Powder Outlet 0 Grind Thickness
5KCG0702 W A_Final.indd 1 8/4/15 8:35 AM
 5KCG0702 PARTS AND FEATURES PARTS AND ACCESSORIES Hopper lid Easy access stainless steel burrs 200 g glass hopper 15 grind settings Die cast metal body Grind control dial Power switch Faceplate assembly
AUTOMATIC BURR COFFEE GRINDER
 AUTOMATIC BURR COFFEE GRINDER MODEL:SCG-903B USER MANUAL www.thesecura.com Welcome Congratulations on purchasing our Secura Automatic Burr Coffee Grinder. Each unit is manufactured to ensure safety and
Operating Instructions Bedienungsanleitung
 SVENSKA NORSK DANSK SUOMI Operating Instructions Bedienungsanleitung Table of contents Table of contents 1 For your safety... 5 1.1 Symbols used... 6 1.2 Proper use... 6 1.3 Danger from electric current...
COLD BREW COFFEE MAKER. Model# GCM-7800 USER MANUAL
 COLD BREW COFFEE MAKER Model# GCM-7800 USER MANUAL Read this manual thoroughly before using and save it for future reference FOR CUSTOMER SERVICE QUESTIONS OR COMMENTS VISIT US @ GOURMIA.COM INFO@GOURMIA.COM
S8 Instructions for Use Type 744
 S8 Instructions for Use Type 744 Table of contents Your S8 Control elements 4 Important information 6 Proper use...6 For your safety...6 1 Preparing and using for the first time 10 JURA on the Internet...10
We would like to welcome you as a coffee lover and enthusiast of Melitta CAFFEO.
 Dear Customer, Congratulations on buying your Melitta CAFFEO. We would like to welcome you as a coffee lover and enthusiast of Melitta CAFFEO. ENGLISH With this Melitta CAFFEO quality product you will
INDEX C o l l e c t i o n
 INDEX 1 DESCRIPTION OF THE APPLIANCE (see page 3)............................................7 2 SAFETY WARNINGS......................................................................7 3 INSTALLATION..........................................................................8
Matic / THa. Operating instructions COFFEE BREWER. Mode d emploi MACHINE À CAFÉ. Gebrauchsanleitung KAFFEEBRÜHMASCHINE
 Operating instructions COFFEE BREWER Mode d emploi MACHINE À CAFÉ Gebrauchsanleitung KAFFEEBRÜHMASCHINE Gebruiksaanwijzing KOFFIEZETAPPARAAT Bruksanvisning KAFFEBRYGGARE Bruksanvisning KAFFEMASKIN GB FR
This appliance can be used by children aged from 8 years and above and persons with
 IMPORTANT SAFEGUARDS Symbols used in these instructions Important warnings are identified by these symbols. It is vital to respect these warnings. Failure to observe the warning could result in life threatening
INSTRUCTION MANUAL. Coffee Maker CMCM-100
 INSTRUCTION MANUAL Coffee Maker CMCM-100 CONTENTS Cusimax recommends safety first....1-2 Know your Cusimax product...3 Operating your Cusimax product 4 Care & cleaning 5 Cusimax Recommends Safety First
Quick Start Guide Read this booklet thoroughly and save these instructions.
 Quick Start Guide Read this booklet thoroughly and save these instructions. FAQs can be found at www.espresso-works.com Email us for any unanswered questions: cs@espresso-works.com For product registration,
/09.06
 www.delonghi.com 5732147800/09.06 STAINLESS STEEL FULLY AUTOMATIC COFFEE CENTER A B C D E F H G X cappuccino container pointer in position 1 please wait... I W M J V K L N U T R O P S Q 1 2 3 cappuccino
instructions COFFEE GRINDER KG 79/89
 instructions COFFEE GRINDER KG 79/89 DESCRIPTION OF APPLIANCE The following terms are used throughout the instruction manual Coffee-bean hopper lid Removable upper burr Coffee-bean hopper ON/OFF switch
Espresso Maker READ BEFORE USE. Questions? Please call us our friendly associates are ready to help
 Espresso Maker Visit www.hamiltonbeach.in for our complete line of products and Use and Care Guides as well as delicious recipes, tips, and other helpful information! Questions? Please call us our friendly
Contact Grill. User's manual
 Contact Grill User's manual EN SBG 2050SS / SBG 2051BK SBG 2052RD / SBG 3050SS SBG 3051BK / SBG 3052RD Prior to using this appliance, please read the user's manual thoroughly, even in cases where you have
6-in-1 K-Cup Coffee Maker
 6-in-1 K-Cup Coffee Maker Model# GCM-6000 USER MANUAL Read this manual thoroughly before using and save it for future reference Model: GCM-6000 2017 Gourmia www.gourmia.com The Steelstone Group Brooklyn,
CAFE BARISTA. User Guide EM5000
 CAFE BARISTA User Guide EM5000 Heading Sub Heading Body copy with not indent applied. Bullet copy Bullet copy Bullet copy Bullet copy Bullet copy Bullet copy Bullet copy Bullet copy 2 Contents Sunbeam
Z8 Instructions for Use
 Z8 Instructions for Use Table of contents Your Z8 Control elements 4 Important information 6 Proper use...6 For your safety...6 1 Preparing and using for the first time 10 JURA on the Internet...10 Operation
coffee wakes up the world User Manual Coffee machine English V0.16
 coffee wakes up the world User Manual Coffee machine English V0.16 Valid for all WMF 900 models Series 900 Order number 33 2624 2010 Edition 05.2014 Congratulations on the purchase of your WMF coffee machine.
Coffee Burr Grinder. Model #591. Instructions. Warranty. 110W/120Vac/60 Hz. Read this manual thoroughly before using and save it for future reference
 Coffee Burr Grinder Model #591 Instructions Warranty Read this manual thoroughly before using and save it for future reference 110W/120Vac/60 Hz IMPORTANT SAFEGUARDS When using electrical appliances, basic
IMPORTANT INSTRUCTIONS MODE D EMPLOI IMPORTANT INSTRUCIONES IMPORTANTES ISTRUZIONI IMPORTANTI
 MOKA 22-04-2003 10:10 Pagina 1 IMPORTANT INSTRUCTIONS SAVE THESE INSTRUCTIONS MODE D EMPLOI IMPORTANT CONSERVEZ LES PRESENTES INSTRUCTIONS INSTRUCIONES IMPORTANTES GUARDE ESTAS INSTRUCCIONES ISTRUZIONI
Type HD8753 USER MANUAL
 Register your product and get support at www.philips.com/welcome 02 English Type HD8753 USER MANUAL 02 EN PLEASE READ THIS USER MANUAL CAREFULLY BEFORE USING THE MACHINE. IMPORTANT SAFEGUARDS When using
Fundamental safety warnings Checking the appliance... 9 Connecting the appliance... 9 Using the appliance for the first time...
 Contents INTRODUCTION... 7 Letters in brackets... 7 Troubleshooting and repairs... 7 SAFETY... 7 Fundamental safety warnings... 7 DESIGNATED USE... 8 INSTRUCTIONS... 8 DESCRIPTION... 8 Description of the
Espresso Multi Capsule Machine
 Espresso Multi Capsule Machine USER MANUAL Model# GCM-7000 Read this manual thoroughly before using and save it for future reference Model: CG9129-GS 2016 Gourmia www.gourmia.com The Steelstone Group Brooklyn,
15-Bar Pump Espresso Maker Instruction Manual
 15-Bar Pump Espresso Maker Instruction Manual Styled for Life Designed & Engineered in New York City SZ-314289_CRUX006_15 bar Espresso maker_im_r3.indd 1 Thank you for Purchasing this Product You may already
F G H
 HD7850 2 3 F G H 1 E D C B A I J K L 28 27 26 2 3 4 5 25 6 7 18 19 20 24 21 22 1 8 23 17 16 9 10 15 11 12 13 14 4 HD7850 English 6 6 English Introduction Congratulations on your purchase and welcome to
Operating and Installation Instructions
 Operating and Installation Instructions Coffee System CVA 4062 CVA 4068 To prevent accidents en - US, CA and appliance damage read these instructions before installation or use. M.-Nr. 07 816 880 Contents
Type HD8754 USER MANUAL
 Register your product and get support at www.philips.com/welcome 02 English Type HD8754 USER MANUAL 02 EN PLEASE READ THIS USER MANUAL CAREFULLY BEFORE USING THE MACHINE. IMPORTANT SAFEGUARDS When using
GIGA 5 Instructions for Use
 GIGA 5 Instructions for Use The Instructions for Use has been awarded the seal of approval by the independent German Technical Inspection Agency, TÜV SÜD, due to its easy-to-understand style, its thoroughness
E6 Instructions for Use
 6 Instructions for Use K For your safety: read and understand manual before use. Table of contents Your 6 IMPORTANT SAFGUARDS 4 Control elements 8 1 Preparing and using for the first time 10 JURA on the
EP5934, EP5930, EP5346 EP5345, EP5340, EP5335 EP5334, EP5333, EP5331 EP5330, EP5045, EP5040 EP5035, EP5034, EP5030
 Super automatic espresso machine 5000 series EP5934, EP5930, EP5346 EP5345, EP5340, EP5335 EP5334, EP5333, EP5331 EP5330, EP5045, EP5040 EP5035, EP5034, EP5030 EN USER MANUAL DA BRUGERVEJLEDNING DE BENUTZERHANDBUCH
 www.krups.com a e e1 f g b i h l m n n1 c d k3 k1 k2 k4 k5 k k1 p p1 o j j1 j2 1 2 3 2 2 1 1 4 5 6 1 2 3 3 2 1 7 8 9a 9b 10 11 12 13 14 15 USA IMPORTANT SAFEGUARDS When using electrical appliances, basic
IMPRESSA Z9 One Touch TFT Instructions for Use
 IMPRSSA Z9 One Touch TFT Instructions for Use The Instructions for Use has been awarded the seal of approval by the independent German Technical Inspection Agency, TÜV SÜD, due to its easy-to-understand
 Register your product and get support at www.saeco.com/welcome 02 English Type HD8642 / HD8643 USER MANUAL 02 EN PLEASE READ THIS USER MANUAL CAREFULLY BEFORE USING THE MACHINE. IMPORTANT SAFEGUARDS When
EXPOBAR OFFICE MACHINES
 EXPOBAR OFFICE MACHINES Supplemental Instructions Includes brewing guide, frothing techniques and recipes. These are supplemental instructions for the Expobar Office Control, Pulser and Lever. They are
Always here to help you
 Always here to help you Register your product and get support at www.saeco.com/welcome HD8758/57 HD8758-57_4219_460_3151_1_COVER_BOOKLET_A5_bl.indd 1 14/10/15 10:07 English 5 ESPRESSO 1 5 2 6 3 7 8 4
3-in-1 K-Cup Coffee Maker
 3-in-1 K-Cup Coffee Maker Model# GCM-4000 USER MANUAL Read this manual thoroughly before using and save it for future reference Model: GCM-4000 2017 Gourmia www.gourmia.com The Steelstone Group Brooklyn,
Z6 Instructions for Use
 PROFSSIONAL AROMA GRINDR Z6 Instructions for Use Table of contents Your Z6 Control elements 4 Important information 6 Proper use...6 For your safety...6 1 Preparing and using for the first time 10 JURA
10-Cup Thermal Programmable Coffee Maker Instruction Manual
 10-Cup Thermal Programmable Coffee Maker Instruction Manual Styled for Life Designed & Engineered in New York City SZ-314291_CRUX005 CRUX 10C_CM IM_R7.indd 1 Thank you for Purchasing this Product You may
PICOBARISTO HD8924 EN DE ES FR IT NL USER MANUAL BENUTZERHANDBUCH MANUAL DEL USUARIO MODE D EMPLOI MANUALE UTENTE GEBRUIKSAANWIJZING
 PICOBARISTO HD8924 EN DE ES FR IT NL USER MANUAL BENUTZERHANDBUCH MANUAL DEL USUARIO MODE D EMPLOI MANUALE UTENTE GEBRUIKSAANWIJZING 4219.460.3607.1 HD8924 SAECO_PICOBARISTO AMF_WE_COVER_A5_FC.indd 1 01-09-16
Burr Grinder. Model #551. Instructions. Warranty
 Burr Grinder Model #551 Instructions Warranty IMPORTANT SAFEGUARDS When using electrical appliances, basic safety precautions should always be followed, including the following: 1. Read all instructions.