We would like to welcome you as a coffee lover and enthusiast of Melitta CAFFEO.
|
|
|
- Bryce Reeves
- 6 years ago
- Views:
Transcription


1

2
3 Dear Customer, Congratulations on buying your Melitta CAFFEO. We would like to welcome you as a coffee lover and enthusiast of Melitta CAFFEO. ENGLISH With this Melitta CAFFEO quality product you will experience many special coffee moments. Enjoy your favourite coffee specialities with all your senses and indulge yourself. With the Perfect Cappuccino milk frother, you can prepare fantastic milk froth for various coffee specialities, and with the twochamber bean container Bean Select, you can select from two different bean types, ensuring unique coffee enjoyment. Please read these operating instructions carefully and thoroughly and keep them in a safe place so that you and your guests can enjoy the Melitta CAFFEO for a long time to come. Should you require more information or if you have any questions on this product, please contact us directly or visit us on the Internet at We hope you enjoy your new fully automatic coffee maker. Your Melitta CAFFEO team Registered trademark of a company of the Melitta Group 41
4 Table of contents 1 Information about these operating instructions Symbols in the text of these operating instructions Intended use Non-intended use General safety instructions Appliance description Legend for Figure A Legend for Figure B Display Starting up Placement Connection Filling the bean container Filling the water tank Switching on for the fi rst time Adjusting the coffee strength Adjusting the dispensed quantity Switching on and off Switching on the appliance Switching off the appliance Inserting the Melitta Claris water fi lter Preparing espresso or café crème Preparing one cup of espresso or café crème Preparing two cups of espresso or café crème Preparing espresso or café crème with ground coffee Preparing milk froth Preparing hot water
5 10 Function settings Adjusting the water hardness Setting the energy-saving mode Setting the stand-by mode Adjusting the brewing temperature Resetting the appliance to the default settings Adjusting grinding fi neness ENGLISH 11 Care and maintenance General cleaning Cleaning the Perfect Cappuccino Cleaning the brewing unit Integrated cleaning programme Integrated descaling programme Descaling the water tank Transport and disposal Preparation for transport, protection against freezing and measures for longer periods of non-use Troubleshooting
6 1 Information about these operating instructions For a clearer overview, unfold the fold-out pages on the front and back of these operating instructions. 1.1 Symbols in the text of these operating instructions The symbols in these operating instructions indicate specifi c hazards associated with handling your Melitta CAFFEO, or provide useful tips. Warning! Sections with this symbol contain information for your safety and point to possible accident and injury hazards. Caution! Sections with this symbol contain information about incorrect operation that should be avoided and point to possible material damage hazards. Note Sections with this symbol contain valuable additional information for operating your Melitta CAFFEO. 44
7 1.2 Intended use The Melitta CAFFEO is exclusively designed for preparation of coffee and coffee specialities, for heating water as well as for heating milk outside of the appliance. The appliance is intended for home use only and not for commercial purposes. ENGLISH Proper use means: that you carefully read, understand, and comply with the operating instructions. that you especially comply with the safety instructions. that you use the Melitta CAFFEO within the operating conditions specifi ed in these operating instructions. 1.3 Non-intended use Non-intended use is defi ned as using the Melitta CAFFEO in a manner that differs from the use described in these operating instructions. Warning! Non-intended use can lead to injury or scalding with hot water or steam. Note The manufacturer bears no liability for damage that is attributed to non-intended use. 45
8 2 General safety instructions The appliance conforms to the following European directives: 2006 / 95 / EC (low voltage), 2004 / 108 / EC (electromagnetic compatibility), 2011 / 65 / EU (RoHS), 2009 / 125 / EC (eco-design / ErP). The appliance has been built using the latest technology. Residual dangers nevertheless exist. You must observe the safety instructions to avoid dangers. Melitta accepts no liability for damage caused by failure to observe the safety instructions. Please carefully read the following instructions all the way through. Failure to comply with the instructions can affect your own safety and the safety of the appliance. 46
9 Warning! Danger due to electrical current If the appliance or the power cable is damaged, the risk of a fatal electric shock is run. Observe the following safety instructions to avoid dangers due to electrical current: Do not use a damaged power cable. A damaged power cable may only be replaced by the manufacturer, its customer service or a similarly qualifi ed person. Do not open any covers fi rmly screwed onto the appliance housing. Only use the appliance when it is in a technically fl awless condition. A defective appliance may only be repaired by an authorised workshop. Do not repair the appliance yourself. Do not undertake any changes to the appliance, its components or its accessories. Do not immerse the appliance in water. Warning! Risk of burning and scalding Escaping fl uids and steam may be very hot. Parts of the appliance also become very hot. Observe the following safety instructions to avoid scalds and burns: Prevent skin from coming into contact with escaping fl uids and steam. Do not touch any nozzles on the outlet during operation. ENGLISH 47
10 Warning! General safety Observe the following safety instructions to avoid personal injury and material damage: Do not reach into the interior of the appliance during operation. The appliance and its power cable must be kept out of the reach of children under 8 years of age. This appliance may be used by children over 8 years of age and by persons with reduced physical, sensory or mental capabilities or a lack of experience and knowledge if they are supervised or have been instructed in using the appliance safely and understand the resulting risks. Children must not play with the appliance. Cleaning and maintenance must not be undertaken by children younger than 8 years of age. Children over 8 years of age must be supervised during cleaning and maintenance. Disconnect the appliance from the power supply when it is left unsupervised for a long time. 48
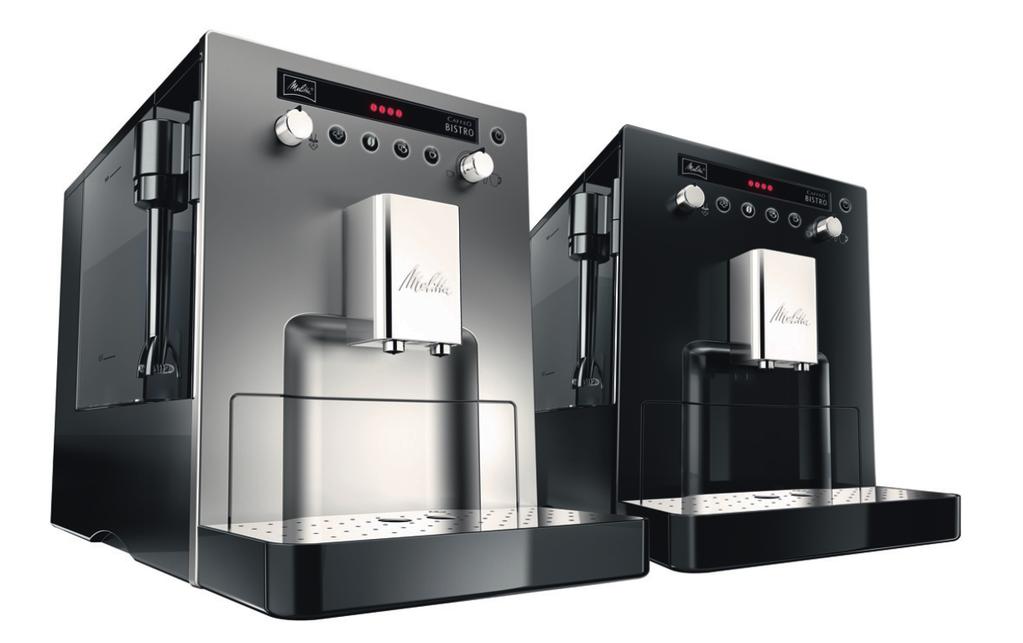
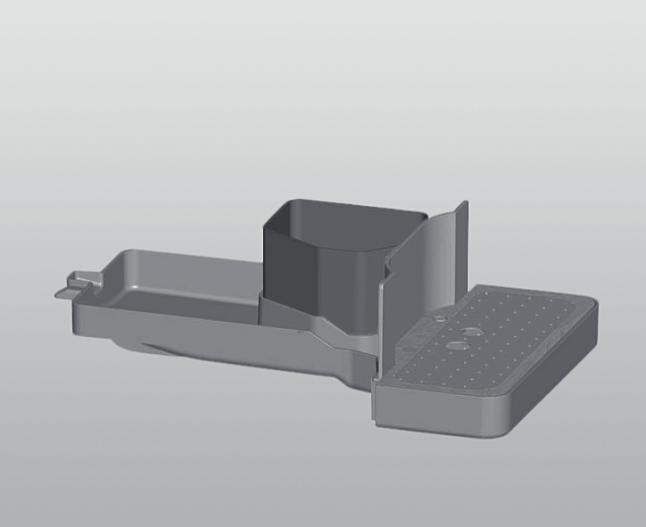
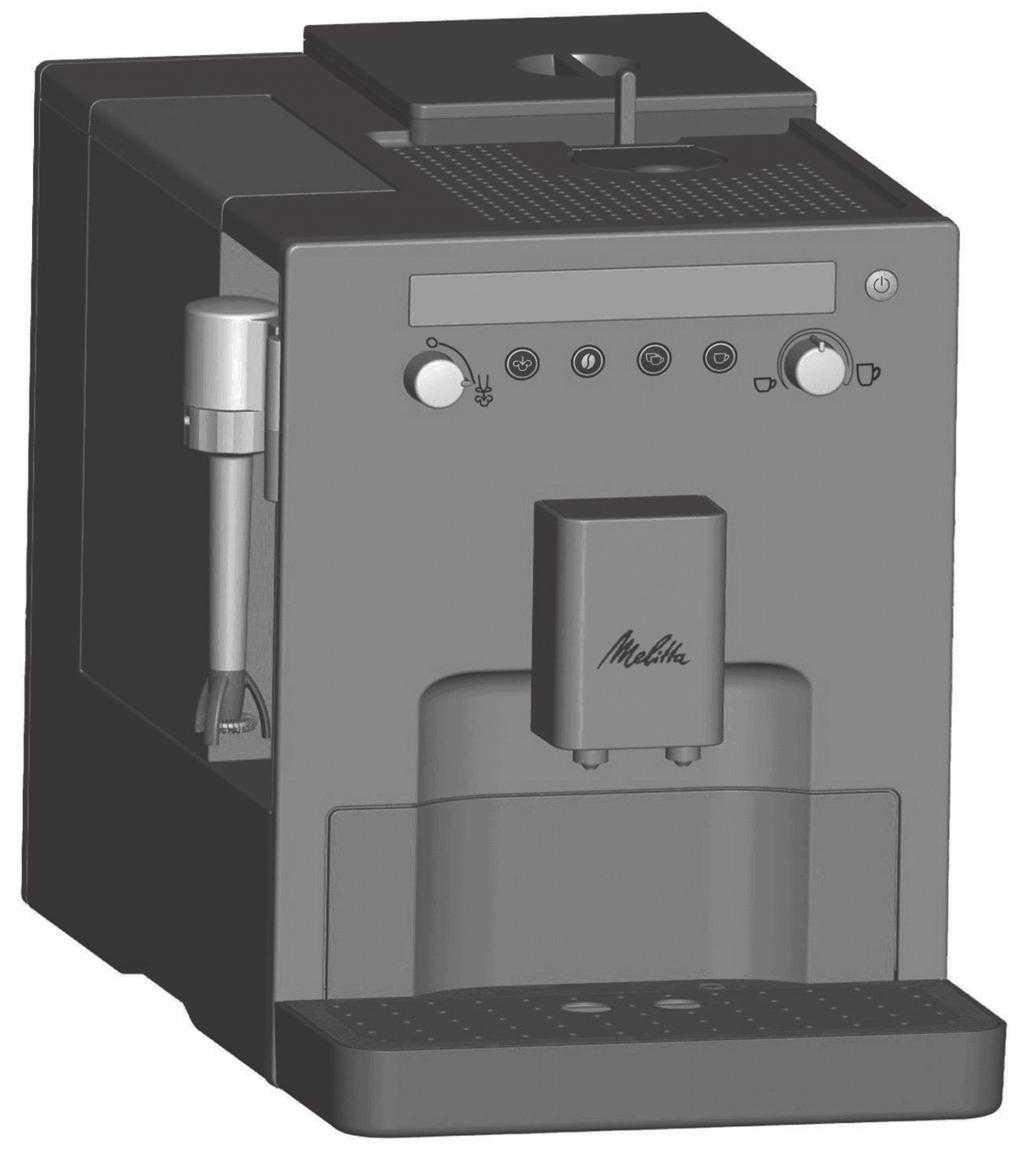
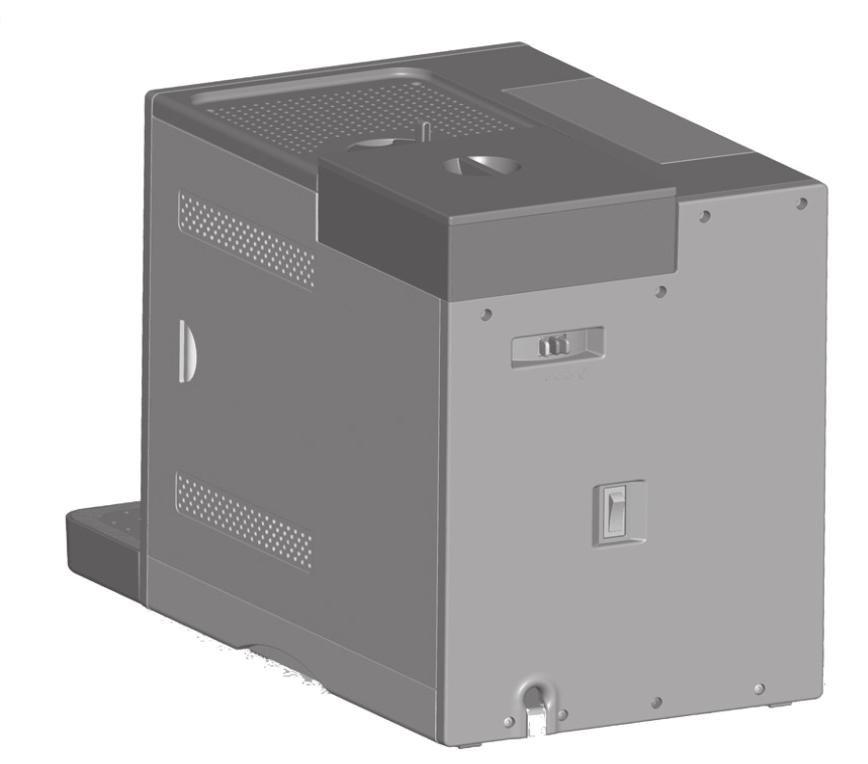
11 3 Appliance description 3.1 Legend for Figure A ENGLISH Fig. number Explanation 1 Drip tray with cup plate and coffee grounds container (internal) 2 "Perfect Cappuccino" milk frother 3 Water tank 4 Button for coffee strength 5 Button for steam dispensing 6 Valve switch for steam and hot water dispensing 7 Display 8 Two-chamber bean container Bean Select 9 Tilt lever for "Bean Select" bean container 10 Ground coffee chute with lid 11 ON /OFF button 12 Coffee quantity regulator 13 Button for one-cup dispensing 14 Button for two-cup dispensing 15 Height-adjustable outlet 16 Water level indicator fl oat for the drip tray 3.2 Legend for Figure B Fig. number Explanation 17 Power cable 18 Brewing unit and identifi cation label (behind the cover) 19 Grinding fi neness adjustment 20 Power switch 49
12 3.3 Display Symbol Meaning Display Explanation/prompt Steam valve Illuminated Flashing Water tank Illuminated Fill the water tank Temperature for steam dispensing is reached Open valve Valve open Ground coffee chute Coffee strength Cleaning Drip tray and coffee grounds container Descaling Flashing Illuminated Illuminated Flashing Illuminated Flashing Illuminated Flashing Illuminated Flashing Lid of the ground coffee chute is open Ground coffee dispenses upon pressing the single-cup dispensing button 1 Bean: mild 2 Beans: normal 3 Beans: strong 4 Beans: very strong Fill bean container; fl ashing stops after dispensing the next coffee. Clean appliance Integrated cleaning programme is running Empty drip tray and coffee grounds container Insert drip tray and coffee grounds container Descaling appliance Integrated descaling programme is running 50
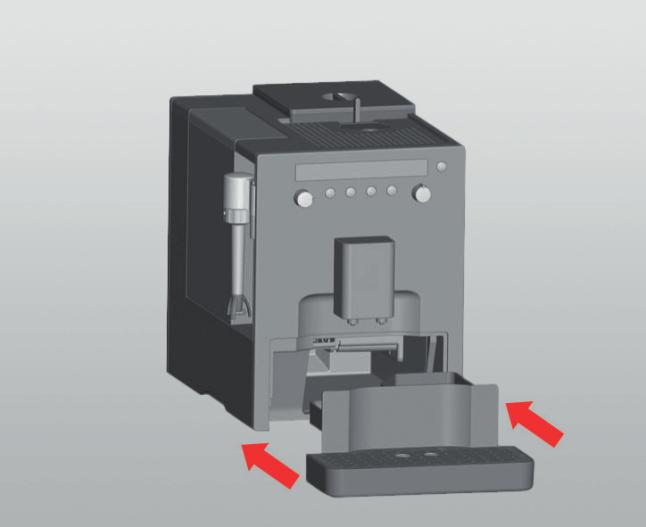
13 4 Starting up When starting the appliance for the fi rst time, please carry out the following steps. When you have completed these steps, the appliance is ready for operation. You can now prepare coffee. We recommend pouring away the first two cups of coffee after the first start up. ENGLISH 4.1 Placement Place the appliance on a stable, level, and dry surface. Make sure that there is a distance of about 10 cm to the wall and other surrounding objects. Caution! Never place the appliance on hot surfaces or in damp areas. Do not transport or store the appliance in vehicles or rooms at low temperatures, as the remaining water could freeze or condense and thereby damage the appliance. Follow the instructions on page 76. The coffee grounds container is located in the drip tray. Please make sure that the drip tray is pushed into the appliance all the way to the stop. Notes Keep the packaging material, including hard foam elements, in order to avoid damage during transport or in case of return shipments. It is normal to fi nd traces of coffee and water in the machine before it is started up for the fi rst time. This is because the appliance has already been tested for faultless function at the factory. 51
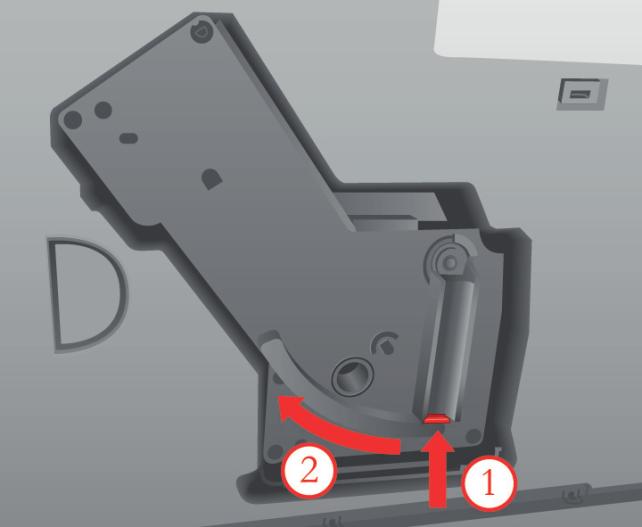
14 4.2 Connection Plug the power cable into an appropriate power socket. Warning! Danger of fire and electric shock due to incorrect supply voltage, incorrect or damaged connections and power cable. Ensure that the supply voltage corresponds to the supply voltage specifi ed on the identification label of the appliance. The identifi cation label is on the right side of the appliance behind the cover (Fig. B, no. 18). Make sure that the power socket meets the applicable standards for electrical safety. If in doubt, contact a qualifi ed electrician. Never use damaged power cables (damaged insulation, bare wires). During the guarantee period, have the damaged power cable replaced only by the manufacturer; only after the guarantee period have it replaced by qualifi ed specialists. 4.3 Filling the bean container Thanks to the two-chamber bean container Bean Select, you can have the choice between two different types of coffee. For example, you can fi ll one chamber with espresso beans and the other with café crème beans. Then you can conveniently switch between the two types using the tilt lever. Fill the bean container (Fig. A, no. 8) with fresh coffee beans. Each of the two chambers can be fi lled with a maximum of 135 g of coffee beans. Caution! Fill the bean container with coffee beans only. Never fi ll the bean container with ground, freeze-dried, or caramelised coffee beans. Select the desired bean type by setting the tilt lever to the appropriate chamber. 52
15 Warning! Hazard for persons allergic to caffeine. Since a residual quantity of the previously used beans remains above the grinder, the two types of beans mix when changing to a different bean type. Consequently, when switching over to decaffeinated beans the fi rst two cups may still contain coffee that is not decaffeinated. This means that only the third cup of coffee prepared after the switchover is free of caffeine. ENGLISH Note When the tilt lever is vertical during the brewing process, no beans fall into the grinder. 4.4 Filling the water tank Lift the lid of the water tank (Fig. A, no. 3) and pull the water tank up and out of the appliance. Fill the water tank to the max. mark with fresh tap water and reinsert it. 4.5 Switching on for the first time All of the tubes have been drained and aired out at the factory. For this reason, the symbol for the valve illuminates after the heat-up phase when starting up for the fi rst time and the appliance must be vented using the valve. Venting is only necessary when starting up for the first time as well as after draining and airing out. You can fi nd more information on page 76. Switch the power switch (Fig. B, No. 20) to position I. Press the ON/OFF button to switch the appliance on. The ON /OFF button fl ashes. The appliance heats up. After the heat-up phase, the valve symbol illuminates. Place a vessel under the Perfect Cappuccino and push the steam pipe downwards until it is positioned below the brim of the vessel. Place a vessel below the outlet. Turn the valve switch (Fig. A, no. 6) clockwise to open the valve. The valve symbol Cappuccino. fl ashes. Water runs into the vessel below the Perfect 53
16 When water is no longer dispensed and the valve symbol is illuminated, turn the valve switch anti-clockwise to close the valve. The appliance performs an automatic rinse and hot water fl ows out of the outlet. The ON/OFF button is then illuminated. The appliance is ready for operation. 4.6 Adjusting the coffee strength Press the button for coffee strength several times to select among four possible coffee strengths. Your selection will then be shown with the bean symbols on the display. Display Coffee strength mild normal (factory setting) strong very strong You can also adjust the coffee fl avour by changing the grinding fi neness setting. You can fi nd more information on page Adjusting the dispensed quantity Turn the coffee quantity regulator (Fig. A, No. 12) to adjust the dispensed quantity variably from 30 ml to 220 ml (regulator to the left: 30 ml, regulator in the middle: 125 ml, regulator to the right: 220 ml). 54
17 5 Switching on and off 5.1 Switching on the appliance Switch the power switch (Fig. B, No. 20) to position I. The appliance is in stand-by mode. The ON/OFF button lights up red. ENGLISH Place a suitable vessel under the outlet. Press the ON/OFF button to switch the appliance on. The ON /OFF button fl ashes. The appliance heats up. The appliance performs an automatic rinse and hot water fl ows out of the outlet. Then the ON/OFF button and the bean symbols illuminate. The appliance is ready for operation. 5.2 Switching off the appliance If possible, place a vessel under the outlet. Press the ON/OFF button to switch the appliance to stand-by mode. The appliance performs an automatic rinse of the coffee lines. The brewing chamber goes into resting position. The ON/OFF button lights up red. Switch the power switch (Fig. B, No. 20) to position 0 to turn off the appliance completely. Notes The appliance performs an automatic rinse every time it is switched on. When the appliance is in stand-by mode, only switch it off using the power switch, otherwise there is a danger that the brewing unit will not be in the correct position. 55
18 6 Inserting the Melitta Claris water filter The Melitta Claris water fi lter removes lime and other harmful substances from the water. Please only insert it after starting up the appliance for the first time. When using the fi lter, the appliance does not require descaling as often, and the water hardness can be set to 1 (you can fi nd more information on page 61). The service life of your appliance will be extended thanks to the reliable protection from lime scale. The water fi lter should be changed regularly; however, after two months at the latest. The water fi lter is available in specialised shops. Set the current month on the blue ring on top of the Melitta Claris water fi lter. This way, you can easily see when it is time to change the Melitta Claris water fi lter. Put the water fi lter in a glass with fresh tap water for several minutes before you insert it. Lift the lid of the water tank (Fig. A, no. 3) and pull the water tank up and out of the appliance. Empty the water tank. Carefully screw the Melitta Claris water fi lter into the thread on the base of the water tank using the screw-in aid at the bottom end of the coffee scoop provided. Fill the water tank to the max. mark with fresh tap water and reinsert it. Place a vessel under the Perfect Cappuccino and push the steam pipe downwards until it is positioned below the brim of the vessel. Turn the valve switch (Fig. A, no. 6) clockwise to open the valve. Water now runs into the vessel beneath the Perfect Cappuccino. Due to the automatic stop function, you must open and close the valve switch several times. As soon as the water tank symbol illuminates, turn the valve switch anti-clockwise to close the valve. The appliance is ready for operation. 56
19 Note The Melitta Claris water fi lter should not remain dry over an extended period of time. We therefore recommend storing the Melitta Claris water fi lter in the refrigerator in a glass of water when the appliance will not be in use for extended periods. ENGLISH 7 Preparing espresso or café crème 7.1 Preparing one cup of espresso or café crème Prerequisite: The appliance is ready for operation (see Switching on and off on page 55). The desired coffee strength and dispensed quantity are set (see page 54). The desired coffee type in the bean container is selected. Place a suitable vessel under the outlet. Press the button for one-cup dispensing. The grinding process and coffee dispensing start now. Dispensing ends automatically when the set dispensed quantity is reached. To stop dispensing coffee prematurely, press the button for one-cup dispensing. 7.2 Preparing two cups of espresso or café crème Prerequisite: The appliance is ready for operation (see Switching on and off on page 55). The desired coffee strength and dispensed quantity are set. The desired coffee type in the bean container is selected. Place two suitable vessels beside each other under the outlet. Press the button for two-cup dispensing. The double grinding process and dispensing of coffee start now. Dispensing ends automatically when the set dispensed quantity is reached. To stop dispensing coffee prematurely, press the button for two-cup dispensing. 57
20 7.3 Preparing espresso or café crème with ground coffee Prerequisite: The appliance is ready for operation (see Switching on and off on page 55). The desired dispensed quantity is set. Open the lid of the ground coffee chute (Fig. A, no. 10). The ground coffee chute symbol fl ashes. Fill a max. of one coffee scoop of fresh ground coffee into the ground coffee chute. Caution! Fill the ground coffee chute with ground coffee only. Instant products can clog up the brewing unit. Never pour in more than one coffee scoop (supplied with the appliance) of ground coffee, otherwise the brewing unit will be overfi lled. Close the lid of the ground coffee chute. The ground coffee chute symbol illuminate. Place a suitable vessel under the outlet. Press the button for one-cup dispensing. and the button for one-cup dispensing Coffee dispensing now starts. It ends automatically when the set dispensed quantity is reached. To stop dispensing coffee prematurely, press the button for one-cup dispensing. Note If you do not dispense coffee from the appliance within 90 seconds after opening the ground coffee chute, the appliance will automatically switch back to coffee bean operation and will discard the ground coffee into the coffee grounds container to prevent later risk of overfi lling the brewing chamber. 58
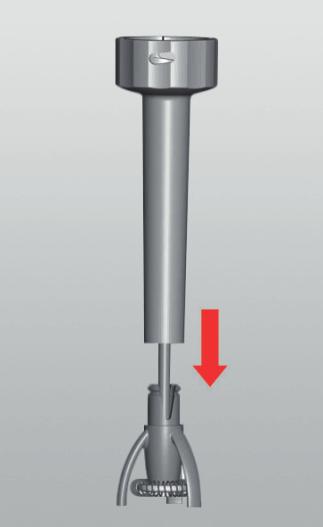
21 8 Preparing milk froth Prerequisite: The appliance must be ready for operation (see Switching on and off on page 55). ENGLISH Place a vessel with milk under the Perfect Cappuccino. Make sure that the whisk of the Perfect Cappuccino is immersed in the milk. Fill the appliance to one third maximum, as the volume of milk increases signifi cantly when frothed. Press the button for steam dispensing. The button for steam dispensing fl ashes. The appliance heats up. When the steam temperature has been reached, the button for steam dispensing and the valve symbol illuminate. Warning! There is danger of burn injuries and scalding due to the hot steam pipe, steam hose and hot whisk. Never touch the steam pipe, the steam hose, or the whisk of the Perfect Cappuccino when in use. Turn the valve switch (Fig. A, no. 6) clockwise to open the valve. The valve symbol and the button for steam dispensing fl ash. The whisk froths the milk and heats it at the same time. You will achieve better frothing results if you move the whisk up and down while frothing. Turn the valve switch anti-clockwise to close the valve and end the frothing process. The volume of milk should have about doubled and the vessel should be warm to the touch. Press the button for steam dispensing to switch from steam mode to the normal operating mode. Wait until the steam pipe has cooled down and then twist off anticlockwise the steam pipe with whisk from the Perfect Cappuccino (Fig. E). Pull the whisk of the Perfect Cappuccino downward to remove it from the steam pipe (Fig. F). 59
22 Rinse off the steam pipe and the whisk under running water or wash them in the dishwasher. Turn the cleaned steam pipe with whisk clockwise onto the Perfect Cappuccino until it locks into place. Note We recommend using cold milk with a high protein content. It is not the fat content, but rather the protein content that is the determining factor for good milk froth. 9 Preparing hot water Prerequisite: The appliance must be ready for operation (see Switching on and off on page 55). Place a cloth under the Perfect Cappuccino to catch any residual water that may escape. Pull the whisk of the Perfect Cappuccino downward to remove it from the steam pipe (Fig. F). Place a vessel under the steam pipe and slide the steam pipe downward until it is below the brim of the vessel. Turn the valve switch (Fig. A, no. 6) clockwise to open the valve. The valve symbol and into the vessel. now fl ashes. Hot water fl ows out of the steam pipe When the desired water quantity is reached, turn the valve switch anticlockwise to close the valve. Wait until the steam pipe cools down and slide the whisk from below onto the steam pipe until it locks into place. 60
23 10 Function settings 10.1 Adjusting the water hardness Use the test strip provided to determine the water hardness in your area. Comply with the instructions on the test strip package. The appliance is factory-adjusted to water hardness 4. ENGLISH Prerequisite: The appliance is in stand-by mode (see Switching on and off on page 55). To maintain appliance quality, please adjust the water hardness as follows: Press the buttons for one-cup dispensing and for steam dispensing simultaneously until the four buttons are weakly illuminated. Press the button for steam dispensing several times to select among the four possible degrees of water hardness. The button for steam dispensing is brightly illuminated. Your water hardness selection according to the table is shown with the bean symbols on the display. Water hardness range Properties d e f soft medium hard very hard (factory setting) > 20 > 25 > 36 Press the ON/OFF button to confi rm the selected water hardness. Depending on the selection, 1 to 4 bean symbols fl ash on the display. The appliance goes back to stand-by mode. 61
24 10.2 Setting the energy-saving mode After the last action, the appliance automatically (depending on the settings) switches to energy-saving mode (the appliance thus consumes much less energy than in stand-by mode). You can set different times for the energy-saving mode. The appliance is factory-set at 15 minutes. Prerequisite: The appliance is in stand-by mode (see Switching on and off on page 55). Please set the energy-saving mode as follows: Press the buttons for one-cup dispensing and for steam dispensing simultaneously until the four buttons are weakly illuminated. Press the button for coffee strength several times to select among the four possible timer settings. The button for coffee strength is brightly illuminated. Your selection is shown with the bean symbols on the display. Display Time 5 minutes 15 minutes (factory setting) 30 minutes OFF Press the ON/OFF button to confi rm the selected time. Depending on the selection, 1 to 4 bean symbols fl ash on the display as confi rmation. The appliance goes back to stand-by mode. Note You can wake up the appliance from the energy-saving mode by pressing any of the buttons. The function of the pressed button (e.g. prepare coffee) will be performed directly, only the heat-up phase takes a little longer. 62
25 10.3 Setting the stand-by mode 30 minutes after the last action (depending on the settings), the appliance automatically switches to stand-by mode. You can set different times for the standby mode. The appliance is factory-set at 30 minutes. ENGLISH Prerequisite: The appliance is in stand-by mode (see Switching on and off on page 55). Please set the stand-by mode as follows: Press the buttons for one-cup dispensing and for steam dispensing simultaneously until the four buttons are weakly illuminated. Press the button for two-cup dispensing several times to select among the four possible timer settings. The button for two-cup dispensing is brightly illuminated. Your selection is shown with the bean symbols on the display. Display Time 30 minutes (factory setting) 2 hours 4 hours 8 hours Press the ON/OFF button to confi rm the selected time. Depending on the selection, 1 to 4 bean symbols fl ash on the display as confi rmation. The appliance goes back to stand-by mode. Note In standby mode, the appliance consumes much less energy. However, we recommend switching the appliance off via the power switch if it will not be used for an extended period (e.g. also overnight). 63
26 10.4 Adjusting the brewing temperature The brewing temperature is factory-set at level 2 (medium ). Prerequisite: The appliance is in stand-by mode (see Switching on and off on page 55). Please set the brewing temperature as follows: Press the buttons for one-cup dispensing and for steam dispensing simultaneously until the four buttons are weakly illuminated. Press the button for one-cup dispensing to select among the three possible brewing temperatures. The button for one-cup dispensing is brightly illuminated. Your selection will then be shown with the bean symbols on the display. Display Brewing temperature low medium (factory setting) high Press the ON/OFF button to confi rm the selected brewing temperature. Depending on the selection, 1 to 3 bean symbols The appliance goes back to stand-by mode. fl ash on the display. 64
27 10.5 Resetting the appliance to the default settings Prerequisite: The appliance is in stand-by mode (see Switching on and off on page 55). ENGLISH Switch the appliance off via the power switch. Wait until the red light in the ON/OFF button extinguishes. Press the buttons for coffee strength and for two-cup dispensing simultaneously. At the same time, switch the appliance on via the power switch. All settings are now reset to the factory settings. Overview of factory settings: Function settings Coffee strength Factory settings normal Water hardness Water hardness 4 Energy-saving mode Standby mode Brewing temperature 15 minutes 30 minutes medium 65
28 10.6 Adjusting grinding fineness The grinding fi neness level was optimally adjusted prior to delivery. Consequently, we recommend that you only readjust grinding fi neness after dispensing approximately 1,000 coffees (about 1 year). You can only set the grinding fi neness while the mill is running. Thus, adjust grinding fi neness directly after coffee dispensing starts. If the coffee fl avour is not suffi ciently intense, then we recommend that you set a fi ner grinding level. Place the lever (Fig. B, no. 19) in one of the three positions (as viewed from the rear of the appliance). Lever position Left Centre Right Grinding fineness Fine Medium Coarse (factory setting) 66
29 11 Care and maintenance 11.1 General cleaning Clean the outside of the appliance with a soft, damp cloth and ordinary dishwashing liquid. Empty and clean the drip tray regularly, at the latest when the fl oat (Fig. A, no. 16) projects out of the cup plate. Clean the coffee grounds container regularly, e.g. in the dishwasher. ENGLISH Caution! To avoid damage to the appliance surface, do not use scouring cloths, sponges or cleaning products. Do not clean the drip tray in the dishwasher; this could cause deformation Cleaning the Perfect Cappuccino Place a cloth under the Perfect Cappuccino to catch any residual water that may escape. Turn the steam pipe with whisk anti-clockwise, away from the Perfect Cappuccino (Fig. E). Pull the whisk of the Perfect Cappuccino downward to remove it from the steam pipe (Fig. F). Rinse off the steam pipe and the whisk under running water or wash them in the dishwasher. Slide the whisk onto the steam pipe from below until it locks into place. Turn the cleaned steam pipe with whisk clockwise onto the Perfect Cappuccino until it locks into place. Note Frequent washing in the dishwasher can cause slight discolourations on the coffee grounds container and on the Perfect Cappuccino. 67
30 11.3 Cleaning the brewing unit Prerequisite: The appliance is in stand-by mode (see Switching on and off on page 55). Note For optimal protection of your appliance, we recommend that you clean the brewing unit under running tap water once a week. Switch the power switch (Fig. B, No. 20) to position 0 to turn off the appliance completely. Reach into the recess on the right side of the appliance (Fig. B, no. 18) and pull off the cover to the right. Press and hold the red button on the handle of the brewing unit (Fig. H) and turn the handle clockwise to the stop (by about 75 ). Use the handle to pull the brewing unit out of the appliance. Leave the brewing unit as it is (do not move or twist the components of the brewing unit). Thoroughly rinse off the entire brewing unit from all sides under running water. Particularly ensure that the surface shown in Fig. J is free of coffee residues. Caution! Never clean the brewing unit in the dishwasher. Let the brewing unit drip dry. If necessary, remove coffee residues from the surfaces in the interior of the appliance where the brewing unit is inserted. Reinsert the brewing unit into the appliance and turn the handle of the brewing unit anti-clockwise to the stop to lock. Insert the two catches of the cover into the back of the appliance and swing the cover to the left until it locks into place. Switch the power switch (Fig. B, No. 20) to position I. The appliance goes back to stand-by mode. 68
31 11.4 Integrated cleaning programme The integrated cleaning programme removes residues, including coffee oil residues, that cannot be eliminated by hand. It takes a total of approximately 15 minutes. The cleaning button fl ashes during the entire process. ENGLISH For optimal cleaning results, we recommend that you clean the brewing unit beforehand (see page 68). Prerequisite: The appliance is in stand-by mode (see Switching on and off on page 55). Caution! Run the integrated cleaning programme every 2 months or after approximately 200 brewed cups of coffee; at the latest, however, run the programme when the symbol for cleaning lights up on the display. Only use Melitta cleaning tabs for fully automatic coffee makers. These cleaning tabs are designed specifi cally for Melitta CAFFEO. The use of other cleaning agents can damage the appliance. Run the integrated cleaning programme as follows: 1 Remove the Melitta Claris water filter if used from the water tank (see page 56). 2 Press the button for one-cup dispensing and the ON/OFF button simultaneously for about 3 seconds. The symbol for cleaning fl ashes. The drip tray symbol illuminates. 3 Empty the drip tray and coffee grounds container. 4 Reinsert the drip tray without the coffee grounds container and place the coffee grounds container under the outlet. Phase 1 During Phase 1, one bean symbol is shown on the display. First, two automatic rinsing processes are carried out. The ground coffee chute symbol illuminates. 69
32 5 Open the lid of the ground coffee chute. The ground coffee chute symbol fl ashes. 6 Throw in a cleaning tab (Fig. G) and close the lid of the ground coffee chute. The symbol for the water tank Phase 1 is completed. illuminates. Phase 2 During Phase 2, two bean symbols are shown on the display. 7 Flip up the lid of the water reservoir (Fig. A, no. 3) and pull the water tank up and out of the appliance. Fill the water reservoir to the max. mark with fresh tap water and re-insert it. The button for steam dispensing Phase 2 is completed. illuminates. Phase 3 During Phase 3, three bean symbols are shown on the display. 8 Press the button for steam dispensing. The integrated cleaning programme starts. This stage lasts approximately 10 minutes. The button for steam dispensing is then illuminated. 9 Empty the coffee grounds container and put it back under the outlet. 10 Press the button for steam dispensing. Phase 3 is completed. 70
33 Phase 4 During Phase 4, four bean symbols are shown on the display. The integrated cleaning programme continues. This stage takes approximately 5 minutes. Water fl ows out of the outlet as well as in the interior of the appliance into the drip tray. Subsequently, the symbol for the drip tray illuminates. ENGLISH 11 Empty the drip tray and the coffee grounds container and then reinsert them. The ON/OFF button illuminates after a short heat-up phase. The buttons and the bean symbols illuminate. The appliance is ready for operation. Note If the valve symbol lights up during the cleaning process: Place a vessel under the Perfect Cappuccino and turn the valve switch (Fig. A, no. 6) clockwise to open the valve. The valve symbol fl ashes. As soon as the valve symbol stays illuminated, turn the valve switch anti-clockwise to close the valve. The integrated cleaning programme continues. 71
34 11.5 Integrated descaling programme The integrated descaling program removes lime scale in the interior of the appliance. It takes a total of approximately 15 minutes. The symbol for descaling fl ashes during the entire process. Prerequisite: The appliance is in stand-by mode (see Switching on and off on page 55). Caution! Carry out the integrated descaling programme every 3 months or when the descaling symbol illuminates on the display. Only use Melitta ANTI CALC Espresso Machines descaling agent. These cleaning tabs are specifi cally designed for the Melitta CAFFEO. Never use vinegar or other descaling agents. Run the integrated descaling programme as follows: 1 Before descaling, remove if necessary the Melitta Claris water fi lter from the water tank (see page 56). 2 Press the button for two-cup dispensing and the ON/OFF button simultaneously for about 3 seconds. The descaling symbol and the drip tray symbol illuminate. Phase 1 During Phase 1, one bean symbol is shown on the display. 3 Empty the drip tray and coffee grounds container. 4 Reinsert the drip tray without the coffee grounds container, and place the coffee grounds container under the Perfect Cappuccino. The symbol for the water reservoir illuminates. 5 Lift the lid of the water tank (Fig. A, no. 3) and pull the water tank up and out of the appliance and then empty it completely. 6 Add the descaling agent (e.g. Melitta ANTI CALC Espresso Machines liquid descaling agent) to the water tank according to the instructions on the packaging. 72
35 Warning! The descaling agent can cause skin irritations Comply with the safety instructions and the dosing information specifi ed on the descaling agent packaging. ENGLISH 7 Reinsert the water tank. 8 Press the button for steam dispensing. Phase 1 is completed. Phase 2 During Phase 2, two bean symbols are shown on the display. The integrated descaling programme is started. Water flows inside the appliance into the drip tray. This stage lasts approximately 10 minutes. Then the valve symbol illuminates. 9 Pull the whisk of the Perfect Cappuccino downward and off of the steam pipe (Fig. F). 10 Turn the Perfect Cappuccino so that the steam pipe is inside the coffee grounds container. Warning! Risk of burns through hot steam pipe or hot whisk Never touch the steam pipe or the whisk of the Perfect Cappuccino during hot water dispensing. 11 Turn the valve switch (Fig. A, no. 6) clockwise to open the valve. The valve symbol fl ashes. The descaling solution fl ows out of the steam pipe into the vessel. This stage lasts approximately 10 minutes. The drip tray symbol and the water tank symbol will be illuminated when the descaling solution has fl owed through the entire appliance. 12 Empty the drip tray and coffee grounds container. 13 Reinsert the drip tray without the coffee grounds container, and place the coffee grounds container under the Perfect Cappuccino. 73
36 14 Thoroughly rinse the water tank, fi ll it to the max. mark with fresh tap water and reinsert it. The button for steam dispensing illuminates. 15 Press the button for steam dispensing. Phase 2 is completed. Phase 3 During Phase 3, three bean symbols are shown on the display. The valve symbol fl ashes. Water fl ows out of the steam pipe into the vessel. Then the valve symbol illuminates. 16 Turn the valve switch anti-clockwise to close the valve. Water fl ows inside the appliance into the drip tray. Subsequently, the symbol for the drip tray illuminates. 17 Empty the drip tray and the coffee grounds container and then reinsert them. 18 Wait until the steam pipe cools down and slide the whisk onto the steam pipe, from below, until it locks into place. The ON/OFF button illuminates after a short heat-up phase. The buttons and the bean symbols illuminate. The appliance is ready for operation. 74
37 11.6 Descaling the water tank You should descale the water tank regularly to ensure faultless function. Lift the lid of the water tank (Fig. A, no. 3) and pull the water tank up and out of the appliance. Before descaling, remove if necessary the Melitta Claris water fi lter from the water tank (see page 56). Fill the water tank with a commercial descaling agent. We recommend the rapid descaling agent in liquid form from Swirl. While performing the descaling, closely observe the instructions of the product manufacturer. Then rinse the water tank thoroughly with clear water. When using the Melitta Claris water fi lter, reinsert it into the water tank (see page 56). Fill the water tank to the max. mark with fresh tap water and reinsert it. ENGLISH 75
38 12 Transport and disposal 12.1 Preparation for transport, protection against freezing and measures for longer periods of non-use Draining and airing out the appliance We recommend draining and airing out the appliance if it is not going to be used for extended periods of time or prior to transport. This also protects the appliance against frost damage. Prerequisite: The appliance is in stand-by mode (see Switching on and off on page 55). Place a vessel under the Perfect Cappuccino. Press the button for steam dispensing and the ON/OFF button simultaneously for longer than 2 seconds. 76 The button for steam dispensing illuminates. fl ashes. The symbol for the water tank Lift the lid of the water tank (Fig. A, no. 3) and pull the water tank up and out of the appliance. The button for steam dispensing fl ashes. As soon as the valve symbol illuminates on the display, turn the valve switch (Fig. A, no. 6) clockwise to open the valve. Steam emerges from the Perfect Cappuccino. The valve symbol and the button for steam dispensing fl ash. As soon as the appliance is drained and aired out, the button for steam dispensing and the valve symbol illuminate. Turn the valve switch anti-clockwise to close the valve. The appliance is in stand-by mode. Reinsert the empty water tank. Switch the appliance off completely via the power switch.
39 Pull out the power plug. Note The Melitta Claris water fi lter should not remain dry over an extended period of time. We therefore recommend storing the Melitta Claris water fi lter in the refrigerator in a glass of water when the appliance will not be in use for extended periods. ENGLISH Transport Drain and air out the appliance. Empty and clean the drip tray and coffee grounds container. Empty the water tank and the bean container. If necessary, remove beans from the bottom with a vacuum cleaner. Transport the appliance in the original packaging if possible, including the hard foam elements, to prevent transport damage. Caution! Do not transport or store the appliance in vehicles or rooms at low temperatures, as the remaining water could freeze or condense and thereby damage the appliance. Disposal Please dispose of the appliance in an environmentally responsible manner by means of suitable collection systems. 77
40 13 Troubleshooting Problem Cause Solution Coffee only drips through. Coffee does not fl ow. Grinder does not grind coffee beans. Loud grinder noise. The bean symbols fl ash even though the bean container is full. The valve symbol illuminates out of turn. Grinding fi neness is too fi ne. Water tank not fi lled or incorrectly inserted. Brewing unit obstructed. Beans do not drop into the grinder (beans are too oily). The tilt lever is vertical. Foreign objects in the grinder Foreign objects in the grinder Insuffi cient quantity of ground beans in the brewing chamber There is air in the lines inside the appliance. Set the grinding fineness coarser. Clean the brewing unit. Descale, if necessary. Run the integrated cleaning programme, if necessary. Fill the water tank and make sure it is inserted correctly. Open the valve until water fl ows out of the appliance and then close it again. Clean the brewing unit. Tap lightly on the bean container. Move the tilt lever to the right or left. Call the hotline. Call the hotline. Press the button for one-cup dispensing or two-cup dispensing. Open the valve until water fl ows out of the appliance and then close it again. If necessary, clean the brewing unit. 78
41 Problem Cause Solution The brewing unit can no longer be reinserted after removal. The buttons for one- and two-cup dispensing fl ash alternately with the ON/OFF button. The brewing unit is not properly locked. The actuator is not in the proper position. The brewing unit is missing or is not properly inserted. The brewing chamber is overfi lled. Check whether the handle for locking the brewing unit is correctly engaged. Switch the appliance off and on again, an then press the buttons for one- and twocup dispensing simultaneously for longer than 2 seconds. The actuator moves into position. Then reinsert the brewing unit and make sure it is correctly locked into place. Insert the brewing unit properly. Switch the appliance off and on again via the power switch (repeat if necessary), until standby mode is displayed. ENGLISH Continuous fl ashing of all buttons System error Switch the appliance off and on again via the power switch, if this does not work, send the appliance to Customer Service. Please contact the Melitta hotline, if the above mentioned solutions do not help to solve the problem: /
We would like to welcome you as a coffee lover and enthusiast of a variety of speciality coffees.
 Dear Customer, Congratulations on buying your Melitta CAFFEO Gourmet. We would like to welcome you as a coffee lover and enthusiast of a variety of speciality coffees. With your new Melitta CAFFEO Gourmet
EN Operating Instructions 21
 EN Operating Instructions 21 7 6 5 4 8 9 10 3 11 2 1 A 14 13 11 B C D E F G H I 3 Safety instructions Please carefully read and comply with the operating instructions. The appliance is intended for home
1. IMPORTANT SAFEGUARDS When using electrical appliances, basic safety precautions should always be followed to reduce the risk of fire, electric
 1. IMPORTANT SAFEGUARDS When using electrical appliances, basic safety precautions should always be followed to reduce the risk of fire, electric shock, and/pr injury to persons including the following:
Operating Instructions Bedienungsanleitung
 SVENSKA NORSK DANSK SUOMI Operating Instructions Bedienungsanleitung Table of contents Table of contents 1 For your safety... 5 1.1 Symbols used... 6 1.2 Proper use... 6 1.3 Danger from electric current...
5KEK1322 W A_v08.indd 1 5/13/16 2:25 PM
 5KEK1322 W10878653A_v08.indd 1 PARTS AND FEATURES PARTS AND ACCESSORIES Tea steeper lid (center section of lid with handle) Kettle lid (outer section) Stainless steel lime scale filter Removable stainless
IMPORTANT SAFEGUARDS. 3. To protect against fire, electric shock and injury to persons do not immerse cord, plug or unit in water or other liquid.
 IMPORTANT SAFEGUARDS When using electrical appliances, basic precautions should always be followed, including the following: 1. Read all instructions. 2. Make sure that your outlet voltage corresponds
Bedienungsanleitung Operating Instructions
 DEUTSCH ITALIANO NEDERLANDS FRANÇAIS Bedienungsanleitung Operating Instructions 1 Table of contents Table of contents 1 For your safety...53 1.1 Symbols used...54 1.2 Proper use...54 1.3 Danger due to
CafeRomatica NICR7.. Fully automatic coffee centre Operating Instructions and Useful Tips. A passion for coffee.
 CafeRomatica Fully automatic coffee centre Operating Instructions and Useful Tips NICR7.. GB A passion for coffee. 1 G F A M J / K A B C D E Display screen Left rotary knob Right rotary knob Bean symbol
COFFEE GRINDER. Owner s Manual
 COFFEE GRINDER Owner s Manual 4 4 FEATURES Bean Hopper Lid Bean Hopper Grinder Start/Stop Button Bean Hopper Holder Bean Hopper Release Button Grinding Timer Dial Coffee Powder Outlet 0 Grind Thickness
COFFEE MAKER INSTRUCTION MANUAL CM4682-V
 COFFEE MAKER INSTRUCTION MANUAL CM4682-V IMPORTANT SAFEGUARDS Before using the electrical appliance, the following basic precautions should always be followed including the following: 1. Read all instructions.
G F I M J K L B C D E S O T H Q P U N R D 4
 1 2 3 4 G F I A M J K L 5 6 7 B C D E 8 9 10 S O T H Q P U N R 11 12 D 4 Equipment GB A B C D E Text display (main menu) Rotary control knob Button > Button exit Height-adjustable coffee spout CafeRomatica
STAINLESS STEEL MILK FROTHER. Model: PKFMR11BK
 STAINLESS STEEL MILK FROTHER Model: PKFMR11BK WARNING! To reduce the risk of fire, electrical shock or injury to persons or property: Carefully read all instructions before operating your new product for
Instructions for use for A1/A100
 de en fr it nl es pt Instructions for use for A1/A100 ru Your A1/A100 Control elements 28 Important information 30 Proper use...30 For your safety...30 1 Preparing and using for the first time 32 Setting
Automatic Coffee Machine Instruction Manual
 Instruction Manual Page 1 of 17 8212-0 Automatic Coffee Machine Instruction Manual Instruction Manual Page 2 of 17 IMPORTANT INFORMATION For safety purposes please read these instructions carefully before
Instructions for use for ENA Micro 5
 de en fr it nl es pt Instructions for use for ENA Micro 5 ru Table of contents Your ENA Micro 5 Control elements 30 Important information 32 Proper use...32 For your safety...32 1 Preparing and using for
SAFETY INSTRUCTIONS FOR USE
 INTRODUCTION Thank you for choosing this De Longhi Coffee machine. We hope you enjoy your new appliance. Please take a few minutes to read these instructions. This is the only way to ensure optimum results
MODEL: POD BREWER AURORA SAF 68 HOMEMAKER ESPRESSO MAKER WITH COFFEE POD
 INSTRUCTION MANUAL Please read this Instruction Manual and the safety instructions before operating the appliance! MODEL: POD BREWER AURORA SAF 68 HOMEMAKER ESPRESSO MAKER WITH COFFEE POD Congratulation
instructions COFFEE GRINDER KG 79/89
 instructions COFFEE GRINDER KG 79/89 DESCRIPTION OF APPLIANCE The following terms are used throughout the instruction manual Coffee-bean hopper lid Removable upper burr Coffee-bean hopper ON/OFF switch
E6/E60 Instructions for Use
 6/60 Instructions for Use Table of contents Your 6/60 Control elements 4 Important information 6 Proper use...6 For your safety...6 1 Preparing and using for the first time 10 JURA on the Internet...10
HD8847 HD8848 USER MANUAL. Super automatic espresso coffee machine 4000 series. Read carefully before using the machine.
 Super automatic espresso coffee machine 4000 series 02 USER MANUAL Read carefully before using the machine. HD8847 HD8848 02 English EN Register your product and get support at www.philips.com/welcome
QUALITY MILK FROTHER INSTRUCTION MANUAL MODEL NO. MMF005
 QUALITY MILK FROTHER INSTRUCTION MANUAL MODEL NO. MMF005 MILK FROTHER INSTRUCTION MANUAL Model No.: MMF005 READ ALL INSTRUCTIONS BEFORE USING THE FROTHER. KEEP THESE INSTRUCTIONS FOR FUTURE REFERENCE.
This appliance can be used by children aged from 8 years and above and persons with
 IMPORTANT SAFEGUARDS Symbols used in these instructions Important warnings are identified by these symbols. It is vital to respect these warnings. Failure to observe the warning could result in life threatening
Coffeemaker User's manual
 Coffeemaker User's manual EN Prior to using this appliance, please read the user's manual thoroughly, even in cases where you have previously familiarised yourself with the operation of similar types of
MODELS 1315 & 1315-S La Pavoni CLUB COMBO
 IMPORTANT WARNINGS MODELS 1315 & 1315-S La Pavoni CLUB COMBO DUET Never operate your espresso machine without water in the tank. This may cause premature pump failure. Do not allow the power cord to come
IMPORTANT INSTRUCTIONS MODE D EMPLOI IMPORTANT INSTRUCIONES IMPORTANTES ISTRUZIONI IMPORTANTI
 MOKA 22-04-2003 10:10 Pagina 1 IMPORTANT INSTRUCTIONS SAVE THESE INSTRUCTIONS MODE D EMPLOI IMPORTANT CONSERVEZ LES PRESENTES INSTRUCTIONS INSTRUCIONES IMPORTANTES GUARDE ESTAS INSTRUCCIONES ISTRUZIONI
Burr Grinder. Automatic burr grinder with 17-position grind selector. Instruction Booklet EM0430
 Burr Grinder Automatic burr grinder with 17-position grind selector Instruction Booklet EM0430 Please read these instructions carefully and retain for future reference. Contents Sunbeam s Safety Precautions
USER MANUAL TECHNICAL DATA
 USER MANUAL TECHNICAL DATA Model: Easy Touch Operating Voltage: 240V AC Frequency: 50 Hz Power con, MAX : 1500W Water tank cap.: 700ml (0.7L) Weight: 5.0 kg Size: L 350 * W 155 * H 245 mm This appliance
Get Started. Better Everyday ECAM23260
 Better Everyday Get Started This short guide is not intended to explain all the functions of the appliance. Please read all the owner s instruction booklet before use. Video available on www.youtube.com/delonghiusa
10,000 prize draw. instructions. EXTRA year guarantee FREE rewards gallery. Register online now!
 r instructions 10,000 prize draw EXTRA year guarantee FREE rewards gallery www.productregister.co.uk/rhobbs Register online now! See back for details 2 Read the instructions, keep them safe, pass them
Coffee Burr Grinder. Model #559. Instructions. Warranty
 Coffee Burr Grinder Model #559 Instructions Warranty IMPORTANT SAFEGUARDS When using electrical appliances, basic safety precautions should always be followed, including the following: 1. Read all instructions.
HD8828 HD8834 USER MANUAL. Super automatic espresso coffee machine 3100 series. Read carefully before using the machine.
 Super automatic espresso coffee machine 3100 series 02 USER MANUAL Read carefully before using the machine. HD8828 HD8834 English 02 EN Register your product and get support at www.philips.com/welcome
S8 Instructions for Use Type 744
 S8 Instructions for Use Type 744 Table of contents Your S8 Control elements 4 Important information 6 Proper use...6 For your safety...6 1 Preparing and using for the first time 10 JURA on the Internet...10
TEA CATER USER MANUAL. UM_EN Part No.:
 USER MANUAL UM_EN Part No.: 1730080-02 CONTENT CONTENT... 2 GENERAL... 4 Introduction...4 Warnings...4 Precautions...4 Intended use...4 Facts & weight...5 General functional description...5 OVERVIEW OF
AUTOMATIC BEAN TO CUP COFFEE MACHINE
 AUTOMATIC BEAN TO CUP COFFEE MACHINE EB24 model USER GUIDE US CA CONTENTS Appliance parts 2 Safety and warnings 4 First use 7 Menu settings 11 Making coffee 15 Making cappuccinos and milk-based coffees
Stainless Steel Milk Frother N3 User Manual
 Stainless Steel Milk Frother N3 User Manual Voltage: 110V~60Hz Power: 500W READ AND SAVE THESE INSTRUCTIONS IMPORTANT Read and follow the instructions in this user manual even if you feel you are familiar
E8/E80 Instructions for Use
 8/80 Instructions for Use Table of contents Your 8/80 Control elements 4 Important information 6 Proper use...6 For your safety...6 1 Preparing and using for the first time 10 JURA on the Internet...10
Type HD8753 USER MANUAL
 Register your product and get support at www.philips.com/welcome 02 English Type HD8753 USER MANUAL 02 EN PLEASE READ THIS USER MANUAL CAREFULLY BEFORE USING THE MACHINE. IMPORTANT SAFEGUARDS When using
OPERATING INSTRUCTIONS FOR YOUR SAFETY CAREFULLY READ THE OPERATING INSTRUCTIONS. FOR HOUSEHOLD USE ONLY
 OPERATING INSTRUCTIONS FOR YOUR SAFETY CAREFULLY READ THE OPERATING INSTRUCTIONS. FOR HOUSEHOLD USE ONLY 2 Opening Congratulations on choosing this high quality espresso machine and thank you for your
Coffee Grinder Instruction Manual
 Coffee Grinder Instruction Manual CoffeeGrinder Manual-English Only.indd 1 07/01/2016 14:14:39 Savisto Home Coffee Grinder Voltage Supply: 220-240V~ 50/60Hz Power Consumption: 150W Eng Please read through
Z6 Instructions for Use
 Z6 Instructions for Use Table of contents Your Z6 Control elements 4 Important information 6 Proper use...6 For your safety...6 1 Preparing and using for the first time 10 JURA on the Internet...10 Setting
AUTOMATIC BEAN TO CUP COFFEE MACHINE
 AUTOMATIC BEAN TO CUP COFFEE MACHINE EB60 model USER GUIDE NZ AU GB IE CONTENTS Appliance parts 2 Safety and warnings 4 First use 9 Menu settings 13 Making coffee 17 Making cappuccinos and milk-based
Type HD8754 USER MANUAL
 Register your product and get support at www.philips.com/welcome 02 English Type HD8754 USER MANUAL 02 EN PLEASE READ THIS USER MANUAL CAREFULLY BEFORE USING THE MACHINE. IMPORTANT SAFEGUARDS When using
Single-Serve Coffee Maker
 840251801 Single-Serve Coffee Maker IMPORTANT SAFEGUARDS When using electrical appliances, basic safety precautions should always be followed to reduce the risk of fire, electric shock, and/or injury to
EN Electric Coffee Grinder
 SCG 5050BK EN Electric Coffee Grinder - 1 - EN Electric Coffee Grinder Important safety instructions READ CAREFULLY AND STORE FOR FUTURE USE. This appliance may be used by persons with physical or mental
5KCG0702 W A_Final.indd 1 8/4/15 8:35 AM
 5KCG0702 PARTS AND FEATURES PARTS AND ACCESSORIES Hopper lid Easy access stainless steel burrs 200 g glass hopper 15 grind settings Die cast metal body Grind control dial Power switch Faceplate assembly
AUTOMATIC BURR COFFEE GRINDER
 AUTOMATIC BURR COFFEE GRINDER MODEL:SCG-903B USER MANUAL www.thesecura.com Welcome Congratulations on purchasing our Secura Automatic Burr Coffee Grinder. Each unit is manufactured to ensure safety and
IMPRESSA XJ5 Professional Instructions for Use. Original instructions for use Before using the machine read the instructions for use.
 IMPRESSA XJ5 Professional Instructions for Use KE Original instructions for use Before using the machine read the instructions for use. JURA Type 684 Table of contents Your IMPRESSA XJ5 Professional Control
E8/E80 Instructions for Use
 8/80 Instructions for Use Table of contents Your 8/80 Control elements 4 Important information 6 Proper use...6 For your safety...6 1 Preparing and using for the first time 10 JURA on the Internet...10
Shotmeister Owner s Manual. The Sleekest Design, Pouring the Coldest Shots
 Shotmeister Owner s Manual The Sleekest Design, Pouring the Coldest Shots Thank you for purchasing a Jägermeister Shotmeister! REGISTRATION INFORMATION Register your Jägermeister Shotmeister Online: at
Instruction Manual Coffee grinder. CM 90 Serie
 Instruction Manual Coffee grinder CM 90 Serie Table of content Safety Instructions... 3 Before first use... 4 Unpacking... 4 Requirements for the installation location... 5 Operating and speed settings...
HD8841 HD8842 USER MANUAL. Super automatic espresso coffee machine 4000 series. Read carefully before using the machine.
 Super automatic espresso coffee machine 4000 series 02 USER MANUAL Read carefully before using the machine. HD8841 HD8842 02 English EN Register your product and get support at www.philips.com/welcome
AUTOMATIC BEAN TO CUP COFFEE MACHINE
 AUTOMATIC BEAN TO CUP COFFEE MACHINE EB60 model USER GUIDE NZ AU GB IE CONTENTS Appliance parts 2 Safety and warnings 4 First use 9 Menu settings 13 Making coffee 17 Making cappuccinos and milk-based
TURNING THE APPLIANCE OFF...10
 contents INTRODUCTION...7 Symbols used in these instructions... 7 Letters in brackets... 7 Troubleshooting and repairs... 7 SAFETY...7 Fundamental safety warnings... 7 DESIGNATED USE...7 INSTRUCTIONS...8
Z8 Instructions for Use
 Z8 Instructions for Use Table of contents Your Z8 Control elements 4 Important information 6 Proper use...6 For your safety...6 1 Preparing and using for the first time 10 JURA on the Internet...10 Operation
USER MANUAL Type HD HD8885
 02 English USER MANUAL Type HD8768 - HD8885 Read carefully before using the machine. 02 EN Register your product and get support at www.saeco.com/welcome IMPORTANT SAFEGUARDS When using electrical appliances,
5KCM0512A W A_ENv10.indd 1 10/13/15 12:41 PM
 5KCM0512A PARTS AND FEATURES PARTS AND ACCESSORIES Scale readout display Timer readout display Plunger handle Power button Lid Plunger (stainless steel mesh filter with silicone seal not shown) Timer button
Built-in Coffee Machine Use and Care Manual
 CM02X Built-in Coffee Machine Use and Care Manual Nov 07 Contents DESCRIPTION OF THE MACHINE P. 3 Controls P. 3 Safety instructions and warnings P. 4 Use P. 5 DESCRIPTION AND OPERATION P.6 INST ALLA TION
User Guide TEA CATER. Your Dealer. U / EN Rev
 User Guide TEA CATER Your Dealer U / EN Rev 101115 1. Contents Tea Cater 1. Contents page 2 2. General 3 3. Function description 3 4. Start-up 3 5. Component overview 4 5. Function button overview 5-6
USER MANUAL JOLLY PRESTIGE - COFFEE MACHINE
 SV JOLLY.pdf 1 17/10/2014 11:25 am USER MANUAL JOLLY PRESTIGE - COFFEE MACHINE SV JOLLY.pdf 1 20/10/2014 1:30 pm Contents Introduction... 02 Important safety precautions... 03 Description of external components...
F G H
 HD7850 2 3 F G H 1 E D C B A I J K L 28 27 26 2 3 4 5 25 6 7 18 19 20 24 21 22 1 8 23 17 16 9 10 15 11 12 13 14 4 HD7850 English 6 6 English Introduction Congratulations on your purchase and welcome to
IMPRESSA XJ9 Professional Instructions for Use. Original instructions for use Before using the machine read the instructions for use.
 IMPRSSA XJ9 Professional Instructions for Use K Original instructions for use Before using the machine read the instructions for use. JURA Type 683 Table of contents Your IMPRSSA XJ9 Professional Control
Type HD8749 GAGGIA NAVIGLIO DELUXE. User manual
 Type HD8749 GAGGIA NAVIGLIO DELUXE User manual IMPORTANT SAFEGUARDS When using electrical appliances, basic safety precautions should always be followed, including the following: 1. Read all instructions.
Type HD8752 / HD8881 USER MANUAL
 Register your product and get support at www.philips.com/welcome 02 English Type HD8752 / HD8881 USER MANUAL 02 EN PLEASE READ THIS USER MANUAL CAREFULLY BEFORE USING THE MACHINE. IMPORTANT SAFEGUARDS
Grind & Brew Automatic DGB625BCU
 Grind & Brew Automatic DGB625BCU Congratulations on your purchase of the Cuisinart Grind & Brew Automatic. For over 30 years Cuisinart s aim has been to produce the very finest kitchen equipment so that
Type HD8852 USER MANUAL
 Register your product and get support at www.philips.com/welcome 02 English Type HD8852 USER MANUAL 02 EN PLEASE READ THIS USER MANUAL CAREFULLY BEFORE USING THE MACHINE. IMPORTANT SAFEGUARDS When using
Custom Grind Deluxe Coffee Grinder
 READ BEFORE USE Visit www.hamiltonbeach.in for our complete line of products and Use and Care Guides as well as delicious recipes, tips, and other useful information! Custom Grind Deluxe Coffee Grinder
Programmable Conical Burr Mill CBM-18
 Programmable Conical Burr Mill CBM-18 IMPORTANT SAFEGUARDS When using electrical appliances, basic safety precautions should always be followed, including the following: 1. Read all instructions. 2. To
Espresso Maker READ BEFORE USE. Questions? Please call us our friendly associates are ready to help
 Espresso Maker Visit www.hamiltonbeach.in for our complete line of products and Use and Care Guides as well as delicious recipes, tips, and other helpful information! Questions? Please call us our friendly
User Manual. Stainless Steel Coffee Urn. Models: 177CU30 11/2018. Please read and keep these instructions. Indoor use only.
 Stainless Steel Coffee Urn Models: 177CU30 11/2018 Please read and keep these instructions. Indoor use only. www.avantcoequipment.com 1 NOTE: Save these instructions for future reference. Index Important
User Manual. Stainless Steel Coffee Urns. Models: 177CU55ETL, 177CU110ETL 10/2016. Please read and keep these instructions. Indoor use only.
 Intertek Stainless Steel Coffee Urns Models: 177CU55ETL, 177CU110ETL 10/2016 Please read and keep these instructions. Indoor use only. www.avantcoequipment.com 1 NOTE: Save these instructions for future
Getting to Know Your Bananza
 User Guide Thank you for purchasing Bananza from JML. To get the best results from this frozen dessert maker, please read these instructions in full and retain for future reference. Contents Safety Warnings
Coffee Burr Grinder. Model #591. Instructions. Warranty. 110W/120Vac/60 Hz. Read this manual thoroughly before using and save it for future reference
 Coffee Burr Grinder Model #591 Instructions Warranty Read this manual thoroughly before using and save it for future reference 110W/120Vac/60 Hz IMPORTANT SAFEGUARDS When using electrical appliances, basic
Wi-Fi Coffee Maker. Model# GCMW-4750 USER MANUAL
 Wi-Fi Coffee Maker Model# GCMW-4750 USER MANUAL Read this manual thoroughly before using and save it for future reference Model: GCMW-4750 2018 Gourmia www.gourmia.com The Steelstone Group Brooklyn, NY
The Scoop 2-Way Brewer
 READ BEFORE USE The Scoop 2-Way Brewer Visit www.hamiltonbeach.in for our complete line of products and Use and Care Guides as well as delicious recipes, tips, and other helpful information! Questions?
Using your Grinder: Fig.1 Fig. 2
 Using your Grinder: 1. Check the bean container (B) for presence of foreign objects before using. 2. Make sure the bean container is completely clean and dry before using. 3. Always operate the appliance
Type HD8779 INSTRUCTIONS FOR USE
 Register your product and get support at www.philips.com/welcome 02 English Type HD8779 INSTRUCTIONS FOR USE 02 EN PLEASE READ THIS USER MANUAL CAREFULLY BEFORE USING THE MACHINE. IMPORTANT SAFEGUARDS
PLEASE READ THIS MANUAL BEFORE USE. SAVE FOR FUTURE REFERENCE.
 8-CUP STAINLESS STEEL CARAFE Coffee Brewer Model: BV1900TS HOUSEHOLD USE ONLY Customer Service Line: 1-855-664-1252 2-year limited warranty bonavitaworld.com Simple to operate Optional pre-infusion cycle
SAVE THESE INSTRUCTIONS THIS PRODUCT IS FOR HOUSEHOLD USE ONLY
 IMPORTANT SAFEGUARDS When using electrical appliances, basic safety precautions should always be followed, including the following: Read all instructions. Do not touch hot surfaces. Use handles and knobs.
User Manual. Stainless Steel Coffee Urns. Models: 177CU30, 177CU55, 177CU110 04/2018. Please read and keep these instructions. Indoor use only.
 Stainless Steel Coffee Urns Models: 177CU30, 177CU55, 177CU110 04/2018 Please read and keep these instructions. Indoor use only. www.avantcoequipment.com 1 NOTE: Save these instructions for future reference.
SAVE THESE INSTRUCTIONS
 22 IMPORTANT SAFEGUARDS When using electrical appliances, basic safety precautions should always be followed to reduce the risk of fire, electric shock, and/or injury to persons, including the following:
Instruction Manual Coffee Grinder. Kaffeemühle / Coffee grinder CM 70 Serie
 Instruction Manual Coffee Grinder Kaffeemühle / Coffee grinder CM 70 Serie Table of content Safety Instructions... 3 Before the first use... 4 Unpacking... 5 Requirements for the installation location...
Triple Brew. Model #352. Coffee & Tea Maker. Instructions Warranty
 Triple Brew Coffee & Tea Maker Model #352 Instructions Warranty IMPORTANT SAFEGUARDS When using electrical appliances, basic safety precautions should always be followed, including: 1. Read all instructions.
Matic / THa. Operating instructions COFFEE BREWER. Mode d emploi MACHINE À CAFÉ. Gebrauchsanleitung KAFFEEBRÜHMASCHINE
 Operating instructions COFFEE BREWER Mode d emploi MACHINE À CAFÉ Gebrauchsanleitung KAFFEEBRÜHMASCHINE Gebruiksaanwijzing KOFFIEZETAPPARAAT Bruksanvisning KAFFEBRYGGARE Bruksanvisning KAFFEMASKIN GB FR
X8 Instructions for Use
 X8 Instructions for Use K Original instructions for use Before using the machine read the instructions for use. JURA Type 739 Table of contents Your X8 Control elements 4 Important information 6 Proper
Operation and maintenance manual. Before using the machine, please read the attached operating instructions. Carefully read the safety rules
 Operation and maintenance manual Before using the machine, please read the attached operating instructions. Carefully read the safety rules 2 IMPORTANT SAFEGUARDS When using electrical appliances, basic
Contents. Electrical requirements (UK only) Preparing and attaching the hot chocolate carafe (D)... 14
 Preparing and attaching the hot chocolate carafe (D)... 14") Contents INTRODUCTION... 8 Symbols used in these instructions... 8 Letters in brackets... 8 Troubleshooting and repairs... 8 SAFETY... 8 Fundamental safety warnings... 8 DESIGNATED USE... 8 INSTRUCTIONS...
Contents INTRODUCTION... 8 Symbols used in these instructions... 8 Letters in brackets... 8 Troubleshooting and repairs... 8 SAFETY... 8 Fundamental safety warnings... 8 DESIGNATED USE... 8 INSTRUCTIONS...
5KEK1522 W A_01_EN.indd 1 11/16/12 1:22 PM
 5KEK1522 Water Kettle INSTRUCTIONS Table of Contents water KEttle SAFETY Important safeguards...6 Electrical requirements...7 Electrical equipment waste disposal...7 PARTS AND FEATURES Parts and accessories...8
De Longhi Appliances via Seitz, Treviso Italia
 De Longhi Appliances via Seitz, 47 31100 Treviso Italia ECAM45.760/11.13 ECAM45.760 BEAN TO CUP ESPRESSO AND CAPPUCCINO MACHINE Instruction for use EN page 6 B B15 B14 B13 B12 B11 B1 B2 B10 B3 B4 B5 B6
Quick Reference Guide
 Impressa Z5 Quick Reference Guide This Guide does not replace the Operating Instructions. For details and cautions you must read all instructions. Watch the DVD instructions! Traces of Coffee Grounds in
2016 Gourmia The Steelstone Group Brooklyn, NY
 2016 Gourmia www.gourmia.com The Steelstone Group Brooklyn, NY All rights reserved. No portion of this manual may be reproduced by any means whatsoever without written permission from The Steelstone Group,
Aroma Fresh. Instructions for use Includes recipes. Model BCM120
 Aroma Fresh Instructions for use Includes recipes Model BCM120 Contents Page Breville recommends safety first 4 Know your Breville Aroma Fresh Coffee Maker 5 Operating your Breville Aroma Fresh Coffee
BEAN TO CUP ESPRESSO AND CAPPUCCINO MACHINE. Instruction for use ECAM26.455
 2 5713216211/05.11 BEAN TO CUP ESPRESSO AND CAPPUCCINO MACHINE Instruction for use ECAM26.455 1 B2 B3 B4 B5 B6 B1 B7 B13 B8 B9 B10 B11 B12 D1 C2 D2 C1 C3 C4 A18 C5 D3 D4 C6 D5 D6 2 A1 A2 A3 A4 A5 A6 A11
CHOCOLINO CAFÉLINO USER MANUAL UM_EN. Part No.: _01
 CHOCOLINO CAFÉLINO USER MANUAL UM_EN Part No.: 1764133_01 CONTENT CONTENT...2 GENERAL...4 Introduction...4 Warnings...4 Precautions...4 Intended use...4 Facts & weight...5 OVERVIEW OF COMPONENTS...6 CHOCOLINO/CAFÉLINO...6
Fundamental safety warnings Checking the appliance... 9 Connecting the appliance... 9 Using the appliance for the first time...
 Contents INTRODUCTION... 7 Letters in brackets... 7 Troubleshooting and repairs... 7 SAFETY... 7 Fundamental safety warnings... 7 DESIGNATED USE... 8 INSTRUCTIONS... 8 DESCRIPTION... 8 Description of the
IMPORTANT SAFEGUARDS. ENGLISH Congratulations on your wise choice!
 Congratulations on your wise choice! As the proud owner of the Gaggia machine, you can now experience the taste of a delicious cup of espresso or cappuccino in the comfort of your own home. Espresso coffee,
CAFE BARISTA. User Guide EM5000
 CAFE BARISTA User Guide EM5000 Heading Sub Heading Body copy with not indent applied. Bullet copy Bullet copy Bullet copy Bullet copy Bullet copy Bullet copy Bullet copy Bullet copy 2 Contents Sunbeam
De Longhi Appliances via Seitz, Treviso Italy
 De Longhi Appliances via Seitz, 47 31100 Treviso Italy www.delonghi.com 5713229821/05.16 ECAM35X.15 BEAN TO CUP ESPRESSO AND CAPPUCCINO MACHINE Instruction for Use Instruction videos available at: http://ecam35015.delonghi.com
Type HD8953 / HD8954 USER MANUAL
 Register your product and get support at www.philips.com/welcome 02 English Type HD8953 / HD8954 MANUAL 02 EN PLEASE READ THIS MANUAL CAREFULLY BEFORE USING THE MACHINE. IMPORTANT SAFEGUARDS When using
 Register your product and get support at www.saeco.com/welcome 02 English Type HD8642 / HD8643 USER MANUAL 02 EN PLEASE READ THIS USER MANUAL CAREFULLY BEFORE USING THE MACHINE. IMPORTANT SAFEGUARDS When
PROGRAMMABLE COFFEE MAKER
 PROGRAMMABLE COFFEE MAKER KM 7280 KM 7280 W ENGLISH EN A B C D E F G H I J K L M N O P 3 SAFETY AND SET-UP Please read this instruction manual thoroughly prior to using this appliance! Follow all safety