Easy Step Cappuccino Maker KES110. Instruction Booklet
|
|
|
- Christiana Parks
- 6 years ago
- Views:
Transcription


1 Easy Step Cappuccino Maker KES110 Instruction Booklet
2 Important Please retain your instruction book for future use. In the event that you need some assistance with your Kambrook appliance, please contact our Customer Service Department on (Australia) or (New Zealand). Alternatively, visit us on our website at
3 Contents Kambrook Recommends Safety First Your Easy Step Cappuccino Maker Operating Instructions Coffee Making Tips Drinks to Try Care and Cleaning Troubleshooting Warranty p4 p6 p7 p12 p13 p14 p16 p20
4 Kambrook Recommends Safety First IMPORTANT: Please retain your instruction book for future use. At Kambrook, we believe that safe performance is the first priority in any consumer product, so that you, our valued customer can confidently use and trust our products. We ask that any electrical appliance that you use be operated in a sensible fashion with due care and attention placed on the following important operating instructions. Important Safeguards For Your Kambrook Easy Step Cappuccino Maker Do not immerse cord, plug or Easy Step Cappuccino Maker body in water or any other liquid. Always use the appliance on a dry, level surface. Before use fully unwind the power cord. Do not place this appliance on or near a hot gas or electric burner, or where it could touch a heated oven. Always turn the Selector Control to STANDBY, switch the power off at the power outlet and then remove the plug when the appliance is not being used and before cleaning. Do not leave the appliance unattended when in use. Young children should be supervised to ensure that they do not play with the appliance. This appliance is for household use only. Do not use this appliance for anything other than its intended use. Do not use outdoors. Do not touch hot surfaces. Use handles. Special Safety Instructions The cup-warming plate will always be heating when the appliance is switched on at the power outlet. Please switch off and unplug when not in use. Only use cold water in the water tank. Do not use any other liquid. Never use the appliance without water in it. Ensure the water tank cap and filter holder are firmly secured when using the appliance. Always ensure the water tank cap is clean around the seal and the centre valve area (never use if the seal is damaged or faulty). As part of regular maintenance, it is recommended that this appliance be taken to the nearest authorised Kambrook Service Centre for checking of the Pressure Indicator Button once every two years. Before removing the Water Tank Cap ensure the Pressure Indicator Button has dropped down and is flush with the top of the cap. To avoid possible burns from hot steam and water, never remove the water tank cap or filter holder while there is steam pressure in the water tank. Remove all steam pressure first. Refer to Page 10 for instructions on how to release the steam pressure. 4
5 Important Safeguards For All Electrical Appliances Fully unwind the power cord before use. Do not let the power cord hang over the edge of a bench or table, touch hot surfaces or become knotted. To protect against electric shock do not immerse the power cord, power plug or appliance in water or any other liquid. The appliance is not intended for use by persons (including children) with reduced physical, sensory or mental capabilities, or lack of experience and knowledge, unless they have been given supervision or instruction concerning use of the appliance by a person responsible for their safety. Children should be supervised to ensure that they do not play with the appliance. It is recommended to regularly inspect the appliance. To avoid a hazard do not use the appliance if power cord, power plug or appliance becomes damaged in any way. Return the entire appliance to the nearest authorised Kambrook Service Centre for examination and/or repair. Any maintenance other than cleaning should be performed at an authorised Kambrook Service Centre. This appliance is for household use only. Do not use this appliance for anything other than its intended use. Do not use in moving vehicles or boats. Do not use outdoors. Misuse may cause injury. The installation of a residual current device (safety switch) is recommended to provide additional safety protection when using electrical appliances. It is advisable that a safety switch with a rated residual operating current not exceeding 30mA be installed in the electrical circuit supplying the appliance. See your electrician for professional advice. WARNING: To avoid possible burns from hot steam and water, NEVER open the water tank cap while there is pressure in the water tank. Remove all pressure first. 5


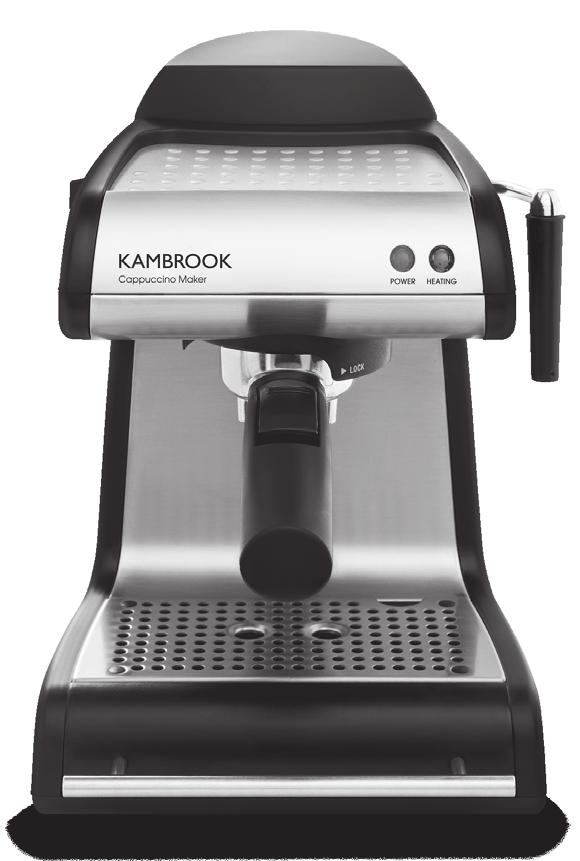
 7. Removable drip tray 8.")
6 Your Easy Step Cappuccino Maker 1. 3 position brew/steam selector control 2. Water tank cap with pressure indicator button 3. Cup warming plate 4. Power and Heating lights 5. Steam tube and nozzle with removable cappuccino froth enhancer 6. Filter holder and 2 stainless steel filters (1-2 cup filter and 2-4 cup filter) 7. Removable drip tray 8. Water tank with hinged cover 9. Stainless steel frothing jug 10. Coffee measuring spoon Not Shown Cleaning tool 6
.")
7 Operating Instructions Before Using Your Easy Step Cappuccino Maker Wash the filter holder, stainless filters and frothing jug in mild detergent and water. Rinse and dry thoroughly. It is recommended to carry out a complete brewing operation with cold water but without any coffee before making your first espresso or cappuccino (see Brewing Coffee). By doing so, any residual dust left inside the Easy Step Cappuccino Maker will be removed. Pre-warming Cups For optimal coffee temperature, use the cup warming plate on top of the appliance to pre-warm the cups. The cup-warming plate will be heating whenever the appliance is switched on at the power outlet. How to Make an Espresso Filling the water tank Switch the power off at the power outlet and remove the plug. Ensure the Brew/Steam selector control is in the STANDBY position. The STANDBY position is located on the centre of sector control. Ensure the Pressure Indicator Button on the Water Tank Cap has dropped down and is flush with the top of the cap. Fig. 1 Unscrew the water tank cap and pour cold water into the tank. Fill to 5mm below the visible water pipes (Fig 1). Do not fill to the top of the tank or there will not be enough area to generate steam. Screw the water tank cap back on top of the water tank, making sure it is secured firmly before operating the appliance. NOTE: Do not use warm or hot water to fill the water tank. WARNING: Do not pour water into the water tank while the selector control is in the brew or steam position. 7


8 Operating Instructions continued Preparing the Coffee Remove the filter holder by rotating 45 degrees to the left (Fig 2 ). Correct Level Incorrect Level Fig. 3 Fig. 4 Fig. 2 Place the 2 or 4 cup filter into the filter holder and use the measuring spoon to fill the filter with ground espresso coffee to the required cup level marking inside the filter (use the smaller filter for 1 or 2 cups and the larger filter for 2 or 4 cups). Do not fill above the 2 or 4 cup mark. Distribute the ground coffee evenly and press it lightly with the measuring spoon (Fig 3 and 4). Too much coffee can block the flow of water. Clean any excess ground coffee from the rim of the filter holder to ensure a proper fit under the brew head. Place the filter retainer clip in the release position by pulling the clip back towards your hand. Place the filter holder underneath the brew head so that the handle is positioned to the left of centre. Lift the filter holder until it contacts the brew head and rotate to the right. WARNING: The metal parts of the filter holder might still be very hot. Cool down these parts by running under cold water. To avoid possible burns from hot steam and water, never open the water tank cap while there is pressure in the water tank. Remove all pressure first. Never let coffee or water level in a cup reach the pouring nozzle of the filter holder. 8
9 Brewing the Coffee The twin nozzle filter holder allows you to make either one or two espresso coffees at a time. Make sure the drip tray is in place. Place empty coffee cups on the drip tray under the filter holder. Make sure the Brew/Steam Selector Control is in the STANDBY position. Plug the power cord into a 230V or 240V power outlet and switch on. The red power light will illuminate when the appliance has been switched on at the power outlet and the cup warming plate will start heating. Rotate the Selector Control to the BREW position. The orange heating light will illuminate to let you know the water is heating. Coffee will begin to flow into the cups in approximately five minutes. The Pressure Indicator Button on the Water Tank Cap will rise when sufficient steam pressure is achieved. When sufficient coffee has flowed into the cups, turn the Selector Control back to the STANDBY position. This will stop the flow of coffee. If you are not continuing to using the steam function, switch off at the power outlet, unplug the power cord, remove all pressure and allow the appliance to cool. Do not remove the water tank cap or filter holder until the steam pressure in the appliance has been released. The Pressure Indicator Button should drop down and be flush with the top of the water tank cap. NOTE: The steam pressure in the machine must be released each time BEFORE re-filling with fresh cold water. How to Froth Milk for a Cappuccino or Latté A cappuccino is an espresso topped with steamed and frothed milk ( 1 3 espresso, 1 3 steamed milk, 1 3 frothed milk), traditionally served in a ceramic cup at 60 C-70 C. A latte is an espresso topped with steamed and frothed milk ( 1 3 espresso, topped with steamed milk and about 1cm of frothed milk), traditionally served in a glass wrapped with a serviette. The first step in making a cappuccino/latte is to make a short espresso (Follow steps in How to make an Espresso ). Fill the frothing jug 1 3 full with cold milk (skim milk is the easiest to froth). Hold the frothing jug below the froth enhancer. Immerse the froth enhancer 10mm into the milk and rotate the Selector Control to the STEAM position. Gently move the frothing jug in a circular motion around the froth enhancer. When the milk begins to increase in volume, immerse the froth enhancer deeper into the milk to further heat the milk. Do not allow the milk to boil. Turn the Selector Control to the STANDBY position to stop the steaming function before removing the jug. Add the steamed milk to each cup of freshly brewed espresso coffee and spoon on the frothed milk. 9

10 Operating Instructions continued Switch the power off at the power outlet, unplug the power cord, remove all steam pressure and allow the appliance to cool. Do not remove the water tank cap or the filter holder until the steam pressure in the appliance has been released. The Pressure Indicator Button should drop down and be flush with the top of the water tank cap. WARNING: To avoid splattering of hot milk, do not lift the steaming nozzle above the surface of the milk while frothing. Ensure the selector control is in the standby position before removing the frothing jug. How to Release the Steam Pressure Switch the power off at the power outlet and unplug the power cord. Place the frothing jug under the steam nozzle. Turn the selector control to the STEAM position and allow all steam and residual water to completely drain off into the jug until all flow and sound ceases. The steam pressure is now removed. Turn the selector control to the BREW position to ensure steam pressure is removed, then turn back to the STANDBY position. The Pressure Indicator Button should drop down and be flush with the top of the water tank cap. (See Fig.5) Pressure Indicator Down Fig. 5 WARNING: The metal parts of the filter holder might still be very hot. Cool down these parts by running under cold water. To avoid possible burns from hot steam and water, never remove the water tank cap or the filter holder while there is steam pressure in the water tank. Remove all steam pressure first. Never let coffee or water level in a cup reach the pouring nozzle of the filter holder. 10
11 After the steam pressure has been released, remove the filter holder from the brew head. Using the filter retainer clip to secure the filter in the filter holder, turn the filter holder upside down to empty used coffee (used coffee grounds should be thrown away with domestic waste and not down the sink which may block drains). Rinse the filter and filter holder with water and allow to dry. 11
12 Coffee Making Tips The Coffee Pre-ground coffee will only retain its flavour for 1 week, provided it is stored in an air tight container, in a cool, dark area. Whole coffee beans are recommended and should be ground just before use. Coffee beans stored in an airtight container will keep up to 1 month before they begin to lose their flavour. Do not store in a refrigerator or freezer. The Grind The coffee must be ground fine, but not too fine (the correct grind should look gritty, like sand or salt). If the grind is too fine, the water will not flow though the coffee even under pressure (this grind looks like powder and feels like flour when rubbed between fingers). If the grind is too coarse, the water flows through the coffee too fast, preventing a full flavoured extraction. 12
13 Drinks to Try Espresso Intense and aromatic, an espresso, or short black as it s also known, uses about 7g of ground coffee. It is served in a small cup or glass to a level of approximately 35mm. Cappuccino A cappuccino is very light and is usually served between 60 C and 70 C. This has one-third espresso, onethird milk and one-third frothed milk. Caffe Latté Served in a glass with a serviette, a caffe latté consists of one-third espresso, topped with steamed milk and about 1cm of foam. Macchiato A macchiato consists of shot or more of espresso, topped with a small amount of frothed milk. Long Black A long black is served as a single or double espresso, poured over hot water. Ristretto Meaning restricted, a ristretto is an extremely short espresso of approximately 15mm, distinguished by its intense flavour and aftertaste. 13


14 Care and Cleaning It is Essential to Clean the Steam System after Each Use Ensure the Selector Control is in the STANDBY position and the steam pressure has been released. Remove the froth enhancer from the steam tube and nozzle for cleaning and wipe the steam tube and nozzle with a damp cloth. Remove the steam nozzle from the steam tube by unscrewing in a counter-clockwise direction using the cleaning tool provided (Fig. 7). Clean the steam nozzle by removing it and letting water run through it for about 10 seconds in the direction opposite to the normal steam flow. If the nozzle is still blocked clean it with the other end of the cleaning tool provided (Fig. 8). Turn the Selector Control to STEAM and allow the appliance to produce steam for 4-5 seconds to clear the steam tube. The filter holder does not have to be locked into position. Turn the Selector Control to STANDBY, switch off at the power outlet, remove the plug and allow the appliance to cool. Remove all steam pressure by following the instructions on Page 10. After the steam pressure has been released, remove the water tank cap and discard the remaining water (always empty the water tank between uses). The steam nozzle must be screwed back onto the steam tube in a clockwise direction and tightened using reasonable force with the end of the cleaning tool provided. The filter holder, stainless steel filters and drip tray can be washed with soapy water. The drip tray consists of 2 parts and can be removed for easier cleaning. (Fig. 6). Fig. 7 Fig. 8 Fig. 6 NOTE: Do not place any of the components in the dishwasher. 14
15 Decalcifying Hard water can cause limestone build up in and on the inner functioning components, reducing the brewing flow, power of the appliance, and affecting the quality of coffee. We advise decalcifying the appliance on a regular basis (once a month) using a liquid decalcifying agent. Follow the instructions provided or use the following as a guide: Diluted solution (for softer water) 1 part decalcifying agent 2 parts cold tap water Concentrated solution (for harder water) 1 part decalcifying agent 1 part cold tap water Decalcifying the appliance Ensure the Selector Control is in the STANDBY position, the appliance is switched off at the power outlet and that the plug is disconnected. Ensure the appliance is cool and all steam pressure in the appliance has been released. Remove the stainless steel filter from the filter holder and place the filter holder back in position. Place an empty cup on the drip tray, under the filter holder. Remove the water tank cap and pour in the decalcifying solution. Screw the water tank cap back on (make sure the cap is on tight). Plug the appliance into the power outlet and turn the power switch on. Turn the Selector Control to the BREW position and allow the decalcifying solution to run through the filter holder. When the solution has run through the appliance (make sure that all the solution has run out and there is no steam pressure in the appliance), turn the Selector Control to the STANDBY position, switch off at the power outlet and remove the plug and allow the appliance to cool. After decalcifying, rinse the water tank thoroughly and refill with cold tap water. Repeat the above procedures several times by running clear the water through the filter holder and through the steam nozzle (half each). This should remove any possible residual after taste left by decalcifying agent. Replace the stainless steel filter and the appliance is ready to use. NOTE: The stainless steel filters should not come in contact with any decalcifying agents. Do not use powdered decalcifying agents. WARNING: To avoid possible burns from hot steam and water, never open the water tank cap while there is pressure in the water tank. Remove all pressure first. 15
16 Troubleshooting Trouble Shooting Chart Problem Coffee does not come out through the filter holder Coffee comes out too quickly Coffee is too weak or watery Coffee comes out around the filter holder No steam is generated Coffee is splattering out of the filter holder Milk not foamy after frothing Causes Appliance was not switched on or plugged in. No water in tank. Selector control not in Brew position. Coffee grind is too fine. Too much coffee in the filter. Water tank cap is not secure, steam is escaping. Coffee grind is too coarse. Not enough coffee in filter. Coffee grind is not fine enough - use Espresso ground coffee. Filter holder is not inserted in the brew head. There are coffee grounds around the filter holder rim. There is too much coffee in the filter. Coffee has been packed too tightly. Appliance is not turned on. The water tank is empty. There is too much water in the water tank, (no room for steam). Selector control not in Steam position. The water tank is empty or low (not enough pressure). Not enough steam. Ensure milk selected is suitable for frothing 16
17 Notes 17
18 Notes 18
19 Notes 19
20 Kambrook 12 Month Replacement Warranty In Australia, this Kambrook Replacement Warranty does not affect the mandatory statutory rights implied under the Trade Practices Act 1974 and other similar State and Territory legislation relating to the appliance. It applies in addition to the conditions and warranties implied by that legislation. In New Zealand, this Kambrook Replacement Warranty does not affect your mandatory statutory rights implied under the Consumer Guarantees Act 1993 in relation to the appliance. It applies in addition to the conditions and guarantees implied by that legislation. This Kambrook Replacement Warranty is valid only in the country of purchase, but other statutory warranties may still apply. This Warranty card and the purchase receipt for this product are to be retained as proof of purchase and must be presented if making a claim under the Kambrook Replacement Warranty. Please note that under any applicable statutory warranty you are not required to produce these documents, but may be required to provide a proof of purchase. Kambrook warrants the purchaser against defects in workmanship and material for a period of 12 months domestic use from the date of purchase (or 3 months commercial use). The Kambrook Replacement Warranty does not apply to any defect, deterioration, loss, injury or damage occasioned by, or as a result of, misuse or abuse, negligent handling or if the product has been used other than in accordance with the instructions. The Kambrook Replacement Warranty excludes breakables such as glass and ceramic items, consumable items and normal wear and tear. This Kambrook Replacement Warranty is void if there is evidence of the product being tampered with by unauthorised persons. If the product includes one or a number of accessories only the defective accessory or product will be replaced. Subject to your statutory rights, in the event of Kambrook choosing to replace the appliance, the Kambrook Replacement Warranty will expire at the original date, i.e. 12 months from the original date of purchase. In the event that you need some assistance with your Kambrook appliance, please contact our Customer Service Department on (Australia) or (New Zealand). Alternatively, visit us on the website at Kambrook 12 Month Replacement Warranty Your Purchase Record (Please Complete) Attach a copy of the purchase receipt here. Date Of Purchase Model Number Serial Number Purchased From (Please don t return purchase record until you are making a claim) Register your warranty at Kambrook - Australia Building 2, Port Air Industrial Estate 1A Hale Street Botany NSW 2019 Australia Customer Service Line Customer Service Fax Kambrook - New Zealand Private Bag Botany, Manukau Auckland 2141 New Zealand Customer Service Line/Spare Parts or Customer Service Fax Due to continual improvement in design or otherwise, the product you purchase may differ slightly from the illustration in this book. Issue 1/10
Espresso/Cappuccino Maker
 Breville is a registered trademark of Breville Pty. Ltd. ABN 98 000 092 928 Breville Customer Service Centre Australian Customers Breville Customer Service Centre Locked Bag 2000 Botany NSW 2019 AUSTRALIA
BarAroma Coffee & Spice Grinder
 Breville is a registered trademark of Breville Pty. Ltd. ABN 98 000 092 928 Breville Customer Service Centre Australian Customers Breville Customer Service Centre PO Box 22 Botany NSW 2019 AUSTRALIA Customer
Kambrook - Australia Ground Floor, Suite 2, Bourke Rd Alexandria NSW 2015, Australia
 Kambrook - Australia Ground Floor, Suite 2, 170-180 Bourke Rd Alexandria NSW 2015, Australia Locked Bag 2000 Botany NSW 1455 Customer Service Line 1300 139 798 Customer Service Fax 1800 621 337 www.kambrook.com.au
Café. KDC120 Issue 1/04
 Kambrook 461 Plummer Street, Port Melbourne 3207, Australia Customer Service Line (free call) 1800 800 634 Customer Service Fax 1800 621 337 Kambrook New Zealand, Private Bag 94411, Greenmount, Auckland,
Aroma Fresh. Instructions for use Includes recipes. Model BCM120
 Aroma Fresh Instructions for use Includes recipes Model BCM120 Contents Page Breville recommends safety first 4 Know your Breville Aroma Fresh Coffee Maker 5 Operating your Breville Aroma Fresh Coffee
Café Roma Instruction Booklet Livret d instructions
 Café Roma Instruction Booklet Livret d instructions ESP8XL CONGRATULATIONS On the purchase of your new Breville Café Roma Espresso Machine CONTENTS 4 Breville recommends safety first 6 Know your Breville
STAINLESS STEEL MILK FROTHER. Model: PKFMR11BK
 STAINLESS STEEL MILK FROTHER Model: PKFMR11BK WARNING! To reduce the risk of fire, electrical shock or injury to persons or property: Carefully read all instructions before operating your new product for
BarVista. Instructions for use. Breville Customer Service Centre Australian Customers. Espresso/Cappuccino Machine
 www.breville.com.au BarVista Espresso/Cappuccino Machine Breville is a registered trademark of Breville Pty. Ltd. ABN 98 000 092 928 Instructions for use Breville Customer Service Centre Australian Customers
Caffeo. Italian style espresso machine. INSTRUCTIONS FOR USE. Breville Customer Service Centre
 Breville is a registered trademark of Breville Pty. Ltd. ABN 98 000 092 928 Breville Customer Service Centre Australian Customers Breville Customer Service Centre Locked Bag 2000 Botany NSW 2019 AUSTRALIA
IMPORTANT SAFEGUARDS. 3. To protect against fire, electric shock and injury to persons do not immerse cord, plug or unit in water or other liquid.
 IMPORTANT SAFEGUARDS When using electrical appliances, basic precautions should always be followed, including the following: 1. Read all instructions. 2. Make sure that your outlet voltage corresponds
INSTRUCTIONS AND WARRANTY
 INSTRUCTIONS AND WARRANTY MODEL NO. SEM10 SALTON CAPPUCCINO MAKER INTRODUCTION Congratulations on purchasing our Salton Cappuccino Maker. Each unit is manufactured to ensure safety and reliability. Before
Stainless Steel Milk Frother N3 User Manual
 Stainless Steel Milk Frother N3 User Manual Voltage: 110V~60Hz Power: 500W READ AND SAVE THESE INSTRUCTIONS IMPORTANT Read and follow the instructions in this user manual even if you feel you are familiar
5KEK1322 W A_v08.indd 1 5/13/16 2:25 PM
 5KEK1322 W10878653A_v08.indd 1 PARTS AND FEATURES PARTS AND ACCESSORIES Tea steeper lid (center section of lid with handle) Kettle lid (outer section) Stainless steel lime scale filter Removable stainless
1. IMPORTANT SAFEGUARDS When using electrical appliances, basic safety precautions should always be followed to reduce the risk of fire, electric
 1. IMPORTANT SAFEGUARDS When using electrical appliances, basic safety precautions should always be followed to reduce the risk of fire, electric shock, and/pr injury to persons including the following:
Espresso Maker READ BEFORE USE. Questions? Please call us our friendly associates are ready to help
 Espresso Maker Visit www.hamiltonbeach.in for our complete line of products and Use and Care Guides as well as delicious recipes, tips, and other helpful information! Questions? Please call us our friendly
Power Drive 1.5L Blender KBL110/KBL210. Instruction Booklet
 Power Drive 1.5L Blender KBL110/KBL210 Instruction Booklet Important Please retain your instruction book for future use. In the event that you need some assistance with your Kambrook appliance, please
AutoGrinder. Automatic coffee grinder. Instruction Booklet EM0415. Please read these instructions carefully and retain for future reference.
 AutoGrinder Automatic coffee grinder Instruction Booklet EM0415 Please read these instructions carefully and retain for future reference. Contents Sunbeam s Safety Precautions 1 Features of your AutoGrinder
COFFEE MAKER INSTRUCTION MANUAL CM4682-V
 COFFEE MAKER INSTRUCTION MANUAL CM4682-V IMPORTANT SAFEGUARDS Before using the electrical appliance, the following basic precautions should always be followed including the following: 1. Read all instructions.
Burr Grinder. Automatic burr grinder with 17-position grind selector. Instruction Booklet EM0430
 Burr Grinder Automatic burr grinder with 17-position grind selector Instruction Booklet EM0430 Please read these instructions carefully and retain for future reference. Contents Sunbeam s Safety Precautions
CAFE BARISTA. User Guide EM5000
 CAFE BARISTA User Guide EM5000 Heading Sub Heading Body copy with not indent applied. Bullet copy Bullet copy Bullet copy Bullet copy Bullet copy Bullet copy Bullet copy Bullet copy 2 Contents Sunbeam
Coffee Burr Grinder. Model #559. Instructions. Warranty
 Coffee Burr Grinder Model #559 Instructions Warranty IMPORTANT SAFEGUARDS When using electrical appliances, basic safety precautions should always be followed, including the following: 1. Read all instructions.
Single-Serve Coffee Maker
 840251801 Single-Serve Coffee Maker IMPORTANT SAFEGUARDS When using electrical appliances, basic safety precautions should always be followed to reduce the risk of fire, electric shock, and/or injury to
IMPORTANT INSTRUCTIONS MODE D EMPLOI IMPORTANT INSTRUCIONES IMPORTANTES ISTRUZIONI IMPORTANTI
 MOKA 22-04-2003 10:10 Pagina 1 IMPORTANT INSTRUCTIONS SAVE THESE INSTRUCTIONS MODE D EMPLOI IMPORTANT CONSERVEZ LES PRESENTES INSTRUCTIONS INSTRUCIONES IMPORTANTES GUARDE ESTAS INSTRUCCIONES ISTRUZIONI
User Manual. Stainless Steel Coffee Urns. Models: 177CU55ETL, 177CU110ETL 10/2016. Please read and keep these instructions. Indoor use only.
 Intertek Stainless Steel Coffee Urns Models: 177CU55ETL, 177CU110ETL 10/2016 Please read and keep these instructions. Indoor use only. www.avantcoequipment.com 1 NOTE: Save these instructions for future
User Manual. Stainless Steel Coffee Urns. Models: 177CU30, 177CU55, 177CU110 04/2018. Please read and keep these instructions. Indoor use only.
 Stainless Steel Coffee Urns Models: 177CU30, 177CU55, 177CU110 04/2018 Please read and keep these instructions. Indoor use only. www.avantcoequipment.com 1 NOTE: Save these instructions for future reference.
AUTOMATIC BURR COFFEE GRINDER
 AUTOMATIC BURR COFFEE GRINDER MODEL:SCG-903B USER MANUAL www.thesecura.com Welcome Congratulations on purchasing our Secura Automatic Burr Coffee Grinder. Each unit is manufactured to ensure safety and
aerolatte ltd. Unit 1 The Corn Works Station Road Radlett WD7 8JY UK
 aerolatte ltd. Unit 1 The Corn Works Station Road Radlett WD7 8JY UK www.aerolatte.com Safety Instructions and WARNINGS When using electrical appliances basic safety precautions should always be followed
Sleeve Down: Frothing. Sleeve Up: Steaming
 Sleeve Down: Frothing Sleeve Up: Steaming 3 SPECIAL CORD SET INSTRUCTIONS Regarding your Cord Set: A. A short power-supply cord (or detachable power-supply cord) is to be provided to reduce risks resulting
the Coffee & Spice Breville Customer Service Centre Instruction Booklet
 Breville Customer Service Centre the Coffee & Spice Instruction Booklet Australian Customers Mail: PO Box 22 Botany, NSW, 2019 AUSTRALIA Phone: 1300 139 798 Fax: (02) 9384 9601 Email: Customer Service:
Coffee Grinder Instruction Manual
 Coffee Grinder Instruction Manual CoffeeGrinder Manual-English Only.indd 1 07/01/2016 14:14:39 Savisto Home Coffee Grinder Voltage Supply: 220-240V~ 50/60Hz Power Consumption: 150W Eng Please read through
CITRUS PRESS. New Zealand Customers
 CITRUS PRESS Breville Customer Service Centre Australian Customers Mail: Breville Customer Service Centre Locked Bag 2000 Botany NSW 2019 AUSTRALIA Phone: Customer Service: 1300 139 798 Fax (02) 9384 9601
Essentials Power Mix KHM10. Instruction Booklet
 Essentials Power Mix KHM10 Instruction Booklet KHM10_IB_FA.indd 1 Important Please retain your instruction book for future use. In the event that you need some assistance with your Kambrook appliance,
INDEX 1. INTRODUCTION. Dear client:
 INDEX 1. Introduction 2. Important Safeguards 3. Preparation 4. Making Espresso 5. Preparing Cappuccino 6. Making Tea 7. Cleaning the Machine 8. BRIEL Technology (The AQUASTOP System) 9. Troubleshooting
INSTRUCTION MANUAL AND RECIPE BOOK CORN DOG MAKER CDM-1 SMART PLANET PLEASE READ THESE INSTRUCTIONS CAREFULLY AND RETAIN FOR FUTURE REFERENCE.
 INSTRUCTION MANUAL AND RECIPE BOOK CORN DOG MAKER CDM-1 SMART PLANET PLEASE READ THESE INSTRUCTIONS CAREFULLY AND RETAIN FOR FUTURE REFERENCE. IMPORTANT SAFEGUARDS Read all instructions before using the
User Manual. Stainless Steel Coffee Urn. Models: 177CU30 11/2018. Please read and keep these instructions. Indoor use only.
 Stainless Steel Coffee Urn Models: 177CU30 11/2018 Please read and keep these instructions. Indoor use only. www.avantcoequipment.com 1 NOTE: Save these instructions for future reference. Index Important
Custom Grind Deluxe Coffee Grinder
 READ BEFORE USE Visit www.hamiltonbeach.in for our complete line of products and Use and Care Guides as well as delicious recipes, tips, and other useful information! Custom Grind Deluxe Coffee Grinder
Micro Casa Semiautomatica
 Micro Casa Semiautomatica Training Manual Contents Overview 1 Models 1 Specifications 1 Features 1 Available accessories 1 Package contents 2 Semiautomatic parts 3 Assembly 4 Operating instructions 4 Starting
USE & CARE INSTRUCTIONS ESPRESSO MAKER FES4B
 USE & CARE INSTRUCTIONS ESPRESSO MAKER FES4B IMPORTANT SAFEGUARDS When using electrical appliances, basic safety precautions should always be followed, including the following: 1. Read all instructions.
Electric Two-Speed Drink Mixer
 Electric Two-Speed Drink Mixer MS2090 Series Before use, please read this manual thoroughly and save for future reference. ovente.com Electric Two-Speed Drink Mixer MS2090 Series 2 ovente.com ELECTRIC
COFFEE GRINDER. Owner s Manual
 COFFEE GRINDER Owner s Manual 4 4 FEATURES Bean Hopper Lid Bean Hopper Grinder Start/Stop Button Bean Hopper Holder Bean Hopper Release Button Grinding Timer Dial Coffee Powder Outlet 0 Grind Thickness
45-Cup Coffee Urn Big Brew Classic. Instruction Manual. Model ACU-045
 45-Cup Coffee Urn Big Brew Classic Instruction Manual Model ACU-045 Congratulations! Your Big Brew Classic will surely become one of the most practical appliances in your home or office. Enjoy fresh brewed
Quick Start Guide Read this booklet thoroughly and save these instructions.
 Quick Start Guide Read this booklet thoroughly and save these instructions. FAQs can be found at www.espresso-works.com Email us for any unanswered questions: cs@espresso-works.com For product registration,
SAVE THESE INSTRUCTIONS THIS PRODUCT IS FOR HOUSEHOLD USE ONLY
 IMPORTANT SAFEGUARDS When using electrical appliances, basic safety precautions should always be followed, including the following: Read all instructions. Do not touch hot surfaces. Use handles and knobs.
Getting to Know Your Bananza
 User Guide Thank you for purchasing Bananza from JML. To get the best results from this frozen dessert maker, please read these instructions in full and retain for future reference. Contents Safety Warnings
the Infuser Instruction Booklet BES840
 the Infuser Instruction Booklet BES840 Contents CONGRATULATIONS on the purchase of your new Breville Infuser Espresso Machine 4 Breville recommends safety first 6 Know your Breville Infuser Espresso Machine
OPERATING INSTRUCTIONS FOR YOUR SAFETY CAREFULLY READ THE OPERATING INSTRUCTIONS. FOR HOUSEHOLD USE ONLY
 OPERATING INSTRUCTIONS FOR YOUR SAFETY CAREFULLY READ THE OPERATING INSTRUCTIONS. FOR HOUSEHOLD USE ONLY 2 Opening Congratulations on choosing this high quality espresso machine and thank you for your
OPERATING INSTRUCTIONS FOR BY MR. COFFEE STEAM ESPRESSO/CAPPUCCINO MAKER MODEL ECM7
 OPERATING INSTRUCTIONS FOR BY MR. COFFEE STEAM ESPRESSO/CAPPUCCINO MAKER MODEL ECM7 IMPORTANT SAFEGUARDS When using electrical appliances, basic safety precautions should always be followed to reduce the
IF THERE IS ANY QUESTION ABOUT A CONDITION BEING SAFE OR UNSAFE, DO NOT OPERATE THIS PRODUCT!
 RO18BT 18 Quart Roaster Oven Operating Instructions READ ALL INSTRUCTIONS AND WARNINGS BEFORE USING THIS PRODUCT. This manual provides important information on proper operation & maintenance. Every effort
Stainless Steel Espresso & Cappuccino Machine
 Stainless Steel Espresso & Cappuccino Machine Model #119 Instructions Warranty 1250 W / 120 V~ / 60 Hz IMPORTANT SAFEGUARDS When using electrical appliances, basic safety precautions should always be followed
Stainless Steel Series
 Stainless Steel Series Steam Espresso Maker Instruction Manual SO-315387_90070_BELLAPro_Espresso Profs._Best Buy_IM_r01.indd 1 Thank You for your purchase Register & sign up for special announcements and
SAFETY INSTRUCTIONS FOR USE
 INTRODUCTION Thank you for choosing this De Longhi Coffee machine. We hope you enjoy your new appliance. Please take a few minutes to read these instructions. This is the only way to ensure optimum results
5KCG0702 W A_Final.indd 1 8/4/15 8:35 AM
 5KCG0702 PARTS AND FEATURES PARTS AND ACCESSORIES Hopper lid Easy access stainless steel burrs 200 g glass hopper 15 grind settings Die cast metal body Grind control dial Power switch Faceplate assembly
5KCM0512A W A_ENv10.indd 1 10/13/15 12:41 PM
 5KCM0512A PARTS AND FEATURES PARTS AND ACCESSORIES Scale readout display Timer readout display Plunger handle Power button Lid Plunger (stainless steel mesh filter with silicone seal not shown) Timer button
Get Started. Better Everyday ECAM23260
 Better Everyday Get Started This short guide is not intended to explain all the functions of the appliance. Please read all the owner s instruction booklet before use. Video available on www.youtube.com/delonghiusa
Model # Instructions Warranty. 950 Watts / 120 Vac / 60 Hz. Read this manual thoroughly before using and save it for future reference
 Perk Model #405.05 Instructions Warranty 950 Watts / 120 Vac / 60 Hz Read this manual thoroughly before using and save it for future reference IMPORTANT SAFEGUARDS When using electrical appliances, basic
Burr Grinder. Model #551. Instructions. Warranty
 Burr Grinder Model #551 Instructions Warranty IMPORTANT SAFEGUARDS When using electrical appliances, basic safety precautions should always be followed, including the following: 1. Read all instructions.
The Scoop 2-Way Brewer
 READ BEFORE USE The Scoop 2-Way Brewer Visit www.hamiltonbeach.in for our complete line of products and Use and Care Guides as well as delicious recipes, tips, and other helpful information! Questions?
QUALITY MILK FROTHER INSTRUCTION MANUAL MODEL NO. MMF005
 QUALITY MILK FROTHER INSTRUCTION MANUAL MODEL NO. MMF005 MILK FROTHER INSTRUCTION MANUAL Model No.: MMF005 READ ALL INSTRUCTIONS BEFORE USING THE FROTHER. KEEP THESE INSTRUCTIONS FOR FUTURE REFERENCE.
Duothek Plus Model #464
 Duothek Plus Model #464 Instructions for Use Warranty Guarantee of Performance IMPORTANT SAFEGUARDS When using electrical appliances, basic safety precautions should always be followed to reduce the risk
Booklet_TCG-357_ENG.qxd 9/8/08 11:19 AM Page 1 COFFEE/SPICE GRINDER. Instruction Booklet. Model: TCG-357
 Booklet_TCG-357_ENG.qxd 9/8/08 11:19 AM Page 1 COFFEE/SPICE GRINDER Instruction Booklet Model: TCG-357 Booklet_TCG-357_ENG.qxd 9/8/08 11:19 AM Page 2 IMPORTANT SAFEGUARDS When using electrical appliances,
4-cup Espresso/Cappuccino Machine
 4-cup Espresso/Cappuccino Machine Model #303 Instructions Warranty IMPORTANT SAFEGUARDS When using electrical appliances, basic safety precautions should always be followed, including the following: Read
PLEASE READ THIS MANUAL BEFORE USE. SAVE FOR FUTURE REFERENCE.
 8-CUP STAINLESS STEEL CARAFE Coffee Brewer Model: BV1900TS HOUSEHOLD USE ONLY Customer Service Line: 1-855-664-1252 2-year limited warranty bonavitaworld.com Simple to operate Optional pre-infusion cycle
COLD BREW COFFEE MAKER. Model# GCM-7800 USER MANUAL
 COLD BREW COFFEE MAKER Model# GCM-7800 USER MANUAL Read this manual thoroughly before using and save it for future reference FOR CUSTOMER SERVICE QUESTIONS OR COMMENTS VISIT US @ GOURMIA.COM INFO@GOURMIA.COM
the Smart Grinder Pro
 the Smart Grinder Pro Instruction Booklet Suits all BCG820 models CONGRATULATIONS on the purchase of your new Breville product 2 Contents 3 Breville recommends safety first 9 Know your Breville product
INSTRUCTIONS AND WARRANTY
 INSTRUCTIONS AND WARRANTY MODEL NO. RHCM46 CAFÉ BARISTA ONE TOUCH AUTOMATIC COFFEE MAKER 1 Congratulations on purchasing our Russell Hobbs Café Barista One Touch Coffee Maker. Each unit is manufactured
EC3OO. Espresso & Cappuccino Machine. Model # W / 120 V~ / 60 Hz. Instructions Warranty
 EC3OO Espresso & Cappuccino Machine Model #123.05 Instructions Warranty 1200W / 120 V~ / 60 Hz Read this manual thoroughly before using and save it for future reference IMPORTANT SAFEGUARDS When using
Half-Pint Soft Serve Ice Cream Maker
 CAUTION: READ OPERATOR S MANUAL BEFORE USE Visit www.hamiltonbeach-me.com for our complete line of products and Use and Care Guides as well as delicious recipes and tips! Half-Pint Soft Serve Ice Cream
Please read and keep these instructions for future use
 172005 REV1.qxp_Layout 1 12/10/2015 14:07 Page 1 CM172005 MUK Rev1 Machine Please read and keep these instructions for future use For competitions, product hints and tips and more join us at www.morphyrichards.co.uk/blog
ESPRESSO COFFEE MAKER INSTRUCTION MANUAL MODEL: CM5013-SA
 ESPRESSO COFFEE MAKER INSTRUCTION MANUAL MODEL: CM5013-SA Read this booklet thoroughly before using and save it for future reference IMPORTANT SAFEGUARDS Before using the electrical appliance, the following
IMPORTANT SAFEGUARDS. ENGLISH Congratulations on your wise choice!
 Congratulations on your wise choice! As the proud owner of the Gaggia machine, you can now experience the taste of a delicious cup of espresso or cappuccino in the comfort of your own home. Espresso coffee,
15-Bar Pump Espresso Maker Instruction Manual
 15-Bar Pump Espresso Maker Instruction Manual Styled for Life Designed & Engineered in New York City SZ-314289_CRUX006_15 bar Espresso maker_im_r3.indd 1 Thank you for Purchasing this Product You may already
5KEK1522 W A_01_EN.indd 1 11/16/12 1:22 PM
 5KEK1522 Water Kettle INSTRUCTIONS Table of Contents water KEttle SAFETY Important safeguards...6 Electrical requirements...7 Electrical equipment waste disposal...7 PARTS AND FEATURES Parts and accessories...8
SG120 Model # Cup Stainless Steel Coffee Maker. Operating Instructions Product Registration Warranty
 SG120 Model #494 12-Cup Stainless Steel Coffee Maker Operating Instructions Product Registration Warranty IMPORTANT SAFEGUARDS When using electrical appliances, basic safety precautions should always be
Cappuccino Plus Espresso and Cappuccino Maker
 Cappuccino Plus Espresso and Cappuccino Maker Thank you for buying the Hamilton Beach Cappuccino Plus. You have made an excellent choice! All of our products are manufactured to the highest level of quality
Wi-Fi Coffee Maker. Model# GCMW-4750 USER MANUAL
 Wi-Fi Coffee Maker Model# GCMW-4750 USER MANUAL Read this manual thoroughly before using and save it for future reference Model: GCMW-4750 2018 Gourmia www.gourmia.com The Steelstone Group Brooklyn, NY
THE PANCAKE FACTORY. Model: PM-2
 THE PANCAKE FACTORY Model: PM-2 IMPORTANT SAFEGUARDS When using electrical appliances, basic safety precautions should always be followed including the following: 1. Read all instructions. 2. Do not touch
MODELS 1315 & 1315-S La Pavoni CLUB COMBO
 IMPORTANT WARNINGS MODELS 1315 & 1315-S La Pavoni CLUB COMBO DUET Never operate your espresso machine without water in the tank. This may cause premature pump failure. Do not allow the power cord to come
Automatic Coffee Machine Instruction Manual
 Instruction Manual Page 1 of 17 8212-0 Automatic Coffee Machine Instruction Manual Instruction Manual Page 2 of 17 IMPORTANT INFORMATION For safety purposes please read these instructions carefully before
WELCOME TO THE PARTY!
 WELCOME TO THE PARTY! Congratulations on your purchase of the Party Grill and welcome to the world of interactive culinary experiences! This unique and versatile grill gives you endless opportunites to
the Bambino Plus Instruction Book - BES500
 the Bambino Plus Instruction Book - BES500 Contents 2 Breville Recommends Safety First 6 Components 8 Features 8 Assembly 9 Functions 15 Care & Cleaning 18 Troubleshooting BREVILLE RECOMMENDS SAFETY FIRST
Crepe Creations. Instructions BCP200
 Crepe Creations Instructions BCP200 Contents Page Breville recommends safety first 4 Know your Breville Crêpe Creations 5 Using your Breville Crêpe Creations 6 Maintaining your Breville Crêpe Creations
Shotmeister Owner s Manual. The Sleekest Design, Pouring the Coldest Shots
 Shotmeister Owner s Manual The Sleekest Design, Pouring the Coldest Shots Thank you for purchasing a Jägermeister Shotmeister! REGISTRATION INFORMATION Register your Jägermeister Shotmeister Online: at
Programmable Conical Burr Mill CBM-18
 Programmable Conical Burr Mill CBM-18 IMPORTANT SAFEGUARDS When using electrical appliances, basic safety precautions should always be followed, including the following: 1. Read all instructions. 2. To
Automatic Cold Brewer
 Automatic Cold Brewer Model# GCM-6800 USER MANUAL Read this manual thoroughly before using and save it for future reference Model: GCM-6800 2017 Gourmia www.gourmia.com The Steelstone Group Brooklyn, NY
MODEL NO. RH1916 RUSSELL HOBBS NERO ESPRESSO COFFEE MAKER
 INSTRUCTIONS AND WARRANTY MODEL NO. RH1916 RUSSELL HOBBS NERO ESPRESSO COFFEE MAKER Congratulations on purchasing our Russell Hobbs Nero Espresso Coffee Maker. Each unit is manufactured to ensure safety
infinity Model # 575 #570 Conical Burr Grinder Instructions Warranty Product Registration 100W / 120V~ / 60 Hz
 infinity Conical Burr Grinder Model # 575 #570 Instructions Warranty Product Registration 100W / 120V~ / 60 Hz IMPORTANT SAFEGUARDS When using electrical appliances, basic safety precautions should always
10,000 prize draw. instructions. EXTRA year guarantee FREE rewards gallery. details. Register online now!
 r instructions 10,000 prize draw EXTRA year guarantee FREE rewards gallery www.russellhobbs.co.uk/productregister/ Register online now! See back for details e j 600ml 600ml k f g A B i 2 Read the instructions,
IMPORTANT INSTRUCTIONS MODE D EMPLOI IMPORTANT INSTRUCIONES IMPORTANTES ISTRUZIONI IMPORTANTI
 ec5/7 19-11-2002 10:09 Pagina 1 IMPORTANT INSTRUCTIONS SAVE THESE INSTRUCTIONS MODE D EMPLOI IMPORTANT CONSERVEZ LES PRESENTES INSTRUCTIONS INSTRUCIONES IMPORTANTES GUARDE ESTAS INSTRUCCIONES ISTRUZIONI
Please read and keep these instructions for future use
 172002 REV1.qxp_Layout 1 25/02/2015 10:32 Page 1 CM172002 MUK Rev1 Please read and keep these instructions for future use For competitions, product hints and tips and more join us at www.morphyrichards.co.uk/blog
BRAND DOUBLE WAFFLE MAKER
 BRAND DOUBLE WAFFLE MAKER User Guide Item: 759106 Recipes Inside! Ginnys.com 800-544-1590 Facebook.com/GinnysBrand Pinterest.com/GinnysBrand Thank you for purchasing a Ginny s Brand Double Waffle Maker.
TABLE OF CONTENTS HAND MIXER SAFETY
 5KHM926 2 HAND MIXER INSTRUCTIONS TABLE OF CONTENTS HAND MIXER SAFETY...2 Important Safeguards...3 Electrical Requirements...3 PARTS AND FEATURES...4 ACCESSORY GUIDE...5 SETTING UP YOUR HAND MIXER Attaching
Oven Toaster Grill with Convection
 READ BEFORE USE Oven Toaster Grill with Convection Visit www.hamiltonbeach.in for our complete line of products and Use and Care Guides as well as delicious recipes, tips, and other useful information!
 www.krups.com a e e1 f g b i h l m n n1 c d k3 k1 k2 k4 k5 k k1 p p1 o j j1 j2 1 2 3 2 2 1 1 4 5 6 1 2 3 3 2 1 7 8 9a 9b 10 11 12 13 14 15 USA IMPORTANT SAFEGUARDS When using electrical appliances, basic
MCM-1NQ PLEASE READ THESE INSTRUCTIONS CAREFULLY AND RETAIN FOR FUTURE REFERENCE.
 MCM-1NQ PLEASE READ THESE INSTRUCTIONS CAREFULLY AND RETAIN FOR FUTURE REFERENCE. CONGRATULATIONS You are now the proud, new owner of a SMART PLANET NESTLÉ NESQUIK Chocolate and Brownie Bites Maker model
Micro Casa a Leva Training Manual
 Micro Casa a Leva Training Manual Contents Overview 1 Models 1 Specifications 1 Features 1 Available accessories 1 Package contents 2 Leva parts 3 Assembly 4 Operating instructions 4 Making coffee 5 Procedure
USE AND CARE GUIDE FOR
 READ AND SAVE THESE INSTRUCTIONS Coffee Maker USE AND CARE GUIDE FOR MODEL ME2TMB IMPORTANT SAFEGUARDS When using electrical appliances, basic safety precautions should always be followed, including the
Thank you for your purchase!
 CM4200S Thank you for your purchase! www.prodprotect.com/blackanddecker Should you have any questions or concerns with your new product, please call our Customer Service Line at 1-800-465-6070 (US and
Coffeemaker User's manual
 Coffeemaker User's manual EN Prior to using this appliance, please read the user's manual thoroughly, even in cases where you have previously familiarised yourself with the operation of similar types of
6-in-1 K-Cup Coffee Maker
 6-in-1 K-Cup Coffee Maker Model# GCM-6000 USER MANUAL Read this manual thoroughly before using and save it for future reference Model: GCM-6000 2017 Gourmia www.gourmia.com The Steelstone Group Brooklyn,
Large Capacity Custom Control. Coffee Grinder. Model# GCG185 USER MANUAL
 Large Capacity Custom Control Coffee Grinder Model# GCG185 USER MANUAL Read this manual thoroughly before using and save it for future reference Model: GCG185 2016 Gourmia www.gourmia.com The Steelstone