professional mixer Model : KM-386
|
|
|
- Bertram Beasley
- 5 years ago
- Views:
Transcription

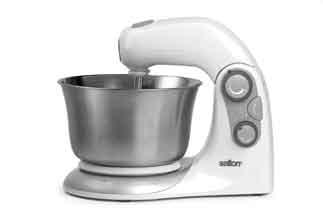
1 professional mixer Model : KM-386
2 IMPORTANT SAFEGUARDS When using electrical appliances, basic safety precautions should always be followed including the following: 1. Read all instructions. 2. Do not touch hot surfaces. Use handles or knobs. 3. To protect against electrical hazards, do not immerse cord, plugs, or the appliance in water or other liquid. 4. Close supervision is necessary when any appliance is used by or near children. 5. Unplug from outlet when not in use and before cleaning. Allow to cool before putting on or taking off parts, and before cleaning the appliance. 6. Avoid contacting moving parts. 7. Do not operate any appliance with a damaged cord or plug or after the appliance malfunctions, or has been damaged in any manner. Return appliance to Salton for examination, repair or adjustment. See Warranty section. 8. The use of accessories or attachments not recommended by Salton may cause fire, electric shock or injury. 9. Do not use outdoors. 10. Do not let cord hang over edge of table or counter, or touch hot surfaces. 11. Do not place on or near a hot gas or electric burner, or in a heated oven. 12. Keep hands, hair, clothing, as well as spatulas and other utensils away from beaters and dough hooks during operation to reduce the risk of injury to persons, and/or damage to the mixer. 13. To disconnect, turn the control to 'OFF', then remove plug from wall outlet. 14. Unplug before inserting or removing parts. 15. Remove beaters and dough hooks from the mixer before washing. 16. Do not use appliance for other than intended use. 17. Do not leave unit unattended while in use. SAVE THESE INSTRUCTIONS HOUSEHOLD USE ONLY 2
3 POLARIZED PLUG This appliance has a polarized plug (one blade is wider than the other). To reduce the risk of electric shock, this plug will fit in a polarized outlet only one way. If the plug does not fit fully in the outlet, reverse the plug. If it still does not fit, contact a qualified electrician. Do not modify the plug in any way. DESCRIPTION OF PARTS 1. Mixer Base 2. Mixer Head 3. Bowl Speed Dial 4. Mixer Head Tilt Button 5. Mixer Speed Dial 6. Accessory Release Button 7. BeaterWhisks 8. Dough Hooks 9. Stainless Steel Bowl 10. Power On Indicator Light INTRODUCTION The Salton Professional Mixer is an advanced mixing system that uses twin motor, 3-way beating action. One motor is located in the Mixer Head and powers the individual beaters or dough hooks, turning each in the opposite direction. One of 10 speeds can be used. The other motor, located in the Base, drives the bowl at High or Low speed. Together this 3-way action provides more powerful and uniform mixing results. BEFORE FIRST USE 1. Unpack and remove all parts and packaging materials from the carton. 2. DO NOT plug the power cord into any outlet before reading these instructions and ensuring that the Mixer Speed Dial is in the Off position. 3. Wash the Bowl, BeaterWhisks, Dough Hooks and Spatula in warm, soapy water. Rinse and dry thoroughly. 3
4 4. Wipe the Mixer Base and Head with a clean, damp cloth. Dry thoroughly with a soft cloth. NOTE: DO NOT use harsh detergents or abrasive cleansers on any part of the appliance. DO NOT immerse the Base or power cord and plug in water or any other liquid. HOW TO ASSEMBLE/DISASSEMBLE IMPORTANT: Before inserting and removing accessories or raising or lowering the Mixer Head, switch off the mixer and remove the plug from the electrical outlet. Assembling the Bowl To install the Bowl place the bottom of the Bowl on the turntable in the Base. Turn the Bowl clockwise until it locks into position with a click. Disassembling the Bowl To remove the Bowl turn counter-clockwise and lift away from the Base. Assembling the BeaterWhisks and Dough Hooks Push the BeaterWhisks or Dough Hooks into the accessory sockets on the underside of the Mixer Head until they click into place. NOTE: 1. The BeaterWhisk with the plastic nodules on the base should be in the socket closest to the front of the machine. 2. Both the BeaterWhisks and Dough Hooks have different left and right hand parts and must be pushed into the appropriate left and right hand sockets. Both parts can only be locked in place if they are in the correct sockets. If only one locks in place, it is in the wrong side. 3. You may need to twist the attachments slightly to engage them in position prior to pushing them into place. Disassembling the BeaterWhisks and Dough Hooks To remove the BeaterWhisks and Dough Hooks hold them loosely with one hand while pressing the Accessory Release Button. The Accessory Release Button does not eject the accessories but will allow them to be removed by hand. NOTE: The Bowl and Accessories can only be removed when the Mixer Head is raised. 4
5 Raising or Lowering the Mixer Head Press the Mixer Head Tilt Button and raise or lower the Mixer Head until it clicks into place. HELPFUL HINTS 1. The Mixer and Mixing Bowl are each driven separately by different motors and their speeds can be individually adjusted. 2. The Mixer Speed Dial is the ON/OFF switch for both the Mixer Head and the Bowl. It is also the speed control for the Mixer Head. 3. The Power On indicator light is also the mixing speed indicator. To select the mixing speed turn the Dial until the required speed is aligned with the Indicator Light. HOW TO USE 1. Position the Base on a level, dry and stable work surface next to a 120 volt A.C. outlet. Ensure that the Mixer Speed Dial is in the Off position. 2. Depress the Mixer Head Tilt Button and raise the Mixer Head until it locks in the raised position. 3. Install the Bowl and BeaterWhisks or Dough Hooks. 4. Ingredients may be added at this time. 5. While pressing the Mixer Head Tilt Button, lower the Mixer Head until it clicks into place. 6. Plug the Mixer into the outlet. The Power On indicator light will be lit indicating that power is connected. 7. Select the Mixer speed by slowly turning the Mixer Speed Control Dial to the desired speed. Select the Bowl speed. 8. Upon completion of mixing, turn the Mixer Speed Dial to the Off position. NOTE: The Power On indicator light will be lit until the power cord is unplugged from the outlet. 9. Unplug the power cord. 10. Depress the Mixer Head Tilt Button and raise the Mixer Head until it locks into the raised position. 11. Press the Accessory Release Button and remove the accessories. 12. Remove the Bowl from the Base. 5
6 HINTS FOR MIXING 1. The BeaterWhisks are used for most mixing tasks. Speeds 7 10 should be used for creaming and whipping of meringues, mayonnaise etc.; speeds 4 7 for cake mixes; speeds 2 5 for biscuit mixes. The lowest speed should be use to fold in dry ingredients. 2. The Dough Hooks are used for heavier doughs such as yeast dough and short crust pastry. Speeds 1 2 should be used to start mixing then increase speed to 3, 4 or 5 as the ingredients combine. As the dough ball forms, lower the mixer speed to The Mixing Bowl automatically turns on when the Mixer Speed Dial is turned on and should normally be used on the low speed setting. For light mixes requiring maximum mixing performance such as mayonnaise and meringue, the higher bowl speed is recommended as this passes the mixture through the BeaterWhisks for faster results. For large volumes, the bowl speed should be reduced to low, especially for thick mixtures. CARE AND CLEANING Before cleaning the Salton Professional Mixer, ensure that the power cord is unplugged from the electrical outlet. 1. Remove BeaterWhisks, Dough Hooks and Bowl. 2. Wipe the Mixer Base and the power cord with a damp cloth. Dry with a soft cloth. DO NOT immerse the Mixer Base or power cord and plug in water or any other liquid. 3. DO NOT use harsh detergents or abrasive cleansers on any part of the appliance. 4. Wash the BeaterWhisks, Dough Hooks and Bowl in warm soapy water. Dry. The BeaterWhisks and Dough Hooks can also be washed in the dishwasher. 5. Store the Mixer in a dry accessible place. Place the BeaterWhisks and Dough Hooks in the Bowl. DO NOT store the accessories in a drawer with other kitchen utensils as they may become damaged. 6. DO NOT wind the power cord around the Mixer Base as the residual heat from the motor may damage the cord. 6
7 RECIPES White Bread 1 package.25 oz (8 g) dry yeast 1 tbsp. (15 ml) sugar 1 cup (250 ml) lukewarm water 3/4 cup (180 ml) lukewarm milk 3 oz. (60 g) butter, melted 4 cups (1L) flour 1 tsp. (5 ml) salt 1. Combine the first five ingredients in a small bowl and allow to stand in a warm place until mixture begins to froth. About 10 minutes. 2. Inset dough hooks into the mixer head. Sift flour and salt into the mixing bowl. 3. With the bowl speed set on low start the mixer at speed 1 or 2, gradually add yeast mixture. Knead on speed 4 or 5 for 3 to 4 minutes or until the dough forms a smooth ball. Mixture will be wet and sticky. Remove dough from bowl using a spatula. 4. Place dough in a greased bowl, turning once to grease the top of the dough. Cover and let rise in a warm place until doubled in size, about minutes. 5. Punch down, fold sides to centre and turn the dough over. Remove the dough from the bowl and place onto a well-floured surface. Lightly knead dough with palm of your hands until smooth and elastic. 6. Cut dough in half and shape into two loaf pans. Cover loosely with plastic wrap and allow to rise in a warm place until doubled in size. About minutes. Preheat oven to 400 F (200 C). 7. Bake for approximately 30 minutes. Baked loaves sound hollow when tapped. 7
8 Variations: Breadsticks 1. Follow steps 1 5 from the White Bread recipe above. 2. Cut dough into 8 portions. In each portion cut 3/8 (1 cm) length slices. 3. Cut each slice into 3/8 (1 cm) strips and roll into thin long sticks. 4. Place onto a baking tray lined with parchment paper. Brush breadsticks with milk and sprinkle with poppy or sesame seeds or sea salt. 5. Bake at 400 F (200 C) for 15 minutes or until dry and crisp and golden brown. Bread Rolls 1. Follow steps 1 to 5 in the White Bread recipe above. 2. Cut the dough into 12 portions and roll each portion into an even soft ball. 3. Place each ball of dough onto a baking tray lined with parchment paper. Cover in plastic wrap and allow to double in size, about minutes. Brush with eggwash (a mixture of egg yolk and tepid water) and sprinkle with a mixture of poppy and sesame seeds. 4. Bake at 400 F (200 C) for minutes. Vanilla Sponge Cake 4 eggs, at room temperature 2/3 cup (170 ml) superfine sugar 1/3 cup (85 ml) custard powder 1/2 tsp. (5 ml) vanilla extract 2/3 cup (170 ml) all-purpose flour 1 tsp. (5 ml) baking powder 1. Grease and flour 2-8 (20 cm) cake pans. Preheat oven to 350 F (180 C). 2. Place the egg whites and sugar in the mixing bowl and with the bowl speed set on high, start mixing on speed 9 10 for about 8 minutes or until very thick and creamy. 3. Stop the mixer and remove the BeaterWhisks and bowl from the mixer. 4. Triple sift the dry ingredients. With a spoon or spatula fold in the sifted mixture. Do not over-beat as you will loose the air bubbles. 18
9 5. Spoon the mixture evenly into the 2 prepared cake pans and bake for approximately 15 minutes or until the sponge comes away from the sides of the pan. 6. Once cooked run a knife around the sides of the cake. Turn onto a cooling rack and gently tap the bottom of the pan to loosen the cake. Allow the cake to cool before using. 7. To serve, cut into two layers and spread the middle with jam or whipped cream. Place the top layer on the cake. Top with sifted icing sugar or more whipped cream. Cut into wedges and serve with fresh berries. Banana Cake 6 oz. (180 g) butter, cut in pieces, room temperature 1-1/2 cups (375 ml) sugar 2 eggs 2-1/4 cups (560 ml) all-purpose flour 1/2 tsp. (3 ml) salt 1 tsp. (5 ml) cinnamon 1/2 tsp. (3 ml) nutmeg 1/2 cup (125 ml) buttermilk 1 tsp. (5 ml) white vinegar 1 tsp. (5 ml) vanilla extract 1-1/2 cups (375 ml) banana, very ripe and mashed 1. Preheat oven to 350 F (180 C). Grease and flour a 8 (20 cm) Bundt pan. 2. With the bowl speed set on high, beat butter and sugar on mixing speed 7 8 until well combined. Add eggs, one at a time, beating well between each addition. 3. Reduce bowl speed to low and mixing speed to 1 2. Add 1/2 the sifted dry ingredients and 1/2 the buttermilk at a time. Mix in the vinegar and vanilla. Add bananas and mix until combined. 4. Pour mixture into the prepared pan and bake for about 40 minutes or until cooked when tested with a skewer. 5. Allow cake to cool in pan for 5 minutes before transferring to a wire rack to cool. 19
10 Butter Frosting 8 oz. (250 g) butter or margarine, softened 3 cups (750 ml) icing sugar 2 3 tbsp. (30 45 ml) milk 1-1/2 tsp. (8 ml) vanilla (optional) 1. Place butter or margarine in the mixing bowl. 2. With the bowl speed set on high, beat on mixing speed 4 5 until light in colour 3. Reduce bowl speed to low and mixing speed to 1 and mix in remaining ingredients until combined. CHOCOLATE CHIP COOKIES 4 oz. (125 g) butter, softened 1/2 cup (125 ml) brown sugar, firmly packed 1/2 cup (125 ml) sugar 1 tsp. (5 ml) vanilla extract 1 egg 1-3/4 cups (430 ml) flour 1 cup (250 ml) chocolate chips 1. Preheat oven to 350 F (180 C). Line 2 cookie sheets with parchment paper. 2. Place butter, sugars and vanilla in the mixing bowl. With the bowl speed set on high, set the mixing speed to 1 2 until the butter starts to break up and combine with the sugars. Increase the mixing speed to 7 and mix until light and creamy. 3. Add egg and vanilla. Mix until well combined. Reduce mixing speed to 1 and add flour and chocolate chips. 4. Roll tablespoon amounts into balls and place onto the cookie sheet. Press lightly with the back of a fork. Ensure that the cookies are well spaced to allow for spreading. 5. Bake in oven for about minutes or until golden brown. Do not overcook. Cool on wire racks. 10 1
11 CREPES 1-1/2 cups (375 ml) all purpose flour pinch salt 2 eggs 1-1/4 cups (310 ml) milk 1 tbsp. (15 ml) oil 1. Sift flour and salt into mixer bowl. 2. Set the bowl speed on low. In a small bowl, combine eggs and milk then add to mixing bowl. Start mixing with the mixer speed on 1. Increase speed to 5 and beat well to remove any lumps. 3. Mix in oil and allow to stand for 1 hour. 4. Grease heated skillet. Pour about 1/3 cup (85 ml) of batter into the skillet to make each crepe. 5. Cook quickly until lightly brown. Turn and brown other side. Sprinkle with lemon juice and sugar. Roll and serve hot. WAFFLES 2 cups (500 ml) all-purpose flour 2 eggs, separated 2/3 cup (170 ml) milk 1/2 cup (125 ml) water 3 oz. (90 g) butter, melted 2 tbsp. (30 ml) fine sugar 1. Preheat waffle maker. 2. Using the mixing bowl combine sifted flour, egg yolks, milk, water and butter. Set the mixing bowl speed on high and the mixing speed on 5. Mix until smooth. Transfer to a large bowl. Wash and dry the mixing bowl and BeaterWhisks. 3. Using the clean mixing bowl and with the bowl speed set on low, beat egg whites on mixing speed 10 until soft peaks form. Gradually add the sugar and beat until the sugar is dissolved. 4. Fold the egg white mixture into the batter. 5. Follow the directions to cook waffles included with your waffle maker. 111
12 Meringues 2 egg whites 3 oz. (90 g) fine sugar 3 oz. (90 g) icing sugar 1. Preheat oven to 250 F (120 C). Line two cookie sheets with parchment paper. 2. Place the egg whites in the mixing bowl. Set the bowl speed on low and beat egg whites on speed 10 until stiff but not dry. 3. With the mixer on speed 10 gradually add fine sugar. 4. Reduce mixing speed to 1 and fold in icing sugar. Mix until stiff and shiny. 5. Using a star shaped nozzle on a piping bag, pipe small meringues onto the prepared cookie sheet. If you do not have a piping bag, use two teaspoons. 6. Bake for 10 minutes, reduce heat to 200 F (100 C) and continue cooking for minutes. 12 1
13 A short supply cord is provided to reduce the hazards of becoming entangled in or tripping over a long cord. Extension cords may be used if care is exercised in their use. If an extension cord is used, the marked electrical rating of the detachable power-supply cord or extension cord should be at least as great as the electrical rating of the appliance. If the appliance is of the grounded type, the extension cord should be a grounded 3-wire cord. The extension cord should be arranged so that it will not drape over the counter top or table top, where it can be pulled on by children or tripped over. LIMITED WARRANTY Salton Canada warrants that this appliance shall be free from defects in material and workmanship for a period of one year from the date of purchase. During this in-warranty period, defective products will be repaired or replaced at the discretion of the retailer and/or Salton Canada. This warranty covers normal domestic usage and does not cover damage which occurs in shipment or failure which results from alteration, accident, misuse, abuse, glass breakage, neglect, commercial use or improper maintenance. A defective product should be returned to the original place of purchase within the retailer s stipulated return/exchange period*. If you are unable to have a defective product replaced under warranty by the retailer, please check our website at for the service centre nearest you. You may also contact us for assistance by mail, , fax or telephone as listed below. To ensure prompt in-warranty service securely package and return the product to us prepaid. Be sure to include the original proof of purchase and a description of the defect along with your address and postal code. For repairs not covered by the warranty, please contact us for assistance. SALTON CANADA Customer Service Department 81A Brunswick Dollard-des-Ormeaux Quebec, Canada H9B 2J5 Website: service@salton.com Fax: Tel: * Return/exchange policies at each retailer vary and may differ from the Salton Canada 1 year limited warranty period. 13
professional stand mixer
 professional stand mixer Instruction Booklet Model: KM-1078 IMPORTANT SAFEGUARDS When using electrical appliances, basic safety precautions should always be followed including the following: 1. Read all
THE PANCAKE FACTORY. Model: PM-2
 THE PANCAKE FACTORY Model: PM-2 IMPORTANT SAFEGUARDS When using electrical appliances, basic safety precautions should always be followed including the following: 1. Read all instructions. 2. Do not touch
Booklet_TCG-357_ENG.qxd 9/8/08 11:19 AM Page 1 COFFEE/SPICE GRINDER. Instruction Booklet. Model: TCG-357
 Booklet_TCG-357_ENG.qxd 9/8/08 11:19 AM Page 1 COFFEE/SPICE GRINDER Instruction Booklet Model: TCG-357 Booklet_TCG-357_ENG.qxd 9/8/08 11:19 AM Page 2 IMPORTANT SAFEGUARDS When using electrical appliances,
PARTY GRILL & RACLETTE
 Booklet_Cover_TPG-315_EN.qxd 12/18/07 1:13 PM Page 1 PARTY GRILL & RACLETTE Instruction Booklet Model: TPG-315 IMPORTANT SAFEGUARDS When using electrical appliances, basic safety precautions should always
automatic rice cooker Instruction Booklet Model RC1211
 automatic rice cooker Instruction Booklet Model RC1211 IMPORTANT SAFEGUARDS When using electrical appliances, basic safety precautions should always be followed including the following: 1. Read all instructions.
JUICE EXTRACTOR BLENDER MODEL JEB-10
 JUICE EXTRACTOR BLENDER MODEL JEB-10 IMPORTANT SAFEGUARDS When using electrical appliances, basic safety precautions should always be followed including the following: 1. Read all instructions. 2. To protect
ROASTER OVEN MODEL RST-18
 ROASTER OVEN MODEL RST-18 1 IMPORTANT SAFEGUARDS When using electrical appliances, basic safety precautions should always be followed including the following: 1. Read all instructions. 2. Place the roaster
INSTRUCTION MANUAL AND RECIPE BOOK CORN DOG MAKER CDM-1 SMART PLANET PLEASE READ THESE INSTRUCTIONS CAREFULLY AND RETAIN FOR FUTURE REFERENCE.
 INSTRUCTION MANUAL AND RECIPE BOOK CORN DOG MAKER CDM-1 SMART PLANET PLEASE READ THESE INSTRUCTIONS CAREFULLY AND RETAIN FOR FUTURE REFERENCE. IMPORTANT SAFEGUARDS Read all instructions before using the
45-Cup Coffee Urn Big Brew Classic. Instruction Manual. Model ACU-045
 45-Cup Coffee Urn Big Brew Classic Instruction Manual Model ACU-045 Congratulations! Your Big Brew Classic will surely become one of the most practical appliances in your home or office. Enjoy fresh brewed
BRAND DOUBLE WAFFLE MAKER
 BRAND DOUBLE WAFFLE MAKER User Guide Item: 759106 Recipes Inside! Ginnys.com 800-544-1590 Facebook.com/GinnysBrand Pinterest.com/GinnysBrand Thank you for purchasing a Ginny s Brand Double Waffle Maker.
FIVE SPEED HAND MIXER User Guide
 BRAND FIVE SPEED HAND MIXER User Guide Item: 740782 Recipes Inside! Ginnys.com 800-544-1590 Facebook.com/GinnysBrand Pinterest.com/GinnysBrand Ginnys.com/Blog Thank you for purchasing a Ginny s Brand Five
Hand Mixer. In U.S.A
 Hand Mixer In U.S.A. -800-85-8900 840074700 Mixer Safety IMPORTANT SAFEGUARDS When using electric appliances, basic safety precautions should always be followed, including the following:. Read all instructions.
SIX SPEED STAND MIXER User Guide
 BRAND SIX SPEED STAND MIXER User Guide Item: 740785 Recipes Inside! Ginnys.com 800-544-1590 Facebook.com/GinnysBrand Pinterest.com/GinnysBrand Ginnys.com/Blog Thank you for purchasing a Ginny s Brand Six
5-SPEED HAND/STAND MIXER User Guide
 BRAND 5-SPEED HAND/STAND MIXER User Guide Item: 63789 Recipes Inside! Ginnys.com 800-544-1590 Facebook.com/GinnysBrand Pinterest.com/GinnysBrand Thank you for purchasing a Ginny s Brand 5-Speed Hand/Stand
Coffeemaker. Coffeemaker Safety... 2 Parts and Features... 3 Using Your Coffeemaker... 4 Cleaning Your Coffeemaker... 4 Customer Service...
 Coffeemaker Coffeemaker Safety... 2 Parts and Features... 3 Using Your Coffeemaker... 4 Cleaning Your Coffeemaker... 4 Customer Service... 6 In USA: 1-800-851-8900 In Canada: 1-800-267-2826 840069400 Coffeemaker
Instruction Manual INCLUDING RECIPES & WARRANTY STATEMENT
 1 YEAR LIMITED WARRANTY Ginny s warrants this product free from defects in material and workmanship for one year from provable date of purchase. Within this warranty period, Ginny s will repair or replace,
Coffee Burr Grinder. Model #559. Instructions. Warranty
 Coffee Burr Grinder Model #559 Instructions Warranty IMPORTANT SAFEGUARDS When using electrical appliances, basic safety precautions should always be followed, including the following: 1. Read all instructions.
TABLE OF CONTENTS HAND MIXER SAFETY
 5KHM926 2 HAND MIXER INSTRUCTIONS TABLE OF CONTENTS HAND MIXER SAFETY...2 Important Safeguards...3 Electrical Requirements...3 PARTS AND FEATURES...4 ACCESSORY GUIDE...5 SETTING UP YOUR HAND MIXER Attaching
Electric Skillet. Instruction Manual & Cooking Guide. Model: AFP-1255G
 Electric Skillet Instruction Manual & Cooking Guide Model: AFP-1255G Congratulations on your purchase of the Electric Skillet. It will surely become one of the most practical appliances in your kitchen.
MCM-1NQ PLEASE READ THESE INSTRUCTIONS CAREFULLY AND RETAIN FOR FUTURE REFERENCE.
 MCM-1NQ PLEASE READ THESE INSTRUCTIONS CAREFULLY AND RETAIN FOR FUTURE REFERENCE. CONGRATULATIONS You are now the proud, new owner of a SMART PLANET NESTLÉ NESQUIK Chocolate and Brownie Bites Maker model
IMPORTANT INSTRUCTIONS MODE D EMPLOI IMPORTANT INSTRUCIONES IMPORTANTES ISTRUZIONI IMPORTANTI
 MOKA 22-04-2003 10:10 Pagina 1 IMPORTANT INSTRUCTIONS SAVE THESE INSTRUCTIONS MODE D EMPLOI IMPORTANT CONSERVEZ LES PRESENTES INSTRUCTIONS INSTRUCIONES IMPORTANTES GUARDE ESTAS INSTRUCCIONES ISTRUZIONI
IMPORTANT SAFEGUARDS SAVE THESE INSTRUCTIONS
 Stand Mixer Important Safeguards... 2 Know Your Mixer... Using Your Mixer... 5 Cleaning Your Mixer...6 Recipes... 7-9 Customer Service... 0 In USA: -800-85-8900 In Canada: -800-267-2826 84007200 IMPORTANT
SPUD MASHER User Guide
 BRAND SPUD MASHER User Guide Item: 742487 Recipes Inside! Ginnys.com 800-544-1590 Facebook.com/GinnysBrand Pinterest.com/GinnysBrand Ginnys.com/Blog Thank you for purchasing a Ginny s Brand Spud Masher.
INSTRUCTION MANUAL. Coffee Maker CMCM-100
 INSTRUCTION MANUAL Coffee Maker CMCM-100 CONTENTS Cusimax recommends safety first....1-2 Know your Cusimax product...3 Operating your Cusimax product 4 Care & cleaning 5 Cusimax Recommends Safety First
1. IMPORTANT SAFEGUARDS When using electrical appliances, basic safety precautions should always be followed to reduce the risk of fire, electric
 1. IMPORTANT SAFEGUARDS When using electrical appliances, basic safety precautions should always be followed to reduce the risk of fire, electric shock, and/pr injury to persons including the following:
PROFESSIONAL BELGIAN WAFFLE MAKER
 PROFESSIONAL BELGIAN WAFFLE MAKER WMK300 For your safety and continued enjoyment of this product, always read the instruction book carefully before using. TABLE OF CONTENTS Important Safeguards............................
Quattro Pizzelle Baker
 RECIPE AND INSTRUCTION BOOKLET Quattro Pizzelle Baker No.5100 Quattro Pizzelle Baker IMPORTANT SAFEGUARDS When using elecrtical appliances, basic safety precautions should always be followed, including
TRIPLE BASKET DEEP FRYER WITH TIMER User Guide. Recipes Inside! BRAND
 BRAND TRIPLE BASKET DEEP FRYER WITH TIMER User Guide Item: 733113 Recipes Inside! Ginnys.com 800-544-1590 Facebook.com/GinnysBrand Pinterest.com/GinnysBrand Ginnys.com/Blog Thank you for purchasing a Ginny
Electric Two-Speed Drink Mixer
 Electric Two-Speed Drink Mixer MS2090 Series Before use, please read this manual thoroughly and save for future reference. ovente.com Electric Two-Speed Drink Mixer MS2090 Series 2 ovente.com ELECTRIC
READ ENTIRE MANUAL BEFORE USE SAVE THESE INSTRUCTIONS
 Thank you for your purchase of Veggetti Power, the quick & easy way to turn veggies into delicious, healthy pasta and more instantly! It s also great for making stir-fries, veggie salads and decorative
EVERYDAY BLENDER User Guide
 BRAND EVERYDAY BLENDER User Guide Item: 762046 Recipes Inside! Ginnys.com 800-544-1590 Facebook.com/GinnysBrand Pinterest.com/GinnysBrand Thank you for purchasing a Ginny s Brand Everyday Blender. Because
LIFE IS ABOUT BALANCE AND EATING WELL
 USE AND CARE LIFE IS ABOUT BALANCE AND EATING WELL Electric Crepe Maker I M P O R TA N T N O T I C E If you have any problems with this unit, contact Consumer Relations for service PHONE: 1-800-275-8273
6-SLICE TOASTER OVEN WITH ROTISSERIE User Guide
 BRAND 6-SLICE TOASTER OVEN WITH ROTISSERIE User Guide Item: 735233 Recipes Inside! Ginnys.com 800-544-1590 Facebook.com/GinnysBrand Pinterest.com/GinnysBrand Ginnys.com/Blog Life is happening. We ll help
(rev. 06/15/12)
") All products are trademarks of Nostalgia Products Group, LLC. Worldwide design & utility patented or patents pending. 2012 Nostalgia Products Group, LLC. www.nostalgiaelectrics.com (rev. 06/15/12) HCM700
All products are trademarks of Nostalgia Products Group, LLC. Worldwide design & utility patented or patents pending. 2012 Nostalgia Products Group, LLC. www.nostalgiaelectrics.com (rev. 06/15/12) HCM700
Coffee Burr Grinder. Model #591. Instructions. Warranty. 110W/120Vac/60 Hz. Read this manual thoroughly before using and save it for future reference
 Coffee Burr Grinder Model #591 Instructions Warranty Read this manual thoroughly before using and save it for future reference 110W/120Vac/60 Hz IMPORTANT SAFEGUARDS When using electrical appliances, basic
Electric Griddle. Griddle Safety... 2 Parts & Features... 3 How to Use Your Griddle... 3 Cleaning Your Griddle... 4 Recipes... 5 Customer Service...
 Electric Griddle 840098400 Griddle Safety... 2 Parts & Features... 3 How to Use Your Griddle... 3 Cleaning Your Griddle... 4 Recipes... 5 Customer Service... 8 In USA: -800-85-8900 In Canada: -800-267-2826
Ev01.qxd 2/22/01 9:57 AM Page 1. Stand Mixer
 840082000 Ev0.qxd 2/22/0 9:57 AM Page Stand Mixer Stand Mixer Safety... 3 Know Your Stand Mixer... 4 How to Use Your Stand Mixer... 5 To Clean... 6 Recipes... 6-0 Customer Service... In USA: -800-85-8900
IF THERE IS ANY QUESTION ABOUT A CONDITION BEING SAFE OR UNSAFE, DO NOT OPERATE THIS PRODUCT!
 RO18BT 18 Quart Roaster Oven Operating Instructions READ ALL INSTRUCTIONS AND WARNINGS BEFORE USING THIS PRODUCT. This manual provides important information on proper operation & maintenance. Every effort
12 CUP COFFEE MAKER User Guide
 BRAND 12 CUP COFFEE MAKER User Guide Item: 740553 Ginnys.com 800-544-1590 Facebook.com/GinnysBrand Pinterest.com/GinnysBrand Ginnys.com/Blog Welcome to the world of full-flavored coffee with the Ginny
FOOD SLICER User Guide
 BRAND FOOD SLICER User Guide Item: 735649 Recipes Inside! Ginnys.com 800-544-1590 Facebook.com/GinnysBrand Pinterest.com/GinnysBrand Thank you for purchasing a Ginny s Brand Food Slicer. Family get-togethers
BRAND. COPPER CERAMIC GRIDDLE GRILL User Guide. Recipes Inside! Item:
 BRAND COPPER CERAMIC GRIDDLE GRILL User Guide Item: 753543 Recipes Inside! Ginnys.com 800-544-1590 Facebook.com/GinnysBrand Pinterest.com/GinnysBrand Thank you for purchasing a Ginny s Brand Copper Ceramic
Burr Grinder. Model #551. Instructions. Warranty
 Burr Grinder Model #551 Instructions Warranty IMPORTANT SAFEGUARDS When using electrical appliances, basic safety precautions should always be followed, including the following: 1. Read all instructions.
5KCG0702 W A_Final.indd 1 8/4/15 8:35 AM
 5KCG0702 PARTS AND FEATURES PARTS AND ACCESSORIES Hopper lid Easy access stainless steel burrs 200 g glass hopper 15 grind settings Die cast metal body Grind control dial Power switch Faceplate assembly
12 CUP COFFEEMAKER User Guide
 BRAND 12 CUP COFFEEMAKER User Guide Item: 757147 Ginnys.com 800-544-1590 Facebook.com/GinnysBrand Pinterest.com/GinnysBrand Welcome to the world of full-flavored coffee with the Ginny s Brand 12-Cup Coffeemaker!
Wi-Fi Coffee Maker. Model# GCMW-4750 USER MANUAL
 Wi-Fi Coffee Maker Model# GCMW-4750 USER MANUAL Read this manual thoroughly before using and save it for future reference Model: GCMW-4750 2018 Gourmia www.gourmia.com The Steelstone Group Brooklyn, NY
MINI MAKER GRILL. Model DMG001. Instruction Manual & Recipe Guide
 MINI MAKER GRILL Instruction Manual & Recipe Guide Model DMG001 TABLE OF CONTENTS MINI MAKER GRILL Important Safeguards...4-5 Parts & Features...6 Using Your Grill...7-9 Maintenance & Cleaning...10 Troubleshooting...
TILT-HEAD STAND MIXER FEATURES
 ENGLISH TILT-HEAD STAND MIXER FEATURES Speed Control Knob Motor Head Attachment Hub Attachment Knob Motor Head Locking Lever (not shown) Beater Shaft Flat Beater Beater Height Adjustment Screw Wire Whip
MINI MAKER GRIDDLE. Model DMS001. Instruction Manual & Recipe Guide
 MINI MAKER GRIDDLE Instruction Manual & Recipe Guide Model DMS001 WELCOME TABLE OF CONTENTS MINI GRIDDLE Safety Guidelines...4-5 Parts & Features...6 Using Your Griddle...7-9 Maintenance & Cleaning...10
WMR-CA. Classic Waffle Maker INSTRUCTION BOOKLET
 INSTRUCTION BOOKLET Classic Waffle Maker WMR-CA For your safety and continued enjoyment of this product, always read the instruction book carefully before using. TABLE OF CONTENTS Important Safeguards..............
REMOVABLE PLATE WAFFLE MAKER. use and care manual WM700R
 TM REMOVABLE PLATE WAFFLE MAKER use and care manual WM700R Thank you for your purchase! Should you have any questions or concerns with your new product, please call our Customer Service Line at 1-800-231-9786
IMPORTANT SAFEGUARDS. 3. To protect against fire, electric shock and injury to persons do not immerse cord, plug or unit in water or other liquid.
 IMPORTANT SAFEGUARDS When using electrical appliances, basic precautions should always be followed, including the following: 1. Read all instructions. 2. Make sure that your outlet voltage corresponds
PAGE TITLE. Instruction manual MODEL DPBD002
 PAGE TITLE Instruction manual MODEL DPBD002 TABLE OF CONTENTS 2 TABLE OF CONTENTS Important Safeguards... 4-5 Parts & Features... 6-7 Using Your Blender... 8-9 Maintenance... 10-11 Recipes... 12-17 Customer
5KHM9212 W A_ENv7.indd 1 2/22/13 10:03 AM
 5KHM9212 W10466753A_ENv7.indd 1 W10466753A_ENv7.indd 2 English... 5 Deutsch... 17 Français... 29 Italiano... 41 Nederlands... 53 Español... 65 Português... 77 Ελληνικά... 89 Svenska... 101 Norsk... 113
Model # Instructions Warranty. 950 Watts / 120 Vac / 60 Hz. Read this manual thoroughly before using and save it for future reference
 Perk Model #405.05 Instructions Warranty 950 Watts / 120 Vac / 60 Hz Read this manual thoroughly before using and save it for future reference IMPORTANT SAFEGUARDS When using electrical appliances, basic
Stand Mixer SM-1502 Instruction Manual
 Stand Mixer SM-1502 Instruction Manual Keep this manual for future reference and pass it on with the equipment to any future users. Technical Data Model: SM-1502 Rated voltage: 220-240V~, 50Hz Power consumption:
Cucina HD2423, HD2422, HD2421, HD2420
 Cucina HD2423, HD2422, HD2421, HD2420 2 2 3 2 3 4 ENGLISH 6 16 24 33 HD2423, 2422, 2421, 2420 6 ENGLISH Important Always follow basic safety precautions when using electrical appliances. Read these directions
BRAND. Reversible Grill/Griddle User Guide. Recipes Inside! Item: Ginnys.com Facebook.com/GinnysBrand Pinterest.
 BRAND Reversible Grill/Griddle User Guide Item: 762057 Recipes Inside! Ginnys.com 800-544-1590 Facebook.com/GinnysBrand Pinterest.com/GinnysBrand Thank you for purchasing a Ginny s Brand Reversible Grill/Griddle.
Programmable Conical Burr Mill CBM-18
 Programmable Conical Burr Mill CBM-18 IMPORTANT SAFEGUARDS When using electrical appliances, basic safety precautions should always be followed, including the following: 1. Read all instructions. 2. To
SAVE THESE INSTRUCTIONS
 IMPORTANT SAFEGUARDS When using electrical appliances especially when children are present, basic safety precautions should always be followed to reduce the risk of fire, electric shock, and/or injury
James Martin Stand Mixer. Stand Mixer ZX867X
 Stand Mixer ZX867X Safety first Never add or remove attachments while the appliance is plugged in. Always read your instructions before using for the first time. 1 Please read all instructions carefully
5KEK1322 W A_v08.indd 1 5/13/16 2:25 PM
 5KEK1322 W10878653A_v08.indd 1 PARTS AND FEATURES PARTS AND ACCESSORIES Tea steeper lid (center section of lid with handle) Kettle lid (outer section) Stainless steel lime scale filter Removable stainless
PLEASE READ THIS MANUAL BEFORE USE. SAVE FOR FUTURE REFERENCE.
 8-CUP STAINLESS STEEL CARAFE Coffee Brewer Model: BV1900TS HOUSEHOLD USE ONLY Customer Service Line: 1-855-664-1252 2-year limited warranty bonavitaworld.com Simple to operate Optional pre-infusion cycle
Rice Cooker Instruction Manual Item Ginnys.com
 Rice Cooker Instruction Manual Item 710197 Ginnys.com 1.800.544.1590 Thank you for purchasing a Ginny s Brand Rice Cooker and welcome to an easier time in the kitchen! You ll get perfectly-prepared rice
INSTRUCTIONS. Cookie Press FOR PROPER USE AND CARE. IMPORTANT! Please keep these instructions and your original box packaging.
 Cookie Press Battery Operated 39 Piece Set Model #4650 IMPORTANT! Please keep these instructions and your original box packaging. www.deni.com INSTRUCTIONS FOR PROPER USE AND CARE Cookie Press IMPORTANT
WMB-2A. Belgian Waffle Maker - 2 Slice INSTRUCTION BOOKLET
 INSTRUCTION BOOKLET Belgian Waffle Maker - 2 Slice WMB-2A For your safety and continued enjoyment of this product, always read the instruction book carefully before using. TABLE OF CONTENTS Important Safeguards.............
OPERATING AND CARE INSTRUCTIONS. Model#: VS7600-2
 OPERATING AND CARE INSTRUCTIONS VitaClay Yogurt Maker and Personal Slow Cooker Model#: VS7600-2 PLEASE READ ALL INSTRUCTIONS CAREFULLY BEFORE INITIAL USE. HOUSEHOLD USE ONLY 2013 Essenergy, Inc. All rights
SAVE THIS INSTRUCTION MANUAL FOR FUTURE REFERENCE
 Model # 3K076 Raclette Instruction Manual SAVE THIS INSTRUCTION MANUAL FOR FUTURE REFERENCE www.ginnys.com 1 CAUTION When using electrical appliances, basic safety precautions should always be followed
Double Coffeemaker Instruction Manual
 BRAND Double Coffeemaker Instruction Manual Item 710431 Ginnys.com 1.800.544.1590 Thank you for purchasing a Ginny s Brand Double Coffeemaker. With two 12-cup carafes, you ll easily keep enough piping-hot
James Martin Hand Mixer. Hand Mixer ZX822
 Hand Mixer ZX822 Safety first Never add or remove attachments while the appliance is plugged in. Always read your instructions before using for the first time. 1 Please read all instructions carefully
OWNERS MANUAL. My Rotisserie Pro Warranty. Please read and save this manual. PROFESSION AL SERIES MRP_MAN_QVC_ENG_V1_ FOR HOUSEHOLD USE ONLY.
 My Rotisserie Pro Warranty The manufacturer warrants that your My Rotisserie Pro is free of defects in materials and workmanship and will, at its option, repair or replace any defective rotisserie that
Recipes Inside! 6.5 QUART DIGITAL SLOW COOKER User Guide BRAND
 BRAND 6.5 QUART DIGITAL SLOW COOKER User Guide Item: 60765 Recipes Inside! Ginnys.com 800-544-1590 Facebook.com/GinnysBrand Pinterest.com/GinnysBrand Ginnys.com/Blog Thank you for purchasing a Ginny s
COFFEE GRINDER. Owner s Manual
 COFFEE GRINDER Owner s Manual 4 4 FEATURES Bean Hopper Lid Bean Hopper Grinder Start/Stop Button Bean Hopper Holder Bean Hopper Release Button Grinding Timer Dial Coffee Powder Outlet 0 Grind Thickness
Electric Pasta Maker Instruction Manual Item Ginnys.com
 Electric Pasta Maker Instruction Manual Item 710306 Ginnys.com 1.800.544.1590 Thank you for purchasing a Ginny s Brand Pasta Maker. You ve just brought more fun and function into your kitchen! You ll be
Ice Cream Maker -makes 2 pints
 Ice Cream Maker -makes 2 pints INSTRUCTIONS FOR PROPER USE AND CARE Model #DBL500 VERDE VITA LLC PO BOX 863 CLARENCE, NY 14031 IMPORTANT! Please keep these instructions and your original box packaging.
Electric Ice Cream Maker
 8405, 8420, 8455-X, 8550-X, 8605, 8620 Electric Ice Cream Maker Owner s Guide READ AND SAVE THESE INSTRUCTIONS IMPORTANT SAFEGUARDS When using electrical appliances, basic safety precautions should always
User Manual. Stainless Steel Coffee Urns. Models: 177CU55ETL, 177CU110ETL 10/2016. Please read and keep these instructions. Indoor use only.
 Intertek Stainless Steel Coffee Urns Models: 177CU55ETL, 177CU110ETL 10/2016 Please read and keep these instructions. Indoor use only. www.avantcoequipment.com 1 NOTE: Save these instructions for future
MODEL# GMF255 MOKA POT MILK FROTHER. PHOTO OF PRODUCT
 MODEL# GMF255 MOKA POT MILK FROTHER www.gourmia.com PHOTO OF PRODUCT 2016 Gourmia www.gourmia.com The Steelstone Group Brooklyn, NY Welcome to the World of Espresso & Milk Frothers from Gourmia! All rights
Dual Basket Deep Fryer Instruction Manual
 BRAND Dual Basket Deep Fryer Instruction Manual MODEL: EDF-3060 Ginnys.com 1.800.544.1590 Life is happening. We ll help you live it...one moment at a time. Thank you for purchasing a Ginny s Brand Double
Coffee Grinder Instruction Manual
 Coffee Grinder Instruction Manual CoffeeGrinder Manual-English Only.indd 1 07/01/2016 14:14:39 Savisto Home Coffee Grinder Voltage Supply: 220-240V~ 50/60Hz Power Consumption: 150W Eng Please read through
mini cupcake maker USER GUIDE
 mini cupcake maker USER GUIDE Now that you have purchased a Kitchen Living product you can rest assured in the knowledge that as well as your 2 year parts and labor guarantee you have the added peace of
INSTRUCTION BOOKLET Belgian Waffle Maker - 4 Slice WMB-4A
 INSTRUCTION BOOKLET Belgian Waffle Maker - 4 Slice WMB-4A For your safety and continued enjoyment of this product, always read the instruction book carefully before using. TABLE OF CONTENTS Important Safeguards..............
PROFESSIONAL WC400. For your safety and continued enjoyment of this product, always read the instruction book carefully before using.
 PROFESSIONAL Wine Center WC400 For your safety and continued enjoyment of this product, always read the instruction book carefully before using. IMPORTANT SAFEGUARDS When using electrical appliances, basic
PIZZA OVEN & MULTI-GRILL
 INSTRUCTION MANUAL PIZZA OVEN & MULTI-GRILL Contents Introduction 2 Pizza Oven & Multi-Grill Parts 3 Before using your Pizza Oven & Multi-Grill 4 Cleaning your Pizza Oven & Multi-Grill 4 Recipes & Suggestions
froth control Operating Instructions Warranty Automatic Milk Frother & Hot Chocolate Maker Model # W / 120Vac / 60Hz
 froth control Automatic Milk Frother & Hot Chocolate Maker Operating Instructions Warranty Visit www.capressoblog.com for fun and delicious milk frother recipes Model #207 Patented Frothing Technology
Duothek Plus Model #464
 Duothek Plus Model #464 Instructions for Use Warranty Guarantee of Performance IMPORTANT SAFEGUARDS When using electrical appliances, basic safety precautions should always be followed to reduce the risk
Ceramic Coated Grill/Griddle Instruction Manual
 BRAND Ceramic Coated Grill/Griddle Instruction Manual MODEL: GR 41140 Ginnys.com 1.800.544.1590 Life is happening. We ll help you live it...one moment at a time. Thank you for purchasing a Ginny s Brand
Half-Pint Soft Serve Ice Cream Maker
 CAUTION: READ OPERATOR S MANUAL BEFORE USE Visit www.hamiltonbeach-me.com for our complete line of products and Use and Care Guides as well as delicious recipes and tips! Half-Pint Soft Serve Ice Cream
Oven Toaster Grill with Convection
 READ BEFORE USE Oven Toaster Grill with Convection Visit www.hamiltonbeach.in for our complete line of products and Use and Care Guides as well as delicious recipes, tips, and other useful information!
(rev. 02/10/17)
") All products are trademarks of Nostalgia Products Group, LLC. Worldwide design & utility patented or patents pending. 2014 2012 Nostalgia Products Group, LLC. www.nostalgiaelectrics.com (rev. 02/10/17)
All products are trademarks of Nostalgia Products Group, LLC. Worldwide design & utility patented or patents pending. 2014 2012 Nostalgia Products Group, LLC. www.nostalgiaelectrics.com (rev. 02/10/17)
Fast Brew 12-Cup Coffeemaker
 READ AND SAVE THESE INSTRUCTIONS WA R N I N G : A risk of fire and electrical shock exists in all electrical appliances and may cause personal injury or death. Please follow all safety instructions. Fast
Custom Grind Deluxe Coffee Grinder
 READ BEFORE USE Visit www.hamiltonbeach.in for our complete line of products and Use and Care Guides as well as delicious recipes, tips, and other useful information! Custom Grind Deluxe Coffee Grinder
Triple Brew. Model #352. Coffee & Tea Maker. Instructions Warranty
 Triple Brew Coffee & Tea Maker Model #352 Instructions Warranty IMPORTANT SAFEGUARDS When using electrical appliances, basic safety precautions should always be followed, including: 1. Read all instructions.
SG120 Model # Cup Stainless Steel Coffee Maker. Operating Instructions Product Registration Warranty
 SG120 Model #494 12-Cup Stainless Steel Coffee Maker Operating Instructions Product Registration Warranty IMPORTANT SAFEGUARDS When using electrical appliances, basic safety precautions should always be
ROSE BOUQUET WAFFLER
 V410-33010-U00_Booklet.qxd 8/11/04 12:43 PM Page 1 ROSE BOUQUET WAFFLER Bakes a single 6 3/4" round waffle featuring an elegant rose bouquet Instructions & Recipes Please read all instructions carefully
Essentials Power Mix KHM10. Instruction Booklet
 Essentials Power Mix KHM10 Instruction Booklet KHM10_IB_FA.indd 1 Important Please retain your instruction book for future use. In the event that you need some assistance with your Kambrook appliance,
10,000 prize draw. instructions. EXTRA year guarantee FREE rewards gallery. Register online now!
 r instructions 10,000 prize draw EXTRA year guarantee FREE rewards gallery www.productregister.co.uk/rhobbs Register online now! See back for details 2 Read the instructions, keep them safe, pass them
Single-Serve Coffee Maker
 840251801 Single-Serve Coffee Maker IMPORTANT SAFEGUARDS When using electrical appliances, basic safety precautions should always be followed to reduce the risk of fire, electric shock, and/or injury to
(rev. 02/16/11)
") All products are trademarks of Nostalgia Products Group, LLC. Worldwide design & utility patented or patents pending. 2011 Nostalgia Products Group, LLC. www.nostalgiaelectrics.com (rev. 02/16/11) TSC250
All products are trademarks of Nostalgia Products Group, LLC. Worldwide design & utility patented or patents pending. 2011 Nostalgia Products Group, LLC. www.nostalgiaelectrics.com (rev. 02/16/11) TSC250
BarAroma Coffee & Spice Grinder
 Breville is a registered trademark of Breville Pty. Ltd. ABN 98 000 092 928 Breville Customer Service Centre Australian Customers Breville Customer Service Centre PO Box 22 Botany NSW 2019 AUSTRALIA Customer
infinity Model # 575 #570 Conical Burr Grinder Instructions Warranty Product Registration 100W / 120V~ / 60 Hz
 infinity Conical Burr Grinder Model # 575 #570 Instructions Warranty Product Registration 100W / 120V~ / 60 Hz IMPORTANT SAFEGUARDS When using electrical appliances, basic safety precautions should always