Because this is a Pressurized Rice Cooker. Observe the water level gauge.
|
|
|
- Catherine Cameron
- 5 years ago
- Views:
Transcription


1 㻭 䠒
2 Because this is a Pressurized Rice Cooker Ensure that the lid is properly secured The lid might feel stiff when closing before or after cooking. Be sure to close it slowly all the way until you hear the latch catch. After cooking, a short time might be required before the lid can be opened. Do not open the lid during cooking. Do not open the lid during cooking. (You could get burned.) Observe the water level gauge. Adding water above the water level gauge shown in this manual could cause the water to spray out when the pressure is released. Observe the water level gauge. Steam may rush out during cooking. Keep your hands and face away from the steam vent during cooking. Steam may spray out during cooking depending on the cooking method. Steam will rush out if the cooker is moved during cooking. Steam may escape depending on the cooking method. Do not use the cooker where steam can escape onto the wall or furniture. ATTENTION This rice cooker cannot be used to cook a wide variety of foods like a commercially available pressure cooker. Do not use the rice cooker for any purpose other than to cook rice and the cooking menu items stated in the Operating Instructions and Cook Book included. In particular, do not use the rice cooker to cook in any way described in commercially available books, etc., if that method is not stated in the Operating Instructions or Cook Book included. Failure to comply with this warning could result in a burn or injury. Specifications Model Rice cooking capacity Power Rated frequency Rated power Cord length Width Size Depth Height Weight RZ-W3000YH 1.0L Type 0.09L-1.0L 220V AC 50Hz 1400W 1.0m 26.8cm 35.2cm 23.7cm Approx. 6.6kg 2
3 Contents Before Use 4-15 Component Names... 4 (Body, Accessories, Operation Panel, Display Window) Safety Precautions... 8 Setting the Current Time Rice Cooking Preparing the Rice... (Tips for cooking delicious rice) Preparing the Rice Cooker... Rice Cooking... Ways to Use Cooking Programs... Rice Cooking using the Timer... (Set the timer to finish cooking when you want to eat) Rice Cooking with Rapid (When you want to cook rice quickly) Rice Cooking with Soaking (when you want to cook rice after soaking it) Warming... Ways to Use Keep Warm... How to Switch Between "Warm Lo" and "Warm Hi"... Rice Unsuitable for Keep Warm Variety Cooking Warming When Stopping Keep Warm Switch from "Off" to warming Tips for keeping the rice warm and delicious Reheat the rice during Keep Warm Cooking (Risotto, Cake) Cleaning and Maintenance Cleaning and Maintenance Body, lid, body interior Intake vent, exhaust vent Temperature sensor Hook area Rice scoop, rice scoop holder, measuring cup Inner pot Non-water supply auto steamer Regulator valve, safety valve, inner lid, lid packing, vacuum valve, pressure-reducing valve, steam sensor, pressure regulator, steam vent top casing How to switch to plate condensation reduction mode immediately after cooking About the non-water supply auto steamer... 33, 34 If there are odors Troubleshooting Troubleshooting Rice Cooking Keep Warm Timer rice cooking Sounds LCD Display Inner Pot Fluorine Coating Power Outage Lid Gap Between Body and Lid, Etc Cook Book


 P.7 Regulator valve P.30 Lid packing P.")
 How to install")

4 Component Names (Body, Accessories, Operation Panel, Display Window) Body Inner pot P.13, 14, 30 Non-water supply auto steamer P.14, Release lever P.31, 32 Pull the lever downward to install or remove the inner lid. Vacuum valve P.30 Pressure-Reducing Valve P.30 Safety valve P.30 Water level gauge (3 locations) P.7 Regulator valve P.30 Lid packing P.30 Plate Steam Vent Top Casing Inner lid Body Stainless Frame Handle Rice scoop holder mounting position (2 locations left and right) How to install the rice scoop holder Install the rice scoop holder to the rice scoop holder mounting position. 1 2 Rice scoop holder Place the rice scoop to the rice scoop holder. Rice scoop 4 Rice scoop holder mounting position (2 locations left and right)

5 The P.OO numbers show the page containing the main explanation. Lid When closing the lid, push down slowly on the front center of the lid (front side) until you hear the latch catch. ATTENTION The pressurized rice cookers have a strong seal making it difficult for air to escape, and the lid might feel stiff when closing immediately after cooking. Close it slowly while applying a little more pressure. Steam vent Keep your hands and face away from the vent, as steam will escape from here during cooking. (You could get burned.) Operation panel and display window P.6, 7 Intake Vent (bottom of body) P.8, 29 Hook button Press this button to open the lid. Warning When opening the lid, confirm that the display is turned off and steam is not coming out of the steam vent, then gently press the hook button. Do not open the lid during cooking (Could result in burns) ATTENTION The pressurized rice cookers have a strong seal making it difficult for air to escape, and the hook button might feel stiff immediately after cooking. Press the hook button while applying a little more pressure. Accessories Rice scoop Exhaust Vent (bottom of body) P.8, 29 Rice scoop holder Back of body Power Plug The shape of the dedicated 220V power plug may differ from that shown in the picture. Measuring cup Power Cord For white rice Approx. 180mL (Approx. 1 Japanese cup) 5
6 Component Names (Body, Accessories, Operation Panel, Display Window) - continued Operation panel and display window For explanatory purposes, the figure shows all of the displays lit up. Operation panel Rice (Variety) button Menu button Steam Warm button Hour/Min button To select the type of rice and the cooking method. To select the rice cooking method and cooking menu. Start Keep Warm, or select "Warm Lo" or "Warm Hi". To set the current time, rice cooking time, soaking time, and reheating time. Display window P Person button Cancel/Off button Timer button Cook/Reheat button To cook a small amount of rice up to 2 Japanese cups. To stop cooking or warming and to cancel timer for cooking or soaking. To select the timer for cooking or soaking, and reheating. To start cooking, reheating, timer cooking, or cooking with soaking. The followings are for someone who is visually impaired. 6 Convex symbol Buzzer sound The convex symbols are provided for Cook/Reheat button with and Cancel/Off button with. The buzzer sound can be changed, or the time can be set to the initial value at the initial setting for menu and time setting. P.14
7 Bright, easy-to-read white LCD The display window lights up when an operation button is pressed. The light automatically turns off after no operation has been performed for about 1 minute. Press or when relit. Display window Rice (Variety) display This shows the type of rice or variety that was selected by flashing the letters. Rice Cooking Method display This shows the rice cooking method selected by flashing. Small Amount Cooking display "1-2person" lights up to show that the cooking a small amount of rice setting was selected. Warm display "Warm Lo" or "Warm Hi" lights up to show the warming setting that was selected. Pressure display The message is displayed while cooking rice when a menu item that uses pressure is selected. Menu display This shows the cooking menu selected by flashing. Reheat Display "Reheat" lights up to indicate reheating of the rice during Keep Warm. Rice Cooking Timer display Timer 1 or Timer 2 lights up to show the timer that was selected. Time display This shows the remaining cooking time, time spent for warming, current time, soaking time, etc. Water level gauge for the inner pot Adjust the amount of water according to the type of rice and the cooking method. When cooking white rice, mixed grain, or germinated brown rice Use the "Hard" water line when you want to cook rice hard for use in sushi, curry, etc. Do not fill with water above this line P.10 When cooking brown rice, porridge, brown rice porridge, or sticky rice Use the designated waterline Adjust the amount of water as desired using the "Soft" and "Hard" water level gauges. However, do not add water above the Soft guideline. (Could cause water to boil out) 7
8 Safety Precautions This rice cooker is a home appliance. Do not use this cooker for commercial applications. Observe the following instructions to prevent injury to the user and others and damage to property. In addition, the precautions provided throughout this manual should be read carefully and the rice cooker should be used correctly. Precautions Shown Here The harm or damage that could result from ignoring the following precautions and incorrectly using the rice cooker are classified and explained using the following symbols and messages. Warning Caution This symbol designates information that, if not followed, could result in death or serious injury. This symbol designates information that, if not followed, could result in injury or property damage. Examples of symbols The information calls for warning or caution. The information prohibits what must not be done. The information gives instructions about what must be done. Warning To Prevent Electric Shock, Short Circuits, Ignition, and Fires Use a 220 VAC power outlet by itself. Push the power plug all the way into the power outlet. Wipe off any dust from the plug prongs. Do not modify the rice cooker. The rice cooker should only be disassembled Contact prohibited and repaired by a service technician. Do not insert or remove the plug with wet hands. Wet hands prohibited Wetting prohibited Do not put the rice cooker, power plug, or the power cord in water or get water on them. Do not place the rice cooker where there is water. Do not use the rice cooker or power plug if wet. (Could cause short-circuit, electric shock, or malfunction.) Do not use the rice cooker if the power cord or power plug is damaged or if the power plug is loosen when plugged into the power outlet. Do not damage, modify, excessively bend, pull on, twist, or fold up the power cord or place it near a hot object or under a heavy object. If the supply cord is damaged, it must be replaced by the manufacturer, its service agent or similarly qualified persons in order to avoid a hazard. Do not insert a metal object, such as a pin or needle or other foreign object in the intake vent, exhaust vent, or gaps between components at the bottom surface of the body. Do not allow unsupervised use by children and keep out of the reach of children. Bottom surface of the body Intake vent Exhaust vent 8 Immediately stop using the rice cooker if anything is abnormal or malfunctioning. If the power cord or power plug is abnormally hot. If the electricity stops and starts flowing when the power cord is bent. If the rice cooker is hotter than normal or if you smell smoke or scorching. If you get shocked when touching the rice cooker. If the rice cooker sometimes does not turn off automatically. If the motor stops turning, turns slowly, or turns unevenly. If there are abnormal sounds during operation. If there are water leaks. If there is another abnormality or malfunction.

 Before cooking, remove the inner lid, plate, and steam vent top casing to make sure no rice or other debris is stuck in the regulator and safety valve.")
 P.")


9 Warning This appliance is not intended for use by persons (including children) with reduced physical, sensory or mental capabilities, or lack of experience and knowledge, unless they have been given supervision or instruction concerning use of the appliance by a person responsible for their safety. During other cooking During rice cooking Warning To prevent burns (Incorrect use is dangerous because pressure is used during cooking.) Before cooking, remove the inner lid, plate, and steam vent top casing to make sure no rice or other debris is stuck in the regulator and safety valve. In addition, do not forget to install the plate and steam vent top casing. (Forgetting to do so could result in burns caused by hot water spraying out or the lid opening suddenly.) P.17 Steam Vent Top Casing Inner lid (back) Plate Safety valve Regulator valve Regulator valve Make sure the hole is not clogged. Ball Make sure the ball can move. Safety valve Make sure it is not clogged. When closing the lid, push down slowly on the front center of the lid (front side) until you hear the latch catch. When opening the lid, confirm that the display is turned off and steam is not coming out of the steam vent, then gently press the hook button. Do not open the lid during cooking. Push down slowly on the front center of the lid. Latch catch Hook button If the lid must be opened during cooking, press the Cancel/Off button to stop cooking and wait for the flashing display to turn off about 30 seconds later before opening the lid. Be careful because pressure will be released, causing steam to rush out of the steam vent. If rice or other debris is stuck in the hook area, use a toothpick or other pointed object to remove it. Lid hook area Check if rice or other debris is stuck here. Body hook area Check if rice or other debris is stuck here. 9
10 Safety Precautions - continued During other cooking During rice cooking Warning To prevent burns Keep your hands and face away from the steam vent. Hot steam could spray out during rice cooking or other cooking. In particular, keep out of the reach of children. Do not touch the steam vent The steam vent could still be hot during or immediately after cooking even if steam is not coming out of it. During cooking, do not open the lid, shake the rice cooker, or carry/move it. Do not allow unsupervised use by children and keep out of the reach of children. Do not fill the inner pot with water above the Max Water Level line. (Incorrect use is dangerous because pressure is used during cooking.) Failure to observe these precautions could cause hot steam to spray out, resulting in burns Steam vent Food or hot water could spray out or the lid could open suddenly causing burns. Max Water Level Do not fill with water above these lines. 10 Do not use the rice cooker for any purpose other than to cook rice and the cooking menu items stated in the Operating Instructions and Cook Book included. Do not cook the following types of foods. Pasty foods (liquid-absorbing spongy food, etc.) or stewing items that swell when heated, such as beans and noodles. (When making rice with red beans, cook the rice after adding separately boiled cowpeas. Refer to the Cook Book for details. P.45 ) Cooking that uses ingredients that suddenly foam up, like baking soda. Cooking that uses lots of oil. Cooking that uses starchy ingredients, such as the base for curry or stew. Ingredients that bubble, such as jam. Cooking that requires plastic or other bags containing food to be heated in the rice cooker. Vegetables with thin skins that can float up, such as greens and tomatoes, cooking containing chunky ingredients, and cooking that uses cooking sheets, aluminum foil, or plastic wrap.
11 During other cooking Warning To prevent burns Do not open the lid during pressurized rice cooking (when the The rice cooker is pressurized, so forcing the lid open is dangerous. (Incorrect use is dangerous because pressure is used during cooking.) Failure to observe these precautions could cause hot steam to spray out, resulting in burns display is displayed). Food or hot water could spray out If the lid must be opened during rice cooking, press the Cancel/Off button to stop cooking and wait for the flashing display to turn off about 30 seconds later before opening the lid. Be careful because pressure will be released, causing steam to rush out of the steam vent. To continue cooking, check the rice type and cooking method selection and then press the Cook/Reheat button. Depending on its state when the rice cooking was interrupted, the rice might not cook well after cooking is restarted. During rice cooking To prevent burns Food or hot water could spray out or the lid could open suddenly causing burns. Do not open the lid during cooking If you must open the lid during cooking, press the Cancel/Off button to stop cooking and confirm that no steam is coming out from the steam vent before opening the lid. 11
12 Safety Precautions - continued Caution Do not use the rice cooker in these locations Where water could get on the rice cooker or where it will be close to a flame or heat, such as by a stove burner. (Failure to observe this precaution could result in electric shock, electrical leakage, or a fire.) Unstable locations or on materials not resistant to heat. (Failure to observe this precaution could result in injury or a fire.) Do not use on sliding tables with insufficient load carrying strength. (The table could break causing the rice cooker to fall and result in an injury or burn.) Do not set the rice cooker on a table cloth, aluminum foil or other material that could block the intake vent or exhaust vent. (Failure to observe this precaution could result in overheating and burns.) When using the rice cooker close to a wall, furniture, or a kitchen storage shelf, make sure the released steam will not be trapped. (Trapped steam will cause condensation, which could discolor or deform the wall or furniture.) Areas where the lid cannot be opened completely. (Failure to observe this precaution could result in burns from touching the hot plate or contact with hot dripping moisture.) Handling the Power Plug Pull out the power plug Unplug the power plug from the power outlet when not using the rice cooker. (A fire, burns, or injuries could result from electric shock or electrical leakage due to the deterioration of insulation.) When unplugging the power plug, hold the power plug and do not pull on the cord. (Failure to observe this precaution could result in injury or a fire.) To prevent burns Check the rice cooking method or cooking menu when cooking. Mistakenly using another cooking method for Risotto, which requires a large amount of water, or another rice cooking method for Porridge, is dangerous because it could cause a large amount of hot water to spray out. Treat the rice cooker with caution after unplugging the power plug and waiting for the rice cooker to cool down. (Failure to observe this precaution could result in burns.) Wait for the inner lid to cool before removing it. Wait for the plate to cool before removing it. (Hot water could drip from it.) Completely open the lid before dishing out the rice. (Hot juices could drip from it.) Contact prohibited Do not touch hot components, such as the inner pot, inner lid, plate, or the stainless frame near the inner pot during or immediately after use. Do not touch the hook button when carrying the rice cooker. (Touching the hook button could cause the lid to open.) Do not lift the handle during rice cooking. (The steam could make the handle hot.) 12
13 Caution To prevent accidents Only use the inner pot provided. (Using another pot could cause a malfunction, overheating, or a fire.) Do not use the rice cooker while there are small metallic objects or aluminum foil left inside of it. (Failure to observe this precaution could result in overheating or a fire.) Inside the rice cooker Do not use the inner pot if the iron plating on the outside of the inner pot comes loose or cracks due to dropping the inner pot on the floor or banging it hard against something. (Using it could cause a fire, bad smells or overheating that melts the plastic touching the inner pot.) If using a medical pacemaker, consult your doctor before using this product. (The operation of this product might affect the pacemaker.) Keep away from objects that are adversely affected by magnetism. (The magnetic memory of credit cards, automatic ticket gates opening passes, etc., could be erased.) During Keep Warm Do not use the rice cooker in the following manners. Do not keep the rice warm in the following manners. It could cause the rice to smell unusual or change color. Do not Keep Warm for more than Keep Warm time Do not repeat the reheating process 13
14 Safety Precautions - continued ATTENTION To prevent breakdowns or malfunctions Do not heat the rice cooker while it is empty. (Failure to observe this precaution could cause overheating.) Do not use with debris stuck to the rice cooker. In particular, keep the area shown in the diagram on the right clean. (Failure to observe this precaution could cause the rice cooker to fail or keep it from cooking well.) The rim and bottom of the inner pot. Temperature sensor Seat on which the inner pot rests Do not place the inner pot directly on a flame, heat it in a microwave oven, or on a magnetic cooking surface, etc. (Failure to observe this precaution could cause the inner pot to deform or the fluorine coating to come off.) Do not cover the lid with a dish cloth or towel. (Failure to observe this precaution could cause the rice cooker to discolor, deform, or fail.) Do not use the rice cooker close to a television, radio, interphone, or cordless telephone. (Failure to observe this precaution could cause noise and image distortion in the other devices.) Stop using the rice cooker or inner pot if it is dropped or damaged and have it inspected and repaired by the dealer where you purchased it. Non-water supply auto steamer Remove and wash the inner lid, plate, and steam vent top casing each time after cooking. (Failure to observe this precaution could cause food debris stuck to these items to dry and discolor.) (When not warming, excessive water could collect on them and drip into the rice.) If the plate is not attached, there will be no pressurization, and the humidifying effect of the steam will not be obtained. 14
15 Setting the Current Time The internal battery powers the clock to show the time, even when the power plug is unplugged. If the power plug is removed from the outlet, the display will dim, then return to normal. This is because the rice cooker is switching to its built-in battery, and is not malfunction. At room temperature the clock time will show an error of approximately 2 minutes after one month. Use the following procedure to adjust the current time setting. A display when the power plug is unplugged Ex: To change 19:27 to 20:30 *This is an example for the rice cooking method. 1 Plug in the power plug. Press or for about 1 second to cause the time display to flash. Press and to set the time to 20:30. The time changes each time the button is pressed. changes in increments of 1 hour and changes in increments of 1 minute. Continue pressing to speed up the incremental change. Press time display to light up the Beeps and the display flashes Lights up Hr Min The time cannot be adjusted during cooking, warming, reheating, or when the timer is set. The selected rice cooking method and the current time are displayed. Pressing the 1-2 Person button for 3 seconds while the current time is flashing will display 12:00 (12:00 noon) to return the clock to its initial setting. The clock is a 24-hour format; for example, 0:00 for 12 p.m. and 12:00 for 12 a.m. If the Cancel/Off button is not pressed, the time setting will automatically complete about 1 minute later. To check the current time during cooking, warming or reheating, or when the timer is set. The current time is displayed for 3 seconds when the Hour or Min button is pressed and then the clock returns to the original display. 15
16 Preparing the Rice (Tips for cooking delicious rice) 1 Measure the rice. Use the measuring cup included to measure the rice. Fill the cup to the brim. 1 cup to the brim with measuring cup included For white rice Approx. 180 ml (Approx. 1 Japanese cup) 2 3 Wash the rice. Swill the rinse-free rice from the bottom and rinse it if water is cloudy. (Cloudy water might cause the rice not to cook well.) Adjust the amount of water. ATTENTION Firstly, swill the rice in a large quantity of water to wash it and then pour off the water right away. ATTENTION Do not use commercially available measuring cup or measuring rice bin. (The amount of rice may differ.) The rice easily absorbs the first water, so discard it right away to keep the rice dust from sticking to the rice. When washing the rice in the inner pot, do not use a metal whisk or other tool. (Such tools could scrape off the fluorine coating.) (Water level gauge P.7 ) Example) When cooking 3 cups of "White" Repeat this step until the water remains clear. Wash the rice well to prevent scorching and a residual smell from the rice dust. Level out the rice, place the inner pot on a level surface, and use the water level gauge to adjust the amount of water to match the type and amount of rice and the cooking method. The water line is a guideline. You can adjust the amount of water for your preference. Use the "Hard" water line when you want to cook rice hard for use in sushi, curry, etc. Align with the "Soft" water line and you want to cook rice soft. However, do not add water above the Soft water line. (Adding more water than this could cause hot water spray out during cooking.) 16 ATTENTION Do not use hot water. (It will make the rice sticky.) Cooking with hard water could cause the rice to become sticky or turn yellow. Also, cooking the rice in hard water (mineral water, etc.) could cause the rice to become crunchy or hard. Adjust the amount of water for your preference. When cooking freshly harvested rice, as a guide, make a small adjustment to the water level on the Hard water gauge. Cooking freshly harvested rice with too much water will make it sticky. For information about water amount adjustment when cooking mixed grain, refer to the mixed grain cooking manuals (written on the bag, etc.) available in stores.


 Close the lid slowly until you hear the latch catch.")
17 Preparing the Rice Cooker 1 Set the inner pot into the rice cooker. Wipe off any water, food, etc., stuck to the outside or bottom of the inner pot before setting it in the rice cooker. Wipe off any water or food on the outside. 2 3 Check the lid. If the non-water supply auto steamer is not attached, there will be no pressurization and the humidifier affected the steam will not be obtained, resulting in the rice being a little hard. Close the lid. ATTENTION Warning If set with moisture or debris stuck to the rice cooker, it could result in malfunction or inability to cook well Make sure the regulator valve, safety valve, and vacuum valve are clean and not clogged. P.31 Remove any food, etc. To attach the non-water supply auto steamer. P.32, 33 Before cooking, remove the inner lid, plate, and steam vent top casing to make sure no rice or other debris is stuck in the regulator and safety valve. In addition, do not forget to install the plate and steam vent top casing. (Forgetting to do so could result in burns caused by hot water spraying out or the lid opening suddenly.) Close the lid slowly until you hear the latch catch. Steam vent ATTENTION The pressurized rice cookers have a strong seal making it difficult for air to escape, and this might prevent the lid from closing if it is closed quickly. Close the lid slowly. The lid will not close if the non-water supply auto steamer is not attached. Latch catch 4 Plug in the power plug. Warning When closing the lid, push down slowly on the front center of the lid (front side) until you hear the latch catch. (Failure to do so could cause the lid to open suddenly, resulting in burns) The selected rice cooking method and the current time are displayed. Note You may hear a zapping sound or see sparks fly when plugging in the power plug, but this is due to the charging of the inverter circuit and is not a malfunction. When preparations are completed, it starts cooking the rice. To cook rice To use a timer to cook the rice To cook rice rapidly To soak the rice before cooking (So that cooking finishes at the time you want to eat) (So that you can cook in a short amount of time) (To cook the rice after letting it soak) P.18, 19 P.22, 23 P.24 P.25 To perform other cooking P.28, 44-17
18 Rice cooking (white rice, glutinous rice (sticky rice) mixed grain, Normal Texture is set upon factory shipment. is displayed on the pressurized rice menu when cooking. Example: If "Normal Texture " is selected for "White" *The displayed time information in the illustration is an example. Press to make Rice to flash. The flashing display will change each time the button is pressed. Flashes Flashes The current time is displayed when "Mix", "Porridge" is selected. 2 Press to make the desired cooking program flash. The flashing display will change each time the button is pressed. Flashes The selectable cooking method differs depending on the type of rice. The selected cooking method is remembered when cooking starts for white rice. However, "Rapid", "Mix" and "Porridge" will not be remembered; instead, the "Texture" or "Eco" used last time will be restored. When cooking a small amount of rice To cook cups Press Flashes "1-2 Person" cooking prevents the rice from being mushy or burnt and cooks the rice to nice and soft texture. Once selected, "1-2 person" cooking program will be remembered. Pressing again will cancel the program. 18
19 germinated brown rice, brown rice) Ways to Use Cooking Programs P.20 Warning Do not open the lid during pressurized rice cooking (when the The rice cooker is pressurized, so forcing the lid open is dangerous. display is displayed). If the lid must be opened during rice cooking, press the Cancel/Off button to stop cooking and wait for the flashing display to turn off about 30 seconds later before opening the lid. To continue cooking, check the rice type and cooking method selection and then press the Cook/Reheat button. Depending on its state when the rice cooking was interrupted, the rice might not cook well after cooking is restarted. 3 4 Caution Check the rice cooking method. If you mistakenly use another cooking method to cook Porridge, which uses a large amount of water, it is dangerous because much hot water could spray out. Press. The melody sounds and cooking starts. The Cook/Reheat lamp lights up. is displayed during cooking. The melody sounds and cooking ends. Keep Warm starts automatically. The Steam Warm lamp lights up. "Warm Lo" or "Warm Hi" is displayed. The elapsed warming time is displayed. turns off when Keep Warm starts. Stir and loosen the rice when cooking is completed. This prevents the extra steam from being absorbed, making the rice sticky and causing it to stick together. How to Keep Warm P.26 The center of the rice might be a little swollen or the rice touching the inner pot might be soft. This is caused by the heat generation from the inner pot itself due to the IH heating and this is done to ensure the rice is cooked well. The displays other than the selected rice turn off. After about 3 seconds This shows the time until cooking is completed. Lights up If the lid is not closed properly, will be displayed. Make sure to close the lid properly. The sound may occur during cooking and Keep Warm. P.40 The time until cooking is completed is calculated by the rice cooking function, taking into account the previous cooking times, water temperature, etc. If the rice cooker is warm, the time until cooking is completed might not be displayed. The time until cooking is completed might move up or stop during cooking. This is due to adjustments being made to make the rice taste better. For Mix and Porridge, this shows the current time because the remaining cooking time changes substantially depending on the amounts of ingredients and rice. The remaining cooking time will be displayed a couple of minutes before the cooking is completed. It is difficult for the steam to escape when the rice cooker is pressurized, so there might be condensation on the lid when opened, but it is not a malfunction. If you are concerned about the condensation: P.33 When the hook button feels stiff 2 1 While pressing down on the front center of the lid, Press the hook button. 19
20 Ways to Use Cooking Programs Cook various types of rice Tips on ways to use The cooking time guide is for a voltage of 220V AC, room temperature of 20 C, and a water temperature of 18 C. The cooking time will differ depending on the voltage, room temperature, water level, type of rice, etc. Rice selection Menu Water line Amount to be cooked (number of cups) Small amount cooking Cooking time guide (min) Select chewiness based on purpose or as desired For freshly harvested rice and rice that absorbs water quickly and becomes sticky easily * Select "Texture ", then cook after adjusting the amount of water using the "Hard" water line. Cooking rice with too much water will be cooked less sticky. Hard rice for sushi, curry, Chinese fried rice, etc. Rice with a light and less sticky texture When you want to bring out stickiness and sweetness Rice for box lunches and rice balls Rice for frozen storage When you want to cook rice quickly * Rapid is a cooking method that gives priority to time, so the surface of the rice is a little watery and the rice is a little hard. For rice that has been mixed (with other ingredients) * When using a store-bought flavoring for mixed rice, place the other ingredients on the top of the rice without stirring them in. Porridge * If you are cooking a thin porridge, do not add water more than the water level line for Porridge, but reduce the amount of rice. When you want to cook rice using less electricity *The rice will be a little hard when cooked. *The rice may cook inconsistently if a large volume of rice is used. White Normal Texture Normal Texture Normal Texture White Rice White Rice White Rice Can be set Can be set Can be set Rapid White Rice Cannot be set Mix White Rice 1-4 Cannot be set Porridge White Porridge Cannot be set White Cannot Eco Rice be set Cooking Okowa (sticky rice) with glutinous rice * The rice may not cook properly if a large volume of ingredients is mixed with it. Mix Sticky Rice Cannot be set When you want to cook white rice with mixed grains added * Follow any water amount adjustment instructions, etc. written on store-bought rice bags. Mixed Grain Normal Mixed Can Grain be set Mix Mixed Cannot 1-4 Grain be set The amount of steam emitted differs depending on the cooking method. 20
21 Tips on ways to use Rice selection Menu Water line Amount to be cooked (number of cups) Small amount cooking Cooking time guide (min) When you want to cook white rice with germinated brown rice added * Recommended ratio: 2 cups of white rice and 1 cup of germinated brown rice * When using a store-bought flavoring for mixed rice, place the other ingredients on the top of the rice without stirring them in. * Do not Keep Warm. (It could cause the rice to smell unusual or change color.) Germinated brown Normal Mix Porridge Germinated Brown Germinated Brown White Porridge Can be set Cannot be set Cannot be set When you want to cook only germinated brown rice, or brown rice * When using a store-bought flavoring for mixed rice, place the other ingredients on the top of the rice without stirring them in. * Do not Keep Warm. (It could cause the rice to smell unusual or change color.) Brown Normal Mix Porridge Brown Rice Brown Rice Brown porridge 1-4 Can be set Cannot be set Cannot be set Cooking For details, refer to the Cook Book (P42-P55). Tips for Cooking Various Types of Rice Mix assorted grains into white rice at a ratio of 30% or less. Mix germinated brown rice into white rice at a ratio of 50% or less. If cooking at a ratio of 50% or more, use brown rice and the "Brown" water line. When making Okowa (sticky rice), mix together 0.5 cup of white rice (uruchi rice) for every cup of glutinous rice. (If only glutinous rice is used, premature water absorption may prevent rice from being cooked properly.) For red bean rice, mix it according to the proportion given in P.47. If you are cooking a thin porridge, do not add water more than the water level line for Porridge, but reduce the amount of rice. After cooking rice, let the rice cooker cool down before cooking rice again. When preparations are completed, it starts cooking the rice. To cook rice To use a timer To cook rice rapidly to cook the rice (So that cooking finishes at the time you want to eat) (So that you can cook in a short amount of time) To soak the rice before cooking (To cook the rice after letting it soak) To perform other cooking P.18, 19 P.22, 23 P.24 P.25 P.28, 44-21
22 Rice Cooking using the Timer (Set the timer to finish cooking when you want to eat) The timer can be set to Timer 1 or Timer 2. Upon factory shipment, Timer 1 is set to 6:00 and Timer 2 is set to 18:00. The timer time is the time when the cooking will finish. If the set time is near the current time, cooking will begin right away. (Timer lamp does not light up.) ATTENTION Do not use the timer for Mix. (The quality of the added ingredients could decline or they could sink into the rice.) As a guideline, the timer is set within 12 hours. Ex: Setting Timer 1 to 7:30 *The display is an example for when "Texture " is selected for "White". Check the current time and adjust if incorrect. P.14 1 Press to make Rice to flash. The flashing display will change each time the button is pressed. Flashes Flashes The current time is displayed when "Mix", "Porridge" is selected. 2 Press to make the desired cooking program flash. The flashing display will change each time the button is pressed. Flashes The selected cooking method is remembered when cooking starts for white rice. However, "Rapid", "Mix" and "Porridge" will not be remembered; instead, the "Texture" or "Eco" used last time will be restored. When cooking a small amount of rice To cook cups Press Flashes "1-2 Person" cooking prevents the rice from being mushy or burnt and cooks the rice to nice and soft texture. Once selected, "1-2 person" cooking program will be remembered. Pressing again will cancel the program. 22

23 Warning Do not open the lid during pressurized rice cooking (when the The rice cooker is pressurized, so forcing the lid open is dangerous. display is displayed). If the lid must be opened during rice cooking, press the Cancel/Off button to stop cooking and wait for the flashing display to turn off about 30 seconds later before opening the lid. Be careful because pressure will be released, causing steam to rush out of the steam vent. To continue cooking, check the rice type and cooking method selection and then press the Cook/Reheat" button. Depending on its state when the rice cooking was interrupted, the rice might not cook well after cooking is restarted Press Check the rice cooking method. If you mistakenly use another cooking method to cook Porridge, which uses a large amount of water, it is dangerous because much hot water could spray out. Lights up Press. to make Timer 1 light up The Cook/Reheat lamp flashes. The lit up item changes each time the button is pressed. Press or to set the cooking completion time to 7:30. The time changes each time the button is pressed. HR changes in increments of 1 hour and changes in increments of 10 minute. Continue pressing to speed up the incremental change. This shows the time when cooking will be completed. The timer is set when the buzzer sounds. The Cook/Reheat lamp turns off and the Timer lamp turns on. Caution Cooking completion time Lights up The time set upon factory default setting or the previously set time is displayed. If the lid is not closed properly, will be displayed. Make sure to close the lid properly. Pressing the 1-2 Person button for 3 seconds when setting the time will return Timer 1 to 6:00 and Timer 2 to 18:00. The Timer 2 buzzer sound is Beep-Beeeeeep. The set time is remembered. To cancel rice cooking timer, press the Cancel/Off button. 6 The melody sounds and cooking ends. Keep Warm starts automatically. The Steam Warm lamp lights up. Stir and loosen the rice when cooking is completed. This prevents the extra steam from being absorbed, making the rice sticky and causing it to stick together. How to Keep Warm P.26 The center of the rice might be a little piled up in the center or the rice touching the periphery of the inner pot might be soft. This is caused by the heat generation from the inner pot itself due to the IH heating and this is done to ensure the rice is cooked well. Lights up It is difficult for the steam to escape when the rice cooker is pressurized, so there might be condensation on the lid when opened, but it is not a malfunction. If you are concerned about the condensation: P.33 When the hook button feels stiff 1 2 Press the hook button. While pressing down on the front center of the lid, 23
24 Rice Cooking with Rapid (When you want to cook rice quickly) This is a cooking method that gives priority to time, so the surface of the rice is a little watery and the rice is a little hard Ex.) If "White" and "Rapid" are selected 1 Press to make White to flash. The flashing display will change each time the button is pressed. Flashes Flashes The current time is displayed when "Mix" or "Porridge" is selected. 2 Press to make Rapid flash. The flashing display will change each time the button is pressed. Flashes The selected cooking method is remembered when cooking starts for white rice. However, "Rapid", "Mix" and "Porridge" will not be remembered; instead, the "Texture" or "Eco" used last time will be restored. 3 Press. The melody sounds and cooking starts. The Cook/Reheat lamp lights up. is displayed during cooking. The displays other than the selected rice turn off. After about 3 seconds If the lid is not closed properly, will be displayed. Make sure to close the lid properly. The sound may occur during cooking and Keep Warm. P.40 The melody sounds and cooking ends. Keep Warm starts automatically. This shows the time until cooking is completed. The Steam Warm lamp lights up. Lights up 24 4 Stir and loosen the rice when cooking is completed. This prevents the extra steam from being absorbed, making the rice sticky and causing it to stick together. For the Keep Warm program P.26
25 Rice cooking with soaking (when you want to cook rice after soaking it) Upon factory shipment, the soaking time is set to 30 minutes. This controls the temperature during soaking depending on the soaking time, and then starts cooking after the rice absorbs water sufficiently. The recommended guideline is 30 minutes in summer and 60 minutes in winter. Soaking cannot be combined with rice cooking timer ATTENTION Do not cook rice after soaking if Mix is selected. (The quality of the added ingredients could decline or they could sink into the rice.) Ex: When soaking for 60 min before cooking *The display is an example for when "Texture " is selected for "White". 1 After selecting the rice type and cooking method, press to make the soaking time (ex: 30 min) light up. The Cook/Reheat lamp flashes. The lit up item changes each time the button is pressed. Lights up Lights up How to select the rice and cooking method P The time set upon factory default setting or the previously set time is displayed. If the lid is not closed properly, will be displayed. Make sure to close the lid properly. 2 Press and select 60 for the soaking time. The time changes each time the button is pressed. 3 Press. This shows the remaining soaking time before cooking starts in minutes. When the buzzer sound is Beep, Beep, Beeeeeep, the soak rice cooking starts. The Cook/Reheat lamp turns off and the Timer lamp turns on. Soaking time The set time is remembered. To cancel soak rice cooking timer, press the Cancel/Off button. 4 The melody sounds and cooking ends. Keep Warm starts automatically. The Steam Warm lamp lights up. Stir and loosen the rice when cooking is completed. This prevents the extra steam from being absorbed, making the rice sticky and causing it to stick together. For the Keep Warm program P.26 Lights up 25
26 Warming There are 2 Keep Warm methods: "Warm Lo" and "Warm Hi". When the cooking is completed, the rice cooker automatically switches to Warm Lo or Warm Hi, and then the Steam Warm lamp turns on. The Warm Lo is set upon factory shipment. Stir the rice right after cooking it and enjoy it while it is still warm. Ways to use Keep Warm "Warm Lo" This keeps rice warm at low temperature. This minimizes discoloration and drying out of the rice and saves electricity. Keep the Keep Warm time under 40 hours. (However, Keep Warm will continue even after 40 hours have passed.) "Warm Hi" This keeps rice warm at high temperature. This keeps down the formation of condensation on the inside of the lid and inner pot. Keep the Keep Warm time under 12 hours. (However, Keep Warm will continue even after 12 hours have passed.) How to switch between "Warm Lo" and "Warm Hi". The rice cooker can be switched between "Warm Lo" and "Warm Hi" during Keep Warm. ( Warm Lo is set upon factory shipment.) 1 Press during Keep Warm The setting changes each time the button is pressed, and then the display window changes between "Warm Lo" and "Warm Hi". Lo Lights up "Warm Lo" display "Warm Hi" display The warming program set once will be remembered by the rice cooker. Lights up Caution Do not keep the rice warm in the following manners. It could cause the rice to smell unusual or change color. Do not Keep Warm for more than Keep Warm time. Rice unsuitable for Keep Warm Depending on the rice type, keeping the rice warm could cause it to lose its quality, smell unusual, or become sticky. Do not Keep Warm (Keeping the rice warm could cause it to lose its quality, smell unusual or become sticky) Types of Rice: Do not Keep Warm if cooking rice using the following menus: "Germinated Brown", "Brown", "Glutinous Rice (Sticky Rice)", "Mix", "Porridge". 26 Note During Keep Warm, condensation will form on the inside of the lid and inside the inner pot, but this prevents the rice from drying out and is not a malfunction. Do not keep mixed grain cooked with "Normal Texture" selected warm for more than 12 hours. Depending on the type of mixed grain, it may become bitter, smell strange, or become sticky even if kept warm for less than 12 hours. However, Keep Warm will continue even after the above amount of time has passed.
27 When Stopping Keep Warm 1 Press during Keep Warm. The Steam Warm lamp turns off. Ex: If "Texture "White". " is selected for Turns off Switch from Off to warming 1 Press. It changes to Warm Lo or Warm Hi that was set last time. The Steam Warm lamp turns on and "Warm Lo" or "Warm Hi" selected last time lights up. Example: If "Warm Lo" is selected for "Texture " of "White". Lights up The warming time elapsed is displayed in 1hour increments. "Warm Lo" will be displayed for up to 40 hours and "Warm Hi" will be displayed for up to 12 hours; afterwards, the current time will be displayed. Tips for keeping the rice warm and delicious Stir the rice occasionally during Keep Warm. When only a little rice is left, keep it in the center of the inner pot as much as possible. (To keep it from drying out or becoming sticky.) Keep the Keep Warm time short. Do not keep warm for more than 40 hours for Warm Lo or 12 hours for Warm Hi. (It could cause the rice to smell unusual or change color.) Reheat the rice during Keep Warm Do not warm rice that was cooked without being washed well, do not leave the rice scoop in the rice when keeping it warm, and do not warm rice that has become cold. (It could cause the rice to smell unusual or change color.) Rice can also be served deliciously by wrapping it in plastic wrap and storing it in the freezer, and warming it in a microwave oven later. Reheat the rice as desired if the temperature of the rice during Keep Warm seems a little low. ATTENTION As a guideline, set the amount of rice below 3 on the White Rice water level gauge. Stir the rice and level it out before reheating. (To prevent uneven heating) Do not repeatedly reheat the rice. (Doing so will dry it out or scorch it.) 1 Reheating the rice immediately Press during Keep Warm. The Cook/Reheat lamp lights up. Reheating automatically runs for about 10 minutes. Lights up When the rice is hot after being cooked or when the rice has cooled after turning off the Keep Warm function, a buzzer will sound and reheating will not be possible. The melody sounds and reheating ends. The rice cooker returns to Keep Warm automatically. The Steam Warm lamp lights up. Lights up To stop before reheating is completed, press the Cancel/Off button. 27
28 Cooking (Risotto, Cake) *The example shows when Cake and 45 minutes are selected Press flash. The flashing display will change each time the button is pressed. Flashes Press menu flash. Press Press. to make Variety Flashes to set the heating time. The time changes each time the button is pressed. The time can be set from 10 minutes to 90 minutes in 5-minute intervals. The melody sounds and heating starts. The Cook/Reheat lamp lights up. to make the desired The flashing display will change each time the button is pressed. The melody sounds and heating ends. Move the cooked food to a different container. Lights up Heating time This shows the remaining heating time until cooking is completed in minutes. Warning Do not use the rice cooker for any purpose other than to cook rice and the cooking menu items stated in the Operating Instructions and Cook Book included. Do not open the lid during cooking. If you must open the lid during cooking, press the Cancel/Off button to stop cooking and wait for about 30 seconds before opening the lid. (Be careful not to get burned.) Caution Check the rice cooking menu when cooking. If you mistakenly use another cooking menu to cook Risotto, which uses a large amount of water, it is dangerous because much hot water could spray out. Flashes Flashes Flashes Flashes Flashes Steam is emitted when using the cooking menu. The menu that was selected last time flashes and the time that was set lights up. The selected menu is remembered when cooking is started. The Risotto heating time cannot be set. This is automatically set depending on the temperature of the rice and the amount of ingredients. Flashes The heating time is not displayed. Refer to the Cook Book for information regarding the heating time and cooking method. Risotto P.52, 53 (The heating time is automatically set.) Cake Flashes P.54, ATTENTION Do not keep warm or store the cooked food in the inner pot. (Doing so could damage the fluorine coating of the inner pot.) The displays other than the selected Variety turn off.
 ATTENTION Do not use benzene, thinner, bleach, polishing powder, or alkaline cleaners. (Using these could damage the surface.")
 Do not use a dishwasher and/or dish dryer. (Using these could cause the parts to deform or discolor.")
![) Body, lid, and body interior (when dirty) Wipe with a well wrung-out cloth. Do not wash with or in water. Body Lid Non-water supply auto steamer [Plate, inner lid, and steam vent top casing] P.](/docs-images/81/82775473/images/29-3.jpg "30-34 Inner pot P.30 Wipe with a well wrung-out cloth. Wipe up condensation accumulated in the moisture trap. Intake vent/exhaust vent Wipe with a well wrung-out cloth.")
29 Cleaning and Maintenance Warning Treat the rice cooker with caution after unplugging the power plug and waiting for the rice cooker to cool down. (Failure to observe this precaution could results in burns.) ATTENTION Do not use benzene, thinner, bleach, polishing powder, or alkaline cleaners. (Using these could damage the surface.) Use dishwashing detergent (ph-neutral) as a cleaner. (Using any other substance could damage the surface.) Wash with a sponge or other soft material. Do not use a plastic or other scrubber. (Using these could damage the surface.) Do not use a dishwasher and/or dish dryer. (Using these could cause the parts to deform or discolor.) Body, lid, and body interior (when dirty) Wipe with a well wrung-out cloth. Do not wash with or in water. Body Lid Non-water supply auto steamer [Plate, inner lid, and steam vent top casing] P Inner pot P.30 Wipe with a well wrung-out cloth. Wipe up condensation accumulated in the moisture trap. Intake vent/exhaust vent Wipe with a well wrung-out cloth. The stainless steel frame may be damaged if wiped too vigorously. Intake vent/exhaust vent (Once a month) Use a vacuum cleaner to suck out the debris from the intake and exhaust vents at the bottom of body. Intake vent Hook area (check before and after each use) Use a tooth pick or similar object to remove the rice and other debris stuck in the hook area if the lid will not latch properly. Exhaust vent Temperature sensor (Check before cooking) If scorched material is stuck to this, sand it off by using a fine grade water-resistant abrasive paper (about #600) with a little water. When the material has been removed, wipe off the area with a well wrung-out cloth. Do not wash with or in water. Temperature sensor Lid hook area Check if rice or other debris is stuck here. Body hook area Check if rice or other debris is stuck here. Rice scoop (Wash after each use) Rice scoop holder and measuring cup (Wash when dirty) Use dishwashing detergent (ph-neutral) and wash with a sponge or other soft material. 29

30 Cleaning and Maintenance (cont.) Inner Pot (Wash after each use) Remove inner pot from the rice cooker and use dishwashing detergent (ph-neutral) and a sponge or other soft material to wash inner pot. It may become impossible to cook rice satisfactorily if the inner pot becomes deformed due to being struck against something or dropped. The inner pot color might become uneven with use, but this will not affect performance or cleanliness. Inner pot inside Inner pot outside Observe the following to avoid scratching the fluorine coating on the inside. Use the rice scoop provided. Do not use metal ladle, whisk, etc. Do not use vinegar. Do not wash spoons, rice bowls, etc. in the pot. Do not wash with a polishing powder or scrubber. The fluorine coating on the inside will wear out with use, so treat it carefully. The fluorine coating is not harmful to humans. The surface rusts easily if moisture is left on it. Promptly wipe off moisture. Do not wipe the outside with paper towels, etc. Due to the rough surface on the outside, pieces of the paper towels may remain on it. ATTENTION Note When removing the inner pot, use both hands to lift it straight out of the rice cooker. Lifting it out using only one hand could cause it to catch on the rice cooker, making it difficult to lift out. A special thermal sprayed thick iron pot has been used to achieve the excellent cooking and heating performance of the inner pot. This special fabrication method makes the outside rough. It could rub on the rice cooker when removing it from or placing it in the rice cooker and cause plastic powder to stick to the inner pot, but this is not a problem for use. Wipe the powder off with a sponge. In addition, pressing hard on the bottom of the inner pot when it is sitting in a sink could scratch the sink, so be careful. Non-water supply auto steamer [Plate, inner lid, and steam vent top casing] (Wash after each use) Vacuum valve, pressure-reducing valve (Wash after each use) These are not removable, so do not pull them. If they are deformed, the pressure cannot be sustained and the rice will not cook well. Inner lid and lid packing (Wash after each use) Wash these together. The lid packing is not detachable, so do not pull it. If it is deformed, the pressure cannot be sustained and the rice will not cook well. Regulator valve (Check before cooking) Clean the front of the regulator valve. When the valve is clogged with debris, use a cotton swab or similar item to unclog it. 30 Safety valve (Check before cooking) If the safety valve (in the center) is clogged with rice or debris, use a cotton swab or similar item to unclog it. Use a cotton swab, etc. to press on the center of the safety valve 2 or 3 times to confirm that it moves. Note Do not remove the lid packing, regulator valve, safety valve, vacuum valve, or pressure-reducing valve from the inner lid. Steam sensor and pressure regulator Do not push on, pull on, or apply excessive force to the pressure regulator. Failure to observe this precaution could cause the rubber part to come loose or tear, or damage the device.
![Non-water supply auto steamer [Plate, inner lid, and steam vent top casing] (Wash after each use) The non-water](/docs-images/81/82775473/images/31-0.jpg "supply auto steamer is assembled with the inner lid, plate, and steam vent top casing.")


, then steadily press it until you hear it latch shut (the button is locked).")
31 Non-water supply auto steamer [Plate, inner lid, and steam vent top casing] (Wash after each use) The non-water supply auto steamer is assembled with the inner lid, plate, and steam vent top casing. Remove the steam cap from the lid and use dishwashing detergent (ph-neutral) and a sponge or other soft material to wash the steam cap. 1 2 Remove the non-water supply auto steamer from the lid. Push down the release lever and remove the non-water supply auto steamer manually with both hands. ATTENTION Separate the non-water supply auto steamer into the inner lid and the other plate. Push down the plate lever and remove the plate. ATTENTION Do not tilt the non-water supply auto steamer when carrying it. Water or hot water might spill from it if tilted. Release lever Hot water and water will spill out, so take it apart in a sink After 8 Wash the plate to clean and unclog it. Wash the inner lid to clean and unclog it. Wash the steam vent top casing to clean and unclog it. Packing (Do not remove it. If this has been removed, press it into the groove.) rinsing, wipe away all moisture and dry thoroughly. Attach the steam vent top casing to the inner lid. Insert the latches of the steam vent top casing into the latch catches of the steam vent bottom casing (2 locations), then steadily press it until you hear it latch shut (the button is locked). Steam vent top casing latches Lever Inner lid Steam vent bottom casing Latch catches Plate 3 The packing attached to the plate is not removed, so do not pull on it. If the packing is deformed, it will reduce the amount of water that collects in the plate. Remove the steam vent top casing from the inner lid Press the button and remove the steam vent top casing. Inner lid Steam Vent Top Casing Latch catch Button 31


 Inner lid Latch catch 2 Plate Preventing rusting of the inner lid The inner lid is made of stainless steel, but it")

 cleanser, and rub off the rust with a balled-up wrap.")
32 Cleaning and Maintenance (cont.) Attach the plate to the inner lid. 9 Do not install the plate upside down Insert the bottom hook of the plate into the bottom guide at the bottom of the inner lid. Align the hook at the top of the plate with the top guide and press the plate in until you hear it lock in place. Top hook Top guide Install the non-water supply auto steamer into the lid. 1 Orient the lid packing to the front and insert the hooks on both sides into the groove. If only the hook on one side is inserted, that hook could be damaged when the inner lid is closed. 1 1 Grooves Lower latches (plate) Lower guide (inner lid) Latch catch 2 Press on the top of the inner lid. To prevent cooking when you have forgotten to install the non-water supply auto steamer, the lid will not close with a moderate force. (The lid closes when there is no inner pot.) Inner lid Latch catch 2 Plate Preventing rusting of the inner lid The inner lid is made of stainless steel, but it can rust due to the residual iron and chloride in the moisture. Wash the inner lid clean and wipe the moisture off after use. Separate the inner lid and plate to let them dry naturally. If rusting occurs Apply a cream (liquid) cleanser, and rub off the rust with a balled-up wrap. Afterwards, thoroughly rinse the inner lid, wipe away all moisture and dry thoroughly. Sometimes the rust cannot be completely removed, so take good care of the rice cooker to prevent rusting. Plate Inner lid 32 Cooking using spices Wash the washable parts immediately after cooking mixed rice, cooking other foods, or cooking risotto, etc. Leaving them dirty could cause odors, spoiling, or rust.


33 How to switch to plate condensation reduction mode immediately after cooking Condensation collects on the inner lid and other plate immediately after cooking to keep the surface of the rice from drying. If the condensation concerns you, increase the steaming time and switch to a mode that reduces the condensation. Once the mode is switched, the setting is remembered until you switch back to the original mode. 1 Press flash. to make Variety Flashes The menu that was selected last time flashes and the time that was set lights up. Flashes Lights up 3 4 Continue pressing for 5 seconds. The switch over is completed when the buzzer sounds and is displayed for 2 seconds. Press. Pressing it again will switch back to the original mode. In this case, is displayed. When switching to a mode that reduces the condensation Approximately 5 more minutes will be required for cooking. It will reduce the amount of water that collects in the plate. The rice cooker is pressurized and has strong seal, so there will be some condensation even when switching to a mode that reduces the condensation. Select "Warm Hi" if condensation during Keep Warm is a concern. P.26 Non-water supply auto steamer The non-water supply auto steamer collects the steam during cooking as distilled water and emits it as steam during cooking, warming, and reheating to bring out the taste of the rice and keep it moist. (There is no need to add water.) Moisture trap Plate Inner lid Caution Wait for the inner lid to cool before removing it. Wait for the plate to cool before removing it. (Hot water could drip from it.) Contact prohibited Do not touch hot components, such as the inner pot, inner lid, or plate during or immediately after use. 33
34 Non-water supply auto steamer (cont.) After cooking (steaming) is finished and during Keep Warm, the rice is kept moist by the steam, so condensation also forms on the surface of the non-water supply auto steamer, but this is not a malfunction. In addition, when the lid is opened, the condensation runs down into the condensation holding areas. This condensation has no effect on the quality of the rice during cooking or Keep Warm, but if it concerns you, you can wipe it off with a cloth. The amount of water that collects in the non-water supply auto steamer differs depending on the menu, amount of rice being cooked, the amount of adjustment of the water level, etc. When 1 ml of water in the non-water supply auto steamer has evaporated, it creates approximately 1600 ml of steam. During steaming the vent is closed to trap the steam and sufficiently fill the inner pot with steam. If the plate is not attached, there will be no pressurization and the humidifier affected the steam will not be obtained, resulting in the rice being a little hard. Remove and wash the inner lid, plate, and steam vent top casing each time after cooking. (To prevent food debris on these parts from drying and discoloring.) (To prevent too much water from collecting and getting on the rice when not keeping it warm.) To care for the rice cooker, wait for it to cool down and then use a sponge or soft cloth, etc. to wipe it. Do not use a scrubber made of plastic or other material. If there are odors If there are odors after cooking a mixed rice, risotto, or foods, or keeping rice warm, you can boil water and use the steam from it to reduce the smell. 1 2 Place water in the inner pot. The amount of water is up to the White Rice water level gauge 2. * Only use water. Do not use detergent, etc. Press to make Variety flash. Flashes The menu that was selected last time flashes and the time that was set lights up. Flashes Lights up If the odor is still a concern 4 Continue pressing 5 seconds. is displayed and heating begins for 1. Place saltwater (approx. 1%) in a pot or fry pan that is large enough to hold the inner lid and the plate and boil the water. 2. When the water begins boiling, put the burner on low and heat the inner lid and the plate for 15 minutes. 3. Discard the hot water and wait for the inner lid and the plate to cool before washing them. Cooking while the rice cooker is empty could cause the plastic parts to deform, so be careful The melody sounds and heating ends. The Cook/Reheat lamp turns off. After the rice cooker cools down, discard the hot water and wipe the moisture from the inner pot. Immediately after cooking is finished the inner pot and inner lid are hot, so wait for the rice cooker to cool down before discarding the hot water and wiping off the moisture. Some odors cannot be completely removed.
35 Troubleshooting Please check the following points before calling for service. If This Happens Check This Rice Cooking Soft Sticky Amount of rice and adjusting the amount of water P.16, 20, 21 Measure the rice by using the measuring cup provided and do not exceed the amount of rice that can be cooked for the particular cooking method. Reduce the amount of water when soft. Reduce the amount of water when using the timer. (This prevents the rice from becoming too soft because it absorbs too much water.) Washing the rice P.16 In case of white rice, wash it until the water stays clear. In case of rinse-free rice, wash the rice thoroughly if the water is cloudy, and then swill the rice to let the rice and water sit for a while. Water used to wash and cook the rice P.16 Wash the rice with cold water but not warm or hot water. (It will make the rice sticky.) Cooking with hard water could cause the rice to become sticky or turn yellow. Rice cooking menu If sticky or soft, try cooking with Normal Texture Stirring the rice Stir the rice as soon as it finishes cooking. (This prevents the excess steam from making the rice sticky or making it smelly.) The bottom of the inner pot or the temperature sensor is dirty P.13-15, 29, 30 Remove any debris. selected. Interrupting cooking P.19, 23 If cooking is interrupted because the Cancel/Off button was pressed, the power cord was unplugged, there was a power outage, etc., the rice might not be cooked properly thereafter. Power supply Using an extension cord or simultaneously plugging other electric devices into the same power outlet could cause the voltage to drop and prevent the rice from cooking properly. Do not use an extension cord and only plug the rice cooker into the power outlet. Uneven cooking Amount of rice and adjusting the amount of water P.16, 20, 21 Measure the rice by using the measuring cup provided and do not exceed the amount of rice that can be cooked for the particular cooking method. Washing the rice P.16 In case of white rice, wash it until the water stays clear. In case of rinse-free rice, wash the rice thoroughly if the water is cloudy, and then swill the rice to let the rice and water sit for a while. The bottom of the inner pot or the temperature sensor is dirty P.13-15, 29, 30 Remove any debris. Interrupting cooking P.19, 23 If cooking is interrupted because the Cancel/Off button was pressed, the power cord was unplugged, there was a power outage, etc., the rice might not be cooked properly thereafter. Power supply Using an extension cord or simultaneously plugging other electric devices into the same power outlet could cause the voltage to drop and prevent the rice from cooking properly. Do not use an extension cord and only plug the rice cooker into the power outlet. 35
36 If This Happens Check This Rice Cooking Hard Hard core Watery and not fully cooked Amount of rice and adjusting the amount of water P.16, 20, 21 Measure the rice by using the measuring cup provided and do not exceed the amount of rice that can be cooked for the particular cooking method. Increase the amount of water when hard. Washing the rice P.16 In case of white rice, wash it until the water stays clear. In case of rinse-free rice, wash the rice thoroughly if the water is cloudy, and then swill the rice to let the rice and water sit for a while. Water used to wash and cook the rice P.16 Cooking the rice in hard water (mineral water, etc.) could cause the rice to become crunchy or hard. Adjust the amount of water for your preference. Rice cooking menu If hard, try cooking with Normal Texture selected. Non-water supply auto steamer If the plate is not attached, there will be no pressurization and the humidifier affected the steam will not be obtained, resulting in the rice being a little hard. The bottom of the inner pot or the temperature sensor is dirty P.13-15, 29, 30 Remove any debris. Interrupting cooking P.19, 23 If cooking is interrupted because the Cancel/Off button was pressed, the power cord was unplugged, there was a power outage, etc., the rice might not be cooked properly thereafter. Power supply Using an extension cord or simultaneously plugging other electric devices into the same power outlet could cause the voltage to drop and prevent the rice from cooking properly. Do not use an extension cord and only plug the rice cooker into the power outlet. Scorching Cooking white rice at a high temperature could cause it to be lightly browned and other rice could be scorched brown. This is not a malfunction. Washing the rice P.16 In case of white rice, wash it until the water stays clear. In case of rinse-free rice, wash the rice thoroughly if the water is cloudy, and then swill the rice to let the rice and water sit for a while. The bottom of the inner pot or the temperature sensor is dirty P.13-15, 29, 30 Remove any debris. Check the cooking method. If the rice is cooked without selecting the 1-2 Person program when cooking a small amount of rice (up to 2 cups), the bottom of the rice may be lightly browned. Select the 1-2 Person program. 36 A thin film forms The center of the rice swells up. This rice cooker uses IH (electromagnetic induction heating) to heat the inner pot and create good convection currents in the cooking rice, which could cause the center of the rice to swell up or the rice touching the inner pot to look white. This is not a malfunction. The thin film that forms is the savory flavor emitted from the rice and is formed from starch. Cooking at high temperature produces a large quantity of savory flavor. This is not a malfunction.
37 Troubleshooting - continued Please check the following points before calling for service. If This Happens Check This Rice Cooking Water boils out. Steam may rush out from the steam vent during cooking. This is to allow pressure to escape, so it is not a malfunction. Amount of rice and adjusting the amount of water P.16 Do not add water above the Soft water line. Measure the rice using the measuring cup provided. Washing the rice P.16 In case of white rice, wash it until the water stays clear. In case of rinse-free rice, wash the rice thoroughly if the water is cloudy, and then swill the rice to let the rice and water sit for a while. Dirty or clogged parts P Remove debris and clogging from the steam vent top casing and plate. Attaching parts P Do not forget to attach the steam vent top casing, plate, and inner lid before cooking the rice. Check the cooking method. Mistakenly using another cooking method for Risotto, which requires a large amount of water, or using another rice cooking method for Porridge, is dangerous because it could cause a large amount of hot water to spray out. Steam may or may not be emitted depending on the cooking method. Steam may spray out during cooking depending on the cooking method. Steam will rush out if the cooker is moved during cooking. Steam is trapped in the rice cooker under pressure, so keep your hands and face away from the steam vents during cooking. When using the rice cooker close to a wall, furniture, or a kitchen storage shelf, make sure the released steam will not be trapped. Mixed rice does not cook properly. Adding seasoning and other ingredients Add the seasoning to the water and adjust the water level and stir to prevent the seasoning from settling to the bottom. Place the other ingredients on top of the rice after the water level has been adjusted and mix them into the rice after the rice has finished cooking. (If the seasoning or other ingredients sink to the bottom, the heat could not be distributed well within the rice cooking.) Amount of seasoning and other ingredients The proper amount of other ingredients is about 30 to 50% of the amount of rice. Use a small amount of ingredients when they are oily. Use a lesser amount for tamari soy sauce. Cooking method P Cook the rice right away. Cook without using the timer or soaking settings. (The quality of the added ingredients could decline or they could sink into the rice.) Sticky rice does not cook properly. When making Okowa (sticky rice), mix together 0.5 cup of white rice (uruchi rice) for every cup of glutinous rice. (If only glutinous rice is used, premature water absorption may prevent rice from being cooked properly) P.20, 21 37
38 If This Happens Check This Rice Cooking Risotto does not cook properly. Cooking takes too long. Amount of stock Add enough stock to just cover the rice and other ingredients. How to add eggs Beat the eggs and then pour them over the entire surface of the cooked risotto. If put in first the eggs will harden on the bottom, and cannot be cooked satisfactorily. Soaking and cooking are completed automatically, so more time is required than when cooking with a rice cooker that does not have a microcomputer (gas rice cooker). This is not a malfunction. Amount of rice and adjusting the amount of water P.16, 20, 21 Measure the rice by using the measuring cup provided and do not exceed the amount of rice that can be cooked for the particular cooking method. Washing the rice P.16 In case of rinse-free rice, wash the rice if the water is cloudy, and then swill the rice to let the rice and water sit for a while. Interrupting cooking If a power outage occurs during cooking, the cooking time will be extended by the amount of time the power was out. The body, rice, inner pot, etc., smells abnormal. There may be a plastic or rubber smell when using the rice cooker for the first time. This will disappear with use. There may also be a smell after cooking mixed rice or using the rice cooker for other cooking. This is not a malfunction. Washing the rice P.16 In case of white rice, wash it until the water stays clear. In case of rinse-free rice, wash the rice thoroughly if the water is cloudy, and then swill the rice to let the rice and water sit for a while. Stirring the rice P.19, 23-25, 27 Stir the rice as soon as it finishes cooking. (This prevents the excess steam from making the rice sticky or making it smelly.) Cooking method P Do not set the timer to wait for a long time during the summer. Interrupting cooking If cooking is interrupted because the Cancel/Off button was pressed, the power cord was unplugged, there was a power outage, etc., the rice might not be cooked properly and odor might occur. Dirty parts P Clean off the steam vent top casing, plate, and inner lid. Much condensation forms. It is difficult for the steam to escape when the rice cooker is pressurized, so there might be condensation on the lid when opened. This is not a malfunction. A mode that reduces the condensation can be switched to. P.33 38
39 Troubleshooting - continued Please check the following points before calling for service. If This Happens Check This Keep Warm Smell abnormal Change color Keeping the rice warm for a long time or repeatedly reheating it could cause it to smell or change color. Keeping rice warm P.26 Do not leave the rice scoop in the rice when keeping it warm. Also do not use the Keep Warm program for rice that has become cold. Washing the rice P.16 In case of white rice, wash it until the water stays clear. In case of rinse-free rice, wash the rice thoroughly if the water is cloudy, and then swill the rice to let the rice and water sit for a while. Stirring the rice P.19, 23-25, 27 Stir the rice as soon as it finishes cooking. Also stir it occasionally during Keep Warm. (This prevents the excess steam from making the rice sticky or making it smelly.) Dirty parts Clean off the steam vent top casing, plate, and inner lid. P Drying Keeping the rice warm for a long time or repeatedly reheating it could cause it to dry out. This is not a malfunction. Amount of rice kept warm P.27 Pile the rice in the middle of the inner pot when keeping a small amount warm. Dirty parts P Clean off the bottom and rim of the inner pot, the temperature sensor, and the lid packing. Attaching parts P Do not forget to attach the steam vent top casing, plate, and inner lid before Keep Warm. Condensation forms Sticky Condensation forms on the inside of the lid and the inner pot to prevent the rice from drying out. In addition, the temperature during Keep Warm is automatically changed and condensation will form when the temperature is lowered. This is not a malfunction. Stirring the rice P.19, 23-25, 27 Stir the rice as soon as it finishes cooking. Also stir it occasionally during Keep Warm. (This prevents the excess steam from making the rice sticky or making it smelly.) Keep Warm program Switch the Keep Warm program to Warm Hi. Amount of rice kept warm P.26 P.27 Pile the rice in the middle of the inner pot when keeping a small amount warm. Temperature of the rice is low. Keep Warm program P.26 If the temperature of the rice seems low, change the Keep Warm program to Warm Hi. Cannot reheat When the rice is hot after being cooked or when the rice has cooled after turning off the Keep Warm function, a buzzer will sound and reheating will not be possible. P.27 39
40 If This Happens Check This Timer rice cooking Sounds Cooking begins immediately. Cooking is not completed by the set time. Rice cooker makes various sounds during use. The time set for the timer is the time when the rice is scheduled to finish cooking. Cooking will begin immediately when the set time is close to the current time. In addition, it takes time to cook the rice, so sometimes the rice does not finish cooking by the set time. Check the current time of the clock and adjust it if it is incorrect (The clock uses 24-hour time). The soaking time is not the time to be scheduled to finish rice cooking (It is the amount of time the rice will be soaked for). P.22, 23, 25 The following sounds are generated by the rice cooker during cooking and Keep Warm, etc. This is not a malfunction. When the power plug is plugged in During use (cooking, keep warm, etc.) Zapping sound Air swishing Latch catch Chugging sound Whirling sound Latch catch Buzzing sound (There may also be sparks) This is the sound of charging to the inverter circuit. sound This is the sound of steam (pressure) escaping. This is the sound of the pressure regulator operating. This is the sound of the cooling fan turning. This is the inner pot IH heating sound. LCD Display Rice cooking time Suddenly changes Not displayed The cooking process is automatically adjusted to make the rice taste delicious. For this reason, the displayed cooking time might suddenly change during cooking. This is not a malfunction. For cooking methods other than "Normal Texture", "Rapid" and "Eco" for "White" or "Normal" for "Mixed Grain", the current time will be displayed, without displaying the cooking time. In addition, the current time is displayed when the rice cooker body is hot. The pressure display ( ) is flashing. : display or H0 display is shown. Interrupting cooking This flashes for 30 seconds when the Cancel/Off button is pressed or the power plug is unplugged during pressure cooking. Do not open the lid while this is flashing. If the lid must be opened at this time: P.19, 23 If : is displayed, please reset the current time. When the Cancel/Off button is pressed while H0 is displayed, the display will change to :. Please reset the current time. P.14 The display dims when the power plug is unplugged. If the power plug is removed from the outlet, the display will dim, then return to normal. This is because the rice cooker is switching to its built-in battery, and is not abnormal. The display disappears when the power plug is unplugged. When : or H0 is displayed after the power plug is unplugged and then plugged in again, the lithium battery inside the rice cooker is going dead. Cooking and warming can be undertaken, but the current time and timer cooking cannot be set. Request that the lithium battery be replaced (with a charge) at the store where you obtained the rice cooker. (The lithium battery is a special battery and cannot be replaced by the customer.) C1 or C2 is displayed. This will be displayed and the power turned off when the voltage drops due to using an extension cord or plugging in other electrical components into the same power outlet. Do not use an extension cord and only plug the rice cooker into the power outlet. 40 C3 or C4 is displayed. H1 to H12 are displayed. If the lid is not closed properly, this will be displayed. Make sure to close the lid properly. When the display does not return to the time display even after the Cancel/Off button is pressed or when the same display is shown repeatedly, have the rice cooker repaired at the store where you purchased it.
41 Troubleshooting - continued Please check the following points before calling for service. If This Happens Check This Inner Pot Fluorine Coating Uneven color It is scratched The color of the fluorine coating may become uneven with use. This is not a malfunction. It also has no effect on performance or cleanliness. P.30 Observe the following to avoid scratching the fluorine coating. Do not use a metal ladle, whisk, etc. Do not wash spoons, rice bowls, etc., inside the inner pot. Do not use vinegar Do not wash with a polishing powder or a scrubber Use the rice scoop provided P.30 If there is a power outage When there is a power outage during use During Cooking During Keep Warm During Timer (Soaking) Cooking will resume when the power comes back on. However, cooking will not resume if the power has been off for more than 30 minutes. Keep Warm will resume when the power comes back on. However, warming might not resume depending on the temperature of the rice. Timer (soaking) will resume when the power comes back on. Lid Difficult to close The lid might feel stiff when closing it (after stirring cooked rice, etc.) because the lid is designed to provide a good seal during pressure cooking. Close it slowly while applying a little more pressure. Does not close Non-water supply auto steamer attachment P.31, 32 The lid will not close using normal force when the non-water supply auto steamer has not been attached. The lid might close if excessive force is used. (This is to prevent you from forgetting to attach the non-water supply auto steamer.) In this case, the lid might become difficult to open, but it can be opened if you press the hook button while pressing down on the lid. The non-water supply auto steamer has come loose If the lid is closed forcefully while the inner pot is not set in the body, the non-water supply auto steamer may come loose. Close the lid gently. Opens slowly There is strong seal, so it may take a little time for the lid to open after the hook button is pressed. Does not open Pressure is applied during cooking, so the hook button is locked to keep the lid from opening. Do not force it open. If the lid must be opened at this time: P.19, 23 Gap between the body and lid Gap increases. Steam escapes from the gap. The gap increases when pressure is applied. This is not a malfunction. Inner lid parts are dirty Pressure will build up if the regulator valve hole is clogged or debris is preventing the internal ball from moving. Clean or unclog the inner lid regulator valve hole and ball. Inner lid deformation P The inner lid or packing is deformed. Replace the inner lid with a new one. Causes noise in the television or radio The rice cooker could cause noise interference to televisions or radios if placed close to them. If this bothers you, move the rice cooker further away. (About 3 meters as a guideline) If you have any misgivings after investigating the above matters, consult with the store where you purchased the rice cooker. If the inner lid or inner pot has become deformed or if the fluorine coating has come off, buy a new inner lid or inner pot at the store where you purchased it before. 41
42 Cook book Enjoy various menus with this versatile rice cooker! In addition to healthy mixed grain and brown rice menus, various cooking menus including risottos, soft-boiled eggs and cakes are presented here in full. Which menu would you like to try out first? Contents White Rice Menu Variety Cooking Menu Vegetable Pilaf 44 Egg Risotto 52 Sweet Potato and Black Sesame Rice 44 Traditional Risotto 52 Red Bean Rice 45 Chinese Risotto 53 Sansai Rice 45 Meat Loaf 53 Chestnut Gomoku Sticky Rice 46 Pot-baked Bibimbap 54 Paella 46 Marble Cake 54 Tai Meshi (Tai Snapper Rice) 47 Yogurt Cheese Cake 54 Chicken Porridge 47 Soy Pulp Cake 55 Green Vegetable Porridge 48 Sponge Cake (Decorated Cake) 55 Sushi Rice 48 Gomoku Chirashi 48 Mixed Grain, Brown Rice Menu Mixed Grain Rice 49 Black Rice Chinese-style Mixed Grain Rice 49 Mushroom Rice 50 Kayaku Mixed Rice 50 Shrimp Pilaf 51 Brown Rice with Hijiki 51 Cups used in this Cook Book White Rice 1 cup = 180 ml (about 1 Japanese cup) (Use the included rice measuring cup) Units used in this Cook Book 1 kcal (kilocalorie) = 4.2 kj (kilo joule) 1 ml (milliliter) = 1 cc (cubic centimeter) The times stated in this Cook Book are guidelines and Spoons used in this Cook Book do not included the preparation time. Teaspoon (tsp, 5 ml) Tablespoon (tbsp, 15 ml) Vinegar, liquor 5g 15g Soy sauce, sweet cooking rice wine 6g 18g Salt 6g 18g Sugar 3g 9g 42

43 Operation Procedure and How to Select or The selection changes as shown below each time or is pressed. Use to select the type of rice. White Mixed Grain Garminated Brown Brown Variety Use to select the cooking method. Eco Porridge Mix Rapid Normal Texture Normal Texture Normal Texture Normal Mix Normal Mix Porridge Risotto Cake Use to set the heating time. There is no heating time setting. The time can be set from 10 minutes to 90 minutes in 5-minute intervals. (The heating time cannot be set for Risotto ) Press. The melody sounds and cooking starts. The melody sounds and cooking starts. Warning Food or hot water could spray out or the lid could open suddenly causing burns. Do not use the rice cooker for any purpose other than to cook rice and the cooking menu items stated in the Operating Instructions and Cook Book included. Do not cook the following types of foods. Pasty foods (liquid-absorbing spongy food, etc.) or stewing items that swell when heated, such as beans and noodles. (When making rice with red beans, cook the rice after adding separately boiled cowpeas. Refer to the Cook Book for details. P.45 ) Do not cook vegetables with thin skins that can float up, such as greens and tomatoes, cooking containing chunky ingredients, or cooking that uses cooking sheets, aluminum foil, or plastic wrap 43
 White rice 2 cups Small onions (cut in half) 4 Potato (cut in 1 cm cubes) 1 (approx. 150 g) Carrot (cut in 7 mm cubes) 1/2 (approx.")
 350 ml Rice type and cooking method: \"White\" \"Mix\" Cooking time guideline: approximately 60 minutes 1 serving:")
44 White Rice Menu Sweet Potato and Black Sesame Rice Rice type and cooking method: "White" "Mix" Cooking time guideline: approximately 55 minutes 1 serving: approximately 500 kcal Vegetable Pilaf Ingredients (4 servings) White rice 2 cups Small onions (cut in half) 4 Potato (cut in 1 cm cubes) 1 (approx. 150 g) Carrot (cut in 7 mm cubes) 1/2 (approx. 50 g) A Green asparagus (cut in 1 cm length) 3 Cauliflower (cut into individual branches) 100 g Whole corn (canned, drained) 100 g Green peas (canned, drained) 100 g Salad oil 2 tbsp Salt and pepper to taste Soup (add water to 1 cube dissolved in a small amount of hot water) 350 ml Rice type and cooking method: "White" "Mix" Cooking time guideline: approximately 60 minutes 1 serving: approximately 410 kcal Preparation Method 1 Drain washed rice in a strainer. 2 Heat salad oil (1 tbsp) in a frying pan, quickly stir fry A, add little salt and pepper, and place in a bowl. 3 Heat salad oil (1 tbsp) in a frying pan, stir fry the rice from 1 until it becomes clear and then place it in the inner pot. 4 Add the stock to 3, add salt and pepper, and mix together. 5 Place 2 on top of the 4 rice, place the inner pot into the rice cooker, close the lid, use the Rice button to select White, use the Menu button to select Mix, and then press the Cook/Reheat button. 6 When cooking is finished, stir and place on a serving dish. Ingredients (4 servings) White rice 3 cups Sweet potato (diced) 200 g Black ground sesame 4 tbsp Soy sauce 2 tbsp A Stock 200 ml Salt Less than 1/2 tsp Preparation Method 1 Peel and dice the sweet potato and allow it to soak in water for a time and drain it. 2 Drain washed rice in a strainer. 3 Place 2 in the inner pot and add A. White rice 4 Add water to 3 "3" up to White Rice 5 Level 3, stir, and place 1 on top of the rice. Place the inner pot into the rice cooker, close the lid, use the Rice button to select White, use the 6 Menu button to select Mix, and then press the Cook/Reheat button. When cooking is finished, stir and place on a serving dish. 44 Add the water and seasoning, adjust the amount of water, and mix well. The meal might not cook properly if the ingredients settle to the bottom. (When using ingredients that contain a lot of water, squeeze out the juice and add the juice and seasoning together.) Spread out the ingredients on the top of the rice and do not mix them in. (Do not mix together even if the instructions on the ingredients package say to.) Tips for Mixing Do not use the timer rice cooking or Keep Warm programs. Doing so could cause the food to smell unusual or lose quality. The amount of ingredients should be about 30 to 50% of the amount of rice. (About 45 to 75 g of ingredients per cup of rice) Preheat ingredients that easily absorb water.
 White rice 1/2 cup Glutinous rice 2 1/2 cups Cowpeas 50 g Salt 1/2 tsp Sesame and salt to taste Thoroughly wash the cowpeas in cold water.")
 in the pot and cook on a low heat for 20 to 30 minutes until they can be eaten but are still firm.")
45 Sansai Rice Rice type and cooking method: "White" "Mix" Cooking time guideline: approximately 55 minutes 1 serving: approximately 480 kcal Ingredients (4 servings) How to boil and drain cowpeas Red Bean Rice Ingredients (4 servings) White rice 1/2 cup Glutinous rice 2 1/2 cups Cowpeas 50 g Salt 1/2 tsp Sesame and salt to taste Thoroughly wash the cowpeas in cold water. Place 1 and water (400 ml) in a different pot, heat to a rolling boil, and then separate the cowpeas from the broth. Again place the cowpeas in water (400 ml) in the pot and cook on a low heat for 20 to 30 minutes until they can be eaten but are still firm. If the water level falls during cooking and exposes the cowpeas, add more water to cover them. Rice type and cooking method: "White" "Mix" Cooking time guideline: approximately 50 minutes 1 serving: approximately 440 kcal Preparation Method Quickly boil and drain the cowpeas, add new water and boil the cowpeas until slightly firm, separate the cowpeas and broth, and allow them to cool. Mix together and wash the white rice and glutinous rice and drain the rice in a strainer. Place 2 in the inner pot, add the 1 broth Sticky rice "3" and water up to Sticky Rice Level 3, add the salt, and stir. 4 Place 1 cowpeas on top of the rice, place the inner pot into the rice cooker, close the lid, use the Rice button to select White, use the Menu button to select Mix, and then press the Cook/Reheat button. 5 When cooking is finished, stir and place on a serving dish, and sprinkle with sesame and salts. Warning Add boiled cowpeas Cooking unboiled cowpeas will increase the amount of cowpeas, which could clog the regulator valve, etc., and cause burns. White rice 1 cup Glutinous rice 2 cups Sansai (Wild vegetables (Certain types of traditionally collected wild vegetables)) mix (boiled in water) 200 g Deep-fried tofu 1 sheet Sake 2 tbsp Soy sauce 1 tbsp A Salt 1/2 tsp Sugar 1 tbsp White sesame seeds to taste Preparation Method 1 Mix together and wash the white rice and glutinous rice and drain the rice in a strainer. 2 Pour boiled water over the deep-fried tofu to remove the oil and cut it into strips in the short direction. Drain the liquid from the sansai. Sticky rice 3 Place 1 and A in "3" the inner pot, add water up to Sticky Rice Level 3, and stir. 4 Place 2 on top of the rice, place the inner pot into the rice cooker, close the lid, use the Rice button to select White, use the Menu button to select Mix, and then press the Cook/Reheat button. 5 When cooking is finished, stir and place on a serving dish, and sprinkle with white sesame seeds. 45
 30 g Burdock root (cut into long thin shavings and soaked in vinegar water) 50 g A Shimeji mushrooms (cut into individual")

46 Chestnut Gomoku Sticky Rice Rice type and cooking method: "White" "Mix" Cooking time guideline: approximately 55 minutes 1 serving: approximately 520 kcal 46 Ingredients (4 servings) White rice 1 cup Glutinous rice 2 cups Deep-fried tofu 1/2 sheet Carrot (cut in quarters) 30 g Burdock root (cut into long thin shavings and soaked in vinegar water) 50 g A Shimeji mushrooms (cut into individual branches) 50 g Sweet boiled chestnut (cut in half) B 8 pieces Stock 200 ml Soy sauce 1 tbsp Sake Sugar 2 tbsp 1 tbsp Salt 1/2 tsp Preparation Method 1 Pour boiled water over the deep-fried tofu to remove the oil, cut it in half lengthwise, and cut it into strips. 2 Mix together and wash the white rice and glutinous rice and drain the rice in a strainer. 3 Add 2 and B to the 4 5 inner pot, add water up to Sticky Rice Level 3 and stir, and place 1 and A Sticky rice "3" on top of the rice. Place the inner pot into the rice cooker, close the lid, use the Rice button to select White, use the Menu button to select Mix, and then press the Cook/Reheat button. When cooking is finished, stir and place on a serving dish. Paella Ingredients (4 servings) White rice 2 cups A Saffron 1 pinch Water 100 ml Mussels 4 Clams with shells 200 g Small whole shrimps (with heads and shells) 4 small Small squid 1 small Onion (chopped)...1/4 (approx. 50 g) B Garlic (minced)... 1 piece Red and yellow bell peppers (diced into 1 cm pieces)... 1/4 each C Small tomato (skinned in boiling water, seeded and coarsely chopped into 1 cm pieces)... 1 small White wine 70 ml Stock (add water to 1 cube dissolved in a small amount of hot water) 200 ml Salt and pepper to taste Lemon Olive oil 1/2 4 tbsp Black olives 4 Preparation Method 1 Drain washed rice in a strainer. 2 Soak saffron A in water for approx. 10 minutes to bring color and fragrance. 3 Soak mussels and clams in salted water to remove any sand, and clean them by rubbing shells against each other. Rice type and cooking method: "White" "Mix" Cooking time guideline: approximately 55 minutes 1 serving: approximately 530 kcal 4 Remove back veins from shrimp. Remove all remaining guts and skin off from squid, and cut it into 1 cm round slices. Then cut tentacles into several pieces if they are large. 5 Heat olive oil (2 tbsp) in a frying pan, stir fry B, add 3, 4, and C to fry briefly along with salt and pepper to taste, and then sprinkle white wine. Turn off the heat when mussels open up and then separate the soup from them. 6 Heat the remaining olive oil (2 tbsp) in a frying pan, and stir fry the rice from 1 until it becomes clear. Place 6 in the inner pot, and add 2, stock and soup from 5. 7 Add more water up to White White rice Rice Level 2, "2" stir, and spread the rest of 5 on top of the rice. 8 Place the inner pot into the rice cooker, close the lid, use the Rice button to select White, use the Menu button to select Mix, and then press the Cook/Reheat button. 9 When cooking is finished, first take out the ingredients on top. After stirring the rice and place on a serving dish, put the ingredients back on the top of the dish. 10 Garnish it with lemon and black olives.
 Soy sauce 1 tbsp A Salt Sake 1/4 tbsp 1 tbsp Sweet cooking rice wine 1 1/2 tbsp Dried kelp (5 x 5 cm piece) 1 sheet Ginger (cut into thin strips) 1 piece Rice type and cooking method: \"White\"")


47 Tai Meshi (Tai Snapper Rice) Ingredients (4 servings) White rice 3 cups Tai snapper 1 (approx. 350 g) Soy sauce 1 tbsp A Salt Sake 1/4 tbsp 1 tbsp Sweet cooking rice wine 1 1/2 tbsp Dried kelp (5 x 5 cm piece) 1 sheet Ginger (cut into thin strips) 1 piece Rice type and cooking method: "White" "Mix" Cooking time guideline: approximately 55 minutes 1 serving: approximately 600 kcal Preparation Method Season the Tai snapper lightly with salt and cook on the grill. Drain washed rice in a strainer. Place 2 and A in the inner pot, add water up to White Rice Level 3 and stir. Sprinkle the half of ginger and place the dried kelp and 1 on top of the rice. White rice "3" Place the inner pot into the rice cooker, close the lid, use the Rice button to select White, use the Menu button to select Mix, and then press the Cook/Reheat button. When the rice has finished cooking, remove the kelp, debone and flake the fish while mixing it in the rice, and then sprinkle the rest of ginger. Place it on a serving dish and garnish it with leaf buds and other greens if desired. Chicken Porridge Rice type and cooking method: "White" "Porridge" Cooking time guideline: approximately 75 minutes 1 serving: approximately 160 kcal Ingredients (4 servings) White rice 1 cup Chicken breast (no skin) 50 g Soup stock cube 1 Japanese scallion leaves to taste A Ginger skin to taste Sake 1 tbsp B Soy sauce 1 tsp Salt 1/2 tsp Japanese scallion stalk to taste White sesame seeds to taste Preparation Method 1 Place the chicken meat in a pot, add 600 ml of water and A, heat until the meat is thoroughly cooked, and then strain the liquid in a bowl for broth. 2 By hand, tear the 1 chicken into fine pieces and sprinkle with B to season. 3 Wash the rice and place it in the inner pot, add the 1 broth and water up to Porridge Level 1, add the salt and soup Porridge "1" flavoring, and stir briefly. 4 Place the inner pot into the rice cooker, close the lid, use the Rice button to select White, use the Menu button to select Porridge, and then press the Cook/Reheat button. 5 When the rice has finished cooking, add the 2 chicken meat, mix together, place on a serving dish, and sprinkle with the Japanese scallion stalk and white sesame seeds. Tips for Porridge Immediately serve warm - do not use the Keep Warm program. Over time the rice will become gooey if left to stand. 47
 leaves or desired greens... 20 g Salt.")


48 48 Green vegetable Porridge Rice type and cooking method: "White" "Porridge" Cooking time guideline: approximately 75 minutes 1 serving: approximately 130 kcal Ingredients (4 servings) White rice... 1 cup Daikon (Japanese large root radish) leaves or desired greens g Salt... to taste Preparation Method Wash the rice, place it in the inner pot, and add water up to Porridge Level 1. Place the inner Porridge "1" pot into the rice cooker, close the lid, use the Rice button to select White, use the Menu button to select Porridge, and then press the Cook/Reheat button. Briefly boil daikon leaves or greens, drain off the water, and finely chop them. When the rice has finished cooking, add 3, salt to taste, stir briefly and place on a serving dish. Warning Add the leaves, such as greens, after the rice has finished cooking. Adding the leaves before the rice is cooked could clog the regulator valve and cause burns. Sushi Rice Rice type and cooking method: "White" "Normal Texture " Cooking time guideline: approximately 45 minutes 1 serving: approximately 420 kcal Ingredients (4 servings) White rice...3 cups Dried kelp cm [Vinegar mixture] Vinegar... 5 tbsp Sugar... 1 tbsp Salt... Less than 1 tsp *You may adjust the taste as you like. (e.g. you may add more sugar.) Preparation Method 1 Use a cloth to wipe off the dried kelp and then make 4 or 5 notches into it. 2 Wash the rice and place it in the inner pot, add water up Hard 1 to Hard Level "3" 3, and place the kelp on top of the rice. 3 Place the inner pot into the rice cooker, close the lid, use the Rice button to select White, use the Menu button to select Normal Texture, and then press the Cook/Reheat button. 4 When the rice has finished cooking, remove the kelp, place the rice in a wooden pail, and use a rice scoop to spread it out. Sprinkle the [Vinegar mixture] evenly over all of the rice and stir by turning over the rice. After stirring for 1 minute, fan the rice with a hand fan until it cools to body temperature and then place a damp cloth on top of the rice to keep it damp. Gomoku Chirashi 1 serving: approximately 600 kcal Ingredients (4 servings) Dried shitake mushrooms (soaked in water and drained) 8 Carrot 30 g Dried gourd 30 g Stock 400 ml Sugar 6 tbsp A Soy sauce 4 tbsp Sweet cooking rice wine 3 tbsp Salt to taste Lotus root 80 g Stock 2 tbsp Vinegar 2 tbsp B Sugar 1 tbsp Salt to taste Shrimps 10 Kinshi egg (This is type of Japanese omelet) 1 egg Leaf buds 10 pieces White sesame seeds 2 tbsp Cherry denbu (This is a gelatinized fish cake that has been dyed pink.) to taste Red ginger to taste * In addition, the ingredients for Sushi rice are also required. Preparation Method 1 Follow the directions for Sushi rice and prepare the sushi rice. 2 Shoe-string slice the shitake mushroom together with the carrot. 3 Massage the dried gourd in salt and then wash it off, boil it until it becomes soft, and then cut into pieces 1 cm in length. 4 Boil 2 in A until the stock is gone. 5 Thinly slice the lotus root, soak it in vinegar water to remove the harsh taste, and then briefly boil it before soaking it in B. 6 Shell the shrimp, remove the guts, and boil. Mix 3 and the white sesame seeds into 1, place on the serving dish, and decorate with 4, 5, cherry denbu, kinshi egg, red ginger, and leaf buds.


, a tea strainer or similar utensil is convenient.")

 50 g Ginger (chopped) 1 piece Dried shrimp (soaked in 100 ml water) 20 g C Cashew nuts (fried to a light color, chopped coarsely) 80 g Salad oil as desired Parsley as desired")
49 Mixed Grain, Brown Rice Menu Mixed Grain Rice Ingredients (6 servings) White rice /3 cups Grains... 2/3 cups Rice type and cooking method: "Mixed Grain" "Normal" Cooking time guideline: approximately 85 minutes 1 serving: approximately 260 kcal Preparation Method Wash the white rice and grains separately, mix together, and add water up to Mixed Grain Level 3. Place the inner pot into the rice cooker, close the lid, use the Rice button to select Mixed Grain, use the Menu button to select Normal, and then press the Cook/Reheat button. When cooking is finished, stir and place on a serving dish. Tips for Mixed Variety Rice Mixed Grain "3" Mix the grains with the white rice, and cook the rice. Only mix around 20 to 30% of the total rice. For washing the smaller mixed variety rice (such as amaranth and quinoa), a tea strainer or similar utensil is convenient. Refer to a commercially-available explanatory leaflet on mixed grains (including the explanation on the package of mixed grains) as well. Black Rice Chinese-style Mixed Grain Rice Rice type and cooking method: "Mixed Grain" "Mix" Cooking time guideline: approximately 85 minutes Per person: approximately 440 kcal Ingredients (4 servings) White rice 1 3/4 cups Black rice 1/4 cup Chicken broth soup stock (granular) 1 tsp A Soy sauce, Sake 1 tbsp each Salt 1/2 tsp Carrot (cut into small squares) 50 g Boiled bamboo shoot (cut into small B squares) 50 g Ginger (chopped) 1 piece Dried shrimp (soaked in 100 ml water) 20 g C Cashew nuts (fried to a light color, chopped coarsely) 80 g Salad oil as desired Parsley as desired Salt and pepper to taste Preparation Method 1 Heat salad oil in a frying pan, quickly stir fry B, add salt and pepper, and allow it to cool. 2 Wash the white rice and black rice separately, and mix together. 3 Add 2, A and the water used to soak the shrimp to the inner pot, Mixed add water up to Grain Mixed Grain "2" Level 2 and stir, and place the mixed ingredients of 1 and C on top of the rice. 4 Place the inner pot into the rice cooker, close the lid, use the Rice button to select Mixed Grain, use the Menu button to select Mixed, and then press the Cook/Reheat button. 5 When cooking is finished, stir and place on a serving dish, and sprinkle with parsley. 49
 6 slices A Mushrooms (cut in half) 6 Shimeji, maitake mushrooms (each cut into individual branches) 100 g each Salad oil 2 tbsp Salt and")


50 Mushroom Rice Rice type and cooking method: "Mixed Grain" "Mix" Cooking time guideline: approximately 85 minutes Per person: approximately 300 kcal 50 Ingredients (6 servings) White rice 2 1/3 cups Mixed variety 2/3 cup Raw shitake mushroom (thinly sliced) 6 slices A Mushrooms (cut in half) 6 Shimeji, maitake mushrooms (each cut into individual branches) 100 g each Salad oil 2 tbsp Salt and pepper to taste Soup (1 block of powdered stock dissolved in a small amount of hot water, B with water added) 200 ml Salt 1/2 tsp Pepper to taste Preparation Method 1 Heat salad oil in a frying pan, quickly stir fry A, add salt and pepper, and allow it to cool. 2 Wash the white rice and grains separately, mix together, and drain the rice in a strainer. 3 Add 2 and B to Mixed the inner pot, add Grain "3" water up to Mixed Grain Level 3 and stir, and place 1 on top of the rice. 4 Place the inner pot into the rice cooker, close the lid, use the Rice button to select Mixed Grain, use the Menu button to select Mix, and then press the Cook/Reheat button. 5 When cooking is finished, stir and place on a serving dish, and sprinkle with parsley if desired. Kayaku Mixed Rice Rice type and cooking method: "Mixed Grain" "Mix" Cooking time guideline: approximately 85 minutes Per person: approximately 400 kcal Ingredients (4 servings) Preparation Method White rice 2 cups 1 Wash the white rice and grains Grains 1/3 cup separately, mix together, drain the Stock 130 ml rice in a strainer, and leave for 5 to 10 Sake 2 tbsp minutes. A Soy sauce 1 1/2 tbsp 2 Sprinkle sake on the B chicken meat. Salt 1/2 tsp Pour boiled water over the deep-fried Chicken thigh (cut in 1 cm cubes) tofu to remove the oil, cut it in half 100 g B lengthwise, and cut it into strips. Sake 1 tsp 3 Slice the konjac so that it is half the Burdock root (cut into long thin shavings thickness, cut the and soaked in vinegar water) 50 g two pieces in half C Carrot (cut into thin strips) 30 g lengthwise, and Dried shitake mushrooms (soaked in then slice thinly. water and thinly sliced) Mixed 1 slice 4 Briefly boil it Grain Deep-fried tofu 1/2 slice "2" before draining the Konjac 1/3 slice liquid. Add 1 and A to the inner pot, add water up to Mixed Grain Level 2 and stir, and place the mixed C, 2 and 3 on top of the rice. 5 Place the inner pot into the rice cooker, close the lid, use the Rice button to select Mixed Grain, use the Menu button to select Mix, and then press the Cook/Reheat button. 6 When cooking is finished, stir and place on a serving dish, and garnish it with leaf buds if desired.
 1/2 (approx. 100 g) Mushrooms (whole) 1 small can (approx.")


51 Shrimp Pilaf Rice type and cooking method: "Mixed Grain" "Mix" Cooking time guideline: approximately 85 minutes Per person: approximately 490 kcal Ingredients (4 servings) White rice 2 1/3 cups Grains 2/3 cup Large peeled shrimp 300 g Onion (chopped) 1/2 (approx. 100 g) Mushrooms (whole) 1 small can (approx. 50 g) Butter 20 g Salt and pepper to taste Soup (1 block of powdered stock dissolved in a small amount of hot water, A with water added) 200 ml Salt 2/3 tsp Preparation Method 1 Heat butter in a frying pan and fry the onion. 2 Add shrimps and mushrooms, fry briefly, then add salt and pepper, and allow it to cool. 3 Wash the white rice and grains separately, mix together, and drain the rice in a strainer. 4 Add the 3 rice and A to the inner Mixed Grain pot, add water up "3" to Mixed Grain Level 3 and stir, and place 2 on top of the rice. 5 Place the inner pot into the rice cooker, close the lid, use the Rice button to select Mixed Grain, use the Menu button to select Mix, and then press the Cook/Reheat button. 6 When cooking is finished, stir and place on a serving dish, and sprinkle with parsley if desired. Brown Rice with Hijiki Rice type and cooking method: "Brown Rice" "Mix" Cooking time guideline: approximately 100 minutes 1 serving: approximately 460 kcal Ingredients (4 servings) Brown rice 3 cups Deep-fried tofu 2 sheets A Dried hijiki (soaked in water) 20 g Carrot (cut into thin strips) 60 g Sake 2 tbsp B Soy sauce 1 1/2 tbsp Salt 1 tsp Preparation Method 1 Pour boiled water over the deep-fried tofu to remove the oil, then cut it into strips in the short direction. 2 Briefly wash the brown rice to remove any debris, etc. 3 Place the 2 brown rice in the inner pot, add B, add water to a little Brown Rice Slightly less than "3" below Brown Level 3 and stir, and place A on top of the rice. 4 Place the inner pot into the rice cooker, close the lid, use the Rice button to select Brown, use the Menu button to select Mix, and then press the Cook/Reheat button. 5 When cooking is finished, stir and place on a serving dish. 51
 Rice being kept warm or that has cooled... 300 g Stock (1 tsp of powdered stock dissolved in water)... 400 to 500 ml Egg (beaten)... 1 Finely chopped green onion.")


52 Variety Cooking Variety Cooking Menu Traditional Risotto Rice type and cooking method: "Variety" "Risotto" Cooking time guideline: approximately 15 minutes 1 serving: approximately 260 kcal 52 Egg Risotto Ingredients (4 servings) Rice being kept warm or that has cooled g Stock (1 tsp of powdered stock dissolved in water) to 500 ml Egg (beaten)... 1 Finely chopped green onion... As desired Tips for Stock If the powder stock does not dissolve well in the water, use a small amount of hot water to dissolve it. Store-bought risotto seasoning and water can also be used for the stock. Adjust the amount of stock to match the amount of rice. Rice type and cooking method: "Variety" "Risotto" Cooking time guideline: approximately 13 minutes 1 serving: approximately 130 kcal Preparation Method 1 If the rice is being kept warm in the rice cooker, press the Cancel/Off button to cancel the Keep Warm program. If using cooled rice, place it in the inner pot. 2 Add the stock to the rice in the inner pot and stir. 3 Place the inner pot into the rice cooker, close the lid, use the Rice button to select Variety, use the Menu button to select Risotto, and then press the Cook/Reheat button. 4 When cooking is finished, evenly spread the beaten egg over the rice and briefly stir it in before placing the rice on a serving dish. Add chopped green onion if desired. Tips for Risotto Stir the rice well after adding the stock (soup). Place the ingredients on top of the rice without mixing them in. Immediately serve warm. Over time the rice will become gooey if left to stand. You can also add ingredients that are already cooked (leftovers, etc.) or vegetables that cook quickly, such as Chinese chives. Ingredients (4 servings) Rice being kept warm or that has cooled 300 g Stock (1 cube of powdered stock dissolved in a small amount of hot water, with water added) 300 to 400 ml Frankfurter 6 Shimeji mushrooms (cut into individual branches) 100 g Pizza cheese 30 g A Powdered cheese 2 tbsp Salt and pepper to taste Parsley to taste Preparation Method 1 Cut the Frankfurter in half diagonally, blanch briefly together with the shimeji mushrooms, and allow them to cool. 2 If the rice is being kept warm in the rice cooker, press the Cancel/Off button to cancel the Keep Warm program. If using cooled rice, place it in the inner pot. 3 Add soup to the rice in the inner pot, stir the rice and place 1 on top of the rice. 4 Place the inner pot into the rice cooker, close the lid, use the Rice button to select Variety, use the Menu button to select Risotto, and then press the Cook/Reheat button. 5 When cooking is finished, add A and briefly stir, favor with salt and pepper, place on a serving dish, and sprinkle with parsley if desired. Warning Add the cheeses such as pizza cheese, after cooking is finished. Adding them before cooking could clog the regulator valve etc, and cause burns.
 100 g Chinese soup (1 tbsp of chicken broth soup stock dissolve in a small amount of hot water, with water added) 400 to 500 ml")

53 Chinese Risotto Rice type and cooking method: "Variety" "Risotto" Cooking time guideline: approximately 15 minutes 1 serving: approximately 160 kcal Ingredients (4 servings) Rice being kept warm or that has cooled 300 g Salted dried kelp 10 g Cabbage (coarsely chopped) 100 g Chinese soup (1 tbsp of chicken broth soup stock dissolve in a small amount of hot water, with water added) 400 to 500 ml Sesame seed oil 1 tbsp Preparation Method 1 If the rice is being kept warm in the rice cooker, press the Cancel/Off button to cancel the Keep Warm program. If using cooled rice, place it in the inner pot. 2 Add Chinese soup to the rice in the inner pot, stir the rice and place the cabbage on top of the rice. 3 Place the inner pot into the rice cooker, close the lid, use the Rice button to select Variety, use the Menu button to select Risotto, and then press the Cook/Reheat button. 4 When cooking is finished, add the salted dried kelp, pour over the sesame seed oil and stir briefly, and place on a serving dish. Warning Add the salted dried kelp, after cooking is finished. Adding them before cooking could clog the regulator valve etc, and cause burns. Meat Loaf Ingredients (4 servings) Ground beef and pork 400 g Onion (chopped) 1/2 (approx. 100 g) Butter 18 g Frozen mixed vegetable (thawed) 50 g Bread crumbs 30 g A Milk 4 tbsp Egg (beaten) 2/3 Salt 1/3 tsp Pepper to taste Nutmeg to taste Rice type and cooking method: "Variety" "Cake" Cooking time guideline: approximately 15 minutes 1 serving: approximately 320 kcal Preparation Method 1 Heat butter in a frying pan, fry onion, and then allow it to cool down. 2 Put ground beef and pork, A and 1 in a bowl to mix thoroughly. 3 Place 2 in the inner pot and level it out. 4 Place the inner pot into the rice cooker, close the lid, use the Rice button to select Variety, use the Menu button to select Cake, use the Min button to set the heating time to 15 to 20 minutes, and then press the Cook/Reheat button. 5 When cooking is finished, open the lid and wait 2 to 3 minutes for the meat loaf to settle its shape. Then take it out from the rice cooker and place on a serving dish. Garnish it with mashed potato or cooked vegetables if desired. 53

 150 g Flour (soft flour) 150 g Sugar 140 g Egg (beaten) 3 Rum 1/2 tbsp Almond")
 40 g Melted butter 20 g Lemon juice 1 tbsp 54 Preparation Method 1 2 3 4 If the rice is being kept warm in the rice cooker, press the Cancel/Off button to")

54 Pot-baked Bibimbap Rice type and cooking method: "Variety" "Cake" Cooking time guideline: approximately 10 minutes 1 serving: approximately 400 kcal Marble Cake Rice type and cooking method: "Variety" "Cake" Cooking time guideline: approximately 50 minutes 1/8th slice: approximately 380 kcal Yogurt Cheese Cake Rice type and cooking method: "Variety" "Cake" Cooking time guideline: approximately 45 minutes 1/8th slice: approximately 230 kcal Ingredients (2 servings) Rice being kept warm or that has cooled 400 g Stock (powdered stock dissolved in water) 1 tbsp A Soy sauce 1 tsp Sweet cooking rice wine 1/2 tbsp Store bought Bibimbap ingredients g Ingredients Butter (at room temperature) 150 g Flour (soft flour) 150 g Sugar 140 g Egg (beaten) 3 Rum 1/2 tbsp Almond powder 45 g Milk slightly more than 2 tbsp Chocolate 70 g Ingredients Cream cheese (at room temperature) 250 g Sugar 80 g (separated into 20 g and 60 g) Eggs (separated into the yolks and whites) 3 Plain yogurt 200 ml Flour (soft flour) 40 g Melted butter 20 g Lemon juice 1 tbsp 54 Preparation Method If the rice is being kept warm in the rice cooker, press the Cancel/Off button to cancel the Keep Warm program. If using cooled rice, place it in the inner pot. Place the store bought Bibimbap ingredients on top of the rice in the inner pot, and sprinkle the mixed A. Place the inner pot into the rice cooker, close the lid, use the Rice button to select Variety, use the Menu button to select Cake, use the Min button to set the heating time to 10 minutes, and then press the Cook/Reheat button. When cooking is finished, stir while mixing in the ingredients, and place on a serving dish. Tips for Bibimbap Place the rice so that it is flat so that it becomes crusty evenly. Add Kimchee as desired. If there is too much Bibimbap soup, reduce the amount of the stock. Preparation Method 1 Beat the butter until it is creamy, add the sugar, and mix until white and fluffy. 2 Add a little egg at a time until it is all combined, then add the almond powder, rum, and milk, and then stir until all the ingredients have been uniformly mixed together. 3 Add the sifted flour to 2 and then mix until barely combined using a wooden spatula. 4 Melt the chocolate in a double boiler. 5 Take 1/3 of the 3 batter and mix in the 4 chocolate to create the chocolate batter. 6 Add 5 to 3 and mix to create the marbled pattern. 7 Pour 6 into the inner pot. Hold the inner pot and gently tap it on a cloth to remove the air bubbles. 8 Place the inner pot into the rice cooker, close the lid, use the Rice button to select Variety, use the Menu button to select Cake, use the Min button to set the heating time to 50 minutes, and then press the Cook/Reheat button. 9 When the cake has finished baking, let it steam for 15 minutes without opening the lid to allow it to firm up. 10 Remove it from the inner pot and allow to cool. Preparation Method 1 Put the egg whites in a bowl and beat gently, add 20 g of sugar, and whip thoroughly until the mixture forms stiff peaks. 2 To cream cheese that has been allowed to reach room temperature and soften, add 60 g of sugar, stir until creamy, and then mix in the egg yolks, plain yogurt, and lemon juice. 3 Add the sifted flour to 2 and then mix in the melted butter. 4 Add 1 to 3 and then mix until no egg white foam remains. 5 Pour 4 into the inner pot. Hold the inner pot and gently tap it on a cloth to remove the air bubbles. 6 Place the inner pot into the rice cooker, close the lid, use the Rice button to select Variety, use the Menu button to select Cake, use the Min button to set the heating time to 45 minutes, and then press the Cook/Reheat button. 7 When the cake has finished baking, let it steam for 15 minutes without opening the lid to allow it to firm up. 8 When cool enough to touch, remove the cake and place it in the refrigerator to cool enough.
 100 g Brown sugar (powdered) 50 g Honey 1 1/2 tbsp Milk 2 tbsp Black beans (store-bought and cooked) 150 g Egg (beaten) 3 Preparation Method 1 Dry fry the soy pulp to remove the")


... 4 Vanilla extract... to taste Milk (at room temperature)... 1 tbsp A Butter (melted)... 20 g Whipped cream... As desired Fruit.")
55 Soy Pulp Cake Rice type and cooking method: "Variety" "Cake" Cooking time guideline: approximately 45 minutes 1/8th slice: approximately 220 kcal Ingredients Soy pulp 150 g Corn starch 2 tbsp Butter (at room temperature) 100 g Brown sugar (powdered) 50 g Honey 1 1/2 tbsp Milk 2 tbsp Black beans (store-bought and cooked) 150 g Egg (beaten) 3 Preparation Method 1 Dry fry the soy pulp to remove the moisture from it and then allow it to cool. 2 When cool enough to touch, sprinkle the corn starch over all of the soy pulp. 3 Put the butter in a bowl, add the brown sugar, and use a hand mixer to mix the ingredients until they are creamy. 4 A little at time, add the honey, eggs, and milk to 3, and then mix. 5 When the batter is mixed uniformly, thoroughly mix the soy pulp 2 and black beans into the batter and pour it into the inner pot. Hold the inner pot and gently tap it on a cloth to remove the air bubbles. 6 Place the inner pot into the rice cooker, close the lid, use the Rice button to select Variety, use the Menu button to select Cake, use the Min button to set the heating time to 45 minutes, and then press the 7 Cook/Reheat button. When the cake has finished baking, let it steam for 15 minutes without opening the lid to allow it to firm up. 8 Remove it from the inner pot and allow to cool. Sponge Cake (Decorated Cake) Rice type and cooking method: "Variety" "Cake" Cooking time guideline: approximately 45 minutes 1/8th slice: approximately 190 kcal Ingredients Flour (soft flour) g Sugar g Eggs (Separate the yolks and whites)... 4 Vanilla extract... to taste Milk (at room temperature)... 1 tbsp A Butter (melted) g Whipped cream... As desired Fruit... As desired Preparation Method 1 Put the egg whites in a bowl and beat gently using a hand mixer, add sugar, and whip thoroughly until the mixture forms stiff peaks. Next, add the egg yolks and beat the mixture until it starts to thicken before adding the vanilla extract. 2 For, thoroughly mix the milk and butter. Sift in the flour to 1 and use a wooden spatula, etc., to mix the batter until barely mixed so that the powder lumps are eliminated, and then quickly mix 2. 4 Quickly pour all of the 3 batter into the inner pot. Hold the inner pot and gently tap it on a cloth to remove the air bubbles. 5 Place the inner pot into the rice cooker, close the lid, use the Rice button to select Variety, use the Menu button to select Cake, use the Min button to set the heating time to 45 minutes, and then press the Cook/Reheat button. 6 When the cake is finished baking, remove it and allow it to cool sufficiently before decorating it with whipped cream, fruit, etc. Warning The inner pot is hot immediately after cooking, so use oven gloves, etc., when removing the sponge cake. Do not touch the inner pot with your bare hands. 3 55


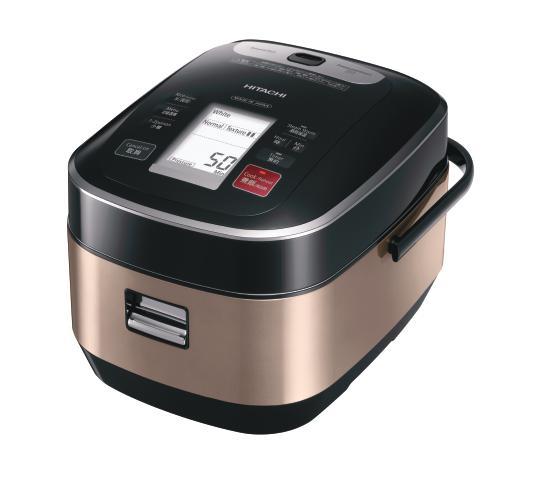
56 A 6
Contents. Specifications. Because this is a Pressurized Rice Cooker
 Because this is a Pressurized Rice Cooker Ensure that the lid is properly secured The lid might feel stiff when closing before or after cooking. Be sure to close it slowly all the way until you hear the
CAUTION. Specifications. About On/Off button. Hot warning display. On/Off button. Rice container. Heat source
 CAUTION About On/Off button This rice cooker has a On/Off button. You cannot make any operations without pressing the On/Off button. If you press the On/Off button to turn on the power, all Rice Cooking
Hitachi IH Rice Cooker Operating Instructions and Cook Book RZ-WS2YH
 Hitachi IH Rice Cooker Operating Instructions and Cook Book RZ-WS2YH Thank you very much for purchasing the Hitachi IH Rice Cooker. After reading the Operating Instructions, keep it well for future reference.
1. IMPORTANT SAFEGUARDS When using electrical appliances, basic safety precautions should always be followed to reduce the risk of fire, electric
 1. IMPORTANT SAFEGUARDS When using electrical appliances, basic safety precautions should always be followed to reduce the risk of fire, electric shock, and/pr injury to persons including the following:
5KEK1322 W A_v08.indd 1 5/13/16 2:25 PM
 5KEK1322 W10878653A_v08.indd 1 PARTS AND FEATURES PARTS AND ACCESSORIES Tea steeper lid (center section of lid with handle) Kettle lid (outer section) Stainless steel lime scale filter Removable stainless
IMPORTANT SAFEGUARDS. 3. To protect against fire, electric shock and injury to persons do not immerse cord, plug or unit in water or other liquid.
 IMPORTANT SAFEGUARDS When using electrical appliances, basic precautions should always be followed, including the following: 1. Read all instructions. 2. Make sure that your outlet voltage corresponds
Important Safeguards WARNING. This product is for household use only. Do not use for industrial purpose. WARNING CAUTION
 Important Safeguards This product is for household use only. Do not use for industrial purpose. WARNING CAUTION Indicate hazard that possibility causes death or injury when a user ignores it and mishandles
What's in the box 2 ENGLISH
 Congratulations on your purchase, and welcome to Philips! To fully benefit from the support that Philips offers, register your product at www.philips.com/welcome. Read this user manual carefully before
5KCM0512A W A_ENv10.indd 1 10/13/15 12:41 PM
 5KCM0512A PARTS AND FEATURES PARTS AND ACCESSORIES Scale readout display Timer readout display Plunger handle Power button Lid Plunger (stainless steel mesh filter with silicone seal not shown) Timer button
5KCG0702 W A_Final.indd 1 8/4/15 8:35 AM
 5KCG0702 PARTS AND FEATURES PARTS AND ACCESSORIES Hopper lid Easy access stainless steel burrs 200 g glass hopper 15 grind settings Die cast metal body Grind control dial Power switch Faceplate assembly
COFFEE GRINDER. Owner s Manual
 COFFEE GRINDER Owner s Manual 4 4 FEATURES Bean Hopper Lid Bean Hopper Grinder Start/Stop Button Bean Hopper Holder Bean Hopper Release Button Grinding Timer Dial Coffee Powder Outlet 0 Grind Thickness
IMPORTANT INSTRUCTIONS MODE D EMPLOI IMPORTANT INSTRUCIONES IMPORTANTES ISTRUZIONI IMPORTANTI
 MOKA 22-04-2003 10:10 Pagina 1 IMPORTANT INSTRUCTIONS SAVE THESE INSTRUCTIONS MODE D EMPLOI IMPORTANT CONSERVEZ LES PRESENTES INSTRUCTIONS INSTRUCIONES IMPORTANTES GUARDE ESTAS INSTRUCCIONES ISTRUZIONI
Get Started. Better Everyday ECAM23260
 Better Everyday Get Started This short guide is not intended to explain all the functions of the appliance. Please read all the owner s instruction booklet before use. Video available on www.youtube.com/delonghiusa
左边 :SAFTY NOTES 右边 : Please follow the safety precautions to avoid any harm to yourself and cause any damages Never Always Warning Attention
 封面 Multi-functional Soymilk Maker Instruction Manual Please read all instruction carefully before operating the machine 第一页 Contents Safety notes 2 Usage notes 3 Product description and specification 4
The Scoop 2-Way Brewer
 READ BEFORE USE The Scoop 2-Way Brewer Visit www.hamiltonbeach.in for our complete line of products and Use and Care Guides as well as delicious recipes, tips, and other helpful information! Questions?
STAINLESS STEEL MILK FROTHER. Model: PKFMR11BK
 STAINLESS STEEL MILK FROTHER Model: PKFMR11BK WARNING! To reduce the risk of fire, electrical shock or injury to persons or property: Carefully read all instructions before operating your new product for
1.5 L Slow Cooker 7644 Instructions for Use
 PARTS PLEASE SAVE THESE INSTRUCTIONS FOR FUTURE REFERENCE. Lid Cooking pot Base Power indicator Control knob TECHNICAL DETAILS: POWER DETAILS: 230V A.C. POWER FREQUENCY: 50Hz WATTAGE: 120W SAFETY INSTRUCTIONS:
IMPORTANT SAFEGUARDS. When using electrical appliances, basic safety precautions should always be followed, including the following:
 IMPORTANT SAFEGUARDS When using electrical appliances, basic safety precautions should always be followed, including the following: 1.Read all instructions. 2.Do not touch hot surfaces. Use handles or
Coffee Burr Grinder. Model #559. Instructions. Warranty
 Coffee Burr Grinder Model #559 Instructions Warranty IMPORTANT SAFEGUARDS When using electrical appliances, basic safety precautions should always be followed, including the following: 1. Read all instructions.
TEA CATER USER MANUAL. UM_EN Part No.:
 USER MANUAL UM_EN Part No.: 1730080-02 CONTENT CONTENT... 2 GENERAL... 4 Introduction...4 Warnings...4 Precautions...4 Intended use...4 Facts & weight...5 General functional description...5 OVERVIEW OF
Automatic Coffee Machine Instruction Manual
 Instruction Manual Page 1 of 17 8212-0 Automatic Coffee Machine Instruction Manual Instruction Manual Page 2 of 17 IMPORTANT INFORMATION For safety purposes please read these instructions carefully before
TABLE OF CONTENTS HAND MIXER SAFETY
 5KHM926 2 HAND MIXER INSTRUCTIONS TABLE OF CONTENTS HAND MIXER SAFETY...2 Important Safeguards...3 Electrical Requirements...3 PARTS AND FEATURES...4 ACCESSORY GUIDE...5 SETTING UP YOUR HAND MIXER Attaching
IF THERE IS ANY QUESTION ABOUT A CONDITION BEING SAFE OR UNSAFE, DO NOT OPERATE THIS PRODUCT!
 RO18BT 18 Quart Roaster Oven Operating Instructions READ ALL INSTRUCTIONS AND WARNINGS BEFORE USING THIS PRODUCT. This manual provides important information on proper operation & maintenance. Every effort
12 CUP COFFEE MAKER User Guide
 BRAND 12 CUP COFFEE MAKER User Guide Item: 740553 Ginnys.com 800-544-1590 Facebook.com/GinnysBrand Pinterest.com/GinnysBrand Ginnys.com/Blog Welcome to the world of full-flavored coffee with the Ginny
MODEL: POD BREWER AURORA SAF 68 HOMEMAKER ESPRESSO MAKER WITH COFFEE POD
 INSTRUCTION MANUAL Please read this Instruction Manual and the safety instructions before operating the appliance! MODEL: POD BREWER AURORA SAF 68 HOMEMAKER ESPRESSO MAKER WITH COFFEE POD Congratulation
Built in Electric Fan Oven
 Built in Electric Fan Oven LAM3400 LAM3402 LAM3403 User & Installation Guide LAMONA The user manual will help you use your product quickly and safely. Index 01 - Before using the oven 05 07 - Cooking and
QUALITY MILK FROTHER INSTRUCTION MANUAL MODEL NO. MMF005
 QUALITY MILK FROTHER INSTRUCTION MANUAL MODEL NO. MMF005 MILK FROTHER INSTRUCTION MANUAL Model No.: MMF005 READ ALL INSTRUCTIONS BEFORE USING THE FROTHER. KEEP THESE INSTRUCTIONS FOR FUTURE REFERENCE.
AUTOMATIC BURR COFFEE GRINDER
 AUTOMATIC BURR COFFEE GRINDER MODEL:SCG-903B USER MANUAL www.thesecura.com Welcome Congratulations on purchasing our Secura Automatic Burr Coffee Grinder. Each unit is manufactured to ensure safety and
Half-Pint Soft Serve Ice Cream Maker
 CAUTION: READ OPERATOR S MANUAL BEFORE USE Visit www.hamiltonbeach-me.com for our complete line of products and Use and Care Guides as well as delicious recipes and tips! Half-Pint Soft Serve Ice Cream
COFFEE MAKER INSTRUCTION MANUAL CM4682-V
 COFFEE MAKER INSTRUCTION MANUAL CM4682-V IMPORTANT SAFEGUARDS Before using the electrical appliance, the following basic precautions should always be followed including the following: 1. Read all instructions.
5KEK1522 W A_01_EN.indd 1 11/16/12 1:22 PM
 5KEK1522 Water Kettle INSTRUCTIONS Table of Contents water KEttle SAFETY Important safeguards...6 Electrical requirements...7 Electrical equipment waste disposal...7 PARTS AND FEATURES Parts and accessories...8
Single-Serve Coffee Maker
 840251801 Single-Serve Coffee Maker IMPORTANT SAFEGUARDS When using electrical appliances, basic safety precautions should always be followed to reduce the risk of fire, electric shock, and/or injury to
Oven Toaster Grill with Convection
 READ BEFORE USE Oven Toaster Grill with Convection Visit www.hamiltonbeach.in for our complete line of products and Use and Care Guides as well as delicious recipes, tips, and other useful information!
MARQUE REFERENCE CODIC
 MARQUE REFERENCE CODIC : KALORIK : TKG OT 00BCRL : 50 EN ANGLAIS PROVISOIREMENT NOTICE LOGO 00L ELECTRIC OVEN WITH ROTISSERIE & LAMP & CONVECTION INSTRUCTION MANUAL Model No. TY000BCL 0-0V~ 50/60Hz 800W
Programmable Conical Burr Mill CBM-18
 Programmable Conical Burr Mill CBM-18 IMPORTANT SAFEGUARDS When using electrical appliances, basic safety precautions should always be followed, including the following: 1. Read all instructions. 2. To
Operating Instructions
 Operating Instructions Household Use Electronic Pressure Cooker Model No. Contents SR-PS608 The pictures in this instructions take SR-PS608 for example. Chinese please refer to page 27~ back cover. ( 中文請參考
Stainless Steel Milk Frother N3 User Manual
 Stainless Steel Milk Frother N3 User Manual Voltage: 110V~60Hz Power: 500W READ AND SAVE THESE INSTRUCTIONS IMPORTANT Read and follow the instructions in this user manual even if you feel you are familiar
aerolatte ltd. Unit 1 The Corn Works Station Road Radlett WD7 8JY UK
 aerolatte ltd. Unit 1 The Corn Works Station Road Radlett WD7 8JY UK www.aerolatte.com Safety Instructions and WARNINGS When using electrical appliances basic safety precautions should always be followed
Shotmeister Owner s Manual. The Sleekest Design, Pouring the Coldest Shots
 Shotmeister Owner s Manual The Sleekest Design, Pouring the Coldest Shots Thank you for purchasing a Jägermeister Shotmeister! REGISTRATION INFORMATION Register your Jägermeister Shotmeister Online: at
Electric Two-Speed Drink Mixer
 Electric Two-Speed Drink Mixer MS2090 Series Before use, please read this manual thoroughly and save for future reference. ovente.com Electric Two-Speed Drink Mixer MS2090 Series 2 ovente.com ELECTRIC
Coffeemaker User's manual
 Coffeemaker User's manual EN Prior to using this appliance, please read the user's manual thoroughly, even in cases where you have previously familiarised yourself with the operation of similar types of
OPERATING INSTRUCTIONS FOR YOUR SAFETY CAREFULLY READ THE OPERATING INSTRUCTIONS. FOR HOUSEHOLD USE ONLY
 OPERATING INSTRUCTIONS FOR YOUR SAFETY CAREFULLY READ THE OPERATING INSTRUCTIONS. FOR HOUSEHOLD USE ONLY 2 Opening Congratulations on choosing this high quality espresso machine and thank you for your
Thank you for your purchase!
 CM4200S Thank you for your purchase! www.prodprotect.com/blackanddecker Should you have any questions or concerns with your new product, please call our Customer Service Line at 1-800-465-6070 (US and
10,000 prize draw. instructions. EXTRA year guarantee FREE rewards gallery. Register online now!
 r instructions 10,000 prize draw EXTRA year guarantee FREE rewards gallery www.productregister.co.uk/rhobbs Register online now! See back for details Read the instructions, keep them safe, pass them on
OPERATING MANUAL. Sample PRO 100 Series. Electric Heating. Applies to Versions: SPE1*, SPE2, SPE4, SPE6
 OPERATING MANUAL Sample PRO 100 Series Electric Heating Applies to Versions: SPE1*, SPE2, SPE4, SPE6 NOTE: All electrically heated roasters in the Sample PRO 100 Series are modular and this manual applies
User Manual. Stainless Steel Coffee Urns. Models: 177CU55ETL, 177CU110ETL 10/2016. Please read and keep these instructions. Indoor use only.
 Intertek Stainless Steel Coffee Urns Models: 177CU55ETL, 177CU110ETL 10/2016 Please read and keep these instructions. Indoor use only. www.avantcoequipment.com 1 NOTE: Save these instructions for future
Wi-Fi Coffee Maker. Model# GCMW-4750 USER MANUAL
 Wi-Fi Coffee Maker Model# GCMW-4750 USER MANUAL Read this manual thoroughly before using and save it for future reference Model: GCMW-4750 2018 Gourmia www.gourmia.com The Steelstone Group Brooklyn, NY
CafeRomatica NICR7.. Fully automatic coffee centre Operating Instructions and Useful Tips. A passion for coffee.
 CafeRomatica Fully automatic coffee centre Operating Instructions and Useful Tips NICR7.. GB A passion for coffee. 1 G F A M J / K A B C D E Display screen Left rotary knob Right rotary knob Bean symbol
CHOCOLINO CAFÉLINO USER MANUAL UM_EN. Part No.: _01
 CHOCOLINO CAFÉLINO USER MANUAL UM_EN Part No.: 1764133_01 CONTENT CONTENT...2 GENERAL...4 Introduction...4 Warnings...4 Precautions...4 Intended use...4 Facts & weight...5 OVERVIEW OF COMPONENTS...6 CHOCOLINO/CAFÉLINO...6
5.3QT DIGITAL 11-IN-1 INSTACOOKER Instruction Manual & Recipes MODEL CC5GT001
 5.3QT DIGITAL 11-IN-1 INSTACOOKER Instruction Manual & Recipes MODEL CC5GT001 1 WHAT S INCLUDED Instacooker Inner Pot Spoon, Steamer* & Condensation Cup Instruction Manual & Recipes *To use the steamer,
12 CUP COFFEEMAKER User Guide
 BRAND 12 CUP COFFEEMAKER User Guide Item: 757147 Ginnys.com 800-544-1590 Facebook.com/GinnysBrand Pinterest.com/GinnysBrand Welcome to the world of full-flavored coffee with the Ginny s Brand 12-Cup Coffeemaker!
User Manual. Stainless Steel Coffee Urn. Models: 177CU30 11/2018. Please read and keep these instructions. Indoor use only.
 Stainless Steel Coffee Urn Models: 177CU30 11/2018 Please read and keep these instructions. Indoor use only. www.avantcoequipment.com 1 NOTE: Save these instructions for future reference. Index Important
User Manual. Stainless Steel Coffee Urns. Models: 177CU30, 177CU55, 177CU110 04/2018. Please read and keep these instructions. Indoor use only.
 Stainless Steel Coffee Urns Models: 177CU30, 177CU55, 177CU110 04/2018 Please read and keep these instructions. Indoor use only. www.avantcoequipment.com 1 NOTE: Save these instructions for future reference.
Burr Grinder. Automatic burr grinder with 17-position grind selector. Instruction Booklet EM0430
 Burr Grinder Automatic burr grinder with 17-position grind selector Instruction Booklet EM0430 Please read these instructions carefully and retain for future reference. Contents Sunbeam s Safety Precautions
Coffee Burr Grinder. Model #591. Instructions. Warranty. 110W/120Vac/60 Hz. Read this manual thoroughly before using and save it for future reference
 Coffee Burr Grinder Model #591 Instructions Warranty Read this manual thoroughly before using and save it for future reference 110W/120Vac/60 Hz IMPORTANT SAFEGUARDS When using electrical appliances, basic
Please read all directions before using the product and retain this guide for reference. This product is intended for household use only.
 Wine Gift Set User Guide IVAWINESET05 Thank you for purchasing the Ivation Wine Gift Set. This User Guide is intended to provide you with guidelines to ensure that operation of this product is safe and
Coffeemaker. Coffeemaker Safety... 2 Parts and Features... 3 Using Your Coffeemaker... 4 Cleaning Your Coffeemaker... 4 Customer Service...
 Coffeemaker Coffeemaker Safety... 2 Parts and Features... 3 Using Your Coffeemaker... 4 Cleaning Your Coffeemaker... 4 Customer Service... 6 In USA: 1-800-851-8900 In Canada: 1-800-267-2826 840069400 Coffeemaker
Coffee Grinder Instruction Manual
 Coffee Grinder Instruction Manual CoffeeGrinder Manual-English Only.indd 1 07/01/2016 14:14:39 Savisto Home Coffee Grinder Voltage Supply: 220-240V~ 50/60Hz Power Consumption: 150W Eng Please read through
AS450, AS600, G1, SG630
 Grill Range Operating Manual Grill Range AS450, AS600, G, SG60 Product Range Also Includes: Induction Hobs / Combination Ovens / Pizza Ovens / Mixers Salamander Grills / Contact Grills / Pie Warmers /
Speed Pour Owner s Manual. Serving up the Coldest Shots
 Speed Pour Owner s Manual Serving up the Coldest Shots INSTRUCTIONS Unpacking and Start-Up Instructions 1. Start by removing the included boxes of the Stag Pourer & Bottle Neck Extender. 2. Remove foam
S m a rtset Control for Convection Models
 S m a rtset Control for Convection Models C O N T E N T S Features of your Oven Control.....................1 Setting the Clock...............................2 Setting the Minute Timer.........................2
OWNERS MANUAL. My Rotisserie Pro Warranty. Please read and save this manual. PROFESSION AL SERIES MRP_MAN_QVC_ENG_V1_ FOR HOUSEHOLD USE ONLY.
 My Rotisserie Pro Warranty The manufacturer warrants that your My Rotisserie Pro is free of defects in materials and workmanship and will, at its option, repair or replace any defective rotisserie that
Custom Grind Deluxe Coffee Grinder
 READ BEFORE USE Visit www.hamiltonbeach.in for our complete line of products and Use and Care Guides as well as delicious recipes, tips, and other useful information! Custom Grind Deluxe Coffee Grinder
IMPORTANT SAFEGUARDS PARTS NAMES AND FUNCTIONS TIPS TO COOKING GREAT-TASTING RICE (PREPARATION AND KEEP WARM) HOW TO COOK RICE: BASIC COOKING STEPS
 HOW TO COOK RICE: BASIC COOKING STEPS") IMPORTANT SAFEGUARDS PARTS NAMES AND FUNCTIONS TIPS TO COOKING GREAT-TASTING RICE (PREPARATION AND KEEP WARM) HOW TO COOK RICE: BASIC COOKING STEPS TIPS TO COOKING VARIOUS RICE MENUS REGULAR KEEP WARM
IMPORTANT SAFEGUARDS PARTS NAMES AND FUNCTIONS TIPS TO COOKING GREAT-TASTING RICE (PREPARATION AND KEEP WARM) HOW TO COOK RICE: BASIC COOKING STEPS TIPS TO COOKING VARIOUS RICE MENUS REGULAR KEEP WARM
10,000 prize draw. instructions. EXTRA year guarantee FREE rewards gallery. Register online now!
 r instructions 10,000 prize draw EXTRA year guarantee FREE rewards gallery www.productregister.co.uk/rhobbs Register online now! See back for details 2 Read the instructions, keep them safe, pass them
TILT-HEAD STAND MIXER FEATURES
 ENGLISH TILT-HEAD STAND MIXER FEATURES Speed Control Knob Motor Head Attachment Hub Attachment Knob Motor Head Locking Lever (not shown) Beater Shaft Flat Beater Beater Height Adjustment Screw Wire Whip
PLEASE READ THIS MANUAL BEFORE USE. SAVE FOR FUTURE REFERENCE.
 8-CUP STAINLESS STEEL CARAFE Coffee Brewer Model: BV1900TS HOUSEHOLD USE ONLY Customer Service Line: 1-855-664-1252 2-year limited warranty bonavitaworld.com Simple to operate Optional pre-infusion cycle
MODELS 1315 & 1315-S La Pavoni CLUB COMBO
 IMPORTANT WARNINGS MODELS 1315 & 1315-S La Pavoni CLUB COMBO DUET Never operate your espresso machine without water in the tank. This may cause premature pump failure. Do not allow the power cord to come
TOASTER OVEN USER MANUAL MODEL: PKMFT039
 TOASTER OVEN USER MANUAL MODEL: PKMFT039 IMPORTANT SAFETY INSTRUCTION When using electrical appliances, basic safety precautions should always be followed, including the followings: 1 Don t touch hot surfaces
Get Started. Better Everyday ECAM26455
 Better Everyday Get Started This short guide is not intended to explain all the functions of the appliance. Please read all the owner s instruction booklet before use. ECAM26455 WELCOME Introducing the
READ ENTIRE MANUAL BEFORE USE SAVE THESE INSTRUCTIONS
 Thank you for your purchase of Veggetti Power, the quick & easy way to turn veggies into delicious, healthy pasta and more instantly! It s also great for making stir-fries, veggie salads and decorative
MODEL# GCM4500 COFFEE MAKER WITH GRINDER. PHOTO OF PRODUCT
 MODEL# GCM4500 COFFEE MAKER WITH GRINDER www.gourmia.com PHOTO OF PRODUCT 2016 Gourmia www.gourmia.com The Steelstone Group Brooklyn, NY Welcome to Delicious and Aromatic world of Coffee Makers from Gourmia!
INSTRUCTION MANUAL AND RECIPE BOOK CORN DOG MAKER CDM-1 SMART PLANET PLEASE READ THESE INSTRUCTIONS CAREFULLY AND RETAIN FOR FUTURE REFERENCE.
 INSTRUCTION MANUAL AND RECIPE BOOK CORN DOG MAKER CDM-1 SMART PLANET PLEASE READ THESE INSTRUCTIONS CAREFULLY AND RETAIN FOR FUTURE REFERENCE. IMPORTANT SAFEGUARDS Read all instructions before using the
WE CAN HELP. Smart Coffee Maker User Manual. Can t connect? Need help? DO NOT RETURN THIS PRODUCT TO THE STORE
 Can t connect? Need help? Wi-Fi Date Code: 01/19 Smart Coffee Maker User Manual WE CAN HELP DO NOT RETURN THIS PRODUCT TO THE STORE Call 1-800-757-1440 Mon-Fri 9:00-5:00 EST (US) or email info@atomiusa.com
SG120 Model # Cup Stainless Steel Coffee Maker. Operating Instructions Product Registration Warranty
 SG120 Model #494 12-Cup Stainless Steel Coffee Maker Operating Instructions Product Registration Warranty IMPORTANT SAFEGUARDS When using electrical appliances, basic safety precautions should always be
User Manual VZ46BHK VZ110BDHK/ VZ120BHK VZ150BDHK/ VZ166BHK
 User Manual VZ46BHK VZ110BDHK/ VZ120BHK VZ150BDHK/ VZ166BHK Thank you for choosing Vinvautz Wine Cellar. Before use, please read and follow all safety and operating instructions. SAFETY INSTRUCTIONS 220V
Register your product within 30 days of purchase to activate its one-year WARRANTY IS ONLY VALID IF YOU REGISTERED WITHIN 30 DAYS AFTER PURCHASE.
 WARRANTY Register your product within 30 days of purchase to activate its one-year limited manufacturer s warranty at /register WARRANTY IS ONLY VALID IF YOU REGISTERED WITHIN 30 DAYS AFTER PURCHASE. LIMITED
Instruction Manual Coffee grinder. CM 90 Serie
 Instruction Manual Coffee grinder CM 90 Serie Table of content Safety Instructions... 3 Before first use... 4 Unpacking... 4 Requirements for the installation location... 5 Operating and speed settings...
Read the instructions, keep them safe, pass them on if you pass the appliance on. Remove all packaging before use.
 instructions 2 Read the instructions, keep them safe, pass them on if you pass the appliance on. Remove all packaging before use. A IMPORTANT SAFEGUARDS Follow basic safety precautions, including: 1 This
G F I M J K L B C D E S O T H Q P U N R D 4
 1 2 3 4 G F I A M J K L 5 6 7 B C D E 8 9 10 S O T H Q P U N R 11 12 D 4 Equipment GB A B C D E Text display (main menu) Rotary control knob Button > Button exit Height-adjustable coffee spout CafeRomatica
A IMPORTANT SAFEGUARDS
 instructions 2 Read the instructions, keep them safe, pass them on if you pass the appliance on. Remove all packaging before use. A IMPORTANT SAFEGUARDS Follow basic safety precautions, including: 1 This
INTRODUCTION. Your new smoker comes almost completely assembled. You will need to complete the assembly which includes:
 INTRODUCTION Congratulations on your purchase of this Smith & Wesson SMOKER, Model SWS032. With proper set-up, operation and maintenance, this smoker will provide you with years of cooking enjoyment. Your
AutoGrinder. Automatic coffee grinder. Instruction Booklet EM0415. Please read these instructions carefully and retain for future reference.
 AutoGrinder Automatic coffee grinder Instruction Booklet EM0415 Please read these instructions carefully and retain for future reference. Contents Sunbeam s Safety Precautions 1 Features of your AutoGrinder
User Guide TEA CATER. Your Dealer. U / EN Rev
 User Guide TEA CATER Your Dealer U / EN Rev 101115 1. Contents Tea Cater 1. Contents page 2 2. General 3 3. Function description 3 4. Start-up 3 5. Component overview 4 5. Function button overview 5-6
HD8847 HD8848 USER MANUAL. Super automatic espresso coffee machine 4000 series. Read carefully before using the machine.
 Super automatic espresso coffee machine 4000 series 02 USER MANUAL Read carefully before using the machine. HD8847 HD8848 02 English EN Register your product and get support at www.philips.com/welcome
PROFESSIONAL WC400. For your safety and continued enjoyment of this product, always read the instruction book carefully before using.
 PROFESSIONAL Wine Center WC400 For your safety and continued enjoyment of this product, always read the instruction book carefully before using. IMPORTANT SAFEGUARDS When using electrical appliances, basic
Espresso Maker READ BEFORE USE. Questions? Please call us our friendly associates are ready to help
 Espresso Maker Visit www.hamiltonbeach.in for our complete line of products and Use and Care Guides as well as delicious recipes, tips, and other helpful information! Questions? Please call us our friendly
SG Cup Coffee Maker. Model # W / 120Vac / 60 Hz. Operating Instructions Warranty
 SG220 12-Cup Coffee Maker Model #427.05 Operating Instructions Warranty 900W / 120Vac / 60 Hz IMPORTANT SAFEGUARDS When using electrical appliances, basic precautions should always be followed, including
ORIGINAL LINE A USER MANUAL
 USER MANUAL Machines with automatic water filling UM_EN Part No.: 1764024_01 CONTENT CONTENT... 2 GENERAL... 4 Introduction...4 Warnings...4 Precautions...4 Intended use...4 Facts & weight...5 General
3.5L Slow Cooker / GVALSC40. Instruction Manual
 3.5L Slow Cooker / GVALSC40 Instruction Manual Important Safety and General Instructions Please keep this user manual in a safe place along with your purchase receipt and carton for future reference. The
12 Bottle Dual Zone. Touchscreen INSTRUCTION MANUAL
 12 Bottle Dual Zone Touchscreen INSTRUCTION MANUAL To ensure proper use of this appliance and your safety, please read the following instruction completely before operating this appliance. 1 TABLE OF CONTENTS
BarAroma Coffee & Spice Grinder
 Breville is a registered trademark of Breville Pty. Ltd. ABN 98 000 092 928 Breville Customer Service Centre Australian Customers Breville Customer Service Centre PO Box 22 Botany NSW 2019 AUSTRALIA Customer
PAGE TITLE. Instruction manual MODEL DPBD002
 PAGE TITLE Instruction manual MODEL DPBD002 TABLE OF CONTENTS 2 TABLE OF CONTENTS Important Safeguards... 4-5 Parts & Features... 6-7 Using Your Blender... 8-9 Maintenance... 10-11 Recipes... 12-17 Customer
Rice Cooker. IH & Inverter
 Rice Cooker IH & Inverter IH & Inverter Series With the latest advanced technology and the trust that comes with a 100year reputation for reliability, Hitachi home appliances are the ultimate choice for
CAUTIONS FOR ALL DEEP FAT FRYERS NEVER LEAVE AN OPERATING FRYER UNATTENDED REMEMBER HOT OIL IS DANGEROUS RESPECT IT! WARNING INSTALLATION Locate your
 CAUTIONS FOR ALL DEEP FAT FRYERS NEVER LEAVE AN OPERATING FRYER UNATTENDED REMEMBER HOT OIL IS DANGEROUS RESPECT IT! WARNING INSTALLATION Locate your fryer in a protected place so that it cannot be tipped
instructions COFFEE GRINDER KG 79/89
 instructions COFFEE GRINDER KG 79/89 DESCRIPTION OF APPLIANCE The following terms are used throughout the instruction manual Coffee-bean hopper lid Removable upper burr Coffee-bean hopper ON/OFF switch
HD8828 HD8834 USER MANUAL. Super automatic espresso coffee machine 3100 series. Read carefully before using the machine.
 Super automatic espresso coffee machine 3100 series 02 USER MANUAL Read carefully before using the machine. HD8828 HD8834 English 02 EN Register your product and get support at www.philips.com/welcome
PKFNMK14. Electric Chocolate Melting and Warming Fondue Set
 PKFNMK14 Electric Chocolate Melting and Warming Fondue Set by IMPORTANT SAFETY INSTRUCTIONS READ CAREFULLY AND KEEP FOR FUTURE REFERENCE Carefully read this manual before using this appliance. Ensure that
BULL. ASSEMBLY & OPERATING INSTRUCTIONS
 BULL. Dutdaar Products Inc. "., Ontario, California 91761 ASSEMBLY & OPERATING INSTRUCTIONS Model No. 18038 7-Burner High Grade Commercial Stainless Steel Longhorn, LP Model No. 18039 7- Burner High Grade
coffee for one Instructions Doc. Size: 5 W x 4.75 H Output at 100% Prints 1/0 Black _INS_coffeemaker
 coffee for one B E T T E R B Y B R O O K S T O N E W E C R E A T E P R O D U C T S T O M A K E L I F E B E T T E R. T H R O U G H I N N O V A T I V E D E S I G N, B E S T - I N - C L A S S P R O D U C