3 Gallon. User Manual
|
|
|
- Theodora Sharp
- 6 years ago
- Views:
Transcription


1 3 Gallon EN User Manual
2 Congratulations on your FastFerment Purchase! Now you will be able to make the best beer, wine, cider or mead in the comfort of your own home with the least amount of effort. Thank you for allowing us to help! We have solid Customer Service so if you have any questions or concerns, please allow us to help before you look elsewhere. NEED HELP? Step 1: Check out our website - Go to Step 2: Watch our Videos - Click on Products -> Product Videos Step 3: Read FastFerment FAQ - Click on FAQs -> FastFerment FAQs Step 4: If you can t find what you re looking for, send an to Info@FastBrewing.com or call us FIRST TIP: Never, Ever Rest the FastFerment on the Jar. Use the Stand. FLOOR
3 Table of Contents EN Standard Kit Contents... 3 Description of Parts... 4 FastFerment Set Up - Cleaning & Sanitizing... 5 FastFerment Set Up - Taping... 6 FastFerment Set Up - Assembly... 7 Simple Steps for Using FastFerment Making Wine with the FastFerment... 9 Making Wine with the FastFerment Option Making Wine with the FastFerment Option Homebrewing with a FastFerment Homebrewing with a FastFerment - Malt Extract Syrup Homebrewing with a FastFerment - Brew in a Bag Homebrewing with a FastFerment - All Grain Top 5 Frequently Asked Questions Hyrdrometer Readings Harvesting Yeast Gallon FastFerment Gallon FastFerment G & 14G FastFerment Accessories FastBrewing Company Contact Information... 32
 Standard Kit Contents Parts List 1) Conical Fermenter Body - 1 2) 3/4 Union Valve - 1 3) Union Fitting Attachment for Mason Jar -1 4) Mason Jar - 1 5) Rubber Grommet - 1 6) Spare O Ring for Union")
4 3G (11.3L) Standard Kit Contents Parts List 1) Conical Fermenter Body - 1 2) 3/4 Union Valve - 1 3) Union Fitting Attachment for Mason Jar -1 4) Mason Jar - 1 5) Rubber Grommet - 1 6) Spare O Ring for Union Valve - 1 7) Gasket for Mason Jar Adaptor - 1 8) 6 Screw Top Lid & Hollow Rubber Gasket - 1 each 9) Teflon Tape ) 3 Piece Airlock ) Hose Barb ) Metal Stand ) Hose Clamp ) Hose - 1 Need Spare Parts? Find a Retailer page at: 3
 Mason Jar - Small vessel to collect trub and sediment.")
 6 Screw Top - Lid for the top of the Conical Fermenter Body 6 Hollow Rubber Gasket - Seals the Conical Fermenter Body and the Lid 9) Teflon Tape - Seals off threads on the Conical")
5 Description of Parts 1) Conical Fermenter Body - Main vessel for fermentation 2) 3/4 Union Valve - Valve to allow contents to flow into the Collection Ball 3) Union Valve Fittings for Mason Jar - Fitting to attach the Conical Fermenter Body to the Mason Jar 4) Mason Jar - Small vessel to collect trub and sediment. Other sizes can be used with the same fitting 5) Rubber Grommet - Holds and seals the Airlock in the Lid 6) Spare O Ring for Union Valve - Replacement part for Union Valve 7) Gasket for Mason Jar Adaptor 8) 6 Screw Top - Lid for the top of the Conical Fermenter Body 6 Hollow Rubber Gasket - Seals the Conical Fermenter Body and the Lid 9) Teflon Tape - Seals off threads on the Conical Fermenter Body and Valve 10) 3-Piece Airlock - Allows O2 to escape during primary and secondary fermentation 11) Hose Barb - Located in the Valve; attaches the Valve to the Hose 12) Stand - Holds the Conical Fermenter Body firmly in place for fermentation and bottling 13) Hose Clamp - Closes off the Hose when filling when needed 14) Hose - Fills bottles or kegs from the open Union Valve Contact us if you have any parts questions: Info@FastBrewing.com Need Spare Parts? Find a Retailer page at: 4
6 FastFerment Set Up - Cleaning & Sanitizing FastFerment parts have not been cleaned prior to shipping. Cleanliness should be the foremost concern of a homebrewer or winemaker. Providing good growing conditions for the yeast in the wort or must also provides good growing conditions for other microorganisms, especially wild yeast and bacteria. Cleanliness to prevent contamination must be maintained throughout every stage of the brewing/winemaking process. There s a Cleaning video - Our Recommendations for Cleaning & Sanitizing Include: Soak with PBW and Rinse PBW (Powdered Brewery Wash) is gentle, alkali-based cleanser used to remove dust and debris before brewing and stubborn deposits after brewing. Soak all parts with PBW and use a soft cloth to assist. Rinse off with water if it is a high quality source. Spray with StarSan Sanitizer Use sanitizer at a rate of 1oz (30ml) in 5 US gallons (18.9L) of water. Apply by spray or soak each part with a contact time of at least 5 minutes. Empty or drain the parts and let air dry. All parts and equipment should be reassembled wet after being sanitized to minimize contamination. DO NOT RINSE SANITIZER OFF. 5
 There s an Assembly video - www.fastbrewing.com NOTE: You might need 6-10 layers of tape.")
 ALERT: Be very careful with the threads - if you cross")
7 FastFerment Set Up - Taping Take the supplied Teflon Tape and wrap the threads in the same direction as the threads rotate (clockwise direction when looking at the thread - see pictures below) There s an Assembly video - NOTE: You might need 6-10 layers of tape. If any connection leaks during a leak test, it requires more layers of tape. Apply Teflon Tape to the threads at the bottom of the Conical Fermenter Body (white to grey) ALERT: Be very careful with the threads - if you cross thread, the warranty is no longer valid on the damaged parts. Always tape in a clockwise direction 6
8 FastFerment Set Up - Assembly There s an Assembly video - Step 1: Step 2: Step 3: Step 4: Step 5: Step 6: Step 7: Step 8: Step 9: Attach the solid end of the Union Valve to the Conical Fermenter Body. *Only screw the valve to where it touches the conical, don t overtighten or this could break the threads off and won t be under warranty. Screw on Mason Jar Adapter to the Mason Jar Attach the Hose to the Hose Barb Attach the Mason Jar Adapter to the Union Valve and open the Union Valve Insert the Grommet into the hole on the top of the 6 Screw Top Insert the Airlock into the Grommet Place the completed FastFerment into the Stand Important! Do a leak test by filling the FastFerment with water to ensure that everything seals properly. We suggest leaving it for a minimum of 5-6 hours. If there is a leak, add a few extra layers of tape. If the leak test produces no leaks, sanitize and begin your first batch by screwing on the 6 Screw Top with the Hollow Rubber Gasket to completed the closed system. 7
9 Simple Steps for Using FastFerment 1. Pour ingredients 2. Screw on lid Allow time for primary into FastFerment with airlock 3. fermentation with valve open 4. When primary fermentation is done, close the valve 5. Remove the Mason Jar 6. Dump, clean & sanitize the Mason Jar 7. Or, harvest the yeast to reuse 8. Reattach the Mason Jar 9. Open the valve Allow time for secondary When primary fermentation 10. fermentation with valve open 11. is done, turn off valve 12. Remove the Mason Jar 13. Attach the filling hose 14. Adjust the hose clamp 15. Bottle or keg & enjoy! 8
 Conical Fermenter FastWasher12 Bottle Washer FastRack12 Rack & Tray PBW (or similar cleaner) StarSan Sanitizer (or similar sanitizer) & Spray Bottle Bottle Brush (long")
 Corks Corker Wine Bottles Degasser It is recommended that if you are using any grape skins, wood chips or other flavoring items larger than a 1/4 (0.")
10 Making Wine with FastFerment Suggested Equipment for WineMaking FastFerment 3 Gallon (11.3L) Conical Fermenter FastWasher12 Bottle Washer FastRack12 Rack & Tray PBW (or similar cleaner) StarSan Sanitizer (or similar sanitizer) & Spray Bottle Bottle Brush (long handled nylon bristle brush) Thermometer (FastBrewing Accessory) Hydrometer Graduated Cylinder (optional for sampling Starting Gravity) Plastic Stirring Spoon (Food Grade Plastic) Corks Corker Wine Bottles Degasser It is recommended that if you are using any grape skins, wood chips or other flavoring items larger than a 1/4 (0.64cm) diameter, you should use a muslin bag in the FastFerment during fermentation for easy retrieval. 9


11 WineMaking Instructions - Option 1 EN There s a Wine Making video - There are hundreds of wine kits so the following guidelines are recommendations to be used with a standard wine kit. We advise that you adjust dates for waiting based on your hydrometer readings and the time duration that the kit provides you with. Please ensure that you read all instructions before beginning to guarantee maximum efficiency and best results. Note - Filling Hose Attachment refers to the Hose on the Hose Barb with the Union Fitting and the Hose Clamp (see picture below - 5 pieces total) Winemaking Option 1: Day 1: Primary Fermentation Filling Hose Attachment Step 1: Step 2: Step 3: Step 4: Step 5: Step 6: Step 7: Step 8: Step 9: Step 10: Step 11: Clean and assemble FastFerment Perform a leak test (use water) and when successful, sanitize all equipment Pour the contents of the bag into the FastFerment and add water to desired volume Slowly sprinkle the packet of Bentonite, stirring constantly Put some water in the bag, swirl it around and dump it into the FastFerment Add 0.55G (2 l) of water, adjusting the temperature so that the inside temperature once full is between F (20-25 C). At this point you have an option to add a mash bag to add more flavor if the kit provides one Stir vigorously Check the specific gravity of must and record Add the yeast as per instructions Screw the lid on the FastFerment with the Grommet and Airlock installed Let primary fermentation occur (approx. 7 days) Primary Fermentation is complete when the Specific Gravity is around The number of days suggested is a general guideline. 10
12 There s a Wine Making video - Winemaking Option 1 Continued: Days 7-10: Secondary Fermentation Step 12: Step 13: Step 14: Step 15: Step 16: Once primary fermentation is complete, close the Union Valve, remove and empty the contents of the Mason Jar Clean and sanitize the Mason Jar before reattaching (at this point you should also remove the mash bag if you are using one) Reattach the Mason Jar Re-open the Union Valve Leave FastFerment in a warm, dark area for the duration of secondary fermentation (approx. 12 days) Days 20-22: Degassing and Stabilizing Step 17: Take a hydrometer reading. The S.G should be or lower for secondary fermentation to be complete. If the S.G is higher, wait a few more days Day 24-32: Clearing At this point you have the option of continuing the next few steps on the same day or waiting 5-7 days Step 18: Step 19: Step 20: 11 It is time to clear the wine by adding the last fining agents. Refer to your kit for clearing instructions Degas - using either a plastic stir spoon or degassing equipment, degas wine vigorously for 2-5 mins. You can repeat this step 2-4 times a day over the next 2 days or just once really well will suffice Add the Metabisulphite and the Potassium Sorbate packages and stir vigorously
13 There s a Wine Making video - Winemaking Option 1 Continued: Day 33-40: Filtering and Bottling Step 23: Step 24: Step 25: Step 26: Step 27: Step 28: Step 29: Clean and sanitize wine bottles and Filling Hose Attachment Remove collection ball and attach sanitized Filling Hose Attachment Make sure the Hose Clamp is closed. Then open the Union Valve to start filling wine into bottles. Try to minimize the exposure to the air. Fill the bottles so that the wine is about 0.75 (2cm) from the bottom of the cork Keep wine bottles upright for 1-3 days Keep your wine in a temperature controlled environment, out of direct sunlight for suggested amount of months prior to consuming Clean and sanitize your equipment Get ready for your next batch using FastFerment! Wine Making Instructions - Option 2, Even Easier Option 2 reduces the workload even more and has been proven successful for years in Wine-on-Premise locations by the Inventor. They are his recommendations only. Winemaking Option 2: Day 1: Primary and Secondary Fermentation Step 1: Step 2: Step 3: Step 4: Step 5: Step 6: Clean and assemble FastFerment Perform a leak test (use water) and when successful, sanitize all equipment Pour the contents of the bag into the FastFerment and add water to desired volume Slowly sprinkle the packet of Bentonite, stirring constantly Put some water in the bag, swirl it around and dump into FastFerment Adjust the temperature so that the inside temperature once full is between F (20-25 C). At this point you have an option to add a mash bag to add more flavor if the kit provides one. 12
14 There s a Wine Making video - Winemaking Option 2 Continued: Step 7: Stir vigorously Step 8: Check the specific gravity of the must Step 9: Sprinkle in the yeast - do not stir Step 10: Put the lid on FastFerment Step 11: Do not open or touch for the duration of primary and secondary fermentation (approx days) Days 20-22: Degassing and Stabilizing Step 12: Take a hydrometer reading. The S.G must be or lower for secondary fermentation to be complete. If the S.G is higher, wait a few more days Day 24-32: Clearing It is important that the wine is thoroughly degassed. The S.G must be between and Step 13: Step 14: It is time to clear the wine by adding the last fining agents. Refer to your kit for clearing instructions Degas - using either a plastic stir spoon or degassing equipment, degas wine vigorously for 2-5 mins. You can repeat this step 2-4 times a day over the next 2 days or once really well is good enough Step 15: Add the Metabisulphite and the Potassium Sorbate packages and stir vigorously If you choose to clear your wine on the same day as your degassing and stabilizing, degas wine again for another 5 minutes. If you waited to clear wine, reseal lid and let it sit for 6 days 13
15 There s a Wine Making video - Winemaking Option 2 Continued: Days 33-40: Filtering and Bottling Check to see if wine is clear - if it is not clear, it is not ready to bottle. Step 17: Step 18: Step 19: Clean and sanitize the wine bottles Rinse and sanitize the Filling Hose (recommended) Remove the Mason Jar There is no need to remove the Mason Jar until this point. It is designed to hold sediment with an approximate foot of clearance from the wine. Step 20: Step 21: Step 22: Step 23: Step 24: Step 25: Attach the sanitized Filling Hose Attachment Make sure the Hose Clamp is closed. Then open the Union Valve to start filling wine into bottles. Try to minimize the exposure to the air. Fill the bottles so that the wine is about 0.75 (2cm) from the bottom of the cork Keep wine bottles upright for 1-3 days Store wine in a temperature controlled environment, out of direct sunlight for suggested amount of months prior to consuming Clean and sanitize all equipment Get ready for your next batch using FastFerment! 14
 Conical Fermenter FastWasher24 Bottle Washer FastRack24 Rack & Tray PBW (or another cleaner) StarSan (or another sanitizer) Thermometer Hydrometer Graduated Cylinder (optional for sampling S.")
16 Homebrewing with FastFerment Suggested Equipment for Homebrewing FastFerment 3 Gallon (11.3L) Conical Fermenter FastWasher24 Bottle Washer FastRack24 Rack & Tray PBW (or another cleaner) StarSan (or another sanitizer) Thermometer Hydrometer Graduated Cylinder (optional for sampling S.G) Bottle Brush (long handled nylon bristle brush) Plastic Stirring Spoon (Food Grade Plastic) Bottle Caps (check if your kit provides them) Capper Large Boiling pot Wort Chiller (or ice to put in a bathtub/large sink) 0.5G (200ml) container (to prepare yeast) Mashtun (optional) Brew-in-a-Bag (optional) Pen and Notepad 15 It is recommended that if you are using any grape skins, wood chips or other flavoring items larger than a 1/4 (0.64cm) diameter, you should use a muslin bag in the FastFerment during fermentation for easy retrieval.
17 Homebrewing Instructions Please read the instructions entirely before starting on your brew day to ensure maximum efficiency and the best results. We also advise you to adjust dates and measurements according to your specific recipe. The three most important things to keep in mind every time you brew are: Cleanliness, Preparation and Good Record Keeping. There s a Brewing video - Homebrewing Option 1: Malt Extract Syrup Day 1 - Brew Day (Follow Instructions on Ingredient Kit): Step 1: Step 2: Step 3: Step 4: Step 5: Step 6: Step 7: Clean and assemble FastFerment Perform a leak test (use water) and when successful, sanitize all equipment Gather ingredients purchased from your favorite homebrew shop Boil suggested amount of water Once boiling, remove pot from the heat and stir in the malt extract syrup, make sure it doesn t collect at the bottom (stir until completely dissolved) Once dissolved, return liquid to boil for a total of 1 hour Once liquid reaches a rolling boil, proceed to adding hops by following instructions given to you (within boiling hour) NEED EXTRA HELP? We have great resources: Step 1: Check out our website - Go to Step 2: Watch our Videos - Click on Products -> Product Videos Step 3: Read FastFerment FAQs - Click on FAQs -> FastFerment FAQs Step 4: If you can t find what you re looking for, send an to Info@FastBrewing.com or call us
18 There s a Brewing video - Homebrewing Option 1: Malt Extract Syrup Continued Step 8: Once the hour is up, it is time to chill the wort. Attach chiller to a cold-water source and cool wort. Cool until wort has reached pitching temperature F (18-32 C) Step 9: Take a sample of the wort and record a hydrometer reading Step 10: Re-hydrate yeast Step 11: Add wort into FastFerment and then add yeast You have the option of sealing the lid and gently shaking the conical to aerate the wort for the yeast to grow or stir vigorously Fermentation: Step 12: Seal the lid tight and place FastFerment in the Stand. Leave undisturbed for the duration of primary fermentation (time varies depending on the type of beer). Depending on the type of beer, choose a location that has a stable temperature. If brewing Ale, room temperature is recommended F (18-21 C) Step 13: Once primary fermentation is complete, close the Union Valve, remove and empty the contents of the Mason Jar There is the option to harvest the yeast for reuse. Check out page for Tips! Step 14: Sanitize and clean the Mason Jar before reattaching (at this point you should also remove the mash bag if you are using one) Step 15: After re-attaching the Mason Jar, re-open the Union Valve Step 16: Allow brew to sit for remainder of secondary fermentation (times vary) Step 17: When secondary fermentation is complete, turn off the Union Valve and remove the Mason Jar, to discard the contents or harvest the yeast (See page 31) Step 18: Your beer is now ready to bottle! 17
19 There s a Brewing video - Homebrewing Option 1: Malt Extract Syrup Continued Bottling/Kegging Day: A typical 2-gallon batch requires one case (24) of 12oz (355ml) bottles for bottling Step 19: Wash, sanitize all beer bottles and place in a FastRack24. Also sanitize Hose, Hose Barb and Hose Clamp Step 20: Prepare priming solution Step 21: Add priming solution to FastFerment and stir gently Step 22: Wait for sediment to settle for minutes before proceeding Step 23: Attach the Filling Hose Attachment Step 24: Put Hose Clamp on the Hose and make sure it is closed. Then open the Union Valve to start filling beer into bottles. Try to minimize the exposure to the air. Fill the bottles so that the wine is about 1 (2.54cm) from the top and cap Step 25: Clean FastFerment and other equipment Step 26: Place bottles in a room-temperature area and let them sit to allow carbonation to take place Step 27: Wait 2-3 weeks. Cool beers and crack one open with a friend! Homebrewing Option 2: Brew-in-a-Bag Brew Day (Follow Instructions on Ingredient Kit): Step 1: Step 2: Step 3: Step 4: Step 5: Step 6: Clean and assemble FastFerment Perform a leak test (use water) and when successful, sanitize all equipment Gather ingredients purchased from your favorite homebrew shop Line boiling pot with a grain bag Fill boiling pot with water (you will be mashing with the full volume of water) Heat your water to 1 more than the target mash temperature of the recipe to allow for cooling caused by the grain addition 18
20 There s a Brewing video - Homebrewing Option 2: Brew-in-a-Bag Continued Step 7: Step 8: Step 9: Step 10: Step 11: Step 12: Step 13: Step 14: Step 15: Add grain to pot and stir the mash very gently until the grains are submerged and wet (if the temperature has cooled significantly during the previous step, add more heat to bring wort back to the desired temperature) Put the lid on and leave it according to the mash schedule After the waiting period, lift the bag from the wort slowly and allow it to drain (hold it close to the beer s surface to eliminate splashing and introducing air) Bring wort to a boil Keep on a rolling boil for 1 hour. Begin adding hops according to provided schedule Once the hour is up, it is time to chill the wort. Attach chiller to a cold water source and cool wort. Cool until wort has reached pitching temperature F (18-32 C) Take hydrometer reading and record Re - hydrate yeast Add wort into FastFerment and then add yeast Fermentation: Step 16: Seal the lid tight and place FastFerment on the Stand. Leave undisturbed for duration of primary fermentation (time varies depending on the type of beer) Depending on the type of beer, choose a location that has a stable temperature. If brewing Ale, room temperature is fine F (18-21 C) Step 17: Once primary fermentation is complete, close the Union Valve, remove and empty the contents of the Mason Jar There is the option to harvest the yeast for reuse. Check out page for Tips! Step 18: Sanitize and clean the Mason Jar before reattaching (at this point you should also remove the mash bag if you are using one) 19
21 There s a Brewing video - Homebrewing Option 2: Brew-in-a-Bag Continued Step 19: Step 20: Step 21: Step 22: After re-attaching the Mason Jar, re-open the Union Valve Allow brew to sit for the remainder of secondary fermentation (times vary) When secondary fermentation is complete, turn off the Union Valve and remove the Mason Jar to discard the contents Your beer is now ready to bottle! Bottling/Kegging Day: Step 23: Wash, sanitize all beer bottles and place in a FastRack24. Also sanitize Hose, Hose Barb and Hose Clamp Step 24: Prepare priming solution Step 25: Add priming solution to FastFerment and stir gently Step 26: Wait for sediment to settle for minutes before proceeding Step 27: Attach the Filling Hose Attachment and the Filling Hose Step 28: Siphon beer into bottles leaving 1 (2.54cm) of space from the top and the cap Step 29: Clean FastFerment and other equipment Step 30: Let bottles sit in a room-temperature area and allow carbonation to take place Step 31: Wait 2-3 weeks. Cool Beers and crack one open with a friend! Homebrewing Option 3: All- Grain Brew Day (Follow Instructions on Ingredient Kit): Step 1: Clean and assemble FastFerment Step 2: Perform a leak test (use water) and when successful, sanitize all equipment Step 3: Gather ingredients purchased from your favorite homebrew shop Step 4: In a Mashtun, steep your milled grain in hot water 152 o F (67 o C) Step 5: Steep for one hour and pour into a boiling pot You may re-add this wort through the Mashtun to get out more sugar or run new water through sugar and pour into boiling pot 20
22 There s a Brewing video - Homebrewing Option 3: All- Grain Continued Brew Day (Follow Instructions on Ingredient Kit): Step 6: Take a sample of the wort and record a hydrometer reading Step 7: Bring wort to a boil Step 8: Keep on a rolling boil for 1 hour then begin adding hops according to brew schedule Step 9: Once the hour is up, it is time to chill the wort. Attach chiller to a cold water source and cool the wort. Cool until wort reaches pitching temp F (18-32 C) Step 10: Take hydrometer reading and record Step 11: Re-hydrate yeast Step 12: Add wort into FastFerment and then add yeast You have the option of sealing the lid and gently shaking the conical to aerate the wort for the yeast to grow or stirring vigorously Fermentation: Step 13: Seal the lid tight and place FastFerment in the stand (Leave undisturbed for duration of primary fermentation. Time varies depending on type of beer) Depending on the type of beer, choose a location that has a stable temperature. If brewing Ale - room temperature is good F (18-21 C) Step 14: Once primary fermentation is complete, close the Union Valve, remove and empty the contents of the Mason Jar There is the option to harvest the yeast for reuse. Check out page for Tips! Step 15: Sanitize and clean the Mason Jar before reattaching (at this point you should also remove the mash bag if you are using one) 21
23 There s a Brewing video - Homebrewing Option 3: All- Grain Continued Step 16: Step 17: Step 18: Step 19: After re-attaching the Mason Jar, re-open the Union Valve Allow brew to sit for remainder of secondary fermentation (times vary) When secondary fermentation is complete, turn off the Union Valve and remove the Mason Jar and discard the contents Your beer is now ready to bottle Bottling/Kegging Day: Step 20: Wash, sanitize all beer bottles and place in a FastRack24. Also sanitize Hose, Hose Barb and Hose Clamp Step 21: Prepare priming solution Step 22: Add priming solution to FastFerment and stir gently Step 23: Wait for sediment to settle for minutes before proceeding Step 24: Attach the Filling Hose Attachment Step 25: Put the Hose Clamp on the Hose and make sure it is closed. Then open the Union Valve to start filling beer into bottles. Try to minimize the exposure to the air. Fill the bottles so that the beer is about 1 (2.54cm) from the top and cap Step 26: Clean FastFerment and other equipment Step 27: Place bottles in a room-temperature area and let them sit to allow carbonation to take place A typical 2-gallon batch requires one case (24) of 12oz (355ml) bottles for bottling 22
24 Top 5 Frequently Asked Questions (FAQs) FastFerment FAQs are regularly updated on our website Go To - Click FAQs FastFerment 1. Valve is Leaking Through the Middle - IT S NOT BROKEN! The valve needs to be tighened. Over time, the middle of the valve may come loose and needs to be tightened using the handle as a wrench. Follow these instructions: Step 1 Step 2 Pop the handle off the valve Place the knobs in the matching divits Step 3 23 Tighten the valve in clockwise rotation To clean the valve, use the same instructions & remove the middle by rotating counter-clockwise
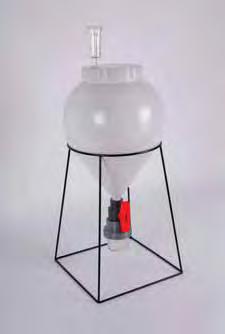
25 Top 5 Frequently Asked Questions (FAQs) Continued 2. The Valve is Clogging The valve clogs if there are large hops or peices of flavoring funneling down into the Mason Jar. The best way to ensure this doesn t happen is to use a muslin bag for everything inside and agitate the conical every so often. 3. Is the Valve Open or Closed During Fermentation? The valve should always be open during Fermentation to allow the trub or sediment fall into the Mason Jar for easy removal. The FastFerment is a closed system so the valve can be left open at all times. 4. Can I set the FastFerment down on the Collection Ball since it s Flat? NO WAY! It is not meant to sit on the collection ball and will 100% fall over, break and probably mess your entire floor. You MUST use the Stand when using the 3G FastFerment. 5. What Temperatures can the FastFerment Handle? Your FastFerment can handle 176 F (80 C) safely. If you go above this temperatures with any of the parts, we cannot guarantee them. FastFerment FAQs are regularly updated on our website Click FAQs FastFerment 24
26 Hydrometer Readings A hydrometer is an instrument used to measure the specific gravity of liquids. Measuring gravity is the same as measuring the density. We use it to determine how much fermentable sugar the wort or must contains. Sugar is more dense than water, so a solution such as wort with lots of sugars will have a higher reading. The more alcohol content in the liquid, the lower the reading will be. You should always try and take your reading using a sample of your liquid that is around 68 F (20 C). If the liquid is 41 F (5 C) higher, add and similarly, if it s 41 F (5 C) lower, take off Why Use A Hydrometer? Taking a hydrometer reading allows you to accurately test whether fermentation is complete. A hydrometer reading (taken before mixing with yeast) will also help you at the end when you are interested in calculating your alcohol content level. The first reading should be at the start of fermentation. Ensure your sample is 68 F (20 C). If not, wait until the sample is closer to this temperature for the most accurate reading. Starting/Original Gravity (OG) All beer and wine vary on their starting gravity. For wine, an average OG should be to For beer, the OG starts in the range. 25
 of space from the top for when inserting the hydrometer. Step 2: Insert your hydrometer into the test jar, giving it a little swirl to remove any bubbles from sticking to the sides.")
27 Hydrometer Readings Continued Taking Hydrometer Readings Step 1: Begin by pouring some wort or must into a hydrometer test jar leaving 2 (5.08cm) of space from the top for when inserting the hydrometer. Step 2: Insert your hydrometer into the test jar, giving it a little swirl to remove any bubbles from sticking to the sides. When recording your reading, ensure that you are at eye level and recording the lower of the two levels (see picture below). Step 3: Step 4: Take a second reading after primary fermentation Take a third reading at the end of secondary fermentation Finish Gravity (FG) The FG Should be (for dry wines) to (for sweet wines). A typical beer will have a FG at Calculating Alcohol Content To calculate the alcohol content, subtract the original gravity (OG) by the finish gravity (FG) and multiply that number by 131 (OG FG * 131). 26
28 Harvesting Yeast How to Harvest Yeast from FastFerment *These are just our suggestions, please consult multiple sources* Step 1: Step 2: Step 3: Step 4: Step 5: Step 6: Step 7: Step 8: Step 9: Step 10: Step 11: Attach the Mason Jar, open the Union Valve, add the wort and pitch the yeast Let fermentation start for 1-3 days As the trub settles over the first few days of fermentation, it can be discarded by cleaning out the Mason Jar. You should always wait 24 hours before switching out the the Mason Jar again so everything can settle. Trub will be characterized by a dark colour You should only change out the Mason Jar if the trub/sediment line is above the Union Valve. Try not to waste any beer. Once most of the trub has been discarded, wait 6-12 days for primary fermentation to be over. The Mason Jar should be filled with flocculated and dormant yeast ready to harvest Close the Union Valve and disconnect the Mason Jar Take the Mason Jar contents and put the rubber bung on tight to seal and store in fridge or cold dark area. You should use this live yeast within 2-4 weeks of harvesting maximum Sanitize the second the Mason Jar and reattach it to the FastFerment Open Union Valve to start secondary fermentation Small amounts of yeast and trub will continue to collect in Mason Jar. This can all be discarded at the end of complete fermentation To reuse your harvested yeast, simply pitch into your next batch by pouring the contents from the Mason Jar into the Conical Fermenter Vessel when it calls for yeast 27


29 7.9G FastFerment EN - Perfect for Gallon Batches - National Homebrew Competition Gold Medal Winner & 3 Competition Golds Brewed with FastFerment - Used by Dozens of Craft Brewers & One of Canada's Largest Breweries for Test Batches - Hundreds of 5-Star Online Ratings sold since 2014 Gold Medal Winning Beer & Wine Made in FastFerment FastWasher12 & FastWasher24 for FastRack12 & FastRack24 Wash, sanitize, drain & store all of your bottles with the FastWasher12 and FastWasher24 and the FastRack12 and FastRack24 FastRack12 FastRack24 28

30 14G FastFerment EN - Most affordable 14G conical fermenter available - Built on the gold medal winning design of the 7.9G FastFerment - Heavy Duty +33% Thicker vessel & collection ball than the 7.9G FastFerment +33% Thicker stand than the 7.9G FastFerment +33% Larger valve than the 7.9G FastFerment Stand Leg Extensions - Makes it easy to keg straight from the 14G FastFerment - Assembles into the stand included with the 14G FastFerment 29 Hop Filter - Works for both 7.9G & 14G FastFerments - Works for dry hopping, oak chips, grapes skins & other flavor infusions


31 7.9G & 14G FastFerment Accessories FastFerment accessories make it easier, and more enjoyable to make beer and wine. 7.9G & 14G 7.9G & 14G 7.9G Hop Filter Thermometer Insulated Jacket 3G, 7.9G & 14G 14G 7.9G Sample Port Stand Leg Extensions Carrying Strap 7.9G & 14G 3G, 7.9G & 14G Collection Balls Want Accessories? Find a Retailer page at: Stands Tell Us What you Want to See! 30
32 Contact Information FastBrewing & WineMaking Unit 105, 264 Queens Quay W. Toronto, ON, Canada M5J 1B Info@TheFastRack.ca We have a solid Customer Service so if you have any questions or concerns, please allow us to help before you look elsewhere. NEED HELP? Step 1: Go Step 2: Click on Product Videos Step 3: Read FastFerment FAQ s Step 4: If you can t find what you re looking for, send an to Info@FastBrewing.com 31 LIMITATION OF LIABILITY Full Throttle Parts Inc. and Axle Plastic Inc. shall not be liable for any liabilities, damages, costs, claims, suits or actions resulting from any breach, violation, or non-performance of any covenant, condition or agreement, whether in contract, tort, or any other action, resulting from any damages of any nature, including, but not limited to, damages for any loss of use,time, profits, savings, investment, or revenues to the extent that the same may be claimed at law for the use and enjoyment of FastFerment or any accessories, parts or any other material aspects associated with FastFerment.
Table of Contents USER MANUAL
 Table of Contents Introduction to the FastFerment... 2 FastFerment Standard Kit Contents... 3 FastFerment Starter Kit Contents... 4 FastFerment Part Descriptions... 5 Setting up the Wall Mounts... 6 Setting
Heron Bay Ultra Premium 6 Week Wine Kit
 Heron Bay Ultra Premium 6 Week Wine Kit 1. PRIMARY FERMENTER: Food grade plastic bucket of at least 30 litres (8 US GAL.) capacity. Use a lid to cover. 2. CARBOY: 23 litre (6 US GAL.) glass, narrow necked
Debris on equipment can harbor micro-organisms that could spoil your homemade ginger beer, even with proper sanitation.
 Homepage Brewing Steps Preparation Alcoholic Ginger Beer Non-Alcoholic Ginger Beer Cooling Fermentation Bottling BREWING PREPARATION Debris on equipment can harbor micro-organisms that could spoil your
WORLD VINYARDS WINE KITS
 WORLD VINYARDS WINE KITS INSTRUCTIONS PRIMARY FIRMENTATION Ensure that your primary fermenter is capable of holding at least 30 litres (7.9 US gallons) of volume. Pre-mark the primary fermenter at 23 litres
EN 7.9G EN USER MANUAL
 7.9G EN EN USER MANUAL Congratulations on your FastFerment Purchase! Now you will be able to make the best beer, wine, cider or mead in the comfort of your own home with the least amount of effort. Thank
Equipment Guide For Malt Extract Brewing
 Equipment Guide For Malt Extract Brewing Legal Notice No part of this ebook may be reproduced or transmitted in any form or by any means, electronic or mechanical, including photocopying, recording, or
Wine, Dry Red Recipe for 20 gallons, SteveG revised 2016-Sep-1
 Wine, Dry Red Recipe for 20 gallons, SteveG revised 2016-Sep-1 This recipe is for using 3 boxes of juice (called WineKit on Amazon.com). Each box of juice produce ~6+ gallons of wine. This recipe will
Brewing Tutorial Stove-top partial-boil with specialty grains
 Brewing Tutorial Stove-top partial-boil with specialty grains Step 1a: (Liquid Yeast Only) 3+ hours (preferably 1-2 days) before brewing, break the nutrient pack. Remove from the fridge and watch for swelling.
MR.BEER Hard Cider. You ll need the following:
 Instructions These instructions will familiarize you with the HARD CIDER BREWING PROCEDURES of the MR.BEER Home Brewing System. The included recipe will produce about 2 gallons (8 quarts) of 3.0% alc/vol
Necessary equipment. - Food grade fermenter or bucket with airtight lid - Airlock - Syphon tube - Bottles or a pressure barrel (keg) with S30 valve
 with S30 valve") Available from www.home-brew-online Necessary equipment - Food grade fermenter or bucket with airtight lid - Airlock - Syphon tube - Bottles or a pressure barrel (keg) with S30 valve A fermenter/bucket
Available from www.home-brew-online Necessary equipment - Food grade fermenter or bucket with airtight lid - Airlock - Syphon tube - Bottles or a pressure barrel (keg) with S30 valve A fermenter/bucket
Mad Millie Beer Kit Instructions KIT. Approx time. 1 HOUR (hands on time, ready in 4 weeks).
.") BREW IT YOURSELF KIT Approx time 1 HOUR (hands on time, ready in 4 weeks). Make your own refreshing lager with Mad Millie. It ll go down even smoother knowing you made it yourself. This kit includes all
BREW IT YOURSELF KIT Approx time 1 HOUR (hands on time, ready in 4 weeks). Make your own refreshing lager with Mad Millie. It ll go down even smoother knowing you made it yourself. This kit includes all
MBAA DISTRICT ST. LOUIS. Home Brewing System. Rev 1.5 3/6/2010
 MBAA DISTRICT ST. LOUIS Home Brewing System Rev 1.5 3/6/2010 This document is a guide to use and cleaning of the brewing system. Comments on safe use of this system are included to make you aware of many,
Deluxe Hand Pump Pressurized Beer Line Cleaning Kit Instruction Manual
 Deluxe Hand Pump Pressurized Beer Line Cleaning Kit Instruction Manual 1. Cleaning Bottle 6. Siphon Tube 2. Pump 7. Screw Cap 3. Duplex Coupler 8. Faucet Brush 4. Plastic Hose Barb 9. 3/16" I.D. Plastic
Learn to Home Brew: A Series of Tutorials Using Mead
 Learn to Home Brew: A Series of Tutorials Using Mead I wanted to learn to make red wine, but since I had never done so and did not have nearby friends to brew with, I decided to teach myself using online
Honey Wheat Ale The Home Brewery All Grain Ingredient kit
 Honey Wheat Ale The Home Brewery All Grain Ingredient kit This ingredient kit is designed to produce 5 gallons of our Honey Wheat Ale using the All Grain method. All-grain brewing is a little more involved
All in One Wine Pump. Rack-Bottle-Degas-Filter
 All in One Wine Pump Rack-Bottle-Degas-Filter Thank you for purchasing the All in One Wine Pump. We are confident this unit will make racking, bottling, degassing and filtration operations quick, simple
CLEAR BEER DRAUGHT SYSTEM INSTRUCTIONS FOR USE
 CLEAR BEER DRAUGHT SYSTEM Thank you for purchasing the Clear Beer Draught System. This product will provide a lifetime of trouble free service and enhance the quality of your homebrewed beer. A lot of
Natural quality pure enjoyment
 DRAUGHT BEER GUIDE Natural quality pure enjoyment Since 1872, Schneider Weisse has been brewed with highest diligence according to the recipe of the brewery s founder, Georg Schneider Ist. For Schneider
BrewKeg25 TM User Manual
 BrewKeg25 TM User Manual OVERVIEW 0 PROCESS SUMMARY 02 SETTING UP YOUR BREWKEG25 TM SET UP 03 EQUIPMENT 03 STEP : CLEAN 04 STEP 2: MIX 06 STEP 3: ADJUST 07 STEP 4: DISPENSE 0 RECEIVE OUR 3 MOST POPULAR
Smart Valve Cold Brew Coffee Maker { Instruction Manual
 Smart Valve Cold Brew Coffee Maker { Instruction Manual Table of Contents Important Safeguards... 2 Glass Decanter Safety Precautions... 3 Getting to Know Your Cold Brew Coffee Maker... 4 Easy-Grab Tab
COUNTRY-STYLE WINE MAKING by an old female wine maker
 COUNTRY-STYLE WINE MAKING by an old female wine maker. 5-1-2012 PART 1 EQUIPMENT Fruit or juice A gallon glass jug or other fermentation vessel, or 4 liter wine jug. An air (fermentation) lock for each
MK5E 5 LITRE POT STILL
 MK5E 5 LITRE POT STILL PATENT APPLICATION N0. 331170 SPIRITS UNLIMITED LTD 60 STAFFORD ST TIMARU Phone 03 6880801 Website www.spiritsunlimited.co.nz Email Spirits.Umlimited@xtra.co.nz C 1999 Spirits Unlimited
Canning and Preserving the Harvest FALL 2018
 Canning and Preserving the Harvest FALL 2018 Course Objectives Demonstrate how to safely and properly extend the shelf life of foods. Demonstrate use of various preservation methods including canning,
YEAST STARTERS. Brewers make wort, YEAST MAKE BEER. A few keys to turning GOOD homebrew into GREAT homebrew
 & YEAST STARTERS A few keys to turning GOOD homebrew into GREAT homebrew Fermentation temperature control Proper oxygenation Yeast health & proper pitching rates Brewers make wort, YEAST MAKE BEER Purpose
5 GALLON WATER/ALCOHOL DISTILLER
 5 GALLON WATER/ALCOHOL DISTILLER! ATTENTION! PLEASE READ THESE INSTRUCTIONS BEFORE USING THIS DEVICE Model# 048-GM-48371 OWNER S MANUAL NOTICE: If your package is missing parts or you are having issues
COLD BREW SYSTEM. Brewing Guide Toddy, LLC. All rights reserved.
 COLD BREW SYSTEM Brewing Guide 2017 Toddy, LLC. All rights reserved. COLD BREW SYSTEM PARTS LIST Toddy s time tested cold-water brewing process unlocks the natural, delicious flavors of your favorite coffees
BREWING WITH EXTRACT FERMENTATION BOTTLING
 BREWING WITH EXTRACT FERMENTATION BOTTLING WELCOME TO THE WORLD OF MAKING HOME-BREWED BEER! Everything you need to know to turn water, malt, hops, and yeast into a delicious beer to enjoy and share with
THE SPARK 500 SYSTEM FEATURES
 THE SPARK 500 The Spark 500 features exceptional materials, fabrication and digital control in a brewer-focussed design. Modular and expandable, a compact installation can easily grow into a large scale
Clean and sanitize hot sundae topping pumps Weekly SS 1 W3
 Clean and sanitize hot sundae topping pumps Weekly SS 1 W3 Why To break the bacteria cycle Time required 5 minutes to prepare 30 minutes to complete Time of day During 14 day brush cleaning During 14 day
GAS BARBECUE MODEL NO: BBQ4 USER GUIDE PART NO: /11
 GAS BARBECUE MODEL NO: BBQ4 PART NO: 6925305 USER GUIDE 2/11 INTRODUCTION Thank you for purchasing this CLARKE product Before attempting to use this product, please read this manual thoroughly and follow
Barista Practice & Equipment Maintenance Coaching Sheets
 Co a c h ing Sh eet Barista Practice & Equipment Maintenance Coaching Sheets Tel l, Sh o w, Co a c h Cleaning a Shaerer Espresso Machine The espresso machine is a critical piece of equipment in your store.
Hints 02. Previous Hints
 Caring for your yeast Sanitising your equipment How to do a wet run Adding the yeast Keeping the temperature right Using the lid clips Signs of fermentation De-gassing a sample More Hints Hints 02 How
STAINLESS STEEL GAS BARBECUE MODEL NO: SSBBQ4 USER GUIDE PART NO: /11
 STAINLESS STEEL GAS BARBECUE MODEL NO: SSBBQ4 PART NO: 6925310 USER GUIDE 2/11 INTRODUCTION Thank you for purchasing this CLARKE product. Before attempting to use this product, please read this manual
Honey Stick Machine Complete Kit HH-100
 Honey Stick Machine Complete Kit HH-100 501 1st St S, Hackensack, MN 56452 500 Santa Anita Dr., Woodland, CA 95776 485 Stewart Rd, Wilkes-Barre, PA 18706 1600 Commerce Street, Marshall, TX 75672 Telephone:
General Supplies
 Compile your list and call us to place your order 505.883.0000 or email it to: yourfriends@victorshomebrew.com General Supplies Category Department Description Price General Additive Acid Blend 1lb 7.69
How to make your own wine at home...and have lots of fun..
 How to make your own wine at home..and have lots of fun.. Introduction Winemaking is art & science at the same time! Questions - Why would you want to do it? - Is it legal? - Is it safe? - Is it expensive?
Draught System Troubleshooting & Reference Manual
 Draught System Troubleshooting & Reference Manual BeerTech.ca Parts Of A Basic System Beer Line Keg Coupler High Pressure Gauge Regulator Low Pressure Gauge Regulator Coupling Nut Drum Valve Set Screw
5 Litre Party Keg Manual
 5 Litre Party Keg Manual These compact party kegs let you keg your beer and serve it on tap without the need for gas bottles, pressure regulators, cooler plates with ice and a mess of hose pipes and couplers.
EURO 5 STAINLESS STEEL REFLUX STILL
 EURO 5 STAINLESS STEEL REFLUX STILL IMPROVED VERSION 2007 HEAT UP TIME: 1 HOUR DISTILLATION TIME: 1 HOUR 40 MINS PRODUCTION: 500MLS @ 92% Patent Application Number 331170 FINISHED PRODUCT: 1150MLS @ 40%
1. IMPORTANT SAFEGUARDS When using electrical appliances, basic safety precautions should always be followed to reduce the risk of fire, electric
 1. IMPORTANT SAFEGUARDS When using electrical appliances, basic safety precautions should always be followed to reduce the risk of fire, electric shock, and/pr injury to persons including the following:
Honeyflow. Farm. Beginners. Winemaking. Kit
 Honeyflow Farm Beginners Winemaking Kit This kit contains: Honeyflow Farm Winemaking Booklet Presque Isle Wine Cellars Beginner s Book of Winemaking Cambden Tablets 1 package of Pasteur Red Wineyeast 1
STEAM CANNER Instruction Manual
 STEAM CANNER Instruction Manual Register this and other Focus Electrics products through our website: www.registerfocus.com Operating Precautions... 2 Steam Canning At A Glance... 2 Using Your Steam Canner...
Solubility Lab Packet
 Solubility Lab Packet **This packet was created using information gathered from the American Chemical Society s Investigation #4: Dissolving Solids, Liquids, and Gases (2007). It is intended to be used
Microbiologist. QA Lab at Boulevard Brewing Co. Production QA Member of A.S.B.C. Sensory Specialist, Beer Judge
 Microbiologist Jennifer Helber Lab Science, Etc. QA Lab at Boulevard Brewing Co. Production QA Member of A.S.B.C. Sensory Specialist, Beer Judge Consultant Lab Science, Etc. K.C. Beer Pairing Examiner
Pressure Canning Wort and Yeast Starters SFHG Meeting Anchor Brewing Company April 16, 2013 Matt
 Pressure Canning Wort and Yeast Starters SFHG Meeting Anchor Brewing Company April 16, 2013 Matt Murray mhm@mac.com @mhm Disclaimer: I'm no expert, I've only pressure canned once so far, but I have done
Step-by-Step Fresh Preserving of High-Acid Foods
 Introduction Because they are relatively easy to preserve, foods containing high amounts of acid are a popular choice for fresh preservers. These foods provide you with the opportunity to prepare and enjoy
Quick Start Guide Read this booklet thoroughly and save these instructions.
 Quick Start Guide Read this booklet thoroughly and save these instructions. FAQs can be found at www.espresso-works.com Email us for any unanswered questions: cs@espresso-works.com For product registration,
IMPORTANT INSTRUCTIONS MODE D EMPLOI IMPORTANT INSTRUCIONES IMPORTANTES ISTRUZIONI IMPORTANTI
 MOKA 22-04-2003 10:10 Pagina 1 IMPORTANT INSTRUCTIONS SAVE THESE INSTRUCTIONS MODE D EMPLOI IMPORTANT CONSERVEZ LES PRESENTES INSTRUCTIONS INSTRUCIONES IMPORTANTES GUARDE ESTAS INSTRUCCIONES ISTRUZIONI
For Jura parts, repairs & tech support, contact: Services Unlimited, Inc./ Parts Guru
 For Jura parts, repairs & tech support, contact: Services Unlimited, Inc./ Parts Guru 209 Walnut street, Lansdale, PA 19446 Phone: 215-362-7000 Fax: 215-361-7434 email: sales@partsguru.com Online store
InfuSsion Mash Tun. Quick Reference Guide
 InfuSsion Mash Tun Quick Reference Guide Stainless Steel Prep Pre-Clean: Prior to first time use, thoroughly wash all surfaces of the mash tun, including all valves and fittings, with Tri-Sodium Phosphate
Introduction. No Hassle Guarantee
 Pro Grill MANUAL Introduction Thank you for selecting West Marine s Pro Grill. Your unit has been carefully inspected and tested. The Pro Grill is one of the finest barbecues manufactured for marine use.
What You ll Need Notes: Create a Water Jacket Notes:
 What You ll Need Despite the proliferation of yogurt makers on the market, everything you need to make yogurt is probably already in your kitchen, with the possible exception of the thermometer. Specifically,
COFFEE MAKER INSTRUCTION MANUAL CM4682-V
 COFFEE MAKER INSTRUCTION MANUAL CM4682-V IMPORTANT SAFEGUARDS Before using the electrical appliance, the following basic precautions should always be followed including the following: 1. Read all instructions.
PickYourOwn.org. Where you can find a pick-your-own farm near you!
 PickYourOwn.org Where you can find a pick-your-own farm near you! Click on the printer icon that looks like this: (at the top left, to the right of save a copy ) to print! See www.pickyourown.org/alllaboutcanning.htm
WineEasy TM Combined Fermentor and Press
 WineEasy TM Combined Fermentor and Press Operation, Assembly & Maintenance Manual for Article number Article 015.335.20 WineEasy Fermenator 75 liter (20 gallon) 015.335.30 WineEasy Fermenator 113 liter
Genius simple solution to the trub pile. UKBrewer
 The TrübTrapper is a beer homebrewing boil kettle filtration system designed to capture the trub in your boil kettle, and keep this unwanted material out of your fermenter, and your beer. It s incredibly
Iced Coffee Maker. Instruction Manual
 Iced Coffee Maker Instruction Manual Customer Service Contact: Product Info: sales@hyperchiller.com Capacity: 12.5 fl. oz. Note: Product can be used twice before requiring refreezing Hyperbius, Inc. 8140
Installation and User Instructions Flushing System Kit
 Installation and User Instructions Flushing System Kit Model: ACFS Part No. 102532 Rev. A Copyright 2007 Dacor All rights reserved. All specifications are subject to change without notice. Dacor assumes
Installation & Parts Manual 2" & 3" High Capacity Strainers For Class 1, Petroleum Applications
 Installation & Parts Manual 2" & 3" High Capacity Strainers For Class 1, Petroleum Applications Installation: M200-20 www.lcmeter.com Table of Contents Description Page Number Introduction... 2 What LC
Lusso / Espresso Si' Models:PL-16 PAB-16. Made In Italy
 Lusso / Espresso Si' Models:PL-16 PAB-16 Made In Italy la pavoni - PL-16 & PAB-16 We recommend using freshly roasted espresso beans ground medium to fine. Fresh coffee will produce better tasting espresso.
phd Pitcher UltraWater Owner s Manual Delicious Great Tasting Antioxidant Alkaline Energized
 Owner s Manual UltraWater phd Pitcher Delicious Great Tasting Antioxidant Alkaline Energized READ ME FIRST! 1. Be sure to flush your UltraWater filter before using the first time. (See Instructions for
pico interactive instruction manual
 pico interactive instruction manual Pro You can navigate through chapters by clicking on the tabs here. Clicking on the PicoBrew logo will take you back to the Table of Contents. Pro pico instruction manual
USING STEEPING GRAINS BREWING WITH EXTRACT FERMENTATION BOTTLING 5 GALLON KIT
 USING STEEPING GRAINS BREWING WITH EXTRACT FERMENTATION BOTTLING 5 GALLON KIT WELCOME TO THE WORLD OF MAKING HOME-BREWED BEER! Everything you need to know to turn water, malt, hops, and yeast into a delicious
Advanced Yeast Handling. BFD education Kai Troester
 Advanced Yeast Handling BFD education Kai Troester Agenda Why yeast storage Short term Long term Yeast Harvesting Yeast washing Sterile techniques Yeast propagation Equipment Why yeast storage Yeast is
IMPORTANT SAFEGUARDS. When using electrical appliances, basic safety precautions should always be followed, including the following:
 IMPORTANT SAFEGUARDS When using electrical appliances, basic safety precautions should always be followed, including the following: 1.Read all instructions. 2.Do not touch hot surfaces. Use handles or
Coffeemaker User's manual
 Coffeemaker User's manual EN Prior to using this appliance, please read the user's manual thoroughly, even in cases where you have previously familiarised yourself with the operation of similar types of
Simplified Braumeister and related brewing equipment operating instructions
 Simplified Braumeister and related brewing equipment operating instructions Before starting the brewing process, you will need to activate any provided and already warmed Wyeast yeast packages (if your
Brewie - Starter`s Guide
 Brewie - Starter`s Guide Table of contents Starter's Guide Assembling the Brewie+ First steps Brewing Fermentation Cleaning Starter's Guide Assembling the Brewie+ UNPACKING Never set up Brewie+ alone.
TEA CATER USER MANUAL. UM_EN Part No.:
 USER MANUAL UM_EN Part No.: 1730080-02 CONTENT CONTENT... 2 GENERAL... 4 Introduction...4 Warnings...4 Precautions...4 Intended use...4 Facts & weight...5 General functional description...5 OVERVIEW OF
5KEK1322 W A_v08.indd 1 5/13/16 2:25 PM
 5KEK1322 W10878653A_v08.indd 1 PARTS AND FEATURES PARTS AND ACCESSORIES Tea steeper lid (center section of lid with handle) Kettle lid (outer section) Stainless steel lime scale filter Removable stainless
How to make a Fruit Mead (A Melomel)
") How to make a Fruit Mead (A Melomel) StormTheCastle.com and Kalif Publishing This is a short and informative guide to successfully making a fruit mead. Fruit mead is mead that has some kind of fruit added.
How to make a Fruit Mead (A Melomel) StormTheCastle.com and Kalif Publishing This is a short and informative guide to successfully making a fruit mead. Fruit mead is mead that has some kind of fruit added.
EN Electric Coffee Grinder
 SCG 5050BK EN Electric Coffee Grinder - 1 - EN Electric Coffee Grinder Important safety instructions READ CAREFULLY AND STORE FOR FUTURE USE. This appliance may be used by persons with physical or mental
Everything you need to know to operate your Sauce Master TM!
 Everything you need to know to operate your Sauce Master TM! See page 3 for assembly. See pages 4-5 for basic recipes and hints. See pages 6-10 for delicious recipes! See page 11 for accessories. See pages
THE GR THER A AINF AINF A THER THE GR
 Craft beer has taken the world by storm. Now, the Grainfather offers you endless possibilities to brew craft beer just like the professional brewer at home. Featu All in one Mash, sparge, boil and cool
WARRANTY. Stainless Steel Steam Tray
 WARRANTY LIMITED WARRANTY Aroma Housewares Company warrants this product free from defects in material and workmanship for one year from provable date of purchase in the United States. Within this warranty
5KCG0702 W A_Final.indd 1 8/4/15 8:35 AM
 5KCG0702 PARTS AND FEATURES PARTS AND ACCESSORIES Hopper lid Easy access stainless steel burrs 200 g glass hopper 15 grind settings Die cast metal body Grind control dial Power switch Faceplate assembly
K Mini Plus. Use & Care Guide. Get the most from your new Keurig brewer
 K Mini Plus Use & Care Guide Get the most from your new Keurig brewer STRONG STRONG Before You Brew 1 Plug & Power 2 Fill & Place Remove packing tape from brewer. Pull plug and extend cord from cord storage
AN OVERVIEW OF THE BREWING PROCESS. Jared Long Head Brewer Altitude Chophouse and Brewery
 AN OVERVIEW OF THE BREWING PROCESS Jared Long Head Brewer Altitude Chophouse and Brewery jared@altitudechophouse.com Water Objective: understand your water, but don t obsess over it. ph alone doesn t
General Winemaking Instructions
 General Winemaking Instructions Introduction to Winemaking You must enjoy wine if you are deciding to make your own. Now you will have even more pleasure when you take that first sip of your own wine.
Dick Hodgman s Recipes
 Vanilla Cream Soda 8 oz. club soda 1 tbs. heavy cream ¼ tsp. vanilla extract 2 3 tsp. sugar Pour the club soda over ice in a glass. Mix in the cream and vanilla. Gently but thoroughly mix the sugar. Adjust
Forward Sealing Beer Faucets
 Forward Sealing Beer Faucets 1 Forward Sealing Faucets Perlick s Forward Sealing Stainless Steel Faucets feature a revolutionary ball and floating O-ring design, which eliminates the need for a valve.
Table of Contents. *For the most up-to-date manual, or for more information regarding this product, visit our website:
 VKP1160 Table of Contents Parts List & Diagram...1 Operating Precautions...2 Cleaning Instructions...2 Accessories...2 Assembly & Use Instructions...3 Tips & Recipes...4 Warranty/Contact Info... Back Cover
Features. Before first use
 Round Dutch Oven Features Colorful exterior enamel is shock-resistant to prevent chipping and cracking Sand-colored interior enamel has a smooth finish that promotes caramelization, prevents sticking and
OPERATING MANUAL. Sample PRO 100 Series. Electric Heating. Applies to Versions: SPE1*, SPE2, SPE4, SPE6
 OPERATING MANUAL Sample PRO 100 Series Electric Heating Applies to Versions: SPE1*, SPE2, SPE4, SPE6 NOTE: All electrically heated roasters in the Sample PRO 100 Series are modular and this manual applies
PickYourOwn.org. Where you can find a pick-your-own farm near you!
 PickYourOwn.org Where you can find a pick-your-own farm near you! Click on the printer icon that looks like this: (at the top left, to the right of save a copy ) to print! See www.pickyourown.org/alllaboutcanning.htm
Silly Science. Bouncy Ball 3 clear cups (5 ounce plastic cups work well) water Borax White liquid glue (PVA) Food coloring 2 spoons
 water Borax White liquid glue (PVA) Food coloring 2 spoons") Silly Science Most of these do not take much time they were part of a challenge run over two hours during which time participants had to complete as many experiments as they could. Bouncy Ball 3 clear
Silly Science Most of these do not take much time they were part of a challenge run over two hours during which time participants had to complete as many experiments as they could. Bouncy Ball 3 clear
Electric Two-Speed Drink Mixer
 Electric Two-Speed Drink Mixer MS2090 Series Before use, please read this manual thoroughly and save for future reference. ovente.com Electric Two-Speed Drink Mixer MS2090 Series 2 ovente.com ELECTRIC
pico interactive instruction manual
 pico interactive instruction manual You can navigate through chapters by clicking on the tabs here. Clicking on the PicoBrew logo will take you back to the Table of Contents. pico instruction manual craft
IMPORTANT SAFEGUARDS. 3. To protect against fire, electric shock and injury to persons do not immerse cord, plug or unit in water or other liquid.
 IMPORTANT SAFEGUARDS When using electrical appliances, basic precautions should always be followed, including the following: 1. Read all instructions. 2. Make sure that your outlet voltage corresponds
PUFF PASTRY ROLLS WITH ALMOND PRALINE CUSTARD CREAM
 PUFF PASTRY ROLLS WITH ALMOND PRALINE CUSTARD CREAM Makes 12 to 16 By Dennis W. Viau; an original recipe. Using puff pastry dough makes these pastries easier to prepare, allowing more time to be devoted
Making Beer at Home, with Keith Blaylock
 February 26, 2009 Bigfork s Essential Stuff Newsletter -- Bringing People Together A Publication of the Essential Stuff Project, Bigfork, Montana Making Beer at Home, with Keith Blaylock Keith challenged
HEAD BREWER JOB DESCRIPTION:
 37 Milford St. Hamilton, NY 13346 315-824-1560 HEAD BREWER JOB DESCRIPTION: Title: Head Brewer As an employee of Good Nature Brewing, Inc. you will have many tasks on any given day. Many of these tasks
5 Moonshine Recipes You'll Be Over-The-Moon About!
 5 Moonshine Recipes You'll Be Over-The-Moon About! Categories : Homesteading, Recipes, Self-Sufficiency So you're looking for some moonshine recipes? That's quite understandable as there are few things
Hand Crank Ice Shaver VKP1099
 Hand Crank Ice Shaver VKP1099 Table of Contents Parts List & Diagram...1 Operating Precautions...2 Accessories...2 Use & Care Instructions...3 Creating Treats & Recipes...4 Warranty/Contact Info... Back
Step 1: Making the wash Add your choice of cleared fermented wash to the boiler.
 INSTRUCTIONS: Step 1: Making the wash Add your choice of cleared fermented wash to the boiler. Step 2: Prepare the Alembic Pot Still 1. Attach the copper condenser arm to the copper dome by removing the
MICRO Brewed DIY BEER BREWING GUIDE
 MICRO Brewed DIY BEER BREWING GUIDE No one knows the heroic individual that invented beer, which is probably for the best since we would erect a continent-sized monument and designate every calendar day
AS450, AS600, G1, SG630
 Grill Range Operating Manual Grill Range AS450, AS600, G, SG60 Product Range Also Includes: Induction Hobs / Combination Ovens / Pizza Ovens / Mixers Salamander Grills / Contact Grills / Pie Warmers /
Micro Casa Semiautomatica
 Micro Casa Semiautomatica Training Manual Contents Overview 1 Models 1 Specifications 1 Features 1 Available accessories 1 Package contents 2 Semiautomatic parts 3 Assembly 4 Operating instructions 4 Starting
A Brief Comparison of Four Beer Fermentation Systems
 A Brief Comparison of Four Beer Fermentation Systems These pages will attempt to address the various advantages and possible drawbacks of each particular system when used by home brewers. A single fermentation
Wood- and Barrel-Aging. Part 2: Small Barrel Handling
 Wood- and Barrel-Aging Part 2: Small Barrel Handling A quick primer Barrels come in a variety of sizes, from homebrewer-sized 5, 8 and 10 gallons, to commercial 59 gallon wine and whiskey barrels and beyond.