ASSEMBLY, USE AND INSTRUCTION MANUAL
|
|
|
- Michael Ball
- 5 years ago
- Views:
Transcription
1 ASSEMBLY, USE AND INSTRUCTION MANUAL Meteor GG EN 6+1 Black EDITION! READ THE OPERATING INSTRUCTIONS BEFORE USING THE APPLIANCE. FOR OUTDOOR USE ONLY.
2 Contents Warnings Technical data...4 Gas category...4 Explotion drawing... 5 Parts list... 6 Hardware...7 Assembly instructions...8 Gas leak test Connecting gas...21 Before using the grill Grilling tips...23 Lighting instructions...24 Warnings...25 Maintenance...26 Cleaning...26 Troubleshooting...27 Consumer Contact
3 WARNINGS!! Failure to follow the instructions provided can imply a risk of serious injury to personnel and fixed installations.! Some grill parts can be sharp, we recommend wearing gloves when assembling and lifting. Sharp edges can cause injury.! The grill is intended for outdoor use only in well-ventilated areas. Never grill in enclosed spaces or under a roof, due to the danger of the lack of oxygen.! Accessible parts of the grill become very hot during use. Keep children and others who need supervision at a safe distance.! Do not move the grill while in use or connected to the gas bottle. Shut off the gas on the regulator after use and disconnect from the gas bottle.! Modification of the grill can cause danger and will invalidate the warranty.! Never keep the gas bottle under the grill when in use. Gas leaks can cause serious damage. Place the gas bottle by the side of the grill during use.! Do not place the grill cover or other flammable material in the compartment under the grill when it is in use or hot.! Do not use lava stones, charcoal or briquettes.! Clean the grill regularly and thoroughly. 3
: Must be approved according to EN standard. Gas bottle (not included): Use standard bottle approved for use in the Nordic Region, 10/11 kg recommended.")
4 Technical data - Meteor 6+1 L: 154 cm Total effect: 20,22 kw (main burner heat input 6 x 2,88 kw) H: 128 cm D: 58 cm Total gas consumption: 1472 g/h. Hose and regulator (not included): Must be approved according to EN standard. Gas bottle (not included): Use standard bottle approved for use in the Nordic Region, 10/11 kg recommended. Even though butane and propane gas can be used, we recommend propane for use in the Nordic Region. Approved hoses and regulators are available from most outlets selling gas equipment. NB! Gas hoses used for this product must not exceed 150 cm in length. Gas information USE IN COUNTRIES BE, CY, CZ, DK, EE, FI, FR, HU, IT, LT, NL, NO, SE, SI, SK, RO, HR, TR, BG, IS, LU, MT VALVE SIZE GAS TYPE GAS CATEGORY 0.84 mm G30(butan), G31(propan) and mixture of these, LPG 28~30 mbar I3B/P(30) This product is produced according to EUROPEAN GAS APPLIANCE STANDARD EN498 AND EN484 and is CE certified. 4


5 Explotion drawing 5
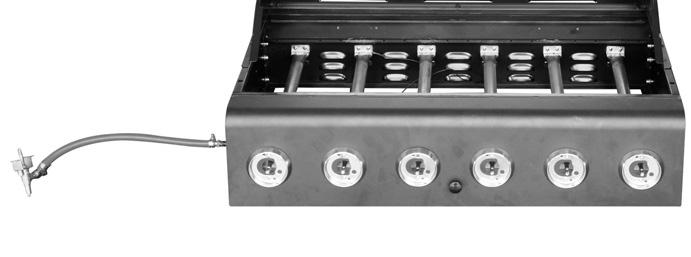
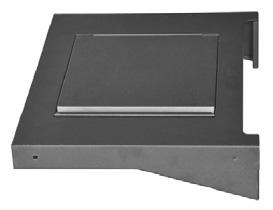
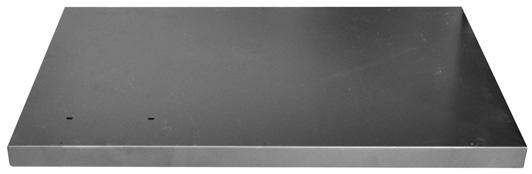
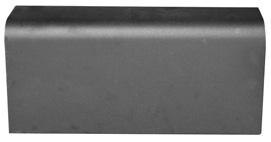
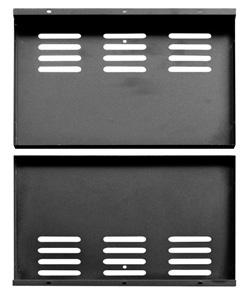
6 Parts list Code Part QTY + = Pre-assembled HOOD A1 Hood (Pre-Assembled to Body) 1 + A2 Hood Handle 1 + A3 Warming Rack 1 B1 Barbecue Body 1 B2 Burner 6 + B3 Control Panel 1 + B4 Knob 6 + BODY TROLLEY HARDWARE B5 Flame Tamer 6 B6 Cooking Grill 2 B7 Drip Tray Left Bracket 1 B8 Drip Tray Right Bracket 1 B9 DrIp Tray 1 B10 Ignition Button 1 C1 Side Burner Shelf 1 C2 Side Burner Shelf Panel 1 C3 Side Shelf 1 C4 Side Shelf Panel 1 C5 Side Burner Grid 1 C6 Knob Bezel 1 C7 Side Burner Knob 1 C8 Side Burner 1 C9 Left Front Leg 1 C10 Left Rear Leg 1 C11 Right Front Leg 1 C12 Right Rear Leg 1 C13 Side Panel 4 C14 Upper Body Support 1 C15 Storage Box Handle 1 C16 Storage Box 1 C17 Front Panel 1 C18 Bottom Panel 1 C19 Axle 1 C20 Wheel 1 C21 Wheel Hubcap 1 C22 Electronic Ignition Assembly 1 C23 Heat Shield 1 D1 ST4.0x10 Screw 30 D2 M4 Step Bolt 4 D3 M4x10 Bolt 3 D4 M6 Nut 12 D5 M6x15 Bolt 16 D6 M6x40 Bolt 16 D7 Locknut 2 When ordering spare parts, please use the code from parts list found here. 6

7 Hardware The following screws and nuts are supplied with the grill and must be fitted. 7

 01 02 03 04 05 06 07 08 09 0")


8 Assembly instructions Please follow these instructions step by step. We recommend two people to assemble the grill to avoid heavy lifting. TOOLS FOR ASSEMBLING (NOT INCLUDED) Medium size flat blade or Philips/cross-point screwdriver Adjustable spanner or metric spanner set NB! Exercise caution when using electric tools their strength can damage the screws. Ruler 1 1Attach the Left Legs (C9,C10) to the Side Panels (C13) using ST4.0x10 Screws (D1x8pcs) as shown. 8
 to")
 using ST4.")
 as shown.")

 and right")
 to the Bottom")

9 2Attach the Left Legs (C11,C12) to the Side Panels (C13) using ST4.0x10 Screws (D1x8pcs) as shown. 3Attach the left cabinet panel assembly (C9, C10, C13) and right cabinet panel assembly (C11, C12, C13) to the Bottom Panel (C18) using M6x40 Bolts (D6x8pcs) and M6 Nuts (D4x8pcs) as shown. 9

")


.")


10 4 Install Front Panel (C17) between left / right front legs using ST4.0x10 Screws (D1x4pcs). 5Attach the Upper Body Support (C14) to the front legs using M6x15 Bolts (D5x4pcs) as shown. 10


 as")

11 6Install the storage box (C16) between left / right front legs using M4 Step Bolts (D2x4pcs) as shown. 7Attach Drip Tray Left Bracket (B7) to the right legs using ST4.0x10 Screws (D1x2pcs) as shown. Repeat above process for Drip Tray Right Bracket (B8). 11

")
 to the")

")


12 8Fix the Electronic Ignition Assembly (C22) and Heat Shield (C23) to the front left leg by inserting two ST4.0x10 Screws (D1x2pcs) through the electronic ignition assembly and heat shield and screwing into the front left leg. 9Remove the retaining bolts from Storage Box Handle (C15), and then attach it onto Storage Box (C16) using the retaining bolts. 12
.")


 onto the cabinet structure and")


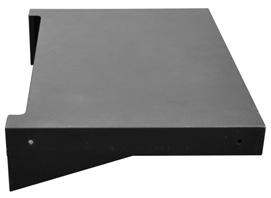
13 10 Unscrew the Locknuts (D7) from both ends of the Axle (C19). Slide the axle through the corresponding holes in the left legs. Slide the Wheels (C20) over each end of the axle. Secure the wheels into place with the locknuts. Place the wheel Hubcaps (C21) onto the outsides of the wheels. 11 Carefully place the Barbecue Body (B1) onto the cabinet structure and fix using M6x40 Bolts (D6x8pcs) as shown. WARNING: DO NOT RELEASE THE BARBECUE BODY WHILE THE BARBECUE HAS NOT BEEN PROPERLY SEATED. THIS MAY RESULT IN INJURY OR DAMAGE TO YOUR BARBECUE. CAUTION! Care must be taken to ensure the hood or lid does not fall open unexpectedly or becomes damaged when it is set on the ground. 13


 onto")


.")
14 12 Press the knobs (B4)onto valve stems as shown. 13 Attach Side Burner Shelf Panel (C2) onto Side Burner Shelf (C1) using M6x15 Bolts (D5x2pcs) and M6 Nuts (D4x2pcs). 14


 as")


 as")


15 14 Attach the side burner shelf assembly to the barbecue body using ST4.0x10 Screw (D1x2pcs) and M6x15 Bolts (D5x4pcs) as shown. 15 Attach the side burner valve and Knob Bezel (C6) onto side burner shelf using M4x10 Bolts (D3x2pcs) as shown. Press the Side Burner Knob (C7) onto side burner valve stem. 15
")
 using M6x15")


 through the")


16 16 Attach Side Shelf Panel (C4) onto Side Shelf (C3) using M6x15 Bolts (D5x2pcs) and M6 Nut (D4x2pcs) as shown. 17 Feed the venturi tube of the Side Burner (C8) through the hole in bottom of the side burner shelf, and fix it onto side burner shelf using a M4x10 Bolt (D3x1pcs) as shown. Make sure that the end of venturi tube is set over the gas outlet of side burner valve. Connect the electronic wire onto the electrode. 16

 as shown.")


")

17 18 Attach the side shelf assembly to the barbecue body using ST4.0x10 Screw (D1x2pcs) and M6x15 Bolts (D5x4pcs) as shown. Electronic Ignition Assembly Diagram 19 Connect the wires to the electronic ignition assembly as shown in the diagram in the next step. Insert the electronic ignition battery (not supplied) into the battery compartment, ensuring the battery is correctly installed according to the (+) (-) markings. 17
 into the barbecue")


 onto the side burner shelf.")


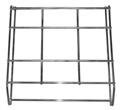
18 20 Carefully lay the Flame Tamer (B5) into the barbecue body ensuring it lies level within the body. Lay the Cooking Grill (B6) into place. 21 Place the Side Burner Grid (C5) onto the side burner shelf. NOTE: Make sure the base of cooking utensil to put on the side burner is larger than 150mm and smaller than 220mm. Attach the Warming Rack (A3) to barbecue body as shown. 18
 by sliding it")


19 22 Insert the Drip Tray (B9) by sliding it underneath the barbecue body. 23 ASSEMBLY IS NOW COMPLETE. PROCEED TO THE NEXT PAGE FOR INSTRUCTIONS ON OPERATION AND MAINTENANCE. ALL JOINTS AND CONNECTIONS MUST NOW BE LEAK TESTED BEFORE USING THE BARBECUE. Leak test annually, and whenever the gas bottle is removed or replaced. 19
20 ! IMPORTANT! GAS LEAK TEST ALL JOINTS AND CONNECTIONS MUST NOW BE LEAK TESTED BEFORE USING THE GRILL. Leak test annually, and whenever the gas bottle is removed or replaced. Always perform a leak test in a well-ventilated area. 1 Make Apply 6 Open 7 8 a mixed solution (½ water and ½ liquid detergent / soap). Ensure that there are no naked flames, heat sources and cigarettes in the vicinity when performing a leak test. Check that all controls on the grill are in the OFF position. Set the regulator to the OFF position and connect it to the gas bottle.! NB! NEVER USE AN OPEN FLAME TO PERFORM A GAS LEAK TEST the liquid to all joints and connections on the gas bottle, regulator, the entire hose and all valves on the grill. the gas tap on the regulator and carefully check for bubbles appearing anywherethe liquid has been applied. IF BUBBLES APPEAR, SWITCH OFF THE GAS SUPPLY AND REPAIR THE PROBLEM. PERFORM A NEW LEAK TEST. DO NOT USE THE GRILL BEFORE YOU ARE SURE THAT THERE ARE NO LEAKS. If there are still gas leaks after repeated attempts, contact your dealer. 20
21 Connecting the gas ALWAYS perform a gas leak test before using the grill. Hose Connect the gas hose to the gas rail inlet on the left hand side of the barbecue. Do not overtighten. Do not use any sealing tape, paste or liquid on the connection. Connect the regulator to the gas bottle according to your regulator and bottle dealer s instructions. Gas hoses used for this product must not exceed 150 cm in length Regulator Confirm all barbecue control knobs are in the OFF position. We recommend propane gas for use in the Nordic Region, but butane can also be used.butane is not very suitable for low temperatures. Gas bottle Check the gas hose regularly for cracks, damage and decay. Never use a damaged gas hose. Check that the movable plastic collar on the regulator is intact and that it has not been damaged by hot grill parts. Check that the gas bottle stands on a firm, flat surface and is lower than the connector. Use an approved gas bottle that fits the regulator supplied. Bottles of 10/11 kg or above are recommended. Fit the regulator and the hose. Follow the assembly instructions supplied with the regulator set. The following gas types can be used I3B/P(30): G30(Butane), G31(propane) and mixture of these, LPG mbar WARNING! Never store the gas bottle under the grill when in use. If the gas bottle is being stored under the grill when not in use, disconnect the regulator.! Never move the grill while it is in use, or connected to the gas bottle. 21
22 Before using the grill LOCATION Ensure that the grill is placed at least 150cm in all directions from house walls, trees, plants and other flammable materials or liquids when in use. Do not place the grill under a roof or overhang. Ensure the grill is placed where there is plenty of ventilation. Do not grill below normal ground level. Always lock the wheels, whenever using the grill. FINAL CHECK Check that all controls knobs work normally. Check that the gas hose is free of cracks and damage (this should be done everytime the grill is used). Check that the gas bottle and hose do not come into contact with hot objects. 22
23 Grilling tips A CLEAN GRILL WORKS BETTER, causes less smoke and prevents fat catching fire. Burn off the grill after use by opening the lid and burning all the burners at full power for 10 minutes. Allow the grill to cool, and then brush off ash from flame guards and grates. BRUSH THE GRATES WITH AN OIL that can tolerate high temperatures. This prevents food from burning onto the grates. PREHEAT THE GRILL for around 10 minutes at full power before placing food on the grates. This gives a better result, and cuts grilling time. DO NOT GRILL FROZEN OR HALF-THAWED FOOD. The cold will extend grilling time and give apoorer result. DIVIDE THE GRILL INTO HOT AND COLD ZONES. When the food is half-ready, move it to the coldzone to finish grilling. This gives a better result and cooks the food through without itbeing burnt. ASSESS COOKING TIME FOR EACH PRODUCT to be grilled and put them on the grill in the orderwhich will mean they are ready at the same time. BRUSH THE FOOD REGULARLY WHILE GRILLING with oil or other marinade. It makes the food stays juicy for longer. DO NOT OPEN THE LID IF NOT NECESSARY. When the lid is opened, a lot of the heat escapes. NB! YOUR BARBECUE IS NOT DESIGNED TO BE USED WITH MORE THAN 50% OF THE COOKING AREA AS A SOLID PLATE THIS INCLUDES BAKING DISHES. FULL COVERAGE WILL CAUSE EXCESSIVE BUILD-UP OF HEAT AND DAMAGE THE BARBECUE. THIS IS NOT COVERED BY WARRANTY. 23


24 Lighting instructions Meteor 6+1 1Always open the barbecue hood before lighting. 2Open the gas supply valve on the gas bottle or regulator. 3From the OFF position, push in the control knob of the burner you wish to light, and turn it to the high position. 4Push and hold the igniter button in the control panel for 4 to 5 seconds to light the burner. 5If burner fails to light, turn the knob to the off position and shut off the gas supply. Wait 5 minutes, then reattempt from step 2. 6Light any of the remaining burners in any order, as needed. Confirm each burner is alight before igniting another burner. 7 Preheat the grill (with the lid open) for around 10 minutes at full power, before placing food on the cooking grill. This gives a better result, and cuts grilling time. 8After completion of preheating, turn control knobs to the lowest position, for best cooking result. MANUAL IGNITION If the grill will not light using the normal lighter, use the following procedure for manual lighting. Use a long match or lighter. Follow step 1-3 (Lighting instruction). Place the match/lighter close to one of the burners. Do not bend over the grill. Turn the control to the relevant burner to full power. Light the rest of the burners by turning on the burner alongside that lit to fullpower. Light one burner at a time. Follow step 7-8. IF THE GRILL WILL NOT LIGHT USING NORMAL OR MANUAL LIGHTING, REFER TO THE TIPS SECTION IN THE TROUBLESHOOTING MANUAL, OR CONTACT YOUR DEALER.! Flames should be blue and stable. If the flames are large and yellow, flaring or broken, check the troubleshooting manual. TURNING OFF THE GRILL Turn all control valves to the Off position, then switch off the gas supply at the bottle. Wait until the barbecue is sufficiently cool before closing its hood. NEVER DOUSE THE GRILL WITH WATER WHEN THE SURFACES ARE HOT. 24
25 WARNING!! Always keep an eye on the grill when in use. Never allow children or others whorequire supervision near the grill when in use.! This grill is only intended for outdoor use and must not be used under a roof. Do notuse under normal ground level. Gas can accumulate and represent a danger ofexplosion. Gas accumulation can also cause oxygen deficiency.! This grill is only intended for use with gas. NEVER use lava stones, briquettes,charcoal, lighting fluid etc.! Never light the grill with the lid closed.! Perform the leak test regularly and always when changing the gas bottle after longstorage. Always check the gas hose for damage and cracks each time you use the grill.! Disconnect the gas bottle when the grill is in use or before moving it.! If storing the grill in a garage or basement below ground level, do not store the gas bottle the same place, as it must be stored above normal ground level.! The vents in the grill must never be sealed or blocked.! Check that the venturi (ventilation) on burners and side burners are not sealed orblocked before use.! Wear gloves when assembling or lifting. Sharp edges can cause injury.! Do not place the grill cover or other flammable material in the compartment under thegrill when it is in use or hot.! Clean the grill regularly and thoroughly. FAT FIRE Lack of maintenance can cause fat deposits to catch fire, causing a fat fire. PREVENT FAT FIRE Keep the grill clean to prevent fires caused by fat. Fill the fat tray with a fat-absorbing material, such as cat litter or absorbent sand. Thiswill absorb fat and food oils to prevent fat fires. Aluminiumfoil can be laid in the bottomof the tray first to make cleaning easier. IN THE EVENT OF FAT FIRE In the event of a fat fire, shut off the gas and disconnect the regulator. Leave the lid open and wait until the fire goes out.! Fires caused by fat damage the metal, paint and enamel. Damage to the grill caused by fat burning, is not covered by the guarantee as it is due to incorrect use.! NB: Do not use water to extinguish the fire! Clean the grill regularly to avoid fat fires. 25

26 Maintenance and cleaning MAINTENANCE Check that the burners are burning correctly regularly. Remove the grill grate and flame guards. Light the grill normally. Turn the controls from low to high, check there is a difference in flame strength and that the flames are blue, not orange. If the burners act abnormally, refer to the troubleshooting chapter. Remove any fat or deposits from previous use with a grill brush. INSECTS AND VERMIN After long-term storage, insects and other vermin can be found in the grill. If you experience problems with lighting or irregular flames, it can be due to unwanted guests blocking the gas supply. In such instances, dismantle and clean the burners. Replace the burners when they are dry. Check that the gas hose is not damaged by mice or rats. CLEANING Use clean water only. A mild washing up liquid can be added for general cleaning. Do not use flammable cleaning agents. To clean the grates, burn the grill for around 10 minutes after use with the lid open, and brush the grates with a grill brush. When cleaning with water, use normal washing up liquid. Do not use scouring products. Do not wash the grates in washing up liquid, it damage the enamel. Dry the grates well after cleaning and leave to soak in food oil. To prevent attracting vermin and odours, clean the fat tray regularly. Store the grill in a dry place or under a cover when not in use. Polish with car wax once a year to avoid rust on external parts. If living within 5 km of the sea,we recommend storing the grill indoors, as salt in the air can reduce its lifetime. Spread cat litter or the like in the bottom of the fat tray to absorb the fat dripping down andprevent fat fires. It also makes cleaning the tray easier. Rust can naturally occur on cast iron and steel parts, and will not affect the grill in the shortterm. Superficial rust can be washed/ polished off. Keep the grill free of fat and grease to maintain performance. The fat cup should be emptied regularly to avoid it running over. When using a grill cover, the grill must be clean and dry and sufficient ventilation must beensured. If not, moisture will accumulate under the cover causing rust damage. 26
27 Troubleshooting PROBLEM POSSIBLE CAUSE SOLUTION Empty gas bottle Replace gas bottle Damaged regulator Check/replace the regulator Burner is blocked Clean the burner Burner will not light when using the ignition knob Gas supply is blocked Electrode is broken or dirty Clean gas ventury or hose Clean the electrode Burners will not light when lighting manually Ignition knob is broken Windy conditions Ignition wire is damaged or fitted incorrectly Empty gas bottle Irregular gas supply The burner is blocked Gas supply or hose is blocked Contact your dealer Place the grill in a less exposed position. Make sure wire is mounted correctly Replace gas bottle Check/replace the regulator Clean the burner Clean gas ventury or hose Gas bottle is too small 10/11 kg or larger bottle is recommended Low flame or backfire Trouble turning the knobs Heavy smoke Burner is blocked Gas supply or hose is blocked Windy conditions Gas valve jammed Fatty foods on the grill Clean the burner Clean gas ventury or hose Place the grill in a less exposed position Replace gas valve. NB! Knobs should be pressed in and turned Trim away excess fat from meat. Clean the fat tray. 27
28 Spare parts, consumer contact and warranty claims. This product is covered by a warranty in accordance with consumer legislation. It has undergone strict quality controls and testing at the factory. If there are any parts missing or the product has been damaged, please contact your dealer or the consumer contact below for help. Faults due to misuse, lack of maintenance or modification of the product will invalidate the warranty. Damaged parts not due to a fault with the product will be invoiced according to our price list + carriage and administration fee. If new parts are needed or in the event of a warranty claim, please contact your dealer or consumer contact: CONSUMER CONTACT Nordic Season Products AS support@nordicseason.no Always attach your receipt and product serial number when making a warranty claim. Produced in China for Nordic Season Products AS.
ASSEMBLY, USE AND INSTRUCTION MANUAL GG English READ THE OPERATING INSTRUCTIONS BEFORE USING THE APPLIANCE. FOR OUTDOOR USE ONLY!
 ASSEMBLY, USE AND INSTRUCTION MANUAL GG881600 English READ THE OPERATING INSTRUCTIONS BEFORE! USING THE APPLIANCE. FOR OUTDOOR USE ONLY! WARNING!! Failure to follow the instructions provided can imply
SEATTLE. Assembly, use and maintenance Gas Barbecue SEATTLE GG301402B. Revised October 2016 FOR OUTDOORS USE ONLY.
 SEATTLE Assembly, use and maintenance Gas Barbecue SEATTLE GG301402B! NB: READ AND FOLLOW THE INSTRUCTIONS ON LEAK TESTING IN THE MANUAL READ THIS MANUAL AND FAMILIARIZE YOURSELF WITH THE PRODUCT BEFORE
STAINLESS STEEL GAS BARBECUE MODEL NO: SSBBQ4 USER GUIDE PART NO: /11
 STAINLESS STEEL GAS BARBECUE MODEL NO: SSBBQ4 PART NO: 6925310 USER GUIDE 2/11 INTRODUCTION Thank you for purchasing this CLARKE product. Before attempting to use this product, please read this manual
GAS BARBECUE MODEL NO: BBQ4 USER GUIDE PART NO: /11
 GAS BARBECUE MODEL NO: BBQ4 PART NO: 6925305 USER GUIDE 2/11 INTRODUCTION Thank you for purchasing this CLARKE product Before attempting to use this product, please read this manual thoroughly and follow
Assembly and Operating Instructions for Outback Omega 100, Omega 200, and Omega 300 Gas Barbecues
 Gas Barbecues Assembly and Operating Instructions for Outback Omega 100, Omega 200, and Omega 300 Gas Barbecues EN (Europe) Omega 100 Omega 200 Omega 300 Photographs are not to scale. Specifications subject
Assembly and Operating Instructions for Outback Meteor 4 Burner Gas BBQ
 Assembly and Operating Instructions for Outback Meteor 4 Burner Gas BBQ Drawings are not to scale. Specifications subject to change without prior notice. MS4431 0359 WARNING For outdoor use only. Not for
Assembly and Operating Instructions for Outback Meteor Select 3 Burner Gas BBQ
 Assembly and Operating Instructions for Outback Meteor Select 3 Burner Gas BBQ Drawings are not to scale. Specifications subject to change without prior notice. MH3330 0359 WARNING For outdoor use only.
WARNING. Assembly and Operating Instructions for Outback Omega Charcoal 100 and Omega Charcoal 200 Barbecues. Omega Charcoal 100 Omega Charcoal 200
 Assembly and Operating Instructions for Outback Omega Charcoal 100 and Omega Charcoal 200 Barbecues Omega Charcoal 100 Omega Charcoal 200 Photographs are not to scale. Specifications subject to change
Assembly and Operating Instructions for Outback Meteor 3 Burner Gas BBQ
 Assembly and Operating Instructions for Outback Meteor 3 Burner Gas BBQ Drawings are not to scale. Specifications subject to change without prior notice. MH3330 0359 WARNING For outdoor use only. Not for
Assembly and Operating Instructions for Phoenix 4 Burner Black and Phoenix 4 Burner SS Gas Barbecues
 Assembly and Operating Instructions for Phoenix 4 Burner Black and Phoenix 4 Burner SS Gas Barbecues EN (Europe) Photographs are not to scale. Specifications subject to change without prior notice. 0359
WARNING. Assembly and Operating Instructions for Outback Kettle Charcoal 57cm Barbecue. EN (Europe)
") Assembly and Operating Instructions for Outback Kettle Charcoal 57cm Barbecue EN (Europe) Photographs are not to scale. Specifications subject to change without prior notice. WARNING For outdoor use only.
Assembly and Operating Instructions for Outback Kettle Charcoal 57cm Barbecue EN (Europe) Photographs are not to scale. Specifications subject to change without prior notice. WARNING For outdoor use only.
WARNING. Assembly and Operating Instructions for Excel 100, Excel 200, and Excel 300 Gas Barbecues FOR YOUR SAFETY FOR YOUR SAFETY.
 Gas Barbecues Assembly and Operating Instructions for Excel 100, Excel 200, and Excel 300 Gas Barbecues Excel 100 Excel 200 Excel 300 Photographs are not to scale. Specifications subject to change without
BULL. ASSEMBLY & OPERATING INSTRUCTIONS
 BULL. Dutdaar Products Inc. "., Ontario, California 91761 ASSEMBLY & OPERATING INSTRUCTIONS Model No. 18038 7-Burner High Grade Commercial Stainless Steel Longhorn, LP Model No. 18039 7- Burner High Grade
NEW YORK. ! Before starting to assemble this grill: NEW YORK KG Charcoal Barbecue OWNERS MANUAL OUTDOOR USE ONLY!
 NEW YORK! NEW YORK KG201793 Charcoal Barbecue OWNERS MNUL! Before starting to assemble this grill: CREFULLY RED THE SFETY INSTRUCTIONS ND WRNING BEFORE USE ENGLISH! OUTDOOR USE ONLY! SFETY INFORMTION!
Assembly and Operating Instructions for Outback Charcoal Kettle
 Assembly and Operating Instructions for Outback Charcoal Kettle Photographs are not to scale. Specifications subject to change without prior notice. CK575 WARNING For outdoor use only. Not for commercial
Assembly and Operating Instructions for Outback Party 6 Burner Gas BBQ
 Assembly and Operating Instructions for Outback Party 6 Burner Gas BBQ Drawings are not to scale. Specifications subject to change without prior notice. FS5680 0359 WARNING For outdoor use only. Not for
Assembly and Operating Instructions for Outback NEW Apollo 4 Burner Gas BBQ
 Assembly and Operating Instructions for Outback NEW Apollo 4 Burner Gas BBQ Drawings are not to scale. Specifications subject to change without prior notice. MF4493 0359 WARNING For outdoor use only. Not
3 Burner Cabinet Barbecue
 3 Burner Cabinet Barbecue Photograph is not to scale. Specification subject to change without prior notice WARNING For outdoor use only. Read instructions before using the appliance. Failure to follow
Customer Helpline: (Homebase) / (Argos)
 / (Argos)") Excel 300T Gas BBQ Assembly Instructions - Please keep for future reference 246124 Dimensions Width - 119.6cm Depth - 55.6cm Height - 102.3cm Important Please read the instructions before using the appliance
Excel 300T Gas BBQ Assembly Instructions - Please keep for future reference 246124 Dimensions Width - 119.6cm Depth - 55.6cm Height - 102.3cm Important Please read the instructions before using the appliance
X4 50 Barbecue. Universal Innovations WARNING. Photograph is not to scale. Specification subject to change without prior notice.
 X4 50 Barbecue Photograph is not to scale. Specification subject to change without prior notice. WARNING For outdoor use only. Read instructions before using the appliance. Failure to follow instructions
WARNING FOR YOUR SAFETY FOR YOUR SAFETY. Assembly and Operating Instructions for Omega 100, Omega 200, and Omega 300 Gas Barbecues.
 Gas Barbecues Assembly and Operating Instructions for Omega 100, Omega 200, and Omega 300 Gas Barbecues Omega 100 Omega 200 Omega 300 Photographs are not to scale. Specifications subject to change without
Assembly and Operating Instructions for Outback Magnum 3 Gas BBQ
 Assembly and Operating Instructions for Outback Magnum 3 Gas BBQ Photographs are not to scale. Specifications subject to change without prior notice. RC4341P 0359 WARNING For outdoor use only. Not for
Assembly and Operating Instructions for Outback Trooper Plus, Hunter Plus Gas Barbecues
 Gas Barbecues Assembly and Operating Instructions for Outback Trooper Plus, Hunter Plus Gas Barbecues EN (Europe) Photographs are not to scale. Specifications subject to change without prior notice. 0359
14 ROUND TABLETOP GAS GRILL. Product code: UPC code: Date of purchase: / /
 OWNER S MANUAL 14 ROUND TABLETOP GAS GRILL Product code: 0-03946564-6 UPC code: 0 45774 87562 1 Date of purchase: / / Safety Guidelines... Safety Instructions... 1 2-3 Assembly Instructions... 4-7 Lighting
Assembly and Operating Instructions for Palermo BBQ
 Assembly and Operating Instructions for Palermo BBQ Photographs are not to scale. Specifications subject to change without prior notice. SM-H5400 0359 WARNING For outdoor use only. Not for commercial use.
Assembly and Operating Instructions for Outback Omega 200, and Omega 250 Gas Barbecues
 Assembly and Operating Instructions for Outback Omega 200, and Omega 250 Gas Barbecues Omega 200 Omega 250 Photographs are not to scale. Specifications subject to change without prior notice. 0359 WARNING
Assembly and Operating Instructions for Outback Charcoal Kettle
 Assembly and Operating Instructions for Outback Charcoal Kettle Photographs are not to scale. Specifications subject to change without prior notice. CK575 WARNING For outdoor use only. Not for commercial
Assembly and Operating Instructions for Outback Spectrum Hooded 3 Burner Gas BBQ
 Assembly and Operating Instructions for Outback Spectrum Hooded 3 Burner Gas BBQ THG3302P Photographs are not to scale. Specifications subject to change without prior notice. 0359 WARNING For outdoor use
Assembly and Operating Instructions for Outback Omega 100, Omega 200 and Omega 300 Gas Barbecues
 Assembly and Operating Instructions for Outback Omega 100, Omega 200 and Omega 300 Gas Barbecues Omega 100 Omega 200 Omega 300 Photographs are not to scale. Specifications subject to change without prior
Assembly and Operating Instructions for Outback Omega 150, and Omega 250 Gas Barbecues
 Assembly and Operating Instructions for Outback Omega 150, and Omega 250 Gas Barbecues Omega 150 Omega 250 Photographs are not to scale. Specifications subject to change without prior notice. 0359 WARNING
Assembly and Operating Instructions for Outback Trekker Portable Gas BBQ
 Assembly and Operating Instructions for Outback Trekker Portable Gas BBQ Photographs are not to scale. Specifications subject to change without prior notice. RG47F 0359 WARNING For outdoor use only. Not
Assembly and Maintenance Instructions for SH-0183-I & SH-0184-I SH-0283-I & SH-0284-I
 Assembly and Maintenance Instructions for SH-0183-I & SH-0184-I SH-0283-I & SH-0284-I Before you begin assembling and using your new BBQ grills we recommend that you read through owner s use and care manual
Assembly and Operating Instructions for Outback Trekker Gas BBQ
 Assembly and Operating Instructions for Outback Trekker Gas BBQ Photographs are not to scale. Specifications subject to change without prior notice. RG47B 0359 WARNING For outdoor use only. Not for commercial
ASSEMBLY & OPERATING INSTRUCTIONS. OUTBACK COMMERCIAL Model: TPA101-6
 ASSEMBLY & OPERATING INSTRUCTIONS OUTBACK COMMERCIAL Model: TPA0-6 Page Table of Contents 3 4 4 5 8 9 0 5 7 7 8 9 Chapter : Safety Information Chapter : Package Contents List Chapter : Hardware Contents
Assembly and Operating Instructions for Outback Comet Kettle Charcoal K100
 Assembly and Operating Instructions for Outback Comet Kettle Charcoal Photographs are not to scale. Specifications subject to change without prior notice. K100 WARNING For outdoor use only - do not use
2 Burner Gas BBQ with side burner
 2 urner Gas Q with side burner Assembly Instructions - Please keep for future reference 345/0901 307223 Dimensions Width - 112cm Depth - 52cm Height - 96.5cm Important - Please read this instructions fully
assembly guide ELECTRIC Model Numbers: Estimated time required for assembly: 1 Hour (English) /05/09
 /05/09") assembly guide Model Numbers: 08601559 10601578 10601585 10601514 Estimated time required for assembly: 1 Hour ELECTRIC (English) 42804372 11/05/09 2 ASSEMBLY GUIDE A, B, C, Assembly: CAUTION: For your
assembly guide Model Numbers: 08601559 10601578 10601585 10601514 Estimated time required for assembly: 1 Hour ELECTRIC (English) 42804372 11/05/09 2 ASSEMBLY GUIDE A, B, C, Assembly: CAUTION: For your
Assembly and Operating Instructions for Outback Omega 150, and Omega 250 Gas Barbecues
 Gas Barbecues Assembly and Operating Instructions for Outback Omega 150, and Omega 250 Gas Barbecues Omega 150 Omega 250 Photographs are not to scale. Specifications subject to change without prior notice.
 #4187508 Attention! This grill will become very hot. Do not move it during operation. Caution! Do not use alcohol, gasoline or similar fluids for lighting or relighting. Warning! Keep children and pets
Assembly & Operation Manual
 Deluxe Outdoor Tabletop Gas Grill Model TT250 Assembly & Operation Manual DANGER 1. Never operate this appliance unattended. 2. Never operate this appliance within 10 ft (3.0 m) of any structure, combustible
Deluxe 6 Burner Stainless Steel Gas BBQ
 Deluxe 6 Burner Stainless Steel Gas BBQ ssembly Instructions - Please keep for future reference 304/2230 Dimensions Width - 50cm Depth - 58cm Height - 07.5cm Important - Please read this instructions fully
Deluxe Caterer BBQ Series
 Deluxe Caterer BBQ Series GC22-4T DLX GC22-6T DLX FEATURES Ideal heavy duty BBQ for sporting and social clubs or anywhere large groups are entertained. Solid 5mm thick stainless steel hotplate Fold down
Contents. Fittings and parts checklist
 JLH2B5 Contents Parts List Exploded Diagram Assembly instructions Safety information Installation Using your barbecue Cooking Maintenance Fittings and parts checklist Ref Description Ref Description 1,
Pellet Pro 12 & 18 Lengths Large 35lb Hopper Assembly Operation Manual
 Pellet Pro 12 & 18 Lengths Large 35lb Hopper Assembly Operation Manual Now with our exclusive PID Controller & Universal Mounting Capabilities! FOR OUTDOOR USE ONLY Disclaimer: The hopper assembly is used
Folding Grill Stand Manual
 O u t d o o r G r i l l i n g P r o d u c t s Folding Grill Stand Manual MODEL: CFGS-150 IMPORTANT SAFETY INSTRUCTIONS READ AND SAVE THESE SAFETY INSTRUCTION BEFORE USING THIS GRILL STAND m DANGER: m Failure
.A gas bottle not connected for use must not be stored in the
 Assembly and Operating Instructions for Outback Combi Gas Charcoal Barbecue EN (Europe) Model: TPA0-4 Photographs are not to scale. Specifications subject to change without prior notice. 0359 WARNING For
JUMBUCK RONDO MEDIUM CHARCOAL SPIT ROASTER (HS-FP002)
") JUMBUCK RONDO MEDIUM 3180887 CHARCOAL SPIT ROASTER (HS-FP002) SAFETY INSTRUCTIONS FOR OUTDOOR USE ONLY For outdoor use only. Improper installation, adjustment, alteration, service or maintenance can cause
JUMBUCK RONDO MEDIUM 3180887 CHARCOAL SPIT ROASTER (HS-FP002) SAFETY INSTRUCTIONS FOR OUTDOOR USE ONLY For outdoor use only. Improper installation, adjustment, alteration, service or maintenance can cause
Specialist Built-in BBQ
 Specialist Built-in BBQ Model No. BQ8246-P Product Features: Vitreous enamel hood and body Sure-fire rotary ignition Viewing window in hood Timer AGA certified FOR OUTDOOR USE ONLY OPERATES ON LPG Gasmate
Montana 4 Burner Gas BBQ
 Montana 4 Burner Gas BBQ ssembly Instructions - Please keep for future reference 129639 Dimensions Width - 138cm Depth - 57.5cm Height - 119cm Important - Please read this instructions fully before starting
OWNER S MANUAL. Cabo. Adventurer Series Gas Grill Model A10-703
 OWNER S MANUAL Cabo Adventurer Series Gas Grill Model A10-703 For questions regarding performance, assembly, operation, parts, or returns, contact the experts at MAGMA by calling (562) 627-0500 7:00 a.m.
Introduction. No Hassle Guarantee
 Pro Grill MANUAL Introduction Thank you for selecting West Marine s Pro Grill. Your unit has been carefully inspected and tested. The Pro Grill is one of the finest barbecues manufactured for marine use.
Premium 4 Burner Gas BBQ
 Premium 4 Burner Gas BBQ ssembly Instructions - Please keep for future reference 287/6847 304/8739 Dimensions Width - 123.5cm Depth - 56.7cm Height - 107.5cm Important - Please read this instructions fully
Important: Retain these instructions for future use.
 CATERER 4 & 6 BURNER BBQ Model No. BQ1050 Model No. BQ1051 Ideal heavy duty BBQ for sporting and social clubs or anywhere large groups are entertained Solid 5mm thick steel hotplate Castors for easy moving
KETTLE BBQ - JDWCKBBQ
 KETTLE BBQ - JDWCKBBQ WARNING: CARBON MONOXIDE HAZARD Burning charcoal inside can kill you. It gives off carbon monoxide which has no odour. NEVER burn charcoal in enclosed spaces e.g. homes, vehicles
Platinum BBQ Series. 4 burner - BQ burner - BQ 1011
 Platinum BBQ Series 4 burner - BQ 1010 6 burner - BQ 1011 FEATURES Premium gas BBQ Double skinned stainless steel hood with temperature gauge Stainless steel BBQ body, fascia, cabinet and side shelves
VCS325SSBI Series and VCS525SSBI Series Assembly Procedures
 VCS325SSBI Series and VCS525SSBI Series Assembly Procedures Model VCS525SSBI Shown Tools Required: Knife or scissors, Phillips or Robertson (square head) screwdriver. WARNING: Some parts may have sharp
INSTRUCTION MANUAL. MODEL NUMBER: GBBK/GBBKR Outdoor Portable Charcoal Grill. For Outdoor Use Only!
 INSTRUCTION MANUAL MODEL NUMBER: GBBK/GBBKR Outdoor Portable Charcoal Grill For Outdoor Use Only! WARNING! BE CAREFUL OF SHARP EDGES DURING ASSEMBLY MADE IN CHINA Save these instructions for future reference.
Grill TC3718 DANGER DANGER. 1. Never operate this appliance unattended.
 Grill TC3718 Conforms to ANSI STD Z21.58-2015/ CSA 1.6-2015 OUTDOOR COOKING GAS APPLIANCE DANGER Tools needed for assembly: Phillips screwdriver, Pliers or Adjustable Wrench DANGER If you smell gas: 1.
G2006-A FOR OUTDOOR USE ONLY - OPERATES ON LPG
 Ranger Barbecue Model No. G2006-A FOR OUTDOOR USE ONLY - OPERATES ON LPG 3716-06/13 General Information Gas Installation Codes Barbecues must be used in accordance with New Zealand Standard 5601 Gas Installations.
Tabletop Gas Grill VT280SS1
 Tabletop Gas Grill VT280SS1 Conforms to ANSI Std Z21.89-2013 Outdoor cooking specialty gas appliance DANGER Tools needed for assembly: Phillips screwdriver, Pliers or Adjustable Wrench DANGER If you smell
" Table Top Charcoal Grill Model # SRYH1450 Instructions Manual
 259-0011 14" Table Top Charcoal Grill Model # SRYH1450 Instructions Manual WARNING FOR YOUR SAFETY 1. This grill is for outdoor use only, and shall not be used in a building, garage, or any other enclosed
WARNING. Assembly and Operating Instructions for Outback Trooper, Outback Hunter, and Outback Ranger Gas Barbecues. EN (Europe) FOR YOUR SAFETY
 FOR YOUR SAFETY") Gas Barbecues Assembly and Operating Instructions for Outback Trooper, Outback Hunter, and Outback Ranger Gas Barbecues EN (Europe) Phot ographs are not to scale. Specifications subj ect t o change without
Gas Barbecues Assembly and Operating Instructions for Outback Trooper, Outback Hunter, and Outback Ranger Gas Barbecues EN (Europe) Phot ographs are not to scale. Specifications subj ect t o change without
Adventurer Barbecue G2727
 Adventurer Barbecue G2727 FEATURES Compact portable unit with generous 460mm x 240mm cooking surface Use at home, picnics or camping Quick and easy set-up Folds down into a compact size - 440mm x 590mm
Tabletop Charcoal Grill Model # SRCG806 Instructions Manual
 259-0002 Tabletop Charcoal Grill Model # SRCG806 Instructions Manual WARNING FOR YOUR SAFETY 1. This grill is for outdoor use only, and shall not be used in a building, garage, or any other enclosed area.
Charcoal Grill WARNING: Kay Home Products TM
 Kay ome Products T 30052 Charcoal rill WARNN: Your grill is intended for residential outdoor use only. Do not use for commercial cooking. Do not use in or on boats or recreational vehicles. Do not use
USE AND CARE MANUAL FOR OUTDOOR USE ONLY
 S o n o m a PLATINUM EDITION Sonoma Platinum Edition Grill: 27 Model with Rear Infrared Burner TM USE AND CARE MANUAL FOR OUTDOOR USE ONLY General Safety Instructions IMPORTANT SAFETY INFORMATION - Read
Kettle Charcoal BBQ. Assembly instructions. Please retain this manual for future reference
 Front.pdf 30/0/ ::5 Product size assembled: H88 x W5 X D6cm Ref No.: XZ08B Catalogue No.: 05-579 Tesco 0 Please retain this manual for future reference P.pdf 3/0/ 7:9:3 Assembly Instructions Warnings REMEMBER
FOR OUTDOOR USE ONLY - OPERATES ON LPG
 Gemini Gas Grill Model No. GM172-120 GM172-121 Model No. GM172-122 FOR OUTDOOR USE ONLY - OPERATES ON LPG Retain these instructions for future use. Important: The installer or seller must leave these instructions
USER GUIDE 22 CAPITAL GRILL
 THE OUTDOOR COLLECTION USER GUIDE 22 CAPITAL GRILL CHARCOAL TROLLEY Model No. RSH015049 INSTRUCTIONS FOR USE: READ ALL WARNINGS AND INSTRUCTIONS BEFORE USE, AND RETAIN. HELPLINE 0844 809 4871 or visit
ASSEMBLY AND OWNER S MANUAL FOR OUTDOOR HOUSEHOLD USE ONLY. NOT FOR COMMERCIAL USE.
 WATER SMOKER For the Ultimate Flavor Experience MODEL 5023 CHARCOAL ASSEMBLY AND OWNER S MANUAL CARBON MONOXIDE HAZARD This appliance can produce carbon monoxide which has no odor. Using it in an enclosed
FOR OUTDOOR USE ONLY THIS IS YOUR ASSEMBLY, CARE & USE MANUAL WITH IMPORTANT WARNING & SAFETY INFORMATION. PLEASE SAVE THESE INSTRUCTIONS.
 Owner s Manual Tabletop Gas Grill 1-Burner Model VT280B1 FOR OUTDOOR USE ONLY THIS IS YOUR ASSEMBLY, CARE & USE MANUAL WITH IMPORTANT WARNING & SAFETY INFORMATION. PLEASE SAVE THESE INSTRUCTIONS. Manufactured
BakerBox multi-purpose pizza oven
 BakerBox multi-purpose pizza oven. ASSEMBLY & OPERATING INSTRUCTIONS Important: Read these instructions for use carefully so as to familiarize yourself with the appliance before putting it to your gas
ASSEMBLY & OPERATION INSTRUCTIONS FOR OUTDOOR GAS BARBECUES
 ASSEMBLY & OPERATION INSTRUCTIONS FOR OUTDOOR GAS BARBECUES FOR MODEL# BBQ / BBQW / BLKBBQW OUTDOOR BBQ GRILL SAFETY INSTRUCTIONS READ THE FOLLOWING INSTRUCTIONS CAREFULLY AND BE SURE YOUR BARBECUE IS
Nebula 6200 Gas Grill
 Nebula 6200 Gas Grill Model No. GM170-009 FOR OUTDOOR USE ONLY - OPERATES ON LPG 3436-05/12 GENERAL INFORMATION Gas Installation Codes Barbecues must be used in accordance with New Zealand Standard 5261
Assembly Instructions & User s Manual TRITON 6 BURNER GRIDDLE Model #: FSODBG1206
 Assembly Instructions & User s Manual TRITON 6 BURNER GRIDDLE Model #: FSODBG1206 Please keep this instruction manual for future reference Customer Service: (888) 922-2336, 7:00 am to 12:00 am daily CST
HOT SPOTS COOKING SAFETY
 Many families gather in the kitchen to spend time together, but it can be one of the most hazardous rooms in the house if you don't practice safe cooking behaviors. Cooking equipment, most often a range
LPG GAS GRILL OWNER S GUIDE
 LPG GAS GRILL OWNER S GUIDE E0 CLASSIC E0 CLASSIC Thank you for purchasing a Weber grill. You ve made a wise investment. Now take a few minutes and protect it by registering your product online at www.weber.com.
Assembly Procedures VCS322SSBI Series / VCS522SSBI Series
 Assembly Procedures VCS322SSBI Series / VCS522SSBI Series Tools Required: Knife or scissors, Phillips or Robertson (square head) screwdriver. Model VCS522SSBI Shown CAUTION: This grill is intended ONLY
IMPORTANT INSTRUCTIONS MODE D EMPLOI IMPORTANT INSTRUCIONES IMPORTANTES ISTRUZIONI IMPORTANTI
 MOKA 22-04-2003 10:10 Pagina 1 IMPORTANT INSTRUCTIONS SAVE THESE INSTRUCTIONS MODE D EMPLOI IMPORTANT CONSERVEZ LES PRESENTES INSTRUCTIONS INSTRUCIONES IMPORTANTES GUARDE ESTAS INSTRUCCIONES ISTRUZIONI
LEGEND 4500D GAS BARBECUES
 LEGEND 4500D GAS BARBECUES ASSEMBLY, OPERATION AND MAINTENANCE INSTRUCTIONS FOR OUTDOOR USE ONLY Made In China For ARLEC BARBEQUES PTY LTD 274 Maroondah Hwy Mooroolbark, VIC 3138 Australia Please read
LUCKENBACH MODEL Assembly Instructions Rev
 LUCKENBACH TM MODEL 03301800 Assembly Instructions Rev. 03-27-03 P/N: 42802113 WARNING! CAUTION! This unit is heavy. Tools needed: 2 adjustable wrenches, a flat screwdriver and hammer. DO NOT assemble
TEXAS RANCHERO GRILL AND SMOKER (TEXASK)
") TEXAS RANCHERO GRILL AND SMOKER (TEXASK) User Manual FOR OUTDOOR USE ONLY READ INSTRUCTIONS CAREFULLY BEFORE ASSEMBLY AND SAVE THIS MANUAL FOR FUTURE REFERENCE. 1 TABLE OF CONTENTS SAFETY INFORMATION...
TEXAS RANCHERO GRILL AND SMOKER (TEXASK) User Manual FOR OUTDOOR USE ONLY READ INSTRUCTIONS CAREFULLY BEFORE ASSEMBLY AND SAVE THIS MANUAL FOR FUTURE REFERENCE. 1 TABLE OF CONTENTS SAFETY INFORMATION...
OWNER S MANUAL BARREL GRILL
 OWNER S MANUAL BARREL GRILL Made in / Hecho en CHINA for Kmart Corporation, Hoffman Estates, IL 60179 SHOP kmart.com See our extensive assortment of outdoor living products on-line at www.sears.com and
DRAGON KAMADO INSTRUCTION MANUAL For safe use and enjoyment of your new barbeque Model: BC1450A0 Code: GKEG Tools required: Phillips Head Screwdriver
 DRAGON KAMADO INSTRUCTION MANUAL For safe use and enjoyment of your new barbeque Model: BC1450A0 Code: GKEG Tools required: Phillips Head Screwdriver IMPORTANT HEALTH & SAFETY INFORMATION 1. WARNING FOR
USE AND CARE MANUAL FOR OUTDOOR USE ONLY MADE IN THE U.S.A.
 S o n o m a PLATINUM EDITION Sonoma Platinum Edition Grill: 30 Model TM USE AND CARE MANUAL FOR OUTDOOR USE ONLY MADE IN THE U.S.A. General Safety Instructions IMPORTANT SAFETY INFORMATION - Read this
Gravity Feed Commercial BBQ Smoker
 Gravity Feed Commercial BBQ Smoker User Manual 2016 Mac s BBQ Ltd Congratulations on the purchase of your new ProQ Gravity Feed BBQ Smoker! The following guide will show you the basics on how to use, care,
1. IMPORTANT SAFEGUARDS When using electrical appliances, basic safety precautions should always be followed to reduce the risk of fire, electric
 1. IMPORTANT SAFEGUARDS When using electrical appliances, basic safety precautions should always be followed to reduce the risk of fire, electric shock, and/pr injury to persons including the following:
INFRARED BURNER KIT INSTRUCTIONS
 3 INFRARED BURNER KIT INSTRUCTIONS (HOT SURFACE IGNITION) 5 1 4 NOTE: This unit has been retrofi tted with an infrared burner. Model # 3050 # 3060 Included parts 2 6* PARTS INCLUDED 1. Infrared burner
22 Kettle Charcoal Grill SAFE USE, CARE AND ASSEMBLY MANUAL
 22 Kettle Charcoal Grill SAFE USE, CARE AND ASSEMBLY MANUAL 85-1448-8 ST22022D Read and save this manual for future reference. If pre-assembled, leave this manual with unit for consumer s future reference.
HORIZON BARBECUE ROASTING HOOD OWNERS MANUAL
 HORIZON BARBECUE ROASTING HOOD OWNERS MANUAL 0 IMPORTANT READ ALL INSTRUCTIONS BEFORE ASSEMBLY, INSTALLATION OR OPERATING ROASTING HOOD SAFETY PRECAUTIONS AND WARNINGS Tucker Horizon barbecues and roasting
for Assembly, Operating & Maintenance of THIS CHARCOAL GRILL IS DESIGNED FOR OUTDOOR USE ONLY.
 Owner s Manual for Assembly, Operating & Maintenance of Model M-15AB Charcoal Grill www.bigjohngrills.com YOU MUST READ THIS OWNER S MANUAL BEFORE OPERATING YOUR CHARCOAL GRILL. WARNING: Do not ignite
Installation instructions and use and care guide
 Installation instructions and use and care guide ASSEMBLY INSTRUCTIONS FOR POLAR GRILL M8/M6/L8 If the grill is placed inside a cabin/hut, take care of ventilation e. g. by assembling ventilation pipes
LPG GAS GRILL OWNER S GUIDE
 LPG GAS GRILL OWNER S GUIDE E0 ORIGINAL E0 ORIGINAL E0 ORIGINAL Thank you for purchasing a Weber grill. You ve made a wise investment. Now take a few minutes and protect it by registering your product
Portable Charcoal Grill
 Portable Charcoal Grill DANGER! WARNING DO NOT use charcoal briquettes for indoor cooking or heating. TOXIC carbon monoxide fumes can accumulate and cause asphyxiation. DO NOT USE on boats or recreational
INTRODUCTION. Your new smoker comes almost completely assembled. You will need to complete the assembly which includes:
 INTRODUCTION Congratulations on your purchase of this Smith & Wesson SMOKER, Model SWS032. With proper set-up, operation and maintenance, this smoker will provide you with years of cooking enjoyment. Your
Pellet Pro 300, 440 & 680 Pellet Grill Operation Manual
 Pellet Pro 300, 440 & 680 Pellet Grill Operation Manual With our exclusive Pellet Pro PID Controller! Using PID Auto-tuning Algorithm Technology FOR OUTDOOR USE ONLY WARNING: MAKE SURE GRILL IS IN AN OPEN
ASSEMBLY INSTRUCTION PRODUCT GUIDE
 PERFECTION trolley ASSEMBLY INSTRUCTION PRODUCT GUIDE Model. 828T Features All Weather Powder Coated Frame Porcelain Coated lid, Porcelain Coated Bowl Stainless Steel Frame Joints Porcelain Lid & Fire
USE AND CARE MANUAL FOR OUTDOOR USE ONLY ALWAYS KEEP YOUR GRILL COVERED WHEN NOT IN USE
 Amana TM SS 4 Burner Gas Grill USE AND CARE MANUAL FOR OUTDOOR USE ONLY ALWAYS KEEP YOUR GRILL COVERED WHEN NOT IN USE BEFORE YOU BEGIN We ve included easy-to-follow, step-by-step instructions which have
Romana Pizza Oven / Smoker
 La Hacienda Romana Pizza Oven / Smoker User Instructions - Please keep for future reference 5610US V1.0 Tools list required (not included) User Instructions - Please keep for future reference IMPORTANT
Hog Roast. This is a large project, for which you will need specialist equipment and skill.
 Hog Roast What you will need This is a large project, for which you will need specialist equipment and skill. Sheet steel (around 1mm thick) Square section, steel tubing (around 25mm sides) for framing