TWIN EAGLES GAS GRILL
|
|
|
- Ruth Carr
- 5 years ago
- Views:
Transcription

1 TWIN EAGLES GAS GRILL INSTALLATION, USE & CARE MANUAL TEBQ42R with optional TEGB42SD-B Grill Base shown. Models: TEBQ30G-B TEBQ30R-B TEBQ36G-B TEBQ36R-B TEBQ42G-B TEBQ42R-B P/N: 18522K (11/10)

2 A special message Congratulations on your purchase of TWIN EAGLES gas barbecue grill. In addition to its Unique Style, Superb Performance and High Quality, this grill is built with pride in the U.S.A. Twin Eagles is committed to making outdoor cooking products you ll be proud to own for years. This manual gives you easy to follow instructions for installing, operating and maintaining your TWIN EAGLES grill. We recommend reading this manual carefully before your first use to insure safety, proper care and operation. Thank you and welcome! TWIN EAGLES FOR YOUR RECORDS Please record the following information and refer to them when contacting the company or an authorized service agent. This information is found on the data nameplate, located on the panel behind the control panel of the grill. Remove the drip pan to visually access the nameplate from the front of the grill. A second label with model number and serial number is located under the right side of the control panel. Model #: Serial #: Date of Purchase: Place of Purchase: Type of Gas: NG LP
3 IMPORTANT SAFETY INFORMATION TWIN EAGLES GAS GRILL WARNING! Read this manual carefully and completely before using your grill to ensure proper operation, proper installation, proper servicing and to reduce the risk of fire, burn hazard and/ or other injury. FOR YOUR SAFETY If you smell gas: 1. Shut off gas to the appliance. 2. Extinguish any open flames. 3. Open lid. 4. If odor continues, keep away from the appliance and immediately call your gas supplier or fire department. AVERTISSEMENT S il y a une odeur de gaz: 1. Coupez l admission de gaz de l appariel. 2. Éteindre toute flamme nue. 3. Ouvrir le couvercle. 4. Si l odeur continue, évite l appareil et appelle tout de suite votre fournisseur de gaz ou les pompiers. FOR YOUR SAFETY 1. Do not store or use gasoline or other flammable vapors and liquids in the vicinity of this or any other appliance. 2. An LP cylinder not connected for use shall not be stored in the vicinity of this or any other appliance. THIS GRILL IS FOR OUTDOOR USE ONLY: If stored indoors, detach and leave L.P. cylinder outdoors. AVERTISSEMENT 1. Ne pas entreposer ni utiliser de l essence ni d autres vapeurs ou liquides inflammables dans le voisinage de l appareil, ni de tout autre appareil. 2. Une bouteille de propane qui n est pas raccordée en vue de son utilisation, ne doit pas être entreposée dans le voisinage de cet appareil ou de tout autre appareil. CE GRIL EST POUR UTILISATION à L ExTéRIEUR SEULEMENT: Si l appareil est entreposé à l interieur, enlever les bouteilles et les laisser à l extérieur. BEFORE LIGHTING 1. Read instructions before lighting. 2. Open lid during lighting. 3. If ignition does not occur in 5 seconds, turn the burner control(s) off, wait 5 minutes, and repeat the lighting procedure. AVANT D ALLUMER L APPAREIL 1. Lisez les instructions avant d allumer l appareil. 2. Ouvrez le couvercle avant d allumer l appareil. 3. Si l appareil ne s allume pas en 5 secondes, fermez le robinet du brûleur, attendez 5 minutes, et procédez de nouveau à l allumage.
4 GENERAL SAFETY REQUIREMENTS: 1. The installation of this appliance must conform with local codes or, in the absence of local codes, either the National Fuel Gas Code, ANZI Z223.1/NFPA 54, or CAN/CGA-B149.1, Natural Gas Installation Code or CAN/CGA-B149.2, Propane Installation Code. 2. This outdoor cooking gas appliance is not intended to be installed in or on recreational vehicles and /or boats. 3. This outdoor cooking gas appliance is intended for use outdoors and shall not be used in a building, garage or any other enclosed area. 4. Minimum clearance of 12 inches from the back and sides of the grill to adjacent combustible construction must be maintained. This outdoor cooking gas appliance shall not be located under overhead-unprotected combustible construction. 5. The utilization of an external electrical source requires that when installed, this outdoor cooking gas appliance must be electrically grounded in accordance with the local codes or, in the absence of local codes, with the National Electrical Code, ANSI/NFPA 70, or the Canadian Electrical Code, CSA C22.1. Keep any electrical supply cord, or the rotisserie motor cord and the fuel supply hose away from any heated surfaces. 6. Keep your grill in an area clear and free from combustible materials, gasoline and other flammable vapors and liquids. 7. DO NOT obstruct the flow of combustion and ventilation air to this appliance. Keep the ventilation openings of the cylinder enclosure free and clear from debris. 8. Check all gas connections for leaks with soapy water solution and brush. Never use an open flame. (Reference page 8 for leak test procedure). 9. Check flexible hoses for cuts and wear that may affect the safety before each use. 10. Never use charcoal in the grill unless using a Twin Eagles Charcoal Tray (TECT). 11. Never use the grill in a windy area. 12. Never use the grill without the drip pan installed and push all the way to the back of the grill. Without the drip pan, hot grease and debris could leak downward and produce a fire hazard. 13. The pressure regulator and hose assembly supplied with the Twin Eagles Gas Grill must be used. Replacement pressure regulators and hose assemblies must be those specified by Twin Eagles. 14. CALIFORNIA PROPOSITION 65-WARNING: The burning of gas cooking fuel generates some by-products which are on the list of substances known by the State of California to cause cancer or reproductive harm. California law requires businesses to warn customers of potential exposure to such substances. To minimize exposure to these substances always operate this unit according to the use and care manual, ensuring you provide good ventilation when cooking with gas. In Massachusetts: All gas products must be installed using a Massachusetts licensed plumber or gasfitter. A T handle type manual gas valve must be installed in the gas supply line to this appliance. This applies to permanently installed natural gas and propane installations. This does not apply to propane portable installations using a 20 pound tank.
5 TABLE OF CONTENTS TWIN EAGLES GAS GRILL GETTING STARTED 2 GAS REQUIREMENTS o GAS SAFETY REQUIREMENT.. 4 o LP GAS HOOKUP. 5 o PORTABLE LP CONNECTION... 6 o NATURAL GAS INSTALLATION.. 7 o LEAK TEST... 8 ELECTRICAL REQUIREMENTS AND ELECTRICAL DIAGRAM 9 WIRING CONNECTION DRAWING DIAGRAM LOCATING THE GRILL o CLEARANCE TO COMBUSTIBLE CONSTRUCTION. 11 o CLEARANCE TO NONCOMBUSTIBLE CONSTRUCTION. 11 CUTOUT DIMENSIONS o INSULATION JACKET o GRILL. 13 ASSEMBLY INSTRUCTIONS o BRIQUETTE TRAY o SMOKER BOX o WARMING RACK.. 14 o ROTISSERIE OPERATING INSTRUCTIONS o BEFORE LIGHTING THE GRILL. 16 o TO LIGHT THE GRILL BURNER. 16 o MATCH LIGHTING INSTRUCTIONS o USING THE GRILL o INTERIOR LIGHT OPERATION AND LIGHT BULB REPLACEMENT.. 17 o USING THE ROTISSERIE BURNER o SEAR ZONE BURNER o SMOKER BOX CLEANING AND MAINTENANCE o STAINLESS STEEL 19 o HEX GRATES. 19 o CERAMIC BRIQUETTE TRAY o U-BURNER & SEAR ZONE BURNER o DRIP PAN & SMOKER BOX 20 o SPIDER AND INSECT WARNING 20 o CORRECT BURNER INSTALLATION. 21 REPLACEMENT PARTS o EXPLODED VIEW o REPLACEMENT PARTS LIST o TROUBLE SHOOTING GUIDE o LIMITED PRODUCT WARRANTY o WARRANTY REGISTRATION CARD
6 GETTING STARTED TWIN EAGLES GAS GRILL 1. Remove all packaging materials, labels and protective plastic film. DO NOT LEAVE UNIT UNDER THE SUN WITH PROTECTIVE PLASTIC FILM ON FOR A LONG PERIOD OF TIME AS IT WILL BE DIFFICULT TO REMOVE THE FILM. 2. Check to ensure that all grill accessories listed below are included. Grill Accessories TEBQ TEBQ TEBQ TEBQ TEBQ TEBQ 30G 30R 36G 36R 42G 42R Basting Pan Hex Grate, Stainless Steel Large Briquette Tray Assy. (Standard Grill) Large Briquette Tray Assy. (Grill w/ Sear Zone) Small Briquette Tray Assy. (Standard Grill) Small Briquette Tray Assy. (Grill w/ Sear Zone) Rotisserie Motor with bracket (s/s) Regulator, NG (NG Grill ONLY) PRE-INSTALLED Regulator, LP (LP Grill ONLY) Warming Rack, (s/s) Spit Rod, (s/s) Meat Holder Forks (pair) (s/s) Smoker Box Assy Assemble parts as per assembly instructions on page Fill up the Warranty Registration Card and mail it to the indicated address. 2
 Rotisserie (Optional)")
")
 located underneath the briquette trays.")
 located on the rear panel")
7 5. Get familiar with the knobs and burners identification below. TEBQ30 TEBQ36 Grill Burner Sear Zone (Opt) Rotisserie (Optional) Grill Burner Grill Burner Sear Zone (Opt) Rotisserie (Optional) Grill Burner Grill Burner TEBQ42 Grill Burner Sear Zone (Opt) Rotisserie (Optional) Grill Burner Grill Burner Grill U-Burner (Standard) located underneath the briquette trays. Sear Zone Burner (Optional) usually located on the left side. Infrared Rotisserie Burner (Optional) located on the rear panel above the hex-grates. 3
8 GAS SAFETY REQUIREMENTS TWIN EAGLES GAS GRILL Each appliance is set and tested at the factory for the type of gas supply to be used. Identify the type of gas, either natural gas or LP gas and make sure that the marking on the data plate (rating plate) matches the gas being supplied to the grill. The data plate is located on the panel behind the control panel of the grill. Remove the drip pan to visually access the nameplate label from the front of the grill. A second label with model number and serial number is located under the right side of the control panel. All gas connections should be made by a qualified technician and in accordance with local codes and ordinances. The installation must conform with local codes or, in the absence of local codes, with either the national Fuel Gas Code, ANSI Z223.1/NFPA 54, or CAN/CGA-B149.1, Natural Gas Installation Code or CAN/CGA-B149.2, Propane Installation Code. WARNING: CHECK TO ENSURE THAT THE GAS SUPPLY HOSE DOES NOT COME IN CONTACT WITH ANY HOT SURFACE OF THE GRILL. NEVER CONNECT THE GRILL TO AN UNREGULATED GAS SUPPLY. L.P. GAS (LIQUIFIED PETROLEUM /PROPANE) If your grill is factory built for L.P., the regulator supplied is set for 11 water column and is for use with L.P. gas only. The factory-supplied regulator and hose must be used with a 20 lb. L.P. cylinder. L.P. GAS SAFETY REQUIREMENT The LP-gas supply cylinder must be constructed and marked in accordance with the Specifications for LP-gas Cylinders of the U.S. Department of Transportation (D.O.T.) or the National Standards of Canada CAN/CSA-B339, Cylinders, Spheres and Tubes for the Transportation of Dangerous Goods, and Commission, as applicable; and 1. Provided with a listed overfilling prevention device. 2. Provided with a cylinder connection device compatible with the connection for outdoor cooking appliances. It must be provided with a shut-off valve terminating in gas tank valve outlet. It must include a collar to protect the cylinder valve. The cylinder supply system must be arranged for vapor withdrawal. Do not operate the gas grill indoors or in any enclosed area. If the gas grill is not in use, the gas must be turned off at the supply cylinder. If the grill is to be stored indoors, disconnect the gas supply cylinder and leave the cylinder outdoors. 4
9 LP GAS HOOK-UP TWIN EAGLES GAS GRILL Install the factory-supplied hose and regulator assembly as shown. Connect the 3 / 8 flare end of the hose to the grill coupling using a ¾ open wrench. Do not apply pipe sealant to the 3 / 8 flare connection. Connect the regulator to the LP cylinder hand tighten it, do not use a wrench. Check for leaks using soapy water solution. (Reference page 7 for leak test procedure). 2 ½ 4" MINIMUM CLEARANCE TO ALLOW LID TO FULLY OPEN CAUTION: Provide adequate ventilation holes in the enclosure for safety purposes in the event of a gas leak. Note: An enclosure for LP gas cylinder must be vented on the level of the cylinder valve and at floor level. The effectiveness of the opening(s) for purposes of ventilation shall be determined with the LP gas supply cylinder in place. This shall be accomplished by one of the following: a. One side of the enclosure shall be fully open; or b. For an enclosure having four sides, a top and a bottom: 1. At least two ventilation openings at cylinder valve level shall be provided in the sidewall, equally sized, spaced at 180 degrees (3.14 rad), and unobstructed. Each opening shall have a total free area of not less than 1/2 square inch per pound (7.1 cm 2 /kg) of stored fuel capacity and not less than a total free area of 10 square inches (64.5 cm 2 ). Ventilation opening(s) shall be provided at floor level and shall have a total free area of not less than ½" square inch per pound (7.1 cm2/kg) of stored fuel capacity and not less than a total free area of 10 square inches (64.5 cm2). If ventilation openings at floor level are in a sidewall, there shall be at least two openings. The bottom of the openings shall be at floor level and the upper edge no more than 5 inches (127 mm) above the floor. The openings shall be equally sized, spaced at 180 degrees (3.14 rad) and unobstructed. 5
 gas cylinder. WARNING: DO NOT PLACE MORE THAN ONE CYLINDER IN THE BASE CABINET ENCLOSURE AT ANY TIME. WARNING: DO NOT USE A DENTED OR RUSTED LP CYLINDER.")

10 PORTABLE LP CONNECTION TWIN EAGLES GAS GRILL One of the many features of the TWIN EAGLES grill base is the pullout slide pan for easy access to the LP gas tank. NOTE: Use only a 20-lbs. (5 gallon capacity) gas cylinder. WARNING: DO NOT PLACE MORE THAN ONE CYLINDER IN THE BASE CABINET ENCLOSURE AT ANY TIME. WARNING: DO NOT USE A DENTED OR RUSTED LP CYLINDER. NEVER USE A CYLINDER WITH A DAMAGED VALVE. ALWAYS CHECK FOR LEAKS AFTER CHANGING THE LP CYLINDER. THE LP PRESSURE REGULATOR AND HOSE SUPPLIED WITH THIS UNIT MUST BE USED WITHOUT ALTERATION. CAUTION: USE EASY PULL. Use the slot at the front of the pan to push or pull out the gas cylinder. Do not place hand on the top of the gas cylinder when pushing or pulling the slide pan. EASY PULL 1) To install the gas cylinder, pull out the slide pan and place the cylinder onto the pan. 2) Check to ensure that the tank s gas valve on top of the cylinder is closed. 3) Connect the LP regulator (included) to the cylinder and hand-tighten only. Open the tank valve and make sure all connections are leak tight using a soapy water solution and a brush. (Reference page 7 for leak test procedure). 6
11 NATURAL GAS INSTALLATION TWIN EAGLES GAS GRILL The installation must conform with local codes or, in the absence of local codes, with either the national Fuel Gas Code, ANSI Z223.1/NFPA 54, or CAN/CGA-B149.1, Natural Gas Installation Code or CAN/CGA-B149.2, Propane Installation Code. 1. This gas appliance and its individual shutoff valve must be disconnected from the gas supply piping system during any pressure testing of that system at the test pressures in excess of 1/2 psi (3.5 kpa). 2. This appliance must be isolated from the gas supply piping system by closing its individual manual shutoff valve during any pressure testing of the gas supply piping system at test pressures equal to or less than 1/2 psi (3.5 kpa). If the gas grill is factory built for natural gas, the regulator supplied is set for 4 water column. The regulator is convertible to 10 water column for system LP application. Do not use with a 20-lb LP cylinder. Make sure that the regulator is set for natural gas. To check, remove the brass hex cap. You will find the conversion plastic pin attached to the cap to the underside of the cap. If the disc (1/2 in. diameter) of the pin is close to the cap, then the regulator is set for natural gas. If the disc is at the tip of the pin, away from the brass cap, the regulator is set for system LP application. To convert to natural gas, remove the plastic conversion pin and invert and replace it back in a manner such that the disc is close to the brass cap. For both natural and LP, the maximum inlet pressure is 14 water column. A typical natural gas installation is shown below. Make sure that the factory-supplied regulator is used and installed with the arrow mark on the regulator pointing towards the gas grill. Do not use any replacement regulator other than that specified by Twin Eagles. Use only pipe sealants that are approved for use with natural and LP gases. An installer-supplied gas shutoff valve must be installed in an accessible location. 2 ½ 4" MINIMUM CLEARANCE TO ALLOW LID TO FULLY OPEN 11 (MUST BE EASILY ACCESSIBLE) CAUTION: Provide adequate ventilation holes in the enclosure for safety purposes in the event of a gas leak. 7
12 LEAK TEST TWIN EAGLES GAS GRILL CAUTION BEFORE TESTING Finding and/or fixing a gas leak is NOT a DO-IT-YOURSELF procedure. NEVER USE THE GRILL WITHOUT FIRST LEAK TESTING THE GAS CONNECTIONS. WARNING: DO NOT USE OPEN FLAME TO CHECK FOR LEAKS. USE OF AN OPEN FLAME COULD RESULT IN A FIRE, EXPLOSION AND BODILY HARM. DO NOT SMOKE WHILE PERFORMING THE LEAK TEST! To prevent fire or explosion hazard, DO NOT use or permit sources of ignition in the area while performing a leak test. Perform leak test outdoors only. Check to ensure that flexible hoses do not have any cuts and wear that may affect the safety before each use. Only the factory supplied hose and regulator must be used. Use only replacement regulator and hose assemblies specified by Twin Eagles. LEAK TEST 1) Prepare a leak testing solution of sudsy water by mixing in a spray bottle with half liquid soap and half water. 2) Confirm that all control knobs are in the OFF position. 3) Turn the main gas valve supply ON. 4) Apply leak testing solution by spraying on the pipe joints, fittings, and hose. 5) A gas leak is detected if; a) there is a faint gas smell and/or b) growing bubbles appear on any of the connection points and/or hose, DO NOT attempt to ignite the grill and IMMEDIATELY turn off the gas supply valve. 6) When there is a gas leak, call a qualified service technician. DO NOT use the grill until the leak is corrected. 4" MINIMUM TO ALLO FULL LEAK TEST LEAK TEST LEAK TEST LEAK TEST LEAK TEST LEAK TEST LEAK TEST 8


 plug for protection against shock hazard. Do not cut or remove the grounding prong from the plug.")

13 ELECTRICAL REQUIREMENTS TWIN EAGLES GAS GRILL TO INSTALL AND SECURE POWER TRANSFORMER Grill models with interior lights have a power transformer which is concealed in a stainless steel box with an attached power supply cord. This transformer must be secured in a dry location and away from the grill firebox and excessive heat area. 1a. In a base cart application, two mounting screws with nuts are provided at the bottom right rear corner of the cart. If not provided, drill two holes using the transformer box as a template. Secure the transformer box as shown. 1b. In an island application secure the transformer box near the GFCI 120V outlet in a dry location and away from the grill firebox and excessive heat area. 2a. Make the transformer connections to the wire harness located at the right rear of the grill to the harness of the transformer box. 2b. Plug-in the transformer s power cord to the properly grounded GFCI 120V outlet. ROTISSERIE MOTOR: The rotisserie motor requires 120 volt supply. The power supply cord on the motor is equipped with a 3-prong (grounded) plug for protection against shock hazard. Do not cut or remove the grounding prong from the plug. WARNING Electrical Grounding Instructions: This outdoor gas cooking appliance is equipped with a three prong (grounding) plug for your protection against shock hazard and should be plugged directly into a properly grounded three prong outlet. Do not cut or remove the third prong from this plug. AVERTISSEMENT Instruction pour la mise à la terre electrique: Cet appareil est muni d une fiche à trois broches (mise à la terre) afin de vous protéger des chocs et doit être branché directement dans une prise de courant à trois broches adéquatement mise à la terre. Il ne faut pas couper ou enlever la broche de mise à la terre de cette fiche. 1a. 2a. 1b. 2b. 9
14 WIRING CONNECTION DIAGRAM 12v HALOGEN LAMP 12v HALOGEN LAMP USED ON 36&42 MODELS ONLY LED LIGHT HOOD SWITCH (NC) LED LIGHT WIRE HARNESS USED ON 36&42 MODELS ONLY HOT SURFACE IGNITER RESISTOR LIGHT SWITCH 2-PIN RECEPTACLE RED + C NO NC - M ( 1 4) F ( 1 4) M F 2-PIN PLUG ( 16) 3 M F ( 1 4) M F BLACK WHITE WHITE BLACK VALVE SWITCH (NO) POWER CHORD L1 115 V L TRANSFORMER M F ( 1 4) ( 1 4) ( 1 4) F M F M 4-PIN MOLEX CONNECTOR 10
15 LOCATING THE GRILL TWIN EAGLES GAS GRILL This gas appliance is designed and certified for outdoor use only. Do not locate this grill under overhead combustible surfaces. Do not operate the grill inside a building, garage, recreation vehicle or any enclosed area. When choosing an area, consider exposure to wind, proximity to traffic paths and length of gas supply line. Keep gas supply lines as short as possible to reduce pressure drop. Keep the grill away from windy area but keep the grill in a well-ventilated area. Do not obstruct the flow of combustion and ventilation air around the grill. The supporting edges of the grill must be located level and flat. The counter should also be leveled. CLEARANCE TO COMBUSTIBLE CONSTRUCTION A minimum clearance of 12 from the sides and 12 from the back of the grill to adjacent vertical combustible construction must be maintained. DÉGAGEMENT DE TOUTE CONSTRUCTION COMBUSTIBLE Il faut maintenir une distance minimum de 12 po (30.48 cm) sur les côtés et de 12 po (30.48 cm) sur l arrière du gril par rapport aux constructions combustibles verticales adjacentes. CLEARANCE TO NONCOMBUSTIBLE CONSTRUCTION A minimum clearance of 2 ½ from the back of the grill above cooking surface to non-combustible construction is required to allow the grill hood to open completely. A minimum of 6 clearance to the sides of the grill above cooking surface to non-combustible construction is recommended to provide space for the rotisserie motor and the spit rod. The grill can be installed directly next to non-combustible construction below the cooking surface. DÉGAGEMENT DE TOUTE CONSTRUCTION INCOMBUSTIBLE Une distance minimum de 2 ½ po (6.25 cm) de l arrière du gril au-dessus de toute surface de cuisson à la construction incombustible est prescrite pour permettre à la hotte d ouvrir complètement. Une distance minimum de 6 po (15.24 cm) des côtés du gril au-dessus de la surface de cuisson à la construction incombustible est recommandée pour prévoir de l espace pour le moteur de la rôtissoire et la poignée des broches de cuisson. Le gril peut être installé directement à proximité d une construction incombustible en-dessous de la surface de cuisson. 11
16 INSULATION JACKET CUT-OUT DIMENSIONS TWIN EAGLES GAS GRILL TWIN EAGLES GRILL INSULATING JACKET INSULATING JACKET INSULATING JACKETS MODEL A B TEIJ ¾ 33 ½ MODEL "A" "B" TEIJ-36 TPIJ /4 ¾ 3391/2 ½ TEIJ-42 TPIJ /4 ¾ 451/2 ½ ACCESS DOORS MODEL ACCESS DOORS C D MODEL TEAD-30 "C" 30 "D" 28 ¼ TEAD30 TEAD /4 ¼ TEAD ¼ TEAD / /04 ACCESS DOORS INSULATING JACKET INSTALLATION TWIN EAGLES OUTDOOR GRILLS INSULATING JACKET WARNING: Do not build the grill under overhead unprotected combustible construction. If the grill is to be placed into combustible enclosure, an approved insulating jacket is necessary to prevent fire, property damage and bodily injury. Use only Twin Eagles insulating jacket. Refer to next page for cut-out dimensions. IMPORTANT: Do not install the transformer box inside the insulating jacket (TEIJ). The transformer box must be secured away from excessive heat and in a dry location. 12
17 GRILL CUT-OUT DIMENSIONS TWIN EAGLES GAS GRILL DETAIL SEE DETAIL (TYPICAL TO ALL TOP UNITS) 13


18 ASSEMBLY INSTRUCTIONS TWIN EAGLES GAS GRILL The TWIN EAGLES Grill is produced fully assembled and tested in the factory and requires no major assembly in the field. For the purpose of safe shipping and transit, some parts such as the briquette trays and rotisserie components are wrapped inside the grill and require minor assembly. Check to ensure that all packaging material have been removed prior to grill operation. TO TO INSTALL INSTALL BRIQUETTE BRIQUETTES TRAYS: TRAYS 1. Put Briquettes briquette trays trays and into grill the hex grill grates above already the burner, installed as but shown packaging by placing material the flash-tube-hole may needed on to the be front. removed. 2. Put the briquette trays with the briquettes into the grill abhe 2. Place burner, the hexagonal as shown. grates directly above the briquette trays and make sure the square openings on the grates 3. Place the hexagonal grates directly above the briquette trays are at the front. and make sure the square openings on the grates are a TO INSTALL AND USE THE SMOKER BOX 1. Lift open smoker box lid and add smoking chips with water. 2. Remove a hex grate. Remove a ½ sized briquette tray where there is no flash tube. 3. Place the smoker box in place of the briquette tray and the smoker box will always line-up on top of the burner flame. Place hex grate back on. Turn on grill to HIGH heat. Once smoking starts, turn the heat down to prevent wood flare-up. Smoker box is standard on all grills. WARMING RACK LEVEL POSITIONS: The warming rack may be used at a HI and LOW level position. The HI level is further away from the heat source while the lower level position is closer to the heat source. When the warming rack is not in use, it may be moved out of the way by moving up to the top support hooks. 14


19 ROTISSERIE ASSEMBLY For Larger Loads 1. Install the rotisserie motor horizontally as shown. The motor socket hole will line up with the lower notch of the spit saddles. 2. Insert the rotisserie-rod into the motor socket hole and place the rod on the lower notch of each spit saddle. 3. Remove the hexagonal grates. 4. Place the basting pan on top of the briquette trays to catch the drippings. For Smaller Loads 1. Install the rotisserie motor vertically as shown. The motor socket hole will line up with the upper notch of the spit saddles. 2. Insert the rotisserie-rod into the motor socket hole and place the rod on the upper notch of each spit saddle. Place a basting pan on top of the hexagonal grates to catch the drippings. 15


20 OPERATING INSTRUCTIONS TWIN EAGLES GAS GRILL BEFORE LIGHTING THE GRILL DO NOT ATTEMPT TO LIGHT THE GRILL IF YOU SMELL GAS. WARNING! IT IS CRITICAL THAT THE GAS BURNERS ARE PROPERLY INSTALLED WITH THEIR ORIFICES INSIDE THE BURNERS AIR SHUTTERS. If not properly installed, gas may leak outside of the burner that could lead to fire, potential damage to your grill and bodily injury. Inspect the gas supply piping or hose prior to turning the gas ON. If there is evidence of cuts, wear, or abrasion, it must be replaced prior to use. The replacement pressure regulator and hose assembly must be the type specified by the manufacturer. Do not use the grill if the odor of gas is present. The pressure regulator and hose assembly supplied with the units must be used. If the unit is LP, screw the regulator and hand tighten to the valve of the cylinder and leak check the hose and regulator connections with a soap and water solution before operating the grill. Reference page 8 for leak test procedure. Always keep your face and body as far away as possible when lighting. Refer to spiders and insects warning and procedure under the cleaning and maintenance page of this manual. TO LIGHT THE GRILL BURNER Lighting the Grill 1. Open the grill hood completely. Do not attempt to light the grill with the hood closed. 2. Open the gas supply shut-off valve. 3. Push in the knob and verify that the hot surface igniter glows. The hot surface igniters are located inside the flashtubes and on the rear panel next to the rotisserie burner, (if equipped). If the igniter does not glow, verify for proper power supply. (Reference page 9 for electrical requirements). 4. Once the glowing is verified simultaneously push-in and turn the knob counter-clock-wise to the biggest flame marking on the bezel. Hold the knob pushed in for 5 seconds. Once you see or hear a flame you can release the knob. CAUTION: If ignition does not take place within 5 seconds, turn knob to the OFF position, wait for five minutes and repeat step Close the hood to allow the grill to pre-heat until the hood thermometer displays the desired grilling temperature. 16

21 Match/BBQ Lighter Lighting Instructions: If there is no electrical power supply available or if hot surface igniter will not light the burners, the burners can be lit manually using a lighted long match, taper or BBQ lighter. 1. Push and turn the knob counter-clock-wise to the biggest flame marking on the bezel. Hold the knob pushed in for 5 seconds. 2. Insert a lit match or BBQ lighter thru the hex grates and near the top of the flashtube. Once you see or hear a flame you can release the knob. Important: If burner fails to light within 5 seconds, turn off gas and wait 5 minutes before repeating the process. Warning: If you smell gas, shutoff the gas supply and immediately check for leaks using the soapy water technique. USING THE GRILL 1. Check to be certain that the drip pan is in place and pushed all the way into the grill. 2. Light the grill burners using the instructions in use and care manual. 3. Turn the control knobs to HI and allow the grill to preheat for 15 minutes or until desired temperature is displayed on the thermometer. The top cover is to be closed during the appliance preheat period. 4. Place the food on the grill and cook to the desired temperature doneness. Adjust heat setting, if necessary. The control knob may be set to any position between HI and LO. 5. Allow grill to cool and clean the drip pan after each use. INTERIOR LIGHT OPERATION The TWIN EAGLES grill is equipped with two interior halogen lights and decorative knob lights for late night grilling. The grill is equipped with a switch that allows the interior lights to shut-off automatically when closing the hood without turning off the knob lights. 1. Push the switch located on the front panel to turn ON interior and knob lights. WARNING: Do not touch the interior halogen lights. It may be hot and can cause serious burns. REPLACING INTERIOR LIGHT BULBS WARNING! Unplug the grill from the 120V power source before replacing the light bulb. 1. Remove the screw that holds the lens cover and slide the lens cover out. 2. Remove the old light bulb by pulling it straight out of the socket without twisting the light bulb. 3. Wearing plastic gloves, insert the new light bulb into the socket. DO NOT touch bulb with bare hands as the oil and dirt with shorten bulb life. 4. Slide the light lens back into the light assembly and screw it to secure it. 17
22 USING THE ROTISSERIE BURNER The Rotisserie system rotates the food in front of infrared burner heat for even cooking and juicier taste. 1. Install the rotisserie motor on the motor bracket and plug it in to proper voltage. Reference electrical requirements. 2. Insert the food on the middle of the spit rod and then secure it with the meat holders on both ends by tightening the thumb screws on the meat forks. If multiple pieces of food will be cooked at the same time, make sure the load is evenly balanced on the spit rod. Proper weight balancing will lead to evenness of cooking and prolong the life of the rotisserie motor. 3. Insert the spit rod in the rotisserie motor at desired cooking position. You may need to remove the cooking grates to create clearance for bigger loads of foods. Reference assembly instructions for rotisserie assembly instructions. 4. Always use the basting pan beneath the food to catch drippings and prevent them from falling on the burners and briquette trays. 5. Locate the rotisserie knob which is the second knob from the left. 6. Push-in and turn the knob counter-clock-wise to the biggest flame marking on the bezel. Hold the knob pushed in for 5 seconds. Once you see or hear a flame you can release the knob. 7. Once lit, the rotisserie burner will reach cooking temperature in about 1 minute. CAUTION: If ignition does not take place within 5 seconds, turn knob to the OFF position, wait for five minutes and repeat step Once cooking is completed, shut-off the rotisserie burner and main valve. WARNING: When using the rotisserie always keep the front hood closed except when basting or checking the meat for cooking completion. It is recommended to use a meat thermometer to check if the food is completely cooked. CAUTION: In sunny or heavy light environments, the flame from the infrared rotisserie burner may be difficult to see and verify complete ignition. NOTE: The rotisserie motor must be stored in an area secured from the surrounding elements when not in use. Do not leave it mounted on the grill. SEAR ZONE Searing steaks and other meats with infrared sear burner at the beginning of the grilling cycle helps lock in juices and flavor. Sear the meats quickly with the front hood open, followed by regular grilling over the U-burner. CAUTION Never allow liquids to come in contact with the Infrared Sear Zone burner since it could cause damage to the ceramic tiles. DO NOT place briquette tray over sear burner. This will block the infrared heat and will damage the tray. SMOKER BOX The Twin Eagles sealed smoker box can hold dry wood chips or liquids for hickory, mesquite or your favorite wood chips to give meat a smoky flavor. 1) Remove a grate. 2) Remove a half size briquette tray where there is no flashtube and replace it with the smoker box. 3) Add water and your favorite wood chips. 4) Wait for the chips to start smoking and you are ready to start grilling. WARNING: Never use the smoker box over the Sear Zone burner 18

 with a stainless steel cleaner. Use the mildest cleaner and always scrub in the direction of the grain.")
23 CLEANING & MAINTENANCE TWIN EAGLES GAS GRILL STAINLESS STEEL The TWIN EAGLES grill is made of all welded stainless steel. It is non-rusting and non-magnetic. Never clean the stainless steel when it is hot. After the initial grilling use, certain areas of the grill may discolor. This is a normal discoloration caused by the intense heat given off by the burners. Specks of grease can gather on the surface of the stainless steel and get baked-on. These can be removed by using a mild abrasive pad (like Scotch Brite) with a stainless steel cleaner. Use the mildest cleaner and always scrub in the direction of the grain. Do not use steel wool to clean the grill. Do not use abrasives on the polished highlights. Be extra careful when cleaning around the highlights. Metal polisher or mild chrome cleaner can be used to bring back the luster on highlights. To touch-up minor scratches in the stainless steel, sand the affected surface very lightly, with 100-dry grit emery sandpaper in the direction of the grain. HEX GRILL GRATES HEX GRATES The easiest way to clean the hex grill grates hex grates is to scrub is to scrub them with them a with barbeque a barbeque brush brush immediately immediately after cooking after cooking is completed is and completed the flame and is the turned flame off. is turned off. Wear a barbeque mitt to protect your hands from the heat and steam. Dip a brass bristle barbeque brush in tap water and scrub the hot grill. Dip the brush frequently in tap water. Steam, created as water comes in contact with the hot grill, helps loosen food particles stuck in the grill. These food particles will either get get burned burned into into the the briquettes briquettes or fall or fall into into the the cleaning cleaning pan. pan. Cleaning Cleaning ofthe grill of would the grill be longer would be and longer more difficult and more if difficult the grill if racks the are grill racks are allowed to cool before cleaning. When cleaning the allowed to cool before cleaning. grates make sure to not hit the rotisserie burner. CERAMIC BRIQUETTE TRAY It is not necessary to remove and clean the briquettes from the tray after every grilling. They burn themselves clean during the next cooking operation. If desired, you can burn them clean by lighting the grill and letting it burn on high for about 30 minutes with the briquette tray upside down. Periodically, the briquette trays need to be cleaned. Remove them from the grill, shake free loose of the debris and wipe the trays clean. Do not handle a hot briquette tray. REPLACING BRIQUETTE TRAYS 1) Remove the screws that hold the trim. 2) Remove the old briquettes and place the new briquettes on the same location as the old ones. 3) Place the trim with the flash-tube-hole on the trim on the same side as the flash-tube-hole on the tray. CAUTION DO NOT place briquette trays over the infrared sear zone burner. This will block the infrared heat and will cause damage to the tray. Flash tube hole. 19


24 BURNERS Burners are made of heavy gauge stainless steel and can be soaked in water and cleaned with wire brush. Check every port hole for clogs. Use a wire pin to clean out clogged ports. Make sure the burner is dry before installing it back to the grill. INFRARED SEAR ZONE BURNER INFRARED The infrared SEAR burner ZONE has BURNER stainless housing and protective screen. The The infrared protective burner screen has helps stainless reflect housing heat up and to protective the screen. cooking The surface protective and also screen catches helps any reflect food particles heat up to from the cooking surface landing and on the also ceramic catches burner. any food At particles the searing from temperatures landing on the that ceramic burner. At the searing temperatures that the burner the burner reaches all food particles will be burned off so the reaches all food particles will be burned off so the only only maintenance required is to cleaning the protective screen maintenance required is to cleaning the protective screen and and checking for any objects that may be trapped. checking for any objects that may be trapped. DRIP PAN The drip pan collects grease, liquid and fallen food The cleaning pan collects grease, liquid and particles. Allow the pan and its contents to cool before cleaning. fallen food particles. Allow the pan and its contents to cool Slide before the pan cleaning. out and Slide wipe it the clean. pan out Make and sure wipe the it drip pan is clean. fully inserted Make sure back the into pan the is grill. fully It inserted is highly back recommended to its to tray clean before the pan using after the every grill. use It is to highly avoid any recommended possibility to of a grease clean fire. DO the pan NOT after use every the grill use without to avoid the any drip possibility pan pushed of all the a way grease to the fire. back DO of NOT the grill use unit. the grill without the drip pan pushed all the way to the back of the grill unit. SMOKER BOX The smoker box is a component that can be easily removed from the grill for cleaning. The lid easily comes off for easy cleaning. SPIDER AND INSECT WARNING Spiders and other insects can nest in the burners of this and any other grills, which causes the gas to flow from the front of the burner. This dangerous condition can cause a fire behind the valve panel, damaging the grill and making the grill unsafe to operate. Inspect the burners once a year or if the grill has not been used for more than one month or if any of the following conditions occur: 1) The smell of gas in conjunction with the burner flames appearing yellow. 2) The grill does not reach temperature. 3) The grill heats unevenly. 4) The burners make popping noises. 20

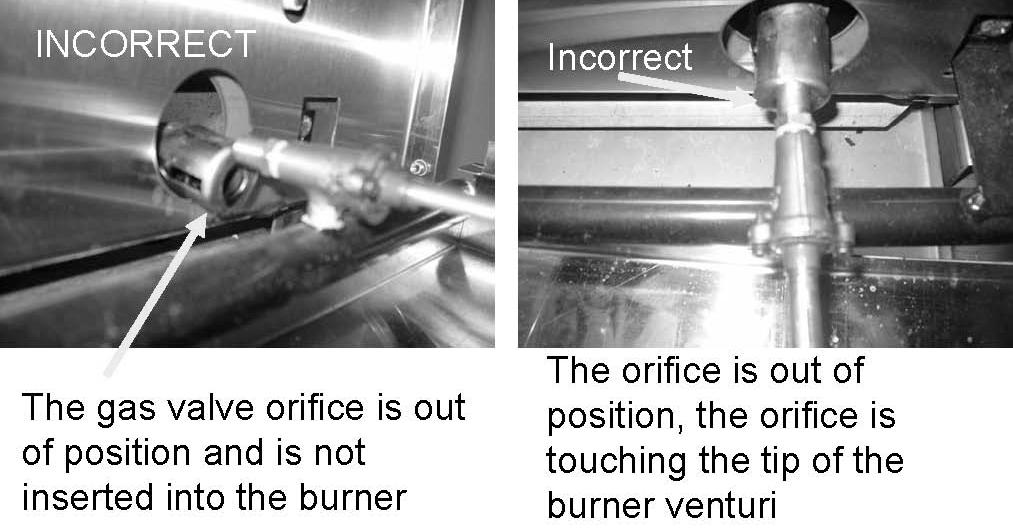
25 Correct Burner Installation 21
26 22 EXPLODED VIEW TWIN EAGLES GAS GRILL
27 Item No. TE Part Number REPLACEMENT PARTS LIST TWIN EAGLES GAS GRILL Description TEBQ 30G TEBQ 30R TEBQ 36G TEBQ 36R TEBQ 42G 1 S Y 30 Front Hood Assembly S Y 36 Front Hood Assembly S Y 42 Front Hood Assembly S14128 Hood Bumper S13105 Bracket, Handle Chrome S12315 Hood Handle (1.25D x 18GA x 24) S12339 Hood Handle (1.25D x 18GA x 30) S12316 Hood Handle (1.25D x 18GA x 36) S15340A Thermometer S14421 Basting Pan S16208Y Rotisserie Motor with Hanger (s/s) S21748 Rotisserie Motor Hanger S21758 Warming Tray Bracket S21737 Infrared Burner Igniter Holder S12640 Elbow, 3/8 NPT x 3/8 MPT S Orifice, #50 I.R. NG S Orifice, #57 I.R. LP S Orifice, #48 I.R. NG 1 19 S Orifice, #56 I.R. LP 1 20 S Rear Hood Cover, S Rear Hood Cover, S Rear Hood Cover, S16240 Halogen light complete S16191 Bulb, halogen light (12V/ 10W) S16241 Cover Lens S21747-L Motor Mounting Bracket (Lh) S21747-R Motor Mounting Bracket (Rh) (Optional) S16230 Hot surface igniter, Rotisserie Burner S13330 Large Infrared Rotisserie Burner 1 30 S13331 Small Infrared Rotisserie Burner S13865 Meat Holder Forks (pair) (s/s), 9 / 16 spit rod S14194 Spring Stand Off S14195 Acorn Nut S14216Y Front Hood Hardware Kit S13833 Warming Rack (30 ) (s/s) S13867 Warming Rack (36 ) (s/s) S13834 Warming Rack (42 ) (s/s) S13863 Spit Rod (30 ) (s/s) 1 39 S13868 Spit Rod (36 ) (s/s) 1 40 S13864 Spit Rod (42 ) (s/s), 9 / S15303 Regulator, NG (NG grill ONLY) S20206 Spit Saddle S15121 Burner Valve Microswitch S15101Y Burner Valve S12601 Brass Elbow, 3/8 CC x 1/8 FIP S15302 Regulator, LP (LP grill ONLY) S12602 Brass Coupling, 3/8 Flare x ½ FIP S Orifice, #41 NG (Main Burner) S Orifice, #53 LP (Main Burner) S21796 Manifold Spacer * * * * * * 51 S12734 Manifold, S12736 Manifold, S12735 Manifold, S /8 Pipe Plug S12665 ¼ Hex Socket Plug S Heat Deflector, S Heat Deflector, S Heat Deflector, S Y Front Panel, 30R 1 60 S Y Front Panel, 36R 1 61 S Y Front Panel, 42R 1 62 S y Front Panel, 30G 1 63 S Y Front Panel, 36G 1 64 S Y Front Panel, 42G 1 65 S16196 Illuminated Switch TEBQ 42R 23
28 REPLACEMENT PARTS LIST TWIN EAGLES GAS GRILL (CONTINUED) Item No. TE Part Number Description TEBQ 30G TEBQ 30R TEBQ 36G TEBQ 36R TEBQ 42G TEBQ 42R 66 S13154 Knob, Chrome S13122 Knob Insert S13147 Twin Eagles Logo S13128P Bezel, Knob, Stainless Steel S16192 LED Holder S16194 Hood Switch S21757 Hood Switch Bracket S12112 Hood Switch Rod S Y Drip Pan Assy. (30 ) S Y Drip Pan Assy. (36 ) S Y Drip Pan Assy. (42 ) S14420 Roller Bearing S12401 Flex Tubing, 3/8 x S16177-B Hot surface igniter, Main Burner S21750Y Flash Tube, (For standard U-Burners ONLY) S21765Y Flash Tube, (For optional Sear Zone Burners ONLY) S13345 Sear Zone Burner (For optional Sear Zone Burners ONLY) S13144 Screen Mesh (For optional Sear Zone Burners ONLY) S Stainless Steel Hex Grate S Stainless Steel Hex Grate S / 16 Stainless Steel Hex Grate S14226 Springs kit, hood S21753Y 12 Briquette Tray Assembly complete with briquettes (Standard grill) S21759 Y 10 Briquette Tray Assembly complete with briquettes (Standard grill) S21761 Y 4 ½ Briquette Tray Assembly complete with briquettes (Grill w/ Sear Zone) Optional S21752Y 6 Briquette Tray Assembly complete with briquettes S Stainless Steel U6-burner (0.75 in. wall) S Stainless Steel U5-burner (0.75 in. wall) S21623Y Smoker Box Assy S22729Y Smoker Box, Assy, (36 ) S Zone Divider S Transformer Cover S16264 Fuse, 10A 250V S16263 Fuse Holder S22038 Transformer Mount S16233 Transformer S16233Y Transformer Assembly S14220 Screw, 1/4-20x1/2, Phil Pan Head S/S S14121 Bezel Screw Non-Shown Parts S13129 Briquettes Only (48) (48) (72) (72) (72) (72) S16247Y LED Wire Harness, 30 (NOT SHOWN) 1 1 S16248Y LED Wire Harness, 36 (NOT SHOWN) 1 1 S16248Y LED Wire Harness, 42 (NOT SHOWN)

29 TROUBLESHOOTING GUIDE TWIN EAGLES GAS GRILL BEFORE CALLING FOR SERVICE: If your Twin Eagles grill does not function properly, use the following troubleshooting guide before contacting your dealer for service. The troubleshooting guide may save the cost of a service call and the inconvenience of being with out your grill. PROBLEM Grill will not light. Burner flame is yellow and gas odor can be smelled. Low heat generated with knob in HI position. Too much heat. Excessive flare-up. Burner blows out Interior light will not turn ON. Glow igniter will not turn ON. Front panel lights will not turn ON. Thermometer is not reaching high temperatures WHAT TO DO 1. Push in the knob and verify that the igniter glow. 2. If the igniter doe not glow verify proper power supply. GFCI 120V. a. Purge the line of any trapped air. b. Check if you can match-light the burner. c. Check to see that the other burners operate. NOTE: It is normal to hear a popping sound when the grill burners are first turner ON. 1. Check the burner inlet for obstruction ex. Spiders, insects, etc. 2. Check the air shutter for proper adjustment. 3. Check any source of gas leak. 1. Check if the problem is isolated to only one burner. If it appears so, clean the orifice and burner, clearing ports of any obstruction. 2. Check for any bent or kinked fuel hose. 3. Check if the air shutter is properly adjusted. 4. Check for proper gas supply and pressure. 5. Pre-heat grill for 15 minutes. 6. If using LP gas, check for empty tank. 1. Check for damaged orifice or no orifice. 2. Check for unauthorized regulator adjustment. 1. Check if the cooking grids are dirty. Clean if necessary. 2. Overload from fatty meats or excessive cooking temperature. 1. Check for any burner defect. 2. Check for proper burner installation. 3. Check if fuel mixture is too lean. 4. Check if gas supply is sufficient. 5. Check if LP tank is empty. 6. Check if the grill location is subject to high winds. 1. Check if the unit is plugged into proper voltage (GFCI 120V). 2. Replacement of the light bulb may be required. 1. Check if the unit is plugged into proper voltage (GFCI 120V). 1. Check if the unit is plugged into proper voltage (GFCI 120V). 1. Allow the grill 15 minutes with hood closed at high setting in order to reach higher temperatures. 25
30 TWIN EAGLES GRILL WARRANTY LIMITED LIFETIME WARRANTY: Twin Eagles warrants the stainless steel main burners, hexagonal grates and all fabricated stainless steel components, to be free from defects in materials and workmanship under normal residential use for the lifetime of the product. This warranty excludes discoloration, surface scratches, weather and atmospheric related staining, and minor surface rust and oxidation which are normal conditions and to be expected with any outdoor product. The actual part will be repaired or replaced, free of charge, with the owner paying for all other costs, including labor and freight. FIVE YEAR LIMITED WARRANTY: Twin Eagles warrants the stainless steel briquette trays, gas valves, sear zone burners, rotisserie burners and drip pans to be free from defects in materials and workmanship under normal residential use for a period of five years from the original date of purchase. The actual part will be repaired or replaced, free of charge, with the owner paying for all other costs including labor and freight. ONE-YEAR FULL WARRANTY: Twin Eagles warrants the outdoor gas grill and all of their component parts, to be free from defects in materials and workmanship under normal residential use for a period of one year from the original date of purchase. Twin Eagles will repair or replace, at its option, any part, which fail or is found to be defective during the warranty period, at no cost to the original purchaser. Warranty service must be performed by a Twin Eagles authorized representative during normal business hours. NINETY (90) DAY RESIDENTIAL PLUS WARRANTY: This warranty applies to applications where use of the product extends beyond normal residential use such as bed and breakfast inn and private clubs. The actual part will be repaired or replaced, free of charge, with the owner paying for all other costs including labor and freight. This warranty excludes all commercial locations such as restaurants and food service locations. WARRANTY LIMITATIONS & EXCLUSIONS This warranty shall apply only to the products purchased and located in the continental United States and Canada. The warranty coverage begins on the original date of purchase and proof of date of purchase is required. In order to activate the warranty, we require that you send in the attached warranty registration card. This warranty applies only to the original owner and may not be transferred. This warranty does not apply to damages resulting from negligence, alteration, misuse, abuse, accident, natural disaster, loss of electrical power to the product for any reason, improper installation or improper operation, unauthorized adjustments or calibrations, dings, dents, scratches, or damages due to harsh cleaning chemicals. This warranty does not apply to commercial use, or to products with altered or removed serial numbers. Twin Eagles shall not be liable for incidental, consequential, special or contingent damages resulting from its breach of this written warranty or any implied warranty. WARRANTY SERVICE & REPLACEMENT PARTS: Call your authorized selling dealer or call Twin Eagles directly at Be prepared to furnish the following information: Purchaser s name, model and serial number of the grill, date of purchase and the accurate description of the problem. Twin Eagles will not pay for service calls for correcting an installation problem. Owner shall be responsible for proper installation, providing normal care and maintenance, providing proof of purchase upon request and making the grill accessible for service. In the event of any warranty replacement, all removal, replacement, installation and shipping costs are the responsibility of the grill owner. Some states do not allow limitations on how long an implied warranty lasts, or the exclusions of or limitations on consequential damages. This warranty gives you specific legal rights and you may have other rights, which vary from state to state. 26

31 HOW TO OBTAIN SERVICE For service, please contact your TWIN EAGLES dealer or call TWIN EAGLES direct at (800) or (562) or fax (562) Mailing address: Twin Eagles, Inc East 166 th Street Cerritos, CA Visit us at Please provide: Model number Serial Number Date of installation A description of the problem Cut Here Warranty Registration Customer Name Model # Address Serial # City Zip Phone # Date Purchased Dealer s Name Dealer s Address This Warranty Registration card must be returned within thirty days of purchased to properly activate your warranty. This information is for our internal use only. Or you may register online at
BULL. ASSEMBLY & OPERATING INSTRUCTIONS
 BULL. Dutdaar Products Inc. "., Ontario, California 91761 ASSEMBLY & OPERATING INSTRUCTIONS Model No. 18038 7-Burner High Grade Commercial Stainless Steel Longhorn, LP Model No. 18039 7- Burner High Grade
OWNERS MANUAL. Installation, Operation & Maintenance Guide MODELS: SO30BQRRL/SO42BQRL
 OWNERS MANUAL Installation, Operation & Maintenance Guide MODELS: SO30BQRRL/SO42BQRL This Page Intentionally Left Blank For Your Safety... 3 Basic Safety Guidelines... 5 Installation... 6 Gas Connection
USE AND CARE MANUAL FOR OUTDOOR USE ONLY
 S o n o m a PLATINUM EDITION Sonoma Platinum Edition Grill: 27 Model with Rear Infrared Burner TM USE AND CARE MANUAL FOR OUTDOOR USE ONLY General Safety Instructions IMPORTANT SAFETY INFORMATION - Read
DELTA HEAT GAS GRILL INSTALLATION, USE & CARE MANUAL
 DELTA HEAT GAS GRILL INSTALLATION, USE & CARE MANUAL Models: 26G-C 32G-C 32R/S-C 38G-C 38R/S-C P/N: 18774N (05/18) A special message Congratulations on your purchase of Delta Heat gas barbecue grill. Delta
Folding Grill Stand Manual
 O u t d o o r G r i l l i n g P r o d u c t s Folding Grill Stand Manual MODEL: CFGS-150 IMPORTANT SAFETY INSTRUCTIONS READ AND SAVE THESE SAFETY INSTRUCTION BEFORE USING THIS GRILL STAND m DANGER: m Failure
STAINLESS STEEL GAS BARBECUE MODEL NO: SSBBQ4 USER GUIDE PART NO: /11
 STAINLESS STEEL GAS BARBECUE MODEL NO: SSBBQ4 PART NO: 6925310 USER GUIDE 2/11 INTRODUCTION Thank you for purchasing this CLARKE product. Before attempting to use this product, please read this manual
14 ROUND TABLETOP GAS GRILL. Product code: UPC code: Date of purchase: / /
 OWNER S MANUAL 14 ROUND TABLETOP GAS GRILL Product code: 0-03946564-6 UPC code: 0 45774 87562 1 Date of purchase: / / Safety Guidelines... Safety Instructions... 1 2-3 Assembly Instructions... 4-7 Lighting
USE AND CARE MANUAL FOR OUTDOOR USE ONLY MADE IN THE U.S.A.
 S o n o m a PLATINUM EDITION Sonoma Platinum Edition Grill: 30 Model TM USE AND CARE MANUAL FOR OUTDOOR USE ONLY MADE IN THE U.S.A. General Safety Instructions IMPORTANT SAFETY INFORMATION - Read this
GAS BARBECUE MODEL NO: BBQ4 USER GUIDE PART NO: /11
 GAS BARBECUE MODEL NO: BBQ4 PART NO: 6925305 USER GUIDE 2/11 INTRODUCTION Thank you for purchasing this CLARKE product Before attempting to use this product, please read this manual thoroughly and follow
DELTA HEAT GAS GRILL INSTALLATION, USE & CARE MANUAL. Models: DHBQ26G-C DHBQ32G-C DHBQ32R/S-C DHBQ38R/S-C P/N: 18774B (12/14)
") DELTA HEAT GAS GRILL INSTALLATION, USE & CARE MANUAL P/N: 18774B (12/14) Models: DHBQ26G-C DHBQ32G-C DHBQ32R/S-C DHBQ38R/S-C A special message Congratulations on your purchase of Delta Heat gas barbecue
DELTA HEAT GAS GRILL INSTALLATION, USE & CARE MANUAL P/N: 18774B (12/14) Models: DHBQ26G-C DHBQ32G-C DHBQ32R/S-C DHBQ38R/S-C A special message Congratulations on your purchase of Delta Heat gas barbecue
TWIN EAGLES GAS GRILL INSTALLATION, USE AND CARE MANUAL
 TWIN EAGLES GAS GRILL INSTALLATION, USE AND CARE MANUAL P/N: 19198F (07/18) MODELS: TEBQ30G-C TEBQ30R-C TEBQ36G-C TEBQ36R-C TEBQ42G-C TEBQ42R-C TEBQ54RS-C A special message to our customers Congratulations
HORIZON BARBECUE ROASTING HOOD OWNERS MANUAL
 HORIZON BARBECUE ROASTING HOOD OWNERS MANUAL 0 IMPORTANT READ ALL INSTRUCTIONS BEFORE ASSEMBLY, INSTALLATION OR OPERATING ROASTING HOOD SAFETY PRECAUTIONS AND WARNINGS Tucker Horizon barbecues and roasting
Introduction. No Hassle Guarantee
 Pro Grill MANUAL Introduction Thank you for selecting West Marine s Pro Grill. Your unit has been carefully inspected and tested. The Pro Grill is one of the finest barbecues manufactured for marine use.
for Assembly, Operating & Maintenance of THIS CHARCOAL GRILL IS DESIGNED FOR OUTDOOR USE ONLY.
 Owner s Manual for Assembly, Operating & Maintenance of Model M-15AB Charcoal Grill www.bigjohngrills.com YOU MUST READ THIS OWNER S MANUAL BEFORE OPERATING YOUR CHARCOAL GRILL. WARNING: Do not ignite
DELTA HEAT GAS GRILL INSTALLATION, USE & CARE MANUAL
 DELTA HEAT GAS GRILL INSTALLATION, USE & CARE MANUAL Models: 26G-C 32G-C 32R/S-C 38G-C 38R/S-C P/N: 18774O (07/18) A special message Congratulations on your purchase of Delta Heat gas barbecue grill.
DELTA HEAT GAS GRILL INSTALLATION, USE, & CARE MANUAL
 DELTA HEAT GAS GRILL INSTALLATION, USE, & CARE MANUAL P/N: 17542A 10/18 MODELS: 26G-D 32G-D 32R/S-D 38G-D 38R/S-D A Special Message to our Customers... Congratulations on your purchase of Delta Heat gas
17.75 In. Table Top Gas Grill
 17.75 In. Table Top Gas Grill Model #OCTG-1775 OUTDOOR USE ONLY! NEVER USE INDOORS! CARBON MONOXIDE HAZARD Burning propane inside may be fatal. It gives off carbon monoxide, which has no odor. NEVER burn
VCS325SSBI Series and VCS525SSBI Series Assembly Procedures
 VCS325SSBI Series and VCS525SSBI Series Assembly Procedures Model VCS525SSBI Shown Tools Required: Knife or scissors, Phillips or Robertson (square head) screwdriver. WARNING: Some parts may have sharp
DUAL BLAZE PORTABLE GAS GRILL
 Outdoor Grilling Pro ducts DUAL BLAZE PORTABLE GAS GRILL MODEL: CGG-522 ASSEMBLY AND OPERATING INSTRUCTIONS m WARNING: FOR OUTDOOR USE ONLY m This instruction manual contains important information necessary
GRILLSTER PORTABLE GAS GRILL
 Gourmet Outdoor Grilling GRILLSTER PORTABLE GAS GRILL MODEL: CGG-059 ASSEMBLY AND OPERATING INSTRUCTIONS m WARNING: FOR OUTDOOR USE ONLY m This instruction manual contains important information necessary
NECO MODEL NECO MODEL AMENDMENT SHEETS FN38LP/NG. Amendment Pages (Use these pages in place of standard manual)
") NECO MODEL AMENDMENT SHEETS NECO MODEL FN38LP/NG Amendment Pages (Use these pages in place of standard manual) Grill Assembly Built-In Instructions 5-12 13-15 16-19 17 20 21-22 23 Welcome & Congratulations
NECO MODEL AMENDMENT SHEETS NECO MODEL FN38LP/NG Amendment Pages (Use these pages in place of standard manual) Grill Assembly Built-In Instructions 5-12 13-15 16-19 17 20 21-22 23 Welcome & Congratulations
57 Stainless Steel Gas Grill
 57 Stainless Steel Gas Grill 1 Welcome & Congratulations Congratulations on your purchase of a new grill! We at Electrolux Home Products are very proud of our product and we are completely committed to
USE AND CARE MANUAL FOR OUTDOOR USE ONLY ALWAYS KEEP YOUR GRILL COVERED WHEN NOT IN USE
 Amana TM SS 4 Burner Gas Grill USE AND CARE MANUAL FOR OUTDOOR USE ONLY ALWAYS KEEP YOUR GRILL COVERED WHEN NOT IN USE BEFORE YOU BEGIN We ve included easy-to-follow, step-by-step instructions which have
OWNER S MANUAL. Cabo. Adventurer Series Gas Grill Model A10-703
 OWNER S MANUAL Cabo Adventurer Series Gas Grill Model A10-703 For questions regarding performance, assembly, operation, parts, or returns, contact the experts at MAGMA by calling (562) 627-0500 7:00 a.m.
Assembly Instructions & User s Manual TRITON 6 BURNER GRIDDLE Model #: FSODBG1206
 Assembly Instructions & User s Manual TRITON 6 BURNER GRIDDLE Model #: FSODBG1206 Please keep this instruction manual for future reference Customer Service: (888) 922-2336, 7:00 am to 12:00 am daily CST
BakerBox multi-purpose pizza oven
 BakerBox multi-purpose pizza oven. ASSEMBLY & OPERATING INSTRUCTIONS Important: Read these instructions for use carefully so as to familiarize yourself with the appliance before putting it to your gas
Searin Sphere Portable Gas Grill
 Gourmet Outdoor Grilling Searin Sphere Portable Gas Grill MODEL: CGG-049 ASSEMBLY AND OPERATING INSTRUCTIONS m WARNING: FOR OUTDOOR USE ONLY m This instruction manual contains important information necessary
Assembly Procedures VCS322SSBI Series / VCS522SSBI Series
 Assembly Procedures VCS322SSBI Series / VCS522SSBI Series Tools Required: Knife or scissors, Phillips or Robertson (square head) screwdriver. Model VCS522SSBI Shown CAUTION: This grill is intended ONLY
" Table Top Charcoal Grill Model # SRYH1450 Instructions Manual
 259-0011 14" Table Top Charcoal Grill Model # SRYH1450 Instructions Manual WARNING FOR YOUR SAFETY 1. This grill is for outdoor use only, and shall not be used in a building, garage, or any other enclosed
INSTRUCTION BOOK CARE & USE/INSTALLATION
 INSTRUCTION BOOK CARE & USE/INSTALLATION Model STL-32 LP/NG, Model STL-40 LP/NG, Model STL-2 LP/NG STL-1 LP/NG. DANGER - IF OU SMELL GAS: WARNING I - Shut off the gas supply to the appliance at its source.
MARINE KETTLE 2 GAS GRILL OWNER S MANUAL
 OWNER S MANUAL MARINE KETTLE 2 GAS GRILL For questions regarding performance, assembly, operation, parts, or returns, contact the experts at MAGMA by calling (562) 627-0500 7:00 a.m. - 5:00 p.m. Pacific
Tabletop Gas Grill VT280SS1
 Tabletop Gas Grill VT280SS1 Conforms to ANSI Std Z21.89-2013 Outdoor cooking specialty gas appliance DANGER Tools needed for assembly: Phillips screwdriver, Pliers or Adjustable Wrench DANGER If you smell
SUMMIT 4 BURNER & 6 BURNER
 WEBER WEBER WEBER WEBER SUMMIT 4 BURNER & 6 BURNER NATURAL GAS COOKING MODULES Operating Guide Read before assembly WEBER WEBER W E B E R W E B E R Summit 6 Burner NG CANADIAN GAS ASSOCIATION R A P P R
INFRARED BURNER KIT INSTRUCTIONS
 3 INFRARED BURNER KIT INSTRUCTIONS (HOT SURFACE IGNITION) 5 1 4 NOTE: This unit has been retrofi tted with an infrared burner. Model # 3050 # 3060 Included parts 2 6* PARTS INCLUDED 1. Infrared burner
Assembly & Operation Manual
 Deluxe Outdoor Tabletop Gas Grill Model TT250 Assembly & Operation Manual DANGER 1. Never operate this appliance unattended. 2. Never operate this appliance within 10 ft (3.0 m) of any structure, combustible
 #4187508 Attention! This grill will become very hot. Do not move it during operation. Caution! Do not use alcohol, gasoline or similar fluids for lighting or relighting. Warning! Keep children and pets
SOWNER S MANUAL INSTALLATION, CARE & USE
 SOWNER S MANUAL INSTALLATION, CARE & USE Models: SIZ26-LP/NG, SIZ32-LP/NG, SIZ40-LP/NG, SIZPRO32-LP/NG, SIZPRO40-LP/NG, and SIZSB2-LP/NG DANGER - IF YOU SMELL GAS: I - Shut off the gas supply to the appliance
ASSEMBLY & OPERATION INSTRUCTIONS FOR OUTDOOR GAS BARBECUES
 ASSEMBLY & OPERATION INSTRUCTIONS FOR OUTDOOR GAS BARBECUES FOR MODEL# BBQ / BBQW / BLKBBQW OUTDOOR BBQ GRILL SAFETY INSTRUCTIONS READ THE FOLLOWING INSTRUCTIONS CAREFULLY AND BE SURE YOUR BARBECUE IS
Contents. Fittings and parts checklist
 JLH2B5 Contents Parts List Exploded Diagram Assembly instructions Safety information Installation Using your barbecue Cooking Maintenance Fittings and parts checklist Ref Description Ref Description 1,
Manual Spark Ignition (MSI) Kit For Use only with Thermocouple Manual Safety (TMSI) UL Approved Fire Pit Pans with Burning Spur
 Kit For Use only with Thermocouple Manual Safety (TMSI) UL Approved Fire Pit Pans with Burning Spur") AAA Battery MODEL: MSI-BSTMSI Manual Spark Ignition (MSI) Kit For Use only with Manual Safety (TMSI) UL Approved Fire Pit Pans with Burning Spur Installation and Operating Instructions IF YOU CANNOT READ
AAA Battery MODEL: MSI-BSTMSI Manual Spark Ignition (MSI) Kit For Use only with Manual Safety (TMSI) UL Approved Fire Pit Pans with Burning Spur Installation and Operating Instructions IF YOU CANNOT READ
INSTRUCTIONAL BOOK CARE & USE/INSTALLATION
 INSTRUCTIONAL BOOK CARE & USE/INSTALLATION Models: SIZ26-LP/NG, SIZ32-LP/NG, SIZ40-LP/NG, SIZPRO32-LP/NG, SIZPRO40-LP/NG, and SIZSB2-LP/NG DANGER - IF YOU SMELL GAS: I - Shut off the gas supply to the
Tabletop Charcoal Grill Model # SRCG806 Instructions Manual
 259-0002 Tabletop Charcoal Grill Model # SRCG806 Instructions Manual WARNING FOR YOUR SAFETY 1. This grill is for outdoor use only, and shall not be used in a building, garage, or any other enclosed area.
Amana SS 5 Burner Grill w/ Rear Burner USE AND CARE MANUAL FOR OUTDOOR USE ONLY ALWAYS KEEP YOUR GRILL COVERED WHEN NOT IN USE
 Amana SS 5 Burner Grill w/ Rear Burner USE AND CARE MANUAL FOR OUTDOOR USE ONLY ALWAYS KEEP YOUR GRILL COVERED WHEN NOT IN USE BEFORE YOU BEGIN We ve included easy-to-follow, step-by-step instructions
Portable Charcoal Grill
 Portable Charcoal Grill DANGER! WARNING DO NOT use charcoal briquettes for indoor cooking or heating. TOXIC carbon monoxide fumes can accumulate and cause asphyxiation. DO NOT USE on boats or recreational
Modular Island Grill - Main Grill Module
 WARNING Improper installation, adjustment, alteration, service or maintenance can cause injury or property damage. Read the installation, operation and maintenance instructions thoroughly before installing
G2006-A FOR OUTDOOR USE ONLY - OPERATES ON LPG
 Ranger Barbecue Model No. G2006-A FOR OUTDOOR USE ONLY - OPERATES ON LPG 3716-06/13 General Information Gas Installation Codes Barbecues must be used in accordance with New Zealand Standard 5601 Gas Installations.
4 Burner w/ Rear Burner Gas Grill - LP USE AND CARE MANUAL. Stop! Missing a part? DO NOT RETURN PRODUCT TO STORE
 4 Burner w/ Rear Burner Gas Grill - LP USE AND CARE MANUAL SF308LP Stop! Missing a part? DO NOT RETURN PRODUCT TO STORE The store where you made the purchase does not stock parts for this item. If you
21.5 Inch Square Charcoal Grill
 21.5 Inch Square Charcoal Grill Model # OCFLA-2150 OUTDOOR USE ONLY! NEVER USE INDOORS! CARBON MONOXIDE HAZARD Burning charcoal inside may be fatal. It gives off carbon monoxide, which has no odor. NEVER
USE AND CARE MANUAL For Model CS812LP. Stop! Missing a part? DO NOT RETURN PRODUCT TO STORE
 Tuscany TM " Value at its Finest" USE AND CARE MANUAL For Model CS812LP Stop! Missing a part? DO NOT RETURN PRODUCT TO STORE The store where you made the purchase does not stock parts for this item. If
22 Kettle Charcoal Grill SAFE USE, CARE AND ASSEMBLY MANUAL
 22 Kettle Charcoal Grill SAFE USE, CARE AND ASSEMBLY MANUAL 85-1448-8 ST22022D Read and save this manual for future reference. If pre-assembled, leave this manual with unit for consumer s future reference.
Cutout Width 28 5/8 28 5/8 40 1/4 40 1/4 (72.7 cm) (72.7 cm) (102.2 cm) (102.2 cm)
 (72.7 cm) (102.2 cm) (102.2 cm)") BASIC SPECIFICATIONS T-SERIES GRILLS Description VGBQ300T/0302T VGIQ300T VGBQ410T/VGIQ410T VGBQ412T Cutout Width 28 5/8 28 5/8 40 1/4 40 1/4 (72.7 cm) (72.7 cm) (102.2 cm) (102.2 cm) Overall Width 29 1/2
BASIC SPECIFICATIONS T-SERIES GRILLS Description VGBQ300T/0302T VGIQ300T VGBQ410T/VGIQ410T VGBQ412T Cutout Width 28 5/8 28 5/8 40 1/4 40 1/4 (72.7 cm) (72.7 cm) (102.2 cm) (102.2 cm) Overall Width 29 1/2
BBQ Grill. Owner s Manual Save These Instructions - For Household Use Only For Sizes: 12 x 18 & 12 x 12
 BBQ Grill Owner s Manual Save These Instructions - For Household Use Only For Sizes: 12 x 18 & 12 x 12 Do not use the Copper Chef TM BBQ Grill until you have read this manual thoroughly. Warranty Information
Gas Barbecue Use, Care & Assembly Manual
 Gas Barbecue Use, Care & Assembly Manual With Grill Lighting Instructions 8450 Series Model No. 9992-649 (Natural Gas) ASSEMBLER/INSTALLER: Leave these instructions with the consumer. CONSUMER/USER: Read
Adventurer Barbecue G2727
 Adventurer Barbecue G2727 FEATURES Compact portable unit with generous 460mm x 240mm cooking surface Use at home, picnics or camping Quick and easy set-up Folds down into a compact size - 440mm x 590mm
IMPORTANT: READ THESE INSTRUCTIONS CAREFULLY BEFORE STARTING INSTALLATION OR USE. WARNINGS AND SAFETY CODES
 FIREMASTER OUTDOOR COUNTERTOP CHARCOAL GRILL Models 3324 and 3329 INSTALLATION INSTRUCTIONS AND OWNER S MANUAL INSTALLER: Leave these instructions with consumer. CONSUMER: Retain for future reference.
Important: Retain these instructions for future use.
 CATERER 4 & 6 BURNER BBQ Model No. BQ1050 Model No. BQ1051 Ideal heavy duty BBQ for sporting and social clubs or anywhere large groups are entertained Solid 5mm thick steel hotplate Castors for easy moving
OUTDOOR KITCHEN PRODUCTS 32, 32R, 38, 38R GAS GRILL INSTALLATION, MAINTENANCE, OPERATING INSTRUCTIONS AND OWNERS MANUAL
 Allegra TM OUTDOOR KITCHEN PRODUCTS 32, 32R, 38, 38R GAS GRILL INSTALLATION, MAINTENANCE, OPERATING INSTRUCTIONS AND OWNERS MANUAL CONGRATULATIONS ON YOUR NEW GAS GRILL PLEASE RETAIN THESE INSTRUCTIONS
Owner's Manual: Stainless Steel Rotisserie Kit for Kenmore Elite & Kenmore Premium Grills
 Owner's Manual: Stainless Steel Rotisserie Kit for Kenmore Elite & Kenmore Premium Grills 141.158031 for 3/4 Burner Kenmore and Kenmore Elite Grills: 141.15804 for 5/6 Burner Kenmore and Kenmore Elite
SAVE THESE INSTRUCTIONS FOR FUTURE REFERENCE. IF YOU ARE ASSEMBLING THIS UNIT FOR SOMEONE ELSE, GIVE THIS MANUAL TO HIM OR HER FOR FUTURE REFERENCE.
 JACKSON GRILLS INC. 106-2480 Mt. Lehman Road Abbotsford, BC V4X 2N3 TELEPHONE: (604)855-6756 FAX: (604)855-5373 EMAIL: info@jacksongrills.com SUPPORT: support@jacksongrills.com WEB SITE: www.jacksongrills.com
ALXE-36 & 36SZ Parts Manual
 ALXE-6 & 6SZ Parts Manual Serial Numbers up to 7-99999 0 9 5 8 6 DETAIL OF HOOD SWITCH MECHANISM FASTENERS 5 & 6 ARE FOR ATTACHING THE SWITCH 0-066 SEE ELECTRICAL COMPONENTS 5 9 7 5 5 0 5 9 8 7 7 9 6 7
Gas Barbecue Use, Care & Assembly Manual
 Gas Barbecue Use, Care & Assembly Manual With Grill Lighting Instructions 8100 Series Model No. 9992-643 (LP Gas) ASSEMBLER/INSTALLER: Leave these instructions with the consumer. CONSUMER/USER: Read all
ALXE-56 & 56SZ Parts Manual. Serial Numbers forward
 ALXE-56 & 56SZ Parts Manual Serial Numbers 18-00000 forward 2 5 1 6 26 9 1 DETAIL OF HOOD SWITCH MECHANISM FASTENERS 1 & 1 ARE FOR ATTACHING THE SWITCH 210-0626 SEE ELECTRICAL COMPONENTS 6 27 26 11 2 2
INTRODUCTION. Your new smoker comes almost completely assembled. You will need to complete the assembly which includes:
 INTRODUCTION Congratulations on your purchase of this Smith & Wesson SMOKER, Model SWS032. With proper set-up, operation and maintenance, this smoker will provide you with years of cooking enjoyment. Your
SBG2500-1, SBG and SBG Gas Grill Owner s Manual
 SBG2500-1, SBG2501-1 and SBG2801-1 Gas Grill Owner s Manual SBB00095-2-0407 Page 1 IMPORTANT This manual should be read thoroughly by the person installing the grill and all persons who will use and maintain
Natural Gas Grill Owner s Guide
 Natural Gas Grill Owner s Guide DANGER If you smell gas: 1. Shut off gas to the appliance. 2. Extinguish any open flames. 3. Open lid. 4. If odor continues, keep away from the appliance and immediately
for Assembly, Operating & Maintenance of THIS GAS GRILL IS DESIGNED FOR OUTDOOR USE ONLY.
 Owner s Manual for Assembly, Operating & Maintenance of Model A2P Portable Gas Grill www.bigjohngrills.com YOU MUST READ THIS OWNER S MANUAL BEFORE OPERATING YOUR GAS GRILL. IF YOU SMELL GAS: DANGER 1.
1550W DIGITAL FRENCH DOOR OVEN Instruction Manual MODEL CCFD19
 1550W DIGITAL FRENCH DOOR OVEN Instruction Manual MODEL CCFD19 1 WHAT S INCLUDED French Door Oven & Instruction Manual Rotisserie Hle Two Wire Racks Baking Pan Rotisserie Tray Hle Crumb Tray 2 IMPORTANT
Discovery Outdoor Grill Use and Care Manual
 Discovery Outdoor Grill Use and Care Manual Models: OB36, OBS36, OB52, OBS52 Style varies. Model OB52 shown. Table of Contents Important Safety Instructions... 1 Getting to Know Your Outdoor Grill... 4
BREW EXPRESS OPERATION GUIDE. model no. BE-112
 BREW EXPRESS OPERATION GUIDE model no. BE-112 by CONTENTS 1. Safety 1 2. Features 2 3. Controller Functions 3 4. Start Up 4 5. Operation 5 6. Maintenance 6 7. Troubleshooting 7 8. Parts & Service 8 9.
Specialist Built-in BBQ
 Specialist Built-in BBQ Model No. BQ8246-P Product Features: Vitreous enamel hood and body Sure-fire rotary ignition Viewing window in hood Timer AGA certified FOR OUTDOOR USE ONLY OPERATES ON LPG Gasmate
assembly guide ELECTRIC Model Numbers: Estimated time required for assembly: 1 Hour (English) /05/09
 /05/09") assembly guide Model Numbers: 08601559 10601578 10601585 10601514 Estimated time required for assembly: 1 Hour ELECTRIC (English) 42804372 11/05/09 2 ASSEMBLY GUIDE A, B, C, Assembly: CAUTION: For your
assembly guide Model Numbers: 08601559 10601578 10601585 10601514 Estimated time required for assembly: 1 Hour ELECTRIC (English) 42804372 11/05/09 2 ASSEMBLY GUIDE A, B, C, Assembly: CAUTION: For your
SBB Gas Grill With Surround Owner s Manual
 SBB2804-1 Gas Grill With Surround Owner s Manual GAS-FIRED Page 1 IMPORTANT This manual should be read thoroughly by the person installing the grill and all persons who will use and maintain the grill.
LUCKENBACH MODEL Assembly Instructions Rev
 LUCKENBACH TM MODEL 03301800 Assembly Instructions Rev. 03-27-03 P/N: 42802113 WARNING! CAUTION! This unit is heavy. Tools needed: 2 adjustable wrenches, a flat screwdriver and hammer. DO NOT assemble
Deluxe Caterer BBQ Series
 Deluxe Caterer BBQ Series GC22-4T DLX GC22-6T DLX FEATURES Ideal heavy duty BBQ for sporting and social clubs or anywhere large groups are entertained. Solid 5mm thick stainless steel hotplate Fold down
Oven Toaster Grill with Convection
 READ BEFORE USE Oven Toaster Grill with Convection Visit www.hamiltonbeach.in for our complete line of products and Use and Care Guides as well as delicious recipes, tips, and other useful information!
INSTRUCTION MANUAL AND RECIPE BOOK CORN DOG MAKER CDM-1 SMART PLANET PLEASE READ THESE INSTRUCTIONS CAREFULLY AND RETAIN FOR FUTURE REFERENCE.
 INSTRUCTION MANUAL AND RECIPE BOOK CORN DOG MAKER CDM-1 SMART PLANET PLEASE READ THESE INSTRUCTIONS CAREFULLY AND RETAIN FOR FUTURE REFERENCE. IMPORTANT SAFEGUARDS Read all instructions before using the
IMPORTANT SAFEGUARDS. When using electrical appliances, basic safety precautions should always be followed, including the following:
 IMPORTANT SAFEGUARDS When using electrical appliances, basic safety precautions should always be followed, including the following: 1.Read all instructions. 2.Do not touch hot surfaces. Use handles or
ASSEMBLY & OPERATING INSTRUCTIONS
 200 100 300 400 800 500 700 600 ASSEMBLY & OPERATING INSTRUCTIONS Model: 720-0432 FOR OUTDOOR USE ONLY A16Y07P-1 PLEASE CONTACT 1-866-984-7455 FOR ASSISTANCE ABOUT ASSEMBLY OR GRILL OPERATION DO NOT RETURN
FOR OUTDOOR USE ONLY THIS IS YOUR ASSEMBLY, CARE & USE MANUAL WITH IMPORTANT WARNING & SAFETY INFORMATION. PLEASE SAVE THESE INSTRUCTIONS.
 Owner s Manual Tabletop Gas Grill 1-Burner Model VT280B1 FOR OUTDOOR USE ONLY THIS IS YOUR ASSEMBLY, CARE & USE MANUAL WITH IMPORTANT WARNING & SAFETY INFORMATION. PLEASE SAVE THESE INSTRUCTIONS. Manufactured
WARNING. Assembly and Operating Instructions for Outback Omega Charcoal 100 and Omega Charcoal 200 Barbecues. Omega Charcoal 100 Omega Charcoal 200
 Assembly and Operating Instructions for Outback Omega Charcoal 100 and Omega Charcoal 200 Barbecues Omega Charcoal 100 Omega Charcoal 200 Photographs are not to scale. Specifications subject to change
Liquid Propane Gas Grill Owner s Guide
 Liquid Propane Gas Grill Owner s Guide Vieluxe 44 Inch Vieluxe 56 Inch DANGER If you smell gas: 1. Shut off gas to the appliance. 2. Extinguish any open flames. 3. Open lid. 4. If odor continues, keep
ALXE-56BFG Parts Manual
 Parts Manual 8 5 DETAIL OF HOOD SWITCH MECHANISM FASTENERS & 5 ARE FOR ATTACHING THE SWITCH 0-0 SEE ELECTRICAL COMPONENTS 8 7 5 7 8 7 5 7 0 9 8 0 9 9 0 5 9 0 5 LAST SAVED BY:»» neil ««Wednesday, December
BREW EXPRESS OPERATION GUIDE MODEL BE112
 BREW EXPRESS OPERATION GUIDE MODEL BE112 Contents 1. Safety 2. Features 3. Controller Functions 4. Start up 5. Operation 6. Maintenance 7. Troubleshooting 8. Parts & Service 9. Warranty & Registration
440 Sizzler Patio gas Braai
 440 Sizzler Patio gas Braai USER MANUAL & ASSEMBLY INSTRUCTIONS Important: Read these instructions and warnings carefully so as to familiarize yourself with the appliance before connecting it to its gas
RG4 AND RG7 INSTALLTION AND MAINTENANCE
 WARNINGS 1. In all cases a qualified and licensed electrician and/or plumber must install the rotisserie machine. 2. In the event a user smells gas, instructions for procedures to follow must be placed
JUMBUCK RONDO MEDIUM CHARCOAL SPIT ROASTER (HS-FP002)
") JUMBUCK RONDO MEDIUM 3180887 CHARCOAL SPIT ROASTER (HS-FP002) SAFETY INSTRUCTIONS FOR OUTDOOR USE ONLY For outdoor use only. Improper installation, adjustment, alteration, service or maintenance can cause
JUMBUCK RONDO MEDIUM 3180887 CHARCOAL SPIT ROASTER (HS-FP002) SAFETY INSTRUCTIONS FOR OUTDOOR USE ONLY For outdoor use only. Improper installation, adjustment, alteration, service or maintenance can cause
GAS GRILL # Natural Gas Grill Owner s Guide
 GAS GRILL Natural Gas Grill Owner s Guide ESNA Guía del Propietario de la Barbacoa de Gas Natural - Pg. 7 Mode d emploi du Grill à gaz naturel - Pg. 7 670 #5606 YOU MUST READ THIS OWNER S GUIDE BEFORE
Gas Grill Built-In NG Gas Grill Owner s Guide
 Gas Grill Built-In NG Gas Grill Owner s Guide S-660 - NG #43264 You must read this Owner s Guide before operating your gas grill. m DANGER If you smell gas: 1. Shut off gas to the appliance. 2. Extinguish
LOT: PO: 4098_GelCanInsert_JW_ Model # oz Gel Fuel Can Firebox Insert
 LOT: PO: 4098_GelCanInsert_JW_010213 f i r e p l a c e s Model # 4098 13oz Gel Fuel Can Firebox Insert - Gel Fuel is flammable. Failure to follow warnings can result in property damage or serious burns.
2002 Owner s Manual. Chef Series Master Chef Series Gourmet Series
 2002 Owner s Manual USA and Canada Chef Series Master Chef Series Gourmet Series Duplication without written consent is strictly prohibited. This owners manual is for BBQ Grills and Outdoor Kitchens Manufactured
45-Cup Coffee Urn Big Brew Classic. Instruction Manual. Model ACU-045
 45-Cup Coffee Urn Big Brew Classic Instruction Manual Model ACU-045 Congratulations! Your Big Brew Classic will surely become one of the most practical appliances in your home or office. Enjoy fresh brewed
GAS GRILL ASSEMBLY, USE AND CARE MANUAL MODEL NO.: GD4210S-B1
 GAS GRILL ASSEMBLY, USE AND CARE MANUAL MODEL NO.: GD4210S-B1 ANY QUESTIONS DURING ASSEMBLY, USE AND CARE, PLEASE CALL OUR SERVICE CENTER FOR ASSISTANCE 1 Message to our users Thank you for selecting the
GasJoe Ultra. Models: GJU30LBS, GJU42LBS KAMADOJOE.COM
 GasJoe Ultra Models: GJU30LBS, GJU42LBS KAMADOJOE.COM WELCOME TO THE KAMADO JOE FAMILY I learn a lot from our customers. Not just the recipes and cooking tips they share, but why they chose to buy a Kamado
INSTRUCTION MANUAL MODELS: RT-30, RT-36, RT-48, RT-60 & RT-72 REVISED APRIL, 2003 *PLEASE RETAIN FOR FUTURE REFERENCE
 INSTRUCTION MANUAL MODELS: RT-30, RT-36, RT-48, RT-60 & RT-72 REVISED APRIL, 2003 *PLEASE RETAIN FOR FUTURE REFERENCE THANK YOU for purchasing this quality product. Your Crown Verity Inc. rotisserie will
OWNERS MANUAL. My Rotisserie Pro Warranty. Please read and save this manual. PROFESSION AL SERIES MRP_MAN_QVC_ENG_V1_ FOR HOUSEHOLD USE ONLY.
 My Rotisserie Pro Warranty The manufacturer warrants that your My Rotisserie Pro is free of defects in materials and workmanship and will, at its option, repair or replace any defective rotisserie that
ComboJoe & GasJoe. Models: GJ26, CGJ26, GJ32S, CGJ32S, GJ38S KAMADOJOE.COM
 ComboJoe & GasJoe Models: GJ26, CGJ26, GJ32S, CGJ32S, GJ38S KAMADOJOE.COM WELCOME TO THE KAMADO JOE FAMILY I learn a lot from our customers. Not just the recipes and cooking tips they share, but why they
ASSEMBLY & OPERATING INSTRUCTIONS
 ASSEMBLY & OPERATING INSTRUCTIONS MODEL #21009 UI 5 BURNER STAINLESS STEEL, ROTISSERIE, BUILT-IN, L.P. (PROPANE) MODEL #21011 UI 5 BURNER STAINLESS STEEL, ROTISSERIE, BUILT-IN, N.G. (NATURAL GAS) TABLE
Platinum BBQ Series. 4 burner - BQ burner - BQ 1011
 Platinum BBQ Series 4 burner - BQ 1010 6 burner - BQ 1011 FEATURES Premium gas BBQ Double skinned stainless steel hood with temperature gauge Stainless steel BBQ body, fascia, cabinet and side shelves
US Item#: Canada Item#: FOR PROPANE GAS USE ONLY I28Y07P
 US Item#: 6388309 Canada Item#: 629309809 FOR PROPANE GAS USE ONLY I28Y07P-7 720-0582 Table of Contents Safety Instruction..................... 2-7 Care and Maintenance................. 26-27 Check list...........................
LEGACY CONVECTION RANGE
 LEGACY CONVECTION RANGE OPERATING AND ASSEMBLY INSTRUCTIONS GAS-FIRED Models: LG24i LG36i (shown) LISTED CAUTION DO NOT DISCARD THIS MANUAL Important operating Read, understand and follow and maintenance