JEMUS TAP MACHINE OWNER S MANUAL
|
|
|
- Della Sutton
- 5 years ago
- Views:
Transcription


1 JEMUS TAP MACHINE OWNER S MANUAL POURING PERFECTION SINCE 1993
2 Dear JEMUS Jägermeister Tap Machine Owner: Thank you for your purchase of the Model JEMUS Jägermeister Tap Machine, the quickest and easiest way to pour colder-than-ice shots while pouring on the profits. The first of its kind in the industry, the Jägermeister Tap Machine has won praise from the beverage media, but more importantly, it has won over tens of thousands of owners across the country and around the world. We are extremely proud of our all new, patented Model JEMUS Jägermeister Tap Machine and believe it is the greatest thing to happen to the corner bar or the home bar. We think you ll agree. Now, you too can serve up the best and coldest shots of Jägermeister in town. The Unique Taste Jägermeister Herbal Liqueur is a 70 proof spirit imported from Wolfenbuttel, Germany. Made from a secret recipe of 56 herbs and spices, Jägermeister s unique taste sets it apart from all other spirits. Jägermeister is the NUMBER ONE selling imported liqueur in the United States and the favorite shot of millions. Why is it so good? What is it about Jägermeister that makes it so irresistible? Is it the taste? The ice-cold chill? The effect? Your answer is as good as ours. What we do know is Jägermeister is available in the 50ml, 100ml, 200ml, 375ml, 750ml, 1L and 1.75L sizes. The Label and the Legend Back in the seventh century, a young lad named Hubertus was envied for his purity. Theoderich of Burgundy was one of these jealous sorts, and so waged war against Hubertus and his uncle. By defeating Theoderich, Hubertus proved himself valiant in battle and dashing in a codpiece, and so won the hand of the beautiful princess, Floribana. Together they lived happily with the benefits of wealth and good fortune. The good Princess soon fell ill and died. In his grief, Hubertus turned away from the sumptuous life of royalty and became a solitary figure, often going to the woods to hunt alone. During one of these hunting trips, Hubertus encountered a splendid stag with a cross that appeared to float between its antlers. The vision moved Hubertus to change his life. He gave all his material possessions to the poor, gave up his title, and founded several monasteries. After his death, Hubertus was made a saint and became the Patron Saint of Hunters. 2
3 STOP Register your Jägermeister JEMUS Tap Machine online at: PLEASE MAKE SURE TO REGISTER YOUR FREEZER AND RETAIN YOUR ORIGINAL BOX AND PACKING MATERIALS. FAILURE TO DO SO MAY CAUSE DELAYS IF YOU REQUIRE WARRANTY SERVICE. NOTE: THIS FREEZER COMES WITH A 1 YEAR LIMITED WARRANTY. THESE MATERIALS WILL BE NEEDED FOR SHIPPING IF YOUR FREEZER NEEDS TO BE RETURNED FOR SERVICE OR REPAIR. Please visit for more information on warranty, repair and returns and for an online version of this owner s manual. Do not return your freezer unless you receive authorization to do so by Tap Machine Inc. To receive a return material authorization (RMA) number, call: or TapService@jagermeister.com Freezers returned to Tap Machine Inc., Mast-Jägermeister US., or our affiliated warehouses, without a specified return material authorization number will be refused and returned to sender. This manual is provided with each new Jägermeister JEMUS Tap Machine and contains important information to keep your machine running problem free. This manual is also available online at DRINK RESPONSIBLY Jägermeister is the registered trademark of Mast-Jägermeister SE. Jägermeister JEMUS Tap Machine manufactured and sold under license exclusively by Tap Machine Inc. Jägermeister Liqueur, 35% Alc./Vol., Imported by Mast-Jägermeister US, Inc., White Plains, NY. Made in China. Tap Machine technology protected by one or more United States patents: , , Additional Patents Pending. All Rights Reserved. Tap Machine Inc. 2007, ENGLISH
4 Table of Contents Dear JEMUS Jägermeister Tap Machine Owner... 2 Table of Contents... 4 List of Figures... 5 WARNINGS AND IMPORTANT NOTICES... 6 NOTICE... 7 Unpacking Your New Machine Note: If You Must Return Your JEMUS Jägermeister Tap Machine Chapter 2 - What s in the Box? - Parts Supplied Chapter 3 - Key Features Chapter 4 - Locating Key Components on Your Tap Machine Locate the Machine Serial Number Other Components Chapter 5 - JEMUS Setup and Operation General How Much Jägermeister Does The Machine Hold? Electrical Requirements Operating Environment Remove the Machine from the Shipping Container Remove From Plastic Bag Placing the Machine on the Bar Tap Handle Installation Bottle Stopper Insertion and Removal Chapter 6 - Plug It In, Turn It On, And Load It! Chapter 7 - Keeping Your Tap Machine Clean Weekly Monthly Chapter 8 - Let s Talk About Temperature Chapter 9 - When Problems Arise Chapter 10 - Contacting Tap Machine Inc JEMUS Specifications Limited Warranty FRANÇAIS
5 List of Figures Figure 1 - Items Supplied Figure 2 - Rear View - Machine On/Off Switch and Fuse Location Figure 3 - Front View Figure 4 - Front View Filter and Drip Tray Figure 5 - Top View Figure 6 Level Indicator Figure 7 - Handle In Place Figure 8 Screw On Bottle Stopper Figure 9 Screw On Figure 10 - Seated Figure 11 - Install Figure 12 - In Place Figure 13 - Remove Figure 14 - Rear View Figure 15 - Clean Filter ENGLISH 5
6 IMPORTANT! NOTICE The Jägermeister Tap Machine is not intended for use by persons with reduced physical, sensory or mental capabilities, or lack of experience and knowledge, unless they have been given supervision or instruction concerning the use of the Jägermeister Tap Machine by a person responsible for their safety. Children should not operate the Jägermeister Tap Machine in any instance. The Tap Machine s intended use is to dispense Jägermeister Herbal Liqueur and should be operated in accordance with the laws and regulations of the location in which such use takes place. When setting up your new Jägermeister Tap Machine, place it on a level surface, indoors, with 4 inches of space on all sides to allow for adequate airflow from the refrigeration system. DO NOT PLACE machine ON AN ANGLE. FAILURE TO PROVIDE ADEQUATE CLEARANCE AROUND THE MACHINE WILL RESULT IN IMPROPER CHILLING OR POSSIBLE DAMAGE TO INTERNAL COMPONENTS. 6
7 WARNINGS AND IMPORTANT NOTICES DANGER ELECTRICAL SHOCK HAZARD Can cause injury or death. Service should only be performed by qualified service personnel. Before attempting to perform ANY maintenance, UNPLUG unit. Use extreme care during electrical circuit tests. Live circuits may be exposed. THERE ARE NO USER REPLACEABLE PARTS OR USER ADJUSTMENTS INSIDE THE machine. IF THE POWER CORD IS DAMAGED IT MUST BE REPLACED BY THE MANUFACTURER, AUTHORIZED SERVICE AGENT, OR SIMILARLY QUALIFIED PERSONS TO AVOID A HAZARD. WARNING DO NOT introduce water or other fluids with a freezing temperature above -10 F while the POWER switch is in the ON position. Failure to do so may result in the unit freezing, causing internal damage. 7 ENGLISH
8 INSTRUCTIONS Unpacking and Start-Up Instructions STOP Failure to follow these simple unpacking instructions may result in damage to your new machine. Please follow these instructions carefully. PLEASE READ BEFORE UNPACKING YOUR JÄGERMEISTER TAP MACHINE 1. Remove the foam that is protecting the top of the machine. 2. Remove the insulation protecting the front and the rear of the tap machine. 8
9 3. Using the straps around the machine, lift the tap machine straight up and out of the box. AT NO TIME SHOULD YOU HOLD THE TAP MACHINE BY THE FRONT FAUCET ASSEMBLY. 4. Remove the accessory package from the box. The accessory package contains the operator s manual, warranty registration card, tap handle, filter, and drip tray and bottle stoppers for your new JEMUS Jägermeister Tap Machine. 5. Return all packing materials to the box. 6. RETAIN AND STORE THE BOX IN A COOL, DRY LOCATION. YOU WILL BE REQUIRED TO USE THIS CONTAINER IF YOU MUST RETURN YOUR JEMUS JÄGERMEISTER TAP MACHINE. 7. Finally, remove any protective coverings on the display panels. 9 ENGLISH
10 Note: If You Must Return Your JEMUS Jägermeister Tap Machine, DO NOT RETURN YOUR MACHINE UNLESS YOU RECEIVE AUTHORIZATION TO DO SO BY TAP MACHINE INC. READ THIS NOTE SHOULD YOUR TAP MACHINE NEED TO BE RETURNED FOR REPAIRS, IT MUST BE RETURNED IN THE ORIGINAL BOX. THIS CONTAINER IS DESIGNED TO PROTECT THE TAP MACHINE FROM DAMAGE DURING SHIPPING. FAILURE TO USE APPROVED PACKING WHEN RETURNING A MACHINE, WILL RESULT IN THE MACHINE BEING RETURNED TO YOU IN IN PRESENT CONDITION. ANY DAMAGE SUSTAINED FROM SHIPPING A TAP IN AN UNAUTHORIZED CONTAINER, WILL NOT BE THE RESPONSIBILITY OF TAP MACHINE INC. THE AUTHORIZED CONTAINER IS: ORIGINAL BOX or CONTAINER AND PACKING PROVIDED BY TAP MACHINE INC. IF YOU REQUIRE A SHIPPING CONTAINER FOR YOUR MACHINE, CALL TO ORDER. A SHIPPING BOX WILL BE SHIPPED TO YOU AT NO CHARGE. DO NOT RETURN YOUR MACHINE UNLESS YOU RECEIVE AUTHORIZATION TO DO SO BY TAP MACHINE INC. TO RECEIVE A RETURN MATERIAL AUTHORIZATION (RMA) NUMBER CALL MACHINES RETURNED TO TAP MACHINE INC, SFIC OR OUR NUMBER WILL BE REFUSED AND RETURNED TO SENDER UNOPENED. AFFILIATED WAREHOUSES, WITHOUT A SPECIFIC RETURN MATERIAL AUTHORIZATION (RMA) NUMBER WILL BE REFUSED AND RETURNED TO SENDER UNOPENED. 10
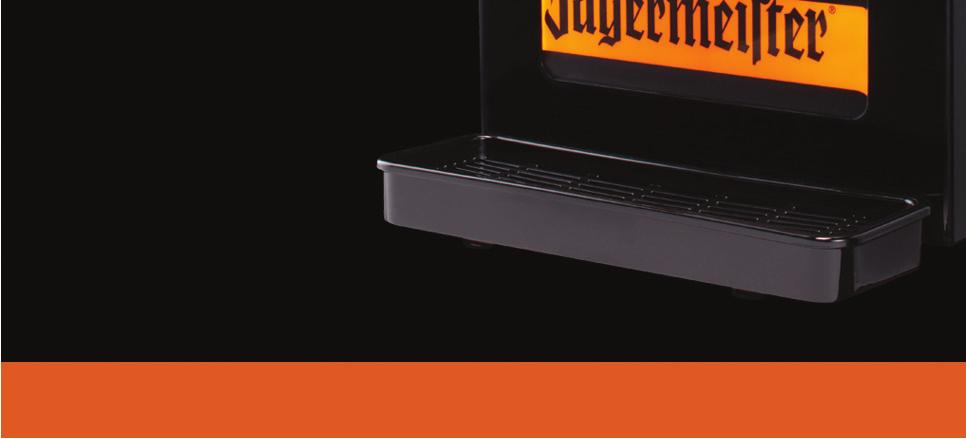
11 Chapter 2 What s in the Box? - Parts Supplied Check and verify that the parts shown below are packaged with the dispenser. If any of these items are missing or to order spare parts, call or visit Description Quantity 1. Bottle Stopper 3 2. Drip Tray 1 3. Drip Tray Cover 1 4. Handle with Logo 1 5. Filter-Reusable 1 6. Plastic Shot Glasses JEMUS Tap Machine 1 8. This Manual (Not Shown) 1 9. Warranty Registration Card (Not Shown) 1 Figure 1 - Items Supplied 11 ENGLISH
12 Chapter 3 Key Features 1. When the power switch at the rear of the machine is in the OFF position, the graphics will be the standard black and white Jägermeister Logo, but once the power switch is in the ON position, machine comes to life with the internal display lighting. The machine will change colors to the dramatic Jägermeister orange logo. 2. Another key feature is the digital indicator in the upper right corner of the machine. This gives you an indication of the amount of Jägermeister in the cooling system. An L on the display indicates that there is less than 420 ml left in the cooling system. As a safety feature, when the L is displayed, the refrigeration system is disabled and will no longer operate. As product is added into the system, once the level reaches 420 ml, the display will change from L to F and the refrigeration system will begin to operate. 3. A simple draft beer style faucet is used as the dispense point. The machine dispenses with no motors or pumps. 12
13 Chapter 4 Locating Key Components on Your Tap Machine Locate the Machine Serial Number The serial number tag is located on the rear of the machine next to the fuse. The serial number is also located on the front page of this manual. OTHER COMPONENTS The On/Off switch enables/disables both the LED lighting and refrigeration system. Fuse is user replaceable as necessary. Figure 2 - Rear View Machine On/Off Switch and Fuse Location Figure 3 - Front View 13 ENGLISH
14 Figure 4 - Front View Filter and Drip Tray Removable-Reusable Filter Assembly The filter must be kept clean to allow for proper ventilation. If the filter is clogged the machine will not be able to effectively cool the Jägermeister. If you notice the machine has gotten warmer over time, this is by far the most likely cause. The filter can be vacuumed or cleaned under warm water. If you use water to clean the filter it should be allowed to dry completely before using the machine. The filer is held in place at the FRONT of the machine by a filter tray. When the drip tray is in place, the filter is not visible. When removing the drip tray for cleaning, the filter will also be extracted from the filter tray. If the filter is damaged a replacement can be ordered at or Bottle Well This acts a reservoir that fills with Jägermeister when bottles are supplied to the machine. Bottle Well Cover (flipped open) These should always be sealed closed when a bottle is not present. Figure 5 - Top View Figure 6 - Level Indicator Level Indication An L shown on the digital display (left) indicates that the level of Jägermeister has fallen below 420ml. An F shown on the digital display indicates the level of Jägermeister is above 420ml. NOTE: The refrigeration system will shut off and no longer chill the Jägermeister when the L is displayed. Once the level is above 420ml, the display will change from L to F and the refrigeration system will turn on. 14
15 Chapter 5 JEMUS Setup and Operation General: The Model JEMUS Jägermeister Tap Machine is a unique display, refrigeration and delivery system designed to chill and dispense Jägermeister Herbal Liqueur at temperatures well below freezing - 0ºF (-18ºC). How Much Jägermeister Does The Machine Hold? The Jägermeister Tap Machine holds the following amounts of Jägermeister: Bottle Well Assembly (not chilled) - fl. oz. Cooling System (Chilled Colder Than Ice) ml fl. oz Total ml fl. oz. THE MACHINE WILL LOAD A TOTAL OF APPROXIMATELY 1.5 Liters OR ABOUT 53 OUNCES OF JÄGERMEISTER. The Model JEMUS Jägermeister Tap Machine is designed to hold only 750ml or 1.0 L Jägermeister bottles. DO NOT ATTEMPT TO USE BOTTLES LARGER THAN 1.0 LITERS. Electrical Requirements: The Model JEMUS requires a 115 VAC, 60 Hz. 15 Amp, 3-pronged power receptacle within 5 feet of the rear of the unit. DO NOT USE AN EXTENSION CORD OR SURGE SUPRESSOR TO POWER THIS UNIT. FAILURE TO PROVIDE ADEQUATE ELECTRICAL POWER WILL RESULT IN IMPROPER CHILLING OF THE JÄGERMEISTER OR POSSIBLE DAMAGE TO INTERNAL COMPONENTS. Operating Environment: The Model JEMUS is designed for indoor use only and for correct operations should be used in ambient temperatures between 32 F (0 C) and 100 F (38 C). Remove the Machine from the Shipping Container: Follow the instructions for removing the machine from the shipping box. DO NOT HOLD OR CARRY THE MACHINE BY THE FAUCTET MOUNTED ON THE FRONT OF THE MACHINE. DOING SO MAY DAMAGE THE MACHINE. Remove From Plastic Bag: Remove the plastic handles from the machine by cutting with a scissors. Remove the machine from the protective plastic bag. Remove the protective plastic coverings that are protecting the display panels on the unit. 15 ENGLISH

16 Placing the Machine on the Bar Place the JEMUS on a flat, level surface with a MINIMUM of 1 inches of clear space at the rear of the unit and 1 inch MINIMUM on both sides is required to permit adequate airflow for the refrigeration system. An additional 5 inches at the front of the machine is necessary for the drip tray/filter access that is provided with the unit. ENSURE THE UNIT IS ON A FLAT LEVEL SURFACE TO ENSURE PROPER OPERATION. DO NOT PLACE THE UNIT ON A FRONT TO BACK OR SIDE TO SIDE ANGLE. DO NOT REMOVE THE LEGS FROM THE MACHINE. FAILURE TO PROVIDE ADEQUATE CLEAR SPACE AT THE REAR OF THE MACHINE WILL RESULT IN IMPROPER CHILLING OF THE JÄGERMEISTER OR POSSIBLE DAMAGE TO INTERNAL COMPONENTS. Tap Handle Installation The Model JEMUS uses a fully functional draft beer type faucet and requires an acrylic handle. The handle is packaged in the drip tray. Locate the acrylic handle and screw it on the top portion of the faucet. DO NOT OVERTIGHTEN THEN HANDLE ON THE FAUCET. OVERTIGHTENING MAY DAMAGE OR BREAK THE HANDLE AND/OR THE FAUCET STEM. The finger grooves on the back of the handle should be facing to the rear of the machine. Use the adjustment on the faucet to tighten in place. Once installed correctly, the flat portion of the handle will face the user. Figure 7 Handle In Place 16

17 Bottle stopper insertion and removal Figure 8 - Screw On Bottle Stopper Model JEMUS bottle stoppers are screw on style. This stopper used in conjunction with the Model JEMUS bottle well assembly supports up to 1 liter bottles without the use of a bottle cage. Do not use these stoppers in older model Jägermeister Tap Machines. IMPORTANT NOTICE: WHEN REPLACING EMPTY BOTTLES DO NOT DISCARD OR THROW THE BOTTLE STOPPERS AWAY. THE BOTTLE STOPPERS ARE TO BE REUSED AND ARE NOT DISPOSABLE! Step 1 Remove the cap from the Jägermeister Bottle and position the Bottle Stopper above the Bottle. Figure 9 - Screw On Figure 10 - Seated Step 2 Step 2 Verify the internal washer is in place. Screw onto the threaded neck of the bottle. Screw on tightly but do not over tighten. A correctly installed bottle stopper will ensure a tight seal between the bottle stopper neck and the bottle. Figure 11 - Install - Step 3 Step 3 Unsnap the three (3) dust caps from the bottle well assembly. Carefully and slowly turn the bottle upside down and position it directly over the machine. If any Jägermeister begins to drip ensure the bottle stopper is securely screwed on. 17 ENGLISH
18 Figure 12 - In Place Step 4 Slowly insert the bottle stopper into the hole of the bottle well. Push down slightly and allow the bottle to rest inside the bottle well. The weight of the bottle will keep the bottle securely in the bottle well. If the bottle is slightly turned, you can turn the bottle up to 1/8 turn to line up with the front of the machine. Repeat for All Bottles. Step 5 To remove a bottle, lift it straight up- Do not pull it forward or to the sidepull the bottle directly up until it has cleared the bottle well. Figure 13 - Remove Unscrew the bottle stopper from the bottle before discarding- Bottle Stoppers ARE NOT Disposable! WHEN REPLACING EMPTY BOTTLES - DO NOT DISCARD OR THROW THE BOTTLE STOPPERS AWAY. THE BOTTLE STOPPERS ARE TO BE REUSED AND ARE NOT DISPOSABLE. 18
19 Chapter 6 Plug It In, Turn It On, And Load It! 1. Unsnap the 3 protective dust caps from the bottle well assembly located on the top of the dispenser. These caps should not be removed and should be snapped in place when a well space is not being used. IF THIS IS THE FIRST USE FOR THE MACHINE, REMOVE ANY ABSORBANT MATERIALS IN EACH WELL. ALSO REMOVE THE PROTECTIVE CAP ON THE OUTPUT OF THE FAUCET 2. Plug in the power cord of the machine into a 115VAC, 60 Hz. 15 Amp, 3-pronged power receptacle within 5 feet of the rear of the unit. DO NOT USE AN EXTENSION CORD OR SURGE SUPPRESSOR. If the power switch is ON, the built in lighting will be on. If the lighting does not come on, turn the power switch to the ON position. 3. Unscrew the caps from 3 fresh bottles of Jägermeister and insert the tapered end of the bottle stoppers as described in Bottle Stopper Insertion and Removal above. The bottle stoppers are spring actuated and prevent dispensing until they are inserted into the bottle well assembly. 4. Place each of the Jägermeister bottles on the top of the machine by inverting the bottle and inserting the barrel end of the bottle stopper assembly into the bottle well assembly until the collar of the bottle stopper rests inside the bottle well assembly flange. The Jägermeister flow into the machine is automatically activated when the bottle stopper is placed correctly into the bottle well. THE MACHINE WILL LOAD A TOTAL OF APPROXIMATELY 1½ LITERS OR ABOUT 53 OUNCES OF JÄGERMEISTER. 5. If the power switch is not in the ON position, place it in the ON position. Allow 30 minutes for the system to chill down before dispensing shots of Jägermeister. When the refrigeration switch is in the ON position and the level indicates F, the refrigeration compressor and the condenser fan will begin to run within 2 minutes. It is very important that the front and the rear of the machine is kept free and clean of obstructions. Air is drawn from the front of the machine through a removable filter and exhausted through the rear of the machine. Once the machine reaches the factor set temperature, the refrigeration system will shut off. The refrigeration system will turn on as need to keep the Jägermeister at the optimum temperature. 19 ENGLISH
20 IMPORTANT INFORMATION IF THE FLOW FROM THE BOTTLES DOES NOT STOP AFTER A FEW SECONDS (the bubbles continue and you may notice Jägermeister flowing all over your counter) - DO NOT CONTINUE ANY FURTHER. REMOVE THE BOTTLES AND CALL OUR SERVICE CENTER AT When product is dispensed, it is normal for bubbles to continue in the bottle(s) for a few seconds after you close the tap handle. GREEN, RED or PINK FLUID INFORMATION If this is the first time the machine has been used, or has been returned from repair, the initial flow from the Jägermeister Tap Machine will be a harmless pink or green fluid followed by Jägermeister. This red, pink or green fluid is an FDA approved glycol solution used during factory tests. All of the liquid dispensed prior to the Jägermeister must be discarded. IMPORTANT It is very important that the rear of the machine is kept clean and free of obstructions. Air is drawn from the front of the machine through a removable filter and exhausted through the rear of the machine. ANY OBSTRUCTION IN AIRFLOW WILL RESULT IN WARM SHOTS OF JÄGERMEISTER BEING DISPENSED. Note As with air conditioning units, once the refrigeration switch has been turned on or off - do not switch it again for at least 5 minutes. Rapidly turning the switch on and off will prevent the compressor from properly starting and/or resetting. If you suspect this has happened, turn the machine off and allow at least 5 full minutes for it to properly reset before restarting. 20

21 Chapter 7 Keeping Your Tap Machine Clean WARNING THE POWER SWITCH MUST BE TURNED OFF DURING CLEANING. Figure 14 - Rear View FAILURE TO TURN THE POWER SWITCH OFF MAY RESULT IN INTERNAL DAMAGE TO THE MACHINE. Your Jägermeister Tap Machine REQUIRES simple, regular cleaning to function properly. THE UNIT MUST NOT BE CLEANED WITH ANY TYPE OF LOW OR HIGH PRESSURE WATER JET. Bottle Stoppers When replacing empty bottles, wash each bottle stopper in warm water before using a new bottle. Be sure to run warm water through the stopper to remove build up of Jägermeister that may hinder desired operation. Weekly Drip Tray and Air Filter Remove and clean the drip tray and air filter at the front of the machine. The filter may be rinsed in warm water and allowed to dry for a few minutes. Replace the filter in the filter holder at the front of the machine. Figure 15 - Clean Filter 21 ENGLISH
22 MONTHLY On a Monthly Basis please follow the below protocol to clean your unit: DRAIN 1. Turn power switch at the rear of the machine to the Off Position. 2. Remove the bottle(s) from the top of the unit 3. Open the faucet and drain remaining product from the system. 4. With the faucet closed, pour approximately one liter of warm water into the bottle well at the top of the machine, than completely drain the water by opening the faucet. DO NOT USE A WATER JET TO CLEAN THE UNIT. SANITIZE 5. Using an FDA approved sanitizer and following the manufacture s dilution instructions / specifications, prepare at least 2 Liters of solution with warm water to use in the machine. 6. With the faucet closed, fill entire unit with sanitizer solution and allow to soak per manufacture s specifications. 7. Open the faucet and completely drain the sanitizing solution. 8. Before proceeding to step 9, repeat steps 6 and 7. FLUSH 9. Flush per manufacture s recommendations and/or with 3 to 4 liters of warm potable water to remove any residual solution that may remain in the unit. Be sure to fill (ideally using an empty 1 Liter Jägermeister bottle) and evacuate the unit at least 2 times during the flushing process. Note: Be sure that sanitizing solution is completely flushed from the unit before bar use. CLEAN EXTERIOR AND OPERATION 10. Replace the bottles of Jägermeister on the top of the machine and turn the power switch at the rear of the machine to the On position. 11. Wipe the outside of the machine with a warm damp cloth. 12. Remove and clean drip tray and air filter at the font of the machine. The filter may be rinsed in warm water and allowed to dry. A dry filter may also be vacuumed. Replace the filter. 13. Allow the machine at least 30 minutes to cool product before dispensing product 22
23 Chapter 8 Let s Talk About Temperature JÄGERMEISTER - THE BIG CHILL WARMS Once a shot of Jägermeister is dispensed into a glass or other container, IT BEGINS TO WARM UP IMMEDIATELY. Depending on the temperature of the glass and the room, Jägermeister can warm up 20º F within seconds. KEEP THIS IN MIND Each person s perception of Colder-Than-Ice Jägermeister is extremely subjective and can only be verified by proper temperature testing of the Jägermeister as it is dispensed from the Tap Machine. Most individuals have a difficult time detecting the difference in liquid temperatures between 0º F and 30º F. They know it s cold, but not how cold. The JEMUS Jägermeister Tap Machine is factory set to dispense Jägermeister at the optimum temperature for enjoyment - 0º F (-18º C). There are no user temperature adjustments. The temperature is factory set and not adjustable. 23 ENGLISH
24 Chapter 9 When Problems Arise Most problems can be prevented by simple weekly and monthly maintenance described in Keeping Your Jägermeister Machine Clean. The Jägermeister Tap Machine is very reliable, however every now and again something can go wrong. Most problems are easily corrected without sending your tap to Tap Machine Inc. for repairs. While the information provided here was accurate at the time of the initial printing, an up-to-date, comprehensive troubleshooting guide and instructions can be found at If you suspect your Tap Machine is not operating properly, check the following complaints and suggested resolutions as it applies to your problem. For additional information go to Frequent Questions Note: These are only the most commonly asked questions and by no means every conceivable question. If there are ever any questions that you have please contact the Tap Machine service line at Why do my bottle stoppers break? Many times your Tap Machine will be placed so the position of the bottles on the machine is higher than where the person trying to take them out is standing. This causes the person to angle the bottle and for the bottle stopper to break. The solution to this problem is simple. When replacing the bottle lift straight up so as not to cause undue stress on the bottle stopper. Why is my Tap Machine is not dispensing product? Check the digital indicator on the upper right corner of the machine. If the L is visible, the machine contains no Jägermeister. Refill the machine. Why is my Tap Machine leaking from the well? The reason for this is that one or more of the bottle stoppers are damaged. You should take the bottles off of your Tap Machine and order new bottle stoppers. Note: since the bottle stopper may not appear broken it is best to dispose of all the bottle stoppers. Why is my Tap Machine not cooling? Is the power switch in the On position? If it is, check the digital indicator on the upper right corner of the machine. If the L is visible, the machine will not be cool. Refill the machine with Jägermeister until the display change to F and the cooling system will be operate. How do I order parts for my Tap Machine? All you have to do is call the Tap Machine service line at or log on to our website at and click on the Replacement Parts icon. 24
25 Chapter 10 Contacting Tap Machine Inc. Before contacting Tap Machine Technical Support log on to and read the FAQ section. Important Required Information: To process a request we will require the following information from you: 1. Serial Number and Date Code The serial number and date codes are located on the front page of this user manual and on the serial number tag located on the rear of the machine. The serial number is also located on the front of the machine directly behind the drip tray. 2. Name of purchaser and/or account name. We need the name of the original purchaser of the machine, and if it is being used in a bar or restaurant - the name of the location it is being used. 3. If you did not purchase the machine from Tap Machine Inc., we need the date of purchase and the name of the company you purchased the machines from. Note: Machines purchased used are not covered under any warranty. If you send us an or leave a voic message, and expect a reply, include a telephone number INCLUDING THE AREA CODE (or address) and the name of a person to contact in addition to the information required above. Be sure to include in an , or be able to tell a technician if you call, what if anything you have tried to do to remedy the problem, has the machine been recently moved or cleaned, etc. If you use the online guide, please be able to tell us what point it directed to contact technical support. Online Form: Direct TapService@jagermeister.com By Telephone: (800) AM to 5 PM ET, M-T except holidays. Friday 9 AM to 12 NOON ET. Voic is available during non-business hours. General Questions: Or us directly at: TapService@jagermeister.com 25 ENGLISH
26 JEMUS Specifications Model Number Dimensions Shipping Weight Power Required Current Draw Electrical Cord Compressor Refrigerant / Charge Size Design Pressure, min. Temperature Range Capacity Bottle Well Assembly (on top) Cooling System (inside) Total Required Clearances Environmental JEMUS 11"W x 15"D x 26"H 47.8 Pounds Kg 115 VAC, 60Hz, 160 Watts 3A at start / 1.4A steady state 6 Ft. 1/5 HP R134A / 90g High Side: 244psig Low Side: 160psig Factory set at: 0º F (not adjustable) 100ml (3.38 fl oz) 1470ml (49.68 fl oz) 1570ml (53.06 fl oz) 2 inches (50mm) to the rear 1 inch (25mm) on each side 5 inches (127mm) to the front For Indoor Use Only Between 32 F (0 C) and 100 F (38 C) DRINK RESPONSIBLY Jägermeister is the registered trademark of Mast-Jägermeister SE. Jägermeister JEMUS Tap Machine manufactured and sold under license exclusively by Tap Machine Inc. Jägermeister Liqueur, 35% Alc./Vol., Imported by Mast-Jägermeister US, Inc., White Plains, NY. Made in China. Tap Machine technology protected by one or more United States patents: , , Additional Patents Pending. All Rights Reserved. Tap Machine Inc. 2007,
27 LIMITED WARRANTY LIMITED ONE (1) YEAR WARRANTY The JEMUS Jägermeister Tap Machine dispenser ( Dispenser ) is warranted to be free from defects in material and workmanship under normal usage when installed and operated in accordance with the instruction manual for a period of one (1) year from the date of purchase ( Warranty Period ). This Limited Warranty is limited to the free replacement of the Dispenser and extends only to the original purchaser and no other subsequent owners regardless of time of subsequent ownership. There is no repair service, on site or otherwise, provided for the Dispenser under this Limited Warranty. Any and all service, repairs or any labor costs upon the Dispenser shall be at the sole discretion and cost to purchaser. This Limited Warranty is solely to replace the Dispenser when it has experienced Operational Failure during the Warranty Period. For purposes of this Limited Warranty, Operational Failure is defined as failure relating directly and exclusively to defects in material and workmanship. The determination of when an Operational Failure has occurred will be made by Tap Machine Inc. This Limited Warranty does not extend to any Dispenser that has been damaged or rendered defective or non-operational due to: (a) accident, misuse or abuse, including but not limited to damage resulting from spillage due to improper bottle insertion or removal; (b) any modifications to or tampering with the Dispenser; (c) temperature variations due to purchaser s failure to clean the filter or attempts to make temperature adjustments; (d) freeze up due to water in the system after cleaning; (e) dispensing product other than Jägermeister Liqueur ( Jägermeister ). This Limited Warranty does not extend to any Dispenser that has been used for products other than Jägermeister. REPLACEMENT OF DISPENSER UNDER LIMITED WARRANTY Tap Machine Inc. will replace the Dispenser free of charge to the original purchaser if the Dispenser experiences an Operational Failure within the Warranty Period. Notification of an Operational Failure must be given within ten (10) business days of the Operational Failure. Notifications must be given by contacting Tap Machine Inc. at between 9 a.m. and 5 p.m. (Eastern Time) Monday through Friday excluding holidays, and the purchaser must fully cooperate and provide information enabling Tap Machine Inc. to evaluate if an Operational Failure has occurred. In order to obtain the replacement Dispenser, the defective unit must be returned to the address provided by Tap Machine Inc. PRIOR TO REPORTING AN OPERATIONAL FAILURE, PLEASE REVIEW THE FREQUENTLY ASKED QUESTIONS GUIDE LOCATED IN THIS MANUAL AND THE CLEANING INSTRUCTIONS IN THIS GUIDE. WARRANTY DISCLAIMERS EXCEPT AS EXPRESSLY SET FORTH IN THIS WARRANTY, THERE ARE NO OTHER WARRANTIES, EXPRESSED OR IMPLIED, INCLUDING ANY IMPLIED WARRANTIES OF MERCHANTABILITY OR FITNESS FOR A PARTICULAR PURPOSE. ALL WARRANTIES NOT STATED IS THIS LIMITED WARRANTY ARE EXPRESSLY DISCLAIMED. ANY IMPLIED WARRANTIES THAT MAY BE IMPOSED BY LAW ARE LIMITED TO THE TERMS OF THIS EXPRESS LIMITED WARRANTY. LIMITATION OF REMEDIES TAP MACHINE INC. IS NOT LIABLE FOR ANY DAMAGES CAUSED BY THE DISPENSER OR THE FAILURE OF THE DISPENSER TO PERFORM, INCLUDING LOST PRODUCT, LOST PROFITS, LOST SAVINGS, INCIDENTAL DAMAGES OR CONSEQUENTIAL DAMAGES. TAP MACHINE INC. IS NOT LIABLE FOR ANY CLAIM MADE BY A THIRD PARTY OR MADE BY THE PURCHASER FOR A THIRD PARTY. 27 ENGLISH
28 Au nouveau propriétaire du distributeur Tap Machine de Jägermeister, modèle JEMUS: Nous vous remercions d avoir acheté le distributeur Tap Machine de Jägermeister, modèle JEMUS, le moyen le plus rapide et le plus facile de verser de la liqueur plus froide que la glace tout en générant un profit. Premier en son genre dans l industrie, cet appareil s est fait remarquer par les médias du domaine de la boisson, mais surtout, il a convaincu plusieurs dizaines de milliers de personnes, au pays et dans le monde, qui possèdent maintenant cette machine. Nous sommes fiers de notre tout nouveau brevet pour le modèle Jemus de Jägermeister et nous sommes persuadés, comme vous ne manquerez pas de l être aussi, que c est la meilleure nouveauté à acquérir pour votre bar, qu il soit au coin de la rue ou à la maison. Vous aussi pouvez maintenant offrir le Jägermeister la meilleure et la plus froide qui soit. Un goût unique Le Jägermeister est une liqueur à base de plantes médicinales importée de Wolfenbuttel en Allemagne, qui possède une teneur en alcool de 35o. Confectionnée à partir de 56 types d herbes et d épices, son goût unique la distingue de toute autre liqueur. Le Jägermeister est la liqueur LA PLUS IMPORTÉE aux États-Unis et la préférée de plusieurs millions de personnes. Buvez de manière responsable. Pourquoi est-ce si bon? Qu est-ce qui fait que le Jägermeister est irrésistible? Est-ce le goût? Est-ce le frisson glacé qui l accompagne? Est-ce la sensation? Toutes les réponses sont bonnes. Une chose est sûre, le Jägermeister est disponible en formats de 50ml, 100ml, 200ml, 375ml, 750ml, 1L et 1,75L. L étiquette et la légende Au 7e siècle, un jeune homme du nom d Hubertus faisait l envie de tous pour sa pureté. Un de ces jaloux, Theoderich de Bourgogne, entra en guerre contre lui et son oncle. Le fringuant Hubertus sortit vainqueur, prouvant sa vaillance durant la bataille et s attirant ainsi les faveurs de la belle princesse Floribana qui lui accorda sa main. Ensemble, ils vécurent heureux, entourés de richesses. Mais la bonne princesse tomba malade et mourut. Dévoré par le chagrin, Hubertus tourna le dos à la vie princière et sombra dans la solitude. Souvent, il s enfonçait dans les bois pour y chasser en solitaire. Durant une de ces sorties, il se trouva face à un cerf magnifique qui portait une croix lumineuse au milieu de ses bois. La vision toucha Hubertus et le motiva à changer sa vie. Il fit don de tous ses biens aux pauvres, renonça à son titre et fonda plusieurs monastères. Après sa mort, Hubertus fut canonisé et devint le saint patron des chasseurs. 28
29 STOP VEUILLEZ LIRE LES INSTRUCTIONS AVANT D UTILISER L APPAREIL MAINTENANT, PRENEZ LE TEMPS DE REMPLIR ET DE NOUS ENVOYER PAR LA POSTE LA CARTE D ENREGISTREMENT DE LA GARANTIE, AFRANCHIE, QUE VOUS TROUVEREZ CI-JOINT, OU D ENREGISTRER VOTRE NOUVEL APPAREIL TAP MACHINE EN LIGNE À FAUTE DE QUOI, VOUS POURRIEZ ÊTRE SOUMIS À DES DÉLAIS INUTILES POUR VOUS PRÉVALOIR DE LA GARANTIE. EN LISANT LE PRÉSENT MANUEL, VOUS VERREZ QUE DES NOTES IMPORTANTES ET DES AVERTISSEMENTS SONT ENCADRÉS COMME CI-DESSOUS : UN ENCADRÉ SIMILAIRE INDIQUE UN AVERTISSEMENT, UNE MISE EN GARDE OU AUTRE RENSEIGNEMENT IMPORTANT. Ce manuel est fourni avec tout nouvel appareil Tap Machine de Jägermeister, modèle JEMUS et il renferme d importantes informations pour son bon fonctionnement. Vous pouvez aussi le consulter en ligne à Liqueur Jägermeister Alc./Vol. 35% Importé par Mast-Jägermeister US, Inc., White Plains, NY. Buvez de façon responsable. Les distributeurs Tap Machines de Jägermeister sont fabriqués exclusivement par Tap Machine Inc. Tap Machine, Tap Machine Inc. Colder Than Ice, et l aspect de Tap Machine sont des marques déposées. Jägermeister et le logo Jägermeister sont des marques déposées de Mast-Jägermeister AG, Wolfenbuttel, Allemagne. La technologie des distributeurs Tap Machine est protégée par un ou plusieurs brevets américains: , , et D autres brevets sont déposés Tous droits réservés. Tap Machine Inc. 2007, FRANÇAIS
30 Table des matières Au nouveau propriétaire du distributeur Tap Machine de Jägermeister, modèle JEMUS...28 Table des matières...30 Liste des illustrations...31 AVERTISSEMENTS ET REMARQUES IMPORTANTES...32 REMARQUE...32 Déballer votre nouvel appareil Remarque: si vous devez renvoyer l appareil...36 Chapitre 2 - Dans la boîte pièces fournies...37 Chapitre 3 - Caractéristiques principales...38 Chapitre 4 - Parties principales de votre appareil Trouver le numéro de série...39 Autres composantes...39 Chapitre 5 - Installation et fonctionnement de JEMUS...41 Alimentation électrique...41 Cadre de fonctionnement...41 Sortir l appareil de la boîte...41 Sortir l appareil du sac en plastique...41 Installer l appareil sur le bar...42 Installer la poignée du robinet...42 Insérer et enlever le bouchon de bouteille Chapitre 6 - Brancher, mettre en marche et remplir...45 Chapitre 7 -Nettoyer votre Tap Machine...46 Nettoyage hebdomadaire...47 Nettoyage mensuel...48 Chapitre 8 - Questions de température...49 Chapitre 9 - Résoudre les problèmes...50 Chapitre 10 - Communiquer avec le fabricant Tap Machine Inc...51 Caractéristiques techniques du modèle JEMUS...52 Garantie limitée
31 Liste des illustrations Illustration 1 - Pièces fournies...37 Illustration Vue de l arrière; interrupteur On/Off (allumer/éteindre); emplacement du fusible Illustration 3 - Vue de l avant...39 Illustration 4 - Vue de l avant; filtre et plateau d égouttement...40 Illustration 5 - Vue du dessus...40 Illustration 6 - Témoin de niveau de liqueur...40 Illustration 7 - Poignée en place...42 Illustration 8 - Bouchon à vis...43 Illustration 9 - Bouchon une fois vissé...43 Illustration 10 - Former un joint étanche...43 Illustration 11 - Installation de la bouteille...43 Illustration 12 - Bouteille en place...44 Illustration 13 - Enlever la bouteille...44 Illustration 14 - Vue de l arrière...47 Illustration 15 - Nettoyer le filtre...47 FRANÇAIS 31
32 AVERTISSEMENTS ET REMARQUES IMPORTANTES DANGER RISQUE D ÉLECTROCUTION Risque de décharge électrique Peut causer des blessures ou la mort. Avant toute opération de maintenance, DÉBRANCHER l appareil. Faire preuve de beaucoup de prudence avant d effectuer des tests du circuit électrique. Des fils électriques peuvent être sous tension. Débrancher et verrouiller TOUTE alimentation électrique avant l ouverture ou la maintenance de cet appareil distributeur sauf quand l appareil est manipulé par du personnel qualifié pour le service après-vente. LES PIÈCES ET LES AJUSTEMENTS INTERNES NE PEUVENT PAS ÊTRE MODIFIÉS PAR LE PROPRIÉTAIRE DE L APPAREIL. SI LE CORDON D ALIMENTATION ÉLECTRIQUE EST ENDOMMAGÉ, IL DOIT ÊTRE REMPLACÉ PAR LE FABRICANT, UN AGENT DU SERVICE APRÈS-VENTE AUTORISÉ OU AUTRE PERSONNEL QUALIFIÉ, AFIN D ÉVITER LE RISQUE AVERTISSEMENT NE PAS introduire de l eau ou autre fluide dont la température de congélation est au-dessus de - 15ºF (-26,6ºC) pendant que l interrupteur d alimentation est en position ON (allumé), sinon vous pourriez endommager l élément de refroidissement de l appareil. 32
33 REMARQUE IMPORTANTE Le distributeur Tap Machine de Jägermeister n est pas destiné aux personnes (y compris les enfants) dénuées d expérience ou de connaissances ou dont les capacités physiques, sensorielles ou mentales sont réduites, sauf si elles ont pu bénéficier, par l intermédiaire d une personne responsable de leur sécurité, d une surveillance ou d instruction préalables concernant l utilisation du distributeur Tap Machine de Jägermeister. Prenez soin de superviser les enfants afin qu ils ne jouent pas avec le distributeur Tap Machine de Jägermeister. 33 FRANÇAIS


34 Déballer votre nouvel appareil STOP Le défaut de suivre ces simples instructions de déballage pourrait endommager votre nouvel appareil. Veuillez suivre ces instructions attentivement. AVANT DE DÉBALLER VOTRE APPAREIL, LISEZ LES INSTRUCTIONS ATTENTIVEMENT. 1. Enlever la mousse d emballage qui protège le dessus de l appareil pour révéler le dessus du distributeur. 2. Enlever l isolant qui protège le devant et l arrière de l appareil. 34


35 3. À l aide des courroies autour de l appareil, soulever le distributeur en tirant vers le haut pour le sortir de la boîte. NE JAMAIS TENIR OU TIRER L APPAREIL PAR LE ROBINET DE DEVANT. 4. Enlever la trousse d accessoires de la boîte, qui contient le mode d emploi, la carte d enregistrement de la garantie, la poignée du robinet, le filtre, le plateau d égouttement et les bouchons de bouteille pour votre nouvel appareil Tap Machine de Jägermeister, modèle JEMUS. 5. Remettre tout les matériaux d emballage dans la boîte. 6. CONSERVER ET ENTREPOSER LA BOÎTE DANS UN ENDROIT FRAIS ET SEC. VOUS DEVREZ UTILISER CETTE BOÎTE POUR RETOURNER VOTRE DISTRIBUTEUR TAP MACHINE DE JÄGERMEISTER, MODÈLE JEMUS. 7. Enfin, décoller tout film protecteur sur les écrans d affichage. 35 FRANÇAIS
36 Remarque: Si vous devez retourner votre appareil Tap Machine de Jägermeister, modèle JEMUS NE PAS RETOURNER L APPAREIL SANS QUE VOUS EN AYEZ REÇU L AUTORISATION PAR TAP MACHINE INC. VEUILLEZ LIRE LE PARAGRAPHE CI-DESSOUS SI VOUS DEVEZ RETOURNER VOTRE APPAREIL TAP MACHINE POUR FAIRE EFFECTUER DES RÉPARATIONS, VOUS DEVEZ UTILISER SON EMBALLAGE ORIGINAL. CETTE BOÎTE EST CONÇUE POUR PROTÉGER L APPAREIL CONTRE LES DOMMAGES DURANT LE TRANSPORT. SI VOUS N UTILISEZ PAS L EMBALLAGE APPROUVÉ POUR RETOURNER L APPAREIL, IL VOUS SERA RENVOYÉ TEL QUEL. TAP MACHINE INC. N EST PAS RESPONSABLE DES DOMMAGES CAUSÉS DURANT LE TRANSPORT DE L APPAREIL DANS UN EMBALLAGE NON AUTORISÉ. LE CONTENANT AUTORISÉ EST COMPOSÉ DE : LA BOÎTE OU CONTENEUR D ORIGINE ET L EMBALLAGE, FOURNIS PAR TAP MACHINE INC. SI VOUS AVEZ BESOIN D UN CONTENEUR POUR TRANSPORTER VOTRE APPAREIL, VEUILLEZ TÉLÉPHONER AU POUR EN COMMANDER UN. L EMBALLAGE VOUS SERA ENVOYÉ SANS FRAIS. NE PAS RETOURNER L APPAREIL SANS QUE TAP MACHINE INC. VOUS EN AIT DONNÉ L AUTORISATION. POUR RECEVOIR UN NUMÉRO D AUTORISATION (RMA) AFIN DE RETOURNER L APPAREIL, APPELEZ LE NOUS N ACCEPTONS PAS LES APPAREILS RETOURNÉS À TAP MACHINE INC., SFIC OU NOS ENTREPOS AFFILIÉS, SANS NUMÉRO D AUTORISATION, LES BOÎTES SERONT RETOURNÉES À L ENVOYEUR SANS AVOIR ÉTÉ OUVERTES. 36

37 Chapitre 2 Dans la boîte pièces fournies Vérifiez que vous avez bien reçu les pièces ci-dessous avec le distributeur. S il vous manque des pièces ou pour en commander d autres, appelez le ou visitez Description Quantité 1. Bouchon de bouteille 3 2. Plateau d égouttement 1 3. Couvercle du plateau d égouttement 1 4. Poignée avec logo 1 5. Filtre réutilisable 1 6. Tap Machine modèle JEMUS 1 7. Présent manuel de l utilisateur (non illustré) 1 8. Carte d enregistrement (non illustré) 1 Illustration 1 pièces fournies 37 FRANÇAIS
, le logo Jägermeister paraît en noir et blanc, mais une fois que l appareil est allumé (interrupteur en position")

38 Chapitre 3 Caractéristiques principales 1. Quand l appareil est éteint (interrupteur à l arrière de l appareil en position OFF), le logo Jägermeister paraît en noir et blanc, mais une fois que l appareil est allumé (interrupteur en position ON), l appareil se met en marche, la lumière intérieure s allume et éclaire le logo qui devient orange, la couleur bien connue de Jägermeister. 2. Le témoin du niveau de liqueur, en haut à droite de l appareil, est une autre caractéristique importante. Il indique la quantité de Jägermeister présent dans le système de refroidissement. Si l écran affiche la lettre «L», il reste moins de 420ml. À ce niveau, par mesure de sécurité, le système de réfrigération est désactivé. Quand vous remplirez le système, une fois que le niveau atteindra 420ml, l écran affichera la lettre «F» et la réfrigération recommencera à fonctionner. 3. Un simple levier comme pour les bières pressions sert de robinet. L appareil n a pas de moteur ni de pompe. 38
39 Chapitre 4 Parties principales de votre appareil Trouver le numéro de série Vous trouverez une étiquette avec le numéro de série à l arrière de l appareil près du fusible. Le numéro de série figure aussi sur la première page du présent manuel. AUTRES COMPOSANTES Interrupteur On/Off et fusible L interrupteur On/Off permet d allumer et d éteindre à la fois la lumière de l affichage à DEL et le système de réfrigération. Vous pouvez remplacer le fusible vousmême au besoin. Vous trouverez des fusibles de rechange dans le compartiment du ventilateur. Illustration 2 Vue de l arrière; interrupteur On/Off (allumer/éteindre); emplacement du fusible Poignée du robinet L appareil est muni d un simple levier en guise de robinet, comme pour les bières pressions. Illustration 3 Vue de l avant FRANÇAIS 39


40 Illustration 4 - Vue de l avant, filtre et plateau d égouttement Installer le filtre réutilisable Le filtre doit être propre en tout temps pour assurer la ventilation adéquate de l appareil. Si le filtre est obstrué, l appareil ne pourra pas bien refroidir la Jägermeister. Si vous remarquez que l appareil se réchauffe au fil du temps, c est probablement que le filtre doit être nettoyé. Vous pouvez passer le filtre à l aspirateur ou sous l eau tiède. Si vous le nettoyez avec de l eau, laissez-le sécher complètement avant d utiliser l appareil. Le filtre se situe à l AVANT de l appareil dans un compartiment. Quand le plateau d égouttement est en place, vous ne pouvez pas voir le filtre. Quand vous sortez le plateau d égouttement pour le laver, le plateau du filtre sortira aussi. Si le filtre est endommagé, vous pouvez en commander un autre à ou par téléphone à Puits de bouteille C est aussi le réservoir qui se remplit de Jägermeister quand des bouteilles sont versées dans l appareil. Couvercle de puits Les couvercles devraient toujours être fermés quand il n y a pas de bouteille. Illustration 5 Vue du dessus Illustration 6 - Témoin de niveau de liqueur Écran indicateur de niveau Si l écran affiche la lettre «L» (si contre), c est qu il reste moins de 420ml de Jägermeister. La lettre «F» s affiche une fois que le niveau est au-dessus de 420ml. REMARQUE: LE SYSTÈME DE RÉFRIGÉRATION S ÉTEINDRA ET NE REFROIDIRA PLUS LA JAGERMEISTER QUAND L ÉCRAN AFFICHE LA LETTRE «L». UNE FOIS QUE LE NIVEAU DÉPASSE 420 ML, L ÉCRAN AFFICHERA LA LETTRE «F» ET LE SYSTÈME SE REMETTRA EN MARCHE. 40
41 Chapter 5 JEMUS Setup and Operation Remarques générales: Le distributeur Tap Machine de Jägermeister, modèle JEMUS est un appareil unique doté d un système de réfrigération pour refroidir et servir la liqueur à base de plantes médicinales et d épices Jägermeister à une température de 0º F (-18º C), c est-à-dire au dessous du point de congélation. Quelle quantité de Jägermeister puis-je mettre dans l appareil? The Jägermeister Tap Machine holds the following amounts of Jägermeister: Bouteilles installées dans les puits (non réfrigérées) - fl. oz. Système de réfrigération (plus froid que la glace) - 49,68 fl. oz Total - 53,06 fl. oz. L APPAREIL PEUT CONTENIR APPROXIMATIVEMENT 1,5 LITRE OU ENVIRON 53 ONCES DE JÄGERMEISTER. Le distributeur de Jägermeister, modèle JEMUS est conçu pour utiliser des bouteilles de 750 ml ou de 1 litre de Jägermeister. NE PAS ESSAYER D UTILISER DES BOUTEILLES DE PLUS DE UN LITRE. Alimentation électrique: Le modèle JEMUS requiert une alimentation de 115 V c. a., 60 Hz. 15 ampères, et une prise à 3 broches à moins de 5 pieds (environ 1,50m) de l arrière de l appareil. NE PAS UTILISER UNE RALLONGE OU UN LIMITEUR DE SURTENSION POUR BRANCHER CET APPAREIL. LE DÉFAUT DE FOURNIR UNE ALIMENTATION ÉLECTRIQUE ADÉQUATE ENTRAÎNERA DES PROBLÈMES DE REFROIDISSEMENT DU JÄGERMEISTER OU MÊME ENDOMMAGERA LES CIRCUITS ÉLECTRIQUES. Cadre de fonctionnement: Le modèle JEMUS est conçu pour être utilisé à l intérieur seulement et, pour fonctionner correctement, la température ambiante devrait être entre 32 F (0 C) et 100 F (38 C). Sortir l appareil de la boîte: Suivre les instructions pour sortir l appareil de la boîte. NE JAMAIS TENIR OU TIRER L APPAREIL PAR LE ROBINET DE DEVANT. SINON, VOUS RISQUEZ D ENDOMMAGER L APPAREIL. Sortir l appareil du sac en plastique: Couper les poignées en plastique avec des ciseaux. Sortir l appareil du sac en plastique de protection et décoller les films de protection des écrans. 41 FRANÇAIS
42 Installer l appareil sur le bar Placer l appareil JEMUS sur une surface plate et horizontale avec AU MOINS 1 pouce (2,6cm) d espace à l arrière et AU MOINS 1 pouce (2,6cm) des deux côtés pour permettre la libre circulation d air nécessaire au bon fonctionnement du système de réfrigération. Prévoyez au moins 5 pouces (12,7cm) devant la machine pour accéder au plateau d égouttement et du filtre. L APPAREIL DOIT REPOSER SUR UNE SURFACE PLATE ET HORIZONTALE POUR UN FONCTIONNEMENT OPTIMAL. NE PAS METTRE L APPAREIL DEVANT DERRIÈRE, NI SUR UN ANGLE. NE PAS ENLEVER LES PIEDS DE L APPAREIL. LE DÉFAUT DE FOUNIR UN ESPACE LIBRE ADÉQUAT À L ARRIÈRE DE L APPAREIL ENTRAÎNERA DES PROBLÈMES DE REFROIDISSEMENT DU JÄGERMEISTER ET POURRAIT ENDOMMAGER LES COMPOSANTES INTERNES. Installer la poignée du robinet Le modèle JEMUS est muni d un simple levier en guise de robinet, comme pour les bières pressions et une poignée en acrylique est nécessaire. Cette poignée est emballée dans le plateau d égouttement ou déjà installée. Si la poignée n est pas déjà installée, la sortir du plateau et la visser sur le haut du robinet. NE PAS VISSER TROP FORT AU RISQUE D ENDOMMAGER OU DE CASSER LA POIGNÉE OU/ET LA BRANCHE DU ROBINET. La rainure au dos de la poignée devrait faire face à l arrière de l appareil. Faire les ajustements nécessaires sur le robinet pour le visser et serrer en place. Une fois installée correctement, la partie plate de la poignée fait face à l utilisateur. Illustration 7 Poignée en place 42
43 Insérer et enlever le bouchon de bouteille Illustration 8 Bouchon à vis Les bouchons de bouteille du modèle JEMUS sont dévissables. Le bouchon du puit de liquide fourni avec le modèle JEMUS peut soutenir des bouteilles de 1 litre sans porte-bidon. Ne pas utiliser ces bouchons avec les anciens modèles Tap Machine de Jägermeister. REMARQUE IMPORTANTE: AU MOMENT DE REMPLACER LES BOUTEILLES, NE PAS JETER LES BOUCHONS FOURNIS AVEC L APPAREIL. LES BOUCHONS SONT RÉUTILISABLES ET NE SONT PAS JETABLES! Illustration 9 Bouchon une fois vissé Étape 1 Enlever la capsule de la bouteille de Jägermeister et mettre le bouchon audessus du boulot de la bouteille. Illustration 10 Former un joint étanche Étape 2 Vérifier que la rondelle (le joint) est bien en place. Visser autour du goulot à vis de la bouteille fermement mais pas trop fort. S il est bien installé, le bouchon assure une fermeture étanche. Illustration 11 Installation de la bouteille Étape 3 Enlever les trois couvercles/capsules des puits de bouteille et tourner lentement la bouteille à l envers de façon à avoir le goulot au-dessus de la machine. Si des gouttes de Jägermeister s échappent de la bouteille, vérifier que le bouchon est bien mis. 43 FRANÇAIS


44 Illustration 12 Bouteille en place Étape 4 Lentement, insérer le goulot muni du bouchon dans le trou du puits de l appareil prévu à cet effet. Appuyer un peu pour permettre à la bouteille de descendre jusqu au fond du puits. Le poids de la bouteille la maintient en place. Au besoin, tourner la bouteille de un huitième de tour pour qu elle s aligne avec le devant de l appareil. Faire de même avec les autres bouteilles. Étape 5 Pour enlever une bouteille, la soulever en tirant vers le haut. Ne pas la tirer de côté ou vers l avant. Continuer de la tirer vers le haut jusqu à ce que le goulot soit entièrement sorti du puits. Illustration 13 Enlever la bouteille Dévisser le bouchon et le mettre de côté avant de jeter la bouteille. Les bouchons fournis avec l appareil NE SONT PAS jetables! AU MOMENT DE REMPLACER LES BOUTEILLES, NE PAS JETER LES BOUCHONS FOURNIS AVEC L APPAREIL. LES BOUCHONS SONT RÉUTILISABLES ET NE SONT PAS JETABLES! 44
Shotmeister Owner s Manual. The Sleekest Design, Pouring the Coldest Shots
 Shotmeister Owner s Manual The Sleekest Design, Pouring the Coldest Shots Thank you for purchasing a Jägermeister Shotmeister! REGISTRATION INFORMATION Register your Jägermeister Shotmeister Online: at
Speed Pour Owner s Manual. Serving up the Coldest Shots
 Speed Pour Owner s Manual Serving up the Coldest Shots INSTRUCTIONS Unpacking and Start-Up Instructions 1. Start by removing the included boxes of the Stag Pourer & Bottle Neck Extender. 2. Remove foam
Model JEM. Jägermeister Tap Machine. Owner Guide
 Model JEM Jägermeister Tap Machine Owner Guide The Quickest, Easiest Way To Pour Colder-Than-Ice Shots Over 16 Years of Pouring Perfection - 2 - Dear JEM Jägermeister Tap Machine Owner: Thank you for your
12 CUP COFFEE MAKER User Guide
 BRAND 12 CUP COFFEE MAKER User Guide Item: 740553 Ginnys.com 800-544-1590 Facebook.com/GinnysBrand Pinterest.com/GinnysBrand Ginnys.com/Blog Welcome to the world of full-flavored coffee with the Ginny
OPERATING MANUAL. Sample PRO 100 Series. Electric Heating. Applies to Versions: SPE1*, SPE2, SPE4, SPE6
 OPERATING MANUAL Sample PRO 100 Series Electric Heating Applies to Versions: SPE1*, SPE2, SPE4, SPE6 NOTE: All electrically heated roasters in the Sample PRO 100 Series are modular and this manual applies
1. IMPORTANT SAFEGUARDS When using electrical appliances, basic safety precautions should always be followed to reduce the risk of fire, electric
 1. IMPORTANT SAFEGUARDS When using electrical appliances, basic safety precautions should always be followed to reduce the risk of fire, electric shock, and/pr injury to persons including the following:
12 CUP COFFEEMAKER User Guide
 BRAND 12 CUP COFFEEMAKER User Guide Item: 757147 Ginnys.com 800-544-1590 Facebook.com/GinnysBrand Pinterest.com/GinnysBrand Welcome to the world of full-flavored coffee with the Ginny s Brand 12-Cup Coffeemaker!
AUTOMATIC BURR COFFEE GRINDER
 AUTOMATIC BURR COFFEE GRINDER MODEL:SCG-903B USER MANUAL www.thesecura.com Welcome Congratulations on purchasing our Secura Automatic Burr Coffee Grinder. Each unit is manufactured to ensure safety and
User Manual. Thermo Pump System Coffee Brewers User Manual. Models: 177C10, 177C15 04/2018. Please read and keep these instructions. Indoor use only.
 Thermo Pump System Coffee Brewers User Manual Models: 177C10, 177C15 04/2018 Please read and keep these instructions. Indoor use only. www.avantcoequipment.com 1 Parts Diagram 177C15 2 5 177C10 3 4 6 4
Coffee Burr Grinder. Model #559. Instructions. Warranty
 Coffee Burr Grinder Model #559 Instructions Warranty IMPORTANT SAFEGUARDS When using electrical appliances, basic safety precautions should always be followed, including the following: 1. Read all instructions.
Single-Serve Coffee Maker
 840251801 Single-Serve Coffee Maker IMPORTANT SAFEGUARDS When using electrical appliances, basic safety precautions should always be followed to reduce the risk of fire, electric shock, and/or injury to
User Manual. Stainless Steel Coffee Urns. Models: 177CU30, 177CU55, 177CU110 04/2018. Please read and keep these instructions. Indoor use only.
 Stainless Steel Coffee Urns Models: 177CU30, 177CU55, 177CU110 04/2018 Please read and keep these instructions. Indoor use only. www.avantcoequipment.com 1 NOTE: Save these instructions for future reference.
Quick Start Guide Read this booklet thoroughly and save these instructions.
 Quick Start Guide Read this booklet thoroughly and save these instructions. FAQs can be found at www.espresso-works.com Email us for any unanswered questions: cs@espresso-works.com For product registration,
OWNERS MANUAL. My Rotisserie Pro Warranty. Please read and save this manual. PROFESSION AL SERIES MRP_MAN_QVC_ENG_V1_ FOR HOUSEHOLD USE ONLY.
 My Rotisserie Pro Warranty The manufacturer warrants that your My Rotisserie Pro is free of defects in materials and workmanship and will, at its option, repair or replace any defective rotisserie that
Lusso / Espresso Si' Models:PL-16 PAB-16. Made In Italy
 Lusso / Espresso Si' Models:PL-16 PAB-16 Made In Italy la pavoni - PL-16 & PAB-16 We recommend using freshly roasted espresso beans ground medium to fine. Fresh coffee will produce better tasting espresso.
Instruction Booklet Wine Kit FPSTBW8055 MODEL FPSTBW , P.N.:
 Instruction Booklet Wine Kit MODEL FPSTBW8050-033, FPSTBW8055 www.oster.ca P.N.: 143061 IMPORTANT SAFEGUARDS When using electrical appliances, basic safety precautions should always be followed including
User Manual. Stainless Steel Coffee Urns. Models: 177CU55ETL, 177CU110ETL 10/2016. Please read and keep these instructions. Indoor use only.
 Intertek Stainless Steel Coffee Urns Models: 177CU55ETL, 177CU110ETL 10/2016 Please read and keep these instructions. Indoor use only. www.avantcoequipment.com 1 NOTE: Save these instructions for future
DISCONTINUED VERSION The information in this manual is no longer current. Espresso/Cappuccino OPERATING & SERVICE MANUAL BUNN-O-MATIC CORPORATION
 BUNNEspress BUNN Espress DISCONTINUED VERSION The information in this manual is no longer current. Espresso/Cappuccino OPERATING & SERVICE MANUAL BUNN-O-MATIC CORPORATION POST OFFICE BOX 3227 SPRINGFIELD,
Coffee Burr Grinder. Model #591. Instructions. Warranty. 110W/120Vac/60 Hz. Read this manual thoroughly before using and save it for future reference
 Coffee Burr Grinder Model #591 Instructions Warranty Read this manual thoroughly before using and save it for future reference 110W/120Vac/60 Hz IMPORTANT SAFEGUARDS When using electrical appliances, basic
The Scoop 2-Way Brewer
 READ BEFORE USE The Scoop 2-Way Brewer Visit www.hamiltonbeach.in for our complete line of products and Use and Care Guides as well as delicious recipes, tips, and other helpful information! Questions?
24-Bottle 2-Temp Touchscreen Refrigerator
 24-Bottle 2-Temp Touchscreen Refrigerator INSTRUCTION MANUAL To ensure proper use of this appliance and your safety, please read the following instructions completely before operating this appliance. WineEnthusiast.com
48-Bottle Dual Zone Silent Wine Refrigerator
 48-Bottle Dual Zone Silent Wine Refrigerator INSTRUCTION MANUAL Please read carefully and follow all safety rules and operating instructions. WineEnthusiast.com 800.356.8466 1 Table of Contents Structure......
User Manual. Stainless Steel Coffee Urn. Models: 177CU30 11/2018. Please read and keep these instructions. Indoor use only.
 Stainless Steel Coffee Urn Models: 177CU30 11/2018 Please read and keep these instructions. Indoor use only. www.avantcoequipment.com 1 NOTE: Save these instructions for future reference. Index Important
Coffee Grinder Instruction Manual
 Coffee Grinder Instruction Manual CoffeeGrinder Manual-English Only.indd 1 07/01/2016 14:14:39 Savisto Home Coffee Grinder Voltage Supply: 220-240V~ 50/60Hz Power Consumption: 150W Eng Please read through
K Mini Plus. Use & Care Guide. Get the most from your new Keurig brewer
 K Mini Plus Use & Care Guide Get the most from your new Keurig brewer STRONG STRONG Before You Brew 1 Plug & Power 2 Fill & Place Remove packing tape from brewer. Pull plug and extend cord from cord storage
MODEL: POD BREWER AURORA SAF 68 HOMEMAKER ESPRESSO MAKER WITH COFFEE POD
 INSTRUCTION MANUAL Please read this Instruction Manual and the safety instructions before operating the appliance! MODEL: POD BREWER AURORA SAF 68 HOMEMAKER ESPRESSO MAKER WITH COFFEE POD Congratulation
COLD BREW COFFEE MAKER. Model# GCM-7800 USER MANUAL
 COLD BREW COFFEE MAKER Model# GCM-7800 USER MANUAL Read this manual thoroughly before using and save it for future reference FOR CUSTOMER SERVICE QUESTIONS OR COMMENTS VISIT US @ GOURMIA.COM INFO@GOURMIA.COM
Electric Two-Speed Drink Mixer
 Electric Two-Speed Drink Mixer MS2090 Series Before use, please read this manual thoroughly and save for future reference. ovente.com Electric Two-Speed Drink Mixer MS2090 Series 2 ovente.com ELECTRIC
5KEK1322 W A_v08.indd 1 5/13/16 2:25 PM
 5KEK1322 W10878653A_v08.indd 1 PARTS AND FEATURES PARTS AND ACCESSORIES Tea steeper lid (center section of lid with handle) Kettle lid (outer section) Stainless steel lime scale filter Removable stainless
Thank you for your purchase!
 CM4200S Thank you for your purchase! www.prodprotect.com/blackanddecker Should you have any questions or concerns with your new product, please call our Customer Service Line at 1-800-465-6070 (US and
IMPORTANT SAFEGUARDS. 3. To protect against fire, electric shock and injury to persons do not immerse cord, plug or unit in water or other liquid.
 IMPORTANT SAFEGUARDS When using electrical appliances, basic precautions should always be followed, including the following: 1. Read all instructions. 2. Make sure that your outlet voltage corresponds
Instruction Manual Coffee grinder. CM 90 Serie
 Instruction Manual Coffee grinder CM 90 Serie Table of content Safety Instructions... 3 Before first use... 4 Unpacking... 4 Requirements for the installation location... 5 Operating and speed settings...
TEA CATER USER MANUAL. UM_EN Part No.:
 USER MANUAL UM_EN Part No.: 1730080-02 CONTENT CONTENT... 2 GENERAL... 4 Introduction...4 Warnings...4 Precautions...4 Intended use...4 Facts & weight...5 General functional description...5 OVERVIEW OF
12 Bottle Dual Zone. Touchscreen INSTRUCTION MANUAL
 12 Bottle Dual Zone Touchscreen INSTRUCTION MANUAL To ensure proper use of this appliance and your safety, please read the following instruction completely before operating this appliance. 1 TABLE OF CONTENTS
Please read all directions before using the product and retain this guide for reference. This product is intended for household use only.
 Wine Gift Set User Guide IVAWINESET05 Thank you for purchasing the Ivation Wine Gift Set. This User Guide is intended to provide you with guidelines to ensure that operation of this product is safe and
MINI MAKER GRILL. Model DMG001. Instruction Manual & Recipe Guide
 MINI MAKER GRILL Instruction Manual & Recipe Guide Model DMG001 TABLE OF CONTENTS MINI MAKER GRILL Important Safeguards...4-5 Parts & Features...6 Using Your Grill...7-9 Maintenance & Cleaning...10 Troubleshooting...
User Guide TEA CATER. Your Dealer. U / EN Rev
 User Guide TEA CATER Your Dealer U / EN Rev 101115 1. Contents Tea Cater 1. Contents page 2 2. General 3 3. Function description 3 4. Start-up 3 5. Component overview 4 5. Function button overview 5-6
MARQUE REFERENCE CODIC
 MARQUE REFERENCE CODIC : KALORIK : TKG OT 00BCRL : 50 EN ANGLAIS PROVISOIREMENT NOTICE LOGO 00L ELECTRIC OVEN WITH ROTISSERIE & LAMP & CONVECTION INSTRUCTION MANUAL Model No. TY000BCL 0-0V~ 50/60Hz 800W
Automatic Cold Brewer
 Automatic Cold Brewer Model# GCM-6800 USER MANUAL Read this manual thoroughly before using and save it for future reference Model: GCM-6800 2017 Gourmia www.gourmia.com The Steelstone Group Brooklyn, NY
Burr Grinder. Model #551. Instructions. Warranty
 Burr Grinder Model #551 Instructions Warranty IMPORTANT SAFEGUARDS When using electrical appliances, basic safety precautions should always be followed, including the following: 1. Read all instructions.
WE CAN HELP. Smart Coffee Maker User Manual. Can t connect? Need help? DO NOT RETURN THIS PRODUCT TO THE STORE
 Can t connect? Need help? Wi-Fi Date Code: 01/19 Smart Coffee Maker User Manual WE CAN HELP DO NOT RETURN THIS PRODUCT TO THE STORE Call 1-800-757-1440 Mon-Fri 9:00-5:00 EST (US) or email info@atomiusa.com
THE COBURN COMPANY, INC. PO Box 147 Whitewater, WI U.S.A. Phone: Fax:
 THE COBURN COMPANY, INC. PO Box 147 Whitewater, WI 53190-0147 U.S.A. Phone: 262-473-2822 Fax: 262-473-3522 800-776-7042 800-776-7044 www.coburnco.com Instruction Manual - Milky Butter Churns Coburn part
Burr Grinder. Automatic burr grinder with 17-position grind selector. Instruction Booklet EM0430
 Burr Grinder Automatic burr grinder with 17-position grind selector Instruction Booklet EM0430 Please read these instructions carefully and retain for future reference. Contents Sunbeam s Safety Precautions
MODEL# GCG165 COFFEE GRINDER. PHOTO OF PRODUCT
 MODEL# GCG165 COFFEE GRINDER www.gourmia.com PHOTO OF PRODUCT 2016 Gourmia www.gourmia.com The Steelstone Group Brooklyn, NY Welcome to Delicious world of Coffee Grinders from Gourmia! All rights reserved.
QUALITY MILK FROTHER INSTRUCTION MANUAL MODEL NO. MMF005
 QUALITY MILK FROTHER INSTRUCTION MANUAL MODEL NO. MMF005 MILK FROTHER INSTRUCTION MANUAL Model No.: MMF005 READ ALL INSTRUCTIONS BEFORE USING THE FROTHER. KEEP THESE INSTRUCTIONS FOR FUTURE REFERENCE.
2016 Gourmia The Steelstone Group Brooklyn, NY
 2016 Gourmia www.gourmia.com The Steelstone Group Brooklyn, NY All rights reserved. No portion of this manual may be reproduced by any means whatsoever without written permission from The Steelstone Group,
Model # Instructions Warranty. 950 Watts / 120 Vac / 60 Hz. Read this manual thoroughly before using and save it for future reference
 Perk Model #405.05 Instructions Warranty 950 Watts / 120 Vac / 60 Hz Read this manual thoroughly before using and save it for future reference IMPORTANT SAFEGUARDS When using electrical appliances, basic
Programmable Conical Burr Mill CBM-18
 Programmable Conical Burr Mill CBM-18 IMPORTANT SAFEGUARDS When using electrical appliances, basic safety precautions should always be followed, including the following: 1. Read all instructions. 2. To
SPACEMAKER 8-CUP THERMAL UNDER THE CABINET COFFEEMAKER. Use & Care Manual SCM2000BD
 TM SPACEMAKER 8-CUP THERMAL UNDER THE CABINET COFFEEMAKER Use & Care Manual SCM2000BD Should you have any questions or concerns with your new product, please call our Customer Service Line at 1-800-231-9786
18-Bottle Dual Zone Slimline Edition Touchscreen Refrigerator
 18-Bottle Dual Zone Slimline Edition Touchscreen Refrigerator INSTRUCTION MANUAL To ensure proper use of this appliance and your safety, please read the following instructions completely before operating
OWNER S MANUAL CARAFE READY T526S
 OWNER S MANUAL CARAFE READY T526S IMPORTANT SAFEGUARDS for Safe Operation & Use When using electrical appliances, basic safety precautions should be followed, including the following: 1. Read and follow
CHOCOLINO CAFÉLINO USER MANUAL UM_EN. Part No.: _01
 CHOCOLINO CAFÉLINO USER MANUAL UM_EN Part No.: 1764133_01 CONTENT CONTENT...2 GENERAL...4 Introduction...4 Warnings...4 Precautions...4 Intended use...4 Facts & weight...5 OVERVIEW OF COMPONENTS...6 CHOCOLINO/CAFÉLINO...6
IMPORTANT INSTRUCTIONS MODE D EMPLOI IMPORTANT INSTRUCIONES IMPORTANTES ISTRUZIONI IMPORTANTI
 MOKA 22-04-2003 10:10 Pagina 1 IMPORTANT INSTRUCTIONS SAVE THESE INSTRUCTIONS MODE D EMPLOI IMPORTANT CONSERVEZ LES PRESENTES INSTRUCTIONS INSTRUCIONES IMPORTANTES GUARDE ESTAS INSTRUCCIONES ISTRUZIONI
User Manual. Beer Keg Dispenser User s Manual. Beer Kegs KEGERATRB, KEGERATRS
 Beer Keg Dispenser User s Manual Beer Kegs KEGERATRB, KEGERATRS 05/2015 Recommended for household use only. Please read the manual thoroughly prior to equipment set-up, operation and maintenance. - 1 -
STAINLESS STEEL MILK FROTHER. Model: PKFMR11BK
 STAINLESS STEEL MILK FROTHER Model: PKFMR11BK WARNING! To reduce the risk of fire, electrical shock or injury to persons or property: Carefully read all instructions before operating your new product for
5KEK1522 W A_01_EN.indd 1 11/16/12 1:22 PM
 5KEK1522 Water Kettle INSTRUCTIONS Table of Contents water KEttle SAFETY Important safeguards...6 Electrical requirements...7 Electrical equipment waste disposal...7 PARTS AND FEATURES Parts and accessories...8
SG Cup Coffee Maker. Model # W / 120Vac / 60 Hz. Operating Instructions Warranty
 SG220 12-Cup Coffee Maker Model #427.05 Operating Instructions Warranty 900W / 120Vac / 60 Hz IMPORTANT SAFEGUARDS When using electrical appliances, basic precautions should always be followed, including
Get Started. Better Everyday ECAM23260
 Better Everyday Get Started This short guide is not intended to explain all the functions of the appliance. Please read all the owner s instruction booklet before use. Video available on www.youtube.com/delonghiusa
MODEL# GMF255 MOKA POT MILK FROTHER. PHOTO OF PRODUCT
 MODEL# GMF255 MOKA POT MILK FROTHER www.gourmia.com PHOTO OF PRODUCT 2016 Gourmia www.gourmia.com The Steelstone Group Brooklyn, NY Welcome to the World of Espresso & Milk Frothers from Gourmia! All rights
Iced Tea MAKER. Model #624. Instructions Warranty. 725W / 120V / 60 Hz
 Iced Tea MAKER Model #624 Instructions Warranty 725W / 120V / 60 Hz IMPORTANT SAFEGUARDS To reduce the risk of fire, electric shock and/or injury to persons, basic safety precautions should always be followed
K35 Use & Care Guide. Get the most from your new Keurig coffee maker
 K35 Use & Care Guide Get the most from your new Keurig coffee maker K35 COFFEE MAKER A. Water Reservoir Lid B. MAX Fill Line C. Water Reservoir D. Water Reservoir Lock Tab Slots E. Power Cord F. Handle
phd Pitcher UltraWater Owner s Manual Delicious Great Tasting Antioxidant Alkaline Energized
 Owner s Manual UltraWater phd Pitcher Delicious Great Tasting Antioxidant Alkaline Energized READ ME FIRST! 1. Be sure to flush your UltraWater filter before using the first time. (See Instructions for
AS450, AS600, G1, SG630
 Grill Range Operating Manual Grill Range AS450, AS600, G, SG60 Product Range Also Includes: Induction Hobs / Combination Ovens / Pizza Ovens / Mixers Salamander Grills / Contact Grills / Pie Warmers /
BBQ Grill. Owner s Manual Save These Instructions - For Household Use Only For Sizes: 12 x 18 & 12 x 12
 BBQ Grill Owner s Manual Save These Instructions - For Household Use Only For Sizes: 12 x 18 & 12 x 12 Do not use the Copper Chef TM BBQ Grill until you have read this manual thoroughly. Warranty Information
Half-Pint Soft Serve Ice Cream Maker
 CAUTION: READ OPERATOR S MANUAL BEFORE USE Visit www.hamiltonbeach-me.com for our complete line of products and Use and Care Guides as well as delicious recipes and tips! Half-Pint Soft Serve Ice Cream
2016 Gourmia The Steelstone Group Brooklyn, NY
 2016 Gourmia www.gourmia.com The Steelstone Group Brooklyn, NY All rights reserved. No portion of this manual may be reproduced by any means whatsoever without written permission from The Steelstone Group,
Custom Grind Deluxe Coffee Grinder
 READ BEFORE USE Visit www.hamiltonbeach.in for our complete line of products and Use and Care Guides as well as delicious recipes, tips, and other useful information! Custom Grind Deluxe Coffee Grinder
USE & CARE GUIDE B145 SINGLE-CUP BREWING SYSTEM BREWING EXCELLENCE ONE CUP AT A TIME
 USE & CARE GUIDE B145 SINGLE-CUP BREWING SYSTEM BREWING EXCELLENCE ONE CUP AT A TIME Please read and save these instructions. Pour des directives en français, veuillez vous reporter à la page 13. SAFE
Fast Brew 12-Cup Coffeemaker
 READ AND SAVE THESE INSTRUCTIONS WA R N I N G : A risk of fire and electrical shock exists in all electrical appliances and may cause personal injury or death. Please follow all safety instructions. Fast
BRAND DOUBLE WAFFLE MAKER
 BRAND DOUBLE WAFFLE MAKER User Guide Item: 759106 Recipes Inside! Ginnys.com 800-544-1590 Facebook.com/GinnysBrand Pinterest.com/GinnysBrand Thank you for purchasing a Ginny s Brand Double Waffle Maker.
infinity Model # 575 #570 Conical Burr Grinder Instructions Warranty Product Registration 100W / 120V~ / 60 Hz
 infinity Conical Burr Grinder Model # 575 #570 Instructions Warranty Product Registration 100W / 120V~ / 60 Hz IMPORTANT SAFEGUARDS When using electrical appliances, basic safety precautions should always
10,000 prize draw. instructions. EXTRA year guarantee FREE rewards gallery. details. Register online now!
 r instructions 10,000 prize draw EXTRA year guarantee FREE rewards gallery www.russellhobbs.co.uk/productregister/ Register online now! See back for details e j 600ml 600ml k f g A B i 2 Read the instructions,
USE AND CARE GUIDE FOR
 READ AND SAVE THESE INSTRUCTIONS Coffee Maker USE AND CARE GUIDE FOR MODEL ME2TMB IMPORTANT SAFEGUARDS When using electrical appliances, basic safety precautions should always be followed, including the
SINGLE SERVE COFFEE MAKER
 SINGLE SERVE COFFEE MAKER USER GUIDE Now that you have purchased a Chefman product you can rest assured in the knowledge that as well as your 3-year parts and labor warranty you have the added peace of
instructions COFFEE GRINDER KG 79/89
 instructions COFFEE GRINDER KG 79/89 DESCRIPTION OF APPLIANCE The following terms are used throughout the instruction manual Coffee-bean hopper lid Removable upper burr Coffee-bean hopper ON/OFF switch
Installation & Parts Manual 2" & 3" High Capacity Strainers For Class 1, Petroleum Applications
 Installation & Parts Manual 2" & 3" High Capacity Strainers For Class 1, Petroleum Applications Installation: M200-20 www.lcmeter.com Table of Contents Description Page Number Introduction... 2 What LC
SG120 Model # Cup Stainless Steel Coffee Maker. Operating Instructions Product Registration Warranty
 SG120 Model #494 12-Cup Stainless Steel Coffee Maker Operating Instructions Product Registration Warranty IMPORTANT SAFEGUARDS When using electrical appliances, basic safety precautions should always be
ROTISSERIE MINI OVEN KWS1523X-F2UB
 ROTISSERIE MINI OVEN KWS1523X-F2UB CAUTION Read all the instructions carefully before using and retain this for further reference. The temperature of accessible surfaces may get hot when the appliance
Getting to Know Your Bananza
 User Guide Thank you for purchasing Bananza from JML. To get the best results from this frozen dessert maker, please read these instructions in full and retain for future reference. Contents Safety Warnings
Instruction Manual Coffee Grinder. Kaffeemühle / Coffee grinder CM 70 Serie
 Instruction Manual Coffee Grinder Kaffeemühle / Coffee grinder CM 70 Serie Table of content Safety Instructions... 3 Before the first use... 4 Unpacking... 5 Requirements for the installation location...
Triple Brew. Model #352. Coffee & Tea Maker. Instructions Warranty
 Triple Brew Coffee & Tea Maker Model #352 Instructions Warranty IMPORTANT SAFEGUARDS When using electrical appliances, basic safety precautions should always be followed, including: 1. Read all instructions.
CAIMANO SPECIAL450 BARISTA
 ANFIM ANFIM Srl Via B. Verro, 33/5-20141 - MILANO ITALY Tel. (+39) 02/8465054 - Fax.(+39) 02/8464401 e-mail: info@anfim.it web site: www.anfim.it COFFEE GRINDER INSTRUCTIONS MANUAL mod: CAIMANO SPECIAL450
Welcome to the perfect pour!
 OPERATING MANUAL BREWART BY COOPERS Welcome to the perfect pour! Congratulations on the purchase of your BrewArt BrewFlo. This manual covers the basic setup and operation of your BrewFlo. To discover the
Coffeemaker. Coffeemaker Safety... 2 Parts and Features... 3 Using Your Coffeemaker... 4 Cleaning Your Coffeemaker... 4 Customer Service...
 Coffeemaker Coffeemaker Safety... 2 Parts and Features... 3 Using Your Coffeemaker... 4 Cleaning Your Coffeemaker... 4 Customer Service... 6 In USA: 1-800-851-8900 In Canada: 1-800-267-2826 840069400 Coffeemaker
Pellet Pro 12 & 18 Lengths Large 35lb Hopper Assembly Operation Manual
 Pellet Pro 12 & 18 Lengths Large 35lb Hopper Assembly Operation Manual Now with our exclusive PID Controller & Universal Mounting Capabilities! FOR OUTDOOR USE ONLY Disclaimer: The hopper assembly is used
MODEL# GCM4500 COFFEE MAKER WITH GRINDER. PHOTO OF PRODUCT
 MODEL# GCM4500 COFFEE MAKER WITH GRINDER www.gourmia.com PHOTO OF PRODUCT 2016 Gourmia www.gourmia.com The Steelstone Group Brooklyn, NY Welcome to Delicious and Aromatic world of Coffee Makers from Gourmia!
Downflow Conversion Kit used to Modify Air Handler Units for Downflow Application
 0672327-00 February 2015 Installation Instructions Downflow Conversion Kit used to Modify Air Handler Units for Downflow Application Scan to see the Downflow Installation Video Go to your app store and
Espresso Multi Capsule Machine
 Espresso Multi Capsule Machine USER MANUAL Model# GCM-7000 Read this manual thoroughly before using and save it for future reference Model: CG9129-GS 2016 Gourmia www.gourmia.com The Steelstone Group Brooklyn,
OPERATING AND CARE INSTRUCTIONS. Model#: VS7600-2
 OPERATING AND CARE INSTRUCTIONS VitaClay Yogurt Maker and Personal Slow Cooker Model#: VS7600-2 PLEASE READ ALL INSTRUCTIONS CAREFULLY BEFORE INITIAL USE. HOUSEHOLD USE ONLY 2013 Essenergy, Inc. All rights
ORIGINAL LINE A USER MANUAL
 USER MANUAL Machines with automatic water filling UM_EN Part No.: 1764024_01 CONTENT CONTENT... 2 GENERAL... 4 Introduction...4 Warnings...4 Precautions...4 Intended use...4 Facts & weight...5 General
Wine Cooler Frigorifero da sottobanco Refrigerateur a vin
 Wine Cooler Frigorifero da sottobanco Refrigerateur a vin Please read this instruction booklet carefully before using your Candy Wine Cooler Table of Contents Parts and Features-----------------------------------------------------------------
The Ultimate Edible Making Machine
 Now Includes Mighty Fast Organic Hemp Filter The Ultimate Edible Making Machine Like us on facebook: facebook.com/mightyfastherbalinfuser Follow Us on Twitter: https://twitter.com/herbalinfuser Follow
COFFEE DISPENSERS. Models SBC570NCF SBC570CF SBC570CMTWIN. Instruction Manual
 COFFEE DISPENSERS Models SBC570NCF SBC570CF SBC570CMTWIN Instruction Manual SBC570NCF BEFORE USE, PLEASE READ AND FOLLOW ALL SAFETY RULES AND OPERATING INSTRUCTIONS. Write Model No. and Serial No. (from
LOT: PO: 4098_GelCanInsert_JW_ Model # oz Gel Fuel Can Firebox Insert
 LOT: PO: 4098_GelCanInsert_JW_010213 f i r e p l a c e s Model # 4098 13oz Gel Fuel Can Firebox Insert - Gel Fuel is flammable. Failure to follow warnings can result in property damage or serious burns.
INSTALLATION & OPERATING GUIDE
 SURE TAMP STEAM INSTALLATION & OPERATING GUIDE BUNN-O-MATIC CORPORATION POST OFFICE BOX 3227 SPRINGFIELD, ILLINOIS 6278-3227 PHONE: (217) 529-661 FAX: (217) 529-6644 http://www.bunn.com/espresso/index.html
Let s get brewing. K Quick Start Guide
 Let s get brewing. K-1500 Quick Start Guide IMPORTANT SAFEGUARDS - READ ALL INSTRUCTIONS BEFORE USING When using electrical appliances, basic safety precautions should be followed, including the following:
MODELS 1315 & 1315-S La Pavoni CLUB COMBO
 IMPORTANT WARNINGS MODELS 1315 & 1315-S La Pavoni CLUB COMBO DUET Never operate your espresso machine without water in the tank. This may cause premature pump failure. Do not allow the power cord to come
WP55. For your safety and continued enjoyment of this product, always read the instruction book carefully before using.
 PROFESSIONAL cordless wine preserver WP55 For your safety and continued enjoyment of this product, always read the instruction book carefully before using. IMPORTANT SAFEGUARDS When using electrical appliances,
The Ultimate Edible Making Machine
 Now Includes Mighty Fast Organic Hemp Filter The Ultimate Edible Making Machine Like us on facebook: facebook.com/mightyfastherbalinfuser Follow Us on Twitter: https://twitter.com/herbalinfuser Follow
Eaton Filtration, LLC
 Eaton Filtration, LLC 900 Fairmount Avenue, Elizabeth, NJ 07207 Phone: 908-787-1000 Fax: 908-351-7893 E-Mail: filtration@eaton.com Web: www.filtration.eaton.com Installation, Operation & Service Manual