G F I M J K L B C D E S O T H Q P U N R D 4
|
|
|
- Martin Ryan
- 6 years ago
- Views:
Transcription


1 G F I A M J K L B C D E S O T H Q P U N R D 4
 H Mains switch I On / Off switch J Cup holding plate K Cup warming plate (model 850) L Service door (side wall) M")
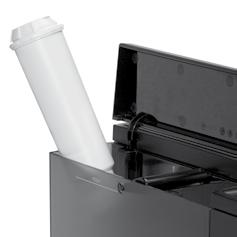
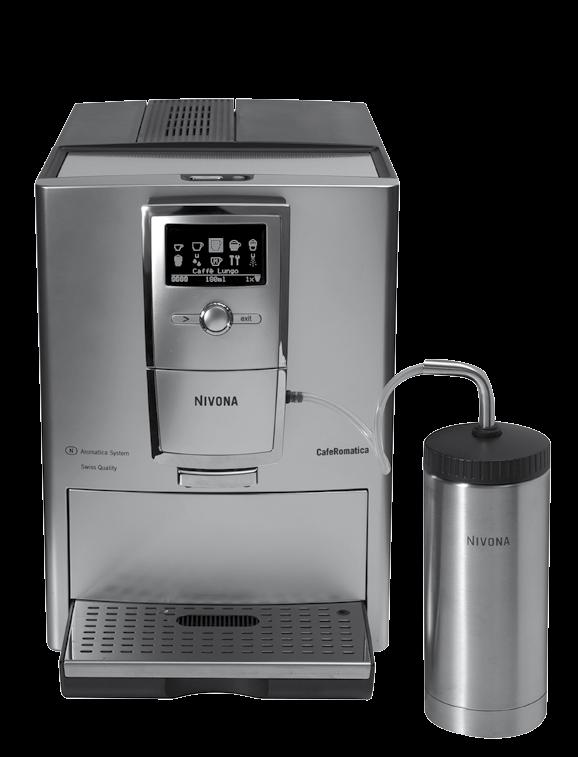
2 Equipment GB A B C D E Text display (main menu) Rotary control knob Button > Button exit Height-adjustable coffee spout CafeRomatica Fully automatic coffee centre Operating Instructions and Useful Tips GB F Removable water reservoir with lid G Bean container with lid (inside) H Mains switch I On / Off switch J Cup holding plate K Cup warming plate (model 850) L Service door (side wall) M Pre-ground coffee chamber with lid (inside) N Drip tray O Used coffee tray (inside) P Cover panel Q Rear rollers (underneath at the back) R Spumatore (milk frother) in separate parts S Nameplate with specifications (inside) T Power cord storage compartment (on rear) U Milk cooler Thermos (model 850) 58 GB A passion for coffee.
3 Operating Instructions and Useful Tips Contents Dear Customer, congratulations and many thanks for choosing a high-quality NIVONA product. To get the most out of your NIVONA machine, please read this manual carefully before use. Please start by reading the safety notes. Please keep this manual in a safe place. You may want to use it as reference guide or hand it on to any further users of your machine. Your retailer and the NIVONA team hope that you enjoy great coffee and are extremely satisfied with this high-quality NIVONA product. Purchase made at Place, date 1. SAFETY INSTRUCTIONS SET UP Preparing the machine The most important controls Adding water and beans Switching on and getting started for the first time Switching on the machine and preparing it for use Pre-warming your cups ADJUSTING THE BASIC SETTINGS Operating the machine with or without the filter Setting the water hardness level Setting the temperature Setting timer functions Setting the language Setting the switch-off rinsing function Setting the ECO mode Reading statistics BREWING SPECIALITY COFFEES Brewing an Espresso Brewing a Café Crème Brewing a Caffè Lungo Brewing a Cappuccino Brewing a Latte Macchiato Preparing warm milk (e.g. for warm chocolate) Preparing hot water (e.g. for tea) Brewing My Coffee Setting the grinder Preparing pre-ground coffee CLEANING AND MAINTENANCE Rinsing the spumatore (milk frother) Rinsing the spout Cleaning the spumatore (milk frother) Cleaning the system Descaling the system Cleaning the machine regularly by hand Cleaning the brewing unit Changing the filter SYSTEM MESSAGES TROUBLESHOOTING ACCESSORIES FURTHER INSTRUCTIONS GB GB 61
4 1. Safety instructions 1. Safety instructions 1. Safety instructions This machine may only be used for the intended purpose (domestic use) and is not for commercial application see guarantee conditions. Otherwise, claims under the guarantee will not be accepted. Operating voltage must be the same as mains voltage. Please note the model nameplate / sticker on the machine (Image 1/S). Do not operate the machine if the power cord or machine case is damaged. Keep the power cord away from hot parts. Do not unplug the machine by pulling on the power cord. Observe the cleaning & descaling instructions provided. Otherwise, claims under the guarantee will not be accepted. Make sure to switch off and unplug the machine before maintenance or cleaning. Place the machine on a firm, level surface and use it indoors only. Do not place the machine on a hot surface or near open flames. Keep out of reach of children and ensure that they do not play with the appliance. Always unplug the machine during extended periods of absence. Do not leave the machine switched on unnecessarily. Never submerge the machine in water. Do not put the machine or individual parts in the dishwasher. Otherwise, claims under the guarantee will not be accepted. Unplug immediately if there is a defect (do not pull the cord or machine to unplug). Liability for damages cannot be accepted if the machine is incorrectly operated, subject to improper use or non-professional servicing. In such cases, services will not be provided under the guarantee. Use the integrated coffee grinder for grinding roasted coffee beans only. Never use for other foods. Always make sure there is nothing but coffee beans in the beans container, otherwise the guarantee will not apply. This machine is not suitable for individuals (including children) with physical, sensory or mental impairments, including individuals who do not have sufficient experience or knowledge, unless they are shown how to operate the machine or initially supervised by someone responsible for their safety. If repair services are required, including replacement of the power cord, please first contact your dealer or the service-hotline. Afterwards send the machine to the dealer from whom it was purchased or to NIVONA national customer services. If the appliance s power cord should become damaged, it must be replaced by the manufacturer, the manufacturer s customer service department or a similarly qualified specialist, in order to avoid any hazards. Caution: Electrical appliances must be repaired by qualified personnel. Non-professional repairs can expose the user to significant dangers. Liability for damages cannot be accepted if the machine is used for any other than the in tended purpose, incorrectly maintained or serviced. Caution: Using the on/off button (Image 1/I) during brewing can damage the machine. Only switch off the appliance when it is in passive state. Caution: Risk of scalding! When you draw steam or hot water, watch out for splashes from the jet / spout (Image 1/E): Leave to cool for a few minutes before touching. CE This machine conforms to the valid EC guideline. Specifications Mains voltage: V Power input: 1465 W 62 GB GB 63
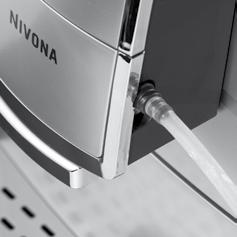
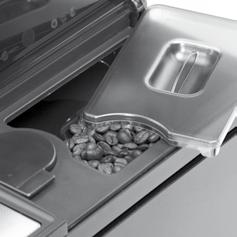
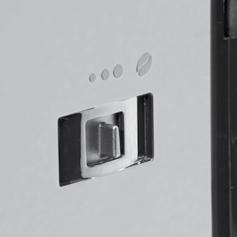
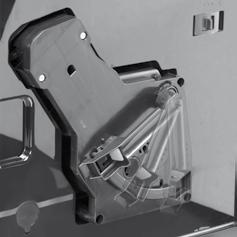
5 2. Set up 2. Set up 2. Set up 2.1 Preparing the machine! Carefully remove the machine and all parts from the packaging. The following items are packaged with the machine: 2.3 Adding water and beans! Open the cover on the left side of the machine (Image 1/F) and take out the water reservoir (Image 2). Rinse the water reservoir with cold, clear tap water.! Fill the water reservoir up to its maximum mark and place it back in the machine. Make sure that the water reservoir is properly clicked into place. User manual Abridged user manual for users in a hurry (Caution: the abridged user manual is not an adequate replacement for this user manual! Please read this entire user manual carefully!) Guarantee card Measuring spoon with assembly tool for filter 2 cleaning tablets 1 Claris filter 1 water hardness test strip Please note: If you need to return your machine for servicing, it should be posted in its complete original packaging. Please retain all original packaging, including Styrofoam parts, for this purpose.! Place the machine on a level, dry and suitable work surface.! Connect the machine to a properly installed mains socket.! Your machine includes a power cord storage compartment if the cord is longer than necessary to reach the mains, any surplus cord can be accommodated in the compartment on the rear of the machine (Image 1/T). 2.2 The most important controls Your NIVONA machine enables you to brew a range of speciality coffees just as you like them. The most important controls and their basic functions are generally identical for the various speciality coffees: The turn-and-press control knob (or Rotary control knob for short) (Image 1/B): Select the value you require by turning the Rotary control knob, and confirm your selection by pressing it. The > button (Image 1/C): Press the > button to move one item along in the selected menu. The exit button (Image 1/D): Press the exit button to leave the selected menu and move one menu level back. Pressing the exit button will abort any brewing process currently in progress. Height-adjustable spout (Image 1/E): You can adjust the spout up or down to suit the size of your cup or glass. Please note: only fill the water reservoir with cold, clear water! Never use carbonated water or other liquids! Otherwise, claims under the guarantee will not be accepted.! Open the cover on the right side of the machine (Image 1/G) and then open the bean container lid (Image 3). Only add untreated, roasted coffee beans. Then close the lid and the cover. Caution: Do not use beans treated with supplements, such as sugar, either during or after roasting. Supplements can damage the grinding mechanism, and any resulting repair costs are not covered by the guarantee. 2.4 Switching on and getting started for the first time! Turn on the mains switch (Image 1/H) to put the machine in stand-by mode, and then press the on/off button (Image 1/I) to turn it on. The Getting started menu will appear on the display screen. Please adjust the following basic settings before you make your first coffee:! Setting the language! Turn the Rotary control knob to select your language. The following text will appear on the display screen: Insert filter?! Operating the machine with or without the filter Operating the machine with the filter A Claris filter is one of the accessories that come with the machine. If you use this filter, you will have to descale your machine less often, 64 GB GB 65
6 2. Set up 2. Set up as the filter softens the water. The machine s default factory setting is Insert filter? No.! Turn the Rotary control knob to select Insert filter? Yes, so that the machine knows that the filter is being inserted.! Press the Rotary The message, Insert filter, will appear on the display screen.! Empty the water reservoir (Image 1/F and 2) and carefully screw the filter into the holder provided in the water reservoir using the assembly tool on the end of the measuring spoon (Image 4). Caution: Be careful not to turn too far or to cause it to snap off.! Fill the water reservoir with fresh water and put it back into the machine.! Place a receptacle with at least 0.5l capacity under the spout and slightly to the left (Image 1/E) and press the Rotary The system will now be rinsed. The message, Rinsing Filter, will appear on the display screen.! Wait until water stops coming out of the spout. The message, Please rinse, will appear on the display screen.! Press the Rotary The machine will be rinsed and will then be ready for use. Please note: If you operate the machine with the filter and have set the system to Filter inserted? Yes, you cannot set water hardness. The machine is set to water hardness level 1 by default. This means that you have to descale your machine less often but you must still descale it when necessary. ALWAYS TAKE THE FILTER OUT before descaling! The filter loses its efficiency after processing about 50 l of water. (To change the filter, see 3.1.1). Caution: Even if the display screen does not show the message, Replace filter, and even if the machine is only used occasionally, the filter must be changed at least every two months (see ). Operating the machine without the filter If you wish to operate the machine without the filter, you must reset the filter setting to Filter inserted? No. This is important because the machine needs to be descaled more often without a filter, depending on water hardness (the machine s default factory setting is Filter inserted? No!).! Turn the Rotary control knob to select Filter inserted? No. The water hardness setting will now appear on the display screen. Please note: It is possible that the machine s pipe system will still be empty when it is set up. This will be indicated when the machine is turned on using the on/off button, as the message, Fill up pipe system, will appear on the display screen.! Place a receptacle with at least 0.5l capacity with its centre under the spout.! Press the Rotary The system will now be filled. Water may come out of the spout (Image 1/E ). After the system has heated up, the message, Please rinse, will appear on the display screen.! Press the Rotary The system will now be filled with water.! Setting the water hardness level Depending on the level of water hardness in your area, the machine will have to be descaled sooner or later. In order for the system to be able to indicate when descaling is required, you must set the correct water hardness level before using the machine for the first time. If you use the machine with a filter and set the appropriate filter setting (see 3.1 below), water hardness will be set to level 1 by default. The basic factory setting for water hardness is LEVEL 3. Firstly, test the quality of your water with the enclosed test strip:! Dip the test strip in the water and gently shake it off.! After about a minute, you will be able to read the test result by counting the number of red dots on the test strip.! The settings for the different water hardness levels are as follows: Test strip / Degree of hardness = display 1 red dot / 1 7 = (HARDNESS) LEVEL 1 2 red dots / 8 14 = (HARDNESS) LEVEL 2 3 red dots / = (HARDNESS) LEVEL 3 4 red dots / >21 = (HARDNESS) LEVEL 4 66 GB GB 67
7 2. Set up 2. Set up / 3. Adjusting the basic settings Please note: If no red dot appears, set water hardness to level 1. Set the water hardness level on your machine as follows:! Turn the Rotary control knob to select the appropriate water hardness level. The message, Please rinse, will now appear on the display screen.! Press the Rotary The system will now be filled with water. The message, NIVONA, will now appear on the display screen. When the machine has heated up, the main menu will appear on the display screen to indicate that the machine is ready for use. The first time you brew a coffee: The first time you brew a coffee, the grinder is still empty. So after the first grinding, the display screen may show the message, Fill up beans, and the machine may not brew any coffee.! Follow the message on the display screen and simply press the Rotary control knob again. The process will then be repeated. 2.5 Switching on the machine and preparing it for use After you have set up the machine (see 2.4), always switch it on and prepare it for use as follows:! Switch on the machine at the mains (Image 1/H).! Press the on/off button (Image 1/I). The message, Heating will now appear on the display screen. Once the machine has heated up, the message, Please rinse, will appear on the display screen.! Press the Rotary The system will now be rinsed. Then it will be ready for use, and the main menu will appear on the display screen (Image 1/A). Please note: If you are not going to use the machine for a significant period of time (e.g., if you are going on holiday), switch off the machine at the mains (Image 1/H) and remove the plug from the mains. 2.6 Pre-warming your cups 850 model only: Your machine is equipped with a high-quality active cup-warming function that can be switched on and off while the machine is on.! By pressing the button (Image 1/K) you can turn on the cup-warming function. (The mains switch (Image 1/H) must be on.) The display screen will show the message, Cup heater on.! By pressing the button again (Image 1/K) you can turn the cupwarming function off again. The display screen will show the message, Cup heater off. Tip: Use the warming function to optimise the temperature and aroma of your coffee to suit your personal preference. 3. Adjusting the basic settings Please note: There is a factory setting for every speciality coffee. So you can brew coffee straight away (see 4). But we would advise you to start by changing the basic settings to match your own preferences. So please adjust the following basic settings (3.1 to 3.8) Operating the machine with or without the filter Operating the machine with the filter A Claris filter is one of the accessories that come with the machine. If you use this filter properly, you will have to descale your machine less often, as the filter softens the water. The machine s default factory setting is Insert filter? No. the Rotary! Turn the Rotary control knob to Filter. Press the Rotary control! Turn the Rotary control knob to Insert filter? Yes, so that the machine knows that the filter is being inserted.! Press the Rotary The message, Insert filter, will appear on the display screen. 68 GB 69 GB
8 3. Adjusting the basic settings 3. Adjusting the basic settings! Empty the water reservoir (Image 1/F and 2) and carefully screw the filter into the holder provided in the water reservoir using the assembly tool on the end of the measuring spoon (Image 4). Caution: Be careful not to turn too far or to cause it to snap off.! Fill the water reservoir with fresh water and put it back into the machine.! Place a receptacle with at least 0.5l capacity under the spout and slightly to the left (Image 1/E) and press the Rotary The system will now be rinsed. The message, Rinsing filter, will appear on the display screen.! Wait until water stops coming out of the spout. The system will now heat up. Then the main menu will appear (Image 1/A), and the system will be ready for use. Please note: If you operate the machine with the filter and have set the system to Filter inserted? Yes, you cannot set water hardness. The machine is set to water hardness level 1 by default. This means that you have to descale your machine less often but you must still descale it when necessary. ALWAYS TAKE THE FILTER OUT before descaling! The filter loses its efficiency after processing about 50 l of water. Caution: Even if the display screen does not show the message, Replace filter, and even if the machine is only used occasionally, the filter must be changed at least every two months Operating the machine without the filter If you wish to operate the machine without the filter, you must reset the filter setting to Filter inserted? No. This is important because the machine needs to be descaled more often without a filter, depending on water hardness (the machine s default factory setting is Filter inserted? No ).! From here you can either continue and program the other settings, Caution: If you are operating the machine without the filter, please do not forget to set the correct water hardness level (see 3.2) Setting the water hardness level Depending on the level of water hardness in your area, the machine will have to be descaled sooner or later. In order for the system to be able to indicate when descaling is required, you must set the correct water hardness level before you have even used the machine. If you use the machine with a filter and set the appropriate filter setting (see 3.1 above), water hardness will be set to level 1 by default. The basic factory setting for water hardness is LEVEL 3. Firstly, test the quality of your water with the enclosed test strip:! Dip the test strip in the water and gently shake it off.! After about a minute, you will be able to read the test result by counting the number of red dots on the test strip.! The settings for the different water hardness levels are as follows: Test strip / Degree of hardness = display 1 red dot / 1 7 = (HARDNESS) LEVEL 1 2 red dots / 8 14 = (HARDNESS) LEVEL 2 3 red dots / = (HARDNESS) LEVEL 3 4 red dots / >21 = (HARDNESS) LEVEL 4 Please note: If no red dot appears, set water hardness to level 1. Set the water hardness level on your machine as follows: the Rotary! Turn the Rotary control knob to Water hardness. Press the Rotary! Turn the Rotary control knob to select your water hardness level. the Rotary! Turn the Rotary control knob to Filter. Press the Rotary control! Turn the Rotary control knob to Filter inserted? No. The other settings will now appear on the display screen Setting the temperature The other settings will now appear on the display screen.! From here you can either continue and program the other settings, According to your preference, you can set the coffee temperature to 70 GB GB 71
9 3. Adjusting the basic settings 3. Adjusting the basic settings 3.4. Setting timer functions Normal, High, Maximum or Individually. The factory setting is High. By following the procedure described below, you will set the same temperature for all speciality coffees. However, you can also set the temperature individually for each speciality coffee (see 4 below). Select the Individually setting in this menu as follows: the Rotary! Turn the Rotary control knob to Temperature. Press the Rotary! Turn the Rotary control knob to select your desired temperature. The other settings will now appear on the display screen.! From here you can either continue and program the other settings, Caution: In order to use the functions described from to 3.4.4, you must first set the clock time (see 3.4.1). Caution: If the machine has been switched off at the mains (Image 1/H), or if there has been a power cut, you will have to set the clock time again in order to use the functions described from to Please note: Once the clock time has been set (see 3.4.1), it will appear on the display screen when the machine is in stand-by mode. If the clock time has not been set (see 3.4.1), the on/off symbol will appear on the display screen in stand-by mode.! Turn the Rotary control knob to select the appropriate hour number. The minute display will now flash on the display screen.! Turn the Rotary control knob to select the appropriate minute number.! Press the exit button to leave the clock menu.! From here you can either continue and program the other time settings, Setting the automatic switch-on time Your machine can be programmed to switch itself on every day at a set time. This means that your machine can be ready for use when you come down for breakfast, for example. You can set the switch-on time as follows: the Rotary! Turn the Rotary control knob to Times. Press the Rotary control! Turn the Rotary control knob to Unit auto ON at. Press the Rotary! Turn the Rotary control knob to Disabled if you wish to deactivate the automatic switch-on time, or to Set auto ON if you wish to activate the automatic switch-on time. Press the Rotary control The hour display will now flash on the display screen Setting the clock time the Rotary! Turn the Rotary control knob to Times. Press the Rotary control! Turn the Rotary control knob to Clock. Press the Rotary control! Turn the Rotary control knob to Disabled if you wish to deactivate the clock, or to Set clock if you wish to activate the clock. Press the Rotary The hour display will now flash on the display screen.! Turn the Rotary control knob to select the hour number for your desired switch-on time. The minute display will now flash on the display screen.! Turn the Rotary control knob to select the minute number for the switch-on time. Your machine will now switch itself on automatically every day at the set switch-on time. 72 GB GB 73
10 3. Adjusting the basic settings 3. Adjusting the basic settings! From here, you can either continue and program the other time settings, Setting the automatic switch-off time Using this function, you can set how long the machine will stay on after its last use before automatically switching into stand-by mode. The basic factory setting is after 0.5 hours. the Rotary! Turn the Rotary control knob to Times. Press the Rotary control! Turn the Rotary control knob to Unit auto OFF in. Press the Rotary The possible switch-off times (ranging from 0.5 to 12 hours) will now appear on the display screen.! Turn the Rotary control knob to select your desired switch-off time. The other time settings will now appear on the display screen, and your machine will automatically switch into stand-by mode once the selected switch-off time has elapsed after its last use.! From here, you can either continue and program the other time settings, Setting the automatic cup-warming function 850 model only: Using this function, you can select to switch on the cup-warming function automatically when the machine is switched on. If both the automatic switch-on function for the machine and the Cup heater auto ON function are activated, the cup-warming function will be automatically switched on 20 minutes before the machine switch-on time. the Rotary! Turn the Rotary control knob to Times. Press the Rotary control! Turn the Rotary control knob to Cup heater auto ON. Press the Rotary Setting the time format 3.5. Setting the language! Turn the Rotary control knob to Disabled or to Enabled. The other time settings will now appear on the display screen.! From here, you can either continue and program the other time settings, Using this function, you can select whether the clock time will be shown in 12-hour or 24-hour mode. The basic factory setting is 24-hour mode. the Rotary! Turn the Rotary control knob to Times. Press the Rotary control! Turn the Rotary control knob to 24 hours or am/pm. The other time settings will now appear on the display screen.! From here, you can either continue and program the other time settings, the Rotary! Turn the Rotary control knob to Language. Press the Rotary! Turn the Rotary control knob to select your language. The other settings will now appear on the display screen Setting the switch-off rinsing function The switch-on rinsing function is pre-programmed and installed by the manufacturer. Each time it is switched on when cold, the 74 GB GB 75
11 3. Adjusting the basic settings 3. Adjusting the basic settings / 4. Brewing speciality coffees 3.7. Setting the ECO mode machine heats up again and needs to be rinsed so that it always uses fresh water. The display screen indicates when rinsing is required, and the rinsing function must be started manually by pressing the Rotary control You also have the option of activating the automatic function that rinses the machine after it is switched off: the Rotary! Turn the Rotary control knob to OFF rinsing. Press the Rotary! Turn the Rotary control knob to select Disabled or Enabled. The other settings will now appear on the display screen. Please note: Even if the switch-off rinsing function is activated, the machine will only be rinsed if it has brewed at least one drink before being switched off. Your machine is equipped with a power-saving function, ECO mode. This is activated by the manufacturer and means that the machine switches into ECO mode with minimal heat output 3 minutes (factory setting) after its last use, so it requires less power. If you start the machine from ECO mode, it may take a few seconds longer than usual to heat up. You can also change the ECO mode. If you deactivate it, the machine will always be fully ready for use when it is on Reading statistics Please note: When the machine switches into ECO mode, the moving message, Save energy, will appear on the display screen.! If your machine is in ECO mode, press the Rotary Your machine will now heat up again and be ready for use. Using the menu item, Statistics, you can read how often the following drinks and functions have been selected since the machine was set up: Espresso - Café Crème - Caffè Lungo - Cappuccino - Latte Macchiato - My coffee - Powder coffee - 1 cup - 2 cups - Total (= sum of all coffees) - Hot water - Milk - Cleaning - Descaling - Filter replace the Rotary! Turn the Rotary control knob to Statistics. Press the Rotary! Turn the Rotary control knob to see the various statistics.! Press the Rotary control knob to end. The other settings will now appear on the display screen. 4. Brewing speciality coffees the Rotary! Turn the Rotary control knob to ECO mode. Press the Rotary! Turn the Rotary control knob to set the time after which the machine will automatically switch into ECO mode, or turn the Rotary control knob to ECO mode Disabled. The other settings will now appear on the display screen. Your NIVONA machine enables you to brew a range of speciality coffees just as you like them. The most important controls and their basic functions are more or less identical for all speciality coffees: The turn-and-press Rotary control knob (or Rotary control knob for short) (Image 1/B): Select the value you require by turning the Rotary control knob, and confirm your selection by pressing it. The > button (Image 1/C): Press the > button to move one item along in the selected menu. The exit button (Image 1/D): Press the exit button to leave the selected menu and move one menu level back. Also press the exit 76 GB GB 77
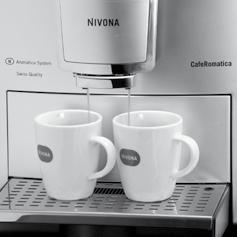
12 4. Brewing speciality coffees 4. Brewing speciality coffees,#$%!- button to abort any brewing process currently in progress. height-adjustable spout (Image 1/E): You can adjust the spout up or down to suit the size of your cup or glass. The selected speciality coffee is shown on the display screen by a symbol, e.g., an espresso cup, and in clear text, e.g., Espresso.! Select the speciality coffee that you wish to brew by turning the Rotary Please note: The current settings for the selected speciality coffee are shown on the display screen on the bottom line under the bar. Each speciality coffee can be brewed in two different ways: a) You can either use the standard settings from the Coffee recipes menu. These are the factory settings which you can change individually to suit your own taste, as described below from 4.1 to 4.8. b) Or you can change the setting individually each time you brew a coffee, as described below from 4.1 to 4.8. This does not alter the standard settings. You can select the following individual settings: aroma, ranging from very mild to very strong, amount per cup or glass in ml, for drinks with milk, proportion of coffee in %, for drinks with milk, amount of froth in ml, temperature and number of cups. Select these settings for individual drinks as described from 4.1 to 4.8. The first time you brew a coffee: The first time you brew a coffee, the grinder is still empty. So after the first grinding, the display screen may show the message, Fill up beans, and the machine may not brew any coffee.! Follow the message on the display screen and simply press the Rotary control knob again. The process will then be repeated. Instructions for brewing two cups of coffee! To brew two cups of coffee one after the other, press the Rotary 4.1 Brewing an Espresso,#$%!- control knob twice in quick succession when starting the brewing process. If two cups of coffee are brewed simultaneously, two consecutive grinding processes will automatically be carried out. If the water or bean supply runs out, or the trays have to be emptied, after the first grinding process, you will be notified on the display screen, and the second cup of coffee will not be brewed.! Follow the message on the display screen and then only press the Rotary control knob once to brew the second cup of coffee. 830 model only: This model can only brew two cups simultaneously for drinks without milk (Espresso, Café Crème, Caffè Lungo). 850 model only: Thanks to its special technology, this model can also brew two milk drinks simultaneously (Cappuccino, Latte Macchiato, warm milk). The standard factory setting for Espresso is: aroma normal, volume per cup 40ml, 1 cup. The display screen shows: the 3-bean symbol, 40ml, and the 1 cup symbol. You can brew your Espresso in two different ways: 1. You can either use the standard settings from the Coffee recipes menu. These are the factory settings which you can nevertheless change individually to suit your own taste, as described below. 2. Or you can change the setting according to your taste for each individual drink brewed. This does not alter the standard settings Brewing an Espresso using the standard setting! Place a cup under the spout (Image 5).! Turn the Rotary control knob to the Espresso symbol. Press the Rotary The cup illumination will now come on, and the machine will brew a cup of Espresso according to the standard setting. You can change the standard setting as follows: 78 GB GB 79
13 4. Brewing speciality coffees 4. Brewing speciality coffees the Rotary! Turn the Rotary control knob to Coffee recipes. Press the Rotary! Turn the Rotary control knob to Espresso. Press the Rotary control The possible settings for aroma, amount and temperature (if the setting in the temperature menu is individually see 3.3) will now appear on the display screen.! Selecting aroma! Turn the Rotary control knob to Flavour. Press the Rotary control! Turn the Rotary control knob to the aroma of your choice (ranging from very mild to very strong). Press the Rotary control knob to confirm your selection.! Selecting amount! Turn the Rotary control knob to Amount total. Press the Rotary! Turn the Rotary control knob to the amount of your choice (from 20 ml to 240 ml). Press the Rotary control knob to confirm your selection. Please note: You must take into account the size of your cups.! Selecting temperature! Turn the Rotary control knob to Temperature. Press the Rotary! Turn the Rotary control knob to the temperature of your choice (Normal, High, Maximum). Press the Rotary control knob to confirm your selection Selecting individual settings for each Espresso,#$%!- Independently of the standard setting in the menu item Settings/Coffee recipes, you can select individual settings for each Espresso that you brew.! In the main menu, turn the Rotary control knob to Espresso / the Espresso symbol.! Press the > button (Image 1/C) until the bean symbol is flashing to indicate that you can change the aroma.! Whilst the symbol is flashing, turn the Rotary control knob to Do you wish to set other parameters, e.g., the amount or the number of cups?! Press the > button (Image 1/C) as many times as necessary until the parameter you require starts flashing.! While the symbol is flashing, turn the Rotary control knob to! You can apply your settings by pressing the exit button or by making no further changes. Please note: Do not forget whether you are brewing one or two cups, and put the cup(s) under the spout as required (Image 6).! Press the Rotary control knob to start brewing your coffee. Please note: If you start brewing your coffee inadvertently or too early, you can actually change some parameters while the coffee is being brewed. The parameter that you can change will flash in the bottom line of the display screen.! While the symbol is flashing, turn the Rotary control knob to After the bean symbol for aroma, the ml display for amount will flash in the middle of the bottom line, so you can change these parameters at any time.! If you wish to abort a brewing process, press the exit button (Image 1/D). 80 GB GB 81
14 4. Brewing speciality coffees 4. Brewing speciality coffees 4.2 Brewing a Café Crème The standard factory setting for Café Crème is: aroma normal, volume per cup 120ml, 1 cup.! Selecting amount!.#$%!- The display screen shows: the 3-bean symbol, 120 ml, the 1xcup symbol. You can brew your Café Crème in two different ways: 1. You can either use the standard settings from the Coffee recipes menu. These are the factory settings which you can nevertheless change individually to suit your own taste, as described below. 2. Or you can change the setting according to your taste for each individual drink brewed. This does not alter the standard settings.! Turn the Rotary control knob to Amount total. Press the Rotary! Turn the Rotary control knob to the amount of your choice (from 20 ml to 240 ml). Press the Rotary control knob to confirm your selection. Please note: You must take into account the size of your cups Brewing a Café Crème using the standard setting! Selecting temperature! Place a cup under the spout (Image 5).! Turn the Rotary control knob to the Café Crème symbol. Press the Rotary The cup illumination will now come on, and the machine will brew a cup of Café Crème according to the standard setting. You can change the standard setting as follows: the Rotary! Turn the Rotary control knob to Coffee recipes. Press the Rotary! Turn the Rotary control knob to Café Crème. Press the Rotary The possible settings for aroma, amount and temperature (if the setting in the temperature menu is individually see 3.3) will now appear on the display screen.! Selecting aroma! Turn the Rotary control knob to Falvour. Press the Rotary control! Turn the Rotary control knob to the aroma of your choice (ranging from very mild to very strong). Press the Rotary control knob to confirm your selection.! Turn the Rotary control knob to Temperature. Press the Rotary! Turn the Rotary control knob to the temperature of your choice (Normal, High, Maximum). Press the Rotary control knob to confirm your selection Selecting individual settings for each Café Crème!.#$%!- Independently of the standard setting in the menu item Settings/Coffee recipes, you can select individual settings for each Café Crème that you brew.! In the main menu, turn the Rotary control knob to Café Crème / the Café Crème symbol.! Press the > button (Image 1/C) until the bean symbol is flashing to indicate that you can change the aroma.! Whilst the symbol is flashing, turn the Rotary control knob to Do you wish to set other parameters, e.g., the amount or the number of cups?! Press the > button (Image 1/C) as many times as necessary until the parameter you require starts flashing.! While the symbol is flashing, turn the Rotary control knob to 82 GB GB 83
15 4. Brewing speciality coffees 4. Brewing speciality coffees 4.3 Brewing a Caffè Lungo!/#$%!-! You can apply your settings by pressing the exit button or by making no further changes. Please note: Do not forget whether you are brewing one or two cups, and put the cup(s) under the spout as required (Image 6).! Press the Rotary control knob to start brewing your coffee. Please note: If you start brewing your coffee inadvertently or too early, you can actually change some parameters while the coffee is being brewed. The parameter that you can change will flash in the bottom line of the display screen.! While the symbol is flashing, turn the Rotary control knob to select your setting. After the bean symbol for aroma, the ml display for amount will flash in the middle of the bottom line, so you can change these parameters at any time.! If you wish to abort a brewing process, press the exit button (Image 1/D). The standard factory setting for Caffè Lungo is: aroma normal, volume per cup 180ml, 1 cup. The display screen shows: the 3-bean symbol, 180 ml, the 1xcup symbol. You can brew your Caffè Lungo in two different ways: 1. You can either use the standard settings from the Coffee recipes menu. These are the factory settings which you can nevertheless change individually to suit your own taste, as described below. 2. Or you can change the setting according to your taste for each individual drink brewed. This does not alter the standard settings Brewing a Caffè Lungo using the standard setting! Place a cup under the spout (Image 5).! Turn the Rotary control knob to the Caffè Lungo symbol. Press the Rotary The cup illumination will now come on, and the machine will brew a cup of Caffè Lungo according to the standard setting. You can change the standard setting as follows: the Rotary! Turn the Rotary control knob to Coffee recipes. Press the Rotary! Turn the Rotary control knob to Caffè Lungo. Press the Rotary The possible settings for aroma, amount and temperature (if the setting in the temperature menu is individually see 3.3) will now appear on the display screen.! Selecting aroma! Turn the Rotary control knob to Flavour. Press the Rotary control! Turn the Rotary control knob to the aroma of your choice (ranging from very mild to very strong). Press the Rotary control knob to confirm your selection.! Selecting amount! Turn the Rotary control knob to Amount total. Press the Rotary! Turn the Rotary control knob to the amount of your choice (from 20 ml to 240 ml). Press the Rotary control knob to confirm your selection. Please note: You must take into account the size of your cups.! Selecting temperature! Turn the Rotary control knob to Temperature. Press the Rotary! Turn the Rotary control knob to the temperature of your choice 84 GB GB 85
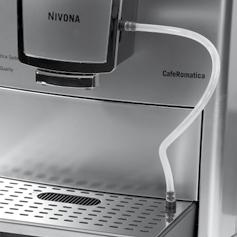
16 4. Brewing speciality coffees 4. Brewing speciality coffees (Normal, High, Maximum). Press the Rotary control knob to confirm your selection Selecting individual settings for each Caffè Lungo Independently of the standard setting in the menu item Settings/Coffee recipes, you can select individual settings for each Caffè Lungo that you brew. 4.4 Brewing a Cappuccino.##$%.#0!-! If you wish to abort a brewing process, press the exit button (Image 1/D). The standard factory setting for Cappuccino is: aroma normal, volume per cup 200ml, proportion of coffee 20 %, 1 cup. The display screen shows: the 3-bean symbol, 200ml, 20 %, the 1xcup symbol.!/#$%!-! In the main menu, turn the Rotary control knob to Caffè Lungo / the Caffè Lungo symbol.! Press the > button (Image 1/C) until the bean symbol is flashing to indicate that you can change the aroma.! Whilst the symbol is flashing, turn the Rotary control knob to Do you wish to set other parameters, e.g., the amount or the number of cups?! Press the > button (Image 1/C) as many times as necessary until the parameter you require starts flashing.! While the symbol is flashing, turn the Rotary control knob to! You can apply your settings by pressing the exit button or by making no further changes. Please note: Do not forget whether you are brewing one or two cups, and put the cup(s) under the spout as required (Image 6). Using the special spumatore (milk frother), you can froth milk straight from the carton or other container and pour it straight into the cup or glass.! Connect the inlet hose to the height-adjustable spout (Image 7).! Dip the other end of the inlet hose (Image 8) directly into the milk carton or container. Caution: Dried milk residue is hard to remove, so please clean the equipment thoroughly as soon as it has cooled down! Always follow the message on the display screen, Rinse frother. You can brew your Cappuccino in two different ways: 1. You can either use the standard settings from the Coffee recipes menu. These are the factory settings which you can nevertheless change individually to suit your own taste, as described below. 2. Or you can change the setting according to your taste for each individual drink brewed. This does not alter the standard settings.! Press the Rotary control knob to start brewing your coffee. Please note: If you start brewing your coffee inadvertently or too early, you can actually change some parameters while the coffee is being brewed. The parameter that you can change will flash in the bottom line of the display screen.! While the symbol is flashing, turn the Rotary control knob to After the bean symbol for aroma, the ml display for amount will flash in the middle of the bottom line, so you can change these parameters at any time Brewing a Cappuccino using the standard setting! Place a cup under the spout (Image 5).! Turn the Rotary control knob to the Cappuccino symbol. Press the Rotary The cup illumination will now come on, and the machine will brew a cup of Cappuccino according to the standard setting. You can change the standard setting as follows: the Rotary! Turn the Rotary control knob to Coffee recipes. Press the Rotary 86 GB GB 87
17 4. Brewing speciality coffees 4. Brewing speciality coffees! Turn the Rotary control knob to Cappuccino. Press the Rotary The possible settings for aroma, amount, proportion of coffee, amount of froth and temperature (if the setting in the temperature menu is individually see 3.3) will now appear on the display screen.! Selecting aroma! Turn the Rotary control knob to Flavour. Press the Rotary control! Turn the Rotary control knob to the aroma of your choice (ranging from very mild to very strong). Press the Rotary control knob to confirm your selection.! Selecting total amount! Selecting temperature! Turn the Rotary control knob to Temperature. Press the Rotary! Turn the Rotary control knob to the temperature of your choice (Normal, High, Maximum). Press the Rotary control knob to confirm your selection Selecting individual settings for each Cappuccino Independently of the standard setting in the menu item Settings/Coffee recipes, you can select individual settings for each Cappuccino that you brew.! Turn the Rotary control knob to Amount total. Press the Rotary! Turn the Rotary control knob to the amount of your choice (from 20 ml to 360 ml). Press the Rotary control knob to confirm your selection. Please note: You must take into account the size of your cup.! Selecting proportion of coffee! Turn the Rotary control knob to Prop. coffee. Press the Rotary! Turn the Rotary control knob to your desired proportion of coffee. Press the Rotary control knob to confirm your selection.! Selecting amount of froth! Turn the Rotary control knob to Amount froth. Press the Rotary! Turn the Rotary control knob to the amount of your choice. Press the Rotary control knob to confirm your selection..##$%.#0!-! In the main menu, turn the Rotary control knob to Cappuccino / the Cappuccino symbol.! Press the > button (Image 1/C) until the bean symbol is flashing to indicate that you can change the aroma.! Whilst the symbol is flashing, turn the Rotary control knob to Do you wish to change other parameters, e.g., the amount or the proportion of coffee?! Press the > button (Image 1/C) as many times as necessary until the parameter you require starts flashing.! While the symbol is flashing, turn the Rotary control knob to! You can apply your settings by pressing the exit button or by making no further changes. Please note: Do not forget whether you are brewing one or two cups (850 model only), and put the cup(s) under the spout as required (Image 6).! Press the Rotary control knob to start brewing your coffee. Please note: If you start brewing your coffee inadvertently or too early, you can actually change some parameters while the coffee is being brewed. The parameter that you can change will flash in the bottom line of the display screen. 88 GB GB 89
18 4. Brewing speciality coffees 4. Brewing speciality coffees 4.5 Brewing a Latte Macchiato 1##$%.#0!-! While the symbol is flashing, turn the Rotary control knob to After the bean symbol for aroma, the ml display for amount, and then the % display for proportion of coffee, will flash in the middle of the bottom line, so you can change these parameters at any time.! If you wish to abort a brewing process, press the exit button (Image 1/D). The standard factory setting for Latte Macchiato is: aroma normal, volume per cup/glass 300ml, proportion of coffee 20%, 1 cup/glass. The display screen shows: the 3-bean symbol, 300ml, 20%, the 1xcup symbol. Using the special spumatore (milk frother), you can froth milk straight from the carton or other container and pour it straight into the cup or glass.! Connect the inlet hose to the height-adjustable spout (Image 7).! Dip the other end of the inlet hose (Image 8) directly into the milk carton or container. Caution: Dried milk residue is hard to remove, so please clean the equipment thoroughly as soon as it has cooled down! Always follow the message on the display screen, Rinse frother. You can brew your Latte Macchiato in two different ways: 1. You can either use the standard settings from the Coffee recipes menu. These are the factory settings which you can nevertheless change individually to suit your own taste, as described below. 2. Or you can change the setting according to your taste for each individual drink brewed. This does not alter the standard settings Brewing a Latte Macchiato using the standard setting! Place a cup or a glass under the spout (Image 5).! Turn the Rotary control knob to the Latte Macchiato symbol. Press the Rotary The cup illumination will now come on, and the machine will brew a cup or glass of Latte Macchiato according to the standard setting. You can change the standard setting as follows: the Rotary! Turn the Rotary control knob to Coffee recipes. Press the Rotary! Turn the Rotary control knob to Latte Macchiato. Press the Rotary The possible settings for aroma, amount, proportion of coffee, amount of milk, amount of froth and temperature (if the setting in the temperature menu is Individually see 3.3) will now appear on the display screen.! Selecting aroma! Turn the Rotary control knob to Falvour. Press the Rotary control! Turn the Rotary control knob to the aroma of your choice (ranging from very mild to very strong). Press the Rotary control knob to confirm your selection.! Selecting total amount! Turn the Rotary control knob to Amount total. Press the Rotary! Turn the Rotary control knob to the amount of your choice (from 20 ml to 360 ml). Press the Rotary control knob to confirm your selection. Please note: You must take into account the size of your cup/glass.! Selecting proportion of coffee! Turn the Rotary control knob to Prop. coffee. Press the Rotary! Turn the Rotary control knob to your desired proportion of coffee. Press the Rotary control knob to confirm your selection. 90 GB GB 91
19 4. Brewing speciality coffees 4. Brewing speciality coffees! Selecting amount of milk! Turn the Rotary control knob to Amount milk. Press the Rotary! Turn the Rotary control knob to the amount of your choice. Press the Rotary control knob to confirm your selection.! Selecting amount of froth! Turn the Rotary control knob to Amount froth. Press the Rotary! Turn the Rotary control knob to the amount of your choice. Press the Rotary control knob to confirm your selection. the parameter you require starts flashing.! While the symbol is flashing, turn the Rotary control knob to! You can apply your settings by pressing the exit button or by making no further changes. Please note: Do not forget whether you are brewing one or two cups (850 model only), and put the cup(s) under the spout as required (Image 6).! Press the Rotary control knob to start brewing your coffee. Please note: If you start brewing your coffee inadvertently or too early, you can actually change some parameters while the coffee is being brewed. The parameter that you can change will flash in the bottom line of the display screen.! While the symbol is flashing, turn the Rotary control knob to! Selecting temperature! Turn the Rotary control knob to Temperature. Press the Rotary! Turn the Rotary control knob to the temperature of your choice (Normal, High, Maximum). Press the Rotary control knob to confirm your selection Selecting individual settings for each Latte Macchiato 1##$%.#0!- Independently of the standard setting in the menu item Settings/ Coffee recipes, you can select individual settings for each Latte Macchiato that you brew.! In the main menu, turn the Rotary control knob to Latte Macchiato / the Latte Macchiato symbol.! Press the > button (Image 1/C) until the bean symbol is flashing to indicate that you can change the aroma.! Whilst the symbol is flashing, turn the Rotary control knob to Do you wish to change other parameters, e.g., the amount or the proportion of coffee?! Press the > button (Image 1/C) as many times as necessary until After the bean symbol for aroma, the ml display for amount, and then the % display for proportion of coffee, will flash in the middle of the bottom line, so you can change these parameters at any time.! If you wish to abort a brewing process, press the exit button (Image 1/D). 4.6 Preparing warm milk (e.g. for warm chocolate)!"#$%.#0 The standard factory setting for warm milk is: 150ml, proportion of froth 20%. The display screen shows: 150ml, 20%. Using the special spumatore (milk frother), you can froth milk straight from the carton or other container and pour it straight into the cup or glass.! Connect the inlet hose to the height-adjustable spout (Image 7).! Dip the other end of the inlet hose (Image 8) directly into the milk carton or container. Caution: Dried milk residue is hard to remove, so please clean the equipment thoroughly as soon as it has cooled down! Always follow the message on the display screen, Rinse frother ). You can prepare your warm milk in two different ways: 92 GB GB 93
CafeRomatica NICR7.. Fully automatic coffee centre Operating Instructions and Useful Tips. A passion for coffee.
 CafeRomatica Fully automatic coffee centre Operating Instructions and Useful Tips NICR7.. GB A passion for coffee. 1 G F A M J / K A B C D E Display screen Left rotary knob Right rotary knob Bean symbol
1. IMPORTANT SAFEGUARDS When using electrical appliances, basic safety precautions should always be followed to reduce the risk of fire, electric
 1. IMPORTANT SAFEGUARDS When using electrical appliances, basic safety precautions should always be followed to reduce the risk of fire, electric shock, and/pr injury to persons including the following:
Quick Reference Guide
 Impressa Z5 Quick Reference Guide This Guide does not replace the Operating Instructions. For details and cautions you must read all instructions. Watch the DVD instructions! Traces of Coffee Grounds in
CafeRomatica. Fully automatic coffee centre Operating Instructions and Useful Tips. A passion for coffee.
 CafeRomatica Fully automatic coffee centre Operating Instructions and Useful Tips 710 A passion for coffee. Operating Instructions and Useful Tips Dear Customer, Congratulations and many thanks for choosing
CafeRomatica. Fully automatic coffee centre Operating Instructions and Useful Tips. A passion for coffee.
 CafeRomatica 605 Fully automatic coffee centre Operating Instructions and Useful Tips A passion for coffee. 605 1 A B C D E M N O P Q F G H I J K L R S T U Equipment A B C D E F G H I J K L M N O P Q R
MODEL: POD BREWER AURORA SAF 68 HOMEMAKER ESPRESSO MAKER WITH COFFEE POD
 INSTRUCTION MANUAL Please read this Instruction Manual and the safety instructions before operating the appliance! MODEL: POD BREWER AURORA SAF 68 HOMEMAKER ESPRESSO MAKER WITH COFFEE POD Congratulation
CafeRomatica NICR7.. Fully automatic coffee centre Operating Instructions and Useful Tips. Neue Lust auf Kaffee.
 CafeRomatica NICR7.. Fully automatic coffee centre Operating Instructions and Useful Tips Neue Lust auf Kaffee. NICR7.. 1 A B C D E F G H I J K L M N O P Q R S T U V W X Y Z Equipment A B C D E F G H I
Get Started. Better Everyday ECAM23260
 Better Everyday Get Started This short guide is not intended to explain all the functions of the appliance. Please read all the owner s instruction booklet before use. Video available on www.youtube.com/delonghiusa
QUALITY MILK FROTHER INSTRUCTION MANUAL MODEL NO. MMF005
 QUALITY MILK FROTHER INSTRUCTION MANUAL MODEL NO. MMF005 MILK FROTHER INSTRUCTION MANUAL Model No.: MMF005 READ ALL INSTRUCTIONS BEFORE USING THE FROTHER. KEEP THESE INSTRUCTIONS FOR FUTURE REFERENCE.
CafeRomatica. Fully automatic coffee centre Operating Instructions and Useful Tips. A passion for coffee.
 CafeRomatica Fully automatic coffee centre Operating Instructions and Useful Tips 610 620 A passion for coffee. Operating Instructions and Useful Tips Dear Customer, Congratulations and many thanks for
IMPRESSA XJ9 Professional Instructions for Use. Original instructions for use Before using the machine read the instructions for use.
 IMPRSSA XJ9 Professional Instructions for Use K Original instructions for use Before using the machine read the instructions for use. JURA Type 683 Table of contents Your IMPRSSA XJ9 Professional Control
Automatic Coffee Machine Instruction Manual
 Instruction Manual Page 1 of 17 8212-0 Automatic Coffee Machine Instruction Manual Instruction Manual Page 2 of 17 IMPORTANT INFORMATION For safety purposes please read these instructions carefully before
USER MANUAL TECHNICAL DATA
 USER MANUAL TECHNICAL DATA Model: Easy Touch Operating Voltage: 240V AC Frequency: 50 Hz Power con, MAX : 1500W Water tank cap.: 700ml (0.7L) Weight: 5.0 kg Size: L 350 * W 155 * H 245 mm This appliance
EN Operating Instructions 21
 EN Operating Instructions 21 7 6 5 4 8 9 10 3 11 2 1 A 14 13 11 B C D E F G H I 3 Safety instructions Please carefully read and comply with the operating instructions. The appliance is intended for home
5KEK1322 W A_v08.indd 1 5/13/16 2:25 PM
 5KEK1322 W10878653A_v08.indd 1 PARTS AND FEATURES PARTS AND ACCESSORIES Tea steeper lid (center section of lid with handle) Kettle lid (outer section) Stainless steel lime scale filter Removable stainless
STAINLESS STEEL MILK FROTHER. Model: PKFMR11BK
 STAINLESS STEEL MILK FROTHER Model: PKFMR11BK WARNING! To reduce the risk of fire, electrical shock or injury to persons or property: Carefully read all instructions before operating your new product for
GIGA 5 Instructions for Use
 GIGA 5 Instructions for Use The Instructions for Use has been awarded the seal of approval by the independent German Technical Inspection Agency, TÜV SÜD, due to its easy-to-understand style, its thoroughness
Get Started. Better Everyday ECAM26455
 Better Everyday Get Started This short guide is not intended to explain all the functions of the appliance. Please read all the owner s instruction booklet before use. ECAM26455 WELCOME Introducing the
PROGRAMMABLE COFFEE MAKER
 PROGRAMMABLE COFFEE MAKER KM 7280 KM 7280 W ENGLISH EN A B C D E F G H I J K L M N O P 3 SAFETY AND SET-UP Please read this instruction manual thoroughly prior to using this appliance! Follow all safety
Z6 Instructions for Use
 Z6 Instructions for Use Table of contents Your Z6 Control elements 4 Important information 6 Proper use...6 For your safety...6 1 Preparing and using for the first time 10 JURA on the Internet...10 Setting
AUTOMATIC BEAN TO CUP COFFEE MACHINE
 AUTOMATIC BEAN TO CUP COFFEE MACHINE EB60 model USER GUIDE NZ AU GB IE CONTENTS Appliance parts 2 Safety and warnings 4 First use 9 Menu settings 13 Making coffee 17 Making cappuccinos and milk-based
OPERATING MANUAL. Sample PRO 100 Series. Electric Heating. Applies to Versions: SPE1*, SPE2, SPE4, SPE6
 OPERATING MANUAL Sample PRO 100 Series Electric Heating Applies to Versions: SPE1*, SPE2, SPE4, SPE6 NOTE: All electrically heated roasters in the Sample PRO 100 Series are modular and this manual applies
PICOBARISTO HD8924 EN DE ES FR IT NL USER MANUAL BENUTZERHANDBUCH MANUAL DEL USUARIO MODE D EMPLOI MANUALE UTENTE GEBRUIKSAANWIJZING
 PICOBARISTO HD8924 EN DE ES FR IT NL USER MANUAL BENUTZERHANDBUCH MANUAL DEL USUARIO MODE D EMPLOI MANUALE UTENTE GEBRUIKSAANWIJZING 4219.460.3607.1 HD8924 SAECO_PICOBARISTO AMF_WE_COVER_A5_FC.indd 1 01-09-16
Type HD8851 USER MANUAL
 Register your product and get support at www.philips.com/welcome 02 English Type HD8851 USER MANUAL 02 EN PLEASE READ THIS USER MANUAL CAREFULLY BEFORE USING THE MACHINE. IMPORTANT SAFEGUARDS When using
AUTOMATIC BEAN TO CUP COFFEE MACHINE
 AUTOMATIC BEAN TO CUP COFFEE MACHINE EB24 model USER GUIDE US CA CONTENTS Appliance parts 2 Safety and warnings 4 First use 7 Menu settings 11 Making coffee 15 Making cappuccinos and milk-based coffees
GIGA 5 Instructions for Use
 GIGA 5 Instructions for Use The Instructions for Use has been awarded the seal of approval by the independent German Technical Inspection Agency, TÜV SÜD, due to its easy-to-understand style, its thoroughness
Instruction Manual Coffee grinder. CM 90 Serie
 Instruction Manual Coffee grinder CM 90 Serie Table of content Safety Instructions... 3 Before first use... 4 Unpacking... 4 Requirements for the installation location... 5 Operating and speed settings...
Contents. Electrical requirements (UK only) Preparing and attaching the hot chocolate carafe (D)... 14
 Preparing and attaching the hot chocolate carafe (D)... 14") Contents INTRODUCTION... 8 Symbols used in these instructions... 8 Letters in brackets... 8 Troubleshooting and repairs... 8 SAFETY... 8 Fundamental safety warnings... 8 DESIGNATED USE... 8 INSTRUCTIONS...
Contents INTRODUCTION... 8 Symbols used in these instructions... 8 Letters in brackets... 8 Troubleshooting and repairs... 8 SAFETY... 8 Fundamental safety warnings... 8 DESIGNATED USE... 8 INSTRUCTIONS...
EP3559, EP3558 EP3551, EP3550
 Super automatic espresso machine 3100 series EP3559, EP3558 EP3551, EP3550 EN USER MANUAL DE BENUTZERHANDBUCH ES MANUAL DEL USUARIO FR MODE D EMPLOI IT MANUALE UTENTE NL GEBRUIKSAANWIJZING 1 EP3558, EP3550
10,000 prize draw. instructions. EXTRA year guarantee FREE rewards gallery. Register online now!
 r instructions 10,000 prize draw EXTRA year guarantee FREE rewards gallery www.productregister.co.uk/rhobbs Register online now! See back for details 2 Read the instructions, keep them safe, pass them
Bedienungsanleitung Operating Instructions
 DEUTSCH ITALIANO NEDERLANDS FRANÇAIS Bedienungsanleitung Operating Instructions 1 Table of contents Table of contents 1 For your safety...53 1.1 Symbols used...54 1.2 Proper use...54 1.3 Danger due to
AUTOMATIC BEAN TO CUP COFFEE MACHINE
 AUTOMATIC BEAN TO CUP COFFEE MACHINE EB60 model USER GUIDE NZ AU GB IE CONTENTS Appliance parts 2 Safety and warnings 4 First use 9 Menu settings 13 Making coffee 17 Making cappuccinos and milk-based
IMPORTANT SAFEGUARDS. 3. To protect against fire, electric shock and injury to persons do not immerse cord, plug or unit in water or other liquid.
 IMPORTANT SAFEGUARDS When using electrical appliances, basic precautions should always be followed, including the following: 1. Read all instructions. 2. Make sure that your outlet voltage corresponds
Coffee Grinder Instruction Manual
 Coffee Grinder Instruction Manual CoffeeGrinder Manual-English Only.indd 1 07/01/2016 14:14:39 Savisto Home Coffee Grinder Voltage Supply: 220-240V~ 50/60Hz Power Consumption: 150W Eng Please read through
Coffee Burr Grinder. Model #559. Instructions. Warranty
 Coffee Burr Grinder Model #559 Instructions Warranty IMPORTANT SAFEGUARDS When using electrical appliances, basic safety precautions should always be followed, including the following: 1. Read all instructions.
IMPRESSA Z9 One Touch TFT Instructions for Use
 IMPRSSA Z9 One Touch TFT Instructions for Use The Instructions for Use has been awarded the seal of approval by the independent German Technical Inspection Agency, TÜV SÜD, due to its easy-to-understand
Fully Automatic Coffee Machine OPERATION MANUAL
 Fully Automatic Coffee Machine OPERATION MANUAL Instructions of coffee machine parts 7 8 1 9 2 10 12 13 14 15 3 16 11 4 5 6 1 Bean container cover 9 Bean container 2 Water tank lid 10 Coffee spout 3 Water
Type HD8852 USER MANUAL
 Register your product and get support at www.philips.com/welcome 02 English Type HD8852 USER MANUAL 02 EN PLEASE READ THIS USER MANUAL CAREFULLY BEFORE USING THE MACHINE. IMPORTANT SAFEGUARDS When using
Type HD8858 / HD8859 USER MANUAL
 Register your product and get support at www.saeco.com/welcome 02 English Type HD8858 / HD8859 USER MANUAL 02 EN PLEASE READ THIS USER MANUAL CAREFULLY BEFORE USING THE MACHINE. IMPORTANT SAFEGUARDS When
HD8847 HD8848 USER MANUAL. Super automatic espresso coffee machine 4000 series. Read carefully before using the machine.
 Super automatic espresso coffee machine 4000 series 02 USER MANUAL Read carefully before using the machine. HD8847 HD8848 02 English EN Register your product and get support at www.philips.com/welcome
Z8 Instructions for Use
 Z8 Instructions for Use Table of contents Your Z8 Control elements 4 Important information 6 Proper use...6 For your safety...6 1 Preparing and using for the first time 10 JURA on the Internet...10 Operation
GIGA X3c Professional Instructions for Use
 GIGA X3c Professional Instructions for Use K Original instructions for use Before using the machine read the instructions for use. Instructions for use has been awarded the seal of approval by the independent
COFFEE GRINDER. Owner s Manual
 COFFEE GRINDER Owner s Manual 4 4 FEATURES Bean Hopper Lid Bean Hopper Grinder Start/Stop Button Bean Hopper Holder Bean Hopper Release Button Grinding Timer Dial Coffee Powder Outlet 0 Grind Thickness
IMPRESSA F8 Instructions for Use
 IMPRSSA F8 Instructions for Use K For your safety: read and understand manual before use. Table of contents Your IMPRSSA F8 IMPORTANT SAFGUARDS 4 Control elements 8 1 Preparing and using for the first
Shotmeister Owner s Manual. The Sleekest Design, Pouring the Coldest Shots
 Shotmeister Owner s Manual The Sleekest Design, Pouring the Coldest Shots Thank you for purchasing a Jägermeister Shotmeister! REGISTRATION INFORMATION Register your Jägermeister Shotmeister Online: at
E8/E80 Instructions for Use
 8/80 Instructions for Use Table of contents Your 8/80 Control elements 4 Important information 6 Proper use...6 For your safety...6 1 Preparing and using for the first time 10 JURA on the Internet...10
S8 Instructions for Use Type 744
 S8 Instructions for Use Type 744 Table of contents Your S8 Control elements 4 Important information 6 Proper use...6 For your safety...6 1 Preparing and using for the first time 10 JURA on the Internet...10
Type HD8754 USER MANUAL
 Register your product and get support at www.philips.com/welcome 02 English Type HD8754 USER MANUAL 02 EN PLEASE READ THIS USER MANUAL CAREFULLY BEFORE USING THE MACHINE. IMPORTANT SAFEGUARDS When using
INDEX C o l l e c t i o n
 INDEX 1 DESCRIPTION OF THE APPLIANCE (see page 3)............................................7 2 SAFETY WARNINGS......................................................................7 3 INSTALLATION..........................................................................8
Type HD8753 USER MANUAL
 Register your product and get support at www.philips.com/welcome 02 English Type HD8753 USER MANUAL 02 EN PLEASE READ THIS USER MANUAL CAREFULLY BEFORE USING THE MACHINE. IMPORTANT SAFEGUARDS When using
GIGA X8 Professional Instructions for Use
 GIGA X8 Professional Instructions for Use K Original instructions for use Before using the machine read the instructions for use. Instructions for use has been awarded the seal of approval by the independent
HD8828 HD8834 USER MANUAL. Super automatic espresso coffee machine 3100 series. Read carefully before using the machine.
 Super automatic espresso coffee machine 3100 series 02 USER MANUAL Read carefully before using the machine. HD8828 HD8834 English 02 EN Register your product and get support at www.philips.com/welcome
CONTENTS. MAKING HOT CHOCOLATE Preparing and attaching the hot chocolate carafe (D) IMPORTANT SAFEGUARDS...8 SAVE THESE INSTRUCTIONS...
 IMPORTANT SAFEGUARDS...8 SAVE THESE INSTRUCTIONS...") CONTENTS IMPORTANT SAFEGUARDS...8 SAVE THESE INSTRUCTIONS... 8 SHORT CORD INSTRUCTIONS...8 INTRODUCTION...9 Symbols used in these instructions... 9 Letters in brackets... 9 Troubleshooting and repairs...
CONTENTS IMPORTANT SAFEGUARDS...8 SAVE THESE INSTRUCTIONS... 8 SHORT CORD INSTRUCTIONS...8 INTRODUCTION...9 Symbols used in these instructions... 9 Letters in brackets... 9 Troubleshooting and repairs...
/09.06
 www.delonghi.com 5732147800/09.06 STAINLESS STEEL FULLY AUTOMATIC COFFEE CENTER A B C D E F H G X cappuccino container pointer in position 1 please wait... I W M J V K L N U T R O P S Q 1 2 3 cappuccino
SAVE THESE INSTRUCTIONS
 22 IMPORTANT SAFEGUARDS When using electrical appliances, basic safety precautions should always be followed to reduce the risk of fire, electric shock, and/or injury to persons, including the following:
We would like to welcome you as a coffee lover and enthusiast of Melitta CAFFEO.
 Dear Customer, Congratulations on buying your Melitta CAFFEO. We would like to welcome you as a coffee lover and enthusiast of Melitta CAFFEO. ENGLISH With this Melitta CAFFEO quality product you will
2016 Gourmia The Steelstone Group Brooklyn, NY
 2016 Gourmia www.gourmia.com The Steelstone Group Brooklyn, NY All rights reserved. No portion of this manual may be reproduced by any means whatsoever without written permission from The Steelstone Group,
IMPRESSA XJ5 Professional Instructions for Use. Original instructions for use Before using the machine read the instructions for use.
 IMPRESSA XJ5 Professional Instructions for Use KE Original instructions for use Before using the machine read the instructions for use. JURA Type 684 Table of contents Your IMPRESSA XJ5 Professional Control
BEAN TO CUP ESPRESSO AND CAPPUCCINO MACHINE. Instruction for use ECAM26.455
 2 5713216211/05.11 BEAN TO CUP ESPRESSO AND CAPPUCCINO MACHINE Instruction for use ECAM26.455 1 B2 B3 B4 B5 B6 B1 B7 B13 B8 B9 B10 B11 B12 D1 C2 D2 C1 C3 C4 A18 C5 D3 D4 C6 D5 D6 2 A1 A2 A3 A4 A5 A6 A11
De Longhi Appliances via Seitz, Treviso Italia
 De Longhi Appliances via Seitz, 47 31100 Treviso Italia ECAM45.760/11.13 ECAM45.760 BEAN TO CUP ESPRESSO AND CAPPUCCINO MACHINE Instruction for use EN page 6 B B15 B14 B13 B12 B11 B1 B2 B10 B3 B4 B5 B6
Burr Grinder. Automatic burr grinder with 17-position grind selector. Instruction Booklet EM0430
 Burr Grinder Automatic burr grinder with 17-position grind selector Instruction Booklet EM0430 Please read these instructions carefully and retain for future reference. Contents Sunbeam s Safety Precautions
Grind & Brew Automatic DGB625BCU
 Grind & Brew Automatic DGB625BCU Congratulations on your purchase of the Cuisinart Grind & Brew Automatic. For over 30 years Cuisinart s aim has been to produce the very finest kitchen equipment so that
USER MANUAL Type HD8965
 02 English USER MANUAL Type HD8965 Read carefully before using the machine. 02 EN Register your product and get support at www.philips.com/welcome IMPORTANT SAFEGUARDS When using electrical appliances,
instructions COFFEE GRINDER KG 79/89
 instructions COFFEE GRINDER KG 79/89 DESCRIPTION OF APPLIANCE The following terms are used throughout the instruction manual Coffee-bean hopper lid Removable upper burr Coffee-bean hopper ON/OFF switch
Speed Pour Owner s Manual. Serving up the Coldest Shots
 Speed Pour Owner s Manual Serving up the Coldest Shots INSTRUCTIONS Unpacking and Start-Up Instructions 1. Start by removing the included boxes of the Stag Pourer & Bottle Neck Extender. 2. Remove foam
Always here to help you
 Always here to help you Register your product and get support at www.saeco.com/welcome HD8758/57 HD8758-57_4219_460_3151_1_COVER_BOOKLET_A5_bl.indd 1 14/10/15 10:07 English 5 ESPRESSO 1 5 2 6 3 7 8 4
A IMPORTANT SAFEGUARDS
 instructions 2 Read the instructions, keep them safe, pass them on if you pass the appliance on. Remove all packaging before use. A IMPORTANT SAFEGUARDS Follow basic safety precautions, including: 1 This
Art Xs95/Xs90 GB 03/ /1806/0905/2000. IMPRESSA Xs95 / Xs90 Short operating instructions
 Art. 65594 Xs95/Xs90 GB 03/06 0044494/1806/0905/2000 IMPRESSA Xs95 / Xs90 Short operating instructions Control elements Control elements 15 14 13 12 11 10 9 8 7 3 27 6 5 16 17 18 19 20 21 22 23 24 25 1.
We would like to welcome you as a coffee lover and enthusiast of a variety of speciality coffees.
 Dear Customer, Congratulations on buying your Melitta CAFFEO Gourmet. We would like to welcome you as a coffee lover and enthusiast of a variety of speciality coffees. With your new Melitta CAFFEO Gourmet
MODELS 1315 & 1315-S La Pavoni CLUB COMBO
 IMPORTANT WARNINGS MODELS 1315 & 1315-S La Pavoni CLUB COMBO DUET Never operate your espresso machine without water in the tank. This may cause premature pump failure. Do not allow the power cord to come
Type HD8779 INSTRUCTIONS FOR USE
 Register your product and get support at www.philips.com/welcome 02 English Type HD8779 INSTRUCTIONS FOR USE 02 EN PLEASE READ THIS USER MANUAL CAREFULLY BEFORE USING THE MACHINE. IMPORTANT SAFEGUARDS
Type HD8953 / HD8954 USER MANUAL
 Register your product and get support at www.philips.com/welcome 02 English Type HD8953 / HD8954 MANUAL 02 EN PLEASE READ THIS MANUAL CAREFULLY BEFORE USING THE MACHINE. IMPORTANT SAFEGUARDS When using
Instruction Manual Coffee Grinder. Kaffeemühle / Coffee grinder CM 70 Serie
 Instruction Manual Coffee Grinder Kaffeemühle / Coffee grinder CM 70 Serie Table of content Safety Instructions... 3 Before the first use... 4 Unpacking... 5 Requirements for the installation location...
E8/E80 Instructions for Use
 8/80 Instructions for Use Table of contents Your 8/80 Control elements 4 Important information 6 Proper use...6 For your safety...6 1 Preparing and using for the first time 10 JURA on the Internet...10
AS450, AS600, G1, SG630
 Grill Range Operating Manual Grill Range AS450, AS600, G, SG60 Product Range Also Includes: Induction Hobs / Combination Ovens / Pizza Ovens / Mixers Salamander Grills / Contact Grills / Pie Warmers /
coffee wakes up the world User Manual Coffee machine English V0.16
 coffee wakes up the world User Manual Coffee machine English V0.16 Valid for all WMF 900 models Series 900 Order number 33 2624 2010 Edition 05.2014 Congratulations on the purchase of your WMF coffee machine.
Operating instructions Coffee machine
 Operating instructions Coffee machine To avoid the risk of accidents or damage to the appliance it is essential to read these instructions before it is installed and used for the first time. en-gb M.-Nr.
INSTRUCTION MANUAL. Coffee Maker CMCM-100
 INSTRUCTION MANUAL Coffee Maker CMCM-100 CONTENTS Cusimax recommends safety first....1-2 Know your Cusimax product...3 Operating your Cusimax product 4 Care & cleaning 5 Cusimax Recommends Safety First
Instructions for use CM 9945 H
 Instructions for use CM 9945 H A B C 2 3 4 Important safety instructions 6 Preliminary steps 8 Scrapping 8 Declaration of conformity CE 8 Built-in installation 9 Product description 11 Technical data 11
EN Electric Coffee Grinder
 SCG 5050BK EN Electric Coffee Grinder - 1 - EN Electric Coffee Grinder Important safety instructions READ CAREFULLY AND STORE FOR FUTURE USE. This appliance may be used by persons with physical or mental
AUTOMATIC BURR COFFEE GRINDER
 AUTOMATIC BURR COFFEE GRINDER MODEL:SCG-903B USER MANUAL www.thesecura.com Welcome Congratulations on purchasing our Secura Automatic Burr Coffee Grinder. Each unit is manufactured to ensure safety and
USER MANUAL Type HD HD8767
 02 English USER MANUAL Type HD8766 - HD8767 Read carefully before using the machine. 02 EN Register your product and get support at www.philips.com/welcome IMPORTANT SAFEGUARDS When using electrical appliances,
Operating Instructions Coffee Machine
 Operating Instructions Coffee Machine To prevent accidents and machine damage, you absolutely must read these instructions before installation or use. en US, CA M.-Nr. 10 608 760 Packaging material / Disposal
Stainless Steel Milk Frother N3 User Manual
 Stainless Steel Milk Frother N3 User Manual Voltage: 110V~60Hz Power: 500W READ AND SAVE THESE INSTRUCTIONS IMPORTANT Read and follow the instructions in this user manual even if you feel you are familiar
ECAM65X.55. BEAN TO CUP ESPRESSO AND CAPPUCCINO MACHINE Instruction for use
 ECAM65X.55 BEAN TO CUP ESPRESSO AND CAPPUCCINO MACHINE Instruction for use EN page 6 B B2 B3 B1 B4 B2 B10 10:00 SELECT BEVERAGE B14 B11 PROFILE 1 B15 B12 B16 B13 QUANTITY AROMA B17 B9 B8 B7 B6 B5 C C1
Half-Pint Soft Serve Ice Cream Maker
 CAUTION: READ OPERATOR S MANUAL BEFORE USE Visit www.hamiltonbeach-me.com for our complete line of products and Use and Care Guides as well as delicious recipes and tips! Half-Pint Soft Serve Ice Cream
Operating Instructions Bedienungsanleitung
 SVENSKA NORSK DANSK SUOMI Operating Instructions Bedienungsanleitung Table of contents Table of contents 1 For your safety... 5 1.1 Symbols used... 6 1.2 Proper use... 6 1.3 Danger from electric current...
Operating instructions Freestanding coffee machine
 Operating instructions Freestanding coffee machine To avoid the risk of accidents or damage to the machine, it is essential to read these instructions before it is installed and used for the first time.
12 CUP COFFEE MAKER User Guide
 BRAND 12 CUP COFFEE MAKER User Guide Item: 740553 Ginnys.com 800-544-1590 Facebook.com/GinnysBrand Pinterest.com/GinnysBrand Ginnys.com/Blog Welcome to the world of full-flavored coffee with the Ginny
Figure: Your machine may look different to the one shown. D6 Instructions for Use. For your safety: read and understand manual before use.
 Figure: Your machine may look different to the one shown. D6 Instructions for Use K E For your safety: read and understand manual before use. Table of contents Your D6 IMPORTANT SAFEGUARDS 4 Control elements
IMPRESSA Z9 One Touch TFT Instructions for Use. For your safety: read and understand manual before use.
 IMPRSSA Z9 One Touch TFT Instructions for Use K For your safety: read and understand manual before use. Table of contents Your IMPRSSA Z9 One Touch TFT IMPORTANT SAFGUARDS 4 Control elements 8 1 Preparing
Z6 Instructions for Use
 PROFSSIONAL AROMA GRINDR Z6 Instructions for Use Table of contents Your Z6 Control elements 4 Important information 6 Proper use...6 For your safety...6 1 Preparing and using for the first time 10 JURA
The Scoop 2-Way Brewer
 READ BEFORE USE The Scoop 2-Way Brewer Visit www.hamiltonbeach.in for our complete line of products and Use and Care Guides as well as delicious recipes, tips, and other helpful information! Questions?
USER MANUAL Type HD8966
 02 English USER MANUAL Type HD8966 Read carefully before using the machine. 02 EN Register your product and get support at www.philips.com/welcome IMPORTANT SAFEGUARDS When using electrical appliances,
Z6 Instructions for Use
 Z6 Instructions for Use K For your safety: read and understand manual before use. Table of contents Your Z6 IMPORTANT SAFGUARDS 4 Control elements 8 1 Preparing and using for the first time 10 JURA on
De Longhi Appliances via Seitz, Treviso Italia
 De Longhi Appliances via Seitz, 47 31100 Treviso Italia www.delonghi.com 5713222711/01.14 ECAM44.62X BEAN TO CUP ESPRESSO AND CAPPUCCINO MACHINE Instruction for use EN page 6 B B12 B11 B10 B9 B8 B1 B2
E6/E60 Instructions for Use
 6/60 Instructions for Use Table of contents Your 6/60 Control elements 4 Important information 6 Proper use...6 For your safety...6 1 Preparing and using for the first time 10 JURA on the Internet...10
Type HD8752 / HD8881 USER MANUAL
 Register your product and get support at www.philips.com/welcome 02 English Type HD8752 / HD8881 USER MANUAL 02 EN PLEASE READ THIS USER MANUAL CAREFULLY BEFORE USING THE MACHINE. IMPORTANT SAFEGUARDS
De Longhi Appliances via Seitz, Treviso Italy
 De Longhi Appliances via Seitz, 47 31100 Treviso Italy www.delonghi.com 5713229821/05.16 ECAM35X.15 BEAN TO CUP ESPRESSO AND CAPPUCCINO MACHINE Instruction for Use Instruction videos available at: http://ecam35015.delonghi.com
BEAN TO CUP ESPRESSO AND DE CAPPUCCINO MACHINE Instruction for use ECAM22.360
 5713218561/09.12 BEAN TO CUP ESPRESSO AND DE CAPPUCCINO MACHINE Instruction for use GB ECAM22.360 B B1 C C1 C2 B2 B3 B4 B5 B6 B7 C3 C4 C5 C6 B8 B9 B10 B11 B12 C7 D1 D5 D D2 D3 D4 Electrical connection