Remove the machine from the box and screw the legs into the threaded inserts on the base of the machine.
|
|
|
- Muriel Dickerson
- 6 years ago
- Views:
Transcription
1
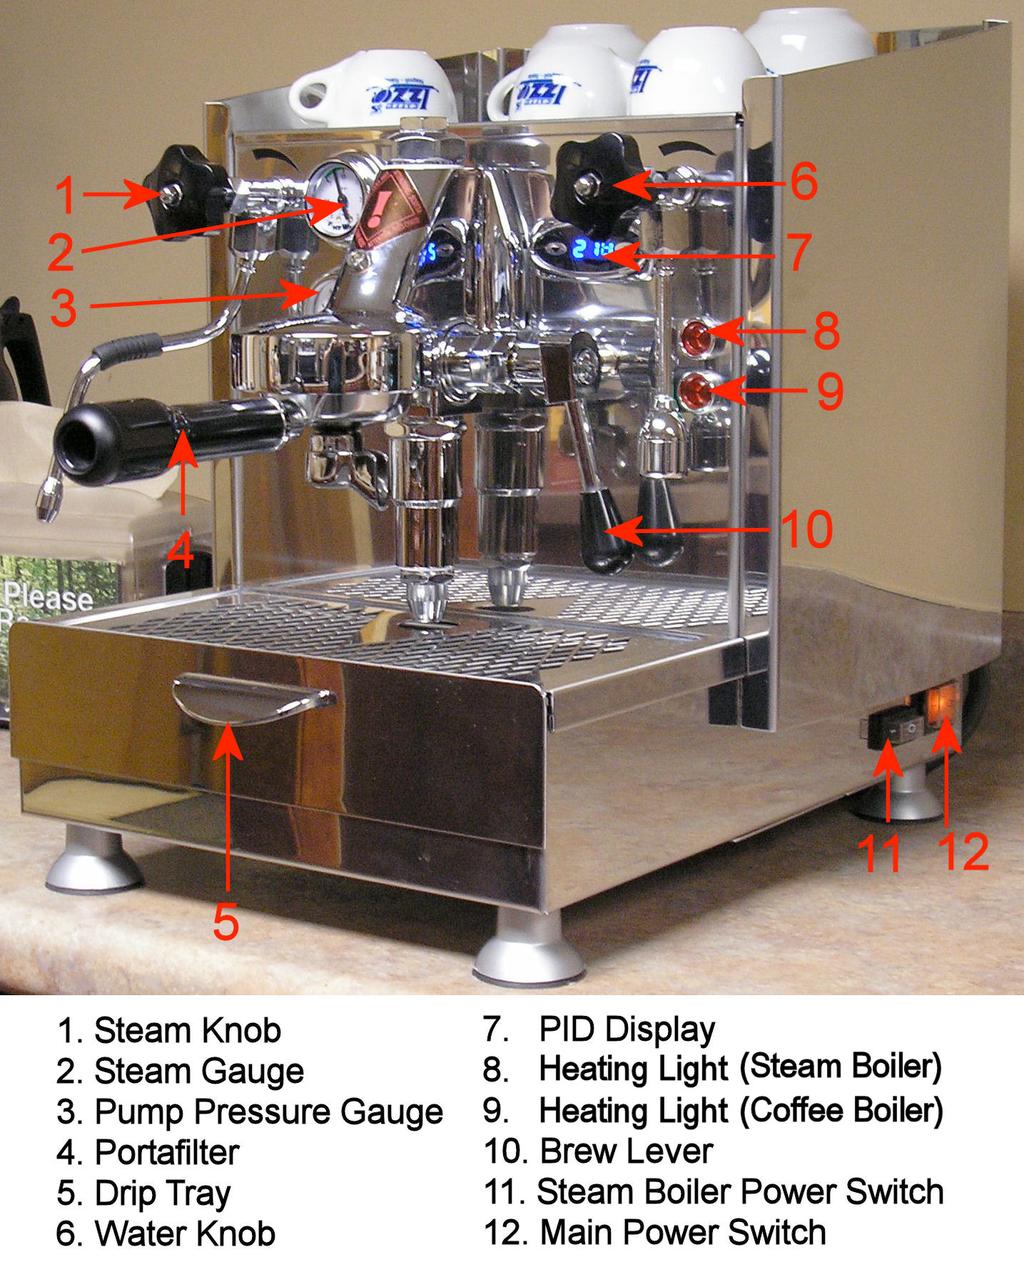
2 Diagram
3 Introduction First of all, thank you for your business! You are going to love your Alex Duetto 2 it combines beauty, value, and great brewing for making the best espressos, cappuccinos, and lattes you ve ever tasted! These instructions include hints that will help you get started quickly. First Time Set Up Remove the machine from the box and screw the legs into the threaded inserts on the base of the machine. Remove the water reservoir located under the top cup tray and rinse with clean water. Before filling the reservoir with tap water, test your water for hardness using the provided test strips. Fill a glass with cold tap water; dip the tip of the test strip into water for one second, then pull the strip out of the water and hold it horizontally for fifteen seconds. After fifteen seconds, compare the color of the strip to the chart on the side of the package to determine how many grains of hardness are in your tap water. Three grains or less of hardness is acceptable. Note: Should your water s hardness level exceed three grains, contact us to discuss your options for addressing this problem. Fill the reservoir with water being careful not to overfill and place it back in the machine with both silicone hoses in the reservoir. Before plugging the machine in, verify the steam and hot water valves are closed and the brew lever should be pointing straight down. Remove the drip tray and verify the gray water switch on the right is in the reservoir position or it may result in damage to the pump. Plug the machine in and turn the main power switch to the on position. Your pump will start filling the boiler in approximately three seconds. Open the steam knob to help prime the pump and speed up the initial fill process. When the pump is done filling, close the steam knob.
4 When the pump stops, place either one of your portafilters into the group. Next, lift the brew lever to start the pump and keep the lever up until water comes out of the portafilter and then lower the brew lever. The coffee boiler should now be heating up. Keep the portafilter locked into the group. You may hear some hissing and gurgling noises as the boiler heats, this is normal. To use the steam boiler, turn on the black power switch. When the upper gauge reaches 1 bar you will be able to use the steam and hot water wands. Normal Operation The top gauge is your boiler pressure gauge. Proper pressure ranges are from 1.0 to 1.5 bar maximum as a matter of desired steam pressure. Our technicians set the boiler pressure to 1.2 bar before shipment. Although your machine may reach it s operating boiler pressure in less than ten minutes, it is not ready to make espresso. To make great espresso with thick, rich crema, everything must be hot: the brew group, the portafilter, and the cup you are brewing into. It will take between 30 and 40 minutes for the group and portafilter to reach proper brew temperature. The boiler pressure cycles about 0.2 bar between the high and low point. For example, if your machine is set so the maximum pressure is 1.2 bar the heating element should come on at 1.0 bar and then turn off at 1.2 bar. This on-off cycle will occur approximately once every minute and the heating element will only be on for five to ten seconds to maintain pressure. Your machine is equipped with a low water shut off micro switch. If the water level in the reservoir gets too low then an audible alert will sound alerting you to refill the reservoir.
. Connect the other end to your filtered water supply.")
 Turn on water supply to machine and make sure there are no leaks.")
5 How To Connect To A Water Source When plumbing the machine, we recommend that you install a filter and Softening system to prolong the life of your machine. Connect the braided line to the bottom of the machine. (Figure 1). Connect the other end to your filtered water supply. Pull out the drip tray and locate water switch on the right side (Figure 2) Turn switch to the Main Water position. (Shown in reservoir position) Turn on water supply to machine and make sure there are no leaks. Figure 1 Figure 2 Important: When you connect the machine to a water source you still Must have water in the reservoir to weigh it down or the Low water level alarm will beep.

6 PID Controller The PID display will cycle back and forth to show you the temperature of each boiler as it is heating. The position of the decimal point indicates which boiler the temperature is being shown for. (See diagram to right) Setting Temperature With the machine on, simultaneously press and hold keys until the display shows T1, then release both buttons. T1 is the coffee boiler temperature. Press to see the current temperature setting. While the temperature is still being displayed, press either arrow key to change the temperature setting. The display will revert back to T1, then press to display T2 which is your steam boiler temperature. Press to see the current temperature setting. While the temperature is still being displayed, press either arrow key to change the temperature setting. After changing temperature, press to revert back to the normal display. Changing Settings And Modes Turn the machine off, then press and hold keys, while turning the machine back on until the display reads F.01, then release the keys. Scrolls through the settings. Selects parameter to change. Turn the machine off and then back on again to save the new settings. Warning: These settings allow the user to operate the machine in 15 or 20 amp modes. Operating the machine in 20 amp mode on a 15 amp circuit could pose a fire hazard and should never be done. Izzo, and/or it s distributors assume no responsibility for misuse or failure to follow these instructions
7 Reset Default Settings To reset the machine to it s factory default settings, turn the machine off. Press and hold the key while turning the machine back on. When the display reads PrS then release the key. Without pressing any keys cycle the machine off and then back on again. Alarm Codes A1 A2 A3 A4 Channel 1 Unplugged Check temperature sensor connections and heater connections for coffee boiler. Channel 1 Short Circuit Check for broken or damaged temperature sensor wire for coffee boiler. Repair or replace temperature sensor. Channel 2 Unplugged Check temperature sensor connections and heater connections for steam boiler. Channel 2 Short Circuit Check for broken or damaged temperature sensor wire for steam boiler. Repair or replace temperature sensor. Default Settings F.01 F F.02 7 T1 200 T2 255 T3 0 E1 18 E2 0 E3 0 P 1.3 I.06 D 1.5 Steam Boiler Temperature Range Fahrenheit Bar Maximum steam pressure is limited to 1.5 bar for safety.
8 Espresso Tips And Technique Golden rules according to Dr. Illy Each 30ml espresso requires seven grams of finely ground coffee, tightly compacted (approximately 30 pounds of pressure) and should take between 18 and 23 seconds to extract. Great espresso made easy Let me begin by explaining the three main variables of preparing great espresso. 1. Quantity of ground coffee 2. Tamp firmness 3. The grind The quantity of ground coffee. Loosely fill the basket slightly mounding over the top. Then lightly run your finger flat across the top of the basket, front to back and then side to side to help fill in any voids. You will then compress (tamp) the grounds with approximately 30 lbs of pressure. Tamp firmness. The only thing you need to remember about tamping is consistency. Don't press with five pounds of pressure in the morning and fifty pounds of pressure when you come home from a tough day at work. If I apply twenty pounds of tamp pressure and you apply thirty pounds, my grind will be slightly finer than yours will, but we can both achieve the same result great espresso. The last variable, the grind. Before discussing the grind, here s a tip to make this even easier. Take your double filter basket out of your double-spouted portafilter and put it into the single-spouted portafilter. Why did I have you do this? Simple it is always easier to make double shots than single shots. This is because doubles are more forgiving if you have slight variations in the two previous variables: quantity of ground coffee and tamp firmness.
9 Adjust your grind so that when you activate the pump, the flow of coffee coming out of the portafilter spout looks like the tapered tail of a mouse and has approximately the thickness of ballpoint pen filler. Your pump pressure gauge should read somewhere between 8 to 9 bar. Now, last but not least, when is it done? The coffee tells you when it is finished; simply observe the color of the crema. When the crema changes from a reddish brown color to a lighter blond color, it is done; stop brewing by pressing the lever all the way down. If you run the pump after the color has changed to light blond, you will only dilute the coffee and extract undesirable bitters. You have to admit that is a lot easier than using shot glasses and timers! Tip: Get into the habit of disposing of the spent grounds immediately after brewing espresso. After disposing of the grounds, return the portafilter to the group and lift the lever up for three to five seconds to rinse away excess oils and loose grounds. By regularly following this procedure, you will greatly reduce the tar-like buildup on the dispersion screen that occurs if you allow coffee oils to dry and bake on the hot group. Steaming Milk First, let s talk about some of the first things you need to learn in order to become Barista-like in your techniques. Milk Whole milk works best to steam, both in technique and in flavor! Lower fat milks contain mostly water which will not foam well and will be almost tasteless when steamed. After all your hard work you will be left with a less than desirable tasting beverage. Milk Your whole milk needs to be as cold as possible to ensure the creamiest, sweetest, and best tasting micro-foam. Once the milk has reached a temperature between degrees, you must stop the process. The longer amount of time you have with the cold milk gives you that extra time to continue making the milk creamy and sweet tasting. Milk heated above 160 degrees will be burnt and taste terrible.
10 Frothing Pitcher Keeping your stainless steel pitcher in the freezer is another tip which helps keep the milk at its coldest. The size of your pitcher is relative to the size and number of drinks you will be preparing at the time. Amount of Milk Too little milk in your frothing pitcher will cause splashing when you turn on the steam arm; too much milk will cause overflow and make a huge mess. The pitcher must be filled between 1/3 and ½ full to have the maximum capacity for properly steaming milk. If your pitcher has a spout, fill it to half an inch below where the spout starts. Stretching the milk Refers to the initial heating of the milk and the forceful introduction of air into the milk (using the steam wand pressure) stretching the consistency of the milk. Stretching continues until the milk reaches an approximate temperature of 100 degrees (body temperature). Texturizing the milk Refers to the next phase of frothing whereby the steam wand is submerged in the milk and the pressure continues to roll the milk. The process breaks down the large air bubbles into tiny air bubbles which then creates the smooth and creamy texture that is most desirable. Technique As you face your espresso machine, point the steam arm over your drip tray and open up the steam valve in order to purge out any unwanted water that may have collected inside the wand due to condensation you do not want that added to your delicious beverage! Next, position the steam arm so it is facing directly toward you and slightly angle it 45 degrees from the base. Holding your half-filled steam pitcher with the handle facing you, submerge the tip of the steam wand approximately an inch below the surface of the cold milk. Your pitcher bottom should be parallel with the countertop. The steam arm should gently rest in the spout of the steam pitcher. Now slightly tilt the pitcher left, keeping the arm away from the side of the pitcher. Open the steam valve completely and position the pitcher so the tip is just below the surface of the milk. This action
11 creates the stretching of the milk in other words, adding air to the milk. When done properly, the sound you hear at this point resembles sucking. You continue this until the milk reaches an approximate temperature of 100 degrees. After your milk has reached this body temperature, submerge the tip of the steam arm approximately one inch below the surface of the milk. This process continues to roll the milk over itself again and again breaking the large air bubbles into tiny air bubbles resulting in a new, creamy and sweeter, texture of the milk. When your milk has reached approximately 155 degrees turn the steam valve off. Helpful Tips When turning the steam valve off, always keep the tip under the surface of the milk for approximately 3 seconds. If you pull it out too soon, you will destroy the nice velvety micro-foam. While texturizing the milk, if you lower the tip too far into the milk you create turbulence rather than rolling. Turbulence will not make micro-foam. If there are a few bubbles in the milk after you have finished, wait 5-10 seconds to allow all the remaining bubbles to surface, then simply tap the edge of the pitcher on the counter and swirl the milk slightly and they will disappear. This is often a good time to purge your steam arm and wipe it down. Be sure to keep your steamed milk moving/swirling until you are ready to pour since milk has a natural tendency to separate. Regular Maintenance Backflushing is a vital maintenance procedure you must follow to help keep your machine running flawlessly for years to come. There are two types of backflushing: one with plain water, and the other with espresso machine cleaner.
12 Plain water backflushing should be done at least once a week, however if you are so inclined, feel free to backflush with plain water as often as you like. To backflush, you use the portafilter s blank insert (the round stainless steel disk without holes). To remove your single or double portafilter basket, use the blank portafilter insert. Turn it upside down and use its edge to pry the basket out of one of your portafilters. (If you always make double espressos, you may choose to keep the blank portafilter insert in your other portafilter so you always have one ready.) Next, place the blank insert into the portafilter and slap it hard with the palm of your hand to secure it in place. To perform a plain water backflush, place the portafilter into the group and snug it firmly. Next, raise the brew lever all the way up for 15 seconds, and then lower it all the way down. Water will forcefully discharge out of the bottom of the group into the drip tray; this is normal. Repeat three to five times. Backflushing with espresso machine cleaner is the same procedure as above with a few minor differences. The first difference is backflushing with espresso machine cleaner only needs to be done approximately once a month or every espressos. I don't recommend backflushing with cleaner more often than once every three weeks since overuse will remove oils that lubricate the brew lever and valves. You can water backflush as often as you prefer. To begin, place 1/3 of a teaspoon of espresso machine cleaner into the blank portafilter insert, then lock the portafilter into the group. Now follow the same procedure as above until the cleaner is dissolved and the water runs clear (about 5-10 flushes). Remove the portafilter from the group and rinse thoroughly, then take a damp cloth and wipe the underside of the group. After you have finished this procedure, I recommend you pull a shot of espresso and dispose of it to cure the group. You're finished and ready for another month of espresso. Note: I only recommend using either Urnex Full Circle Equipment Wash, Cafiza, or Puro Cafe because they are specially formulated for this purpose. The use of other cleaners may affect the performance of your machine and could even damage it.
13 We re Here To Help Enjoy your espresso machine and remember, should you have any questions, either visit our website or contact us through phone or . Please remember: Save the shipping carton and all the packing material that came with your machine. This is very important should you need to return your machine to us. If you do need to send your machine back for any reason, you must first call our service department. Thank you again for your business.
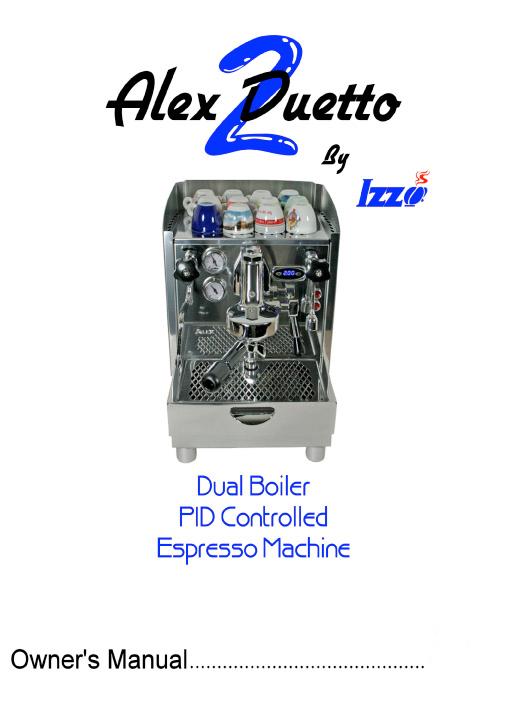
Made In Italy By. Owner s Manual
 Made In Italy By Owner s Manual Diagrams...2 Introduction...3 First Time Set Up Reservoir Mode...3 First Time Set Up Plumbed In Mode...5 Before Each Use...6 Normal Operation...7 Reservoir...7 Audible Alert...7
Alexia. Espresso Machine. Owner s Manual. Made In Italy
 Alexia Espresso Machine by Made In Italy Owner s Manual Table Of Contents Table Of Contents... 1 Diagrams... 2 Introduction... 3 First Time Set Up... 3 Before Each Use... 4 Normal Operation... 5 Gauges...
LUCCA M58. Dual Boiler Espresso Machine. Revised January 201. Made In Italy
 Dual Boiler Espresso Machine by Made In Italy Revised January 201 Introduction Thank you for your business! You are going to love your new Dual Boiler Espresso Machine. It combines classic beauty, value,
Silvano EVO. PID Controlled Espresso Machine. Made In Italy 6/2015 REV
 Silvano EVO PID Controlled Espresso Machine by Made In Italy 6/2015 REV Owner s Manual Silvano Espresso Machine Diagrams...2 Introduction...3 First Time Set Up...3 Before Each Use...5 Normal Operation...5
Anita. Espresso Machine. Owner s Manual. Made In Italy
 Anita Espresso Machine by Made In Italy Owner s Manual Table Of Contents Table Of Contents... 1 Diagrams... 2 Introduction... 3 First Time Set Up... 3 Before Each Use... 5 Normal Operation... 5 Gauges...
Espresso Machine. Made In Italy By. Owner s Manual
 Espresso Machine Made In Italy By Owner s Manual Diagrams...2 Introduction...3 First Time Set Up...3 Basic machine operation...5 Pulling Shots...5 Accessing The Menu...5 Understanding The Display...6 Features...7
Dual Boiler Espresso Machine
 Dual Boiler Espresso Machine by Made In Italy 6/2015 REV. Diagrams... 2 Introduction... 3 First Time Set Up... 3 Before Each Use... 5 Normal Operation... 5 Gauges... 5 Lights... 6 Pump... 6 Water Reservoir...
Alexia EVO. Espresso Machine. Owner s Manual 6/2015 rev. Made In Italy
 Alexia EVO Espresso Machine by Made In Italy Owner s Manual 6/2015 rev Table Of Contents Table Of Contents...1 Diagrams...2 Introduction...3 First Time Set Up...3 Before Each Use...4 Normal Operation...5
EXPOBAR OFFICE MACHINES
 EXPOBAR OFFICE MACHINES Supplemental Instructions Includes brewing guide, frothing techniques and recipes. These are supplemental instructions for the Expobar Office Control, Pulser and Lever. They are
 EXPOBAR BREWTUS IV Supplemental Instructions for all Expobar Brewtus IV machines Rotary Pump (IV-R), Vibration Pump(IV), Plumbable Vibration Pump (IV-P) www.wholelattelove.com 888.411.5282 1 Congratulations
EXPOBAR BREWTUS III Supplemental Instructions
 EXPOBAR BREWTUS III Supplemental Instructions www.wholelattelove.com 888.411.5282 1 Congratulations on the purchase of your new Brewtus III R or Brewtus III V! The Expobar Brewtus is a very unique machine
Espresso Machine. Made In Italy By
 Espresso Machine Made In Italy By Diagrams...2 Introduction...3 First Time Set Up...3 Basic machine operation...5 Pulling Shots...5 Accessing The Menu...5 Understanding The Display...6 Features...7 User
OPERATING INSTRUCTIONS FOR YOUR SAFETY CAREFULLY READ THE OPERATING INSTRUCTIONS. FOR HOUSEHOLD USE ONLY
 OPERATING INSTRUCTIONS FOR YOUR SAFETY CAREFULLY READ THE OPERATING INSTRUCTIONS. FOR HOUSEHOLD USE ONLY 2 Opening Congratulations on choosing this high quality espresso machine and thank you for your
MAKING ESPRESSO. The Steps. 1 Inspect. 2 Grind & Dose. 3 Groom & Tamp. 4 Pull the Shot
 Barista Manual MAKING ESPRESSO The Steps 1 Inspect Detach portafilter Discard spent grounds if necessary Rinse and dry portafilter and basket 2 Grind & Dose Grind enough coffee for current shot Dispense
Models 2450 & Espressimo TM Espresso Cappuccino Machines. Operation & Installation Manual TABLE OF CONTENTS. For
 Espressimo TM Espresso Cappuccino Machines Operation & Installation Manual For Models 2450 & 1750 *Also includes information & instructions for Q & E models. TABLE OF CONTENTS Warning Labels...2 Initial
Micro Casa Semiautomatica
 Micro Casa Semiautomatica Training Manual Contents Overview 1 Models 1 Specifications 1 Features 1 Available accessories 1 Package contents 2 Semiautomatic parts 3 Assembly 4 Operating instructions 4 Starting
IMPORTANT SAFEGUARDS. 3. To protect against fire, electric shock and injury to persons do not immerse cord, plug or unit in water or other liquid.
 IMPORTANT SAFEGUARDS When using electrical appliances, basic precautions should always be followed, including the following: 1. Read all instructions. 2. Make sure that your outlet voltage corresponds
Wega Mininova 2003 Installation Instructions
 Wega Mininova 2003 Installation Instructions Thank you for purchasing a Wega Espresso Product. We are sure you will be happy with your purchase and the quality of coffee produced by our machines and grinders.
MODELS 1315 & 1315-S La Pavoni CLUB COMBO
 IMPORTANT WARNINGS MODELS 1315 & 1315-S La Pavoni CLUB COMBO DUET Never operate your espresso machine without water in the tank. This may cause premature pump failure. Do not allow the power cord to come
Lusso / Espresso Si' Models:PL-16 PAB-16. Made In Italy
 Lusso / Espresso Si' Models:PL-16 PAB-16 Made In Italy la pavoni - PL-16 & PAB-16 We recommend using freshly roasted espresso beans ground medium to fine. Fresh coffee will produce better tasting espresso.
BZ35 Espresso Machine
 BZ35 Espresso Machine Operation Guide The Bezzera BZ35 is a quality automatic espresso coffee machine which has piped in water and drainage as well as consistent volumetric delivery of espresso. INSTALLING
INSTALLATION QUICK START GUIDE AND CHECKLIST ATTENTION!! DO NOT ATTEMPT A PARTIAL INSTALL.
 AND CHECKLIST CHECKLIST MUST BE SIGNED AND RETURNED TO RANCILIO GROUP NA TO RECEIVE PAYMENT FOR YOUR SERVICES ATTENTION!! Please check the site to make sure they are ready for installation before you begin
Buona Fortuna Training Manual Technical Instructions
 Buona Fortuna Training Manual Technical Instructions Buona Fortuna Coffee Company 123 Latte Boulevard Seattle, Washington 11222 Phone: 222-555-1555 Fax: 222-555-1556 Espresso Machine Training Manual Contents
Barista Practice & Equipment Maintenance Coaching Sheets
 Co a c h ing Sh eet Barista Practice & Equipment Maintenance Coaching Sheets Tel l, Sh o w, Co a c h Cleaning a Shaerer Espresso Machine The espresso machine is a critical piece of equipment in your store.
Quick Reference Guide
 Impressa Z5 Quick Reference Guide This Guide does not replace the Operating Instructions. For details and cautions you must read all instructions. Watch the DVD instructions! Traces of Coffee Grounds in
Operating the Rancilio Silvia after PID kit modification Version 1.1
 Operating the Rancilio Silvia after PID kit modification Version 1.1 When the machine is turned on, the controller will display the boiler temperature in the machine. The temperature reading will start
Micro Casa a Leva Training Manual
 Micro Casa a Leva Training Manual Contents Overview 1 Models 1 Specifications 1 Features 1 Available accessories 1 Package contents 2 Leva parts 3 Assembly 4 Operating instructions 4 Making coffee 5 Procedure
CAFE BARISTA. User Guide EM5000
 CAFE BARISTA User Guide EM5000 Heading Sub Heading Body copy with not indent applied. Bullet copy Bullet copy Bullet copy Bullet copy Bullet copy Bullet copy Bullet copy Bullet copy 2 Contents Sunbeam
fig. 1.1 fig. 1 fig. 1.2 fig. 1.3 fig. 2 6c 6d 7c 7b 8a 8b 10b 10b 10c 10a
 1 2 fig. 1 16 fig. 1.1 6a 3 4 5 6 15 14 6b 6c 6d 7 8a 8b 13 12 fig. 1.2 7c 7b 7a 10b 9 10 11 fig. 1.3 fig. 2 10b 10c 10a fig. 1 1 Knob 2 Handle Bar 3 LEVER 4 Carousel (removable) 5 Funnel for coffee (removable)
MAKER S MANUAL. Good coffee, made simple. General tips... 1
 MAKER S MANUAL Good coffee, made simple. General tips... 1 Plunger... 3 stovetop... 5 chemex... 7 syphon... 9 ESPRESSO... 11 G ENERAL t i p s T hey say that a good cup of coffee makes your day, and a bad
MODEL: POD BREWER AURORA SAF 68 HOMEMAKER ESPRESSO MAKER WITH COFFEE POD
 INSTRUCTION MANUAL Please read this Instruction Manual and the safety instructions before operating the appliance! MODEL: POD BREWER AURORA SAF 68 HOMEMAKER ESPRESSO MAKER WITH COFFEE POD Congratulation
5KEK1322 W A_v08.indd 1 5/13/16 2:25 PM
 5KEK1322 W10878653A_v08.indd 1 PARTS AND FEATURES PARTS AND ACCESSORIES Tea steeper lid (center section of lid with handle) Kettle lid (outer section) Stainless steel lime scale filter Removable stainless
Barista Skills Coaching Sheets
 Co a c h ing Sh eet Barista Skills Coaching Sheets Tel l, Sh o w, Co a c h Pulling Espresso: Super-Automatic Espresso is the foundation of most Peet s drinks, and is brewed to order by skilled baristas
Sleeve Down: Frothing. Sleeve Up: Steaming
 Sleeve Down: Frothing Sleeve Up: Steaming 3 SPECIAL CORD SET INSTRUCTIONS Regarding your Cord Set: A. A short power-supply cord (or detachable power-supply cord) is to be provided to reduce risks resulting
the Bambino Plus Instruction Book - BES500
 the Bambino Plus Instruction Book - BES500 Contents 2 Breville Recommends Safety First 6 Components 8 Features 8 Assembly 9 Functions 15 Care & Cleaning 18 Troubleshooting BREVILLE RECOMMENDS SAFETY FIRST
User Manual. Stainless Steel Coffee Urns. Models: 177CU55ETL, 177CU110ETL 10/2016. Please read and keep these instructions. Indoor use only.
 Intertek Stainless Steel Coffee Urns Models: 177CU55ETL, 177CU110ETL 10/2016 Please read and keep these instructions. Indoor use only. www.avantcoequipment.com 1 NOTE: Save these instructions for future
IMPORTANT SAFEGUARDS. ENGLISH Congratulations on your wise choice!
 Congratulations on your wise choice! As the proud owner of the Gaggia machine, you can now experience the taste of a delicious cup of espresso or cappuccino in the comfort of your own home. Espresso coffee,
Stainless Steel Espresso & Cappuccino Machine
 Stainless Steel Espresso & Cappuccino Machine Model #119 Instructions Warranty 1250 W / 120 V~ / 60 Hz IMPORTANT SAFEGUARDS When using electrical appliances, basic safety precautions should always be followed
Chicken Rotisserie. Model LM-8A LM-12A LM-8M LM-12M Instruction Manual
 Chicken Rotisserie Model LM-8A LM-12A LM-8M LM-12M Instruction Manual 735 Rossiter, St-Jean-sur-Richelieu, Quebec, Canada, J3B 8A4 E-Mail : info@resfab.com Website : www.resfab.com 2007-05 TABLE OF CONTENTS
1. IMPORTANT SAFEGUARDS When using electrical appliances, basic safety precautions should always be followed to reduce the risk of fire, electric
 1. IMPORTANT SAFEGUARDS When using electrical appliances, basic safety precautions should always be followed to reduce the risk of fire, electric shock, and/pr injury to persons including the following:
User Manual. Stainless Steel Coffee Urns. Models: 177CU30, 177CU55, 177CU110 04/2018. Please read and keep these instructions. Indoor use only.
 Stainless Steel Coffee Urns Models: 177CU30, 177CU55, 177CU110 04/2018 Please read and keep these instructions. Indoor use only. www.avantcoequipment.com 1 NOTE: Save these instructions for future reference.
INDEX 1. INTRODUCTION. Dear client:
 INDEX 1. Introduction 2. Important Safeguards 3. Preparation 4. Making Espresso 5. Preparing Cappuccino 6. Making Tea 7. Cleaning the Machine 8. BRIEL Technology (The AQUASTOP System) 9. Troubleshooting
CafeRomatica NICR7.. Fully automatic coffee centre Operating Instructions and Useful Tips. A passion for coffee.
 CafeRomatica Fully automatic coffee centre Operating Instructions and Useful Tips NICR7.. GB A passion for coffee. 1 G F A M J / K A B C D E Display screen Left rotary knob Right rotary knob Bean symbol
INSTALLATION & OPERATING GUIDE
 SURE TAMP STEAM INSTALLATION & OPERATING GUIDE BUNN-O-MATIC CORPORATION POST OFFICE BOX 3227 SPRINGFIELD, ILLINOIS 6278-3227 PHONE: (217) 529-661 FAX: (217) 529-6644 http://www.bunn.com/espresso/index.html
Caffeo. Italian style espresso machine. INSTRUCTIONS FOR USE. Breville Customer Service Centre
 Breville is a registered trademark of Breville Pty. Ltd. ABN 98 000 092 928 Breville Customer Service Centre Australian Customers Breville Customer Service Centre Locked Bag 2000 Botany NSW 2019 AUSTRALIA
Burr Grinder. Automatic burr grinder with 17-position grind selector. Instruction Booklet EM0430
 Burr Grinder Automatic burr grinder with 17-position grind selector Instruction Booklet EM0430 Please read these instructions carefully and retain for future reference. Contents Sunbeam s Safety Precautions
Installation and User Instructions Flushing System Kit
 Installation and User Instructions Flushing System Kit Model: ACFS Part No. 102532 Rev. A Copyright 2007 Dacor All rights reserved. All specifications are subject to change without notice. Dacor assumes
Espresso Maker READ BEFORE USE. Questions? Please call us our friendly associates are ready to help
 Espresso Maker Visit www.hamiltonbeach.in for our complete line of products and Use and Care Guides as well as delicious recipes, tips, and other helpful information! Questions? Please call us our friendly
6-in-1 K-Cup Coffee Maker
 6-in-1 K-Cup Coffee Maker Model# GCM-6000 USER MANUAL Read this manual thoroughly before using and save it for future reference Model: GCM-6000 2017 Gourmia www.gourmia.com The Steelstone Group Brooklyn,
G F I M J K L B C D E S O T H Q P U N R D 4
 1 2 3 4 G F I A M J K L 5 6 7 B C D E 8 9 10 S O T H Q P U N R 11 12 D 4 Equipment GB A B C D E Text display (main menu) Rotary control knob Button > Button exit Height-adjustable coffee spout CafeRomatica
the Infuser Instruction Booklet BES840
 the Infuser Instruction Booklet BES840 Contents CONGRATULATIONS on the purchase of your new Breville Infuser Espresso Machine 4 Breville recommends safety first 6 Know your Breville Infuser Espresso Machine
User Manual. Stainless Steel Coffee Urn. Models: 177CU30 11/2018. Please read and keep these instructions. Indoor use only.
 Stainless Steel Coffee Urn Models: 177CU30 11/2018 Please read and keep these instructions. Indoor use only. www.avantcoequipment.com 1 NOTE: Save these instructions for future reference. Index Important
INSTRUCTIONS FOR USE MODEL: PROFESSIONAL PC-16 PG-16 PB-16
 INSTRUCTIONS FOR USE MODEL: PROFESSIONAL PC-16 PG-16 PB-16 First Time Operation For first time "out of the box" operation we recommend you clean the inside of your la Pavoni machine. Follow the simple
Quick Start Guide Read this booklet thoroughly and save these instructions.
 Quick Start Guide Read this booklet thoroughly and save these instructions. FAQs can be found at www.espresso-works.com Email us for any unanswered questions: cs@espresso-works.com For product registration,
Half-Pint Soft Serve Ice Cream Maker
 CAUTION: READ OPERATOR S MANUAL BEFORE USE Visit www.hamiltonbeach-me.com for our complete line of products and Use and Care Guides as well as delicious recipes and tips! Half-Pint Soft Serve Ice Cream
the Duo-Temp Pro Sage by Heston Blumenthal Customer Service Centre Instruction Booklet
 Sage by Heston Blumenthal Customer Service Centre Freephone (UK Landline): 0808 178 1650 Mobile Calls (National Rate): 0333 0142 970 www.sageappliances.co.uk customerservice@sageappliances.co.uk the Duo-Temp
HD8847 HD8848 USER MANUAL. Super automatic espresso coffee machine 4000 series. Read carefully before using the machine.
 Super automatic espresso coffee machine 4000 series 02 USER MANUAL Read carefully before using the machine. HD8847 HD8848 02 English EN Register your product and get support at www.philips.com/welcome
@CafflanoKompresso. Handheld Espresso Maker. User Tips. Click
 Cafflano Kompresso Handheld Espresso Maker User Tips Click! Click @CafflanoKompresso Tamping Scoop Recommended dose of fine espresso ground coffee for Filter Basket is 10 to 15 gram 11-12 gram Measure
Olympia Cremina Lever Espresso Machine
 Olympia Cremina Lever Espresso Machine The Ultimate Guide from FreshCoffeeShop with video showing how to make espresso properly Olympia Cremina is a hand made lever espresso machine. The first version
COFFEE GRINDER. Owner s Manual
 COFFEE GRINDER Owner s Manual 4 4 FEATURES Bean Hopper Lid Bean Hopper Grinder Start/Stop Button Bean Hopper Holder Bean Hopper Release Button Grinding Timer Dial Coffee Powder Outlet 0 Grind Thickness
ESPRESSO. Instructions for use ES 8012
 ESPRESSO M A C H I N E Instructions for use ES 8012 ESPRESSO MACHINE CONTENTS 4 Congratulations 6 Catler recommends safety first 8 Key features of your Espresso Machine ES 8012 13 Know your Espresso Machine
Shotmeister Owner s Manual. The Sleekest Design, Pouring the Coldest Shots
 Shotmeister Owner s Manual The Sleekest Design, Pouring the Coldest Shots Thank you for purchasing a Jägermeister Shotmeister! REGISTRATION INFORMATION Register your Jägermeister Shotmeister Online: at
15-Bar Pump Espresso Maker Instruction Manual
 15-Bar Pump Espresso Maker Instruction Manual Styled for Life Designed & Engineered in New York City SZ-314289_CRUX006_15 bar Espresso maker_im_r3.indd 1 Thank you for Purchasing this Product You may already
Get Started. Better Everyday ECAM23260
 Better Everyday Get Started This short guide is not intended to explain all the functions of the appliance. Please read all the owner s instruction booklet before use. Video available on www.youtube.com/delonghiusa
Sage by Heston Blumenthal
 Sage by Heston Blumenthal Freephone (UK Landline): 0808 178 1650 Mobile Calls (National Rate): 0333 0142 970 www.sageappliances.co.uk customerservice@sageappliances.co.uk Register your product and get
EP3559, EP3558 EP3551, EP3550
 Super automatic espresso machine 3100 series EP3559, EP3558 EP3551, EP3550 EN USER MANUAL DE BENUTZERHANDBUCH ES MANUAL DEL USUARIO FR MODE D EMPLOI IT MANUALE UTENTE NL GEBRUIKSAANWIJZING 1 EP3558, EP3550
phd Pitcher UltraWater Owner s Manual Delicious Great Tasting Antioxidant Alkaline Energized
 Owner s Manual UltraWater phd Pitcher Delicious Great Tasting Antioxidant Alkaline Energized READ ME FIRST! 1. Be sure to flush your UltraWater filter before using the first time. (See Instructions for
Automatic Coffee Machine Instruction Manual
 Instruction Manual Page 1 of 17 8212-0 Automatic Coffee Machine Instruction Manual Instruction Manual Page 2 of 17 IMPORTANT INFORMATION For safety purposes please read these instructions carefully before
TILT-HEAD STAND MIXER FEATURES
 ENGLISH TILT-HEAD STAND MIXER FEATURES Speed Control Knob Motor Head Attachment Hub Attachment Knob Motor Head Locking Lever (not shown) Beater Shaft Flat Beater Beater Height Adjustment Screw Wire Whip
Armonia Smart. Quick Start Guide MACHINE DESCRIPTION STARTING UP
 Quick Start Guide Armonia Smart MACHINE DESCRIPTION LEGENDE. PRODUCT CANISTER 2. PRODUCT CANISTER / COFFEE HOPPER. COFFEE HOPPER. CARD READER. DECAFFEINATED DOOR. DISPLAY 7. DOSE BUTTON 8. INFO BUTTON
Owner s Manual Cyncra and Hydra Espresso Machines
 Artistry Ingenuity Understanding Owner s Manual Cyncra and Hydra Espresso Machines Safety Warnings IMPORTANT Information for the Cyncra and Hydra Espresso Machine Manufactured by Synesso, Inc. DISCONNECT
 Congratulations on your wise choice! As the proud owner of a Gaggia machine, you can now experience the taste of a delicious cup of espresso or cappuccino in the comfort of your own home. Espresso, originally
Smart Valve Cold Brew Coffee Maker { Instruction Manual
 Smart Valve Cold Brew Coffee Maker { Instruction Manual Table of Contents Important Safeguards... 2 Glass Decanter Safety Precautions... 3 Getting to Know Your Cold Brew Coffee Maker... 4 Easy-Grab Tab
Type HD8754 USER MANUAL
 Register your product and get support at www.philips.com/welcome 02 English Type HD8754 USER MANUAL 02 EN PLEASE READ THIS USER MANUAL CAREFULLY BEFORE USING THE MACHINE. IMPORTANT SAFEGUARDS When using
A IMPORTANT SAFEGUARDS
 instructions 2 Read the instructions, keep them safe, pass them on if you pass the appliance on. Remove all packaging before use. A IMPORTANT SAFEGUARDS Follow basic safety precautions, including: 1 This
the Oracle Sage by Heston Blumenthal Customer Service Centre Phone:
 Sage by Heston Blumenthal Customer Service Centre Phone: 0844 334 5110 www.sageappliances.co.uk customerservice@sageappliances.co.uk the Oracle Instruction Booklet Register your product and get more from
User Manual. Thermo Pump System Coffee Brewers User Manual. Models: 177C10, 177C15 04/2018. Please read and keep these instructions. Indoor use only.
 Thermo Pump System Coffee Brewers User Manual Models: 177C10, 177C15 04/2018 Please read and keep these instructions. Indoor use only. www.avantcoequipment.com 1 Parts Diagram 177C15 2 5 177C10 3 4 6 4
AUTOMATIC BEAN TO CUP COFFEE MACHINE
 AUTOMATIC BEAN TO CUP COFFEE MACHINE EB24 model USER GUIDE US CA CONTENTS Appliance parts 2 Safety and warnings 4 First use 7 Menu settings 11 Making coffee 15 Making cappuccinos and milk-based coffees
Cleaning the La Marzocco Espresso Machine, Linea FB 70
 Cleaning the La Marzocco Espresso Machine, Linea FB 70 The Bean Caffe, SAC Location WRD 204 Technical Writing May 22, 2013 Russell Wojcik ABSTRACT This manual documents the disassembling, cleaning, and
MR. COFFEE ESPRESSO/ CAPPUCCINO MAKER
 2003 Sunbeam Products, Inc. All rights reserved. MR. COFFEE is a registered trademark of Sunbeam Products, Inc. Distributed by Sunbeam Products, Inc., Boca Raton, Florida 33431. MODEL ECMP30/33 Instruction
EspressoPRO User Components. fig. 1
 1a fig. 1 EspressoPRO User Components 1b 2 frothxpress Assembly U. Steam Nozzle V. Connector W. Frothing Sleeve X. Knob (for regulating froth) Y. Joint Z. Milk Container lid with siphoning straw U V X
HD8828 HD8834 USER MANUAL. Super automatic espresso coffee machine 3100 series. Read carefully before using the machine.
 Super automatic espresso coffee machine 3100 series 02 USER MANUAL Read carefully before using the machine. HD8828 HD8834 English 02 EN Register your product and get support at www.philips.com/welcome
PLEASE READ THIS MANUAL BEFORE USE. SAVE FOR FUTURE REFERENCE.
 8-CUP STAINLESS STEEL CARAFE Coffee Brewer Model: BV1900TS HOUSEHOLD USE ONLY Customer Service Line: 1-855-664-1252 2-year limited warranty bonavitaworld.com Simple to operate Optional pre-infusion cycle
ESPRESSO. Redline Espresso Standard. Notes:
 ESPRESSO We divide the espresso training into 2 parts standards and methods of production. The standards are the building blocks that the methods of production are built with. We will constantly reference
IMPORTANT INSTRUCTIONS MODE D EMPLOI IMPORTANT INSTRUCIONES IMPORTANTES ISTRUZIONI IMPORTANTI
 MOKA 22-04-2003 10:10 Pagina 1 IMPORTANT INSTRUCTIONS SAVE THESE INSTRUCTIONS MODE D EMPLOI IMPORTANT CONSERVEZ LES PRESENTES INSTRUCTIONS INSTRUCIONES IMPORTANTES GUARDE ESTAS INSTRUCCIONES ISTRUZIONI
5KCM0512A W A_ENv10.indd 1 10/13/15 12:41 PM
 5KCM0512A PARTS AND FEATURES PARTS AND ACCESSORIES Scale readout display Timer readout display Plunger handle Power button Lid Plunger (stainless steel mesh filter with silicone seal not shown) Timer button
左边 :SAFTY NOTES 右边 : Please follow the safety precautions to avoid any harm to yourself and cause any damages Never Always Warning Attention
 封面 Multi-functional Soymilk Maker Instruction Manual Please read all instruction carefully before operating the machine 第一页 Contents Safety notes 2 Usage notes 3 Product description and specification 4
EP5934, EP5930, EP5346 EP5345, EP5340, EP5335 EP5334, EP5333, EP5331 EP5330, EP5045, EP5040 EP5035, EP5034, EP5030
 Super automatic espresso machine 5000 series EP5934, EP5930, EP5346 EP5345, EP5340, EP5335 EP5334, EP5333, EP5331 EP5330, EP5045, EP5040 EP5035, EP5034, EP5030 EN USER MANUAL DA BRUGERVEJLEDNING DE BENUTZERHANDBUCH
Sage by Heston Blumenthal Customer Service Centre
 20172069 P1 BES810BSS_UKM_IB_E17_HiRes.pdf color:1c PANTONE 518C ZB2382 DC:- SIZE:148X210MM August 18, 2017 14:04:40 Sage by Heston Blumenthal Customer Service Centre Freephone (UK Landline): 0808 178
HOW TO USE YOUR ESPRESSO MACHINE
 HOW TO USE YOUR ESPRESSO MACHINE 1 Version 120126 REASONS FOR CHOOSING A EXPOBAR ESPRESSO MACHINE An unbeatable combination: a reliable high-performance machine at a competitive price. Simple, tried and
SAVE THESE INSTRUCTIONS THIS PRODUCT IS FOR HOUSEHOLD USE ONLY
 IMPORTANT SAFEGUARDS When using electrical appliances, basic safety precautions should always be followed, including the following: Read all instructions. Do not touch hot surfaces. Use handles and knobs.
Type HD8858 / HD8859 USER MANUAL
 Register your product and get support at www.saeco.com/welcome 02 English Type HD8858 / HD8859 USER MANUAL 02 EN PLEASE READ THIS USER MANUAL CAREFULLY BEFORE USING THE MACHINE. IMPORTANT SAFEGUARDS When
Coffee Burr Grinder. Model #559. Instructions. Warranty
 Coffee Burr Grinder Model #559 Instructions Warranty IMPORTANT SAFEGUARDS When using electrical appliances, basic safety precautions should always be followed, including the following: 1. Read all instructions.
EC3OO. Espresso & Cappuccino Machine. Model # W / 120 V~ / 60 Hz. Instructions Warranty
 EC3OO Espresso & Cappuccino Machine Model #123.05 Instructions Warranty 1200W / 120 V~ / 60 Hz Read this manual thoroughly before using and save it for future reference IMPORTANT SAFEGUARDS When using
SAFETY INSTRUCTIONS FOR USE
 INTRODUCTION Thank you for choosing this De Longhi Coffee machine. We hope you enjoy your new appliance. Please take a few minutes to read these instructions. This is the only way to ensure optimum results
AUTOMATIC BEAN TO CUP COFFEE MACHINE
 AUTOMATIC BEAN TO CUP COFFEE MACHINE EB60 model USER GUIDE NZ AU GB IE CONTENTS Appliance parts 2 Safety and warnings 4 First use 9 Menu settings 13 Making coffee 17 Making cappuccinos and milk-based
USER MANUAL TECHNICAL DATA
 USER MANUAL TECHNICAL DATA Model: Easy Touch Operating Voltage: 240V AC Frequency: 50 Hz Power con, MAX : 1500W Water tank cap.: 700ml (0.7L) Weight: 5.0 kg Size: L 350 * W 155 * H 245 mm This appliance
BREW EXPRESS OPERATION GUIDE. model no. BE-112
 BREW EXPRESS OPERATION GUIDE model no. BE-112 by CONTENTS 1. Safety 1 2. Features 2 3. Controller Functions 3 4. Start Up 4 5. Operation 5 6. Maintenance 6 7. Troubleshooting 7 8. Parts & Service 8 9.
Automatic Cold Brewer
 Automatic Cold Brewer Model# GCM-6800 USER MANUAL Read this manual thoroughly before using and save it for future reference Model: GCM-6800 2017 Gourmia www.gourmia.com The Steelstone Group Brooklyn, NY
Matic / THa. Operating instructions COFFEE BREWER. Mode d emploi MACHINE À CAFÉ. Gebrauchsanleitung KAFFEEBRÜHMASCHINE
 Operating instructions COFFEE BREWER Mode d emploi MACHINE À CAFÉ Gebrauchsanleitung KAFFEEBRÜHMASCHINE Gebruiksaanwijzing KOFFIEZETAPPARAAT Bruksanvisning KAFFEBRYGGARE Bruksanvisning KAFFEMASKIN GB FR