All in One Wine Pump. Rack-Bottle-Degas-Filter
|
|
|
- Alexander Bennett
- 5 years ago
- Views:
Transcription

1 All in One Wine Pump Rack-Bottle-Degas-Filter
2 Thank you for purchasing the All in One Wine Pump. We are confident this unit will make racking, bottling, degassing and filtration operations quick, simple and a lot of fun! Family owned and operated, we are dedicated to bringing you a great experience with our quality American-Made product. Customer service is everything to us. If you have any questions, comments or concerns, please contact us at Allinonewinepump.com. You will get a prompt response. Steve Helsper/ Owner & Creator Table of Contents Section 1: Description of the All in One Wine Pump 1.1 What does it do? 1.2 Receiving your All in One Wine Pump Section 2: Safeguards and Warranty Information 2.1 Safeguards 2.2 Electrical 2.3 Proper Use Conditions 2.4 Warranty Information Section 3: Using the All in One Wine Pump 3.1 Setting up Your All in One Wine Pump 3.2 Cleaning and Sanitizing 3.3 Racking Wine into Glass 3.4 Racking Wine into an Oak Barrel or Sanke Keg 3.5 Bottling Wine 3.6 Degassing Wine 3.7 Filtering Wine 3.8 Filtration Set-up & Process Manual written and designed by: Jeff Shoemaker
3 Section 1: Description of the All in One Wine Pump 1.1 What does it do? All in One Racking, Degassing, Bottling & Filtration. Features Advantages Odorless and oil-free vacuum wine pump Light weight- approx. 9lbs and well balanced Durable plastic housing is easy to clean In-line vacuum release this controls carboy filling and bottling functions 2 speed filling control for wine, beer and mead bottling control Consistent liquid height and no overfill spillage while filling wine bottles Can be used to bottle with any shape or size bottles Degassing of wine (Co2 removal) during every wine transfer Decreases racking time Better quality wine- less air contact No lifting of heavy carboys No more bending over for transferring or bottling wine, beer and or mead Less chance of getting hurt dropping carboys Bottle with less oxygen contact Faster racking and bottling The ability to filter and rack at the same time Works extremely well with all wine kits to remove any excessive CO2 Custom accessories are available to fit most every size and shape of bottles

4 Note: Before using the All in One Wine Pump, please carefully read all safety information and instructions in this manual. Failure to do so could result in incorrect use of the pump, causing damage to the unit. 1.2 Receiving Your Unit Upon receiving the unit, ensure all pieces are included. Please refer to the next page for part illustrations. Each part number matches the number on this page. Standard All in One Wine Pump 1. All in One Wine Pump Complete 2. Two-hole #6.5 bung racking assembly with Vacuum elbow 3. 5 of 5/16 vacuum resistant tubing 4. Bottling attachment 5. Reservoir attachment 6. Vacuum release with 6 of ¼ tubing (all Color coded) The Deluxe Version will also include: 7. Splash-racking cane #7.0 bung racking assembly 8. ¼ NPT to 3/8 barbed adapters for use with filter housing (sold separately) Important- In order to use the pump to rack and/or bottle wine, the following items will need to be purchased separately from your local home winemaking store or online outlets. If you re having trouble locating these items, please contact us. One clear empty wine bottle to act as your reservoir container 2-3/8 racking canes (pictured right)

5 All in One Wine Pump Part Illustrations
6 Section 2: Safeguards and Warranty Information 2.1 Safeguards Prior to starting the unit each time, check power cords and tubing for any signs of breakage, corrosion or defects to ensure your pump will work as intended. Check glass carboys for cracks and defects prior to putting it under a vacuum. Failure to do so could cause the carboy to shatter. Do not move the unit while it s in use. Close supervision is needed when operating the unit near children. 2.2 Electrical Note: Before connecting the unit to electrical power, ensure the electrical system conforms to the needs of the pump. If you are unsure, consult a qualified electrician. To protect against electrical shock, do not immerse cords, plugs or the pump unit into water or other liquid. Should the pump fail to start, or begin to overheat, disconnect power source immediately. 2.3 Proper Use Conditions (Please Review) The All in One Wine Pump is designed for use on wine barrels, wine & beer bottles, glass wine vessels sized- one, three, five, six and seven gallons. Due to their thin-glass walls, this unit is not to be used with 54 liter vessels commonly referred to as Demijohns. This unit is designed for indoor use only; it should be used well away from splashing or running water. If the pump gets wet, unplug unit and discontinue use until it has fully dried. If the overflow container becomes full and wine is sucked into the unit, quickly unplug the pump and contact for us for assistance. Be sure to check your glass vessel for cracks, chips and defects prior to using the All in One Wine Pump. Warranty and Safety Information 3.1 Warranty: One year limited warranty 30-day money back guarantee Do not use products not recommended by All in One Wine Pump as they may not work correctly with the unit causing damage. Doing so will void the warranty. Do not alter the structural components of the pump in anyway. Doing so will void the warranty.
7 Section 3: Using the All in One Wine Pump 3.1 Setting up your All in One Wine Pump The Over-Flow Container A clear 750 ml wine bottle is needed to act as the over-flow container for the unit. This prevents wine from entering the pump in the event that wine gets sucked into the vacuum tubing. Be sure to turn the unit off and empty if it gets at least half-full. Insert the wine bottle as illustrated in the picture on the next page. Insert the GREEN rubber stopper-vacuum assembly into the wine bottle. Note: The tubing coming out of the vacuum pump to the over-flow container is to lead over the handle not through the hole. This is to ensure the rubber stopper sits correctly in the mouth of the wine bottle. Wine Transfer Tubing Assembly 1. Insert your 3/8 racking into the open hole on your #6.5 bung with vacuum elbow. (Wetting the cane with water will help.) Then attach supplied 3/8 tubing to the racking cane. 2. Attach the other racking cane to the other end of the 3/8 tubing. Connecting the ¼ Tubing with Vacuum Release Valve The All in One Wine Pump uses a color coded system to make set-up a snap. Following this system will ensure the unit is set-up correctly. 1. Find the BLUE end of the tubing and slide it over the vacuum elbow marked with BLUE tape located at your over-flow container. 2. Find the RED end of the tubing and slide it over the vacuum elbow marked with RED tape located in the #6.5 bung with racking cane inserted. 3. Plug the unit in. 4. You re all set!
8 3.2 Cleaning and Sanitizing Prior to using the unit, the hoses, racking canes and anything touching the wine will need to be sanitized. We recommend using a no-rinse sanitizer such as Star-San (follow manufacturer s instructions for use.) *Or you can make a sulfite/ citric acid solution. A. To sanitize the inside of the tubing and receiving glass carboy: Add your chosen sanitizer to your receiving carboy. Swirl the sanitizer solution around fully coating the inside and set aside leaving sanitizer in the carboy. B. Using a spray bottle, apply sanitizer to both 3/8 racking canes, place sanitized racking cane into your sanitized carboy. C. Put the unit together and draw sanitizer solution through the tubing into another receiving vessel. The tubing and carboy are now sanitized and are ready to be used with your wine. When you are finished racking/bottling your wine, simply rinse all tubing and racking canes with warm water and allow to hang-dry. The pump itself will never need cleaning as wine will not come in contact with the unit. *To make a sulfite/ citric acid sanitizer solution: In a gallon of cold water, add 2 teaspoons of potassium metabisulfite and 1 tablespoon of citric acid. Mix thoroughly and keep in a tightly stoppered inert container for future use. Discard when sulfite odor has diminished.
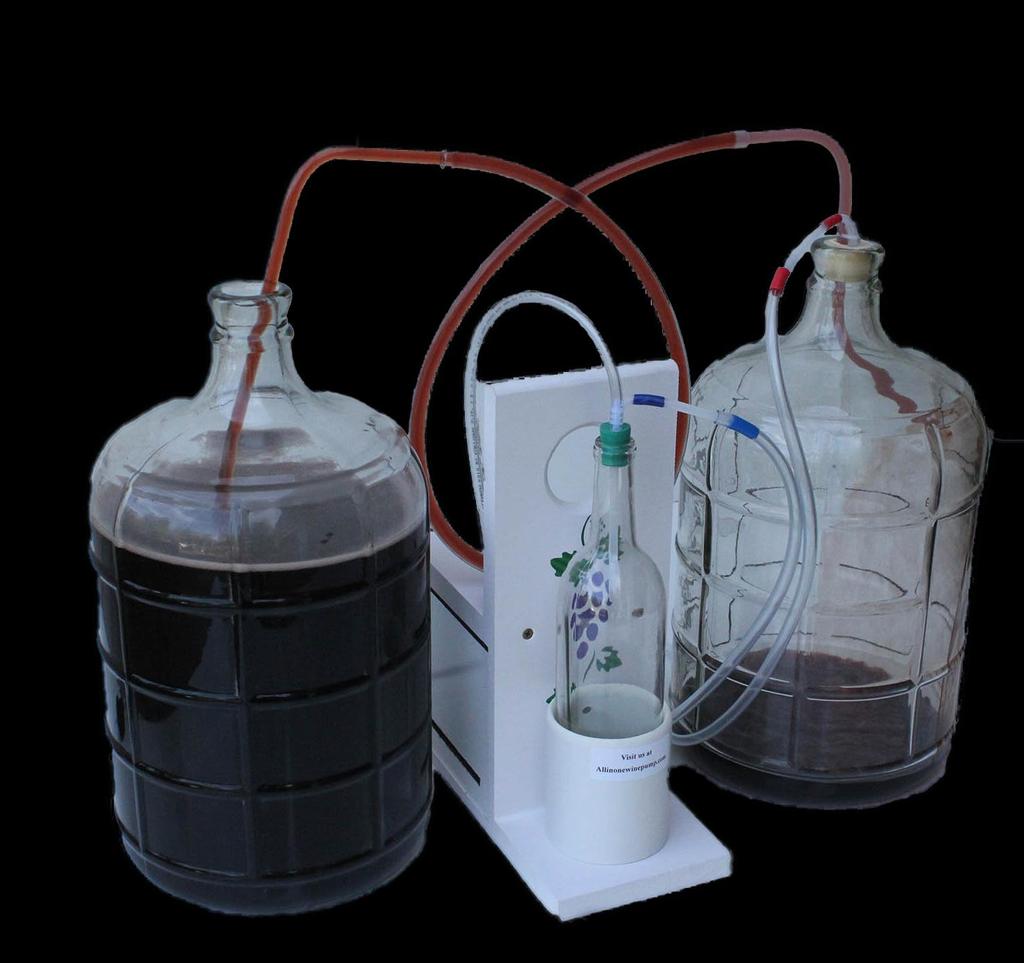
9 3.3 Racking/ Transferring Wine into glass with the All in One Wine Pump The All in One Wine Pump makes it very simple for you transfer your wine. With this unit, you now have the ability to transfer wine side by side from a glass carboy or an open-top fermenter to receiving glass carboy. You can even transfer wine from the floor to an elevated surface. This avoids the need to lift a heavy filled carboy! The All in One can transfer from virtually any container, as long as it is transferring into a glass carboy that can withstand the vacuum pressure. Before using your new pump for the first time, make sure to review all instructions outlined in this manual. If you are having trouble getting set up, videos are available on allinonewinepump.com. Or you can contact us directly at Allinonewinepump.com We recommend you practice with water first to gain experience and an understanding of how the pump works. 1. Sanitize the unit (Section 2.3) (When testing the unit with water, forgo the sanitization process until you learn how to set-up the All in One Wine Pump. Otherwise, when using the pump with wine, as always, the first step is to sanitize the tubing, racking canes and your glass carboy. 2. Connect your vacuum tubing by matching BLUE to BLUE on the overflow container and matching RED to RED to the #6.5 bung. 3. Connect your wine transfer tubing to the racking cane and the other end to the racking cane that is inserted in the #6.5 bung. 4. Insert the #6.5 bung into the receiving glass carboy. Push downward on the bung to ensure you have a good seal. 5. Insert the racking cane into your carboy of wine. 6. Turn the unit on. 7. Wine will start to flow from the full vessel to the empty one. 8. With the installation of the vacuum control valve (sold separately,) you can slow the flow down as it reaches the top. This will give you your desired filllevel and will prevent wine from entering the vacuum tubing. 9. Once the receiving vessel is full, press the vacuum release valve to stop flow and stop the vacuum. 10. Turn off the unit. Remove the #6.5 bung assembly, top up the vessel and replace your bung with air-lock or a solid bung. If you are unable to top up your vessel at this time, a headspace eliminator is available at allinonewinepump.com 11. Rinse the wine transfer tubing with warm water and hang dry. The vacuum tubing will not need rinsing unless wine has been sucked through into the overflow container. Racking/ transferring from a large vessel to a smaller vessel. When the wine transfer is complete and the bung racking assembly is left in the receiving carboy, wine could be sucked back through the wine transfer tubing and into the donor carboy in an attempt at equilibrium between the two vessels. This may happen even when the pump is shut off. To prevent this: Lift the racking cane out of the wine in the donor vessel to get a small amount of air in the wine transfer line. Or remove the #6.5 bung racking assembly and set it aside or in the next receiving carboy. Note: The All in One Wine Pump can also be used to transfer wine into plastic (PET) carboys. Please visit allinonewinepump.com for the the Plastic (PET) Carboy Transfer Kit.
10 3.4 Racking/ Transferring Wine into an oak barrel or sanke keg with the All in One Wine Pump The All in One Wine Pump makes it very simple for you transfer your wine from any vessel to an oak barrel or sanke keg. 1. Sanitize the unit (Section 2.3) 2. Connect your vacuum tubing by matching BLUE to BLUE on the overflow container and matching RED to RED to the bung racking assembly (see helpful tips.) 3. Connect your wine transfer tubing to the racking cane and the other end to the racking cane that is inserted in the bung racking assembly. 4. Insert the bung racking assembly into the receiving barrel or sanke keg. Push downward on the bung to ensure you have a good seal. 5. Insert the racking cane into your vessel of wine. 6. Turn the unit on. 7. Wine will start to flow from the full vessel to the empty one. 8. Unlike glass carboys, determining when an oak barrel or sanke is full can be difficult. When using the All in One Wine Pump for racking into the aforementioned vessels, continue to transfer the wine into the vessel until you see wine being sucked into the overflow container. At this point immediately activate the vacuum release valve to stop the flow. Remove the bung racking assembly, top up your barrel or keg as needed and replace you airlock or bung. 9. Rinse the wine transfer tubing, vacuum tubing and overflow container (if needed) with warm water and hang dry. Helpful tips: For best performance, we encourage you to contact us to determine the best fitting bung for the bung racking assembly. We can custom fit your particular barrel or keg. At some point in the transfer into your barrel or keg, activate the vacuum release valve to stop the flow and remove the bung to monitor the filllevel. This will help you be prepared to activate the vacuum release valve once the barrel or keg is full.
 3.")
11 3.5 Bottling Wine with the All in One Wine Pump 1. Place your full vessel of wine lower than the surface you are bottling (on the floor). This allows excess wine in the bottle to be sucked back into the bucket or carboy below by way of gravity. 2. Sanitize the unit (Section 2.3) 3. Connect your vacuum tubing by matching BLUE to BLUE on the over-flow container and matching RED to RED to the GREEN wine bottle filler assembly. 4. Connect one end of your wine transfer tubing the racking cane. Connect the other end of your wine transfer tubing to the vacuum racking elbow on the GREEN wine bottle filler assembly. 5. Insert the racking cane into your wine to be bottled. 6. Turn the unit on. No wine will flow at this time. 7. Place the GREEN bottle filler assembly in the mouth of the bottleslightly. No need to put the GREEN rubber stopper in all of the way (this makes it easy to remove once your bottle has been filled.) 8. Once the GREEN rubber stopper makes a seal, your bottle will begin to fill. (When working with red wines in green bottles, we recommend placing a light behind your bottles so you can monitor filllevels.) 9. Pay close attention as your bottle is being filled. When the wine comes in contact with the filler tube or reaches the top of the bottle, immediately activate the vacuum release button. Wait 1-3 seconds for excess wine to be sucked back into the bucket or carboy and remove the GREEN bottle filler assembly. 10. Continue to hold in the vacuum release button as you move between bottles. 11. When bottling is finished, simply rinse your tubing with warm water and hang dry. Helpful Tips: In the event of an over-fill, use a two milliliter transfer pipette to remove excess wine to the appropriate fill-level. With the purchase of the precision vacuum control valve, your fill-rate can be adjusted to a rate you are comfortable with. Otherwise, once the bottle is half-full, briefly activate the vacuum release valve to slow the flow. This will better prepare you for when the bottle is filled. The vacuum release will need to be activated once more to stop the flow.
12 3.6 Degassing Why Degas? During Fermentation, the yeast converts sugars into alcohol and carbon dioxide (CO2), literally supersaturating the young wine with CO2. This is the reason why most winemakers who taste young wine will detect a sharp, very bitter, almost acidic flavor profile. Removing enough CO2 by degassing your wine will mellow and soften the wine by allowing the desired tastes and aromas of the grape to come forward. Degassing Kit Wines Degassing has become a very important part of Kit wine making. Wine kits recommend bottling the wine in less than a month after fermentation and stabilization. This time frame is not nearly long enough for the CO2 to disperse on its own. Wine kit manufacturers have now added degassing as a step in their instructions. Unfortunately, degassing by hand is a long tedious process that is rarely successful. The use of drill mounted degassing wands can actually stir oxygen into the wine, potentially causing oxidation. The All in One Pump is a sealed unit- meaning no oxygen touches the wine during this or any of the other All in One Pump s processes. It is an easy and effective method of degassing wine that can speed up the aging process. Simply by using the pump for racking from one carboy to another, CO2 is automatically dispersed. Splash-racking the wine into the receiving carboy with our splash-racking accessory will also assist in removing the CO2. This can all be done while our sealed unit protects the wine from oxidation. Cut the racking cane in the #6.5 bung racking assembly so it protrudes out of the bottom of the #6.5 bung Wine will fall from the racking cane into the carboy assisting in removal of CO Filtration with Your All in One Wine Pump Should I Filter? Early-drinking wines should be filtered to avoid deposits settling in the bottle. Kit-wines and wines made from concentrates fall in this category and generally require filtration. Most four to six-week wine kits will continue to drop sediment even if fining agents are used. Most winemakers filter their wine to enhance its appearance or polish their wine. Typically, five micron filters are used for dark reds or a heavy bodied wine; while 1 micron filters are normally used for fruit or white wines. You can get crystal clear, competition worthy results in minutes by filtering your wine while you rack/transfer it! We highly recommend the following filter housing and filters, which can be added to the All in One Wine Pump. We ve listed the part numbers that we recommended from filterfast.com below: FILTER HOUSING WRENCH- SW-1A BRACKET FILTER - 1 MICRON = P1 FILTER - 5 MICRON = P5 Barb fittings (1/4 NPT to 3/8 barb) needed to connect the filter to the All in One Wine Pump along with additional tubing can be found at allinonewinepump.com.

13 3.8 Filtration Set-up & Process With the addition of an in-line filter to your existing All in One Wine Pump set-up, you now have the ability to filter your wine as you transfer it from one vessel to another. Note: An extra piece of 3/8 wine transfer tubing is needed to complete the filtration setup. This can be found at your local home winemaking store, or at Allinonewinepump.com. 1. Tightly wrap Teflon tape around the threads of your 3/8 barb fittings. 2. Screw barb fittings into the filter housing lid until it is snug. (The lid is plastic, over-tightening could result in breakage of the lid.) 3. Install mounting bracket on to the filter housing lid. Be sure to use all four screws. 4. Insert the O-ring into the lid being sure that it is properly seated. 5. Sanitize the lid and filter housing with a no-rinse sanitizer (Section 2.3.) The filter is packaged in a clean room and should not need sanitized. 6. Insert the filter cartridge into filter the housing (no special orientation) and screw the lid on. 7. Mount the filter to a work bench using all four screws to ensure stability. 8. Sanitize the receiving vessel. Sanitize racking cane and wine transfer tubing by spraying no-rinse sanitizer solution into the tubing ensuring the inside is completely coated. 9. Connect the wine transfer tubing to your racking cane and the other end of the tubing to the barb fitting on the filter. (There should be an arrow on the lid of the filter housing indicating which direction liquid is supposed to flow.) 10. Connect another piece of wine transfer tubing to the other barb fitting. Connect the other end of this tubing to the racking cane in the #7.0 bung racking assembly. 11. Attach vacuum tubing by matching BLUE to BLUE and RED to RED. 12. Insert your racking cane into the wine. Insert the bung racking assembly into the receiving carboy. (Push downward on the bung to ensure a tight seal is achieved.) 13. Turn the unit on. 14. Wine will begin to flow through the filter and into the receiving vessel. 15. Once the donor carboy is empty, activate vacuum release and remove #7.0 bung racking assembly from the receiving carboy. Top up you vessel and replace air-lock. 16. Once the filtration process is complete, disassemble and rinse the lid, filter housing, and wine transfer tubing with warm water and allow it to dry before storing. Discard filter cartridge. Helpful Tips: One of the main reasons for wine failing to flow through the filter is the lid not being properly tightened onto the filter housing. We recommend once the O-ring is installed and the filter housing has been tightened appropriately, use a permanent marker to draw a line on the lid and filter housing. By matching this line up in future uses, it ensures the lid has been tightened enough, and the O-ring has been properly seated. By mounting the filter housing to a sturdy surface such a work bench, or a board, this assists you in getting the lid tightly screwed on the filter housing. By using the precision vacuum valve you are able to slow down the process of filtration. This improves your overall filtration and you will notice less bubbling throughout the housing and lines.
WORLD VINYARDS WINE KITS
 WORLD VINYARDS WINE KITS INSTRUCTIONS PRIMARY FIRMENTATION Ensure that your primary fermenter is capable of holding at least 30 litres (7.9 US gallons) of volume. Pre-mark the primary fermenter at 23 litres
Heron Bay Ultra Premium 6 Week Wine Kit
 Heron Bay Ultra Premium 6 Week Wine Kit 1. PRIMARY FERMENTER: Food grade plastic bucket of at least 30 litres (8 US GAL.) capacity. Use a lid to cover. 2. CARBOY: 23 litre (6 US GAL.) glass, narrow necked
IMPORTANT SAFEGUARDS. 3. To protect against fire, electric shock and injury to persons do not immerse cord, plug or unit in water or other liquid.
 IMPORTANT SAFEGUARDS When using electrical appliances, basic precautions should always be followed, including the following: 1. Read all instructions. 2. Make sure that your outlet voltage corresponds
Wine, Dry Red Recipe for 20 gallons, SteveG revised 2016-Sep-1
 Wine, Dry Red Recipe for 20 gallons, SteveG revised 2016-Sep-1 This recipe is for using 3 boxes of juice (called WineKit on Amazon.com). Each box of juice produce ~6+ gallons of wine. This recipe will
Debris on equipment can harbor micro-organisms that could spoil your homemade ginger beer, even with proper sanitation.
 Homepage Brewing Steps Preparation Alcoholic Ginger Beer Non-Alcoholic Ginger Beer Cooling Fermentation Bottling BREWING PREPARATION Debris on equipment can harbor micro-organisms that could spoil your
User Manual. Thermo Pump System Coffee Brewers User Manual. Models: 177C10, 177C15 04/2018. Please read and keep these instructions. Indoor use only.
 Thermo Pump System Coffee Brewers User Manual Models: 177C10, 177C15 04/2018 Please read and keep these instructions. Indoor use only. www.avantcoequipment.com 1 Parts Diagram 177C15 2 5 177C10 3 4 6 4
OPERATING MANUAL. Sample PRO 100 Series. Electric Heating. Applies to Versions: SPE1*, SPE2, SPE4, SPE6
 OPERATING MANUAL Sample PRO 100 Series Electric Heating Applies to Versions: SPE1*, SPE2, SPE4, SPE6 NOTE: All electrically heated roasters in the Sample PRO 100 Series are modular and this manual applies
IMPORTANT INSTRUCTIONS MODE D EMPLOI IMPORTANT INSTRUCIONES IMPORTANTES ISTRUZIONI IMPORTANTI
 MOKA 22-04-2003 10:10 Pagina 1 IMPORTANT INSTRUCTIONS SAVE THESE INSTRUCTIONS MODE D EMPLOI IMPORTANT CONSERVEZ LES PRESENTES INSTRUCTIONS INSTRUCIONES IMPORTANTES GUARDE ESTAS INSTRUCCIONES ISTRUZIONI
Please read all directions before using the product and retain this guide for reference. This product is intended for household use only.
 Wine Gift Set User Guide IVAWINESET05 Thank you for purchasing the Ivation Wine Gift Set. This User Guide is intended to provide you with guidelines to ensure that operation of this product is safe and
5KEK1322 W A_v08.indd 1 5/13/16 2:25 PM
 5KEK1322 W10878653A_v08.indd 1 PARTS AND FEATURES PARTS AND ACCESSORIES Tea steeper lid (center section of lid with handle) Kettle lid (outer section) Stainless steel lime scale filter Removable stainless
12 CUP COFFEE MAKER User Guide
 BRAND 12 CUP COFFEE MAKER User Guide Item: 740553 Ginnys.com 800-544-1590 Facebook.com/GinnysBrand Pinterest.com/GinnysBrand Ginnys.com/Blog Welcome to the world of full-flavored coffee with the Ginny
Coffeemaker. Coffeemaker Safety... 2 Parts and Features... 3 Using Your Coffeemaker... 4 Cleaning Your Coffeemaker... 4 Customer Service...
 Coffeemaker Coffeemaker Safety... 2 Parts and Features... 3 Using Your Coffeemaker... 4 Cleaning Your Coffeemaker... 4 Customer Service... 6 In USA: 1-800-851-8900 In Canada: 1-800-267-2826 840069400 Coffeemaker
12 CUP COFFEEMAKER User Guide
 BRAND 12 CUP COFFEEMAKER User Guide Item: 757147 Ginnys.com 800-544-1590 Facebook.com/GinnysBrand Pinterest.com/GinnysBrand Welcome to the world of full-flavored coffee with the Ginny s Brand 12-Cup Coffeemaker!
Coffee Grinder Instruction Manual
 Coffee Grinder Instruction Manual CoffeeGrinder Manual-English Only.indd 1 07/01/2016 14:14:39 Savisto Home Coffee Grinder Voltage Supply: 220-240V~ 50/60Hz Power Consumption: 150W Eng Please read through
1. IMPORTANT SAFEGUARDS When using electrical appliances, basic safety precautions should always be followed to reduce the risk of fire, electric
 1. IMPORTANT SAFEGUARDS When using electrical appliances, basic safety precautions should always be followed to reduce the risk of fire, electric shock, and/pr injury to persons including the following:
Booklet_TCG-357_ENG.qxd 9/8/08 11:19 AM Page 1 COFFEE/SPICE GRINDER. Instruction Booklet. Model: TCG-357
 Booklet_TCG-357_ENG.qxd 9/8/08 11:19 AM Page 1 COFFEE/SPICE GRINDER Instruction Booklet Model: TCG-357 Booklet_TCG-357_ENG.qxd 9/8/08 11:19 AM Page 2 IMPORTANT SAFEGUARDS When using electrical appliances,
Important Safety Information
 Thank you for purchasing the Knox KN-SMM01 Soy Milk & Soup Maker! Please read the instructions carefully before your first use of this product. Important Safety Information 1. Make sure electricity supply
Wi-Fi Coffee Maker. Model# GCMW-4750 USER MANUAL
 Wi-Fi Coffee Maker Model# GCMW-4750 USER MANUAL Read this manual thoroughly before using and save it for future reference Model: GCMW-4750 2018 Gourmia www.gourmia.com The Steelstone Group Brooklyn, NY
MODELS 1315 & 1315-S La Pavoni CLUB COMBO
 IMPORTANT WARNINGS MODELS 1315 & 1315-S La Pavoni CLUB COMBO DUET Never operate your espresso machine without water in the tank. This may cause premature pump failure. Do not allow the power cord to come
Learn to Home Brew: A Series of Tutorials Using Mead
 Learn to Home Brew: A Series of Tutorials Using Mead I wanted to learn to make red wine, but since I had never done so and did not have nearby friends to brew with, I decided to teach myself using online
5KEK1522 W A_01_EN.indd 1 11/16/12 1:22 PM
 5KEK1522 Water Kettle INSTRUCTIONS Table of Contents water KEttle SAFETY Important safeguards...6 Electrical requirements...7 Electrical equipment waste disposal...7 PARTS AND FEATURES Parts and accessories...8
Coffee Burr Grinder. Model #559. Instructions. Warranty
 Coffee Burr Grinder Model #559 Instructions Warranty IMPORTANT SAFEGUARDS When using electrical appliances, basic safety precautions should always be followed, including the following: 1. Read all instructions.
IF THERE IS ANY QUESTION ABOUT A CONDITION BEING SAFE OR UNSAFE, DO NOT OPERATE THIS PRODUCT!
 RO18BT 18 Quart Roaster Oven Operating Instructions READ ALL INSTRUCTIONS AND WARNINGS BEFORE USING THIS PRODUCT. This manual provides important information on proper operation & maintenance. Every effort
THE PANCAKE FACTORY. Model: PM-2
 THE PANCAKE FACTORY Model: PM-2 IMPORTANT SAFEGUARDS When using electrical appliances, basic safety precautions should always be followed including the following: 1. Read all instructions. 2. Do not touch
COFFEE MAKER INSTRUCTION MANUAL CM4682-V
 COFFEE MAKER INSTRUCTION MANUAL CM4682-V IMPORTANT SAFEGUARDS Before using the electrical appliance, the following basic precautions should always be followed including the following: 1. Read all instructions.
Electric Two-Speed Drink Mixer
 Electric Two-Speed Drink Mixer MS2090 Series Before use, please read this manual thoroughly and save for future reference. ovente.com Electric Two-Speed Drink Mixer MS2090 Series 2 ovente.com ELECTRIC
User Manual. Stainless Steel Coffee Urn. Models: 177CU30 11/2018. Please read and keep these instructions. Indoor use only.
 Stainless Steel Coffee Urn Models: 177CU30 11/2018 Please read and keep these instructions. Indoor use only. www.avantcoequipment.com 1 NOTE: Save these instructions for future reference. Index Important
5 Litre Party Keg Manual
 5 Litre Party Keg Manual These compact party kegs let you keg your beer and serve it on tap without the need for gas bottles, pressure regulators, cooler plates with ice and a mess of hose pipes and couplers.
The Scoop 2-Way Brewer
 READ BEFORE USE The Scoop 2-Way Brewer Visit www.hamiltonbeach.in for our complete line of products and Use and Care Guides as well as delicious recipes, tips, and other helpful information! Questions?
COLD BREW COFFEE MAKER. Model# GCM-7800 USER MANUAL
 COLD BREW COFFEE MAKER Model# GCM-7800 USER MANUAL Read this manual thoroughly before using and save it for future reference FOR CUSTOMER SERVICE QUESTIONS OR COMMENTS VISIT US @ GOURMIA.COM INFO@GOURMIA.COM
Necessary equipment. - Food grade fermenter or bucket with airtight lid - Airlock - Syphon tube - Bottles or a pressure barrel (keg) with S30 valve
 with S30 valve") Available from www.home-brew-online Necessary equipment - Food grade fermenter or bucket with airtight lid - Airlock - Syphon tube - Bottles or a pressure barrel (keg) with S30 valve A fermenter/bucket
Available from www.home-brew-online Necessary equipment - Food grade fermenter or bucket with airtight lid - Airlock - Syphon tube - Bottles or a pressure barrel (keg) with S30 valve A fermenter/bucket
Shotmeister Owner s Manual. The Sleekest Design, Pouring the Coldest Shots
 Shotmeister Owner s Manual The Sleekest Design, Pouring the Coldest Shots Thank you for purchasing a Jägermeister Shotmeister! REGISTRATION INFORMATION Register your Jägermeister Shotmeister Online: at
Single-Serve Coffee Maker
 840251801 Single-Serve Coffee Maker IMPORTANT SAFEGUARDS When using electrical appliances, basic safety precautions should always be followed to reduce the risk of fire, electric shock, and/or injury to
COFFEE GRINDER. Owner s Manual
 COFFEE GRINDER Owner s Manual 4 4 FEATURES Bean Hopper Lid Bean Hopper Grinder Start/Stop Button Bean Hopper Holder Bean Hopper Release Button Grinding Timer Dial Coffee Powder Outlet 0 Grind Thickness
SPUD MASHER User Guide
 BRAND SPUD MASHER User Guide Item: 742487 Recipes Inside! Ginnys.com 800-544-1590 Facebook.com/GinnysBrand Pinterest.com/GinnysBrand Ginnys.com/Blog Thank you for purchasing a Ginny s Brand Spud Masher.
PROFESSIONAL WC400. For your safety and continued enjoyment of this product, always read the instruction book carefully before using.
 PROFESSIONAL Wine Center WC400 For your safety and continued enjoyment of this product, always read the instruction book carefully before using. IMPORTANT SAFEGUARDS When using electrical appliances, basic
Get Started. Better Everyday ECAM23260
 Better Everyday Get Started This short guide is not intended to explain all the functions of the appliance. Please read all the owner s instruction booklet before use. Video available on www.youtube.com/delonghiusa
WE CAN HELP. Smart Coffee Maker User Manual. Can t connect? Need help? DO NOT RETURN THIS PRODUCT TO THE STORE
 Can t connect? Need help? Wi-Fi Date Code: 01/19 Smart Coffee Maker User Manual WE CAN HELP DO NOT RETURN THIS PRODUCT TO THE STORE Call 1-800-757-1440 Mon-Fri 9:00-5:00 EST (US) or email info@atomiusa.com
SUCCESSFUL BOTTLING by Lum Eisenman
 SUCCESSFUL BOTTLING by Lum Eisenman Light-bodied, white table wines and most blush wines are bottled a few months after harvest. Heavier-bodied white table wines, such as Chardonnay and Sauvignon Blanc,
TABLE OF CONTENTS HAND MIXER SAFETY
 5KHM926 2 HAND MIXER INSTRUCTIONS TABLE OF CONTENTS HAND MIXER SAFETY...2 Important Safeguards...3 Electrical Requirements...3 PARTS AND FEATURES...4 ACCESSORY GUIDE...5 SETTING UP YOUR HAND MIXER Attaching
INSTRUCTION MANUAL AND RECIPE BOOK CORN DOG MAKER CDM-1 SMART PLANET PLEASE READ THESE INSTRUCTIONS CAREFULLY AND RETAIN FOR FUTURE REFERENCE.
 INSTRUCTION MANUAL AND RECIPE BOOK CORN DOG MAKER CDM-1 SMART PLANET PLEASE READ THESE INSTRUCTIONS CAREFULLY AND RETAIN FOR FUTURE REFERENCE. IMPORTANT SAFEGUARDS Read all instructions before using the
5KCG0702 W A_Final.indd 1 8/4/15 8:35 AM
 5KCG0702 PARTS AND FEATURES PARTS AND ACCESSORIES Hopper lid Easy access stainless steel burrs 200 g glass hopper 15 grind settings Die cast metal body Grind control dial Power switch Faceplate assembly
User Manual. Stainless Steel Coffee Urns. Models: 177CU30, 177CU55, 177CU110 04/2018. Please read and keep these instructions. Indoor use only.
 Stainless Steel Coffee Urns Models: 177CU30, 177CU55, 177CU110 04/2018 Please read and keep these instructions. Indoor use only. www.avantcoequipment.com 1 NOTE: Save these instructions for future reference.
Pellet Pro 12 & 18 Lengths Large 35lb Hopper Assembly Operation Manual
 Pellet Pro 12 & 18 Lengths Large 35lb Hopper Assembly Operation Manual Now with our exclusive PID Controller & Universal Mounting Capabilities! FOR OUTDOOR USE ONLY Disclaimer: The hopper assembly is used
INSTRUCTION MANUAL MODELS: RT-30, RT-36, RT-48, RT-60 & RT-72 REVISED APRIL, 2003 *PLEASE RETAIN FOR FUTURE REFERENCE
 INSTRUCTION MANUAL MODELS: RT-30, RT-36, RT-48, RT-60 & RT-72 REVISED APRIL, 2003 *PLEASE RETAIN FOR FUTURE REFERENCE THANK YOU for purchasing this quality product. Your Crown Verity Inc. rotisserie will
MBAA DISTRICT ST. LOUIS. Home Brewing System. Rev 1.5 3/6/2010
 MBAA DISTRICT ST. LOUIS Home Brewing System Rev 1.5 3/6/2010 This document is a guide to use and cleaning of the brewing system. Comments on safe use of this system are included to make you aware of many,
MINI JET WINE FILTER. Plug in power supply IMPORTANT NOTICE M A N U F A C T U R I N G I N C.
 The fine art of filtration. M A N U F A C T U R I N G I N C. MINI JET WINE FILTER Plug in power supply M A N U F A C T U R I N G I N C. 365 Franklin Blvd Cambridge, Ontario Canada N1R 8G7 Tel: 519-622-1166
User Manual. Beer Keg Dispenser User s Manual. Beer Kegs KEGERATRB, KEGERATRS
 Beer Keg Dispenser User s Manual Beer Kegs KEGERATRB, KEGERATRS 05/2015 Recommended for household use only. Please read the manual thoroughly prior to equipment set-up, operation and maintenance. - 1 -
Manual Spark Ignition (MSI) Kit For Use only with Thermocouple Manual Safety (TMSI) UL Approved Fire Pit Pans with Burning Spur
 Kit For Use only with Thermocouple Manual Safety (TMSI) UL Approved Fire Pit Pans with Burning Spur") AAA Battery MODEL: MSI-BSTMSI Manual Spark Ignition (MSI) Kit For Use only with Manual Safety (TMSI) UL Approved Fire Pit Pans with Burning Spur Installation and Operating Instructions IF YOU CANNOT READ
AAA Battery MODEL: MSI-BSTMSI Manual Spark Ignition (MSI) Kit For Use only with Manual Safety (TMSI) UL Approved Fire Pit Pans with Burning Spur Installation and Operating Instructions IF YOU CANNOT READ
Programmable Conical Burr Mill CBM-18
 Programmable Conical Burr Mill CBM-18 IMPORTANT SAFEGUARDS When using electrical appliances, basic safety precautions should always be followed, including the following: 1. Read all instructions. 2. To
Thank you for your purchase!
 CM4200S Thank you for your purchase! www.prodprotect.com/blackanddecker Should you have any questions or concerns with your new product, please call our Customer Service Line at 1-800-465-6070 (US and
IMPORTANT SAFEGUARDS. When using electrical appliances, basic safety precautions should always be followed, including the following:
 IMPORTANT SAFEGUARDS When using electrical appliances, basic safety precautions should always be followed, including the following: 1.Read all instructions. 2.Do not touch hot surfaces. Use handles or
Owner's Manual: Stainless Steel Rotisserie Kit for Kenmore Elite & Kenmore Premium Grills
 Owner's Manual: Stainless Steel Rotisserie Kit for Kenmore Elite & Kenmore Premium Grills 141.158031 for 3/4 Burner Kenmore and Kenmore Elite Grills: 141.15804 for 5/6 Burner Kenmore and Kenmore Elite
Double Coffeemaker Instruction Manual
 BRAND Double Coffeemaker Instruction Manual Item 710431 Ginnys.com 1.800.544.1590 Thank you for purchasing a Ginny s Brand Double Coffeemaker. With two 12-cup carafes, you ll easily keep enough piping-hot
phd Pitcher UltraWater Owner s Manual Delicious Great Tasting Antioxidant Alkaline Energized
 Owner s Manual UltraWater phd Pitcher Delicious Great Tasting Antioxidant Alkaline Energized READ ME FIRST! 1. Be sure to flush your UltraWater filter before using the first time. (See Instructions for
MR.BEER Hard Cider. You ll need the following:
 Instructions These instructions will familiarize you with the HARD CIDER BREWING PROCEDURES of the MR.BEER Home Brewing System. The included recipe will produce about 2 gallons (8 quarts) of 3.0% alc/vol
5 GALLON WATER/ALCOHOL DISTILLER
 5 GALLON WATER/ALCOHOL DISTILLER! ATTENTION! PLEASE READ THESE INSTRUCTIONS BEFORE USING THIS DEVICE Model# 048-GM-48371 OWNER S MANUAL NOTICE: If your package is missing parts or you are having issues
MODEL# GMF255 MOKA POT MILK FROTHER. PHOTO OF PRODUCT
 MODEL# GMF255 MOKA POT MILK FROTHER www.gourmia.com PHOTO OF PRODUCT 2016 Gourmia www.gourmia.com The Steelstone Group Brooklyn, NY Welcome to the World of Espresso & Milk Frothers from Gourmia! All rights
Deluxe Hand Pump Pressurized Beer Line Cleaning Kit Instruction Manual
 Deluxe Hand Pump Pressurized Beer Line Cleaning Kit Instruction Manual 1. Cleaning Bottle 6. Siphon Tube 2. Pump 7. Screw Cap 3. Duplex Coupler 8. Faucet Brush 4. Plastic Hose Barb 9. 3/16" I.D. Plastic
Installation and User Instructions Flushing System Kit
 Installation and User Instructions Flushing System Kit Model: ACFS Part No. 102532 Rev. A Copyright 2007 Dacor All rights reserved. All specifications are subject to change without notice. Dacor assumes
User Manual. Stainless Steel Coffee Urns. Models: 177CU55ETL, 177CU110ETL 10/2016. Please read and keep these instructions. Indoor use only.
 Intertek Stainless Steel Coffee Urns Models: 177CU55ETL, 177CU110ETL 10/2016 Please read and keep these instructions. Indoor use only. www.avantcoequipment.com 1 NOTE: Save these instructions for future
Micro Casa Semiautomatica
 Micro Casa Semiautomatica Training Manual Contents Overview 1 Models 1 Specifications 1 Features 1 Available accessories 1 Package contents 2 Semiautomatic parts 3 Assembly 4 Operating instructions 4 Starting
45-Cup Coffee Urn Big Brew Classic. Instruction Manual. Model ACU-045
 45-Cup Coffee Urn Big Brew Classic Instruction Manual Model ACU-045 Congratulations! Your Big Brew Classic will surely become one of the most practical appliances in your home or office. Enjoy fresh brewed
Professional Drink mixer
 Professional Drink mixer PDM Series For your safety and continued enjoyment of this product, always read the instruction book carefully before using. CONTENTS Important Safeguards............................
5KCM0512A W A_ENv10.indd 1 10/13/15 12:41 PM
 5KCM0512A PARTS AND FEATURES PARTS AND ACCESSORIES Scale readout display Timer readout display Plunger handle Power button Lid Plunger (stainless steel mesh filter with silicone seal not shown) Timer button
Hand Mixer. In U.S.A
 Hand Mixer In U.S.A. -800-85-8900 840074700 Mixer Safety IMPORTANT SAFEGUARDS When using electric appliances, basic safety precautions should always be followed, including the following:. Read all instructions.
BarAroma Coffee & Spice Grinder
 Breville is a registered trademark of Breville Pty. Ltd. ABN 98 000 092 928 Breville Customer Service Centre Australian Customers Breville Customer Service Centre PO Box 22 Botany NSW 2019 AUSTRALIA Customer
The Ultimate Edible Making Machine
 Now Includes Mighty Fast Organic Hemp Filter The Ultimate Edible Making Machine Like us on facebook: facebook.com/mightyfastherbalinfuser Follow Us on Twitter: https://twitter.com/herbalinfuser Follow
TILT-HEAD STAND MIXER FEATURES
 ENGLISH TILT-HEAD STAND MIXER FEATURES Speed Control Knob Motor Head Attachment Hub Attachment Knob Motor Head Locking Lever (not shown) Beater Shaft Flat Beater Beater Height Adjustment Screw Wire Whip
MODEL# GCG165 COFFEE GRINDER. PHOTO OF PRODUCT
 MODEL# GCG165 COFFEE GRINDER www.gourmia.com PHOTO OF PRODUCT 2016 Gourmia www.gourmia.com The Steelstone Group Brooklyn, NY Welcome to Delicious world of Coffee Grinders from Gourmia! All rights reserved.
PLEASE READ THIS MANUAL BEFORE USE. SAVE FOR FUTURE REFERENCE.
 8-CUP STAINLESS STEEL CARAFE Coffee Brewer Model: BV1900TS HOUSEHOLD USE ONLY Customer Service Line: 1-855-664-1252 2-year limited warranty bonavitaworld.com Simple to operate Optional pre-infusion cycle
Westec 4-Channel. Micro-Oxygenation Unit. The Ox Box
 Westec 4-Channel Micro-Oxygenation Unit The Ox Box Introduction...3 Shipping list...3 User Required...3 Installation...4 Oxygen Tank Hookup...4 Sparge Stone Setup...5 Transitioning the tank...6 Ox Box
INSTRUCTION MANUAL. Coffee Maker CMCM-100
 INSTRUCTION MANUAL Coffee Maker CMCM-100 CONTENTS Cusimax recommends safety first....1-2 Know your Cusimax product...3 Operating your Cusimax product 4 Care & cleaning 5 Cusimax Recommends Safety First
STAINLESS STEEL MILK FROTHER. Model: PKFMR11BK
 STAINLESS STEEL MILK FROTHER Model: PKFMR11BK WARNING! To reduce the risk of fire, electrical shock or injury to persons or property: Carefully read all instructions before operating your new product for
SPACEMAKER 8-CUP THERMAL UNDER THE CABINET COFFEEMAKER. Use & Care Manual SCM2000BD
 TM SPACEMAKER 8-CUP THERMAL UNDER THE CABINET COFFEEMAKER Use & Care Manual SCM2000BD Should you have any questions or concerns with your new product, please call our Customer Service Line at 1-800-231-9786
BREW EXPRESS OPERATION GUIDE. model no. BE-112
 BREW EXPRESS OPERATION GUIDE model no. BE-112 by CONTENTS 1. Safety 1 2. Features 2 3. Controller Functions 3 4. Start Up 4 5. Operation 5 6. Maintenance 6 7. Troubleshooting 7 8. Parts & Service 8 9.
assembly guide ELECTRIC Model Numbers: Estimated time required for assembly: 1 Hour (English) /05/09
 /05/09") assembly guide Model Numbers: 08601559 10601578 10601585 10601514 Estimated time required for assembly: 1 Hour ELECTRIC (English) 42804372 11/05/09 2 ASSEMBLY GUIDE A, B, C, Assembly: CAUTION: For your
assembly guide Model Numbers: 08601559 10601578 10601585 10601514 Estimated time required for assembly: 1 Hour ELECTRIC (English) 42804372 11/05/09 2 ASSEMBLY GUIDE A, B, C, Assembly: CAUTION: For your
INSTALLATION QUICK START GUIDE AND CHECKLIST ATTENTION!! DO NOT ATTEMPT A PARTIAL INSTALL.
 AND CHECKLIST CHECKLIST MUST BE SIGNED AND RETURNED TO RANCILIO GROUP NA TO RECEIVE PAYMENT FOR YOUR SERVICES ATTENTION!! Please check the site to make sure they are ready for installation before you begin
Wega Mininova 2003 Installation Instructions
 Wega Mininova 2003 Installation Instructions Thank you for purchasing a Wega Espresso Product. We are sure you will be happy with your purchase and the quality of coffee produced by our machines and grinders.
The Ultimate Edible Making Machine
 Now Includes Mighty Fast Organic Hemp Filter The Ultimate Edible Making Machine Like us on facebook: facebook.com/mightyfastherbalinfuser Follow Us on Twitter: https://twitter.com/herbalinfuser Follow
Downloaded from Quick Start Guide D512. Smart Decanter
 Quick Start Guide D52 Smart Decanter Contents Safety Precaution Cleaning Technical Data Correct Disposal of This Product Connecting Power Rechargeable Battery Installation Your isommelier 0 04 05 isommelier
JUICE EXTRACTOR BLENDER MODEL JEB-10
 JUICE EXTRACTOR BLENDER MODEL JEB-10 IMPORTANT SAFEGUARDS When using electrical appliances, basic safety precautions should always be followed including the following: 1. Read all instructions. 2. To protect
800W HIGH SPEED VACUUM BLENDING SYSTEM
 800W HIGH SPEED VACUUM BLENDING SYSTEM INSTRUCTIONS MODEL TEVBLF 1 MEET CHEF ENGLISH Todd English is a celebrated chef, restaurateur, author, and television personality. He has opened innovative and award-winning
BULL. ASSEMBLY & OPERATING INSTRUCTIONS
 BULL. Dutdaar Products Inc. "., Ontario, California 91761 ASSEMBLY & OPERATING INSTRUCTIONS Model No. 18038 7-Burner High Grade Commercial Stainless Steel Longhorn, LP Model No. 18039 7- Burner High Grade
INTRODUCTION. Your new smoker comes almost completely assembled. You will need to complete the assembly which includes:
 INTRODUCTION Congratulations on your purchase of this Smith & Wesson SMOKER, Model SWS032. With proper set-up, operation and maintenance, this smoker will provide you with years of cooking enjoyment. Your
STAINLESS STEEL GAS BARBECUE MODEL NO: SSBBQ4 USER GUIDE PART NO: /11
 STAINLESS STEEL GAS BARBECUE MODEL NO: SSBBQ4 PART NO: 6925310 USER GUIDE 2/11 INTRODUCTION Thank you for purchasing this CLARKE product. Before attempting to use this product, please read this manual
Installation & Parts Manual 2" & 3" High Capacity Strainers For Class 1, Petroleum Applications
 Installation & Parts Manual 2" & 3" High Capacity Strainers For Class 1, Petroleum Applications Installation: M200-20 www.lcmeter.com Table of Contents Description Page Number Introduction... 2 What LC
SG120 Model # Cup Stainless Steel Coffee Maker. Operating Instructions Product Registration Warranty
 SG120 Model #494 12-Cup Stainless Steel Coffee Maker Operating Instructions Product Registration Warranty IMPORTANT SAFEGUARDS When using electrical appliances, basic safety precautions should always be
User Guide TEA CATER. Your Dealer. U / EN Rev
 User Guide TEA CATER Your Dealer U / EN Rev 101115 1. Contents Tea Cater 1. Contents page 2 2. General 3 3. Function description 3 4. Start-up 3 5. Component overview 4 5. Function button overview 5-6
for Assembly, Operating & Maintenance of THIS CHARCOAL GRILL IS DESIGNED FOR OUTDOOR USE ONLY.
 Owner s Manual for Assembly, Operating & Maintenance of Model M-15AB Charcoal Grill www.bigjohngrills.com YOU MUST READ THIS OWNER S MANUAL BEFORE OPERATING YOUR CHARCOAL GRILL. WARNING: Do not ignite
Burr Grinder. Model #551. Instructions. Warranty
 Burr Grinder Model #551 Instructions Warranty IMPORTANT SAFEGUARDS When using electrical appliances, basic safety precautions should always be followed, including the following: 1. Read all instructions.
Folding Grill Stand Manual
 O u t d o o r G r i l l i n g P r o d u c t s Folding Grill Stand Manual MODEL: CFGS-150 IMPORTANT SAFETY INSTRUCTIONS READ AND SAVE THESE SAFETY INSTRUCTION BEFORE USING THIS GRILL STAND m DANGER: m Failure
MARQUE REFERENCE CODIC
 MARQUE REFERENCE CODIC : KALORIK : TKG OT 00BCRL : 50 EN ANGLAIS PROVISOIREMENT NOTICE LOGO 00L ELECTRIC OVEN WITH ROTISSERIE & LAMP & CONVECTION INSTRUCTION MANUAL Model No. TY000BCL 0-0V~ 50/60Hz 800W
Equipment Guide For Malt Extract Brewing
 Equipment Guide For Malt Extract Brewing Legal Notice No part of this ebook may be reproduced or transmitted in any form or by any means, electronic or mechanical, including photocopying, recording, or
INSTALLATION & OPERATING GUIDE
 SURE TAMP STEAM INSTALLATION & OPERATING GUIDE BUNN-O-MATIC CORPORATION POST OFFICE BOX 3227 SPRINGFIELD, ILLINOIS 6278-3227 PHONE: (217) 529-661 FAX: (217) 529-6644 http://www.bunn.com/espresso/index.html
BREW EXPRESS OPERATION GUIDE MODEL BE112
 BREW EXPRESS OPERATION GUIDE MODEL BE112 Contents 1. Safety 2. Features 3. Controller Functions 4. Start up 5. Operation 6. Maintenance 7. Troubleshooting 8. Parts & Service 9. Warranty & Registration
BZ35 Espresso Machine
 BZ35 Espresso Machine Operation Guide The Bezzera BZ35 is a quality automatic espresso coffee machine which has piped in water and drainage as well as consistent volumetric delivery of espresso. INSTALLING
BREW EXPRESS IMPORTANT NOTE: model no. BE-104 & BE-110. For more information see our instructional video online at
 BREW EXPRESS Operation GUIDE model no. BE-104 & BE-110 IMPORTANT NOTE: For more information see our instructional video online at www.brewexpress.com. Do not return this product to place of purchase without
3.5L Slow Cooker / GVALSC40. Instruction Manual
 3.5L Slow Cooker / GVALSC40 Instruction Manual Important Safety and General Instructions Please keep this user manual in a safe place along with your purchase receipt and carton for future reference. The
MTN Products. AquaCafé r (Touch Capsules) Installation & Operations Manual
 Installation & Operations Manual") MTN Products AquaCafé r (Touch Capsules) Installation & Operations Manual Table of Contents SPECIFICATIONS... 1 TOUCH PADS INSTRUCTIONS... 3 SET- UP INSTRUCTIONS... 4 BOTTLE INSTRUCTIONS... 5 INITIAL COLD
MTN Products AquaCafé r (Touch Capsules) Installation & Operations Manual Table of Contents SPECIFICATIONS... 1 TOUCH PADS INSTRUCTIONS... 3 SET- UP INSTRUCTIONS... 4 BOTTLE INSTRUCTIONS... 5 INITIAL COLD