LazyMan Gourmet Grills
|
|
|
- Dale Ford
- 6 years ago
- Views:
Transcription


1 LazyMan Gourmet Grills USE AND CARE GUIDE LM LM SERIES

2 WARNING READ THIS MANUAL CAREFULLY and completely before using your grill to reduce the risk of: 1. Fire 2. Burn hazard, personal injury, or property damage 3. Burned food or unpleasant cooking experiences 4. Unapproved installation or servicing THIS PRODUCT IS DESIGNED FOR OUTDOOR USE ONLY. Improper installation, adjustment, alteration, service, or maintenance can cause property damage, injury, or death. Read this manual thoroughly before installation, use, or servicing of this product DANGER IF YOU SMELL GAS: 1. Shut off all gas supply lines to the grill. 2. Extinguish any open flames. 3. Carefully open the hood. Use caution, as the hood may be HOT. 4. If the gas odor continues, keep everyone away from the grill and immediately call your gas company or fire department. WARNING 1. DO NOT store or use gasoline or any other flammable liquids in the vicinity of this or any other appliance. 2. Propane (LP) gas cylinders, not connected to the grill, should NOT be stored in the vicinity of this, or any other appliance. Propane cylinders must be stored outdoors. WARNING 1. The burning of gas cooking fuels generates by-products which are on the list of substances, known by some states, to cause cancer or reproductive harm. 2. To minimize exposure to such substances, always operate this appliance according to the use and care instructions found in this manual. 3. NOTE TO INSTALLERS: assure that grill owner receives this manual after installation. i
3 WARNING 1. Never use dented, rusty, or damaged propane cylinders. Never store additional or empty propane cylinders in the grill cabinet, the island enclosure, or in the vicinity of this or any other appliance. Never store propane cylinders indoors or on their sides. 2. Children should NEVER be left alone or unattended in the area where the grill is located. Place your grill well away from areas where children play. Do not store items that may be of interest to children, in or around the grill or island enclosure. 3. Never attempt to move the grill when hot. When in use, portions of the grill are hot enough to cause severe burns. 4. Always maintain the required clearances to combustibles as detailed in this manual. The grill is designed for outdoor use ONLY. Never use inside a garage, building, shed, breezeway, or other enclosed area. Do not use this grill under any overhead combustible construction. 5. Gas grills are not designed or certified to be used or installed on any recreational vehicle, portable trailers, boats, or any other moving installation. 6. Always have an ABC fire extinguisher accessible. Never attempt to extinguish a grease fire with water or other liquids. 7. Store your grill in a well ventilated area when not in use. If stored indoors, detach and leave propane cylinders OUTDOORS in a well ventilated area, away from heat or where children may have access to them. 8. Keep electrical supply cords and fuel supply hoses away from all heated surfaces. Electrical supply cords should be placed away from walkways to avoid a tripping hazard. 9. Do not repair or replace any part of this grill unless specifically recommended in this manual. 10. If this grill is installed by a professional installer or technician, be sure that he/she shows you where the gas supply shut-off valve is located. All gas lines must have a shut-off valve that is readily and easily accessible. If you smell gas, check for leaks IMMEDIATELY. Refer to section entitled Leak Test Procedure. Check leak with soap and water only. Never use an open flame to check for gas leaks. 11. When using a propane cylinder, inspect the gas supply hose prior to each use of the grill. If there is excessive abrasion or wear, or the hose is cut, it must be replaced before using the grill. 12. Never remove the grounding prong from an electrical cord, or use this product with an ungrounded 2-prong adaptor. 13. THIS MANUAL MUST REMAIN WITH THE PRODUCT OWNER FOR FUTURE REFERENCE. To obtain replacement parts or service, contact: LazyMan Inc. 560 Independence Street, Belvidere, NJ Customer Service (908) (800) ii
4 TABLE OF CONTENTS Important Safety Precautions..1 Built-in Grill Application Requirements and Cutouts 2 Electrical Hook-Up (Built-In Models) 4 Freestanding Grill Application Requirements 4 Electrical Hook-Up (Freestanding Models)..4 Built-in Grill Island Installation.5 Gas Connections.7 Natural Gas (NG) Liquid Propane (LP)...7 Final Checks...9 Operation of Your Grill...11 Introduction. 11 Checklists 11 Lighting Your Grill Manual Lighting. 14 Preheating. 15 Direct Heat vs Indirect Heat...16 Using the Optional Rotisserie System...16 Cooking Temperature Chart. 19 Cleaning Your Grill...20 Troubleshooting.22 Replacing the Electronic Igniter 26 Exploded View Parts Lists..27 LazyMan Warranty Information 29 iii
5 IMPORTANT SAFETY PRECAUTIONS 1. Insure all tie down wires and/or packaging materials have been removed from the outside of the grill and the grill interior. 2. Avoid wearing loose fitting clothing or long sleeves while grilling. They could ignite. 3. Never leave the grill unattended while cooking. 4. Never touch the grill racks, hood, or surrounding metal surfaces with your bare hands while grilling. These surfaces will be HOT. 5. The use of an insulated glove or mitt is recommended while opening or operating the grill. Open the grill hood slowly to allow heat and smoke to escape before fully opening. 6. The grill hood must be fully opened before attempting to light the grill. Do not attempt to light with the grill hood closed as an explosion could occur. Do not lean over the grill when lighting. 7. Do not heat unopened food containers on the grill, as, pressure will build up and the container can explode. 8. Do not use aluminum foil on the grill racks. This will prevent proper ventilation and allow excessive heat to build inside the grill. Such heat can damage components of the grill. 9. Use caution when cooking excessively fatty meats, as, the oils produced can cause flare-ups. Keep a water spray bottle close by to reduce these flare-ups. Damage created by uncontrolled, internal fires is not covered under warranty. 10. Never remove the drip pan while grilling. Always assure that it is pushed all the way in. Hot grease can leak downward and produce a fire or explosion. The drip pan should be cleaned on a regular basis when the grill is cold. 11. Do not lean on the side shelves on freestanding applications. Do not place any load of over 25 pounds on side shelves. 12. If burner does not light within 5 seconds, turn gas off and wait 5 minutes before attempting to re-light. If any burner goes out during operation, turn burner off and check for adequate fuel. Wait 5 minutes before attempting to re-light. 13. When using portable LP gas cylinders, always turn off the main valve on the cylinder after each use. 14. Use caution when operating the grill in windy conditions. When hood is closed, wind can enter from the back and cause an overheating condition. This can damage the grill and its components. If windy conditions prevail, and the hood is closed, keep an eye on the temperature gages for a sudden drop or rise in temperature. This is a sign that the air flow has been interrupted. 15. This grill has been made with the finest materials available and, as a result, this grill is HEAVY. Shipping weights for a 30 freestanding unit is between pounds. Always use two or more people when moving or installing this product. Failure to follow this instruction can result in back or other personal injuries. 16. The LazyMan LM210 Series grills arrive nearly fully assembled and require only minor assembly steps. Assure that ALL packaging materials have been removed before attempting to light the grill. This includes removing all shipping tie wraps, zip ties, cardboard, and the accessory carton. Remove the cooking grates and look for ALL internal packaging materials INSIDE the grill. Last, peel off all protective vinyl coating from ALL exterior and interior surfaces on the grill. 1
6 BUILT-IN APPLICATION REQUIREMENTS AND CUTOUTS All LazyMan grills are manufactured to very tight tolerances. To ensure the best possible fit, however, it is best to purchase and have the grill available for the contractor BEFORE constructing a new island. As a guideline, prepare your island cutout per the dimensions found in the chart above. The LazyMan LM210 Series built-in grill is intended to be mounted and installed in a built-in enclosure (island) made from NON-COMBUSTIBLE materials such as masonry, brick, or steel. For installations in wood or other combustible materials, LazyMan offers a stainless steel insulation kit. These kits add extended cutout requirements as shown in chart and will insulate most of the heat generated by the grill from the combustible construction. These kits are available from your local dealer and are identified as follows: 2
7 STAINLESS STEEL INSULATION KITS: SSIK-20- Insulation Kit for LM SSIK-28- Insulation Kit for LM SSIK-30- Insulation Kit for LM SSIK-40- Insulation Kit for LM The LM210 Series grill is designed to be placed in an island cutout that has a bottom in the cutout. The grill rests inside and on the bottom of the cutout. Additionally, access holes will need to be cut in the bottom or back to allow for pipe routing. COMBUSTIBLE MATERIALS: the grill should be mounted so that there are no combustible materials within 12 of the sides, front, or back of the grill. REAR HOOD CLEARANCE: Position the grill and cut-out so that there is a minimum of 6 of island surface at the rear and to the rear wall of the island (for Standard Hoods). This clearance is required to allow the hood to STANDARD HOOD ROLL TOP HOOD open properly. If your grill is equipped with a Roll Top Hood, a minimum of 1 of rear clearance is recommended for venting. See section entitled Important Safety Precautions, items #15 and #16. After unpacking, lift the grill into place. The cut-out dimensions provided should result in the grill side edges clearing the sides of the island cutout by 1/8 per side. Leave the grill partially out and away from the rear wall at this point. This will allow access for gas hook-ups. 3
8 The island/ enclosure should have ventilation holes to prevent gas build-up in the event of a leak. See Built-In Application Requirements and Cutouts Diagram for recommended cutouts. The MINIMUM vent size is 10 x 10 or an equivalent rectangular size creating 100 square inches in three places on the island enclosure. The deck ledges need to flat and level to prevent uneven burner flames and soot build-up inside the grill. Refer to ANSI Z21.58 Standard for Outdoor Cooking Gas Appliances and Section 1.7 Enclosures for Self- Contained LP-Gas Supply Systems. For rotisserie operation, a 120 Volt, 60 hertz, 15 amp GFI certified outdoor outlet must be mounted on a vertical wall within 30 of the rotisserie motor location. The rear vertical wall of the island, if present, is ideal. All electrical connections must be installed by a qualified electrician. Please note that the outlet is not required for the ignition function of the grill, as the ignition runs independently by battery. Although not required if the optional rotisserie system will not be used, it is always better to have an outlet installed and available for general purpose. ELECTRICAL HOOK-UP (BUILT-IN MODELS) For rotisserie operation, connect the 110V AC power cord of the rotisserie motor into the 120V Outdoor outlet. Always store the rotisserie motor in a dry place when not in use. FREESTANDING GRILL APPLICATION REQUIREMENTS Because of their mobility, freestanding grills are more versatile as they can be moved to various locations for convenience and accessibility. Here are a few points to consider when selecting a location: 1. Locate the grill in an open air environment. Do not locate under a breezeway, or inside a garage, building, or shed. Proper distance to combustibles must be maintained at all times (12 to sides, front, and back). Do not locate this grill under any combustible, overhead construction. 2. Select a location where prevailing winds come from either side of the grill or from the front. Do not face the back of the grill directly toward oncoming winds. When grilling with the hood closed, if so equipped, winds can enter from the back and disrupt air flow and cause overheating. Damage caused by this overheating is not covered under warranty. 3. Position the grill within 30 of an outdoor 120V electrical outlet for rotisserie operation. If this is not possible, then position grill such that when using an outdoor extension cord, the cord does not lay in a high traffic area. This cord can create a trip hazard. The cord can be taped to the ground securely to prevent any such hazard. Note that the ignition function of this grill is battery operated and does not rely on a 120V electrical outlet. The outlet is required for the rotisserie motor operation only. 4. If the freestanding grill is using Natural Gas (NG), position the grill in the vicinity of a gas outlet/valve to minimize the amount of piping required to hook up the grill. 5. See section entitled Unpacking and Set-up for more information on preparation or your grill. ELECTRICAL HOOK-UP (FREESTANDING MODELS) Use the above grill positioning guidelines to assure accessibility to an outdoor 120V electrical outlet and usage of outdoor extension cords. For rotisserie operation, connect the AC plug of the rotisserie motor into the 120V AC outlet. Always store the rotisserie motor in a dry place when not in use. 4
9 LM210 SERIES ISLAND INSTALLATION- BUILT-IN MODELS NOTE: Use this INSTALLATION section in conjunction with the following GAS CONNECTIONS section to assure that all gas considerations have been made before installing your grill. INSTALLATION- USING NG GAS: After the island has been constructed and built per the previous cutout recommendations and guidelines, it s now time to install the LazyMan 210 Series grill into the island. The above diagram shows a typical Natural Gas installation where the gas piping is routed through the back of the island and externally to the gas source. This routing can also be accomplished internally (inside the island) if the island is constructed with a hollow design and there is space between the back wall of the cutout and the back wall of the island. This grill is shipped with a ½ NPT (female) fitting at the end of the gas manifold for both NG connections and LP hose connections. It is also shipped with an NG regulator (for natural gas grills) and an LP regulator with hose for grills set up for liquid propane. It is highly recommended that a qualified plumber or gas technician make this installation and perform the gas hookup procedure. 1. Measure the distance from the back of the cutout to the back of the island. You will need a ½ pipe with ½ NPT male threads at both ends that match this distance plus 2. This pipe is called a nipple. Nipples come pre-threaded at both ends and are available in a variety of different lengths. 2. Use pipe joint compound or Teflon tape (to seal the threads) FOR ALL PIPE CONNECTIONS and install this first pipe into the fitting at the back of the grill. 3. Using two or more people, carefully lift the grill into the island cutout and slide the grill toward the back of the cutout. Allow the newly installed pipe to slide through the pre-cut hole or opening and through the back 5
10 wall of the island. Slide the grill all the way in so that the front of the grill is flush with the front of the island. 4. Make your first connection using a ½ NPT female elbow. Point this elbow downward if the main gas supply is near the ground. If the main gas supply is in a location other than the ground, point the elbow in that direction. 5. Install a short nipple into the open end of the elbow and install the supplied NG regulator at the end of this nipple. Make sure the regulator is installed so the arrow (marked on the regulator) is pointing to the grill, i.e., in the direction the gas will be flowing. 6. Measure the distance from the open end of the regulator to the ground and subtract 8 from this measurement to allow for the next 3 connections. This will be the length of your next nipple. 7. Install this nipple to the regulator and at the other end, install a ½ NPT female Tee connection. The third (downward) leg of the Tee is used to install a 3 minimum length Drip Leg with cap. This leg is required in many states and is used for periodic moisture relief. Check your local codes. This complete pipe routing should now be resting 1-2 inches above the ground. 8. Install the next nipple into the center opening of the Tee and run this connection to the gas source. IMPORTANT NOTE: If the gas source does not have a gas shut-off valve, then a new ½ quarter turn valve MUST be installed between the last gas pipe and the existing gas source. This gas valve should be installed by a qualified plumber or gas technician. See the next step. 9. If the gas source is a stubbed gas pipe coming from the side of the house or exit point, then THE GAS MUST BE TURNED OFF AT THE METER. A new quarter turn gas valve must be installed, either at the gas source or inline from the gas source in a convenient location. 10. Use the Leak Test Procedure found in the FINAL CHECKS section of this manual to check all gas connections prior to operation of this grill. INSTALLATION- USING LP GAS (LIQUID PROPANE-BOTTLE)- when using bottled LP, then use the LP regulator and hose equipped with the LP grill. The installation should begin the same as the NG installation where a ½ NPT pipe (threaded at both ends) is routed from the gas exit point at the rear of the grill through the rear of the island. A ½ NPT female elbow is then added to the end of the ½ pipe. At this point, the hard piping is complete. Connect the fitting at the end of the LP hose to the newly installed elbow. Use the above diagram for this hard piping requirement and connection of the LP hose. As previously mentioned, if the island is constructed in a hollow manner, and there is a hollow space between the back of the cutout and the back of the island, then the first hard piping can be routed directly DOWNWARD into the island interior. Additional fittings will be required. This piping can terminate with either a ½ NPT female elbow or a ½ NPT straight coupler. The LP hose can then be connected directly to the last fitting. Always assure that the LP hose is completely visible and accessible inside the island. 1. Use 2 or more people and lift the grill onto the top island surface. 2. Follow steps #1 through #4 of the NG piping installation. This portion of the installation completes the hard piping requirements and routes the piping through the back of the island. 3. Use pipe joint compound or Teflon tape on the fitting at the end of the LP hose and install directly to the ½ NPT female elbow at the rear of the island. 4. Use the Leak Test Procedure found in the FINAL CHECKS section of this manual to check all gas connections. INSTALLATION- USING LP (LIQUID PROPANE) BULK TANK- If you have ordered a grill configured for LP (Liquid Propane), then you have received an LP regulator and hose with your grill. If you plan to attach the grill directly to a bulk propane tank, then you cannot use the supplied hose. You must obtain a regulator from LazyMan Inc. Please order P/N This is a regulator which converts from NG to LP. Please use the instructions that come with the regulator for this conversion. Follow the same connection pattern shown above for NG connections. 6
11 GAS CONNECTIONS This grill has been factory pre-set to use either Propane Gas (LP) or Natural Gas (NG). It is critical that the gas you use matches the gas that the grill has been set up for. You can verify this by checking the label mounted on the right rear side of the grill. Ensure that the gas supplied meets minimum pressure requirements, as shown below, under full load: PRESSURE (WATER COLUMN INCHES) FUEL MAXIMUM MINIMUM LP NG 7 4 Both the regulator and the manifold orifices have been set for the type of gas specified on the label. If it is desired to convert to a different type of gas, a gas conversion kit must be obtained from LazyMan Inc. or from one of its dealers, and must be installed by a qualified technician. NATURAL GAS: LazyMan Inc. recommends that only a qualified professional performs the required gas hook-ups on this product. To ensure satisfactory performance, the gas supply line must be sized to accommodate the TOTAL BTU requirements of all the gas fired equipment that will be connected to this line. Minimum pipe size should be 1/2 I.D., however, 3/4" I.D. is recommended for the long runs and best performance. For this, a 3/4" FIP x 1/2 MIP reducer fitting will be required (not supplied). Calculate the total BTU output of all appliances that will be attached to this line and use the chart entitled Gas Supply Line Runs to determine allowable run line distances. Failure to meet these minimum run requirements will reduce the performance of the grill and any other appliances connected to this line. In general, always keep the supply line run as SHORT as possible. The longer the gas run line, the lower the gas pressure and the smaller number of BTU s the line can handle. MAXIMUM GAS PIPING LENGTH PIPING LENGTH (FEET, ¾ PIPE) TOTAL BTUS (ALL APPLIANCES ON LINE) , , , , , , , ,000 A gas shut-off valve must be installed between the gas appliances and the gas line in an easily accessible location. This valve should be installed by a qualified plumber. All pipe joints must be sealed with threading tape or pipe joint compound. The first 2 threads should be free and clear of any compound to avoid the compound from entering into the pipe. Never use threading compound on flare fittings. LIQUID PROPANE GAS: Grills set up for LP gas come equipped with an LP hose/regulator assembly for connection to a standard 20 lb (5 gal) LP gas cylinder. 7
12 GAS CONNECTIONS All fittings necessary to attach the hose assembly to the grill are included. BULK TANK LP: Some residences and/or commercial establishments use bulk propane cylinders and are permanently plumbed with LP connections. When this is the case, then a 4/11 regulator must be obtained and set for the proper gas type (LP). 4/11 regulators are convertible from NG to LP. To convert, follow the instructions provided with the regulat or. Order LazyMan P/N WARNING Do not change the regulator/ hose assembly or use any other assembly other than the one supplied with your LazyMan grill. Do not attempt to use a 5LP-A equipped regulator/hose assembly with a standard 510 POL cylinder/valve assembly. Do not store a spare LP gas cylinder under or near this appliance LP CYLINDER REQUIREMENTS: The LP cylinder must be constructed and marked in accordance with the U.S. Department of Transportation (DOT) specifications for LP cylinders and be designed for use with a Type 1 system only. When exchanging your cylinder for a refill, exchange only with a Type 1, 20 lb cylinder with an overfill protection device. Never use a cylinder with a damaged valve. A dented or rusty LP cylinder may be hazardous and should not be used. If in doubt, have it checked by your LP supplier. Always shut off the LP gas when finished using the grill, both at the grill valves and the LP cylinder valve. Cylinders must always be stored outdoors in a well ventilated area and out be of reach of children. If your grill is stored indoors, the LP cylinder must be removed and stored outdoors. LP CONNECTIONS: Make sure the LP cylinder valve is fully closed before connecting to the grill. It is possible for the valve to be partially open without releasing gas, but, as soon as the regulator is connected, gas can leak from the connection. Insert the regulator inlet into the cylinder valve and turn the black coupler clockwise until the coupler is hand tight. Do not over-tighten this connection. To disconnect the coupler, first make sure the cylinder valve is turned completely off. Turn the coupler counter-clockwise. The inlet will then disengage. Always leak test the connection after refilling or exchanging LP gas cylinders. See Leak Test Procedure. GAS LINE PURGING: After refilling or replacing an LP gas cylinder, it is always best to purge the system of air before attempting to light the grill. 8
13 GAS CONNECTIONS Make sure all grill controls are in the OFF position. Make sure the LP cylinder valve is turned OFF. Turn one or more of the grill burner valves to ON. This releases pressure in the system. Close the burner valve(s) back to the OFF position. For LP, turn the cylinder valve knob one complete turn (minimum) in the counterclockwise direction. Turn the LP cylinder valve to the ON position. Light the burners as usual, one at a time, by opening the valves slowly. DANGER! To prevent fire or explosion, DO NOT smoke or allow any potential source of ignition (sparks, electrical arcing, etc.) in the area while performing a leak test. Leak tests should be conducted outdoors only. NEVER conduct a leak test using fire or flame. FINAL CHECKS LEAK TEST PROCEDURE: Create a soapy solution of one part dish soap and three parts water. Confirm that all control knobs are in the OFF position. Turn on the fuel supply. For Natural Gas, turn the valve handle 1/4 turn so the handle is in-line with the pipe and gas flow. Apply the soap solution generously with a paint brush or squirt bottle on every connection and fitting. If bubbles appear to grow on any of the connections, then gas is escaping. Turn off gas supply immediately. FIXING A GAS LEAK: Make sure the main gas supply has been turned OFF. Turn all grill control knobs to HIGH to purge the system of any gas build-up, then return them to OFF. Wash off the soapy solution and then dry off. Tighten the loose joint or replace any fitting that may be suspect. For LP applications, do NOT attempt to repair any leaks found at the main cylinder valve. The LP cylinder needs to be replaced. Repeat the leak test procedure to confirm that no leaks are present. 9
14 GAS CONNECTIONS BURNER FLAME-AIR SHUTTER ADJUSTMENT Air flow that enters the burner is controlled by the Air Shutter. Each burner is installed, adjusted and tested in the factory prior to shipment. However, fluctuations in gas pressure, gas conversions, and gas quality can affect performance of the burner and adjustments to the flame height may be necessary. Flames should be blue in color and stable, with a slight yellow tip. The bright blue core should be about 3/8 tall with a total flame height of 1-1/2. The flames should burn quietly and not appear to lift up from the burner. If your flames do not match this description, use the following procedure. To Adjust: DANGER BE EXTREMELY CAREFUL AROUND HOT BURNERS AND ADJACENT GRILL PARTS. Air shutters are located near the brass valves at the front of each burner. Each burner needs to be adjusted separately. Begin by completely removing the drip pan and setting it aside. For the best view of the burners, remove the cooking grates and the Broilrite Flavor Enhancer plates. The valve and burner air shutter can be seen by looking upward at them from the front. You will see a small Phillips head screw which secures the air shutter. Loosen this screw. NOTE: the air shutter opening has been factory pre-set to the half-way position. Ignite this burner and observe the flame. By opening or closing the air shutter opening, the burner flame will change in color. If the flame is too YELLOW, this indicates a lack of air and excess carbon is being produced. OPEN up the air shutter by sliding it TO THE REAR. Use a flat screw driver or other long steel tool to accomplish this. DO NOT USE YOUR BARE HANDS OR FINGERS TO MAKE THIS ADJUSTMENT. See also Yellow Burner Flames in the Trouble Shooting section. If the flame is noisy (sounds like a torch) and tends to lift up, then the air shutter is delivering TOO MUCH air. Slide the air shutter FORWARD slightly to CLOSE up the opening and reduce the air flow. Your goal is to create the most efficient, quiet, soft blue flame. After adjusting each burner, tighten up the Phillips head screw which secures the air shutter. Replace the drip pan, enhancer plates, and the cooking grates. NEVER operate the grill without the drip pan installed, as this can cause a potentially dangerous condition. 10
15 OPERATION OF YOUR GRILL INTRODUCTION Outdoor grills create more heat than interior kitchen cooking ranges and are able to sear and cook meats and other food products with a much hotter flame. The drippings from the meats fall on the Broilrite Flavor Enhancers and intensify the flames by splashing back to the flames themselves as well as to the food. This is how the outdoor Bar B Que grill flavor is created. The high performance burners contained in this grill require a constant, steady supply of fresh air to mix with the fuel. Using your grill in windy conditions may disrupt the proper air flow. Wind can be particularly disruptive (and damaging) if you are grilling on HIGH and you are using the optional hood in the closed position. If the wind is coming from the REAR, this condition can trap the hot air and gasses inside the grill and cause an overheating condition. An early warning sign of this condition can be seen if the grill had been previously preheated, and the inside temperature shown by the hood thermometer gages suddenly begins to DECREASE or INCREASE. The wind has prevented the hot gases from escaping from the rear, and instead building up at the lower front of the grill, away from the hood thermometer probes. The knobs and front panel will have become extremely HOT. To immediately remedy this condition, open the hood and turn down the heat. Any damage caused by this overheating condition is NOT COVERED by warranty. If you are using a freestanding grill, this condition can also be remedied by moving the grill to a new location, such that the wind does not enter from the rear. (See also section entitled Freestanding Grill Application Requirements ). PRE-GRILL CHECKLIST BEFORE YOUR FIRST USE: 1. Make sure ALL packing materials have been removed from the interior and the exterior of the grill. 2. Make sure the fuel lines have been connected per instructions in the installation section of this manual. AT EACH NEW SEASON: At the start of each new grilling season, the grill should be inspected. Remove the cooking grates and the Broilrite Flavor Enhancer plates. Remove each burner and check for any apparent obstructions. Also check the orifices at the tip of each valve. Look especially for cotton-like or mud-like formations. Spiders, wasps, and other insects nesting in these areas can disrupt air and gas flow, and can cause damage to the grill or personal injury. A wire brush can be used on the outside of the burners to remove any scale or foreign matter. The inside of the burners can be cleaned and flushed out with a garden hose. Make sure burners are completely dry before re-inserting into the grill. Obstructions found in the orifice at the tip of the valves can be cleared using a paper clip or a small wire. Never use a wooden 11
16 toothpick as it can break off and clog the hole. As a final check, inspect all hoses and gas lines for any evidence of damage. OPERATION OF YOUR GRILL By following these procedures, you can keep your outdoor grill operating like new for years to come. If you have any questions, you can always call the factory at (800) Wind is not blowing too strongly from the rear of the grill. CHECKLIST BEFORE EACH USE: Always make sure that: 1. You DO NOT smell gas BEFORE you light the grill. If you smell gas, shut everything OFF and call a qualified plumber to check for leaks. See also section in this manual entitled FINAL CHECKS. 2. The cooking area and cooking grates are free from combustibles that could ignite. 3. All control knobs turn freely. 4. All burners are seated properly. 5. Connections to any Propane cylinder, if being used, have been leak tested. 6. The valve on a Propane cylinder, if being used, has been turned ON before attempting to light the grill. 7. If you are using Natural Gas (NG), be sure that the main gas valve has been turned ON before attempting to light the grill. WARNING 1. Never attempt to light the grill if you smell gas. 2. Always light the grill with the hood OPEN or the Stainless Steel Weather Cover removed. 3. DO NOT release fuel into a closed grill before lighting. This will increase the risk of explosion, property damage, personal injury, or death. 4. When lighting, keep your face and body as far from the grill as possible. If a burner does not light within 5 seconds, turn the control OFF, and wait 5 minutes for the gas to dissipate, before attempting to reignite. 5. NEVER LEAVE THE GRILL UNATTENDED WHILE COOKING. 12
17 OPERATION OF YOUR GRILL LM210 SERIES GRILL CONTROLS LIGHTING YOUR GRILL Make sure all control knobs for the grill are in the OFF position. For Natural Gas (NG) grills, turn the main gas control valve to ON. The valve is ON when the valve lever is in line and parallel to the gas piping and gas flow. For Propane (LP) grills, turn the propane cylinder valve at least one full turn in the counterclockwise direction. To light your grill, you must ALWAYS start with the Starter Burner Control Knob. The location of this knob is shown in the above diagram and for LM210-28, it is located in the CENTER. For the LM210-40, it is located on the FAR RIGHT. This is the PRIMARY burner location that is lit by the electronic ignition system. Once this burner is lit, then the other burners are lit, one-by-one, via flash tubes located inside at the rear of the grill. You then work your way from the primary burner to each ADJACENT burner until ALL burners are lit. The burners NOT needed for cooking can be safely shut off AFTER the grill is preheated and has reached the desired cooking temperature. LIGHTING PRODEDURE Remove the weather cover or, if your grill is equipped with a hood, open the hood. 13
18 OPERATION OF YOUR GRILL With the gas source turned on (as shown above), rotate the Starter Burner Control Knob COUNTERCLOCKWISE until the knob pointer is facing UP (HIGH position). AT THE SAME TIME, depress the IGNITION button on the front panel to ignite the ignition burner. The electronic igniter will continue to spark as long as you depress the button. Once the burner is lit, you can remove your finger from the button. For the remaining burners, work to the left and turn the nearest ADJACENT burner to HIGH. Wait a few seconds and the burner will ignite. For the LM210-28, after the LEFT burner is lit, then proceed to light the RIGHT burner. If after 5 seconds, the next adjacent burner DOES NOT light, then turn ALL burners OFF, including the starting burner and wait 5 minutes for the gas to dissipate. After 5 minutes, it is safe to start the procedure again. around 350 F. NEVER leave the grill unattended during the pre-heat cycle. Do NOT allow the thermometer to exceed 450 F. This indicates that the grill is getting too hot and may cause damage to the grill. When grilling with the hood closed, most cooking can be done with the temperature range of F. COOKING ON YOUR GRILL HIGH SETTING- Use this setting only for fast warm-up, and for searing steaks and chops. This setting can also be used for burning food residue from the cooking grates after the cook-out is over. MEDIUM SETTING- Use this setting for most grilling, roasting, or baking, as well as for cooking hamburgers and vegetables. LOW SETTING- Use this setting for all smoke cooking, rotisserie cooking, and for cooking very lean, thin cuts of meat or fish. Use the cooking chart on the following page as a guide to prepare a wide variety of food dishes on your grill. Use a food thermometer, purchased separately, to periodically check the internal temperature of the food you are cooking to assure it has reached the perfect degree of doneness. After successful ignition of ALL burners, keep all control knobs on HIGH. The grill should always be pre-heated for the most efficient cooking. If the grill is equipped with a hood, pre-heat with the hood CLOSED. This will allow for a faster pre-heat cycle. In most cases, pre-heat the grill until the hood thermometer reads MANUAL LIGHTING Manual lighting is used when the AAA battery used to power your ignition is discharged and there is no replacement battery immediately available. Use either a long wooden match or a long-tipped lighter and insert between the grate bars and to the side of the CENTER Broilrite Flavor Enhancer 14
19 OPERATION OF YOUR GRILL plate (for 28 size) or the FAR RIGHT Flavor Enhancer plate (for the 40 size) and directly to the burner. Turn the corresponding knob to HIGH to light the starter burner. Remove the match or lighter and continue to light the remaining burners using the flash tubes in the rear of the grill. preheat with all burners on. Close the optional hood, if your grill is so equipped, to begin pre-heating. Pre-heat the grill for around 10 minutes or around 350 as shown on the hood thermometer. NEVER allow the thermometer to exceed 450 indicating that your grill is overheating. Overheating can damage the grill hood and grill components and is NOT covered by warranty. After pre-heating, turn off the burner(s) that you do not plan to use. USE EXTREME CAUTION WHEN LIGHTING Use the lighting instructions found on the previous pages to continue. PRE-HEATING As mentioned earlier, preheating your grill is an important part of the grilling process and will provide much more consistent cooking results. It gives the burners, the flavor enhancers, and the grates time to properly and evenly warm up. Light your grill per the LIGHTING INSTRUCT- IONS. Light all burners, and set the controls to HIGH. Even if you are planning to use only one or two burners, it is best to WARNING DO NOT leave the grill unattended during the pre-heat process or ANY time while the grill is in use. DO NOT pre-heat the grill for more than 10 minutes as, damage caused by overheating can result. TYPES OF HEAT The high powered burners used in your LazyMan LM210 grill are capable of creating a very large range of heat intensities. By varying the number of burners used, the temperature set, and the hood open/closed positions (for hood models), a wide variety of cooking possibilities exist. These possibilities can lead to an endless list of delicious recipes. The two primary types of heat are DIRECT HEAT AND INDIRECT HEAT. 15
20 OPERATION OF YOUR GRILL DIRECT HEAT Direct Heat is also known as Radiant Heat. This type of heat occurs when the food is placed directly over the heat source (main burner). The heat radiates directly from the burners up to the food. Direct heat is a must have for general back yard bar-b-ques when it is desired to sear the outside of the meat to seal in the juices and flavors. directly on the cooking grates. With rotisserie cooking, the food product is mounted to a spit rod held in place with forks. The spit rod is mounted to a rotisserie motor which slowly turns the food above the burners. INDIRECT HEAT Indirect Heat occurs when the heat source is NOT directly below the food source. Heat reaches the food source through air movement and not from direct flames. This type of heat is also known as convection cooking. It is achieved by placing the food on ONE side of the grill and lighting the burner(s) on the OTHER side of the grill. The burner below the food is turned OFF. This type of cooking requires the use of the optional hood which remains closed throughout most of the cooking process. The heat is regulated by adjusting the setting on the control knob for the active burner(s). USING THE OPTIONAL ROTISSERIE SYSTEM Rotisserie cooking is an entirely different process than cooking with the food resting As the meat heats up, juices begin to flow. As the meat is turning, the juices fall back into the meat rather that falling away. This essentially creates a self-basting process. The basting can be enhanced by collecting the juices that do fall from the meat (in a basting or baking pan) and reapplying them to the meat with a basting brush. The end result is a very juicy and evenly cooked meal. The components to your rotisserie system are: -Rotisserie Motor -Motor Holding Bracket(s) -Spit Rod -Spit Forks 16
21 OPERATION OF YOUR GRILL PROCEEDURE Slide the motor into place over the Motor Holding Bracket. Plug the motor power cord into the intended 120V outdoor outlet. Remove the warming rack from the rear interior of the grill. Place the other end of the spit rod into its cradle at the right side of the grill. Locate the spit rod and place one of the forks toward the center of the rod. The pointed end of the fork should be facing the pointed end of the spit rod. Slide the meat product over the pointed end of the spit rod and down to the existing fork. Slide the other fork down to the meat product. Center the meat and press BOTH forks into the meat so that the meat is held tightly in place by the forks. Roll the spit rod in your hand, to assure proper meat placement, and tighten BOTH thumb screws on the forks. Wrap any loose portion of the meat, for example, the wing of a turkey, with butcher s string only. Do NOT use standard string, plastic, or nylon string. Slide the pointed end of the spit rod into the square receptacle of the motor. Place a basting pan or baking pan, if desired, directly under the meat. This will allow the collection of additional juices that fall from the meat. Select a pan size just large enough to collect the juices under the meat but not so large as to block the heat coming from the burners. If the meat being cooked is LARGER than the space below it, then remove the cooking grate directly below it. If a basting pan is being used, place the pan directly on top of the Broilrite Flavor Enhancer plates. After everything is in place, i.e., the motor is in position, the spit rod is in place, loaded with 17
22 the meat product, and the basting pan is in place, light the starting burner and then all other burners to warm up the grill. Use the Lighting Procedure instructions found on the previous pages. After the grill is warm, the appropriate burners can be left ON, and the burners not needed can be turned OFF. Turn the rotisserie motor ON to start the process. OPERATION OF YOUR GRILL WARNING Never attempt to light the burners BEFORE the meat is in place, as, severe burns to the fingers and hands can result while attempting to mount the meat and spit rod on top of the hot burners. DO NOT attempt to use the rotisserie system when the grill is already hot. Most rotisserie cooking is done with the optional hood OPEN, if the grill is so equipped. The hood can be closed periodically during windy conditions, but be careful not to allow the hood to overheat. It is a good practice to periodically check the rotisserie process while cooking. The cooking of the meat may be proceeding too fast or too slow. If you see any signs of burning during the early cooking process, you will want to adjust the control knob settings for each burner. 18
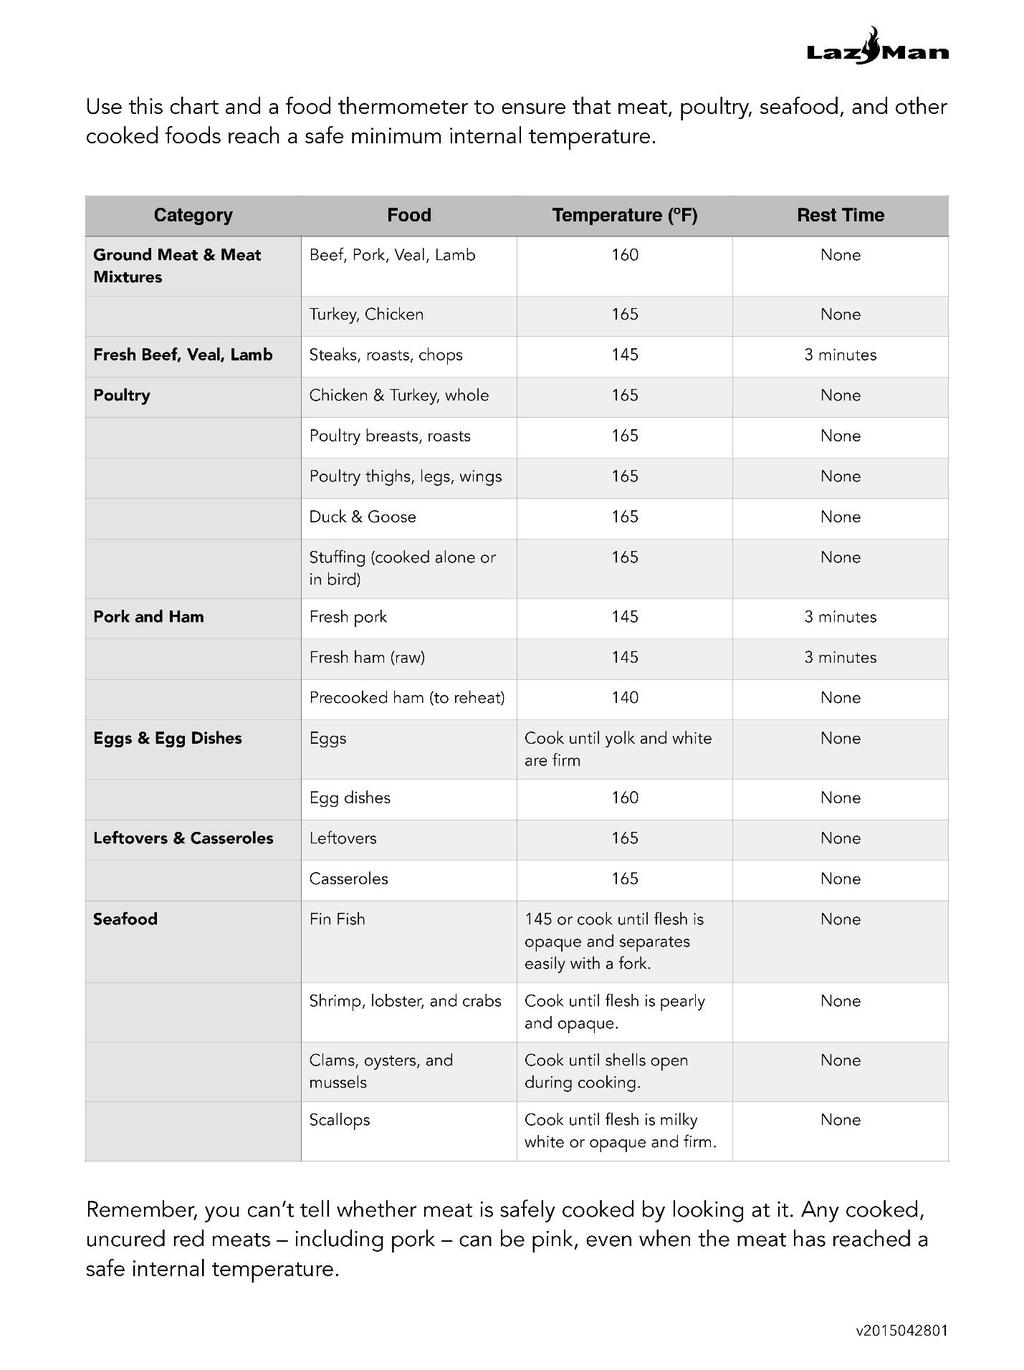
23 19
24 CLEANING YOUR GRILL CLEANING YOUR GRILL Your LazyMan LM210 Series grill has been built with the finest grade of 304 stainless steel available. All exterior surfaces feature a #4 brushed finish. With proper maintenance, this finish will last for many years. Here are a few pointers to keep your grill looking and functioning like new: After each use, wipe down the complete exterior of your grill using a soft cloth and a commercially available stainless steel cleaner. It is important to remove the grease splatters and food debris at this time, rather than allowing it to become cooked on. It will be much harder to remove the next time. Always wipe in the direction of the grain finish. The front hood and most front surfaces have the grain running in a horizontal direction. When trying to remove a heavier grease and dirt build-up, a mild mixture of dish soap and warm water can be used for cleaning. To remove the most stubborn stains, a non- metallic, medium grit abrasive like Scotch-Brite can be used, but ALWAYS remember to work in the direction of the grain. DO NOT use metallic abrasives (like steel wool) to clean your grill s front surfaces. DO NOT use solvents on the grill label. CLEANING THE DRIP PAN Similar to cleaning the main grill components, the longer you wait to clean the drip pan, the harder it will be to remove the grease and food debris. The drip pan can be removed completely from the grill for easier cleaning. Start by draining any free flowing grease by tilting the pan over a waste container (an empty coffee can is perfect). Scoop up the food debris with a dust pan or similar device. Wipe the remaining grease with paper towels, and then finish by using a mild solution of dish soap and a kitchen sponge backed by a Scotch-Bright pad. A commercially available stainless steel cleaner can also be used. WARNING It is critical to keep the drip pan free from food build-up, as, this debris can still cause flare-ups and create a fire hazard. Always remember to replace the drip pan into the grill. DO NOT USE THE GRILL WITHOUT THE DRIP PAN IN PLACE. It is also good practice to check the contents of the drip pan after a heavy rain. If the grill is not covered, the drip pan can collect water and prevent it from doing its job. CLEANING THE GRATES It is best to clean the grates immediately after each use while the grill is still warm (but not when the grill is turned on). Wear a long oven or bar b que mitt(s) to protect your hand from the heat and remaining steam, and use a commercially available 20
25 CLEANING YOUR GRILL grate brush to clear all grease and debris. Dipping the brush in hot water can also expedite the process and make it easier to remove the grease. Periodically you should do a more thorough cleaning by removing the grates and deep cleaning them. They can be placed in a pan of dish soap water (similar to cleaning a kitchen pot or pan) and then scrubbing them with a nonmetallic medium grit abrasive (like a sponge backed with Scotch-Brite or equivalent). Using metallic abrasives (like steel wool) is NOT recommended since portions of the steel fibers can remain on the grates and contaminate food. CLEANING THE BROILRITE FLAVOR ENHANCERS If you are deep cleaning your grates, then as long as the grates are out of the grill, it might be a good time to clean the Flavor Enhancer plates. They are located directly BELOW the grates. Simply lift the plates straight up from the burners. Start by scraping off all heavy debris with a flat object (a wide putty knife makes a good tool for this). Finish by placing the plates in a pan of hot soapy water and clean them with a sponge backed with Scotch-Brite or equivalent. CLEANING THE BURNERS the rear and off of the valve orifice at the front, and lift straight up and out. Work over a trash can and turn the burner over to allow the loose debris to fall. Use a brass or steel brush to remove as much debris as possible. For any stubborn stains or debris spots, use a metal scraper (putty knife or equivalent) to remove. Inspect all burner ports (holes) to assure that they are not clogged. Clear any clogged ports with a paper clip. DO NOT use a wooden tooth pick as it can break off inside the port. Finish the cleaning process by tilting the burner upright, with the venturi opening facing down, and over the trash can. Shake the burner and allow all remaining INSIDE debris to fall out from the venturi opening. Be careful not to disrupt or change the air flow setting created by the air shutter. The INSIDE of the burner can be cleaned by flushing it out with a garden hose. Be sure the burner is completely dry before reinstalling into the grill. WARNING Proper placement of ALL burners, after cleaning, is CRITICAL. They must be centered over the brass orifices and must be secured at the back with their original mounting screws. Once the grates and Flavor Enhancers have been removed from the grill (see above), you will have access to the main burners. Make sure the grill is cool and that all control knobs and main gas supply lines are turned OFF. Remove the screws holding the rear of each burner to the rear of the grill interior. Carefully slide the burner to 21
- is the main shut-off valve turned on? The valve will be ON when the valve lever is parallel to the gas line.")
26 TROUBLESHOOTING Please check the more common and more obvious grill functions before further attempting to troubleshoot your LazyMan LM210 Series Grill, and before you call for service. Sometimes great aggravations can result from simple oversights. For Natural Gas (NG)- is the main shut-off valve turned on? The valve will be ON when the valve lever is parallel to the gas line. For Liquid Propane Gas (LP)- is the valve knob turned at least one complete turn in the COUNTERCLOCKWISE direction? valve very SLOWLY to help allow the valve to reset. Is the correct type of fuel being supplied? The type of fuel your grill was built for (NG or LP) can be found on the label at the right rear of the grill. Is the ignition operating properly, i.e., do you hear clicking when the ignition button is pushed? If not, replace the AAA battery found inside the ignition button assembly. See also the following section entitled GRILL DOESN T LIGHT for instructions on replacing the battery. In most cases, the following troubleshooting tips can be performed by the grill owner and can be performed relatively safely. Please read and follow the steps carefully to assure that there have not been oversights in troubleshooting your LazyMan grill. If you have exhausted the troubleshooting steps, OR if you are simply not comfortable working on your grill, you can contact the LazyMan Customer Service team and they will be glad to assist you. Does the Liquid Propane (LP) gas cylinder have fuel? Is the hose connection tight? These cylinders have a built-in safety valve that prevents the fuel from being supplied (or may reduce the gas flow) if the tank has recently been tilted or jarred. This will make the cylinder appear to be empty. If so, wait 5 minutes for the valve to reset and try again. This time, open the CONTACT: LazyMan Inc. CUSTOMER SERVICE: (908) (800) Customer Service Dept. 560 Independence Street, Belvidere, NJ
BULL. ASSEMBLY & OPERATING INSTRUCTIONS
 BULL. Dutdaar Products Inc. "., Ontario, California 91761 ASSEMBLY & OPERATING INSTRUCTIONS Model No. 18038 7-Burner High Grade Commercial Stainless Steel Longhorn, LP Model No. 18039 7- Burner High Grade
14 ROUND TABLETOP GAS GRILL. Product code: UPC code: Date of purchase: / /
 OWNER S MANUAL 14 ROUND TABLETOP GAS GRILL Product code: 0-03946564-6 UPC code: 0 45774 87562 1 Date of purchase: / / Safety Guidelines... Safety Instructions... 1 2-3 Assembly Instructions... 4-7 Lighting
OWNERS MANUAL. Installation, Operation & Maintenance Guide MODELS: SO30BQRRL/SO42BQRL
 OWNERS MANUAL Installation, Operation & Maintenance Guide MODELS: SO30BQRRL/SO42BQRL This Page Intentionally Left Blank For Your Safety... 3 Basic Safety Guidelines... 5 Installation... 6 Gas Connection
STAINLESS STEEL GAS BARBECUE MODEL NO: SSBBQ4 USER GUIDE PART NO: /11
 STAINLESS STEEL GAS BARBECUE MODEL NO: SSBBQ4 PART NO: 6925310 USER GUIDE 2/11 INTRODUCTION Thank you for purchasing this CLARKE product. Before attempting to use this product, please read this manual
USE AND CARE MANUAL FOR OUTDOOR USE ONLY
 S o n o m a PLATINUM EDITION Sonoma Platinum Edition Grill: 27 Model with Rear Infrared Burner TM USE AND CARE MANUAL FOR OUTDOOR USE ONLY General Safety Instructions IMPORTANT SAFETY INFORMATION - Read
Introduction. No Hassle Guarantee
 Pro Grill MANUAL Introduction Thank you for selecting West Marine s Pro Grill. Your unit has been carefully inspected and tested. The Pro Grill is one of the finest barbecues manufactured for marine use.
GAS BARBECUE MODEL NO: BBQ4 USER GUIDE PART NO: /11
 GAS BARBECUE MODEL NO: BBQ4 PART NO: 6925305 USER GUIDE 2/11 INTRODUCTION Thank you for purchasing this CLARKE product Before attempting to use this product, please read this manual thoroughly and follow
Folding Grill Stand Manual
 O u t d o o r G r i l l i n g P r o d u c t s Folding Grill Stand Manual MODEL: CFGS-150 IMPORTANT SAFETY INSTRUCTIONS READ AND SAVE THESE SAFETY INSTRUCTION BEFORE USING THIS GRILL STAND m DANGER: m Failure
USE AND CARE MANUAL FOR OUTDOOR USE ONLY MADE IN THE U.S.A.
 S o n o m a PLATINUM EDITION Sonoma Platinum Edition Grill: 30 Model TM USE AND CARE MANUAL FOR OUTDOOR USE ONLY MADE IN THE U.S.A. General Safety Instructions IMPORTANT SAFETY INFORMATION - Read this
for Assembly, Operating & Maintenance of THIS CHARCOAL GRILL IS DESIGNED FOR OUTDOOR USE ONLY.
 Owner s Manual for Assembly, Operating & Maintenance of Model M-15AB Charcoal Grill www.bigjohngrills.com YOU MUST READ THIS OWNER S MANUAL BEFORE OPERATING YOUR CHARCOAL GRILL. WARNING: Do not ignite
BakerBox multi-purpose pizza oven
 BakerBox multi-purpose pizza oven. ASSEMBLY & OPERATING INSTRUCTIONS Important: Read these instructions for use carefully so as to familiarize yourself with the appliance before putting it to your gas
" Table Top Charcoal Grill Model # SRYH1450 Instructions Manual
 259-0011 14" Table Top Charcoal Grill Model # SRYH1450 Instructions Manual WARNING FOR YOUR SAFETY 1. This grill is for outdoor use only, and shall not be used in a building, garage, or any other enclosed
Contents. Fittings and parts checklist
 JLH2B5 Contents Parts List Exploded Diagram Assembly instructions Safety information Installation Using your barbecue Cooking Maintenance Fittings and parts checklist Ref Description Ref Description 1,
OWNER S MANUAL. Cabo. Adventurer Series Gas Grill Model A10-703
 OWNER S MANUAL Cabo Adventurer Series Gas Grill Model A10-703 For questions regarding performance, assembly, operation, parts, or returns, contact the experts at MAGMA by calling (562) 627-0500 7:00 a.m.
INFRARED BURNER KIT INSTRUCTIONS
 3 INFRARED BURNER KIT INSTRUCTIONS (HOT SURFACE IGNITION) 5 1 4 NOTE: This unit has been retrofi tted with an infrared burner. Model # 3050 # 3060 Included parts 2 6* PARTS INCLUDED 1. Infrared burner
Tabletop Charcoal Grill Model # SRCG806 Instructions Manual
 259-0002 Tabletop Charcoal Grill Model # SRCG806 Instructions Manual WARNING FOR YOUR SAFETY 1. This grill is for outdoor use only, and shall not be used in a building, garage, or any other enclosed area.
ASSEMBLY & OPERATION INSTRUCTIONS FOR OUTDOOR GAS BARBECUES
 ASSEMBLY & OPERATION INSTRUCTIONS FOR OUTDOOR GAS BARBECUES FOR MODEL# BBQ / BBQW / BLKBBQW OUTDOOR BBQ GRILL SAFETY INSTRUCTIONS READ THE FOLLOWING INSTRUCTIONS CAREFULLY AND BE SURE YOUR BARBECUE IS
 #4187508 Attention! This grill will become very hot. Do not move it during operation. Caution! Do not use alcohol, gasoline or similar fluids for lighting or relighting. Warning! Keep children and pets
HORIZON BARBECUE ROASTING HOOD OWNERS MANUAL
 HORIZON BARBECUE ROASTING HOOD OWNERS MANUAL 0 IMPORTANT READ ALL INSTRUCTIONS BEFORE ASSEMBLY, INSTALLATION OR OPERATING ROASTING HOOD SAFETY PRECAUTIONS AND WARNINGS Tucker Horizon barbecues and roasting
Assembly & Operation Manual
 Deluxe Outdoor Tabletop Gas Grill Model TT250 Assembly & Operation Manual DANGER 1. Never operate this appliance unattended. 2. Never operate this appliance within 10 ft (3.0 m) of any structure, combustible
for Assembly, Operating & Maintenance of THIS GAS GRILL IS DESIGNED FOR OUTDOOR USE ONLY.
 Owner s Manual for Assembly, Operating & Maintenance of Model A2P Portable Gas Grill www.bigjohngrills.com YOU MUST READ THIS OWNER S MANUAL BEFORE OPERATING YOUR GAS GRILL. IF YOU SMELL GAS: DANGER 1.
Gas Barbecue Use, Care & Assembly Manual
 Gas Barbecue Use, Care & Assembly Manual With Grill Lighting Instructions 8450 Series Model No. 9992-649 (Natural Gas) ASSEMBLER/INSTALLER: Leave these instructions with the consumer. CONSUMER/USER: Read
G2006-A FOR OUTDOOR USE ONLY - OPERATES ON LPG
 Ranger Barbecue Model No. G2006-A FOR OUTDOOR USE ONLY - OPERATES ON LPG 3716-06/13 General Information Gas Installation Codes Barbecues must be used in accordance with New Zealand Standard 5601 Gas Installations.
GRILLSTER PORTABLE GAS GRILL
 Gourmet Outdoor Grilling GRILLSTER PORTABLE GAS GRILL MODEL: CGG-059 ASSEMBLY AND OPERATING INSTRUCTIONS m WARNING: FOR OUTDOOR USE ONLY m This instruction manual contains important information necessary
IF THERE IS ANY QUESTION ABOUT A CONDITION BEING SAFE OR UNSAFE, DO NOT OPERATE THIS PRODUCT!
 RO18BT 18 Quart Roaster Oven Operating Instructions READ ALL INSTRUCTIONS AND WARNINGS BEFORE USING THIS PRODUCT. This manual provides important information on proper operation & maintenance. Every effort
VCS325SSBI Series and VCS525SSBI Series Assembly Procedures
 VCS325SSBI Series and VCS525SSBI Series Assembly Procedures Model VCS525SSBI Shown Tools Required: Knife or scissors, Phillips or Robertson (square head) screwdriver. WARNING: Some parts may have sharp
INSTRUCTION BOOK CARE & USE/INSTALLATION
 INSTRUCTION BOOK CARE & USE/INSTALLATION Model STL-32 LP/NG, Model STL-40 LP/NG, Model STL-2 LP/NG STL-1 LP/NG. DANGER - IF OU SMELL GAS: WARNING I - Shut off the gas supply to the appliance at its source.
Searin Sphere Portable Gas Grill
 Gourmet Outdoor Grilling Searin Sphere Portable Gas Grill MODEL: CGG-049 ASSEMBLY AND OPERATING INSTRUCTIONS m WARNING: FOR OUTDOOR USE ONLY m This instruction manual contains important information necessary
Tabletop Gas Grill VT280SS1
 Tabletop Gas Grill VT280SS1 Conforms to ANSI Std Z21.89-2013 Outdoor cooking specialty gas appliance DANGER Tools needed for assembly: Phillips screwdriver, Pliers or Adjustable Wrench DANGER If you smell
INTRODUCTION. Your new smoker comes almost completely assembled. You will need to complete the assembly which includes:
 INTRODUCTION Congratulations on your purchase of this Smith & Wesson SMOKER, Model SWS032. With proper set-up, operation and maintenance, this smoker will provide you with years of cooking enjoyment. Your
RG4 AND RG7 INSTALLTION AND MAINTENANCE
 WARNINGS 1. In all cases a qualified and licensed electrician and/or plumber must install the rotisserie machine. 2. In the event a user smells gas, instructions for procedures to follow must be placed
1550W DIGITAL FRENCH DOOR OVEN Instruction Manual MODEL CCFD19
 1550W DIGITAL FRENCH DOOR OVEN Instruction Manual MODEL CCFD19 1 WHAT S INCLUDED French Door Oven & Instruction Manual Rotisserie Hle Two Wire Racks Baking Pan Rotisserie Tray Hle Crumb Tray 2 IMPORTANT
1. IMPORTANT SAFEGUARDS When using electrical appliances, basic safety precautions should always be followed to reduce the risk of fire, electric
 1. IMPORTANT SAFEGUARDS When using electrical appliances, basic safety precautions should always be followed to reduce the risk of fire, electric shock, and/pr injury to persons including the following:
DUAL BLAZE PORTABLE GAS GRILL
 Outdoor Grilling Pro ducts DUAL BLAZE PORTABLE GAS GRILL MODEL: CGG-522 ASSEMBLY AND OPERATING INSTRUCTIONS m WARNING: FOR OUTDOOR USE ONLY m This instruction manual contains important information necessary
17.75 In. Table Top Gas Grill
 17.75 In. Table Top Gas Grill Model #OCTG-1775 OUTDOOR USE ONLY! NEVER USE INDOORS! CARBON MONOXIDE HAZARD Burning propane inside may be fatal. It gives off carbon monoxide, which has no odor. NEVER burn
IMPORTANT SAFEGUARDS. When using electrical appliances, basic safety precautions should always be followed, including the following:
 IMPORTANT SAFEGUARDS When using electrical appliances, basic safety precautions should always be followed, including the following: 1.Read all instructions. 2.Do not touch hot surfaces. Use handles or
Manual Spark Ignition (MSI) Kit For Use only with Thermocouple Manual Safety (TMSI) UL Approved Fire Pit Pans with Burning Spur
 Kit For Use only with Thermocouple Manual Safety (TMSI) UL Approved Fire Pit Pans with Burning Spur") AAA Battery MODEL: MSI-BSTMSI Manual Spark Ignition (MSI) Kit For Use only with Manual Safety (TMSI) UL Approved Fire Pit Pans with Burning Spur Installation and Operating Instructions IF YOU CANNOT READ
AAA Battery MODEL: MSI-BSTMSI Manual Spark Ignition (MSI) Kit For Use only with Manual Safety (TMSI) UL Approved Fire Pit Pans with Burning Spur Installation and Operating Instructions IF YOU CANNOT READ
Gas Barbecue Use, Care & Assembly Manual
 Gas Barbecue Use, Care & Assembly Manual With Grill Lighting Instructions 8100 Series Model No. 9992-643 (LP Gas) ASSEMBLER/INSTALLER: Leave these instructions with the consumer. CONSUMER/USER: Read all
HOT SPOTS COOKING SAFETY
 Many families gather in the kitchen to spend time together, but it can be one of the most hazardous rooms in the house if you don't practice safe cooking behaviors. Cooking equipment, most often a range
Adventurer Barbecue G2727
 Adventurer Barbecue G2727 FEATURES Compact portable unit with generous 460mm x 240mm cooking surface Use at home, picnics or camping Quick and easy set-up Folds down into a compact size - 440mm x 590mm
MARQUE REFERENCE CODIC
 MARQUE REFERENCE CODIC : KALORIK : TKG OT 00BCRL : 50 EN ANGLAIS PROVISOIREMENT NOTICE LOGO 00L ELECTRIC OVEN WITH ROTISSERIE & LAMP & CONVECTION INSTRUCTION MANUAL Model No. TY000BCL 0-0V~ 50/60Hz 800W
NECO MODEL NECO MODEL AMENDMENT SHEETS FN38LP/NG. Amendment Pages (Use these pages in place of standard manual)
") NECO MODEL AMENDMENT SHEETS NECO MODEL FN38LP/NG Amendment Pages (Use these pages in place of standard manual) Grill Assembly Built-In Instructions 5-12 13-15 16-19 17 20 21-22 23 Welcome & Congratulations
NECO MODEL AMENDMENT SHEETS NECO MODEL FN38LP/NG Amendment Pages (Use these pages in place of standard manual) Grill Assembly Built-In Instructions 5-12 13-15 16-19 17 20 21-22 23 Welcome & Congratulations
Important: Retain these instructions for future use.
 CATERER 4 & 6 BURNER BBQ Model No. BQ1050 Model No. BQ1051 Ideal heavy duty BBQ for sporting and social clubs or anywhere large groups are entertained Solid 5mm thick steel hotplate Castors for easy moving
INSTRUCTION MANUAL MODELS: RT-30, RT-36, RT-48, RT-60 & RT-72 REVISED APRIL, 2003 *PLEASE RETAIN FOR FUTURE REFERENCE
 INSTRUCTION MANUAL MODELS: RT-30, RT-36, RT-48, RT-60 & RT-72 REVISED APRIL, 2003 *PLEASE RETAIN FOR FUTURE REFERENCE THANK YOU for purchasing this quality product. Your Crown Verity Inc. rotisserie will
Cutout Width 28 5/8 28 5/8 40 1/4 40 1/4 (72.7 cm) (72.7 cm) (102.2 cm) (102.2 cm)
 (72.7 cm) (102.2 cm) (102.2 cm)") BASIC SPECIFICATIONS T-SERIES GRILLS Description VGBQ300T/0302T VGIQ300T VGBQ410T/VGIQ410T VGBQ412T Cutout Width 28 5/8 28 5/8 40 1/4 40 1/4 (72.7 cm) (72.7 cm) (102.2 cm) (102.2 cm) Overall Width 29 1/2
BASIC SPECIFICATIONS T-SERIES GRILLS Description VGBQ300T/0302T VGIQ300T VGBQ410T/VGIQ410T VGBQ412T Cutout Width 28 5/8 28 5/8 40 1/4 40 1/4 (72.7 cm) (72.7 cm) (102.2 cm) (102.2 cm) Overall Width 29 1/2
57 Stainless Steel Gas Grill
 57 Stainless Steel Gas Grill 1 Welcome & Congratulations Congratulations on your purchase of a new grill! We at Electrolux Home Products are very proud of our product and we are completely committed to
Installation & Operation Instructions
 Manufactured by K & W Mfg. Co. Inc., Corona, California Installation & Operation Instructions For Gas Barbecues Models 5453 and 5457 A Note to You Thank you for buying a Flame-Broil barbecue grill. To
22 Kettle Charcoal Grill SAFE USE, CARE AND ASSEMBLY MANUAL
 22 Kettle Charcoal Grill SAFE USE, CARE AND ASSEMBLY MANUAL 85-1448-8 ST22022D Read and save this manual for future reference. If pre-assembled, leave this manual with unit for consumer s future reference.
Platinum BBQ Series. 4 burner - BQ burner - BQ 1011
 Platinum BBQ Series 4 burner - BQ 1010 6 burner - BQ 1011 FEATURES Premium gas BBQ Double skinned stainless steel hood with temperature gauge Stainless steel BBQ body, fascia, cabinet and side shelves
ASSEMBLY & OPERATING INSTRUCTIONS
 Rialto, California 92673 ASSEMBLY & OPERATING INSTRUCTIONS Model #54658 5 Burner Stainless Steel Built-In, L.P. (Propane) Gas Model #54659 5 Burner Stainless Steel, Built-In, Natural Gas TABLE OF CONTENTS
Assembly Procedures VCS322SSBI Series / VCS522SSBI Series
 Assembly Procedures VCS322SSBI Series / VCS522SSBI Series Tools Required: Knife or scissors, Phillips or Robertson (square head) screwdriver. Model VCS522SSBI Shown CAUTION: This grill is intended ONLY
Deluxe Caterer BBQ Series
 Deluxe Caterer BBQ Series GC22-4T DLX GC22-6T DLX FEATURES Ideal heavy duty BBQ for sporting and social clubs or anywhere large groups are entertained. Solid 5mm thick stainless steel hotplate Fold down
ASSEMBLY & OPERATING INSTRUCTIONS
 ASSEMBLY & OPERATING INSTRUCTIONS MODEL #21009 UI 5 BURNER STAINLESS STEEL, ROTISSERIE, BUILT-IN, L.P. (PROPANE) MODEL #21011 UI 5 BURNER STAINLESS STEEL, ROTISSERIE, BUILT-IN, N.G. (NATURAL GAS) TABLE
INSTALLATION AND OPERATING INSTRUCTIONS
 2 3 UNPACKING INSTRUCTION: Carefully unpack the oven and inspect immediately for shipping damages. Your counter top oven was shipped in a carton designed to give maximum protection in normal handling.
assembly guide ELECTRIC Model Numbers: Estimated time required for assembly: 1 Hour (English) /05/09
 /05/09") assembly guide Model Numbers: 08601559 10601578 10601585 10601514 Estimated time required for assembly: 1 Hour ELECTRIC (English) 42804372 11/05/09 2 ASSEMBLY GUIDE A, B, C, Assembly: CAUTION: For your
assembly guide Model Numbers: 08601559 10601578 10601585 10601514 Estimated time required for assembly: 1 Hour ELECTRIC (English) 42804372 11/05/09 2 ASSEMBLY GUIDE A, B, C, Assembly: CAUTION: For your
12 Bottle Dual Zone. Touchscreen INSTRUCTION MANUAL
 12 Bottle Dual Zone Touchscreen INSTRUCTION MANUAL To ensure proper use of this appliance and your safety, please read the following instruction completely before operating this appliance. 1 TABLE OF CONTENTS
IMPORTANT: READ THESE INSTRUCTIONS CAREFULLY BEFORE STARTING INSTALLATION OR USE. WARNINGS AND SAFETY CODES
 FIREMASTER OUTDOOR COUNTERTOP CHARCOAL GRILL Models 3324 and 3329 INSTALLATION INSTRUCTIONS AND OWNER S MANUAL INSTALLER: Leave these instructions with consumer. CONSUMER: Retain for future reference.
USE AND CARE MANUAL FOR OUTDOOR USE ONLY ALWAYS KEEP YOUR GRILL COVERED WHEN NOT IN USE
 Amana TM SS 4 Burner Gas Grill USE AND CARE MANUAL FOR OUTDOOR USE ONLY ALWAYS KEEP YOUR GRILL COVERED WHEN NOT IN USE BEFORE YOU BEGIN We ve included easy-to-follow, step-by-step instructions which have
INSTRUCTIONAL BOOK CARE & USE/INSTALLATION
 INSTRUCTIONAL BOOK CARE & USE/INSTALLATION Models: SIZ26-LP/NG, SIZ32-LP/NG, SIZ40-LP/NG, SIZPRO32-LP/NG, SIZPRO40-LP/NG, and SIZSB2-LP/NG DANGER - IF YOU SMELL GAS: I - Shut off the gas supply to the
LP (Liquefied Petroleum Gas) Installation Safety Precautions
 Installation Safety Precautions") Installation Safety Precautions Use grill, as purchased, only with LP (propane) gas and the regulator/valve assembly supplied. If your grill is Dual Fuel ready, a conversion kit must be purchased for use
Installation Safety Precautions Use grill, as purchased, only with LP (propane) gas and the regulator/valve assembly supplied. If your grill is Dual Fuel ready, a conversion kit must be purchased for use
Liquid Propane Gas Grill Owner s Guide
 Liquid Propane Gas Grill Owner s Guide Vieluxe 44 Inch Vieluxe 56 Inch DANGER If you smell gas: 1. Shut off gas to the appliance. 2. Extinguish any open flames. 3. Open lid. 4. If odor continues, keep
ASSEMBLY & OPERATING INSTRUCTIONS
 Ontario, California 91761 ASSEMBLY & OPERATING INSTRUCTIONS MODEL 47628 MODEL 47629 MODEL 41628 MODEL 41629 4 Burner Stainless Steel, Rotisserie, Grill Lights, Built-In, L.P. (Propane) 4 Burner Stainless
Installation & Parts Manual 2" & 3" High Capacity Strainers For Class 1, Petroleum Applications
 Installation & Parts Manual 2" & 3" High Capacity Strainers For Class 1, Petroleum Applications Installation: M200-20 www.lcmeter.com Table of Contents Description Page Number Introduction... 2 What LC
SOWNER S MANUAL INSTALLATION, CARE & USE
 SOWNER S MANUAL INSTALLATION, CARE & USE Models: SIZ26-LP/NG, SIZ32-LP/NG, SIZ40-LP/NG, SIZPRO32-LP/NG, SIZPRO40-LP/NG, and SIZSB2-LP/NG DANGER - IF YOU SMELL GAS: I - Shut off the gas supply to the appliance
Specialist Built-in BBQ
 Specialist Built-in BBQ Model No. BQ8246-P Product Features: Vitreous enamel hood and body Sure-fire rotary ignition Viewing window in hood Timer AGA certified FOR OUTDOOR USE ONLY OPERATES ON LPG Gasmate
SBB Gas Grill With Surround Owner s Manual
 SBB2804-1 Gas Grill With Surround Owner s Manual GAS-FIRED Page 1 IMPORTANT This manual should be read thoroughly by the person installing the grill and all persons who will use and maintain the grill.
ASSEMBLY & OPERATING INSTRUCTIONS
 ASSEMBLY & OPERATING INSTRUCTIONS MODEL #98110 BULLET 4 BURNER STAINLESS STEEL, BUILT-IN, L.P. (PROPANE) MODEL #98111 BULLET 4 BURNER STAINLESS STEEL, BUILT-IN, N.G. (NATURAL GAS) TABLE OF CONTENTS PAGE
ASSEMBLY & OPERATING INSTRUCTIONS
 200 100 300 400 800 500 700 600 ASSEMBLY & OPERATING INSTRUCTIONS Model: 720-0432 FOR OUTDOOR USE ONLY A16Y07P-1 PLEASE CONTACT 1-866-984-7455 FOR ASSISTANCE ABOUT ASSEMBLY OR GRILL OPERATION DO NOT RETURN
5KEK1322 W A_v08.indd 1 5/13/16 2:25 PM
 5KEK1322 W10878653A_v08.indd 1 PARTS AND FEATURES PARTS AND ACCESSORIES Tea steeper lid (center section of lid with handle) Kettle lid (outer section) Stainless steel lime scale filter Removable stainless
Owner's Manual: Stainless Steel Rotisserie Kit for Kenmore Elite & Kenmore Premium Grills
 Owner's Manual: Stainless Steel Rotisserie Kit for Kenmore Elite & Kenmore Premium Grills 141.158031 for 3/4 Burner Kenmore and Kenmore Elite Grills: 141.15804 for 5/6 Burner Kenmore and Kenmore Elite
Assembly Instructions & User s Manual TRITON 6 BURNER GRIDDLE Model #: FSODBG1206
 Assembly Instructions & User s Manual TRITON 6 BURNER GRIDDLE Model #: FSODBG1206 Please keep this instruction manual for future reference Customer Service: (888) 922-2336, 7:00 am to 12:00 am daily CST
INSTRUCTION MANUAL AND RECIPE BOOK CORN DOG MAKER CDM-1 SMART PLANET PLEASE READ THESE INSTRUCTIONS CAREFULLY AND RETAIN FOR FUTURE REFERENCE.
 INSTRUCTION MANUAL AND RECIPE BOOK CORN DOG MAKER CDM-1 SMART PLANET PLEASE READ THESE INSTRUCTIONS CAREFULLY AND RETAIN FOR FUTURE REFERENCE. IMPORTANT SAFEGUARDS Read all instructions before using the
OPERATING MANUAL. Sample PRO 100 Series. Electric Heating. Applies to Versions: SPE1*, SPE2, SPE4, SPE6
 OPERATING MANUAL Sample PRO 100 Series Electric Heating Applies to Versions: SPE1*, SPE2, SPE4, SPE6 NOTE: All electrically heated roasters in the Sample PRO 100 Series are modular and this manual applies
KettlePizza Gas Pro Assembly & Operating Instructions
 KettlePizza Gas Pro Assembly & Operating Instructions Important Safety Warning: THANK YOU for buying a KettlePizza Oven Kit! As with many cooking grill accessories, there can be some risks involved and
INSTALLATION & OPERATION MANUAL
 INSTALLATION & OPERATION MANUAL 900A SERIES GAS GRIDDLES MODEL 902A 904A 924A 936A 948A 960A 972A ML-52630 ML-52631 ML-52592 ML-52596 ML-52600 ML-52604 ML-52608 VULCAN-HART COMPANY, P.O. BO 696, LOUISVILLE,
Barbecues MASPORT INBUILT DOOR INSTALLATION
 Barbecues MASPORT INBUILT DOOR INSTALLATION OWNER S MANUAL Please read these instructions carefully before assembly, to reduce risk of fire, burn hazard or other injury. Keep these instructions in a safe
440 Sizzler Patio gas Braai
 440 Sizzler Patio gas Braai USER MANUAL & ASSEMBLY INSTRUCTIONS Important: Read these instructions and warnings carefully so as to familiarize yourself with the appliance before connecting it to its gas
Cover. Liquid Propane Gas Grill Model No.: Assembly Instructions/Use and Care Manual
 Cover Assembly Instructions/Use and Care Manual Liquid Propane Gas Grill Model No.: 122.16118 Parts Assembly Safety Rules Use and Care Troubleshooting Español! WARNING: Read this Owner s manual carefully
SUMMIT 4 BURNER & 6 BURNER
 WEBER WEBER WEBER WEBER SUMMIT 4 BURNER & 6 BURNER NATURAL GAS COOKING MODULES Operating Guide Read before assembly WEBER WEBER W E B E R W E B E R Summit 6 Burner NG CANADIAN GAS ASSOCIATION R A P P R
Pellet Pro 12 & 18 Lengths Large 35lb Hopper Assembly Operation Manual
 Pellet Pro 12 & 18 Lengths Large 35lb Hopper Assembly Operation Manual Now with our exclusive PID Controller & Universal Mounting Capabilities! FOR OUTDOOR USE ONLY Disclaimer: The hopper assembly is used
45-Cup Coffee Urn Big Brew Classic. Instruction Manual. Model ACU-045
 45-Cup Coffee Urn Big Brew Classic Instruction Manual Model ACU-045 Congratulations! Your Big Brew Classic will surely become one of the most practical appliances in your home or office. Enjoy fresh brewed
Modular Island Grill - Main Grill Module
 WARNING Improper installation, adjustment, alteration, service or maintenance can cause injury or property damage. Read the installation, operation and maintenance instructions thoroughly before installing
Coyote Stainless Steel Gas Grill Use & Care Manual
 Coyote Stainless Steel Gas Grill Use & Care Manual For Liquid Propane and Natural Gas Models Coyote 2-Burner Grill Built-in & Cart Model C1C28LP / C1C28NG C1C28LP-FS / C1C28NG-FS For Outdoor Use Only 4006980
Oven Toaster Grill with Convection
 READ BEFORE USE Oven Toaster Grill with Convection Visit www.hamiltonbeach.in for our complete line of products and Use and Care Guides as well as delicious recipes, tips, and other useful information!
12 CUP COFFEE MAKER User Guide
 BRAND 12 CUP COFFEE MAKER User Guide Item: 740553 Ginnys.com 800-544-1590 Facebook.com/GinnysBrand Pinterest.com/GinnysBrand Ginnys.com/Blog Welcome to the world of full-flavored coffee with the Ginny
FOR OUTDOOR USE ONLY THIS IS YOUR ASSEMBLY, CARE & USE MANUAL WITH IMPORTANT WARNING & SAFETY INFORMATION. PLEASE SAVE THESE INSTRUCTIONS.
 Owner s Manual Tabletop Gas Grill 1-Burner Model VT280B1 FOR OUTDOOR USE ONLY THIS IS YOUR ASSEMBLY, CARE & USE MANUAL WITH IMPORTANT WARNING & SAFETY INFORMATION. PLEASE SAVE THESE INSTRUCTIONS. Manufactured
21.5 Inch Square Charcoal Grill
 21.5 Inch Square Charcoal Grill Model # OCFLA-2150 OUTDOOR USE ONLY! NEVER USE INDOORS! CARBON MONOXIDE HAZARD Burning charcoal inside may be fatal. It gives off carbon monoxide, which has no odor. NEVER
LOT: PO: 4098_GelCanInsert_JW_ Model # oz Gel Fuel Can Firebox Insert
 LOT: PO: 4098_GelCanInsert_JW_010213 f i r e p l a c e s Model # 4098 13oz Gel Fuel Can Firebox Insert - Gel Fuel is flammable. Failure to follow warnings can result in property damage or serious burns.
SBG2500-1, SBG and SBG Gas Grill Owner s Manual
 SBG2500-1, SBG2501-1 and SBG2801-1 Gas Grill Owner s Manual SBB00095-2-0407 Page 1 IMPORTANT This manual should be read thoroughly by the person installing the grill and all persons who will use and maintain
Spartan BBQ s User Manuals
 by Spartan BBQ s User Manuals Spartan 4 Burner BBQ s SB4BFS SB4BBI euromaid.com.au 1800 805 300 customerservice@hapl.com.au Masterluxe domestic outdoor gas barbecue Installation and Opera AGS ating SUN
BUILT IN DELUXE SPIT BRAAI MODELS: 1200 & 1500
 BUILT IN DELUXE SPIT BRAAI MODELS: 1200 & 1500 INSTALLATION INSTRUCTIONS Actual product may differ slightly from the picture above Features (this unit includes a light fitting, brass knob, stainless steel
OWNER S MANUAL WARNING ES-90 ELECTRIC SMOKER & GRILL ASSEMBLY AND OPERATING INSTRUCTIONS
 S M O K E R A N D G R I L L ES-90 ELECTRIC SMOKER & GRILL OWNER S MANUAL ASSEMBLY AND OPERATING INSTRUCTIONS WARNING READ AND FOLLOW ALL WARNINGS AND INSTRUCTIONS IN THIS MANUAL TO AVOID PERSONAL INJURY
SAVE THESE INSTRUCTIONS FOR FUTURE REFERENCE. IF YOU ARE ASSEMBLING THIS UNIT FOR SOMEONE ELSE, GIVE THIS MANUAL TO HIM OR HER FOR FUTURE REFERENCE.
 JACKSON GRILLS INC. 106-2480 Mt. Lehman Road Abbotsford, BC V4X 2N3 TELEPHONE: (604)855-6756 FAX: (604)855-5373 EMAIL: info@jacksongrills.com SUPPORT: support@jacksongrills.com WEB SITE: www.jacksongrills.com
SUMMITTM450 & 650. LP Gas Barbecues. Operating Guide. Read before assembly
 WEBER WEBER WEBER WEBER SUMMITTM450 & 650 LP Gas Barbecues Operating Guide Read before assembly DANGER If you smell gas: 1. Shut off gas to the appliance. 2. Extinguish any open flames. 3. Open lid. 4.
SMOKE N GRILL OWNER S MANUAL ASSEMBLY AND OPERATION INSTRUCTIONS WARNING CHARCOAL SMOKER AND GRILL DS-30 CHARCOAL SMOKER AND GRILL
 SMOKE N GRILL CHARCOAL SMOKER AND GRILL DS-30 CHARCOAL SMOKER AND GRILL OWNER S MANUAL ASSEMBLY AND OPERATION INSTRUCTIONS WARNING READ AND FOLLOW ALL WARNINGS AND INSTRUCTIONS IN THIS MANUAL TO AVOID
2002 Owner s Manual. Chef Series Master Chef Series Gourmet Series
 2002 Owner s Manual USA and Canada Chef Series Master Chef Series Gourmet Series Duplication without written consent is strictly prohibited. This owners manual is for BBQ Grills and Outdoor Kitchens Manufactured
ASSEMBLY & OPERATING INSTRUCTIONS
 ASSEMBLY & OPERATING INSTRUCTIONS MODEL #87048 MODEL #87049 LONESTAR SELECT 4 BURNER STAINLESS STEEL, BUILT-IN, L.P. (PROPANE) LONESTAR SELECT 4 BURNER STAINLESS STEEL, BUILT-IN, N.G. (NATURAL GAS) TABLE
Charcoal Grill WARNING: Kay Home Products TM
 Kay ome Products T 30052 Charcoal rill WARNN: Your grill is intended for residential outdoor use only. Do not use for commercial cooking. Do not use in or on boats or recreational vehicles. Do not use
FOR OUTDOOR USE ONLY - OPERATES ON LPG
 Gemini Gas Grill Model No. GM172-120 GM172-121 Model No. GM172-122 FOR OUTDOOR USE ONLY - OPERATES ON LPG Retain these instructions for future use. Important: The installer or seller must leave these instructions
INSTRUCTION MANUAL. MODEL NUMBER: GBBK/GBBKR Outdoor Portable Charcoal Grill. For Outdoor Use Only!
 INSTRUCTION MANUAL MODEL NUMBER: GBBK/GBBKR Outdoor Portable Charcoal Grill For Outdoor Use Only! WARNING! BE CAREFUL OF SHARP EDGES DURING ASSEMBLY MADE IN CHINA Save these instructions for future reference.