ASSEMBLY, USE AND CARE MANUAL
|
|
|
- Hortense Morris
- 5 years ago
- Views:
Transcription


1 ASSEMBLY, USE AND CARE MANUAL MODEL NO: PG-50403SRL MODEL NAME: Classic Series Pedestal Grill FOR OUTDOOR USE ONLY This manual is available on Item #: - JSCART-2 - JCSCART-NG (with side burner) - JCSCART-2NG DANGER If you smell gas: 1. Shut off gas to the appliance. 2. Extinguish any open flame. 3. Open lid. 4. If odor continues, keep away from the appliance and immediately call your gas supplier or your fire department. WARNING 1. Do not store or use gasoline or other flammable liquids or vapors in the vicinity of this or any other appliance. 2. An LP cylinder not connected for use shall not be stored in the vicinity of this or any other appliance.
2 TABLE OF CONTENTS Messages to Our Users Important Installation Safety Precautions Exploded View Parts List Assemble Instruction Gas Connections Leaking Test Installer Final Check List Grill Lighting Instructions Operation Instructions Care & Maintenance Trouble Shooting Grilling Tips Placement of Grill Limited Warranty MESSAGE TO OUR USERS Thank you for purchasing your new Jackson Grill. We hope you will have great enjoyment in using our fine product. Do not attempt to assemble and use this grill unless you read this entire manual thoroughly. Keep the manual in a handy place as it has answers for questions that may occur in your future use. Please record the serial number of your grill in your owner s manual. Any questions please feel free to contact our service center, we will be glad to assist you; please refer to this model No. PG-50403SRL (Classic Series) whenever you contact us. Thank you. VERY IMPORTANT: ANY PROBLEM, PLEASE CONTACT OUR SERVICE CENTER AT NOTE: THIS APPLIANCE IS NOT INTENDED TO INSTALL IN OR ON RECREATIONAL VEHICLES OR BOATS. THIS APPLIANCE IS FOR OUTDOOR USE ONLY. DEAR INSTALLER / ASSEMBLER: PLEASE LEAVE THIS MANUAL WITH THE CONSUMER. DEAR CONSUMER: PLEASE KEEP THIS MANUAL FOR FUTURE USE.!!!WARNING!!! Failure to follow all manufacturer s instructions could result in serious body injury and/or property damage.!!!caution!!! Some parts of this grill may have sharp edges especially as mentioned in this manual! Wear suitable protective gloves if necessary. 2
3 A special message to our customers: Thank you for choosing the Jackson Grill for your new gas grill. This appliance is designed with quality components and we are confident that it will provide you with years of excellent operation. Please take the time to read the whole manual and familiarize yourself with all of the features of the Jackson Grill. This manual also contains important safety information and operation instructions. Ensure that this manual remains handy to the barbeque for quick reference. If you need to obtain replacement parts for your Jackson Grill, contact your local dealer. NOTE: It is normal for stainless steel surfaces to discolor due to high heat given off from the barbeque burners. Please take the time to fill out and return the Ownership and Registration Card below. It can be mailed to: Jackson Grills Inc Mt. Lehman Road, Abbotsford, BC V4X 2N3 Or Fax: Please complete and return within 10 days. Thank you. Mr. Mrs. Ms. Miss First Name: Initial: Last Name: Street: Apt. #: City: State/Province: Zip/Postal: Phone: Date of Purchase: Dealer: Model: Item #: Serial #: Comments: Thank you for taking the time to fill out this Ownership and Registration Card 32
4 IMPORTANT The symbols and boxes shown below explain what each symbol means. Read and follow every message found in this manual.!!! DANGER!!! DANGER: Indicates an imminently hazardous situation which will result in death or serious body injury if not followed.!!! WARNING!!! WARNING: Warn the possibility of serious body injury if the instructions are not followed strictly. Be sure to always read and follow all of the messages.!!! CAUTION!!! CAUTION: Indicates a potentially hazardous situation which may result in minor or moderate body injury if not followed.!!!warning!!! FOR YOUR SAFETY 1. Shut off the gas to the appliance. 2. Extinguish any open flame. 3. Open lid. 4. If odor continues, immediately call your gas supplier or your fire department.!!!warning!!! FOR YOUR SAFETY 1. Do not store or use gasoline or other flammable vapors and liquids in the vicinity of this or any other appliance. 2. An L.P. cylinder not connected for use shall not be stored in the vicinity of this or any other appliance. 42
5 INSTALLATION SAFETY PRECAUTIONS!!!WARNING!!! Do not try to install this appliance without reading the INSTALLATION SAFETY PRECAUTIONS section of this manual. 1. This grill is designed to operate using only the gas specified on the rating plate. Do not attempt to operate your grill with other gases. Failure to follow this warning may result in a fire hazard and bodily harm, and we will void your warranty. 2. The installation of this appliance must conform with local codes or, in the absence of local codes, with the National Fuel Gas Code, ANSI Z223. 1, or CAN/CGA-B149.2 Propane Installation Code. 3. The L.P. tank used must conform with the specification for L.P.-gas cylinders of the U.S. Department of Transportation (DOT) or the National Standard of Canada, CAN/CSA-B339, Cylinders, Spheres and Tubes for the Transportation of Dangerous Goods. 4. The motor must be electrically grounded in accordance with local codes or, in the absence of local codes, with the National Electrical Code, ANSI/NFPA , or the Canadian Electrical Code, CSA C22.1. Keep the power cord of the motor away from the hot surfaces of the grill while in use. Remove and store the motor in a dry place when not in use. 5. This grill is safety certified for use in the United States and Canada only. Never modify to use in other places. Modification may cause serious body injury or property loss. 52


6 EXPLODED VIEW 6
7 MODEL PG-50403SRL PARTS REF# DESCRIPTION Q TY REF# DESCRIPTION Q TY 01 Rear Panel 1 38 Gas Valves, Main Burner 4 02 Cooking Grids 2 39 Valve Bracket 1 03 Flame Tamers 4 40 Firebox 1 04 Tube Main Burners 4 41 Bracket C, Side Burner 1 05 Rotisserie Motor 1 42 Side Burner 1 06 Motor Bracket 1 43 Side Burner Brass Ring 1 07 Left Side Shelf 1 44 Gas Valve, Side Burner 1 08 Back Panel, Cart 1 45 Ignition Electrode, Side Burner 1 09 Left Panel, Cart 1 46 Side Burner Hose 1 10 Bottom Panel, Cart 1 47 Knob, Side Burner 1 11 Cross Bars, Bottom Panel 2 48 Knob Seat, Side Burner 1 12 Casters Without Brakes 2 49 Side Burner Housing 1 13 Casters With Brakes 2 50 Bracket B, Side Burner 1 14 Door Handles 2 51 Bracket A, Side Burner 1 15 Right Door 1 52 Side Burner Base 1 16 Left Door 1 53 Cooking Grid, Side Burner 1 17 Lighting Rod 1 54 Hinge, Side Burner Lid 1 18 Lighting Rod Screw 1 55 Handle, Side Burner Lid 1 19 Door Hinges 2 56 Lid, Side Burner 1 20 Tank Holder 1 57 Right Side Shelf 1 21 NG Hole Bushing 1 58 Push Bar 1 22 Tank Holder Rubber Strap 1 59 Prongs 2 23 Right Panel 1 60 Rotisserie Rod 1 24 Door Magnets 4 61 Shaft Collar 1 25 Welding Plate, Door Bracket 2 62 Rotisserie Handle 1 26 Door Bracket 1 63 Lid Handle 1 27 Grease Tray 1 64 Insulation Spacers 2 28 Knobs, Main Burners 4 65 Name Plate 1 29 Knob Seats, Main Burners 4 66 Temp. Gauge 1 30 Knob, Rear Burner 1 67 Lid 1 31 Knob Seat, Rear Burner 1 68 Spark Electrode, Rear Burner 1 32 Control Panel 1 69 Thermocouple Protection Cover 1 33 Gas Valve, Rear Burner 1 70 Thermocouple Bracket 1 34 Manifold 1 71 Infrared Cover 1 35 Safety Valve, Rear Burner 1 72 Rear Burner 1 36 LP Gas Regulator 1 73 Warming Rack 1 37 Rear Burner Thermocouple 1 74 NG Gas Hose 1 Note: 1. Part # and Part # 74 are not available on ITEM # JCSCART-2; 2. Part # 36 is not available on ITEM # JCSCART-NG; 3. Part # and Part # 36 are not available on ITEM # JCSCART-2NG. 7


8 ASSEMBLY INSTRUCTION PLEASE READ THE INSTRUCTIONS CAREFULLY AND FOLLOW STEP BY STEP. TOOLS REQUIRED: Philips head screwdriver (not provided), hexagon / Allen wrench (provided). The following hardware is provided. Item Description Specification Quantity 1 With Split lock And Washer 1/4-20x1/2inch 14pcs 2 Truss head screw With Split lock And Washer 3/16-24X3/8inch 2pcs 3 Truss head screw With Split lock And Washer 5/32-32X3/8inch 2pcs 4 Hexagon/wrench 1pc Step I: 1. Use 2 pcs of truss head 1/4-20 x 1/2 screws to attach the left shelf from the inside of the firebox. Use 2 pcs of truss head 1/4-20 x 1/2 screws to attach the left shelf from the outside of the grill firebox. 2. Use 1 pc of 5/32-32 x 3/8 screw to attach the left side shelf bracket to left side panel, 3. Behind the front panel of left side shelf, use 1 pc of 3/16-24x3/8 screw to attach the left side shelf to control panel. 4. Use 2 pcs of truss head 1/4-20 x 1/2 screws to install the motor bracket on the left side shelf. 5. Slide the motor into the motor bracket. 8


9 Step II: 1. Use 4 pcs of truss head 1/4-20 x 1/2 screws to attach the push bar to the right shelf. 2. Use 2 pcs of truss head 1/4-20 x 1/2 screws to attach the right shelf from the inside of the firebox. Use 2 pcs of truss head 1/4-20 x 1/2 screws to attach the right shelf from the outside of the grill firebox. 3. Use 1 pc of 5/32-32 x 3/8 screw to attach the right side shelf bracket to left side panel, 4. Behind the front panel of right side shelf, use 1 pc of 3/16-24x3/8 screw to attach the right side shelf to control panel. 9


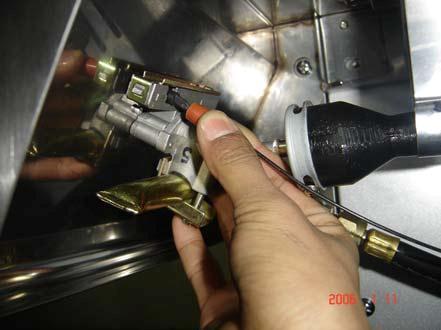
10 Step III: (This step is only available for ITEM# JCSCART-NG) 1. Take out the side burner valve from the square hole of right side panel. 2. Remove the packing materials. Use the hexagon wrench to unscrew (don t remove) the set screw of control knob, and pull out the knob. 3. Unscrew two M4*6 screws from gas valve. 4. Unscrew the 4 screws on side burner bracket A & B which fix side burner. 5. Place side burner valve in back of side burner control panel. 6. Secure gas valve to panel using the M4*6 screws. 7. Make sure valve stem comes through large hole of the panel. Valve orifice should be in center of burner tube. 8. Tighten the screws of side burner bracket A& B. 9. Beneath right side shelf, attach side burner igniter wire to valve electrode. 10. Press control knob onto valve stem, and tighten the set screw of knob


11
. Next, screw handle onto rod.")

12 Step IV: 1. Take out rotisserie rod from bottom panel packing foam, also handle and forks from motor bracket carton. 2. Slide the shaft collar onto the rod followed by the two forks (forks should be pointing toward each other). Next, screw handle onto rod. Tighten thumbscrews of shaft collar and forks. 3. Remove packing material from flame tamers, cooking grids, warming rack, then place them in the proper positions shown below. Step V: 1. Place tank into tank hole in bottom panel. Make sure tank valve is facing front of grill. 2. Hook the end of tank strap to tank holder bracket. 12


13 Step VI: When the grill is in the location, step on the brakes of the casters by foot for hold still. 13
14 GAS CONNECTION!!!WARNING!!! IMPORTANT: Your grill has been designed to operate using only the gas specified on the rating plate. Do not attempt to operate your grill with other gases. Failure to follow this warning may result in a fire hazard and bodily harm. CONNECTION FOR PROPANE GAS(LPG) ITEMS: ONLY USE THE REGULATOR AND HOSE ASSEMBLY PROVIDED WITH THIS GRILL. REPLACEMENT PRESSURE REGULATORS AND HOSE ASSEMBLIES MUST BE THOSE SPECIFIED BY THE MANUFACTURER. Your LP gas grill is factory built to operate using liquid propane gas only. Never attempt to operate your grill on gases other than the type specified on the grill rating plates. Your regulator supplied with your liquid propane gas grill is set for 11inch water column pressure and is for use with propane gas only. The regulator and factory supplied hose assembly must be used when operating your grill with a 20lbs LP gas cylinder. If replacement of the hose and/or regulator becomes necessary, factory specified parts are required. L.P. tank Requirements: The L.P. tank used with your grill must meet the following requirements: 1. Measurement: 12 (30.5cm) (Diameter) X 18 (45.7cm) (Tall) 2. Maximum Capacity: 20lbs. (9Kg) 3. Constructed and marked in accordance with the specification for L.P.-gas cylinders of the U.S. Department of Transportation (DOT) or the National Standard of Canada, CAN/CSA-B339, Cylinders, Spheres and Tubes for the Transportation of Dangerous Goods. See L.P. tank collar for marking. 4. Be arranged for vapor withdrawal. 5. Has a collar to protect the tank valve. 6. No dent or rust. A dented or rusty L.P. tank may be hazardous. L.P. tank valve used must meet the following requirements: 1. Have type I outlet compatible with regulator provided. 2. Have safety relief valve. 3. UL listed Overfill Protection Device (OPD), This OPD safety feature is identified by a unique triangular hand wheel. Only use tanks equipped with this type of valve. (as the figure shown below) For your safety: Ensure that the black plastic grommets of the regulator provided are in place and that the hose does not come into contact with the heat shield or the grill head. Connect the regulator to the L.P. tank: VERY IMPORTANT: a. THE REGULATOR SHALL INCORPORATE IN SUCH A LOCATION THAT IT WILL NOT ATTAIN A TEMPERATURE ABOVE 140 (60 ). b. THE REGULATOR SHALL INCORPORATE A PRESSURE RELIEF VALVE OR OVERPRESSURE DEVICE. c. THE INLET OF THE PRESSURE REGULATOR SHALL BE FITTED TO CONNECT THE TYPE I 14
. 3. Make sure all burner knobs are in their off position. 4. Remove the protective cap from L.P.")
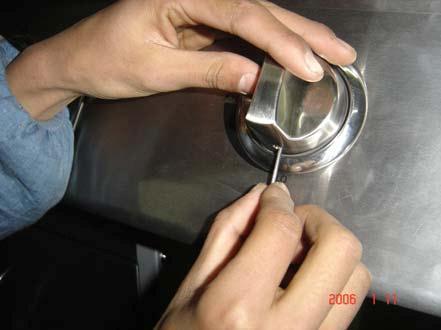
15 CONNECTION OF THE TANK VALVE PER ANSIZ Make sure tank valve is in its full off position (turn clockwise to stop). 2. Check tank valve to assure it has proper external male threads (type I connection per ANSIZ21.81). 3. Make sure all burner knobs are in their off position. 4. Remove the protective cap from L.P. tank valve. Always use cap and strap supplied with valve. 5. Inspect valve connection port and regulator assembly. Look for any damage or debris. Remove any debris. Inspect hose for damage. Never attempt to use damaged or plugged equipment. Contact your local L.P. gas dealer for repair. 6. When connect regulator assembly to the valve, hand tighten nut clockwise to a positive stop. Do not use a wrench to tighten. Use of a wrench may damage quick coupling nut and result in a hazardous condition. (as the figure shown below) 7. Open tank valve fully (counterclockwise). Use a soapy water solution to check all connections for leaks before attempting to light grill. If a leak is found, turn tank valve off and do not use grill until a local L.P. gas dealer can make repairs. OPD HAND WHEEL g!!!warning!!! 2. Never insert any foreign objects into the valve outlet. It may damage the valve and cause leak, leaking gas may result in fire, explosion, heavy body injury, or even death. 3. Do not connect this grill to the self-contained L.P. gas system of a motor home or camper trailer. 4. Do not use the grill until leak tested. 5. Stop and call the fire department if any leak detected. 6. If you cannot stop a gas leak, close the L.P. tank valve IMMEDIATELY, call L.P. supplier or the fire department.!!!danger!!! 1. NEVER store a spare L.P. tank under or near grill or in an enclosed area. 2. NEVER fill the tank beyond 80% full. An overfilled spare L.P. tank is dangerous because surplus gas may leak from safety relief valve. The safety relief valve on a L.P. tank could activate to release gas and cause a fire. 3. The spare L.P. tank must have safety caps installed on the L.P. tank outlet. 4. If any gas leak found on the spare L.P. tank, immediately go away from it and call the fire department. 15
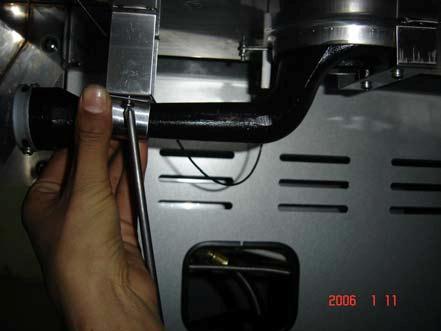
16 VERY IMPORTANT: DISCONNECTED THE TANK WHEN THIS GRILL IS NOT IN USE. To disconnect L.P. gas tank: 1. Turn all the knobs off. 2. Turn the tank valve off fully (turn clockwise to stop). 3. Detach the regulator assembly from tank valve by turning the quick coupling nut counterclockwise. Install the protective cap back L.P. tank valve. CONNECTION FOR NATURAL GAS(NG) ITEMS: Your natural gas grill is factory built to operate using natural gas only. Never attempt to operate your grill on gases other than the type specified on the grill rating plates. Your grill operates at 7 inch water column pressure. Verify supply pressure with your local gas company. If supply pressure is different than 7 inch, contact a certified plumber for assistance. Not for use with LP gas. Before connection: The natural gas hose and assemble are supplied with this grill. Hose and assembly are CSA listed for natural gas, manufacturer gas, mixed gas and for liquefied petroleum and for LP Gas-Air mixtures on basis of 0.64 specific gravity for 1000 BTU s per cubic foot of gas at 0.3 inch water column pressure drop. Only ANSI Z21.54 approved hoses should be used with this grill. The appliance and its individual shut off valve must be disconnected from the gas supply piping system during any pressure testing on that system at test pressures in excess of 1/2 psi (3.5Kpa). The appliance must be isolated from the gas supply piping system by closing its individual manual shut off valve during any pressure testing of the gas supply piping system at test pressure equal to or less than 1/2 psi (3.5Kpa).!!!WARNING!!! Do not use hard metal piping of any kind to connect this type of grill to natural gas source. Use only hose specified by reputable dealer. Using hard metal piping or convoluted metal tubing is an unsafe practice. Movement of the grill can cause breakage of metal pipe.!!!danger!!! Connection should be made by a certified plumber. Supply the plumber with a copy of these instructions. Incorrect connection can result in a gas leak with possibility of fire. Connect your grill to natural gas source: 1. Insert the inlet connection to grill cabinet from back of grill. Tighten it to gas manifold with wrench. Make sure to put natural gas hose through U shape bracket. 16


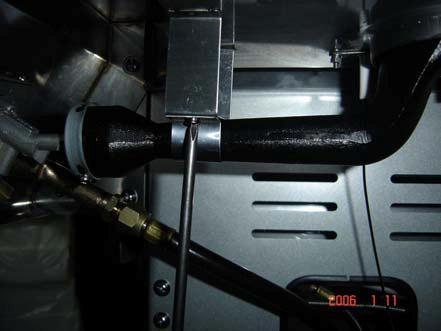
17 2. Coat pipe nipple with gas resistant teflon tape or pipe dope. Tighten quick- disconnect coupler onto pipe nipple that leads to natural gas supply. 3. After grill is completely assembled, make sure natural gas supply valve is OFF and then connect natural gas hose to socket. Push sleeve back on socket and insert plug until sleeve snaps forward, locking plug into socket. Be sure to leak test these connections prior to use. Disconnect your grill from natural gas source: 1. Turn natural gas supply valve to OFF position. 2. Push sleeve back and pull plug out of sleeve. 17


18 LEAK TESTING GENERAL Although all gas connections on the grill are leak tested at the factory prior to shipment, a complete gas tightness check must be performed at the installation site due to possible mishandling in shipment, or excessive pressure unknowingly being applied to the unit. Periodically check the whole system for leaks, or immediately check if the smell of gas is detected. BEFORE TEST 1. Make sure that all packing material is removed from the grill including the burner tie-down straps. 2. Do not smoke while leak testing. 3. Never leak test with an open flame. 4. Make a soap solution with one part liquid detergent and one part water. Prepare a spray bottle, brush, or rag to apply the solution to the connections. For the initial leak test, make sure the L.P. cylinder is full. 5. Grill must be leak tested outdoors in well-ventilated area, away from ignition sources such as gas fired or electrical appliances, and flammable materials. 6. Keep grill away from open flames and/or sparks while testing. TO TEST ON PROPANE GRILL (ITEM# JCSCART-2): 1. Make sure all control knobs are in the OFF position. 2. Make sure the regulator is connected to the L.P. tank tightly. 3. Completely open L.P. tank valve by turning counter clockwise. If you hear a POP sound, turn gas off IMMEDIATELY, it indicates a heavy leak at the connection. Call your gas dealer or fire department. 4. Check every connection from the L.P. tank up to and including the connection to the manifold pipe assembly (the pipe that goes to the burner) by brushing or spraying the soapy solution on the connections. 5. If soap bubbles appear, there is a leak. Turn off L.P. tank valve IMMEDIATELY and retighten connections. Open L.P. tank valve again, and recheck. 6. Always close the L.P. tank valve after leak test by turning clockwise. Only those parts recommended by the manufacturer should be used on the grill. Substitution can void the warranty. Do not use the grill until all connections have been checked and do not leak. TO TEST ON NATURAL GAS GRILL (ITEM# JCSCART-NG / JCSCART-2NG): 1. Make sure all control knobs are in the OFF position. 2. Turn on the natural gas supply. If you hear a rushing sound, turn gas off immediately. There is a major leak at the connection. Correct before proceeding. 3. Create a mixture of half water and half liquid dishwashing soap. Brush soapy solution onto the following: A. Quick-disconnect coupler B. The full length of gas supply hose C. Gas supply connection to gas manifold. C A B 18
19 SAFETY TIPS 1. ALWAYS CHECK FOR LEAKS AFTER EVERY GAS TANK CHANGE. 2. ALWAYS CHECK FOR LEAKS OF EVERY CONNECTIONS BEFORE EACH USE. 3. IF ANY GREASE OR HOT ITEMS FALLING FROM THE GRILL ONTO THE VALVE, REGULATOR, HOSE, ANYTHING CONVEYING THE GAS, CLOSE THE GAS IMMEDIATELY. CHECK THE CAUSE, AND REMOVE THE CAUSE. REPERFORM THE LEAK TEST BEFORE CONTINUING. 4. DO NOT REMOVE THE GREASE TRAY IF THE GRILL HASN T COMPLETELY COOLED. 5. CLOSE ALL CONTROL KNOBS AND L.P. TANK VALVE WHEN THE GRILL IS NOT IN USE. 6. NEVER MOVE THE GRILL WHILE IN USE OR STILL HOT. 7. PUSH THE GRILL FORWARD, DO NOT PULL WHEN MOVING IT. 8. CHECK ALL GAS SUPPLY FITTINGS FOR LEAKS BEFORE EACH USE. IT IS HANDY TO KEEP A SPRAY BOTTLE OF SOAPY WATER NEAR THE SHUT-OFF VALVE OF VALVE OF THE GAS SUPPLY LINE. SPRAY ALL THE FITTINGS. BUBBLES INDICATE LEAKS. 9. DISCONNECTED L.P. TANK IN STORAGE OR BEING TRANSPORTED MUST HAVE A SAFETY CAP INSTALLED. DO NOT STORE AN L.P. TANK IN ENCLOSED SPACES LIKE CARPORT, COVERED PATIO, PORCH, GARAGE OR OTHER BUILDINGS. 10. NEVER LEAVE A GAS TANK IN A RECREATIONAL VEHICLE OR BOAT WHICH MAY BECOME OVERHEATED BY THE SUN. 11. DO NOT STORE L.P. TANK IN OR NEAR AN AREA WHERE CHILDREN PLAY. 12. DISCONNECTED THE TANK AND REMOVE FROM THE GRILL IF THE GRILL IS STORED INDOORS. 13. ANY OTHER PROBLEM, SEE TROUBLESHOOTING OR CONTACT JACKSON GRILLS AT INSTALLER FINAL CHECK LIST!!!WARNING!!! PRE-START CHECKLIST: Property damage, bodily harm, severe burns, and death could result from failure to follow these safety steps. These steps should be performed after the grill has been assembled, stored, moved, cleaned, or repaired, DO NOT operate this grill until you have read and understand ALL of the warning and instructions in this manual. ˆ Ensure that the grill is properly assembled. ˆ The LP regulator & hose connected to grill are provided by the manufacturer. ˆ Inspect the natural gas supply hose for burns, chaffing, kinks, and proper routing before each use. If it is evident there is excessive abrasion or wear, or the hose is cut, it must be replaced prior the grill being used. ˆ Leak check all gas connections and hose, ˆ All internal packaging removed. ˆ Burners are sitting properly on orifices. ˆ Knobs turn freely. ˆ Properly place the empty grease tray onto grease tray brackets to catch grease during use. ˆ User informed of gas supply shut off valve location. ˆ Position your grill on lever ground in a well- ventilated location, at least 36 clearance maintained from combustible materials, buildings and overhangs. ˆ Ensure that all electrical supply cords are properly grounded. Keep any electrical supply cord and the fuel supply hose away from any heated surfaces. Hose should be at least 3 inches from hot surfaces. ˆ There is no unprotected combustible construction material over the grill ˆ Do not obstruct the flow of combustion and ventilation air. 19

20 GRILL LIGHTING INSTRUCTIONS BEFORE LIGHTING: Finally inspect the gas supply hose before turning the gas ON. If there is evidence of cuts, wear, or abrasion, it must be replaced before use, the replacement hose assembly shall be that specified by the manufacturer. VERY IMPORTANT: ALWAYS INSPECT THE HOSE BEFORE EACH USE OF THIS GRILL. TO LIGHT MAIN AND SIDE BURNERS OF THE GRILL: 1. Read instructions before lighting. 2. Turn all knobs to OFF then open the L.P. tank valve. Always keep your face and body as far from the grill as possible when lighting. 3. Open lid during lighting. 4. Push and turn any control knob slowly to HI position. The built-in igniter will click and spark simultaneously to light the pilot and burner in sequence. Turn the control knob to OFF IMMEDIATELY if the burner does not light within 5 seconds, wait 5 minutes for gas to dispel, then repeat the lighting procedure. 5. Follow match lighting instructions if burner can t be lit after repeated 3-4 times. TO LIGHT THE MAIN AND SIDE BURNERS BY MATCH (AS THE ABOVE FIGURE SHOWN): If the burner will not light after several attempts then the burner can be match lit. Tools: Lighting rod (hanging behind the right door) Usage: 1. Read instructions before lighting. 2. Open the lid during lighting. 3. Simply place a lighted match between the coils on the end of the lighting rod and hold next to the burner to ignite. 4. Push and turn the knob to HI position, make sure the burner lights and stays lighted. 5. Repeat 3.4 to light other burners. Keep a spray bottle of soapy water near the gas supply valve and check the connections before each use. Do not light the grill if odor of gas is present, call our service center. 20
21 FLAME CHARACTERISTICS: Check for proper burner flame characteristics. Each burner is adjusted prior to shipment; however, variations in the local gas supply may take subtle necessary adjustments. Burner flames should be blue and stable with no yellow tips, excessive noise, or lifting. If any of these conditions exist call our customer service line. If the flame is yellow, it indicates insufficient air. If the flame is noisy and tends to lift away from the burner, it indicates too much air. NOTE: small yellow tips are ok TO LIGHT REAR BURNER OF THE GRILL: THE WARMING RACK MUST BE REMOVED BEFORE LIGHTING THE REAR BURNER! 1. Read instructions before lighting. 2. Turn all knobs to OFF then open the L.P. tank valve. Always keep your face and body as far from the grill as possible when lighting 3. Open lid during lighting. 4. Push down the safety valve switch button and hold on with right hand, allow the gas to reach the burner. 5. Push and turn rear burner knob slowly to HI position with left hand 3 seconds later than push down the button. The built-in igniter will click and spark simultaneously to light the pilot and burner in sequence. Keep pushing the button for 10 seconds to allow the safety valve open. Turn the control knob to OFF and release the button IMMEDIATELY if the burner does not light within 5 seconds, wait 5 minutes for gas to dispel, then repeat the lighting procedure. 6. Follow match lighting instruction if burner can t be lit after repeated 3-4 times. TO LIGHT REAR BURNER BY MATCH: 1. Read instructions before lighting. 2. Open the lid during lighting. 3. Push and turn the rear burner knobs slowly to HI position, then release. 4. Push down the safety valve switch button with right hand and hold on, light by match with left hand. Make sure the burner lights and stays lighted. 21
22 OPERATION INSTRUCTIONS!!!CAUTION!!! 1. Often clean the grill, a grease fire that may damage the grill may occur if the grill has not been cleaned frequently 2. NEVER leave the grill unattended while using. 3. Do not use water to extinguish the grease fire, it may cause body injury. Turn knobs off and L.P. tank off in case grease fire occurs. 4. Grease fire can t be put out by closing the lid. Turn off knobs and L.P. tank IMMEDIATELY if any grease fire occurs.!!!warning!!! For your safety use of grill: 1. Keep grill area clear and free from any flammable material. 2. NEVER let children operate the grill or play near the grill. 3. This grill is for outdoor use ONLY. NEVER use in a enclosed area like carport, porch, covered patio, garage, or under a surface that can catch fire. 4. Do not block the ventilation holes in the four sides of the grill cart, it may affect the combustion performance of the burner due to insufficient air. 5. Use grill at least 36 away from any wall or surface. 120 away from objects that may spark and ignite gas i.e. live electrical appliances, pilot lights of water heaters, etc. 6. Do not use this grill on or under wood balconies. 7. This grill is designed to use only L.P. gas, DO NOT use lava rock, briquets, charcoal on it. 8. NEVER light the burner with lid closed. Non-ignited gas accumulated inside a closed grill may cause explosions. 9. Check the burner flames periodically. 10. Turn off the gas supply when the grill is not in use. 11. Always turn off the L.P. tank completely and detach from the grill before moving. TOTAL GAS CONSUMPTION: Total gas consumption (per hour) of PG-50403SRL grill with all burners on HI : For Item # JCSCART-NG: Main burners 48,000 Btu/hr Rear burner 7,500 Btu/hr Side burner 12,000 Btu/hr Total 67,500 Btu/hr For Item # JCSCART-2 / JCSCART-2NG: Main burners 48,000 Btu/hr Rear burner 7,500 Btu/hr Total 55,500 Btu/hr 22
23 GENERAL USE OF THE GRILL: The grill burners encompass the entire cooking area and are side ported to minimize blockage from falling grease and debris. Above the burners are stainless steel radiated. The igniter knobs are located on the valve panel. Follow the lighting instructions printed on the control panel. USING THE GRILL: Grilling requires high heat for searing and proper browning. Most foods are cooked at the HI heat setting for the entire cooking time. However, when grilling large pieces of meat or poultry, it may be necessary to turn the heat to a lower setting after the initial browning. This cooks the food through without burning the outside. Foods cooked for a long time or basted with a sugary marinade may need a lower heat setting near the end of the cooking time. Make sure the grill has been leak tested and is properly located. Remove any packing material. Light the grill burners using the instructions in this manual. Turn the control knob to HI and preheat the grill for 15 minutes. Notice: The grill lid is to be closed during the appliance preheat period. Place the food on the grill and cook to the desired doneness. Adjust heat setting, if necessary. The control knob may be set to any position between HI and LO. NOTE: The grill is designed to grill efficiently without the use of lava rocks or briquettes of any kind. Heat is radiated by the stainless steel flame tamers under the stainless steel cooking grids. NOTE: The hot grill sears the food, sealing in the juices. The longer the preheat, the faster the meat browns.!!warning!! Electrical Grounding Instructions 1. This grill is equipped with a three-prong (grounding) plug for your protection against shock hazard and should be plugged directly into a properly grounded three-prong receptacle. 2. Do not cut or remove the grounding prong from this plug. 3. Keep any electrical supply cord and the fuel supply hose away from any heated surfaces. Remove and store the motor in a dry place when not use. USING ROTISSERIE KIT: 1. Take off the rotisserie kit from the grill. 2. Slide off the left fork. 3. Load the meat or poultry onto the rod. 4. Restore the left fork, put two forks into the meat or poultry as far as possible. Make sure the meat or poultry is located in the middle of the rod. Screw the wing nuts of the fork as tight as possible. 5. Wrap the food with butchers string (never use nylon or plastic string) to secure any loose portions, if necessary. 6. Restore the rotisserie kit into the motor. TIPS OF ROTISSERIE KIT: 1. If larger cuts of meat are being grilled, the rod may flex, it s normal. 2. Remove the cooking grids for larger cuts of meat, if the meat scrapes on the cooking grids during rotation. 23

24 CARE & MAINTENANCE MAINTENANCE 1. Keep the grill area clear and free from combustible materials, gasoline and other flammable vapors and liquids. 2. Keep the holes in the three sides of the cart clear and free from debris, thus ensure the flow of combustion and ventilation air is unobstructed. 3. Visually check burner flames as following: a. Remove cooking grids and flame tamers b. Light burners. c. Turn knobs from HI to LO, Check the flame status, the flame in LO position should be smaller than in HI position, as figure shown below. d. Always check flame before each use, see TROUBLESHOOTING if any abnormal status found. CLEANING STAINLESS STEEL CLEANING The grill is made of stainless steel. There are many different stainless steel cleaners available. Always use the mildest cleaning procedure first, scrubbing in the direction of the grain. To touch up noticeable scratches in the stainless steel, sand very lightly with dry 100 grit emery papers in the direction of the grain. Specks of grease can gather on the surfaces of the stainless steel and bake on to the surface and give the appearance of rust. Use an abrasive pad in conjunction with a stainless steel cleaner to remove. DO NOT USE ACID DETERGENT AND/OR ANTIRUST TO CLEAN THE CONTROL PANEL WITH PRINTING. SUCH STRONG CLEANSER MAY CLEAN OFF THE PRINTING. COOKING AREA CLEANING The easiest way to clean the grill is to clean immediately after turning off the flame and cooking is completed. Wear a barbeque mitt to protect your hand from the heat and steam. Dip a brass bristle barbeque brush in tap water and scrub the hot grill. Dip the brush frequently in the water. Steam, created as water contacts the hot grill, assists the cleaning process by softening any food particles. The food particles will fall and burn. Never immerse a hot parts in water. GRILL BURNER CLEANING 1. Be sure the tank valve and the knobs are in the OFF position. Make sure the grill is cool. 2. Clean the exterior of the burner with a wire brush. Clear stubborn scale with a metal scraper. Clear any clogged ports with a straightened paper clip. Never use a wooden toothpick as it may break off and clog the port. 3. The frequency to clean the burner relies on how often you use the grill. VERY IMPORTANT: The orifice of the valve must be located in the center of burner section after move and clean. Otherwise, it may cause serious body injury and property damage. Swing the burner slightly after replaced to check whether it is installed properly. GREASE TRAY CLEANING The grease tray should be emptied and wiped down periodically and washed in a mild detergent and warm water solution. A small amount of sand may be placed in bottom of grease tray to absorb the grease. 24
25 TROUBLE SHOOTING SPIDER AND INSECT WARNING Spiders and insects can nest in the burners after storing, these nest can cause fires inside the tube or beneath the grill. This is very dangerous condition. So always clean the burners before use after storing. WHEN TO LOOK FOR SPIDERS Inspect the burners at least once a year or immediately in case any of the following conditions occur: 1. Yellow flame with insects burning smell. 2. Temperature can t rise. 3. Heats unevenly. 4. The burners make popping noises. BEFORE CALLING FOR SERVICE Inspect according to following trouble shooting before contact our service center. TROUBLE SHOOTING PROBLEMS POSSIBLE CAUSE SOLUTIONS Burner won t light after turning and pushing the knobs Burner can t light by match Yellow or orange flame with gas odor Electrode deposited with cooking residues Electrode damaged Electrode wires are loose or fall off Orifice blocked Wire is shorting No gas Gas flow is not smooth Incorrect assembly between burner and valve Incomplete combustion Gas hose bent or kinked Use clean swab and alcohol to clean. Replace. Reconnect or replace with new electrode assembly with wires. Check the orifice for blockage. Replace with new electrode assembly with wires. Open the LP tank valve / Replace LP tank valve Clear burner tubes Re-assemble Call our customer service center. Smooth out the hose. Low heat with knob in HI position. Flare-up Burner or orifice blocked. Low gas pressure Grill not preheated Excessive meat fat Temp. too high Grease deposit Clear blockage. Call the gas dealer. Preheat the grill for 15 minutes. Cut off fat before grilling. Adjust Clean Flame out High winds Find a less windy place. Flame lifting Too high of a gas pressure Call the gas dealer. Flashback Burner port blocked Clean burner port. Grease fire Grease accumulated in food Turn off knobs and LP tank valve. Leave lid open and let fire burn out. Clean the grill after cooling. 25
26 GRILLING TIPS 1. The doneness of meat, whether rare, medium, or well done, is affected by the thickness to a large extent. 2. The cooking time is affected by the kind of meat, the size and shape of the cut, the temperature of the meat when cooking begins, and the degree of doneness desired. 3. Defrost meat in the refrigerator overnight. Don t use a microwave, this always yields a juicier. 4. Use a spatula instead of tongs or a fork to turn the meat, as a spatula will not puncture into the meat and let the juices come out. 5. To get the juiciest meats, add seasoning or salt after the cooking is finished on each side and turn the meat only once (juices are lost when the meat is turned several times). Turn the meat just after the juices begin to bubble to the surface. 6. Cut off any excess fat from the meat before grilling. FOOD SAFETY Always follow the following tips to enjoy a safe and heath outdoor grilling. 1. Always use hot soapy water to wash hands, surfaces & utensils after processing raw meat. 2. Always separate the raw meats from done foods to avoid cross contamination. 3. Always use clean utensils to handle the food. 4. Always cook the meat thoroughly to kill germs. Use a thermometer to inspect the inner temp. of the meat, if necessary. 5. Place the done foods and leftovers promptly into refrigerator, if eat no longer at that moment. DO NOT LEAVE THE GRILL UNATTENDED WHILE COOKING. PLACEMENT OF THE GRILL 1. Clean the grill. 2. Store the grill in well-ventilated dry outdoors and out of reach of children when L.P. tank is connected to the grill. 3. Store the grill in dry indoors ONLY after the L.P. tank is turned off and removed, the L.P. tank must store outdoors, out of the reach of children, NEVER store the tank in a building, garage or any other enclosed area. 4. Put on the vinyl cover supplied with this grill. 26
27 LIMITED WARRANTY MODEL NO.: PG-50403SRL Jackson Grills Inc. warrants the following materials and workmanship to be free of defects for as long as you own the grill. This covers the following components: main stainless steel outer hood, stainless steel cooking grills, stainless steel outer pedestal system, stainless steel handle, Stainless Steel Burners and Stainless Steel cross lighters. Subject to the following conditions: During the first 5 years Jackson Grills will replace or repair at our option the defective parts free of charge. From 6 years to lifetime Jackson Grills will provide replacement parts at 50% of the current retail price. Inner stainless hood, firebox, Flame Diffusers and warming shelf come with a 10-year warranty. During the first 5 years Jackson Grills will replace or repair at our option the defective parts free of charge. From 6 to 10 years Jackson Grills will provide replacement parts at 50% of the current retail price. The hardwood cart option (if equipped) is warranted for a period of one year. Other components: hose and regulator, thermometer, gas valves, knobs, fasteners, igniter and electrode, and all accessories will be provided free of charge during the two years of the limited warranty. Limited Warranty subject to the following conditions and limitations: - This factory warranty is non transferable and may not be extended whatsoever by any of our representatives. - Jackson Grills Inc. warrants its products to the original purchaser only (NO EXCEPTIONS) - This Limited Warranty does not cover any damage caused by misuse, lack of maintenance, hostile environments, accident, alterations, abuse or neglect, and parts installed by other manufacturers will nullify the warranty. - This Limited Warranty does not cover and scratches, dents, corrosion, or discoloring by heat (all stainless steel will discolor), abrasive and chemical cleaners will also damage grill and grill surface. - Should deterioration occur to the point of non-performance within the duration of the warranted coverage, a replacement will be provided in the first year only. This warranty extends to the repair or replacement of warranted parts that are defective in materials or workmanship provided that the product has been operated in accordance with the operation instructions and under normal conditions. - After the first year Jackson Grills Inc. reserves the right to fully disengage all obligations with respect to this Limited Warranty by refunding the original warranted purchaser the original wholesale purchase price of the warranted parts. - A licensed, authorized, service technician or contractor must install the gas grill. Installation must be done in accordance with the installation instructions included with the product. - Jackson Grills Inc. or its parties will not be responsible for the installation, labor or any other costs or expenses related to the re installation of the warranted part, and such expenses are not covered by this warranty. - Notwithstanding any provision contained in this Limited Warranty, Jackson Grills Inc. responsibility under this warranty is defined as above and it shall not in any event extend to any incidental, consequential, or indirect damages. - Jackson Grills Inc. neither assumes, nor authorizes any third party to assume, on its behalf, any other liabilities with respect to the sale of this product. - The bill of sale and proof of original ownership and serial number will be required when making any warranty claims from your authorized dealer. The warranty registration card must be returned within 30 days to register your warranty. - Jackson Grills Inc. reserves the right to inspect any parts prior to approving warranty claim. Jackson Grills or its representatives shall not be liable for ANY transportation charges, labor charges or duties 27
BULL. ASSEMBLY & OPERATING INSTRUCTIONS
 BULL. Dutdaar Products Inc. "., Ontario, California 91761 ASSEMBLY & OPERATING INSTRUCTIONS Model No. 18038 7-Burner High Grade Commercial Stainless Steel Longhorn, LP Model No. 18039 7- Burner High Grade
GAS BARBECUE MODEL NO: BBQ4 USER GUIDE PART NO: /11
 GAS BARBECUE MODEL NO: BBQ4 PART NO: 6925305 USER GUIDE 2/11 INTRODUCTION Thank you for purchasing this CLARKE product Before attempting to use this product, please read this manual thoroughly and follow
Folding Grill Stand Manual
 O u t d o o r G r i l l i n g P r o d u c t s Folding Grill Stand Manual MODEL: CFGS-150 IMPORTANT SAFETY INSTRUCTIONS READ AND SAVE THESE SAFETY INSTRUCTION BEFORE USING THIS GRILL STAND m DANGER: m Failure
SAVE THESE INSTRUCTIONS FOR FUTURE REFERENCE. IF YOU ARE ASSEMBLING THIS UNIT FOR SOMEONE ELSE, GIVE THIS MANUAL TO HIM OR HER FOR FUTURE REFERENCE.
 JACKSON GRILLS INC. 106-2480 Mt. Lehman Road Abbotsford, BC V4X 2N3 TELEPHONE: (604)855-6756 FAX: (604)855-5373 EMAIL: info@jacksongrills.com SUPPORT: support@jacksongrills.com WEB SITE: www.jacksongrills.com
STAINLESS STEEL GAS BARBECUE MODEL NO: SSBBQ4 USER GUIDE PART NO: /11
 STAINLESS STEEL GAS BARBECUE MODEL NO: SSBBQ4 PART NO: 6925310 USER GUIDE 2/11 INTRODUCTION Thank you for purchasing this CLARKE product. Before attempting to use this product, please read this manual
GAS GRILL ASSEMBLY, USE AND CARE MANUAL MODEL NO.: GD4210S-B1
 GAS GRILL ASSEMBLY, USE AND CARE MANUAL MODEL NO.: GD4210S-B1 ANY QUESTIONS DURING ASSEMBLY, USE AND CARE, PLEASE CALL OUR SERVICE CENTER FOR ASSISTANCE 1 Message to our users Thank you for selecting the
14 ROUND TABLETOP GAS GRILL. Product code: UPC code: Date of purchase: / /
 OWNER S MANUAL 14 ROUND TABLETOP GAS GRILL Product code: 0-03946564-6 UPC code: 0 45774 87562 1 Date of purchase: / / Safety Guidelines... Safety Instructions... 1 2-3 Assembly Instructions... 4-7 Lighting
OWNERS MANUAL. Installation, Operation & Maintenance Guide MODELS: SO30BQRRL/SO42BQRL
 OWNERS MANUAL Installation, Operation & Maintenance Guide MODELS: SO30BQRRL/SO42BQRL This Page Intentionally Left Blank For Your Safety... 3 Basic Safety Guidelines... 5 Installation... 6 Gas Connection
USE AND CARE MANUAL FOR OUTDOOR USE ONLY
 S o n o m a PLATINUM EDITION Sonoma Platinum Edition Grill: 27 Model with Rear Infrared Burner TM USE AND CARE MANUAL FOR OUTDOOR USE ONLY General Safety Instructions IMPORTANT SAFETY INFORMATION - Read
USE AND CARE MANUAL FOR OUTDOOR USE ONLY MADE IN THE U.S.A.
 S o n o m a PLATINUM EDITION Sonoma Platinum Edition Grill: 30 Model TM USE AND CARE MANUAL FOR OUTDOOR USE ONLY MADE IN THE U.S.A. General Safety Instructions IMPORTANT SAFETY INFORMATION - Read this
ASSEMBLY, USE AND CARE MANUAL
 JACKSON GRILLS INC. #106-2480 Mt. Lehman Rd. Abbotsford, BC V4X 2N3 TELEPHONE: (604) 855-6756 FAX: (604) 855-5373 SUPPORT: support@jacksongrills.com WEB SITE: www.jacksongrills.com ASSEMBLY, USE AND CARE
BakerBox multi-purpose pizza oven
 BakerBox multi-purpose pizza oven. ASSEMBLY & OPERATING INSTRUCTIONS Important: Read these instructions for use carefully so as to familiarize yourself with the appliance before putting it to your gas
Contents. Fittings and parts checklist
 JLH2B5 Contents Parts List Exploded Diagram Assembly instructions Safety information Installation Using your barbecue Cooking Maintenance Fittings and parts checklist Ref Description Ref Description 1,
Assembly Instructions & User s Manual TRITON 6 BURNER GRIDDLE Model #: FSODBG1206
 Assembly Instructions & User s Manual TRITON 6 BURNER GRIDDLE Model #: FSODBG1206 Please keep this instruction manual for future reference Customer Service: (888) 922-2336, 7:00 am to 12:00 am daily CST
Assembly & Operation Manual
 Deluxe Outdoor Tabletop Gas Grill Model TT250 Assembly & Operation Manual DANGER 1. Never operate this appliance unattended. 2. Never operate this appliance within 10 ft (3.0 m) of any structure, combustible
" Table Top Charcoal Grill Model # SRYH1450 Instructions Manual
 259-0011 14" Table Top Charcoal Grill Model # SRYH1450 Instructions Manual WARNING FOR YOUR SAFETY 1. This grill is for outdoor use only, and shall not be used in a building, garage, or any other enclosed
17.75 In. Table Top Gas Grill
 17.75 In. Table Top Gas Grill Model #OCTG-1775 OUTDOOR USE ONLY! NEVER USE INDOORS! CARBON MONOXIDE HAZARD Burning propane inside may be fatal. It gives off carbon monoxide, which has no odor. NEVER burn
Introduction. No Hassle Guarantee
 Pro Grill MANUAL Introduction Thank you for selecting West Marine s Pro Grill. Your unit has been carefully inspected and tested. The Pro Grill is one of the finest barbecues manufactured for marine use.
Tabletop Charcoal Grill Model # SRCG806 Instructions Manual
 259-0002 Tabletop Charcoal Grill Model # SRCG806 Instructions Manual WARNING FOR YOUR SAFETY 1. This grill is for outdoor use only, and shall not be used in a building, garage, or any other enclosed area.
GRILLSTER PORTABLE GAS GRILL
 Gourmet Outdoor Grilling GRILLSTER PORTABLE GAS GRILL MODEL: CGG-059 ASSEMBLY AND OPERATING INSTRUCTIONS m WARNING: FOR OUTDOOR USE ONLY m This instruction manual contains important information necessary
LP (Liquefied Petroleum Gas) Installation Safety Precautions
 Installation Safety Precautions") Installation Safety Precautions Use grill, as purchased, only with LP (propane) gas and the regulator/valve assembly supplied. If your grill is Dual Fuel ready, a conversion kit must be purchased for use
Installation Safety Precautions Use grill, as purchased, only with LP (propane) gas and the regulator/valve assembly supplied. If your grill is Dual Fuel ready, a conversion kit must be purchased for use
ASSEMBLY & OPERATION INSTRUCTIONS FOR OUTDOOR GAS BARBECUES
 ASSEMBLY & OPERATION INSTRUCTIONS FOR OUTDOOR GAS BARBECUES FOR MODEL# BBQ / BBQW / BLKBBQW OUTDOOR BBQ GRILL SAFETY INSTRUCTIONS READ THE FOLLOWING INSTRUCTIONS CAREFULLY AND BE SURE YOUR BARBECUE IS
 #4187508 Attention! This grill will become very hot. Do not move it during operation. Caution! Do not use alcohol, gasoline or similar fluids for lighting or relighting. Warning! Keep children and pets
DUAL BLAZE PORTABLE GAS GRILL
 Outdoor Grilling Pro ducts DUAL BLAZE PORTABLE GAS GRILL MODEL: CGG-522 ASSEMBLY AND OPERATING INSTRUCTIONS m WARNING: FOR OUTDOOR USE ONLY m This instruction manual contains important information necessary
Searin Sphere Portable Gas Grill
 Gourmet Outdoor Grilling Searin Sphere Portable Gas Grill MODEL: CGG-049 ASSEMBLY AND OPERATING INSTRUCTIONS m WARNING: FOR OUTDOOR USE ONLY m This instruction manual contains important information necessary
for Assembly, Operating & Maintenance of THIS CHARCOAL GRILL IS DESIGNED FOR OUTDOOR USE ONLY.
 Owner s Manual for Assembly, Operating & Maintenance of Model M-15AB Charcoal Grill www.bigjohngrills.com YOU MUST READ THIS OWNER S MANUAL BEFORE OPERATING YOUR CHARCOAL GRILL. WARNING: Do not ignite
440 Sizzler Patio gas Braai
 440 Sizzler Patio gas Braai USER MANUAL & ASSEMBLY INSTRUCTIONS Important: Read these instructions and warnings carefully so as to familiarize yourself with the appliance before connecting it to its gas
Owner s Manual for JPG50
 Owner s Manual for JPG50 Important Notice Please read ALL safety notices on Pg. 1-2 before assembling or operating this grill. Version: MAY17 CERTIFICATION AND SAFETY!WARNING! If you smell gas: 1. Shut
NECO MODEL NECO MODEL AMENDMENT SHEETS FN38LP/NG. Amendment Pages (Use these pages in place of standard manual)
") NECO MODEL AMENDMENT SHEETS NECO MODEL FN38LP/NG Amendment Pages (Use these pages in place of standard manual) Grill Assembly Built-In Instructions 5-12 13-15 16-19 17 20 21-22 23 Welcome & Congratulations
NECO MODEL AMENDMENT SHEETS NECO MODEL FN38LP/NG Amendment Pages (Use these pages in place of standard manual) Grill Assembly Built-In Instructions 5-12 13-15 16-19 17 20 21-22 23 Welcome & Congratulations
SUMMIT 4 BURNER & 6 BURNER
 WEBER WEBER WEBER WEBER SUMMIT 4 BURNER & 6 BURNER NATURAL GAS COOKING MODULES Operating Guide Read before assembly WEBER WEBER W E B E R W E B E R Summit 6 Burner NG CANADIAN GAS ASSOCIATION R A P P R
OWNER S MANUAL for Versa 100
 OWNER S MANUAL for Versa 100 For Portable Model: JPG100-LP (Liquid Propane) Important Notice Please read ALL safety notices on Pg.3 before assembling or operating this grill. Version: AUG15 TABLE OF CONTENTS
USE AND CARE MANUAL FOR OUTDOOR USE ONLY ALWAYS KEEP YOUR GRILL COVERED WHEN NOT IN USE
 Amana TM SS 4 Burner Gas Grill USE AND CARE MANUAL FOR OUTDOOR USE ONLY ALWAYS KEEP YOUR GRILL COVERED WHEN NOT IN USE BEFORE YOU BEGIN We ve included easy-to-follow, step-by-step instructions which have
Tabletop Gas Grill VT280SS1
 Tabletop Gas Grill VT280SS1 Conforms to ANSI Std Z21.89-2013 Outdoor cooking specialty gas appliance DANGER Tools needed for assembly: Phillips screwdriver, Pliers or Adjustable Wrench DANGER If you smell
HORIZON BARBECUE ROASTING HOOD OWNERS MANUAL
 HORIZON BARBECUE ROASTING HOOD OWNERS MANUAL 0 IMPORTANT READ ALL INSTRUCTIONS BEFORE ASSEMBLY, INSTALLATION OR OPERATING ROASTING HOOD SAFETY PRECAUTIONS AND WARNINGS Tucker Horizon barbecues and roasting
Fusion 600 Pro WARNING. To reduce the risk of fire,burn hazard or other injury,read the manual carefully and completely before using your grill.
 Fusion 600 Pro USER MANUAL & ASSEMBLY INSTRUCTIONS Important: Read these instructions and warnings carefully so as to familiarize yourself with the appliance before connecting it to its gas container.
22 Kettle Charcoal Grill SAFE USE, CARE AND ASSEMBLY MANUAL
 22 Kettle Charcoal Grill SAFE USE, CARE AND ASSEMBLY MANUAL 85-1448-8 ST22022D Read and save this manual for future reference. If pre-assembled, leave this manual with unit for consumer s future reference.
JUMBUCK RONDO MEDIUM CHARCOAL SPIT ROASTER (HS-FP002)
") JUMBUCK RONDO MEDIUM 3180887 CHARCOAL SPIT ROASTER (HS-FP002) SAFETY INSTRUCTIONS FOR OUTDOOR USE ONLY For outdoor use only. Improper installation, adjustment, alteration, service or maintenance can cause
JUMBUCK RONDO MEDIUM 3180887 CHARCOAL SPIT ROASTER (HS-FP002) SAFETY INSTRUCTIONS FOR OUTDOOR USE ONLY For outdoor use only. Improper installation, adjustment, alteration, service or maintenance can cause
assembly guide ELECTRIC Model Numbers: Estimated time required for assembly: 1 Hour (English) /05/09
 /05/09") assembly guide Model Numbers: 08601559 10601578 10601585 10601514 Estimated time required for assembly: 1 Hour ELECTRIC (English) 42804372 11/05/09 2 ASSEMBLY GUIDE A, B, C, Assembly: CAUTION: For your
assembly guide Model Numbers: 08601559 10601578 10601585 10601514 Estimated time required for assembly: 1 Hour ELECTRIC (English) 42804372 11/05/09 2 ASSEMBLY GUIDE A, B, C, Assembly: CAUTION: For your
INSTRUCTION MANUAL MODELS: RT-30, RT-36, RT-48, RT-60 & RT-72 REVISED APRIL, 2003 *PLEASE RETAIN FOR FUTURE REFERENCE
 INSTRUCTION MANUAL MODELS: RT-30, RT-36, RT-48, RT-60 & RT-72 REVISED APRIL, 2003 *PLEASE RETAIN FOR FUTURE REFERENCE THANK YOU for purchasing this quality product. Your Crown Verity Inc. rotisserie will
SBG2500-1, SBG and SBG Gas Grill Owner s Manual
 SBG2500-1, SBG2501-1 and SBG2801-1 Gas Grill Owner s Manual SBB00095-2-0407 Page 1 IMPORTANT This manual should be read thoroughly by the person installing the grill and all persons who will use and maintain
Evolution 500 Pro WARNING. To reduce the risk of fire,burn hazard or other injury,read the manual carefully and completely before using your grill.
 Evolution 500 Pro USER MANUAL & ASSEMBLY INSTRUCTIONS Important: Read these instructions and warnings carefully so as to familiarize yourself with the appliance before connecting it to its gas container.
Outdoor Charcoal Barbecue Grill
 OWNER S MANUAL Outdoor Charcoal Barbecue Grill Model No CBT1706W FOR YOUR SAFETY: 1 Do NOT store or use gasoline or other flammable liquids or vapors in the vicinity of this or any other appliance 2 When
3-Burner LP Gas Grill
 ITEM # 41590 WARNING Improper installation, adjustment, alteration, service or maintenance can cause injury or property damage. Read the installation, operation and maintenance instructions thoroughly
Cover. Liquid Propane Gas Grill Model No.: Assembly Instructions/Use and Care Manual
 Cover Assembly Instructions/Use and Care Manual Liquid Propane Gas Grill Model No.: 122.16118 Parts Assembly Safety Rules Use and Care Troubleshooting Español! WARNING: Read this Owner s manual carefully
VCS325SSBI Series and VCS525SSBI Series Assembly Procedures
 VCS325SSBI Series and VCS525SSBI Series Assembly Procedures Model VCS525SSBI Shown Tools Required: Knife or scissors, Phillips or Robertson (square head) screwdriver. WARNING: Some parts may have sharp
FOR OUTDOOR USE ONLY THIS IS YOUR ASSEMBLY, CARE & USE MANUAL WITH IMPORTANT WARNING & SAFETY INFORMATION. PLEASE SAVE THESE INSTRUCTIONS.
 Owner s Manual Tabletop Gas Grill 1-Burner Model VT280B1 FOR OUTDOOR USE ONLY THIS IS YOUR ASSEMBLY, CARE & USE MANUAL WITH IMPORTANT WARNING & SAFETY INFORMATION. PLEASE SAVE THESE INSTRUCTIONS. Manufactured
ASSEMBLY & OPERATING INSTRUCTIONS
 200 100 300 400 800 500 700 600 ASSEMBLY & OPERATING INSTRUCTIONS Model: 720-0432 FOR OUTDOOR USE ONLY A16Y07P-1 PLEASE CONTACT 1-866-984-7455 FOR ASSISTANCE ABOUT ASSEMBLY OR GRILL OPERATION DO NOT RETURN
WARNING. Assembly and Operating Instructions for Outback Omega Charcoal 100 and Omega Charcoal 200 Barbecues. Omega Charcoal 100 Omega Charcoal 200
 Assembly and Operating Instructions for Outback Omega Charcoal 100 and Omega Charcoal 200 Barbecues Omega Charcoal 100 Omega Charcoal 200 Photographs are not to scale. Specifications subject to change
Outdoor Pizza Oven MODEL: CPO-600 ASSEMBLY AND OPERATING INSTRUCTIONS
 Outdoor Grilling Pro ducts Outdoor Pizza Oven MODEL: CPO-600 ASSEMBLY AND OPERATING INSTRUCTIONS m WARNING: FOR OUTDOOR USE ONLY m This instruction manual contains important information necessary for the
Cover. Liquid Propane Gas Grill Kenmore Model No.: Kmart Item No.: Use and Care Guide
 Cover Use and Care Guide Liquid Propane Gas Grill Kenmore Model No.: 122.16129800 Kmart Item No.: 640-845662-113 Parts Assembly Safety Rules Use and Care Troubleshooting Español (Pg. 22)! WARNING: Read
SBB Gas Grill With Surround Owner s Manual
 SBB2804-1 Gas Grill With Surround Owner s Manual GAS-FIRED Page 1 IMPORTANT This manual should be read thoroughly by the person installing the grill and all persons who will use and maintain the grill.
OWNER S MANUAL. Cabo. Adventurer Series Gas Grill Model A10-703
 OWNER S MANUAL Cabo Adventurer Series Gas Grill Model A10-703 For questions regarding performance, assembly, operation, parts, or returns, contact the experts at MAGMA by calling (562) 627-0500 7:00 a.m.
57 Stainless Steel Gas Grill
 57 Stainless Steel Gas Grill 1 Welcome & Congratulations Congratulations on your purchase of a new grill! We at Electrolux Home Products are very proud of our product and we are completely committed to
Assembly Procedures VCS322SSBI Series / VCS522SSBI Series
 Assembly Procedures VCS322SSBI Series / VCS522SSBI Series Tools Required: Knife or scissors, Phillips or Robertson (square head) screwdriver. Model VCS522SSBI Shown CAUTION: This grill is intended ONLY
1. IMPORTANT SAFEGUARDS When using electrical appliances, basic safety precautions should always be followed to reduce the risk of fire, electric
 1. IMPORTANT SAFEGUARDS When using electrical appliances, basic safety precautions should always be followed to reduce the risk of fire, electric shock, and/pr injury to persons including the following:
Portable Charcoal Grill
 Portable Charcoal Grill DANGER! WARNING DO NOT use charcoal briquettes for indoor cooking or heating. TOXIC carbon monoxide fumes can accumulate and cause asphyxiation. DO NOT USE on boats or recreational
BBQ Grill. Owner s Manual Save These Instructions - For Household Use Only For Sizes: 12 x 18 & 12 x 12
 BBQ Grill Owner s Manual Save These Instructions - For Household Use Only For Sizes: 12 x 18 & 12 x 12 Do not use the Copper Chef TM BBQ Grill until you have read this manual thoroughly. Warranty Information
KettlePizza Gas Pro Assembly & Operating Instructions
 KettlePizza Gas Pro Assembly & Operating Instructions Important Safety Warning: THANK YOU for buying a KettlePizza Oven Kit! As with many cooking grill accessories, there can be some risks involved and
for Assembly, Operating & Maintenance of THIS GAS GRILL IS DESIGNED FOR OUTDOOR USE ONLY.
 Owner s Manual for Assembly, Operating & Maintenance of Model A2P Portable Gas Grill www.bigjohngrills.com YOU MUST READ THIS OWNER S MANUAL BEFORE OPERATING YOUR GAS GRILL. IF YOU SMELL GAS: DANGER 1.
G2006-A FOR OUTDOOR USE ONLY - OPERATES ON LPG
 Ranger Barbecue Model No. G2006-A FOR OUTDOOR USE ONLY - OPERATES ON LPG 3716-06/13 General Information Gas Installation Codes Barbecues must be used in accordance with New Zealand Standard 5601 Gas Installations.
Gas Barbecue Use, Care & Assembly Manual
 Gas Barbecue Use, Care & Assembly Manual With Grill Lighting Instructions 8450 Series Model No. 9992-649 (Natural Gas) ASSEMBLER/INSTALLER: Leave these instructions with the consumer. CONSUMER/USER: Read
SOWNER S MANUAL INSTALLATION, CARE & USE
 SOWNER S MANUAL INSTALLATION, CARE & USE Models: SIZ26-LP/NG, SIZ32-LP/NG, SIZ40-LP/NG, SIZPRO32-LP/NG, SIZPRO40-LP/NG, and SIZSB2-LP/NG DANGER - IF YOU SMELL GAS: I - Shut off the gas supply to the appliance
US Item#: Canada Item#: FOR PROPANE GAS USE ONLY I28Y07P
 US Item#: 6388309 Canada Item#: 629309809 FOR PROPANE GAS USE ONLY I28Y07P-7 720-0582 Table of Contents Safety Instruction..................... 2-7 Care and Maintenance................. 26-27 Check list...........................
SERIAL # MFG. DATE PURCHASE DATE:
 OUTDOOR GAS GRILL MODEL #720/730-0830D Pages 2-43 GRIL À GAS EXTÉRIEUR MODÈLE 720/730-0830D Pages 44-86 SERIAL # MFG. DATE PURCHASE DATE: This instructions manual contains important information necessary
User Manual TRITON ORIGINAL Model #: FSOGBG3002
 User Manual TRITON ORIGINAL Model #: FSOGBG3002 Please keep this instruction manual for future reference Customer Service: (888) 922-2336, 8:00am to 10:00pm,Monday thru Saturday 9:00am to 8:00pm Sunday
INSTRUCTION BOOK CARE & USE/INSTALLATION
 INSTRUCTION BOOK CARE & USE/INSTALLATION Model STL-32 LP/NG, Model STL-40 LP/NG, Model STL-2 LP/NG STL-1 LP/NG. DANGER - IF OU SMELL GAS: WARNING I - Shut off the gas supply to the appliance at its source.
Liquid Propane Gas Grill Owner s Guide
 Liquid Propane Gas Grill Owner s Guide Vieluxe 44 Inch Vieluxe 56 Inch DANGER If you smell gas: 1. Shut off gas to the appliance. 2. Extinguish any open flames. 3. Open lid. 4. If odor continues, keep
ASSEMBLY & OPERATING INSTRUCTIONS
 Rialto, California 92673 ASSEMBLY & OPERATING INSTRUCTIONS Model #54658 5 Burner Stainless Steel Built-In, L.P. (Propane) Gas Model #54659 5 Burner Stainless Steel, Built-In, Natural Gas TABLE OF CONTENTS
TOASTER OVEN USER MANUAL MODEL: PKMFT039
 TOASTER OVEN USER MANUAL MODEL: PKMFT039 IMPORTANT SAFETY INSTRUCTION When using electrical appliances, basic safety precautions should always be followed, including the followings: 1 Don t touch hot surfaces
ASSEMBLY & OPERATING INSTRUCTIONS
 ASSEMBLY & OPERATING INSTRUCTIONS Liquid Propane Gas Grill Parts Assembly Safety Rules Use and Care Troubleshooting! WARNING: Read this Owner s manual carefully and be sure your gas grill is properly assembled,
3-Burner LP Gas Grill
 ITEM # 41590 3-Burner LP Gas Grill WARNING Improper installation, adjustment, alteration, service or maintenance can cause injury or property damage. Read the installation, operation and maintenance instructions
H SERIES GAS BBQ GRILL USER S MANUAL MODEL NUMBER: PG L ITEM NUMBER:PGS H30P FOR OUTDOOR USE ONLY. Copyright October 2010-AEI Corporation
 H SERIES GAS BBQ GRILL USER S MANUAL MODEL NUMBER: PG-4030000L ITEM NUMBER:PGS H30P TM FOR OUTDOOR USE ONLY Copyright October 2010-AEI Corporation SAFETY SYMBOLS The symbols listed below are being used
IMPORTANT SAFEGUARDS. When using electrical appliances, basic safety precautions should always be followed, including the following:
 IMPORTANT SAFEGUARDS When using electrical appliances, basic safety precautions should always be followed, including the following: 1.Read all instructions. 2.Do not touch hot surfaces. Use handles or
Oven Toaster Grill with Convection
 READ BEFORE USE Oven Toaster Grill with Convection Visit www.hamiltonbeach.in for our complete line of products and Use and Care Guides as well as delicious recipes, tips, and other useful information!
STAINLESS STEEL LP GAS GRILL MODEL NO.: ITEM NO: 33459
 200 300 100 150 100 400 200 250 500 300 600 50 350 C F 700 STAINLESS STEEL LP GAS GRILL MODEL NO.: 720-0171 ITEM NO: 33459 Jenn-Air is a Trademark of the Maytag Corporation and is used under license to
Grill TC3718 DANGER DANGER. 1. Never operate this appliance unattended.
 Grill TC3718 Conforms to ANSI STD Z21.58-2015/ CSA 1.6-2015 OUTDOOR COOKING GAS APPLIANCE DANGER Tools needed for assembly: Phillips screwdriver, Pliers or Adjustable Wrench DANGER If you smell gas: 1.
HOT SPOTS COOKING SAFETY
 Many families gather in the kitchen to spend time together, but it can be one of the most hazardous rooms in the house if you don't practice safe cooking behaviors. Cooking equipment, most often a range
Manual Spark Ignition (MSI) Kit For Use only with Thermocouple Manual Safety (TMSI) UL Approved Fire Pit Pans with Burning Spur
 Kit For Use only with Thermocouple Manual Safety (TMSI) UL Approved Fire Pit Pans with Burning Spur") AAA Battery MODEL: MSI-BSTMSI Manual Spark Ignition (MSI) Kit For Use only with Manual Safety (TMSI) UL Approved Fire Pit Pans with Burning Spur Installation and Operating Instructions IF YOU CANNOT READ
AAA Battery MODEL: MSI-BSTMSI Manual Spark Ignition (MSI) Kit For Use only with Manual Safety (TMSI) UL Approved Fire Pit Pans with Burning Spur Installation and Operating Instructions IF YOU CANNOT READ
Amana SS 5 Burner Grill w/ Rear Burner USE AND CARE MANUAL FOR OUTDOOR USE ONLY ALWAYS KEEP YOUR GRILL COVERED WHEN NOT IN USE
 Amana SS 5 Burner Grill w/ Rear Burner USE AND CARE MANUAL FOR OUTDOOR USE ONLY ALWAYS KEEP YOUR GRILL COVERED WHEN NOT IN USE BEFORE YOU BEGIN We ve included easy-to-follow, step-by-step instructions
3 Burner Cabinet Barbecue
 3 Burner Cabinet Barbecue Photograph is not to scale. Specification subject to change without prior notice WARNING For outdoor use only. Read instructions before using the appliance. Failure to follow
INSTRUCTION MANUAL. MODEL NUMBER: GBBK/GBBKR Outdoor Portable Charcoal Grill. For Outdoor Use Only!
 INSTRUCTION MANUAL MODEL NUMBER: GBBK/GBBKR Outdoor Portable Charcoal Grill For Outdoor Use Only! WARNING! BE CAREFUL OF SHARP EDGES DURING ASSEMBLY MADE IN CHINA Save these instructions for future reference.
GAS GRILL # Natural Gas Grill Owner s Guide
 GAS GRILL Natural Gas Grill Owner s Guide ESNA Guía del Propietario de la Barbacoa de Gas Natural - Pg. 7 Mode d emploi du Grill à gaz naturel - Pg. 7 670 #5606 YOU MUST READ THIS OWNER S GUIDE BEFORE
Char-Broil C-21G0
 463620414 Char-Broil C-21G0 TABLE OF CONTENTS For Your Safety................................ 2 Grilling Guide................................ 3-4 Use and Care............................... 5-7 Limited
1550W DIGITAL FRENCH DOOR OVEN Instruction Manual MODEL CCFD19
 1550W DIGITAL FRENCH DOOR OVEN Instruction Manual MODEL CCFD19 1 WHAT S INCLUDED French Door Oven & Instruction Manual Rotisserie Hle Two Wire Racks Baking Pan Rotisserie Tray Hle Crumb Tray 2 IMPORTANT
Adventurer Barbecue G2727
 Adventurer Barbecue G2727 FEATURES Compact portable unit with generous 460mm x 240mm cooking surface Use at home, picnics or camping Quick and easy set-up Folds down into a compact size - 440mm x 590mm
INSTRUCTIONAL BOOK CARE & USE/INSTALLATION
 INSTRUCTIONAL BOOK CARE & USE/INSTALLATION Models: SIZ26-LP/NG, SIZ32-LP/NG, SIZ40-LP/NG, SIZPRO32-LP/NG, SIZPRO40-LP/NG, and SIZSB2-LP/NG DANGER - IF YOU SMELL GAS: I - Shut off the gas supply to the
LUCKENBACH MODEL Assembly Instructions Rev
 LUCKENBACH TM MODEL 03301800 Assembly Instructions Rev. 03-27-03 P/N: 42802113 WARNING! CAUTION! This unit is heavy. Tools needed: 2 adjustable wrenches, a flat screwdriver and hammer. DO NOT assemble
Assembly & Operating Instructions
 Assembly & Operating Instructions US Item#: 6466079 Canada Item#: 6208859 FOR PROPANE GAS USE ONLY his instructions manual contains important information necessary for the proper assembly and safe use
21.5 Inch Square Charcoal Grill
 21.5 Inch Square Charcoal Grill Model # OCFLA-2150 OUTDOOR USE ONLY! NEVER USE INDOORS! CARBON MONOXIDE HAZARD Burning charcoal inside may be fatal. It gives off carbon monoxide, which has no odor. NEVER
4 Burner w/ Rear Burner Gas Grill - LP USE AND CARE MANUAL. Stop! Missing a part? DO NOT RETURN PRODUCT TO STORE
 4 Burner w/ Rear Burner Gas Grill - LP USE AND CARE MANUAL SF308LP Stop! Missing a part? DO NOT RETURN PRODUCT TO STORE The store where you made the purchase does not stock parts for this item. If you
Assembly and Maintenance Instructions for SH-0183-I & SH-0184-I SH-0283-I & SH-0284-I
 Assembly and Maintenance Instructions for SH-0183-I & SH-0184-I SH-0283-I & SH-0284-I Before you begin assembling and using your new BBQ grills we recommend that you read through owner s use and care manual
720/ A FOR OUTDOOR USE ONLY
 9000272A0 This instructions manual contains important information necessary for the proper assembly and safe use of the appliance. Read and follow all warnings and instructions before assembling and using
LPGSASA Permit Number (1185/18/RSA-08/A)
") ASSEMBLY & OPERATING INSTRUCTIONS Important: Read these instructions for use carefully so as to familiarize yourself with the appliance before connecting it to its gas container. Keep these instructions
ASSEMBLY & OPERATING INSTRUCTIONS Important: Read these instructions for use carefully so as to familiarize yourself with the appliance before connecting it to its gas container. Keep these instructions
Tabletop Gas Grill ITEM # WARNING FOR YOUR SAFETY : For Outdoor Use Only (outside any enclosure) Print in China
 Print in China") ITEM # 41242 WARNING Improper installation, adjustment, alteration, service or maintenance can cause injury or property damage. Read the installation, operation and maintenance instructions thoroughly
ITEM # 41242 WARNING Improper installation, adjustment, alteration, service or maintenance can cause injury or property damage. Read the installation, operation and maintenance instructions thoroughly
Gas Barbecue Use, Care & Assembly Manual
 Gas Barbecue Use, Care & Assembly Manual With Grill Lighting Instructions 8100 Series Model No. 9992-643 (LP Gas) ASSEMBLER/INSTALLER: Leave these instructions with the consumer. CONSUMER/USER: Read all
Gas Barbecue Use, Care & Assembly Manual
 Gas Barbecue Use, Care & Assembly Manual With Grill Lighting Instructions 5600 LP Gas Series 5610 Natural Gas Series ASSEMBLER/INSTALLER: Leave these instructions with the consumer. CONSUMER/USER: Read
OWNER S MANUAL for Versa 100
 OWNER S MANUAL for Versa 100 *Note: Side Shelf and Rotisserie are Optional For Portable Model: JVS100-LP (Liquid Propane) Important Notice Please read ALL safety notices on Pg.3 before assembling or operating
Coffeemaker. Coffeemaker Safety... 2 Parts and Features... 3 Using Your Coffeemaker... 4 Cleaning Your Coffeemaker... 4 Customer Service...
 Coffeemaker Coffeemaker Safety... 2 Parts and Features... 3 Using Your Coffeemaker... 4 Cleaning Your Coffeemaker... 4 Customer Service... 6 In USA: 1-800-851-8900 In Canada: 1-800-267-2826 840069400 Coffeemaker
Outdoor Gas Barbeque / Grill Use and Care Manual TROUBLESHOOTING GUIDE...PAGE 19
 ! WARNING! Hazardous Fire or Explosion may result if these instructions are ignored. It is your responsibility to see that your new grill is assembled, installed, maintained and cared for properly. Failing
THE PANCAKE FACTORY. Model: PM-2
 THE PANCAKE FACTORY Model: PM-2 IMPORTANT SAFEGUARDS When using electrical appliances, basic safety precautions should always be followed including the following: 1. Read all instructions. 2. Do not touch