R NINE ONE USER MANUAL
|
|
|
- Monica Baldwin
- 5 years ago
- Views:
Transcription


1 R NINE ONE USER MANUAL
2 Congratulations on purchasing a Rocket Espresso machine one of the finest domestic espresso machines in the world. Your machine is a Certified Authentic Rocket Espresso machine. This User Manual covers the Rocket Espresso R NINE ONE model. ROCKET ESPRESSO - REGISTRATION AND WARRANTY To initiate your warranty and register your machine, please go to and enter the following details: Name: Country: Place of purchase: Serial number of the machine: address: JOIN THE ROCKET ESPRESSO MOVEMENT FOR BETTER ESPRESSO IN THE HOME. CONTENTS THE FOUR M s MACCHINA How to use your Rocket Espresso machine General and safety information 4 Technical specifications 8 Accessories and parts 10 Machine description 11 Machine installation 13 Digital display glossary 15 Factory settings of your machine 18 Pressure profile settings 19 Personalise your R NINE ONE 20 How to program Auto on/off 24 Setting the coffee volume portions 26 Hot water tempering valve 27 Pressure profiles 28 Machine operation 30 MISCELA Selecting a coffee blend to suit your espresso machine 32 MACINATURA Our recommendations on a good grinder and the correct grinding of the coffee 33 MANO The skilled hand of the barista What is espresso? 34 How to make beautiful espresso 35 How to texture & pour milk 38 Preventative maintenance & cleaning 42 Troubleshooting 45 Preparing your Rocket for transportation and/or servicing 47 Pg 01

3 CONTACT DETAILS MANUFACTURER Rocket Milano S.R.L. Via Curiel Liscate Milano Italy THE FOUR M s Espresso coffee brewing is defined by the four M s: the Macinatura is the correct grinding of a coffee blend, Miscela is the coffee blend, Macchina is the espresso machine, and Mano is the skilled hand of the barista. Once each factor of the four M s is precisely controlled, you will have prepared an espresso beverage that is the ultimate coffee experience. If you follow our User Manual How to Use your Rocket and Make Beautiful Espresso for step by step guidance on the four M s you will have many years of satisfaction with your Rocket Espresso machine. Pg 02 Pg 03
4 MACCHINA How to use your Rocket and make beautiful espresso. GENERAL INFORMATION 1. This user manual is an essential part of the safe operation of your Rocket Espresso machine, therefore it is important that you read the enclosed warnings and cautions carefully. Particularly information concerning safety during installation, operation and cleaning. Please keep this User Manual in a safe place where it can be made available to all users. REMOVING MACHINE FROM PACKAGING 1. Ensure that there are no signs of damage to the machine by checking the external cladding of the packaging. 2. Check the machine for signs of damage once the packaging has been carefully removed. 3. Retain the machine s packaging in case of future need to move, or send, the machine by courier. Keep the packaging (boxes, foam, plastic bags) well away from the reach of children. 4. If there is evidence of defect or damage to the machine, the authorized dealer from whom you purchased the machine should be notified immediately so that remedial action can be taken. SAFETY INSTRUCTIONS 1. Check to see that the data on the rating plate corresponds to that of the main electrical supply to which the machine will be attached. 2. The installation and repair must conform to local electrical and plumbing safety codes and regulations. 3. Installation of any Rocket Espresso machine must only be undertaken by duly authorized and properly trained and qualified personnel. 4. This machine is only safe when it has been correctly connected to an efficient earthing/grounding system. 5. Before connecting the machine to electric supply, ensure that the capacity and power rating is suitable for the maximum power consumption indicted on the espresso machine. 6. We do not recommend the use of accessory attachments such as adaptors, multiboards or extension cords that are not recommended by the appliance manufacturer as they may cause injury. 7. Do not use this machine if there is damage to its cord, plug or any other part or if the machine malfunctions. Return the machine to the nearest authorized service facility for examination, repair or adjustment. 8. This machine has been designed for the sole purpose of producing coffee, hot water and steam for hot beverages. All other uses are inappropriate and dangerous. The manufacturer shall not be held responsible for any damage caused by inappropriate use. 9. To protect against electric shocks when using any electrical appliance including your Rocket machine: a. Do not immerse the machine itself, cord and plugs in water or other liquid and do not let the machine s internal parts get in contact with liquid. b. Prevent the power cable from being stretched or pulled tight. c. Do not use the machine with wet hands. d. Do not allow children or untrained persons to use the machine. e. Do not operate the machine when bare foot. f. Fit a circuit breaker to the electric supply feeding the machine. g. Do not tip liquids on top of the machine. h. The machine should not be exposed to elements such as sunlight, rain, snow, extreme temperatures etc. 10. Always use Rocket Espresso certified and manufactured spare parts and accessories. 11. Before performing any cleaning (other than back-flushing) or maintenance turn the machine off at the machine s power switch and disconnect the machine from the electrical supply. Pg 04 Pg 05
5 12. This appliance is intended to be used in household and similar applications such as: a. Staff kitchen areas in shops, offices and other working environments. b. Farm houses. c. By clients in hotels,motels and other residential type environments. d. Bed and breakfast type environments. 13. If the machine operates in a faulty manner, is compromised in its performance or stops working, turn the machine into the off position at the machine power switch and disconnect it from the electrical supply. Do not attempt to repair it. Contact a Rocket Espresso qualified and authorized technician. Any repair must be performed by the manufacturer or by an authorized dealer using only original parts. 14. When the machine is not in use for long periods of time, the hydraulic systems should be drained completely and the machine stored in a temperature above freezing (0 or 32 F). This will prevent the hydraulic system from freezing which could damage the internal pipes and boiler. 15. The machine must be operated with soft, clean drinking water. If the local water supply has a high mineral content use a water softener. A build up of mineral deposit may restrict the flow of water within the hydraulic systems causing damage to the machine and risking personal injury. Conversely very pure waters may interfere with the electronic signals read by the machine for both boiler level and water reservoir level indications. Use a filtered water. 16. If the appliance is to be connected to the water mains: a. The maximum inlet pressure is 0.4MPa b. the minimum inlet pressure is 0.1MPa c. You must use the new hose-sets supplied with the machine do not reuse old hose-sets. 17. The appliance is not to be used by persons (including children) with reduced physical, sensory or mental capabilities, or lack of experience and knowledge, unless they have been given supervision or instruction. 18. Unsupervised children should not play with the appliance. 19. This appliance can be used by children aged from 8 years and above if they have been given supervision or instruction concerning use of the appliance in a safe way and if they understand the hazards involved. 20. Cleaning and user maintenance shall not be made by children unless they are older than 8 and supervised. 21. Keep the appliance and its cord out of reach of children aged less than 8 years. 22. Appliances can be used by persons with reduced physical, sensory or mental capabilities or lack of experience and knowledge if they have been given supervision or instruction concerning use of the appliance in a safe way and understand the hazards involved. 23. Children shall not play with the appliance. Pg 06 Pg 07


 Weight:")
6 R NINE ONE TECHNICAL SPECIFICATIONS FEATURES Programmable pressure profile system Digital touch display Brew boiler capacity: 1,9 litre W Service boiler capacity: 3,6 litre W Water source option: Hard plumbing or tank supply Wattage: 1600 W Five pump pressure profiles + one semi automatic profile Permanent magnets volumetric pump. DIMENSIONS & WEIGHT 410 x 505 x 430 mm (width x depth x height) Weight: 47.4 kg Pg 08 Pg 09
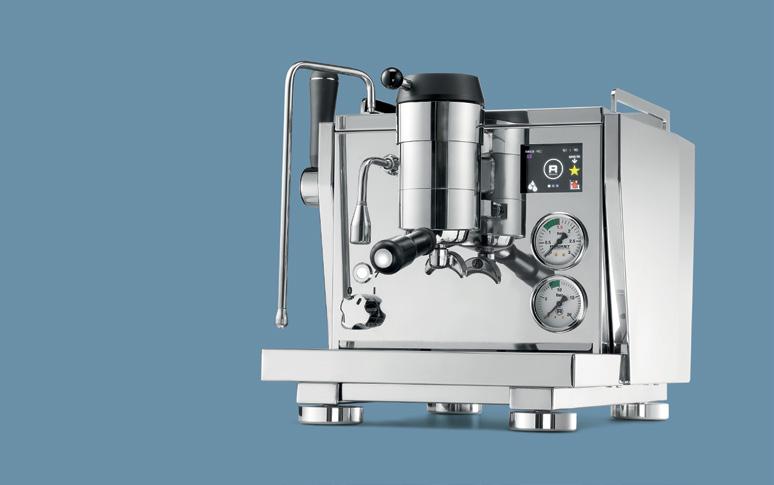
7 ACCESSORIES AND PARTS Check the box and packaging to ensure that the following parts and accessories are included: 1. Portafilter - double 2. Portafilter - single 3. Portafilter - bottomless 4. Back flush cap 5. Tamper 6. Group head cleaning brush 7. Drip tray 8. User manual 9. Water Connection hose 10. Drip tray drain hose 11. Rocket Espresso cleaning tablets MACHINE DESCRIPTION 1. Steam tap lever. 2. Steam wand for steaming milk: caution can be become and cause burns. 3. On/Off: O = off and 1 = on. 4. Control lamp: machine is on when it is illuminated. 5. Saturated group head. 6. Group control paddle. 7. Portafilter. Caution, its metal parts can become hot and cause burns. 8. Hot water wand. Caution, can become hot and cause burns Pg 10 Pg 11
8 MACHINE DESCRIPTION continued Cup Tray: do not pour liquid into the tray. It will filter inside the equipment and can cause electrical shocks and serious injuries. 10. Boiler Pressure gauge: boiler pressure should be at one bar when the machine is ready. 11. Pump pressure gauge. 12. Digital touch display. 13. Drip tray with grid. 14. Reservoir lid cover. 15. Hot water mixing valve MACHINE INSTALLATION 1. Ensure the machine is unpackaged and placed on a hard and stable surface near an adequate power supply. 2. Remove the water reservoir cover and fill the reservoir with filtered water, pouring from a very clean water jug with a spout that is easy to pour from. Be careful to pour water into the water reservoir only (to remove the reservoir for cleaning see maintenance instructions). Replace the cover of the water reservoir. Rocket Espresso recommend the use of the Rocket Espresso water filter. 3. Connect the machine to power supply that is rated in accordance with the serial plate on the espresso machine. 4. Turn the on/off switch to the on position 1. Boiler water fill begins you will hear the pump noise. Place the portafilter in the group. 5. Allow 20 to 25 minutes warm up time. When the machine is ready the temperature will be displayed on screen 1 of the touch screen. The correct operating temperature and pressure should be +/- 92 C or F displayed on the touch screen, with a service boiler pressure of +/- 1 bar. 6. Place a cup underneath the group and turn the paddle to release a cup of hot water from the group - first time use only. Close the hot water by returning the paddle to the start position Pg 12 Pg 13
9 MACHINE INSTALLATION CONNECTING TO MAIN WATER SUPPLY The R NINE ONE is preset at the factory to use the supplied 1.9 litre water reservoir. To connect the R NINE ONE machine to mains water supply, use the steel braided water hose provided and ensure the following instructions are adhered to: 1. Use a certified plumber to complete the installation and ensure that the installation meets local authority standard and regulations in all cases. 2. Line pressure exceeding 4 bars should be limited with the use of a pressure regulating valve on the water feed line. 3. Use a shut off valve to isolate the water supply to the machine. 4. If you are drawing water from a non pressurised system (ie. from a remote water supply tank, not mains pressurised) fit a non return valve to the end of the water supply hose to ensure that the line pressure is maintained at all times. 5. Use an in line filter to ensure the water supply of the machine is of the highest quality - ask your plumber what he would recommend. 6. Once the mains installation is complete it will be necessary to switch the machine from tank to water supply. See page 20. Water source settings. DIGITAL DISPLAY GLOSSARY SCREEN cup symbol 2. 2 cups symbol 3. Rocket symbol: press to move between screens 4. Hot water symbol: press to switch between on/off 5. symbol indicates the coffee boiler is heating 6. symbol indicates the coffee boiler is not heating NB. It is normal for the machine to switch between and symbols. Machine temperature is always indicated above this symbol. 7. symbols indicates the selected pressure profile being used 8. symbol indicates manual mode 9. symbol recalls last saved manual profile Pg 14 Pg 15
10 DIGITAL DISPLAY GLOSSARY SCREEN 2 DIGITAL DISPLAY GLOSSARY SCREEN symbol indicates the service boiler is turned off/on 11. Press symbol to select language, water source (tank or water supply) and temperature C or F 12. symbol changes temperature for coffee and steam boiler 13. symbol sets time/date and auto on/off function 14. symbol changes pressure profile setting 15. symbol displays machine error message 16. symbol displays how many cups have been produced 17. Press symbol to set your single/double coffee volumes 18. Press symbol to put machine on standby 19. symbol is the technician only menu. Pg 16 Pg 17
11 FACTORY SETTINGS OF YOUR MACHINE Prior to delivery your Rocket R NINE ONE espresso machine has been tested. The factory settings mean that your machine is set and ready for use. Default settings are as follows: The temperature is set to Celsius The language is set to English Water source is set to tank/reservoir supply Service boiler: heating is set to 123 C (range available 110 C to 125 C) Brew Boiler: the temperature of the coffee water is set to 92 C range available (90 C to 110 C) PRESSURE PROFILE SETTINGS PROFILE A 6 4 Bar 18-9 Bar 6-5 Bar PROFILE B 8-4 Bar 22 9 Bar PROFILE C 20 9 Bar 10 5 Bar All preset programs can be modified. Pressure profile D and E are available for programming. symbol indicates manual mode symbol recalls last saved manual profile Pg 18 Pg 19
12 PERSONALISE YOUR R NINE ONE 1. Water Source Settings 3. Temperature Settings (units) WATER SOURCE TEMPERATURE TANK CELSIUS Screen 2 - Spanner Symbol Water Source Screen Screen 2 - Spanner Symbol Temperature Screen Go to the second screen menu and press symbol. Press either or to navigate through to the water source screen. Press either or to select tank water or water supply. Press to confirm or press to cancel and return to home screen. Alternatively press to scroll to the next setting. 2. Language Settings LANGUAGE Go to the second screen menu and press symbol. Press either or to navigate through to the temperature screen Press either or to select celsius or fahrenheit. Press to confirm or press to cancel and return to home screen. Alternatively press to scroll to the next setting. 4. Change the Temperature of the Coffee Boiler COFFEE TEMP 92 C Screen 2 - Spanner Symbol Language Screen Screen 2 - Temperature Symbol Coffee Temp Screen Go to the second screen menu and press symbol. Press either or to navigate through to the language screen. Go to the second screen menu and press symbol. Press either or to navigate through to the coffee temp screen. Press either or to change the language. Press either to decrease or to increase the coffee boiler Press to confirm or press to cancel and return to home screen. temperature. Alternatively press to scroll to the next setting. Press to confirm or press to cancel and return to home screen. Alternatively press to scroll to the next setting. Pg 20 Pg 21
13 5. Change the Temperature of the Service Boiler 7. Setting the Date STEAM TEMP 123 C JUL 13 Screen 2 - Temperature Symbol Steam Temp adjust screen Screen 2 - Clock Date adjust screen Go to the second screen menu and press symbol. Press either or to navigate through to the steam temp screen. Press either to decrease or to increase the service boiler temperature. Press to confirm or press to cancel and return to home screen. Alternatively press to scroll to the next setting. 6. Switch Service Boiler On/Off Go to the second screen menu. Press the symbol. To scroll between year/month/date press Press the or arrows to change year/month/date. Press to save. 8. Setting the Day and Time 10 : 50 Screen 2 - Steam On Go to the second screen menu. Screen 2 - Steam Off Press the symbol to turn it off. Steam symbol with a cross through it will appear To turn the service boiler on press symbol. The steam symbol without a cross through it will appear Screen 2 - Clock Time adjust screen Go to the second screen menu. Press the symbol. Press to select day. Press the or arrows to change day if necessary. Press to select time adjustment screen. To scroll between hours/minutes press Press the or arrows to change hours/minutes. Pg 22 Press to save. Pg 23
14 HOW TO PROGRAM AUTO ON/OFF Each day the machine can be programmed to turn on and off twice. For example: T1 the machine turns on at 6.30am and turns off at 10.30am T2 the machine turns on at 5pm and turns off at 11pm To programme your machine follow the instructions listed below in sequential order. Screen 2 Clock symbol How to Program Auto on/off Navigate to the second screen menu. Press the symbol AUTOMATIC START OFF Automatic Start Off Press to navigate through to the automatic start menu To enable feature press so that appears and the graphic displays ON Day & Time Auto Settings T1 Press once to navigate to Monday T1 menu To enable Monday T1 press box so that appears MONDAY T1 START 06 : 30 Press once to set T1 stop time Press to set hour. Press or to advance or decrease hour Press to set minutes. Press or to advance or decrease minutes Once finished programming the various days press to save and exit back to main menu Press at any time to cancel and exit back to main menu. Day & Time Auto Settings T2 Following on from T1 settings press once to navigate to Monday T2 menu To enable Monday T2 press box so that appears Press to set hour. Press or to advance or decrease hour Press to set minutes. Press or to advance or decrease minutes Press once to set T2 stop time Press to set hour. Press or to advance or decrease hour Press to set minutes. Press or to advance or decrease minutes Press once to navigate to the next day of the week and repeat above instructions MONDAY T1 STOP 10 : 30 Monday T1 Stop time MONDAY T2 START 17 : 00 Monday T2 Start time MONDAY T2 STOP 23 : 00 Monday T2 Stop time Press to set hour. Press or to advance or decrease hour Once finished programming the Press to set minutes. Press Monday T1 Start time various days press to save and or to advance or decrease exit back to main menu minutes Press at any time to cancel and Pg 24 exit back to main menu. Pg 25
15 SETTING THE COFFEE VOLUME PORTIONS (volumetric portion control) A flow meter allows the machine to calculate the precise coffee volume you would like from the single or double porta filter. (Generally 25 to 30ML from the single porta filter and 50 to 60 ML from the double porta filter). When you are sure the grind setting is correct you can set the flow meter. It is important to understand that the volumetric portion control will differ between each pressure profile. The flow meter will count total water volume irrespective of the time it may take. Example; Pump pressure of 9 bar over 30 seconds will yield a different total volume than 5 bar over the same 30 seconds. HOT WATER TEMPERING VALVE Located on the cup warming tray. You can regulate the temperature of the water coming from the hot water tap without unduly influencing the steam pressure. Using a very fine screwdriver turn the adjustment screw to increase / decrease the hot water / cold water mix as per the indications on the cup tray panel. Turning the screw clockwise increases the water temperature. Hot water tempering valve Screen 3 Programme symbol Programme mode screen 1. Navigate to Screen 3 and press symbol. 2. Load a single portafilter and press the symbol. 3. The extraction will begin. When you have 25-30ml (1 cup) of espresso in the cup press cup symbol to stop the extraction. 4. Press the Rocket Symbol to return to the home screen. 5. Now, every time you press the one cup symbol on the home screen you will get the exact amount you selected. To program the double portafilter do the same process with the cup (50-60ml). Pg 26 Pg 27
16 PRESSURE PROFILES The R NINE ONE pressure profile system allows up to 5 time interval and pressure adjustments to be made over the course of the extraction. It is therefore possible to increase / decrease the length of time and change the pressure for each interval. For example: USING THE MACHINE IN MANUAL MODE To use the machine manually and create you own profile: PROFILE A S T T T3 5.0 T4 0.0 T5 0.0 P1 4.0 P2 9.0 P3 5.0 P4 0.0 P5 0.0 bar Screen 1 Graph symbol Screen 1 Manual mode symbol Screen 2 Graph symbol Profile A settings 1. Press symbol. 2. Press to select the profile you wish to edit. 3. Press to scroll from time to pressure. 4. Press to increase or to decrease seconds or pressure. 5. Press to confirm (save) and to return to home screen. 1. Press symbol and cycle through graph profiles to the symbol. 2. The machine is now in manual mode. 3. Load the portafilter with coffee and insert into the group head. 4. Turn the group paddle to start the extraction (the further the paddle is turned the greater the pressure created as indicated by the profile on the screen. The display will allow you to monitor pressure, time and water volume. 5. At this point it is possible to save the manual profile you have just created. 6. To save the manual profile press symbol. The display will show Last profile saved. 7. To recall the saved profile scroll through the graph profiles to the symbol. 8. Press the symbol graph and the machine will recall the last saved profile. Pg 28 Pg 29
. G portafilter in the group head.")


17 MACHINE OPERATION 1. Install the portafilter by inserting it into the group head and rotate the portafilter handle from left to right. The portafilter is inserted properly once it is firmly inside the group head and the portafilter handle is sitting at 90 degrees from the face of the machine (Fig G). G portafilter in the group head. Turn the paddle to release heated water and start the brewing process.. 6. To stop the brewing process return the group control paddle to the starting position so that the water stops flowing. 7. To heat milk dip the steam tip 1 under the surface of the milk which is contained in a stainless milk jug. Release heat into the milk by pulling the steam handle 2 forwards so the valve is fully open. Once the milk is at a good temperature for consumption push the lever back to the upright position. Remove jug from under the steam wand. 8. In order to prevent heated milk from being sucked into the boiler it is recommended that you purge the steam wand after heating milk. Purge by releasing steam for a few seconds into the atmosphere. 9. To dispense hot water press the hot water symbol 3 on the touch screen and release the required amount of water into a cup or vessel. To stop the hot water press the hot water symbol on the touch screen. CAUTION THE WATER IS VERY HOT. 10. More details of brewing coffee and steaming milk are outlined in the Mano section of this Rocket Espresso handbook. 2. You can now turn the group control paddle to start the water flowing through the portafilter. 3. It is important to leave the portafilter installed in the group head when not in use. The portafilter must remain heated for a successful brew process. It will also prevent the head seal inside the group head from drying out prematurely. 4. Single (with one spout) and double (with two spouts) portafilter handles come ready assembled with single and double baskets fitted. 5. You are now ready to start brewing coffee by removing the portafilter and placing ground coffee inside the filter basket. Press down on the coffee with the supplied tamper and install the Pg 30 Pg


18 MISCELA The coffee blend 1. Ideally coffee beans should be consumed between three and fourteen days from roasting. In the first three days the beans are still releasing carbons from the roasting process. 2. From fourteen days the coffee will start to lose its flavor characteristics to become old and stale tasting. 3. Store your coffee beans in an airtight container in a cool dark place. Do not refrigerate or freeze. 4. Blending is to combine coffees from two or more countries of origin. 5. Espresso coffee should be a harmonious blend of sweetness, acidity and bitterness. 6. Espresso roasts tend to be slightly darker than filter or French Press roasts as a darker profile emphasizes body and sweetness. MACINATURA The grinding of the coffee blend 1. An espresso grind is a very fine grind yet still granular. 2. Coffee loses its flavor rapidly once ground therefore only grind as much as is needed for the next espresso beverage. 3. Temperature, humidity and wearing of the grinder burrs all affect the accuracy of the grind setting, therefore each morning you may find you need to dial-in your grinder (make the grind setting coarser or finer) This will be the difference between good coffee and great coffee. 4. It is important to have a good burr grinder with a fully adjustable grind setting. Pg 32 Pg 33
 beverage prepared from 7-9 grams (14-18 grams for a double) of coffee through which")


. HOW TO MAKE BEAUTIFUL ESPRESSO 1.")

19 MANO The skilled hand of the barista What is espresso? Espresso is a 25-30ml (50-60ml for a double) beverage prepared from 7-9 grams (14-18 grams for a double) of coffee through which clean water of C has been forced at 9-10 atmospheres of pressure, and where the grind of the coffee is such that the brew time is seconds. While brewing, the flow of espresso will appear to have the viscosity of warm honey and the resulting beverage will exhibit a thick dark, golden crema. Espresso should be prepared specifically for, and immediately served to its intended consumer (as defined by the Specialty Coffee Association of America). HOW TO MAKE BEAUTIFUL ESPRESSO 1. Place fresh coffee grounds into the portafilter basket until full or overflowing. 2. Knock the handle on the tamping mat once to settle the grounds. 3. Evenly distribute the grounds to a level flush with the rim of the filter basket. Release any excess grounds back into the doser hopper. 4. Compress the grounds with a tamper, pressing firmly, then twist the tamper to smooth the surface of the grounds. Tamp pressure should be around 30kg so the applied pressure should be very firm. 5. Rocket Espresso filter baskets have a reference line inside them, that the grounds, once tamped, should be level with. Continued over page... Pg 34 Pg 35

20 HOW TO MAKE BEAUTIFUL ESPRESSO CONTINUED Insert the portafilter into the group head and activate the pump immediately by lifting the brew lever. 7. Observe the flow. 8. Liquid volume should be 50-60ml in seconds (from the double handle or 25-30ml in seconds if using the single basket. Stop the pump appropriately. 9. Serve immediately or combine with milk to prepare an espresso based beverage. 10. Remove portafilter and knock out spent coffee. 11. Wipe filter basket clean and flush group head. 12. Return portafilter to group head to keep portafilter heated. Extraction at 8-10 seconds FLOW RATE & GRIND SETTING Ensure that your dosing and tamping is consistent. Good extraction is characterised by a 5 10 second delay before any coffee will pour. Heavy droplets will appear and develop into a thick, straight and even pour. The colour will be dark brown or hazelnut, preferably with a reddish reflection (see page 33). The pour should be cut off before the colour lightens and the pour begins to curl in. If the flow is too fast (another sign is a pale crema and white streaks) then adjust your grind to make it finer. The finer the grind the slower the extraction. The coarser the grind the faster the extraction. If the flow rate is too slow, adjust your grind setting to make it coarser. Correct grind equals correct extraction equals correct flavour. Extraction at seconds Pg 36 Pg 37
21 HOW TO TEXTURE MILK 1. Half fill your stainless milk jug with fresh cold milk. Use a 250ml jug if you are preparing milk for one milk coffee. Use the 500ml jug if preparing two milk coffees. 2. Purge the steam wand of condensation by quickly releasing steam into the atmosphere for a few seconds 3. Place the steam wand nozzle just under the surface of the milk and to the side. Turn the steam pressure on fully. You should hear a sipping type sound which is the sound of the milk increasing in volume. The milk should also be swirling in a whirlpool motion which folds out the air bubbles and improves the texture of the heated milk. 4. Keep the jug steady so that large bubbles do not develop. 5. You are aiming to stretch the half a jug of milk to three-quarters full and to have a dense and satisfying microfoam texture 6. Turn off the steam pressure when the milk is about 65 or the milk jug is just too hot to touch. 7. Remove the milk jug, clean the steam wand with a wet cloth and purge the wand of any milk residue. 8. If there are any large surface bubbles, give the jug a heavy knock on the bench. Swirl the milk jug in a circular motion to reveal a gloss-like appearance. The milk is now ready to pour. Do not delay or the texture will separate in the jug. MILK TEXTURING 1/2 full There are three parts to texturing milk. They should be done simultaneously: stretch, swirl and heat. STRETCH The air must be folded into the milk to stretch it. Place the nozzle just below the surface of the cold milk and turn the steam wand on, releasing its full pressure. As the milk warms and grows, the nozzle should be kept at the top of the milk surface to continue the stretch. When the volume of the milk has increased by half, the nozzle can remain below the surface of the milk. SWIRL Place the steam wand to the side of the jug. This creates a swirling motion in the milk, which keeps the milk nicely blended and smoothes out any bubbles. 3/4 full HEAT Turn off the steam wand when the milk has reached 60-65ºC. You should be able to touch the bottom of the jug, but not hold for any longer than a couple of seconds. If there are any large bubbles, give the jug a heavy knock on the bench to remove them. If there are still a few bubbles, skim off the top couple of millimetres with a spoon. Swirl the jug to reveal a glossy sheen. Now the milk is ready to pour. Pg 38 Pg 39


22 HOW TO POUR HEATED MILK 1. Start by pouring the heated milk gently into the centre of the crema ensuring that the crema stays intact. 2. Once the espresso and milk is nicely combined and the volume in the cup is about half full, speed up the pouring process by taking the spout closer to the cup and increasing the angle on the pour. 3. Keep the jug as close to the surface of the beverage as possible. Rock the jug side to side to release the heavier textured milk into the cup. This is how one creates shapes and patterns in the cup. ESPRESSO MENU RISTRETTO 90ml demitasse 20ml restricted double shot ESPRESSO 90ml demitasse 40ml double shot FLAT WHITE 150ml cup 40ml double shot 110ml lightly textured hot milk CAFFE LATTE 220ml glass or cup 40ml double shot 180ml lightly textured hot milk LONG BLACK 150ml cup 80ml hot water 40ml double shot AMERICANO 300ml cup 220ml hot water 40ml double shot PICCOLO LATTE 100ml glass 20ml restricted double shot 80ml lightly textured hot milk CAPPUCCINO 150ml cup 40ml double shot 110ml heavily textured hot milk MACCHIATO 90ml demitasse 40ml double shot a splash of textured hot milk MOCHACCINO 190ml cup Chocolate powder or syrup 40ml double shot a splash of textured hot milk LONG MACCHIATO AFFOGATO 150ml cup 300ml cup 80ml hot water Scoop of vanilla 40ml double shot ice cream a splash of 40ml double shot textured hot milk Pg 40 Pg 41
23 PREVENTATIVE MAINTENANCE & CLEANING Keeping your machine clean will prolong its life and produce much better espresso beverages. STEAM NOZZLES 1. Clean the steam nozzle after every use by wiping with a damp cloth. Turn the steam wand on to release condensation and milk residue. 2. If the steam jets get blocked with dry milk use a paper clip to unclog them. BACKFLUSHING 1. Remove the filter basket from the portafilter and fit the back flush cap. 2. While the brew water is flowing loosely insert the portafilter into the group head, rotating the portafilter back and forth. Keep emptying the blind basket of hot water and old grounds until the water runs clear. 3. You should backflush the group head every day. GROUP BREW HEAD 1. Every week, after backflushing, add a small amount of espresso cleaning detergent to the blind basket. Dissolve the detergent in hot water and insert the portafilter into the group head. Use a solution readily available at your local store. 2. Turn the group paddle on and off again after about 10 seconds. Repeat this several times. 3. Empty the basket of the detergent and backflush using water only as above until the group is thoroughly cleansed of detergent residue. REMOVING THE SHOWER FOIL AND HEAD SEAL 1. Using a number 3 allen key remove the shower foil and dispersion screen. 2. Scrub the inside of the group head with the supplied group cleaning brush. 3. Using a damp cloth wipe clean the area where the portafilter engages into the group head. 4. Soak the metal parts that have been removed (shower foil, brass spreader) in a solution made from 2 teaspoons of espresso cleaning detergent and hot water. Soak for 10 minutes. Rinse thoroughly, wipe clean and return. 5. The head seal is a standard 8MM and may need to be replaced from time to time. PORTAFILTER 1. Remove the filter basket from the portafilter handle using a small screwdriver or the under-side of the blind basket. 2. Wipe the inside of the basket and portafilter clean with a damp cloth. 3. If the coffee oils have built up soak the metal end of the portafilter and basket in the same detergent solution as the shower foil and brass spreader above. 4. Rinse thoroughly, dry and return. Pg 42 Pg 43
24 WATER RESERVOIR 1. Remove and clean the water reservoir periodically with warm soapy water. To remove the reservoir, take off the reservoir cover and lift the reservoir up by the two black handles a firm upwards movement. 2. When returning the reservoir, ensure you press down firmly so that the tank plug at the bottom is fully engaged. 3. Use fresh, filtered water to fill the reservoir. Do not use distilled water. DRIP TRAY 1. Remove the drip tray and wash with hot soapy water. Rinse, dry and return. BODYWORK 1. Wipe the stainless steel surfaces with a soft, non-abrasive and damp cloth. Polish using a dry, soft cloth. The Rocket Espresso supplied stainless steel cloth is best for the cleaning of your machine body work. We do not recommend using any of the commercial stainless steel cleaners. DESCALING 1. Rocket Espresso do not recommend descaling your espresso machine. 2. Many of the chemicals used to descale espresso machines are particularly aggressive. These chemicals can cause internal corrosion of hard metals used in the construction of the machine. 3. Additionally it is very difficult to remove all the descaling solution from the machine once the procedure is completed. 4. Control the quality of the water you use in the machine, always using a filtered water. Distilled water may lack the necessary conductivity required for various electronic functions needed in the operation of the machine. 5. Additionally where possible try to use the Rocket Espresso reservoir filter. TROUBLESHOOTING EXTRACTION IS TOO FAST Check the filter basket is not under-dosed. Check the grind is not too coarse. EXTRACTION IS TOO SLOW Check the filter basket is not overfull. Check the grind is not too fine. Check the shower foil is not blocked - it may need to be back flushed or removed and cleaned. Check the spout of the handle is not blocked. If it is dirty with rancid coffee oil, it will need to be soaked in a solution of espresso head cleaning shampoo and water. WATER ESCAPING FROM AROUND THE HANDLE Check the head seals. If they have dried out, they will need to be replaced. Ensure the group handles are kept in place whenever the machine is not in use, as this will help to protect the seals. ESPRESSO TOO COLD Check the cups are warm. You can heat your cups by pouring hot water into them, and then discarding it, before you start the extraction. Too much water may have been drawn from the group head. Let the machine rest and limit the amount of water drawn from it between extractions to ensure the machine remains at temperature. ESPRESSO TASTES BITTER Extraction may be too slow. Check the grind is not too fine. Correct the dose and make it coarser. The machine may be dirty. Back flush and clean the group head. Clean the group handles and filter baskets. Pg 44 Pg 45
25 TROUBLESHOOTING ESPRESSO TASTES SOUR Extraction may be too fast. Check the grind is not too coarse. Correct the dose and make it finer. ESPRESSO IS WATERY AND THIN Extraction may be too fast. If it is, the crema will be pale. Check the grind is not too coarse. Correct the dose. ESPRESSO IS BUBBLY Water from the machine may be too hot. Let some water run from the group head. Try another extraction. Coffee may be too fresh. LOW OR NO PRESSURE FROM STEAM WAND May be due to overuse of the group head or hot water tap. Give the machine time to recover pressure. The steam wand may be clogged with dry milk. Remove the nozzle, soak it and unclog the jets with a paper clip. MILK IS THIN AND BUBBLY Ensure the milk is being stretched gradually. If air is introduced too quickly, large bubbles will form. Ensure the steam is releasing its full pressure and that all the jets are not blocked. May be due to using reheated milk. Try again with fresh milk. GREEN LIGHT IS FLASHING Indicates the water level is low. RESERVOIR REMOVAL FOR CLEANING Remove the reservoir cover and lift the reservoir up with a gentle but firm pull by the two black handles. When you are returning the reservoir, ensure you press down so that the tank plug at the bottom is fully engaged. PREPARING YOUR ROCKET FOR TRANSPORTATION AND/OR SERVICING 1. While your machine is on, remove the water reservoir and empty it of water. 2. Turn off the machine. 3. Place a one litre metal jug under the hot water spout and turn on hot water tap until it is emptied of contents. This will be when one litre of water is released. 4. If your machine is not working you will not be able to empty the boiler, but should still empty the water reservoir and return to the machine. 5. It is best to transport your machine in the original box. If not, you can make one that is as good. 6. Source a thick cardboard box that is all around 5cm larger than your machine. 7. Cut a flat piece of polystyrene (at least 5cm thick) to fit bottom of the box. 8. Place machine on polystyrene and wiggle machine to make imprints where the feet sit. 9. Remove and cut holes for the feet so that the machine sits flat on the bottom of the box. 10. Use more polystyrene to line the rest of the box. 11. If transporting for servicing, ensure your full contact details are included inside the box. 12. Your Rocket Espresso machine weighs in excess of 47KG and can be easily damaged when shipped in a cardboard box. Every precaution should be taken to ensure its safety. Pg 46 Pg 47

26 CONTACT DETAILS MANUFACTURER Rocket Milano S.R.L. Via Curiel Liscate Milano Italy MODEL R NINE ONE R 60V R 58 Giotto & Mozzafiato Evoluzione R Giotto & Mozzafiato Type v Appartamento Porta Via The retail outlet or local distributor that you purchased this Rocket Espresso Milano machine should be your first point of contact for all service and warranty enquiries about your machine. AUTHORISED ROCKET ESPRESSO MILANO DISTRIBUTOR CONTACT DETAILS Company name: Address: Phone number: Machine model purchased: For all technical questions that can not be answered by your dealer please visit rocket-espresso.com where to buy and use the online support form submitting all the details regarding your machine. For all authorised Rocket Espresso dealers worldwide please visit: Pg 48 Pg 49
 ROCKET Milano S.R.L.")
27 EC DECLARATION OF CONFORMITY We (the manufacturer) ROCKET Milano S.R.L. located in ITALY, Liscate, Via Curiel 13 in accordance with the following Directive(s) 2014/30/EC 2006/95/EC The Electromagnetic Compatibility Directive The Low Voltage Directive hereby declare that the following model of espresso machines produced by the formentioned company Rocket Espresso R NINE ONE Rocket Espresso R 60V Rocket Espresso R 58 Rocket Espresso Giotto Evoluzione R and Mozzafiato Evoluzione R Rocket Espresso Giotto Type v and Mozzafiato Type v Rocket Espresso Appartamento Rocket Espresso Porta Via are in conformity with the applicable requirements of the following documents: EN :2006+A1: A2:2011 EN :2002+A1:2005+A2:2008+A11:2012 EN :1997+A1:2001+A2: 2008 EN :2012 EN :2006+A1:2009+A2:2009 EN 62233:2008 EN :2013 I hereby declare that the equipments named above have been designed to comply with the relevant sections of the above specifications. The units comply with all applicable Essential Requirements of the Directives. Rocket Milano S.R.L. Federico Gallia - Amministratore Delegato Liscate, 22/07/2018 ROCKET MILANO S.R.L. Via Curiel 13, LISCATE (MI) Italy support@rocket-espresso.com Sede Legale- Liscate (MI) VIA CURIEL 13, CAP C.F. P.IVA - IT Pg 51
28 ROCKET MILANO S.R.L. VIA CURIEL LISCATE MILAN, ITALY
Micro Casa Semiautomatica
 Micro Casa Semiautomatica Training Manual Contents Overview 1 Models 1 Specifications 1 Features 1 Available accessories 1 Package contents 2 Semiautomatic parts 3 Assembly 4 Operating instructions 4 Starting
1. IMPORTANT SAFEGUARDS When using electrical appliances, basic safety precautions should always be followed to reduce the risk of fire, electric
 1. IMPORTANT SAFEGUARDS When using electrical appliances, basic safety precautions should always be followed to reduce the risk of fire, electric shock, and/pr injury to persons including the following:
IMPORTANT SAFEGUARDS. 3. To protect against fire, electric shock and injury to persons do not immerse cord, plug or unit in water or other liquid.
 IMPORTANT SAFEGUARDS When using electrical appliances, basic precautions should always be followed, including the following: 1. Read all instructions. 2. Make sure that your outlet voltage corresponds
OPERATING INSTRUCTIONS FOR YOUR SAFETY CAREFULLY READ THE OPERATING INSTRUCTIONS. FOR HOUSEHOLD USE ONLY
 OPERATING INSTRUCTIONS FOR YOUR SAFETY CAREFULLY READ THE OPERATING INSTRUCTIONS. FOR HOUSEHOLD USE ONLY 2 Opening Congratulations on choosing this high quality espresso machine and thank you for your
EXPOBAR OFFICE MACHINES
 EXPOBAR OFFICE MACHINES Supplemental Instructions Includes brewing guide, frothing techniques and recipes. These are supplemental instructions for the Expobar Office Control, Pulser and Lever. They are
5KEK1322 W A_v08.indd 1 5/13/16 2:25 PM
 5KEK1322 W10878653A_v08.indd 1 PARTS AND FEATURES PARTS AND ACCESSORIES Tea steeper lid (center section of lid with handle) Kettle lid (outer section) Stainless steel lime scale filter Removable stainless
MODELS 1315 & 1315-S La Pavoni CLUB COMBO
 IMPORTANT WARNINGS MODELS 1315 & 1315-S La Pavoni CLUB COMBO DUET Never operate your espresso machine without water in the tank. This may cause premature pump failure. Do not allow the power cord to come
COFFEE GRINDER. Owner s Manual
 COFFEE GRINDER Owner s Manual 4 4 FEATURES Bean Hopper Lid Bean Hopper Grinder Start/Stop Button Bean Hopper Holder Bean Hopper Release Button Grinding Timer Dial Coffee Powder Outlet 0 Grind Thickness
Micro Casa a Leva Training Manual
 Micro Casa a Leva Training Manual Contents Overview 1 Models 1 Specifications 1 Features 1 Available accessories 1 Package contents 2 Leva parts 3 Assembly 4 Operating instructions 4 Making coffee 5 Procedure
CAFE BARISTA. User Guide EM5000
 CAFE BARISTA User Guide EM5000 Heading Sub Heading Body copy with not indent applied. Bullet copy Bullet copy Bullet copy Bullet copy Bullet copy Bullet copy Bullet copy Bullet copy 2 Contents Sunbeam
USER MANUAL JOLLY PRESTIGE - COFFEE MACHINE
 SV JOLLY.pdf 1 17/10/2014 11:25 am USER MANUAL JOLLY PRESTIGE - COFFEE MACHINE SV JOLLY.pdf 1 20/10/2014 1:30 pm Contents Introduction... 02 Important safety precautions... 03 Description of external components...
STAINLESS STEEL MILK FROTHER. Model: PKFMR11BK
 STAINLESS STEEL MILK FROTHER Model: PKFMR11BK WARNING! To reduce the risk of fire, electrical shock or injury to persons or property: Carefully read all instructions before operating your new product for
A N F I M Srl. Caimano On Demand. Super Caimano COFFEE GRINDER C O D Y S C O D Y - II. Model
 ANFIM A N F I M Srl Via B. Verro, 33/5-20141 - Tel. (+39) 02/8465054 e-mail: info@anfim.it MILANO ITALY - Fax.(+39) 02/8464401 website: www.anfim.it INSTRUCTION MANUAL Model Caimano On Demand Super Caimano
Shotmeister Owner s Manual. The Sleekest Design, Pouring the Coldest Shots
 Shotmeister Owner s Manual The Sleekest Design, Pouring the Coldest Shots Thank you for purchasing a Jägermeister Shotmeister! REGISTRATION INFORMATION Register your Jägermeister Shotmeister Online: at
QUALITY MILK FROTHER INSTRUCTION MANUAL MODEL NO. MMF005
 QUALITY MILK FROTHER INSTRUCTION MANUAL MODEL NO. MMF005 MILK FROTHER INSTRUCTION MANUAL Model No.: MMF005 READ ALL INSTRUCTIONS BEFORE USING THE FROTHER. KEEP THESE INSTRUCTIONS FOR FUTURE REFERENCE.
SAFETY INSTRUCTIONS FOR USE
 INTRODUCTION Thank you for choosing this De Longhi Coffee machine. We hope you enjoy your new appliance. Please take a few minutes to read these instructions. This is the only way to ensure optimum results
5KCG0702 W A_Final.indd 1 8/4/15 8:35 AM
 5KCG0702 PARTS AND FEATURES PARTS AND ACCESSORIES Hopper lid Easy access stainless steel burrs 200 g glass hopper 15 grind settings Die cast metal body Grind control dial Power switch Faceplate assembly
Instruction Manual Coffee grinder. CM 90 Serie
 Instruction Manual Coffee grinder CM 90 Serie Table of content Safety Instructions... 3 Before first use... 4 Unpacking... 4 Requirements for the installation location... 5 Operating and speed settings...
Get Started. Better Everyday ECAM23260
 Better Everyday Get Started This short guide is not intended to explain all the functions of the appliance. Please read all the owner s instruction booklet before use. Video available on www.youtube.com/delonghiusa
IMPORTANT SAFEGUARDS. ENGLISH Congratulations on your wise choice!
 Congratulations on your wise choice! As the proud owner of the Gaggia machine, you can now experience the taste of a delicious cup of espresso or cappuccino in the comfort of your own home. Espresso coffee,
instructions COFFEE GRINDER KG 79/89
 instructions COFFEE GRINDER KG 79/89 DESCRIPTION OF APPLIANCE The following terms are used throughout the instruction manual Coffee-bean hopper lid Removable upper burr Coffee-bean hopper ON/OFF switch
TEA CATER USER MANUAL. UM_EN Part No.:
 USER MANUAL UM_EN Part No.: 1730080-02 CONTENT CONTENT... 2 GENERAL... 4 Introduction...4 Warnings...4 Precautions...4 Intended use...4 Facts & weight...5 General functional description...5 OVERVIEW OF
12 CUP COFFEE MAKER User Guide
 BRAND 12 CUP COFFEE MAKER User Guide Item: 740553 Ginnys.com 800-544-1590 Facebook.com/GinnysBrand Pinterest.com/GinnysBrand Ginnys.com/Blog Welcome to the world of full-flavored coffee with the Ginny
5KCM0512A W A_ENv10.indd 1 10/13/15 12:41 PM
 5KCM0512A PARTS AND FEATURES PARTS AND ACCESSORIES Scale readout display Timer readout display Plunger handle Power button Lid Plunger (stainless steel mesh filter with silicone seal not shown) Timer button
Espresso Maker READ BEFORE USE. Questions? Please call us our friendly associates are ready to help
 Espresso Maker Visit www.hamiltonbeach.in for our complete line of products and Use and Care Guides as well as delicious recipes, tips, and other helpful information! Questions? Please call us our friendly
the Bambino Plus Instruction Book - BES500
 the Bambino Plus Instruction Book - BES500 Contents 2 Breville Recommends Safety First 6 Components 8 Features 8 Assembly 9 Functions 15 Care & Cleaning 18 Troubleshooting BREVILLE RECOMMENDS SAFETY FIRST
COFFEE MAKER INSTRUCTION MANUAL CM4682-V
 COFFEE MAKER INSTRUCTION MANUAL CM4682-V IMPORTANT SAFEGUARDS Before using the electrical appliance, the following basic precautions should always be followed including the following: 1. Read all instructions.
PROGRAMMABLE COFFEE MAKER
 PROGRAMMABLE COFFEE MAKER KM 7280 KM 7280 W ENGLISH EN A B C D E F G H I J K L M N O P 3 SAFETY AND SET-UP Please read this instruction manual thoroughly prior to using this appliance! Follow all safety
Automatic Coffee Machine Instruction Manual
 Instruction Manual Page 1 of 17 8212-0 Automatic Coffee Machine Instruction Manual Instruction Manual Page 2 of 17 IMPORTANT INFORMATION For safety purposes please read these instructions carefully before
MODEL: POD BREWER AURORA SAF 68 HOMEMAKER ESPRESSO MAKER WITH COFFEE POD
 INSTRUCTION MANUAL Please read this Instruction Manual and the safety instructions before operating the appliance! MODEL: POD BREWER AURORA SAF 68 HOMEMAKER ESPRESSO MAKER WITH COFFEE POD Congratulation
Coffee Grinder Instruction Manual
 Coffee Grinder Instruction Manual CoffeeGrinder Manual-English Only.indd 1 07/01/2016 14:14:39 Savisto Home Coffee Grinder Voltage Supply: 220-240V~ 50/60Hz Power Consumption: 150W Eng Please read through
CAIMANO SPECIAL450 BARISTA
 ANFIM ANFIM Srl Via B. Verro, 33/5-20141 - MILANO ITALY Tel. (+39) 02/8465054 - Fax.(+39) 02/8464401 e-mail: info@anfim.it web site: www.anfim.it COFFEE GRINDER INSTRUCTIONS MANUAL mod: CAIMANO SPECIAL450
User Guide TEA CATER. Your Dealer. U / EN Rev
 User Guide TEA CATER Your Dealer U / EN Rev 101115 1. Contents Tea Cater 1. Contents page 2 2. General 3 3. Function description 3 4. Start-up 3 5. Component overview 4 5. Function button overview 5-6
Burr Grinder. Automatic burr grinder with 17-position grind selector. Instruction Booklet EM0430
 Burr Grinder Automatic burr grinder with 17-position grind selector Instruction Booklet EM0430 Please read these instructions carefully and retain for future reference. Contents Sunbeam s Safety Precautions
INSTRUCTION MANUAL. Coffee Maker CMCM-100
 INSTRUCTION MANUAL Coffee Maker CMCM-100 CONTENTS Cusimax recommends safety first....1-2 Know your Cusimax product...3 Operating your Cusimax product 4 Care & cleaning 5 Cusimax Recommends Safety First
IMPORTANT INSTRUCTIONS MODE D EMPLOI IMPORTANT INSTRUCIONES IMPORTANTES ISTRUZIONI IMPORTANTI
 MOKA 22-04-2003 10:10 Pagina 1 IMPORTANT INSTRUCTIONS SAVE THESE INSTRUCTIONS MODE D EMPLOI IMPORTANT CONSERVEZ LES PRESENTES INSTRUCTIONS INSTRUCIONES IMPORTANTES GUARDE ESTAS INSTRUCCIONES ISTRUZIONI
Get Started. Better Everyday ECAM26455
 Better Everyday Get Started This short guide is not intended to explain all the functions of the appliance. Please read all the owner s instruction booklet before use. ECAM26455 WELCOME Introducing the
Programmable Conical Burr Mill CBM-18
 Programmable Conical Burr Mill CBM-18 IMPORTANT SAFEGUARDS When using electrical appliances, basic safety precautions should always be followed, including the following: 1. Read all instructions. 2. To
The Scoop 2-Way Brewer
 READ BEFORE USE The Scoop 2-Way Brewer Visit www.hamiltonbeach.in for our complete line of products and Use and Care Guides as well as delicious recipes, tips, and other helpful information! Questions?
Thank you for your purchase!
 CM4200S Thank you for your purchase! www.prodprotect.com/blackanddecker Should you have any questions or concerns with your new product, please call our Customer Service Line at 1-800-465-6070 (US and
PLEASE READ THIS MANUAL BEFORE USE. SAVE FOR FUTURE REFERENCE.
 8-CUP STAINLESS STEEL CARAFE Coffee Brewer Model: BV1900TS HOUSEHOLD USE ONLY Customer Service Line: 1-855-664-1252 2-year limited warranty bonavitaworld.com Simple to operate Optional pre-infusion cycle
A N F I M Srl. Caimano: Timer / Automatico / Manuale Super Caimano: Timer / Automatico Caimano SPecial 450: Timer / Automatico
 ANFIM A N F I M Srl Via B. Verro, 33/5-204 - Tel. (+39) 02/8465054 e-mail: info@anfim.it MILANO ITALY - Fax.(+39) 02/846440 web site: www.anfim.it GB INSTRUCTIONS MANUAL mod: Caimano: Timer / Automatico
12 CUP COFFEEMAKER User Guide
 BRAND 12 CUP COFFEEMAKER User Guide Item: 757147 Ginnys.com 800-544-1590 Facebook.com/GinnysBrand Pinterest.com/GinnysBrand Welcome to the world of full-flavored coffee with the Ginny s Brand 12-Cup Coffeemaker!
BZ35 Espresso Machine
 BZ35 Espresso Machine Operation Guide The Bezzera BZ35 is a quality automatic espresso coffee machine which has piped in water and drainage as well as consistent volumetric delivery of espresso. INSTALLING
G F I M J K L B C D E S O T H Q P U N R D 4
 1 2 3 4 G F I A M J K L 5 6 7 B C D E 8 9 10 S O T H Q P U N R 11 12 D 4 Equipment GB A B C D E Text display (main menu) Rotary control knob Button > Button exit Height-adjustable coffee spout CafeRomatica
CafeRomatica NICR7.. Fully automatic coffee centre Operating Instructions and Useful Tips. A passion for coffee.
 CafeRomatica Fully automatic coffee centre Operating Instructions and Useful Tips NICR7.. GB A passion for coffee. 1 G F A M J / K A B C D E Display screen Left rotary knob Right rotary knob Bean symbol
Instruction Manual Coffee Grinder. Kaffeemühle / Coffee grinder CM 70 Serie
 Instruction Manual Coffee Grinder Kaffeemühle / Coffee grinder CM 70 Serie Table of content Safety Instructions... 3 Before the first use... 4 Unpacking... 5 Requirements for the installation location...
Coffeemaker User's manual
 Coffeemaker User's manual EN Prior to using this appliance, please read the user's manual thoroughly, even in cases where you have previously familiarised yourself with the operation of similar types of
BarAroma Coffee & Spice Grinder
 Breville is a registered trademark of Breville Pty. Ltd. ABN 98 000 092 928 Breville Customer Service Centre Australian Customers Breville Customer Service Centre PO Box 22 Botany NSW 2019 AUSTRALIA Customer
DOMESTIC ESPRESSO MACHINES
 DOMESTIC ESPRESSO MACHINES HANDMADE IN ITALY ROCKET ESPRESSO Rocket Espresso produces the finest espresso machines in the tradition of Fatto a Mano translated to, made by hand. Our small team of craftsmen
 Congratulations on your wise choice! As the proud owner of a Gaggia machine, you can now experience the taste of a delicious cup of espresso or cappuccino in the comfort of your own home. Espresso, originally
Coffee Burr Grinder. Model #559. Instructions. Warranty
 Coffee Burr Grinder Model #559 Instructions Warranty IMPORTANT SAFEGUARDS When using electrical appliances, basic safety precautions should always be followed, including the following: 1. Read all instructions.
Quick Reference Guide
 Impressa Z5 Quick Reference Guide This Guide does not replace the Operating Instructions. For details and cautions you must read all instructions. Watch the DVD instructions! Traces of Coffee Grounds in
Lusso / Espresso Si' Models:PL-16 PAB-16. Made In Italy
 Lusso / Espresso Si' Models:PL-16 PAB-16 Made In Italy la pavoni - PL-16 & PAB-16 We recommend using freshly roasted espresso beans ground medium to fine. Fresh coffee will produce better tasting espresso.
INDEX 1. INTRODUCTION. Dear client:
 INDEX 1. Introduction 2. Important Safeguards 3. Preparation 4. Making Espresso 5. Preparing Cappuccino 6. Making Tea 7. Cleaning the Machine 8. BRIEL Technology (The AQUASTOP System) 9. Troubleshooting
5KEK1522 W A_01_EN.indd 1 11/16/12 1:22 PM
 5KEK1522 Water Kettle INSTRUCTIONS Table of Contents water KEttle SAFETY Important safeguards...6 Electrical requirements...7 Electrical equipment waste disposal...7 PARTS AND FEATURES Parts and accessories...8
General data 3. Important safeguards 4. Introduction 5. Instruction for use 6. Description of external components 8. Installation 9.
 Contents General data 3 Important safeguards 4 Introduction 5 Instruction for use 6 Description of external components 8 Installation 9 Technical data 10 Start up 11 Operating instructions 15 Dispensing
aerolatte ltd. Unit 1 The Corn Works Station Road Radlett WD7 8JY UK
 aerolatte ltd. Unit 1 The Corn Works Station Road Radlett WD7 8JY UK www.aerolatte.com Safety Instructions and WARNINGS When using electrical appliances basic safety precautions should always be followed
This appliance can be used by children aged from 8 years and above and persons with
 IMPORTANT SAFEGUARDS Symbols used in these instructions Important warnings are identified by these symbols. It is vital to respect these warnings. Failure to observe the warning could result in life threatening
Espresso/Cappuccino Maker
 Breville is a registered trademark of Breville Pty. Ltd. ABN 98 000 092 928 Breville Customer Service Centre Australian Customers Breville Customer Service Centre Locked Bag 2000 Botany NSW 2019 AUSTRALIA
AUTOMATIC BEAN TO CUP COFFEE MACHINE
 AUTOMATIC BEAN TO CUP COFFEE MACHINE EB60 model USER GUIDE NZ AU GB IE CONTENTS Appliance parts 2 Safety and warnings 4 First use 9 Menu settings 13 Making coffee 17 Making cappuccinos and milk-based
Matic / THa. Operating instructions COFFEE BREWER. Mode d emploi MACHINE À CAFÉ. Gebrauchsanleitung KAFFEEBRÜHMASCHINE
 Operating instructions COFFEE BREWER Mode d emploi MACHINE À CAFÉ Gebrauchsanleitung KAFFEEBRÜHMASCHINE Gebruiksaanwijzing KOFFIEZETAPPARAAT Bruksanvisning KAFFEBRYGGARE Bruksanvisning KAFFEMASKIN GB FR
SAVE THESE INSTRUCTIONS THIS PRODUCT IS FOR HOUSEHOLD USE ONLY
 IMPORTANT SAFEGUARDS When using electrical appliances, basic safety precautions should always be followed, including the following: Read all instructions. Do not touch hot surfaces. Use handles and knobs.
10,000 prize draw. instructions. EXTRA year guarantee FREE rewards gallery. Register online now!
 r instructions 10,000 prize draw EXTRA year guarantee FREE rewards gallery www.productregister.co.uk/rhobbs Register online now! See back for details Read the instructions, keep them safe, pass them on
AUTOMATIC BEAN TO CUP COFFEE MACHINE
 AUTOMATIC BEAN TO CUP COFFEE MACHINE EB60 model USER GUIDE NZ AU GB IE CONTENTS Appliance parts 2 Safety and warnings 4 First use 9 Menu settings 13 Making coffee 17 Making cappuccinos and milk-based
10,000 prize draw. instructions. EXTRA year guarantee FREE rewards gallery. Register online now!
 r instructions 10,000 prize draw EXTRA year guarantee FREE rewards gallery www.productregister.co.uk/rhobbs Register online now! See back for details 2 Read the instructions, keep them safe, pass them
Wi-Fi Coffee Maker. Model# GCMW-4750 USER MANUAL
 Wi-Fi Coffee Maker Model# GCMW-4750 USER MANUAL Read this manual thoroughly before using and save it for future reference Model: GCMW-4750 2018 Gourmia www.gourmia.com The Steelstone Group Brooklyn, NY
CHOCOLINO CAFÉLINO USER MANUAL UM_EN. Part No.: _01
 CHOCOLINO CAFÉLINO USER MANUAL UM_EN Part No.: 1764133_01 CONTENT CONTENT...2 GENERAL...4 Introduction...4 Warnings...4 Precautions...4 Intended use...4 Facts & weight...5 OVERVIEW OF COMPONENTS...6 CHOCOLINO/CAFÉLINO...6
BARISTA MAX ESPRESSO MACHINE WITH INTEGRATED GRINDER. User Guide EM5300
 BARISTA MAX ESPRESSO MACHINE WITH INTEGRATED GRINDER User Guide EM5300 Xxx Contents 2-3 Sunbeam s Safety Precautions 4-6 Features of your Sunbeam Barista Max 7 More Details about your Sunbeam Barista Max
Stainless Steel Milk Frother N3 User Manual
 Stainless Steel Milk Frother N3 User Manual Voltage: 110V~60Hz Power: 500W READ AND SAVE THESE INSTRUCTIONS IMPORTANT Read and follow the instructions in this user manual even if you feel you are familiar
Wega Mininova 2003 Installation Instructions
 Wega Mininova 2003 Installation Instructions Thank you for purchasing a Wega Espresso Product. We are sure you will be happy with your purchase and the quality of coffee produced by our machines and grinders.
User Manual. Stainless Steel Coffee Urns. Models: 177CU55ETL, 177CU110ETL 10/2016. Please read and keep these instructions. Indoor use only.
 Intertek Stainless Steel Coffee Urns Models: 177CU55ETL, 177CU110ETL 10/2016 Please read and keep these instructions. Indoor use only. www.avantcoequipment.com 1 NOTE: Save these instructions for future
Custom Grind Deluxe Coffee Grinder
 READ BEFORE USE Visit www.hamiltonbeach.in for our complete line of products and Use and Care Guides as well as delicious recipes, tips, and other useful information! Custom Grind Deluxe Coffee Grinder
DOMESTIC ESPRESSO MACHINES
 DOMESTIC ESPRESSO MACHINES HANDMADE IN ITALY ROCKET ESPRESSO Rocket Espresso produces the finest espresso machines in the tradition of Fatto a Mano translated to, made by hand. Our small team of craftsmen
15-Bar Pump Espresso Maker Instruction Manual
 15-Bar Pump Espresso Maker Instruction Manual Styled for Life Designed & Engineered in New York City SZ-314289_CRUX006_15 bar Espresso maker_im_r3.indd 1 Thank you for Purchasing this Product You may already
Speed Pour Owner s Manual. Serving up the Coldest Shots
 Speed Pour Owner s Manual Serving up the Coldest Shots INSTRUCTIONS Unpacking and Start-Up Instructions 1. Start by removing the included boxes of the Stag Pourer & Bottle Neck Extender. 2. Remove foam
6-in-1 K-Cup Coffee Maker
 6-in-1 K-Cup Coffee Maker Model# GCM-6000 USER MANUAL Read this manual thoroughly before using and save it for future reference Model: GCM-6000 2017 Gourmia www.gourmia.com The Steelstone Group Brooklyn,
Electric Two-Speed Drink Mixer
 Electric Two-Speed Drink Mixer MS2090 Series Before use, please read this manual thoroughly and save for future reference. ovente.com Electric Two-Speed Drink Mixer MS2090 Series 2 ovente.com ELECTRIC
Easy Step Cappuccino Maker KES110. Instruction Booklet
 Easy Step Cappuccino Maker KES110 Instruction Booklet Important Please retain your instruction book for future use. In the event that you need some assistance with your Kambrook appliance, please contact
WE CAN HELP. Smart Coffee Maker User Manual. Can t connect? Need help? DO NOT RETURN THIS PRODUCT TO THE STORE
 Can t connect? Need help? Wi-Fi Date Code: 01/19 Smart Coffee Maker User Manual WE CAN HELP DO NOT RETURN THIS PRODUCT TO THE STORE Call 1-800-757-1440 Mon-Fri 9:00-5:00 EST (US) or email info@atomiusa.com
EXPOBAR BREWTUS III Supplemental Instructions
 EXPOBAR BREWTUS III Supplemental Instructions www.wholelattelove.com 888.411.5282 1 Congratulations on the purchase of your new Brewtus III R or Brewtus III V! The Expobar Brewtus is a very unique machine
SAVE THESE INSTRUCTIONS
 5 1 2 3 4 6 7 ENGLISH Congratulations on your wise choice! As the proud owner of the Gaggia machine, you can now experience the taste of a delicious cup of espresso or cappuccino in the comfort of your
MARQUE REFERENCE CODIC
 MARQUE REFERENCE CODIC : KALORIK : TKG OT 00BCRL : 50 EN ANGLAIS PROVISOIREMENT NOTICE LOGO 00L ELECTRIC OVEN WITH ROTISSERIE & LAMP & CONVECTION INSTRUCTION MANUAL Model No. TY000BCL 0-0V~ 50/60Hz 800W
Sage by Heston Blumenthal
 Sage by Heston Blumenthal Freephone (UK Landline): 0808 178 1650 Mobile Calls (National Rate): 0333 0142 970 www.sageappliances.co.uk customerservice@sageappliances.co.uk Register your product and get
A IMPORTANT SAFEGUARDS
 instructions 2 Read the instructions, keep them safe, pass them on if you pass the appliance on. Remove all packaging before use. A IMPORTANT SAFEGUARDS Follow basic safety precautions, including: 1 This
45-Cup Coffee Urn Big Brew Classic. Instruction Manual. Model ACU-045
 45-Cup Coffee Urn Big Brew Classic Instruction Manual Model ACU-045 Congratulations! Your Big Brew Classic will surely become one of the most practical appliances in your home or office. Enjoy fresh brewed
INSTALLATION & OPERATING GUIDE
 SURE TAMP STEAM INSTALLATION & OPERATING GUIDE BUNN-O-MATIC CORPORATION POST OFFICE BOX 3227 SPRINGFIELD, ILLINOIS 6278-3227 PHONE: (217) 529-661 FAX: (217) 529-6644 http://www.bunn.com/espresso/index.html
OPERATING MANUAL. Sample PRO 100 Series. Electric Heating. Applies to Versions: SPE1*, SPE2, SPE4, SPE6
 OPERATING MANUAL Sample PRO 100 Series Electric Heating Applies to Versions: SPE1*, SPE2, SPE4, SPE6 NOTE: All electrically heated roasters in the Sample PRO 100 Series are modular and this manual applies
Half-Pint Soft Serve Ice Cream Maker
 CAUTION: READ OPERATOR S MANUAL BEFORE USE Visit www.hamiltonbeach-me.com for our complete line of products and Use and Care Guides as well as delicious recipes and tips! Half-Pint Soft Serve Ice Cream
USER MANUAL TECHNICAL DATA
 USER MANUAL TECHNICAL DATA Model: Easy Touch Operating Voltage: 240V AC Frequency: 50 Hz Power con, MAX : 1500W Water tank cap.: 700ml (0.7L) Weight: 5.0 kg Size: L 350 * W 155 * H 245 mm This appliance
Installation and User Instructions Flushing System Kit
 Installation and User Instructions Flushing System Kit Model: ACFS Part No. 102532 Rev. A Copyright 2007 Dacor All rights reserved. All specifications are subject to change without notice. Dacor assumes
AUTOMATIC BEAN TO CUP COFFEE MACHINE
 AUTOMATIC BEAN TO CUP COFFEE MACHINE EB24 model USER GUIDE US CA CONTENTS Appliance parts 2 Safety and warnings 4 First use 7 Menu settings 11 Making coffee 15 Making cappuccinos and milk-based coffees
User Manual. Thermo Pump System Coffee Brewers User Manual. Models: 177C10, 177C15 04/2018. Please read and keep these instructions. Indoor use only.
 Thermo Pump System Coffee Brewers User Manual Models: 177C10, 177C15 04/2018 Please read and keep these instructions. Indoor use only. www.avantcoequipment.com 1 Parts Diagram 177C15 2 5 177C10 3 4 6 4
Please read all directions before using the product and retain this guide for reference. This product is intended for household use only.
 Wine Gift Set User Guide IVAWINESET05 Thank you for purchasing the Ivation Wine Gift Set. This User Guide is intended to provide you with guidelines to ensure that operation of this product is safe and
Sleeve Down: Frothing. Sleeve Up: Steaming
 Sleeve Down: Frothing Sleeve Up: Steaming 3 SPECIAL CORD SET INSTRUCTIONS Regarding your Cord Set: A. A short power-supply cord (or detachable power-supply cord) is to be provided to reduce risks resulting
Single-Serve Coffee Maker
 840251801 Single-Serve Coffee Maker IMPORTANT SAFEGUARDS When using electrical appliances, basic safety precautions should always be followed to reduce the risk of fire, electric shock, and/or injury to
ZIRCON USER MANUAL. UM_EN Date:
 R USER MANUAL UM_EN Date: 150610 CONTENTS Original Instructions CONTENTS...2 SYMBOL DESCRIPTION...4 Hazard intensity levels... 4 GENERAL...5 Introduction... 5 General instructions... 5 Warnings... 5 Precautions...
EN Electric Coffee Grinder
 SCG 5050BK EN Electric Coffee Grinder - 1 - EN Electric Coffee Grinder Important safety instructions READ CAREFULLY AND STORE FOR FUTURE USE. This appliance may be used by persons with physical or mental
the Infuser Instruction Booklet BES840
 the Infuser Instruction Booklet BES840 Contents CONGRATULATIONS on the purchase of your new Breville Infuser Espresso Machine 4 Breville recommends safety first 6 Know your Breville Infuser Espresso Machine
Buona Fortuna Training Manual Technical Instructions
 Buona Fortuna Training Manual Technical Instructions Buona Fortuna Coffee Company 123 Latte Boulevard Seattle, Washington 11222 Phone: 222-555-1555 Fax: 222-555-1556 Espresso Machine Training Manual Contents