Schaerer Coffee Art C. Models: EUS EUS EUS EUS
|
|
|
- Georgiana Sullivan
- 5 years ago
- Views:
Transcription


1 Schaerer Coffee Art C User Manual v01 Models: EUS EUS EUS EUS
2 Copyrights Published by: Schaerer USA Corporation, Signal Hill California Version: Version 01 / January 2016 Designed and edited by: Schaerer USA Corporation, Signal Hill California Copyright: Schaerer USA Corporation, Signal Hill California All rights reserved, including translation into other languages. This manual may not be copied, photocopied or distributed, in whole or in part, by any means, nor transmitted electronically, without the publisher s written consent. All information, illustrations, and specifi cations are based on the latest product information available at the time of publication approval. Schaerer USA Corporation reserves the right to change the content at any time without prior notice. Note that the pictures and display messages shown inside are only examples; your machine and display messages may vary.
3 Cautions & Warnings Cautions & Warnings USE CAUTION WHILE OPERATING AND CLEAN- ING THE COFFEE ART PLUS MACHINE WARNING: TO PREVENT ELECTRICAL SHOCK, DO NOT REMOVE SIDE OR BACK PANELS FROM THIS MACHINE. NO USER SERVICE- ABLE PARTS INSIDE. REFER SERVICING TO AUTHORIZED SERVICE PERSONNEL ONLY. WARNING: IF WATER OR SMOKE IS COMING FROM INSIDE THE MA- CHINE, TURN OFF MACHINE IMMEDIATELY. UNPLUG THE MACHINE, TURN OFF WATER SUPPLY, AND CONTACT AN AUTHORIZED SERVICE AGENT. WARNING: DO NOT MOVE MACHINE WHILE IT IS STILL CONNECTED TO UTILITIES. CAUTION: ALL DISPENSED PRODUCTS ARE EXTREMELY HOT! USE CAUTION WHILE OPERATING ALL FUNCTIONS. KEEP HANDS AWAY FROM FOAMER HEAD/COFFEE SPOUT/SPLITTER WHILE DISPENSING OR CLEANING (EXTREMELY HOT). CAUTION: DO NOT PLACE HANDS INSIDE MACHINE WHILE OPERATING, EXCEPT WHEN FOLLOWING CLEANING PROCEDURES. CAUTION: DO NOT TILT MACHINE TO EITHER SIDE (VERY HEAVY). CAUTION: DO NOT PLACE LIQUID CONTAINERS (SYRUPS, MILK, ETC.) ON TOP OF THIS EQUIPMENT.
4 Table of Contents Table of Contents Table of Contents Introduction Machine Overview Machine Accessories Utility Hook-Up Requirements Operation General Operation Tips During Operation Maintenance Daily Cleaning Hopper Cleaning Error Messages How to Get Help Warranty Information
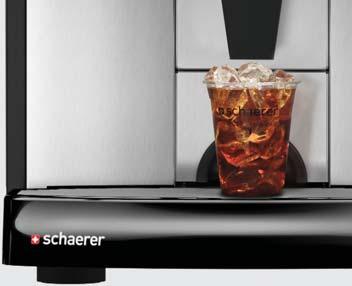
5 Introduction Machine Overview Machine Overview Machine General Overview Dual bean hoppers each hold up to 1 kg (2.2 lbs.) Regular (left) and Decaf (right) Cleaning tablet funnel Service Card Reader User Panel: 7 Touch Screen or Button Depending on Model Confriguration Optional Flavor Module Available Only on Touch Screen Models Hot water spout Coffee spout Grounds bin Drip tray grill Drip tray Flavor Module option is available on these models: EUS Coffee Art C HC Touch EUS Coffee Art C H Touch EUS Coffee Art C H Touch 3G EUS Coffee Art C CH Touch 3G - 5 -


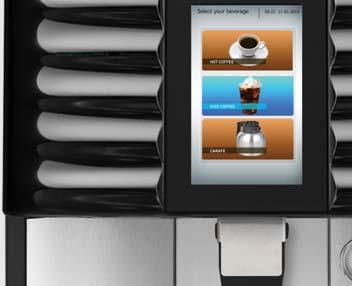
6 Introduction Machine Overview User Panel with Touch Screen Staff Operated Mode Beverage size selection Time and date indicator Beverage type selection Press the DECAF icon fi rst then select your beverage type. The icon controls the power to the machine. To turn the machine off, press and hold the icon. To turn it on, just the press the icon. Press the icon to go into the Service Menu. Self-Serve Mode Notes: 1. This icon may be hidden; press & hold the blank area to bring up the icon. 2. When machine is off this icon is called Quick Menu. Beverage size selection Press the icon to go into the Service Menu. Notes: 1. This icon may be hidden; press & hold the blank area to bring up the icon. 2. When machine is off this icon is called Quick Menu. Panel confi guration may vary


7 Introduction Machine Overview User Panel with Buttons and - button (initiates the cleaning cycle & quick rinse) button (on/off) and + button (stop/cancel) LED display Beverage selection Panel confi guration may vary. Bean Hoppers Fill the hoppers on top of the machine with whole beans only. The machine grinds the beans freshly for each beverage. The left hopper is intended for regular coffee beans. The right hopper is intended for decaffeinated coffee beans. Cleaning Tablet Funnel The cleaning tablet funnel is located between the two bean hoppers. For machines with 3 grinders, the tablet funnel is located behind front center hopper. Only Schaerer Cleaning Tablets should be dropped into this funnel during the daily cleaning procedure. Refer to pages for daily cleaning instructions. Use only Schaerer Cleaning Tablets (Item # 65221) for the daily cleaning procedure. Refer to page 9 for reordering cleaning tablets


8 Introduction Machine Overview Hot Water Spout and Coffee Spout The hot water outlet is used for tea water. The coffee spout can accommodate tall cups. Grounds Bin The grounds bin is located below and behind the coffee spout. It holds the used grounds which are disposed of after each coffee is brewed. The bin slides straight out from the machine and must be emptied periodically or when prompted on the display. Drip Tray Grill and Drip Tray The drip tray grill is removable for easy cleaning and access to the inside of the drip tray. The drip tray is connected to a fl exible hose which should be connected to a fi xed drain line. The purpose of this basin is to funnel any spilled liquids down the drain. To prevent blockage, we recommend that you avoid fl ushing large quantities of milk and/or used coffee grounds down the drain. Card Reader For use by manufacturer-authorized service agent


9 Introduction Machine Accessories Machine Accessories User Manual Daily Cleaning Instructions Large Cleaning Brush (Item #67409) Schaerer Cleaning Tablet (Item #65221) TO ORDER CLEANING SUPPLIES PLEASE CALL (PRESS 1, THEN PRESS 4) - 9 -
10 - 10 -
11 Utility Hook-Up Requirements Utility Hook-Up Requirements - SCA C Touch w/flavor Module 8 Top Clearance 2 Side Clearance 3 Rear Clearance 17" 10.25" 22" 33" Optional Syrup Module 4 Clearance 15 1/2 10 1/4 3 Diameter Access Hole Located Rear Center of Machine 1 Diameter Drain Hose 4 2 3/4 The receptacle (NEMA L6-20R), water filter and scale inhibitor can be located either under the counter or top of counter behind the machine. 3 Clearance 3 Clearance 1 1/2 Diameter Drain Pipe to Floor Drain Water Filter Scale Inhibitor POWER, WATER SUPPLY, AND ACCESS REQUIREMENTS G X Y Receptacle type: NEMA L6-20R 3 Prong twist-lock Breaker panel: 20 Amp dedicated 220V single phase circuit Actual maximum load: 16 Amps Access hole with collar (no sharp edges) Located centrally under machine for water and drain hose Diameter: Minimum 3" The receptacle, water shut-off valve and drain pipe must be within 3 feet (36") of the center of the location (footprint) of the machine. Water shut-off valve with 3/8" compression fi tting Back fl ow preventer in accordance with local requirements Ideal under counter space for softener: 30"(minimum requirement: 26"). Drain pipe to fl oor drain Copper or PVC in accordance with local health codes and regulations Diameter: 1.5" or larger Notes: Access hole is only required if any of the utility hook-ups are located under the counter
, water filter and scale inhibitor can be located either")

 of the center of")

12 Utility Hook-Up Requirements Utility Hook-Up Requirements - SCA C Button 8 Top Clearance 2 Side Clearance 3 Rear Clearance 17" 22" 33" 4 Clearance 15 1/2 10 1/4 3 Diameter Access Hole Located Rear Center of Machine 1 Diameter Drain Hose 4 2 3/4 The receptacle (NEMA L6-20R), water filter and scale inhibitor can be located either under the counter or top of counter behind the machine. 3 Clearance 3 Clearance 1 1/2 Diameter Drain Pipe to Floor Drain Water Filter Scale Inhibitor POWER, WATER SUPPLY, AND ACCESS REQUIREMENTS G X Y Receptacle type: NEMA L6-20R 3 Prong twist-lock Breaker panel: 20 Amp dedicated 220V single phase circuit Actual maximum load: 16 Amps Access hole with collar (no sharp edges) Located centrally under machine for water and drain hose Diameter: Minimum 3" The receptacle, water shut-off valve and drain pipe must be within 3 feet (36") of the center of the location (footprint) of the machine. Water shut-off valve with 3/8" compression fi tting Back fl ow preventer in accordance with local requirements Ideal under counter space for softener: 30"(minimum requirement: 26"). Drain pipe to fl oor drain Copper or PVC in accordance with local health codes and regulations Diameter: 1.5" or larger Notes: Access hole is only required if any of the utility hook-ups are located under the counter
13 Operation General Operation General Operation Introduction This chapter describes the basic functions of the coffee machine. Read the instructions carefully to ensure smooth routine operation. Filling Bean Hoppers Only use whole beans in the bean hoppers! Never reach with your hands into the bean hoppers when the machine is switched on. When refilling the bean hoppers, do not reach into the grinder and do not press any of the product buttons! 1. Remove the lid from the bean hopper. 2. Fill with whole beans maximum 1 kg (2.2 lbs) and close the lid. A well-closed lid prevents loss of aroma. Preparing the Machine for Operation Prior to switching on the machine, check the following: The fresh water supply is open. The hoppers are fi lled (see above). The grounds bin is empty. The machine is connected to the power supply. Switching On the Coffee Machine Switch on the coffee machine by pressing the icon/button. If the machine has been switched off for a long period of time, the message heating appears on the display. A product selection can be made when the message Select your beverage appears on the display

14 Operation General Operation Switching the Coffee Machine to Standby Mode If the coffee machine is not used for longer periods, i.e. overnight, it can be switched to standby mode. In this mode, the boiler is not heated and no beverages are available. 1. Press the icon/button until the message "Standby" appears on the display. Extended Idle Time 1. Perform the daily cleaning: (See section "Daily Cleaning" on pages 17-20). 2. Switch the machine to Standby (Press the icon/button). 3. Close the shut-off valve from the fresh water supply. 4. Disconnect the machine from the power supply. 5. Vacuum the coffee beans from the bean hoppers. 6. Store the machine in a dry and clean location. On premises where temperatures can drop below zero, the boiler has to be emptied. To empty the boiler, contact a manufacturer-authorized service agent for assistance. Removal / Relocation / Disassembly Contact a manufacturer-authorized customer service agent


15 Operation Tips During Operation Tips During Operation Always run the daily cleaning procedure when prompted by the machine display. Refer to pages for details. During peek hours, you can dispense into a carafe or container. Empty the grounds bin regularly and when prompted by the machine display. Periodically wipe the machine exterior thoroughly with a clean, damp cloth to remove residue
16 - 16 -


17 Maintenance Daily Cleaning Daily Cleaning (Touch Screen) Read and follow the instructions carefully before you begin the daily cleaning procedure. This procedure should be performed on a daily basis or when prompted by the machine display. Never reach into the machine or under the coffee spout during the automatic cleaning cycle! When the Start cleaning message appears on the screen, follow the machine prompts to initial the clean cycle. Note: In some confi gurations, the machine will automatically initiate the cleaning cycle after two hours of the Start cleaning message appears. During that time all product buttons will be locked until the procedure is completed. This procedure is only for models with touch screen EUS Coffee Art C HC Touch EUS Coffee Art C H Touch EUS Coffee Art C H Touch 3G EUS Coffee Art C CH Touch 3G Item #67409 Item #65221 Use only Schaerer cleaning supplies for this procedure. When the Start cleaning message appears on the screen, press OK and move to the next step. Press the icon to go into the Service Menu. In some configurations, this icon may be hidden. If hidden, press and hold the same area (bottom left corner) for 3-5 seconds. Service menu will appear


 Refi ll beans if necessary.")
18 Maintenance Daily Cleaning Select Cleaning. Immediately remove grounds bin within 6 seconds. Empty coffee grounds into trash can. Wash, rinse, sanitize bin and set aside. Remove metal shield above grounds bin and set aside. If grounds bin is not removed within 6 seconds, the machine will return to normal operating mode. If this happens, repeat step 3 and Use large cleaning brush to wipe coffee grounds from brew unit and surrounding areas into drip tray. Do not touch brew unit or any other parts of inside area with your hands. 9. Put back metal shield and slide coffee grounds bin back into place. 10. Lift dome lid and drop in one Schaerer cleaning tablet. Close lid after dropping tablet. Press OK on the screen. Note: Dome lid is located behind front center hopper for 3 grinder machine configuration. 11. Press Continue on the screen to activate cleaning cycle. Cleaning runs (4:33 min.) Refi ll beans if necessary. Press Continue to return to normal operating mode. When automated cleaning cycle is complete, fl ush drip tray with a pitcher of water. Wipe the machine exterior thoroughly with a clean, damp cloth to remove residue

19 Maintenance Daily Cleaning Daily Cleaning (Buttons) Read and follow the instructions carefully before you begin the daily cleaning procedure. This procedure should be performed on a daily basis or when prompted by the machine display. Never reach into the machine or under the coffee spout during the automatic cleaning cycle! When the Start cleaning message appears on the screen, follow the machine prompts to initial the clean cycle. Note: In some confi gurations, the machine will automatically initiate the cleaning cycle after two hours of the Start cleaning message appears. During that time all product buttons will be locked until the procedure is completed. This procedure is only for models with buttons. Model # TBD Coffee Art C HC Button Black EUS Coffee Art C H Button Black Item #67409 Item #65221 Use only Schaerer cleaning supplies for this procedure. Press and hold the button until display reads cleaning program empty gr. container. Immediately remove grounds bin within 6 seconds. Empty coffee grounds into trash can. Wash, rinse, sanitize bin and set aside. If grounds bin is not removed within 6 seconds, the machine will return to normal operating mode. If this happens, repeat step

 the blinking button to activate cleaning cycle (this takes about 4:30 minutes).")
20 Maintenance Daily Cleaning Remove metal shield above grounds bin and set aside. Use large cleaning brush to wipe coffee grounds from brew unit and surrounding areas into drip tray. Do not touch brew unit or any other parts of inside area with your hands. Put back metal shield and slide coffee grounds bin back into place Wait until display reads cleaning program insert tablet. Lift dome lid located between the two bean hoppers and drop in one Schaerer cleaning tablet. Close lid after dropping tablet. Note: Dome lid is located behind front center hopper for 3 grinder machine configuration. Press (do not hold) the blinking button to activate cleaning cycle (this takes about 4:30 minutes). All beverage selection buttons will be locked during this time. Cleaning runs (4:33 min.) When automated cleaning cycle is complete, fl ush drip tray with a pitcher of water. Wipe the machine exterior thoroughly with a clean, damp cloth to remove residue


21 Maintenance Hopper Cleaning Hopper Cleaning (Standard Hoppers) Read and follow the instructions carefully before you begin the hopper cleaning procedure. This procedure should be performed on an as needed basis. Do not clean the bean hoppers in the dishwasher. Do not use abrasive cleaning products. When refi lling the bean hoppers, do not reach into the grinder and do not press any of the product buttons! Turn counter clockwise untill it clicks to lock the beans and release the hopper. 4. Lift the hopper upward to remove from the machine. 5. Empty the beans into another container. Use warm water to wash, rinse and sanitize the hopper. Dry the hopper thoroughly with a clean, damp cloth. Align hopper with the base. Place hopper back on to machine. Turn clockwise untill it clicks to release the beans and lock the hopper. Repeat these steps for the other hopper. DO NOT OVER TURN


22 Maintenance Hopper Cleaning Hopper Cleaning (Oval Hoppers) Read and follow the instructions carefully before you begin the hopper cleaning procedure. This procedure should be performed on an as needed basis. Do not clean the bean hoppers in the dishwasher. Do not use abrasive cleaning products. When refi lling the bean hoppers, do not reach into the grinder and do not press any of the product buttons! Push the bean slide inward to lock the beans and release the hopper. Lift the hopper upward to remove from the machine. Empty the beans into another container. Use warm water to wash, rinse and sanitize Dry the hopper thoroughly with a clean, damp cloth. Place hopper back on to machine. Pull the bean slide outward to release the beans and lock the hopper into place. Repeat these steps for the other hopper
23 Error Messages Error Messages Display Message Cause Remedy Grounds container missing The grounds container was removed (cleaning program, emptying, etc.) The limit switch is defective. Insert grounds container. If the message persists, call for service. Empty grounds container The grounds container is full. Empty the grounds container and reinsert it. Cleaning program Grinder left/right no beans Grinder left/right blocked Heating coffee water/hot water/ steam Service request Grinder left/right overloaded Grinder current fault Brewing unit current fault Over current brew motor Water fl ow error Appears when a programmed count of beverages has been dispensed without the machine being cleaned. Appears when the bean hopper on the leftor right is empty or when a coffee bean has become stuck. Beverage output is blocked! An object (such as a stone) has become jammed in the left or right grinder. Beverage output is blocked! The temperature is 10 C below the programmed temperature. The programmed number of beverages (cups/month) has been reached. Service is required. Left/right grinder is overloaded. Grinder left/right blocked. PC board issue. Electronics issue. PC board issue. Electronics issue. Brewing unit is drawing too much current (over 4A). Brewing unit is jammed. No water connection. Pump problem. (pump pressure < 7.5bar) Brewer is blocked. Water system is blocked. Grind level is too fi ne. PC board and fl ow meter are improperly connected. Electrical problem (e.g. PC board). The machine must be cleaned. Refer to page for daily cleaning procedures. Refill the bean hopper with coffee beans (max. 1000g.) and confi rm. Check bean slides (oval hoppers). Refer to page 22. Check bean release (standard hoppers). Refer to page 21. If jammed, use the stem of the cleaning brush to stir the coffee beans around and unclog the grinder. Then press confi rm. Check grinder for blockage. Remove bean hoppers and vacuum remaining beans if necessary. Then press confi rm. If the message persists, call for service. Wait until the temperature has been reached. If the message persists, call for service. Call for service. Check grinder for blockage. Remove bean hoppers and remaining beans with vacuum if necessary. Then press confi rm. If the message persists, call for service. Call for service. Call for service. Call for service. Check water supply. If the message persists, call for service
24 Error Messages Display Message Cause Remedy Crit. coffee temp. Crit. hot water temp. Timeout coffee heater Hot water heater timeout Coffee sensor defect Hot water sensor defect Electrical problem between the sensor and PC board. Temperature sensor issue. Electrical problem between the sensor and PC board. Temperature sensor issue. The set temperature of the coffee boiler was not reached within 4 minutes of the unit switching on. The set temperature of the hot water boiler was not reached within 4 minutes of the unit switching on. Electrical problem between the sensor and PC board. Temperature sensor issue. Electrical problem between the sensor and PC board. Temperature sensor issue. Call for service. Call for service. Switch the machine off and back on. Ensure grounds bin is in place. If the message persists, call for service. Switch the machine off and back on. Ensure grounds bin is in place. If the message persists, call for service. Call for service. Call for service. Brew unit timeout The brewing unit motor does not run. Call for service. Initializing Display dark The software and processor are being restarted. The brewing unit moves to the initial position. Machine is not connected to the power supply. Machine is not switched on. Switch the machine off and then back on. If the message persists, call for service. Check whether the machine is connected to the power supply. Check whether the machine is switched on. If the message persists, call for service
25 How to Get Help How to Get Help Normal Business Hours During normal business hours, a Schaerer representative will answer your call directly. If all lines are busy, please leave a message according to the instructions you hear on the voic . Monday through Friday: Weekends: 5:00AM to 5:00PM PST 5:00AM to 3:00PM PST Messages received during business hours will be returned in the order they were received. After Hours Support Outside normal business hours, you can use our voic system to notify an on-duty technician for emergencies. Our after-hours notifi cation system is active during the following times: Monday through Friday: Weekends: 5:00PM to 9:00PM PST 3:00PM to 9:00PM PST Messages received during after hours will be returned promptly. Please do not use the after hours voic system for general questions or other non-emergency requests! *Messages received outside of normal after hours will be returned the next day. *Please DO NOT use this system for general questions or other non-emergency requests. How to Contact Us (Normal and After Hours) Call (within U.S. and Canada) or (outside U.S. and Canada) Press 1 for a list of departments. Press 2 to get service on your coffee machine. During normal business hours, a Schaerer representative will answer your call directly. Should you reach voic or if you re calling after hours, please leave a message containing the following information: 1. The machine s serial number (if available). 2. Your full name. 3. Your business name. 4. The store number (if applicable). 5. Your phone number, including area code. 6. The store address including postal code. 7. A brief description of the problem. During after hours, follow the attendant prompts and leave a voic ; an on-duty technician will be notify. Onsite Response Times* If a service request is received before 9:00AM PST, all attempts possible will be made for same day service. If a service request is received after 9:00AM PST, same day service will be attempted. Otherwise, service will be scheduled for the next day. * Due to long distances between some locations and their authorized Schaerer Service Vendor, onsite response times may differ
26 - 26 -
27 Warranty Information Warranty Information General Warranty Program and Policy Schaerer USA Corporation provides its customers with a one year warranty, including parts and labor, on all new equipment purchased from Schaerer USA Corporation. This warranty document pertains to the Coffee Art C machine, hereinafter referred to as the machine. The terms and conditions are set forth below. Term Manufacturer s warranty covers malfunctioning of major components for the 12 month period commencing on the date of installation of the machine. A grace period may be granted for a later warranty start date of up to 30 days from the date of shipment ex-warehouse or the date of installation, whichever occurs fi rst. After this time period of one (1) year, all warranty coverage has expired. General Warranty Coverage In general, manufacturer s warranty covers malfunctioning of major components. If, during the warranty period (1 year from installation), a component does not work and needs to be replaced or repaired, Schaerer USA will cover time & materials for the service call. Installation and Staff Training The date of installation shall be the fi rst day the machine is installed and connected to water, drain and power at the designated installation site specified in advance and in writing by the customer. Upon installation, the Schaerer Service Vendor will train the manager(s) and store personnel on how to operate and clean the machine. Installation and training should take place in one visit. Consequently, it is important that the site is ready for installation upon arrival of the Service Vendor. Standby time due to the site not being ready or due to other equipment and/or furniture and fi xtures that need to be moved will be charged on a time and materials basis. Any additional installation and/or training visit(s) shall be charged to the customer on a time and material basis. Conditions Parts damaged and/or replaced and the resulting labor are included in the contract, provided that: Repairs are carried out by Schaerer USA Corporation or an authorized Schaerer Service Vendor. The malfunction/damage has not resulted through negligence, misuse, mistreatment, lack of cleaning and/or operator error, however caused. The malfunction/damage has not resulted from water quality issues and/or inadequate voltage supply (please refer to more explicit descriptions and examples below). Daily cleaning should be performed according to the instructions provided with each machine. Tablets used during the cleaning procedure must be Schaerer Cleaning Tablets. Schaerer USA reserves the right to rescind warranty coverage in the event that cleaning instructions are not proper followed. Non-warranty Service Calls If a component malfunctions due to water quality issues, operator abuse, operator error, lack of cleaning, negligence, misuse, irregular voltage or voltage that is too high/low supplied to the machine, the repair is NOT covered under warranty. Water quality supplied to the machine is ultimately the sole responsibility of the owner/operator. Please note that with a softener/fi lter installed and maintained, some solids can still reach the machine. Damage caused by these solids is NOT covered under warranty. Any damage or malfunction due to irregular voltage, damage caused by lightning strikes or voltage that is too high (>> 240V) or too low (<< 205V) is not covered under warranty. Blown fuses, damage to computer boards, transformers, voltage regulators, coils, wiring or other electrical components caused by voltage supply outside of the V range are not covered under manufacturer s warranty. Please be reminded that the machine should be hooked up to a single phase 220V circuit with a dedicated 20 amp breaker
28 Warranty Information Non-warranty service calls will be invoiced on a time and materials basis to the customer by the Schaerer Service Vendor. The service technician will make an on-site assessment of whether or not a repair is covered under warranty. If the customer has questions about warranty coverage or disputes the technician s decision that a service call is not covered under manufacturer s warranty, please contact Schaerer USA at to discuss warranty coverage. Preventative Maintenance Calls Two preventative maintenance visits shall be included. These visits shall be scheduled in or near the 2nd and 4th quarter and need to take place during normal business hours. Schaerer USA will coordinate scheduling through its Service Vendors. In the event that the store or site does not make itself available for a PM visit, Schaerer USA reserves the right to void its obligation toward this visit and the warranty in general. Schaerer USA Corporation is entitled to utilize customer-initiated service visits to perform the preventative maintenance inspection, should one occur during or near the respective PM dates. Components/Parts Covered Under Warranty The following major internal components are covered under this contract: Control Board PC-Board Pump Head Pump Motor Flow Meter Brewing Unit (Automat) Brew Valve Tea Valve Temperature Probe (internal damage) Water Boiler Grinders Grinder Motors Brew Group Drive Motor Transformer Card Reader Display (internal damage) Air Pump Position switches (internal damage) Warranty Exceptions Examples of components NOT covered under this contract, excluding manufacturer defects: Paneling (Shell) Bean Hoppers Cup Warmer Plate Drip Tray O-rings Product Buttons (external damage) Coffee Spout Display (external) Grinder Blades (normal wear and tear) Hot Water Spout Chip Cards Examples of major component malfunctions NOT covered under manufacturer s warranty: Any valve that is clogged or damaged by calcium or other solids/deposits. Any sensor is covered with calcium or other solids/deposits. Any boiler fi lled with solids/deposits that needs to be replaced. Any damage due to cartridge residue reaching the machine because it was not fl ushed properly. Examples of operator error, misuse, abuse, neglect, lack of cleaning, etc., issues that are NOT covered under manufacturer s warranty: Clogged brew group/automat due to lack of cleaning. Any clogging of the drip tray or cracks in the drip tray. Foreign objects (coins, small stones, plastic objects, etc.) in the grinders. Position switches, inside the automat/brew group area. Calibration complaints (beverage volume and temperature) based on measurements not following the correct measuring procedure. Main waterline being turned off. The terms and conditions of this contract are valid for the current program period only. The examples listed above do not represent an exhaustive list of the errors that might be encountered. They are examples only. Terms and conditions of this contract are subject to change
29 Notes Notes
30 Notes Notes
Schaerer Coffee Press. Models: Coffee Press Coffee Press with Brewing Arm
 Schaerer Coffee Press User Manual 06.2014 v01 Models: 03.1210.8000 Coffee Press 03.1210.8001 Coffee Press with Brewing Arm Copyrights Published by: Schaerer USA Corporation, Signal Hill California Version:
INSTALLATION & OPERATING GUIDE
 SURE TAMP STEAM INSTALLATION & OPERATING GUIDE BUNN-O-MATIC CORPORATION POST OFFICE BOX 3227 SPRINGFIELD, ILLINOIS 6278-3227 PHONE: (217) 529-661 FAX: (217) 529-6644 http://www.bunn.com/espresso/index.html
AUTOMATIC BURR COFFEE GRINDER
 AUTOMATIC BURR COFFEE GRINDER MODEL:SCG-903B USER MANUAL www.thesecura.com Welcome Congratulations on purchasing our Secura Automatic Burr Coffee Grinder. Each unit is manufactured to ensure safety and
Armonia Smart. Quick Start Guide MACHINE DESCRIPTION STARTING UP
 Quick Start Guide Armonia Smart MACHINE DESCRIPTION LEGENDE. PRODUCT CANISTER 2. PRODUCT CANISTER / COFFEE HOPPER. COFFEE HOPPER. CARD READER. DECAFFEINATED DOOR. DISPLAY 7. DOSE BUTTON 8. INFO BUTTON
Coffee Burr Grinder. Model #559. Instructions. Warranty
 Coffee Burr Grinder Model #559 Instructions Warranty IMPORTANT SAFEGUARDS When using electrical appliances, basic safety precautions should always be followed, including the following: 1. Read all instructions.
TEA CATER USER MANUAL. UM_EN Part No.:
 USER MANUAL UM_EN Part No.: 1730080-02 CONTENT CONTENT... 2 GENERAL... 4 Introduction...4 Warnings...4 Precautions...4 Intended use...4 Facts & weight...5 General functional description...5 OVERVIEW OF
INSTALLATION QUICK START GUIDE AND CHECKLIST ATTENTION!! DO NOT ATTEMPT A PARTIAL INSTALL.
 AND CHECKLIST CHECKLIST MUST BE SIGNED AND RETURNED TO RANCILIO GROUP NA TO RECEIVE PAYMENT FOR YOUR SERVICES ATTENTION!! Please check the site to make sure they are ready for installation before you begin
MODELS 1315 & 1315-S La Pavoni CLUB COMBO
 IMPORTANT WARNINGS MODELS 1315 & 1315-S La Pavoni CLUB COMBO DUET Never operate your espresso machine without water in the tank. This may cause premature pump failure. Do not allow the power cord to come
Wi-Fi Coffee Maker. Model# GCMW-4750 USER MANUAL
 Wi-Fi Coffee Maker Model# GCMW-4750 USER MANUAL Read this manual thoroughly before using and save it for future reference Model: GCMW-4750 2018 Gourmia www.gourmia.com The Steelstone Group Brooklyn, NY
1. IMPORTANT SAFEGUARDS When using electrical appliances, basic safety precautions should always be followed to reduce the risk of fire, electric
 1. IMPORTANT SAFEGUARDS When using electrical appliances, basic safety precautions should always be followed to reduce the risk of fire, electric shock, and/pr injury to persons including the following:
COFFEE GRINDER. Owner s Manual
 COFFEE GRINDER Owner s Manual 4 4 FEATURES Bean Hopper Lid Bean Hopper Grinder Start/Stop Button Bean Hopper Holder Bean Hopper Release Button Grinding Timer Dial Coffee Powder Outlet 0 Grind Thickness
The Scoop 2-Way Brewer
 READ BEFORE USE The Scoop 2-Way Brewer Visit www.hamiltonbeach.in for our complete line of products and Use and Care Guides as well as delicious recipes, tips, and other helpful information! Questions?
Automatic Coffee Machine Instruction Manual
 Instruction Manual Page 1 of 17 8212-0 Automatic Coffee Machine Instruction Manual Instruction Manual Page 2 of 17 IMPORTANT INFORMATION For safety purposes please read these instructions carefully before
Coffee Grinder Instruction Manual
 Coffee Grinder Instruction Manual CoffeeGrinder Manual-English Only.indd 1 07/01/2016 14:14:39 Savisto Home Coffee Grinder Voltage Supply: 220-240V~ 50/60Hz Power Consumption: 150W Eng Please read through
Burr Grinder. Automatic burr grinder with 17-position grind selector. Instruction Booklet EM0430
 Burr Grinder Automatic burr grinder with 17-position grind selector Instruction Booklet EM0430 Please read these instructions carefully and retain for future reference. Contents Sunbeam s Safety Precautions
MODEL# GCM4500 COFFEE MAKER WITH GRINDER. PHOTO OF PRODUCT
 MODEL# GCM4500 COFFEE MAKER WITH GRINDER www.gourmia.com PHOTO OF PRODUCT 2016 Gourmia www.gourmia.com The Steelstone Group Brooklyn, NY Welcome to Delicious and Aromatic world of Coffee Makers from Gourmia!
Matic / THa. Operating instructions COFFEE BREWER. Mode d emploi MACHINE À CAFÉ. Gebrauchsanleitung KAFFEEBRÜHMASCHINE
 Operating instructions COFFEE BREWER Mode d emploi MACHINE À CAFÉ Gebrauchsanleitung KAFFEEBRÜHMASCHINE Gebruiksaanwijzing KOFFIEZETAPPARAAT Bruksanvisning KAFFEBRYGGARE Bruksanvisning KAFFEMASKIN GB FR
User Manual. Stainless Steel Coffee Urns. Models: 177CU55ETL, 177CU110ETL 10/2016. Please read and keep these instructions. Indoor use only.
 Intertek Stainless Steel Coffee Urns Models: 177CU55ETL, 177CU110ETL 10/2016 Please read and keep these instructions. Indoor use only. www.avantcoequipment.com 1 NOTE: Save these instructions for future
User Manual. Stainless Steel Coffee Urns. Models: 177CU30, 177CU55, 177CU110 04/2018. Please read and keep these instructions. Indoor use only.
 Stainless Steel Coffee Urns Models: 177CU30, 177CU55, 177CU110 04/2018 Please read and keep these instructions. Indoor use only. www.avantcoequipment.com 1 NOTE: Save these instructions for future reference.
K Mini Plus. Use & Care Guide. Get the most from your new Keurig brewer
 K Mini Plus Use & Care Guide Get the most from your new Keurig brewer STRONG STRONG Before You Brew 1 Plug & Power 2 Fill & Place Remove packing tape from brewer. Pull plug and extend cord from cord storage
BREW EXPRESS OPERATION GUIDE. model no. BE-112
 BREW EXPRESS OPERATION GUIDE model no. BE-112 by CONTENTS 1. Safety 1 2. Features 2 3. Controller Functions 3 4. Start Up 4 5. Operation 5 6. Maintenance 6 7. Troubleshooting 7 8. Parts & Service 8 9.
MODEL: POD BREWER AURORA SAF 68 HOMEMAKER ESPRESSO MAKER WITH COFFEE POD
 INSTRUCTION MANUAL Please read this Instruction Manual and the safety instructions before operating the appliance! MODEL: POD BREWER AURORA SAF 68 HOMEMAKER ESPRESSO MAKER WITH COFFEE POD Congratulation
OPTIMA PLUS-SOFT PLUS
 QUICK START GUIDE OPTIMA PLUS-SOFT PLUS OPTIMA SOFT PLUS OPTIMA PLUS NT-05430-00-EN MACHINE DESCRIPTION 1 3 2 4 6 5 7 9 8 10 12 11 LEGEND 1 COFFEE HOPPER 2 DECAFFEINATED DOOR 3 CARD READER 4 PEOPLE PRESENCE
EP3559, EP3558 EP3551, EP3550
 Super automatic espresso machine 3100 series EP3559, EP3558 EP3551, EP3550 EN USER MANUAL DE BENUTZERHANDBUCH ES MANUAL DEL USUARIO FR MODE D EMPLOI IT MANUALE UTENTE NL GEBRUIKSAANWIJZING 1 EP3558, EP3550
BREW EXPRESS OPERATION GUIDE MODEL BE112
 BREW EXPRESS OPERATION GUIDE MODEL BE112 Contents 1. Safety 2. Features 3. Controller Functions 4. Start up 5. Operation 6. Maintenance 7. Troubleshooting 8. Parts & Service 9. Warranty & Registration
Burr Grinder. Model #551. Instructions. Warranty
 Burr Grinder Model #551 Instructions Warranty IMPORTANT SAFEGUARDS When using electrical appliances, basic safety precautions should always be followed, including the following: 1. Read all instructions.
PLEASE READ THIS MANUAL BEFORE USE. SAVE FOR FUTURE REFERENCE.
 8-CUP STAINLESS STEEL CARAFE Coffee Brewer Model: BV1900TS HOUSEHOLD USE ONLY Customer Service Line: 1-855-664-1252 2-year limited warranty bonavitaworld.com Simple to operate Optional pre-infusion cycle
Barista Practice & Equipment Maintenance Coaching Sheets
 Co a c h ing Sh eet Barista Practice & Equipment Maintenance Coaching Sheets Tel l, Sh o w, Co a c h Cleaning a Shaerer Espresso Machine The espresso machine is a critical piece of equipment in your store.
Custom Grind Deluxe Coffee Grinder
 READ BEFORE USE Visit www.hamiltonbeach.in for our complete line of products and Use and Care Guides as well as delicious recipes, tips, and other useful information! Custom Grind Deluxe Coffee Grinder
12 CUP COFFEE MAKER User Guide
 BRAND 12 CUP COFFEE MAKER User Guide Item: 740553 Ginnys.com 800-544-1590 Facebook.com/GinnysBrand Pinterest.com/GinnysBrand Ginnys.com/Blog Welcome to the world of full-flavored coffee with the Ginny
User Guide TEA CATER. Your Dealer. U / EN Rev
 User Guide TEA CATER Your Dealer U / EN Rev 101115 1. Contents Tea Cater 1. Contents page 2 2. General 3 3. Function description 3 4. Start-up 3 5. Component overview 4 5. Function button overview 5-6
User Manual. Stainless Steel Coffee Urn. Models: 177CU30 11/2018. Please read and keep these instructions. Indoor use only.
 Stainless Steel Coffee Urn Models: 177CU30 11/2018 Please read and keep these instructions. Indoor use only. www.avantcoequipment.com 1 NOTE: Save these instructions for future reference. Index Important
User Manual. Thermo Pump System Coffee Brewers User Manual. Models: 177C10, 177C15 04/2018. Please read and keep these instructions. Indoor use only.
 Thermo Pump System Coffee Brewers User Manual Models: 177C10, 177C15 04/2018 Please read and keep these instructions. Indoor use only. www.avantcoequipment.com 1 Parts Diagram 177C15 2 5 177C10 3 4 6 4
K35 Use & Care Guide. Get the most from your new Keurig coffee maker
 K35 Use & Care Guide Get the most from your new Keurig coffee maker K35 COFFEE MAKER A. Water Reservoir Lid B. MAX Fill Line C. Water Reservoir D. Water Reservoir Lock Tab Slots E. Power Cord F. Handle
CMC DUO. Standard version. Table of contens
 CMC DUO Standard version O P E R A T I N G M A N U A L Table of contens 1 Terminal assignment and diagram... 2 2 Earthen... 4 3 Keyboards... 4 4 Maintenance... 5 5 Commissioning... 5 6 Machine specific
infinity Model # 575 #570 Conical Burr Grinder Instructions Warranty Product Registration 100W / 120V~ / 60 Hz
 infinity Conical Burr Grinder Model # 575 #570 Instructions Warranty Product Registration 100W / 120V~ / 60 Hz IMPORTANT SAFEGUARDS When using electrical appliances, basic safety precautions should always
5KEK1522 W A_01_EN.indd 1 11/16/12 1:22 PM
 5KEK1522 Water Kettle INSTRUCTIONS Table of Contents water KEttle SAFETY Important safeguards...6 Electrical requirements...7 Electrical equipment waste disposal...7 PARTS AND FEATURES Parts and accessories...8
Coffee Burr Grinder. Model #591. Instructions. Warranty. 110W/120Vac/60 Hz. Read this manual thoroughly before using and save it for future reference
 Coffee Burr Grinder Model #591 Instructions Warranty Read this manual thoroughly before using and save it for future reference 110W/120Vac/60 Hz IMPORTANT SAFEGUARDS When using electrical appliances, basic
OWNER S MANUAL CARAFE READY T526S
 OWNER S MANUAL CARAFE READY T526S IMPORTANT SAFEGUARDS for Safe Operation & Use When using electrical appliances, basic safety precautions should be followed, including the following: 1. Read and follow
Type HD8754 USER MANUAL
 Register your product and get support at www.philips.com/welcome 02 English Type HD8754 USER MANUAL 02 EN PLEASE READ THIS USER MANUAL CAREFULLY BEFORE USING THE MACHINE. IMPORTANT SAFEGUARDS When using
EP5934, EP5930, EP5346 EP5345, EP5340, EP5335 EP5334, EP5333, EP5331 EP5330, EP5045, EP5040 EP5035, EP5034, EP5030
 Super automatic espresso machine 5000 series EP5934, EP5930, EP5346 EP5345, EP5340, EP5335 EP5334, EP5333, EP5331 EP5330, EP5045, EP5040 EP5035, EP5034, EP5030 EN USER MANUAL DA BRUGERVEJLEDNING DE BENUTZERHANDBUCH
Triple Brew. Model #352. Coffee & Tea Maker. Instructions Warranty
 Triple Brew Coffee & Tea Maker Model #352 Instructions Warranty IMPORTANT SAFEGUARDS When using electrical appliances, basic safety precautions should always be followed, including: 1. Read all instructions.
Single-Serve Coffee Maker
 840251801 Single-Serve Coffee Maker IMPORTANT SAFEGUARDS When using electrical appliances, basic safety precautions should always be followed to reduce the risk of fire, electric shock, and/or injury to
HD8847 HD8848 USER MANUAL. Super automatic espresso coffee machine 4000 series. Read carefully before using the machine.
 Super automatic espresso coffee machine 4000 series 02 USER MANUAL Read carefully before using the machine. HD8847 HD8848 02 English EN Register your product and get support at www.philips.com/welcome
User manual COFFEE QUEEN. Tower 10 litre for wall mounting. Your retail dealer. U / GB Rev
 User manual COFFEE QUEEN Tower 10 litre for wall mounting Your retail dealer...... U / GB Rev 080522 1. Table of contents Tower wall mounting 1. Table of contents page 2 2. General 3 3. Function description,
Espresso Maker READ BEFORE USE. Questions? Please call us our friendly associates are ready to help
 Espresso Maker Visit www.hamiltonbeach.in for our complete line of products and Use and Care Guides as well as delicious recipes, tips, and other helpful information! Questions? Please call us our friendly
INSTALLATION AND WARRANTY CERTIFICATE. Machine model Serial Number # Rating and optional. Installation Company: Technician ID: Date: / /
 INSTALLATION AND WARRANTY CERTIFICATE Machine model Serial Number # Rating and optional Installation Company: Technician ID: Date: / / Water-Line Pressure: NOTE: over 5bar/70psi, a pressure regulator must
6 oz SHOT. Use & Care Guide. Get the most from your new Keurig brewer
 6 Use & Care Guide Get the most from your new Keurig brewer 6 6 6 6 Before You Brew 1 Plug & Place Rinse & Fill 2 Remove packing tape from brewer and frother, and plug into a grounded outlet. Lower the
Type HD8753 USER MANUAL
 Register your product and get support at www.philips.com/welcome 02 English Type HD8753 USER MANUAL 02 EN PLEASE READ THIS USER MANUAL CAREFULLY BEFORE USING THE MACHINE. IMPORTANT SAFEGUARDS When using
10,000 prize draw. instructions. EXTRA year guarantee FREE rewards gallery. Register online now!
 r instructions 10,000 prize draw EXTRA year guarantee FREE rewards gallery www.productregister.co.uk/rhobbs Register online now! See back for details 2 Read the instructions, keep them safe, pass them
Using your Grinder: Fig.1 Fig. 2
 Using your Grinder: 1. Check the bean container (B) for presence of foreign objects before using. 2. Make sure the bean container is completely clean and dry before using. 3. Always operate the appliance
EP5961, EP5960, EP5365 EP5364, EP5363, EP5361 EP5360
 Super automatic espresso machine 5000 series EP5961, EP5960, EP5365 EP5364, EP5363, EP5361 EP5360 EN USER MANUAL DA BRUGERVEJLEDNING DE BENUTZERHANDBUCH ES MANUAL DEL USUARIO FR MODE D EMPLOI IT MANUALE
Duothek Plus Model #464
 Duothek Plus Model #464 Instructions for Use Warranty Guarantee of Performance IMPORTANT SAFEGUARDS When using electrical appliances, basic safety precautions should always be followed to reduce the risk
5KEK1322 W A_v08.indd 1 5/13/16 2:25 PM
 5KEK1322 W10878653A_v08.indd 1 PARTS AND FEATURES PARTS AND ACCESSORIES Tea steeper lid (center section of lid with handle) Kettle lid (outer section) Stainless steel lime scale filter Removable stainless
Given a realistic scenario depicting a new site install, the learner will be able to install and setup the brewer for retail turnover without error.
 Unit 2 Setup Unit Objectives Given a realistic scenario depicting a new site install, the learner will be able to install and setup the brewer for retail turnover without error. Given an installed machine,
SAFETY INSTRUCTIONS FOR USE
 INTRODUCTION Thank you for choosing this De Longhi Coffee machine. We hope you enjoy your new appliance. Please take a few minutes to read these instructions. This is the only way to ensure optimum results
2016 Gourmia The Steelstone Group Brooklyn, NY
 2016 Gourmia www.gourmia.com The Steelstone Group Brooklyn, NY All rights reserved. No portion of this manual may be reproduced by any means whatsoever without written permission from The Steelstone Group,
HD8828 HD8834 USER MANUAL. Super automatic espresso coffee machine 3100 series. Read carefully before using the machine.
 Super automatic espresso coffee machine 3100 series 02 USER MANUAL Read carefully before using the machine. HD8828 HD8834 English 02 EN Register your product and get support at www.philips.com/welcome
QUICK START GUIDE F10 - F20
 QUICK START GUIDE F0 - F0 C O F F E E M A C H I N E S STARTING UP FILL IN BEAN HOPPER Fill in the required amount for daily consumption in order to keep coffee always fresh. After checking that the machine
IMPORTANT SAFEGUARDS. 3. To protect against fire, electric shock and injury to persons do not immerse cord, plug or unit in water or other liquid.
 IMPORTANT SAFEGUARDS When using electrical appliances, basic precautions should always be followed, including the following: 1. Read all instructions. 2. Make sure that your outlet voltage corresponds
DISCONTINUED VERSION The information in this manual is no longer current. Espresso/Cappuccino OPERATING & SERVICE MANUAL BUNN-O-MATIC CORPORATION
 BUNNEspress BUNN Espress DISCONTINUED VERSION The information in this manual is no longer current. Espresso/Cappuccino OPERATING & SERVICE MANUAL BUNN-O-MATIC CORPORATION POST OFFICE BOX 3227 SPRINGFIELD,
Important Safety Information... 1 The Xpress System The Xpress System Components... 3 Using the Espresso System... 4
 Xpress User Guide Table of Contents Important Safety Information... 1 The Xpress System... 2 The Xpress System Components... 3 Using the Espresso System... 4 Starting the System... 4 Starting the Machine
USER MANUAL Type HD8772
 02 English USER MANUAL Type HD8772 Read carefully before using the machine. 02 EN Register your product and get support at www.philips.com/welcome IMPORTANT SAFEGUARDS When using electrical appliances,
USER MANUAL JOLLY PRESTIGE - COFFEE MACHINE
 SV JOLLY.pdf 1 17/10/2014 11:25 am USER MANUAL JOLLY PRESTIGE - COFFEE MACHINE SV JOLLY.pdf 1 20/10/2014 1:30 pm Contents Introduction... 02 Important safety precautions... 03 Description of external components...
Operator Manual 100 Series Coffee Grinders
 Operator Manual 100 Series Coffee Grinders Models 100 and 190SS Model 100 Model 190SS Specifications...2 Safety Information...2 Installation...3 Operation...3 Table of Contents Cleaning & Maintenance...6
DE MANUAL BENUTZERHANDBUCH SM7683, SM7680 SM6080/SM6081/SM7080/SM7081 USER MANUAL BENUTZERHANDBUCH BENUTZERHANDBUCH
 SM7686, USER MANUAL SM7685, SM7684 SM7683, SM7680 SM6080/SM6081/SM7080/SM7081 BENUTZERHANDBUCH USER MANUAL MANUAL IT MANUALE DEL USUARIO UTENTE DE MANUAL BENUTZERHANDBUCH DEL USUARIO MODE NL GEBRUIKSAANWIJZING
Booklet_TCG-357_ENG.qxd 9/8/08 11:19 AM Page 1 COFFEE/SPICE GRINDER. Instruction Booklet. Model: TCG-357
 Booklet_TCG-357_ENG.qxd 9/8/08 11:19 AM Page 1 COFFEE/SPICE GRINDER Instruction Booklet Model: TCG-357 Booklet_TCG-357_ENG.qxd 9/8/08 11:19 AM Page 2 IMPORTANT SAFEGUARDS When using electrical appliances,
OPERATING MANUAL. Sample PRO 100 Series. Electric Heating. Applies to Versions: SPE1*, SPE2, SPE4, SPE6
 OPERATING MANUAL Sample PRO 100 Series Electric Heating Applies to Versions: SPE1*, SPE2, SPE4, SPE6 NOTE: All electrically heated roasters in the Sample PRO 100 Series are modular and this manual applies
Let s get brewing. K Quick Start Guide
 Let s get brewing. K-1500 Quick Start Guide IMPORTANT SAFEGUARDS - READ ALL INSTRUCTIONS BEFORE USING When using electrical appliances, basic safety precautions should be followed, including the following:
Installation and User Instructions Flushing System Kit
 Installation and User Instructions Flushing System Kit Model: ACFS Part No. 102532 Rev. A Copyright 2007 Dacor All rights reserved. All specifications are subject to change without notice. Dacor assumes
USING YOUR BREWER. OWNER S MANUAL: Getting the most from your new B31 MINI PLUS Keurig Brewer
 USING YOUR BREWER OWNER S MANUAL: Getting the most from your new B31 MINI PLUS Keurig Brewer Important Safeguards Safe Operation & Use When using electrical appliances, basic safety precautions should
Service Manual SLG Grinder
 Service Manual SLG Grinder IMPORTANT SAFEGUARDS & SYMBOLS This appliance is designed for commercial use. Any servicing other than cleaning and maintenance should be performed by an authorized Wilbur Curtis
Sleeve Down: Frothing. Sleeve Up: Steaming
 Sleeve Down: Frothing Sleeve Up: Steaming 3 SPECIAL CORD SET INSTRUCTIONS Regarding your Cord Set: A. A short power-supply cord (or detachable power-supply cord) is to be provided to reduce risks resulting
Aroma Fresh. Instructions for use Includes recipes. Model BCM120
 Aroma Fresh Instructions for use Includes recipes Model BCM120 Contents Page Breville recommends safety first 4 Know your Breville Aroma Fresh Coffee Maker 5 Operating your Breville Aroma Fresh Coffee
Model # Instructions Warranty. 950 Watts / 120 Vac / 60 Hz. Read this manual thoroughly before using and save it for future reference
 Perk Model #405.05 Instructions Warranty 950 Watts / 120 Vac / 60 Hz Read this manual thoroughly before using and save it for future reference IMPORTANT SAFEGUARDS When using electrical appliances, basic
MODEL# GMF255 MOKA POT MILK FROTHER. PHOTO OF PRODUCT
 MODEL# GMF255 MOKA POT MILK FROTHER www.gourmia.com PHOTO OF PRODUCT 2016 Gourmia www.gourmia.com The Steelstone Group Brooklyn, NY Welcome to the World of Espresso & Milk Frothers from Gourmia! All rights
AUTOMATIC BEAN TO CUP COFFEE MACHINE
 AUTOMATIC BEAN TO CUP COFFEE MACHINE EB24 model USER GUIDE US CA CONTENTS Appliance parts 2 Safety and warnings 4 First use 7 Menu settings 11 Making coffee 15 Making cappuccinos and milk-based coffees
Thank you for your purchase!
 CM4200S Thank you for your purchase! www.prodprotect.com/blackanddecker Should you have any questions or concerns with your new product, please call our Customer Service Line at 1-800-465-6070 (US and
MODEL# GCG165 COFFEE GRINDER. PHOTO OF PRODUCT
 MODEL# GCG165 COFFEE GRINDER www.gourmia.com PHOTO OF PRODUCT 2016 Gourmia www.gourmia.com The Steelstone Group Brooklyn, NY Welcome to Delicious world of Coffee Grinders from Gourmia! All rights reserved.
BarAroma Coffee & Spice Grinder
 Breville is a registered trademark of Breville Pty. Ltd. ABN 98 000 092 928 Breville Customer Service Centre Australian Customers Breville Customer Service Centre PO Box 22 Botany NSW 2019 AUSTRALIA Customer
Electric Two-Speed Drink Mixer
 Electric Two-Speed Drink Mixer MS2090 Series Before use, please read this manual thoroughly and save for future reference. ovente.com Electric Two-Speed Drink Mixer MS2090 Series 2 ovente.com ELECTRIC
Models 2450 & Espressimo TM Espresso Cappuccino Machines. Operation & Installation Manual TABLE OF CONTENTS. For
 Espressimo TM Espresso Cappuccino Machines Operation & Installation Manual For Models 2450 & 1750 *Also includes information & instructions for Q & E models. TABLE OF CONTENTS Warning Labels...2 Initial
12 CUP COFFEEMAKER User Guide
 BRAND 12 CUP COFFEEMAKER User Guide Item: 757147 Ginnys.com 800-544-1590 Facebook.com/GinnysBrand Pinterest.com/GinnysBrand Welcome to the world of full-flavored coffee with the Ginny s Brand 12-Cup Coffeemaker!
User s Guide COFFEE SOLUTION TM
 User s Guide COFFEE SOLUTION TM 1 Item#CC500 CK REFERENCE WARRANTY Congratulations! We hope you enjoy your new Back to Basics Coffee Solution TM. The Coffee Solution TM is designed for easy brewing and
SG120 Model # Cup Stainless Steel Coffee Maker. Operating Instructions Product Registration Warranty
 SG120 Model #494 12-Cup Stainless Steel Coffee Maker Operating Instructions Product Registration Warranty IMPORTANT SAFEGUARDS When using electrical appliances, basic safety precautions should always be
USE AND CARE GUIDE FOR
 READ AND SAVE THESE INSTRUCTIONS Coffee Maker USE AND CARE GUIDE FOR MODEL ME2TMB IMPORTANT SAFEGUARDS When using electrical appliances, basic safety precautions should always be followed, including the
45-Cup Coffee Urn Big Brew Classic. Instruction Manual. Model ACU-045
 45-Cup Coffee Urn Big Brew Classic Instruction Manual Model ACU-045 Congratulations! Your Big Brew Classic will surely become one of the most practical appliances in your home or office. Enjoy fresh brewed
Coffeemaker. Coffeemaker Safety... 2 Parts and Features... 3 Using Your Coffeemaker... 4 Cleaning Your Coffeemaker... 4 Customer Service...
 Coffeemaker Coffeemaker Safety... 2 Parts and Features... 3 Using Your Coffeemaker... 4 Cleaning Your Coffeemaker... 4 Customer Service... 6 In USA: 1-800-851-8900 In Canada: 1-800-267-2826 840069400 Coffeemaker
BREW EXPRESS IMPORTANT NOTE: model no. BE-104 & BE-110. For more information see our instructional video online at
 BREW EXPRESS Operation GUIDE model no. BE-104 & BE-110 IMPORTANT NOTE: For more information see our instructional video online at www.brewexpress.com. Do not return this product to place of purchase without
PICOBARISTO HD8924 EN DE ES FR IT NL USER MANUAL BENUTZERHANDBUCH MANUAL DEL USUARIO MODE D EMPLOI MANUALE UTENTE GEBRUIKSAANWIJZING
 PICOBARISTO HD8924 EN DE ES FR IT NL USER MANUAL BENUTZERHANDBUCH MANUAL DEL USUARIO MODE D EMPLOI MANUALE UTENTE GEBRUIKSAANWIJZING 4219.460.3607.1 HD8924 SAECO_PICOBARISTO AMF_WE_COVER_A5_FC.indd 1 01-09-16
Programmable Conical Burr Mill CBM-18
 Programmable Conical Burr Mill CBM-18 IMPORTANT SAFEGUARDS When using electrical appliances, basic safety precautions should always be followed, including the following: 1. Read all instructions. 2. To
Keurig Vue V600 Brewer Use & Care Guide
 Keurig Vue V600 Brewer Use & Care Guide IMPORTANT SAFEGUARDS Safe Operation & Use When using electrical appliances, basic safety precautions should be followed, including the following: 1. Read all instructions
Operating instructions COFFEE BREWER 1/0
 Operating instructions COFF BRWR GB 1 / 0 1/0 Operating instructions nglish 1.1 Introduction We are delighted that you have chosen one of our quality products. The machines have been specifically designed
MARQUE REFERENCE CODIC
 MARQUE REFERENCE CODIC : KALORIK : TKG OT 00BCRL : 50 EN ANGLAIS PROVISOIREMENT NOTICE LOGO 00L ELECTRIC OVEN WITH ROTISSERIE & LAMP & CONVECTION INSTRUCTION MANUAL Model No. TY000BCL 0-0V~ 50/60Hz 800W
Type HD8852 USER MANUAL
 Register your product and get support at www.philips.com/welcome 02 English Type HD8852 USER MANUAL 02 EN PLEASE READ THIS USER MANUAL CAREFULLY BEFORE USING THE MACHINE. IMPORTANT SAFEGUARDS When using
User Manual CT / CTS / CTMcool. CTMcool by Thermoplan AG, Subject to change _REV-1_EN
 User Manual CT / CTS / CTMcool CTMcool CT CTS 805.012_REV-1_EN 1 Activity log for documents FORM 10072-0_E Document: Manual BW3 CT / CTS / CTMcool REV-1 Modification journal Revision Date Modifications
Keurig Vue V500 Brewer Use & Care Guide
 Keurig Vue V500 Brewer Use & Care Guide IMPORTANT SAFEGUARDS Safe Operation & Use When using electrical appliances, basic safety precautions should be followed, including the following: 1. Read all instructions
BWone-CTM-RF. EN Operator manual. (Translation of original manual) B
 B") BWone-CTM-RF EN Operator manual (Translation of original manual) 120.849-B 4 420 150 580 651 Contents Information...3 Safety instructions...4 Machine overview / Scope of delivery...10 Overview of operating
BWone-CTM-RF EN Operator manual (Translation of original manual) 120.849-B 4 420 150 580 651 Contents Information...3 Safety instructions...4 Machine overview / Scope of delivery...10 Overview of operating
Jura S Series Grinder Replacing
 Lansdale, PA 19446 Phone: 215-361-7000 Fax: 215-361-7434 Jura S Series Grinder Replacing Please read before using this guide: This guide is for users who have know the use of fully automatic machines,
Quick Start Guide Read this booklet thoroughly and save these instructions.
 Quick Start Guide Read this booklet thoroughly and save these instructions. FAQs can be found at www.espresso-works.com Email us for any unanswered questions: cs@espresso-works.com For product registration,