Notice to Installer: Leave these instructions with the grill owner for future reference.
|
|
|
- Fay Porter
- 5 years ago
- Views:
Transcription

1 This gas grill must be used only outdoors in a well-ventilated space and must not be used inside a building, garage, screened-in porch, gazebo or any other enclosed area. EN APPLY SERIAL NUMBER LABEL FROM CARTON Serial No. XXXXXX MODEL NO. 410, 410SB DANGER IF YOU SMELL GAS: Shut off gas to the appliance. Extinguish any open flame. Open lid. If odor continues, keep away from the appliance and immediately call your gas supplier or fire department. WARNING Do not try to light this appliance without reading the LIGHTING instructions section of this manual. Do not store or use gasoline or other flammable liquids or vapors in the vicinity of this or any other appliance. An L.P. cylinder not connected for use must not be stored in the vicinity of this or any other appliance. If the information in these instructions is not followed exactly, a fire or explosion may result, causing property damage, personal injury or death. Notice to Installer: Leave these instructions with the grill owner for future reference. Napoleon Group of Companies 214 Bayview Dr., Barrie, Ontario, Canada L4N 4Y8 Phone: Fax: (705) Customer Solutions: or grills@napoleonproducts.com Z CE JUN 29/15
2 EN 2 THANK YOU FOR CHOOSING NAPOLEON NAPOLEON products are designed with superior components and materials, and are assembled by trained craftsmen who take great pride in their work. The burner and valve assembly are leak tested and test-fired at a quality test station. This grill has been thoroughly inspected by a qualified technician before packaging and shipping to ensure that you, the customer, receive the quality product you expect from NAPOLEON. We at Napoleon are dedicated to you, our valued customer. It is our goal to provide you with the necessary tools for an unforgettable grilling experience. This manual is provided to assist you in assuring your new grill is assembled, installed, maintained and cared for properly. It is important to read and understand this entire manual before operating your new grill to ensure you fully understand all the safety precautions and features your grill has to offer. By carefully following these instructions, you will enjoy years of trouble-free grilling. If this product fails to meet your expectations, for any reason, please call our customer solutions department at between 9 AM and 5 PM (Eastern Standard Time) or visit our Website at. Napoleon Gas Grill President s Limited Lifetime Warranty NAPOLEON warrants that components in your new NAPOLEON product will be free from defects in material and workmanship from the date of purchase, for the following period: Aluminum castings / stainless steel base Lifetime Stainless steel lid Lifetime Porcelain enamel lid Lifetime Stainless steel cooking grids Lifetime Stainless steel tube burners 10 years plus5 Stainless steel sear plates 5 years plus5 Porcelain-enameled cast iron cooking grids 5 years plus5 Stainless steel infrared rotisserie burner 5 years Ceramic infrared rotisserie burner (excluding screen) 3 years Ceramic infrared bottom or side burners (excluding screen) 2 years All other parts 2 years plus5 indicates a period of extended warranty coverage whereby the replacement part will be made available to the consumer for an additional 5 years at 50% of the current retail price. Conditions and Limitations NAPOLEON warrants its products against manufacturing defects to the original purchaser only, provided that the purchase was made through an authorized NAPOLEON dealer and is subject to the following conditions and limitations: This factory warranty is non-transferable and may not be extended what-so-ever by any of our representatives. The gas grill must be installed by a licensed, authorized service technician or contractor. Installation must be done in accordance with the installation instructions included with the product and all local and national building and fire codes. This limited warranty does not cover damages caused by misuse, lack of maintenance, grease fires, hostile environments, accident, alterations, abuse or neglect and parts installed from other manufacturers will nullify this warranty. Discoloration to plastic parts from chemical cleaners or UV exposure is not covered by this warranty. This limited warranty further does not cover any scratches, dents, painted finishes, corrosion or discoloring by heat, abrasive and chemical cleaners, nor chipping on porcelain enamel parts, nor any components used in the installation of the gas grill. Should deterioration of parts occur to the degree of non-performance (rusted through or burnt through) within the duration of the warranted coverage, a replacement part will be provided. After the first year, with respect to this President s Limited Lifetime Warranty NAPOLEON may, at its discretion, fully discharge all obligations with respect to this warranty by refunding to the original warranted purchaser the wholesale price of any warranted but defective part(s). NAPOLEON will not be responsible for the installation, labor or any other costs or expenses related to the reinstallation of a warranted part, and such expenses are not covered by this warranty. Notwithstanding any provision contained in this President s Limited Lifetime Warranty NAPOLEON s responsibility under this warranty is defined as above and it shall not in any event extend to any incidental, consequential, or indirect damages. This warranty defines the obligation and liability of NAPOLEON with respect to the NAPOLEON gas grill and any other warranties expressed or implied with respect to this product, its components or accessories are excluded. NAPOLEON neither assumes, nor authorizes any third party to assume, on its behalf, any other liabilities with respect to the sale of this product. NAPOLEON will not be responsible for: over firing, blow outs caused by environmental conditions such as strong winds, or inadequate ventilation, Any damages to the gas grill due to weather damage, hail, rough handling, damaging chemicals or cleaners will not be the responsibility of NAPOLEON. The bill of sale or copy will be required together with a serial number and a model number when making any warranty claims from NAPOLEON. NAPOLEON reserves the right to have its representative inspect any product or part prior to honoring any warranty claim. NAPOLEON shall not be liable for any transportation charges, labor costs, or export duties.
3 WARNING! Failure to follow these instructions could result in property damage, personal injury or death. Read and follow all warnings and instructions in this manual prior to operating grill. Safe Operating Practices This gas grill must be assembled exactly according to the instructions in the manual. If the grill was store assembled, you must review the assembly instructions to confirm correct assembly and perform the required leak tests before operating the grill. Read the entire instruction manual before operating the gas grill. Under no circumstance should this gas grill be modified. Follow lighting instructions carefully when operating grill. Gas must be turned off at the propane cylinder or at the natural gas supply valve when the gas grill is not in use. Keep children and pets away from hot grill, DO NOT allow children to climb inside cabinet. Children should be supervised to ensure that they do not play with the appliance. This appliance is not intended for use by persons (including children) with reduced physical, sensory or mental capabilities, or lack of experience and knowledge, unless they have been given supervision or instruction concerning use of the appliance by a person responsible for their safety. Do not leave the grill unattended while in use. Do not move grill when hot or operating. This grill is for household use only. This gas grill must not be installed in or on recreational vehicles and/or boats. This gas grill must only be stored outdoors in a well-ventilated area and must not be used inside a building, garage, screened -in porch or any other enclosed area. Maintain proper clearance to combustibles (16 (410mm) to rear of unit 7 (180mm) to sides). Additional clearance 24 (610mm) is recommended near vinyl siding or panes of glass. At all times keep the ventilation openings of the cylinder enclosure free and clear from debris. Do not operate unit under any combustible construction. Do not locate in windy settings. High winds adversely affect the cooking performance of the gas grill. When the gas grill is stored indoors, the propane cylinder must be disconnected from the grill and stored outdoors in a well-ventilated area, disconnected cylinders must not be stored in a building, garage or other enclosed area. Natural gas units must be disconnected from the supply when being stored indoors. Inspect the gas line hose before each use. If there is evidence of excessive abrasion or wear, it must be replaced before using the gas grill, with a replacement hose assembly specified by the grill manufacturer. Never store a spare LP gas cylinder under or near this grill. Never fill the cylinder beyond 80 % full. Leak test all connections before initial use, even if the grill was purchased fully assembled, annually or whenever any gas component has been replaced. Never use natural gas in a unit designed for liquid propane gas. Never use lighter fluid in a gas grill. Burner controls must be off when turning supply cylinder on. Do not light burners with lid closed. Do not operate rear burner with main burners operating. The lid is to be closed during the preheat period. Do not route hose underneath drip pan-proper hose clearance to bottom of unit must be maintained. Clean grease tray and sear plates regularly to avoid build-up, which may lead to grease fires. Remove warming rack before lighting rear burner. The extreme heat will damage the warming rack. Ensure sear plates are positioned properly according to sear plate installation instructions. Do not use side shelves to store lighters, matches or any other combustibles. Keep gas line away from heated surfaces Keep any electrical supply cord away from water or heated surfaces. Inspect infrared burner venturi tube for spider webs and other obstructions periodically. Clean the tubes completely if you find any such obstructions. The outdoor cooking gas grill and its individual shutoff valve must be disconnected from the gas supply piping system during any pressure testing of that system at test pressures in excess of 0.5psi (3.5kPa). The outdoor cooking gas grill must be isolated from the gas supply piping system by closing its individual manual shutoff valve during any pressure testing of the gas supply piping system at test pressures equal to or less than 1/2 psi (3.5 kpa). 3 EN
4 EN 4 Correct Disposal Of This Product This marking indicates that this product should not be disposed with other household wastes throughout the EU. To prevent possible harm to the environment or human health from uncontrolled waste disposal, recycle it responsibly to promote the sustainable reuse of material resources. To return your used device, please use the return and collection systems or contact the retailer where the product was purchased. They can take this product for environmental safe recycling. Gas Cylinder Use only gas cylinders, which meet national and regional codes. The minimum cylinder size for butane units is 13kg, and for propane units is 6kg. Ensure that the cylinder can provide enough fuel to operate the appliance. If in doubt, check with your local gas supplier. Use caution when handling the cylinder valve. Never connect a cylinder, which does not meet local codes. All cylinders must be placed outside the enclosure (under the right side shelf) on level ground. Only cylinders connected to the appliance may be stored in the enclomust not be stored in the enclosure, or in close proximity of an operating unit. Cylinders must not be exposed sure, or close to the appliance. Spare cylinders to extreme heat or direct sunlight. WARNING! Ensure that the hose is routed to maintain proper clearance to the underside of the unit. Hoses that contact high temperature surfaces may melt and leak, causing a fire. Cylinder Connection: Ensure that the gas regulator hose is kink free. Remove the cap or plug from the cylinder fuel valve. Tighten regulator to cylinder valve. Leak test all joints prior to using the barbecue. A leak test must be performed annually, and each time a cylinder is hooked up, or if a part of the gas system is replaced. WARNING! Do not route hose underneath drip pan. Do not route hose between space in bottom shelf and back panel. Do not route hose over top of back panel. Ensure all connections are tightened using two wrenches. Do not use Teflon tape or pipe dope on any hose connection. Ensure the hose does not contact any high temperature surfaces, or it may melt and leak causing a fire. Do not use enclosure to store excess hose, as there is a greater chance of the hose contacting a hot surface, it may melt and leak causing a fire. Gas Hose If the hose and regulator are not included by the manufacturer, then only hoses and regulators which meet national and regional codes are to be used. Ensure that the hose does not come into contact with grease, other hot drippings, or any hot surfaces on the appliance. Check hose regularly. In the case of rips, melting or wear, replace hose before using the appliance. The recommended hose length is 0.5m. The hose must not be longer than 1.5m. Ensure that the hose is twist and kink free when installed. Replace the hose before expiry date printed on the hose.
5 Technical Data The following table lists input values for the appliance. Burner Orifice Size (Gross) Heat Input (Total) Gas Usage (Total) 5 EN Main 1.07mm (#58) 12.0 kw 870 g/hr Side 0.82mm 2.4 kw 174 g/hr Certified Gases / Pressures - Check rating plate to ensure that it corresponds with following list. Gas Category I 3B/P(30) I 3+(28-30/37) I 3B/P(37) I 3B/P(50) Gases / Pressures Butane 30mbar Butane 28-30mbar Butane 37mbar Butane 50mbar Propane 30mbar Propane 37mbar Propane 37mbar Propane 50mbar Countries BE, BG, CY, DK, EE, FI, FR, GB, HR, HU, IS, IT, LT, LU, MT, NL, NO, RO, SE, SI, SK, TR BE, CH, CY, CZ, ES, FR, GB, GR, IE, IT, LT, LU, LV, PT, SK, SI PL AT, CH, DE, SK Do not tamper with or modify regulator. Use only regulator which supply the pressure listed in the table above. A regulator of mbar must be used for butane or a 37 mbar regulator for propane. The grill is equipped with an internal regulator. This internal regulator has an outlet pressure of 24.5 mbar for propane/ butane and must not be modified or adjusted. For replacement, use only the regulator specified by the manufacturer. This unit includes an internal regulator which stabilizes the gas pressure and improves grill performance. This regulator cannot be adjusted. There is a pressure tap located on the side of the regulator. It can be used by a qualified service person when servicing the grill to determine if the regulator is functioning properly. The screw within the pressure tap must always be kept tight, except when performing a pressure Leak Testing Instructions WARNING! A leak test must be performed annually and each time a cylinder is hooked up or if a part of the gas system is replaced. WARNING! Never use an open flame to check for gas leaks. Be certain no sparks or open flames are in the area while you check for leaks. Sparks or open flames will result in a fire or explosion, damage to property, serious bodily injury, or death. Leak testing: This must be done before initial use, annually, and whenever any gas components are replaced or serviced. Do not smoke while performing this test, and remove all sources of ignition. See Leak Testing Diagram for areas to check. Turn all burner controls to the off position. Turn gas supply valve on. Brush a half-and-half solution of liquid soap and water onto all joints and connections of the regulator, hose, manifolds and valves. Bubbles will indicate a gas leak. Either tighten the loose joint or have the part replaced with one recommended by the Napoleon Customer Care department and have the grill inspected by a certified gas installer. If the leak cannot be stopped, immediately shut off the gas supply, disconnect it, and have the grill inspected by a certified gas installer or dealer. Do not use the grill until the leak has been corrected.
6 6 Lighting Instructions EN Side Burner Left Burner Centre Burner Right Burner Off Position WARNING! Open lid. WARNING! Ensure all burner controls are in the off position. Turn on the gas supply valve. Main Burner Lighting Rear Burner Lighting (If equipped) Side Burner Lighting (If equipped) 1. Open grill lid. 1. Open grill lid. 1. Open side burner cover. 2. Push and turn any main burner knob slowly to the hi position. This action will ignite the pilot flame which will in turn light the selected burner. If the pilot lights, continue to push down on the control knob until the burner lights and then release. 2. Remove the warming rack. 2. Push and turn the side burner control knob slowly to the hi position. This action will ignite the side burner. 3. If the pilot does not ignite, then immediately turn the control knob back to the off position and repeat step 2 several times.. 4. If the pilot and burner will not ignite within 5 seconds, turn the control knob to the off position and wait 5 minutes for any excess gas to dissipate. Either repeat steps 2 and 3 or light with a match. 5. If lighting the unit with a match, clip the match into the supplied lighting rod. Hold the lit match down through the grill and sear plate while turning the corresponding burner valve to high. 3. Push and turn the rotisserie burner control knob slowly to the hi position. This action will ignite the pilot flame, which will in turn light the burner. If the pilot lights, continue to push down on the burner control knob until the burner lights then release. 4. If the burner does not ignite, then immediately turn the control knob back to the off position and repeat step 3 several times. 5. If the burner will not ignite within 5 seconds, turn the control knob to the off position and wait 5 minutes for any excess gas to dissipate. Either repeat steps 3 and 4 or light with a match. 3. If the burner does not ignite, then immediately turn the control knob back to the off position and repeat step 2 several times. 4. If the burner will not ignite within 5 seconds, turn the control knob to the off position and wait 5 minutes for any excess gas to dissipate. Either repeat steps 2 and 3 or light with a match.
7 Operating The Grill Initial Lighting: When lit for the first time, the gas grill emits a slight odor. This is a normal temporary condition caused by the burn-in of internal paints and lubricants used in the manufacturing process and does not occur again. Simply run the main burners on high for approximately one-half hour. Main Burner Use: When searing foods, we recommend preheating the grill by operating all main burners in the high position with the lid closed for approximately 10 minutes. Food cooked for short periods of time (fish, vegetables) can be grilled with the lid open. Cooking with the lid closed will ensure higher, more even temperatures that can reduce cooking time and cook meat more evenly. Food that has a cooking time longer than 30 minutes, such as roasts, can be cooked indirectly (with the burner lit opposite to the food placement). When cooking very lean meats, such as chicken breasts or lean pork, the grids can be oiled before pre-heating to reduce sticking. Cooking meat with a high degree of fat content can create flare-ups. Either trim the fat or reduce temperatures to inhibit this. Should a flare-up occur, move food away from the flames and reduce the heat. Leave the lid open. See Your All Season Grill cookbook by Napoleon for more detailed instructions. Direct Cooking: Place food to be cooked on the grill directly over the heat. This method is generally used for searing or for foods that do not require prolonged cooking times such as hamburgers, steaks, chicken pieces, or vegetables. The food is first seared to trap-in the juices and flavor, and then the temperature is lowered to finish cooking the food to your preference. Indirect Cooking: With one or more burners operating, place food to be cooked on the grill over a burner that is not operating. The heat circulates around the food, cooking slowly and evenly. Cooking with this method is much the same as cooking in your oven and is generally used for larger cuts of meats such as roasts, chickens or turkeys, but can also be used for cooking foods that are prone to flare-ups or for smoking foods. Lower temperatures and slower cooking times result in tender foods. Rear Burner Use (If Equipped): Remove the warming rack prior to use. Cooking grids should also be removed if they interfere with the rotisserie. The rear burner is designed to be used in conjunction with the rotisserie kit (included with most rear burner units) available from your dealer. See the rotisserie kit assembly instructions. To use the counterbalance - remove the rotisserie motor from the gas grill. Place the spit with meat being cooked across the hangers inside the grill. The meat will naturally hang with the heavy side down. Tighten the counterbalance arm and weight so the arm is facing up. Slide the counterweight in or out to balance the load and tighten in place. Re-install the motor and begin cooking. Place a metal dish underneath the meat to collect drippings for basting and naturally delicious gravy. Basting liquid may be added as required. To seal in juices, first operate rear burner on high until brown, then reduce the heat to thoroughly cook foods. Keep the lid closed for best results. Your roasts and fowl will brown perfectly on the outside and stay moist and tender on the inside. For example, a 3 pound chicken on the rotisserie will be done in approximately 1½ hours on medium to high. See Your all Season Grill cookbook by Napoleon for more detailed instructions. 7 EN WARNING! Barbecue sauce and salt can be corrosive and will cause rapid deterioration of the gas grill components unless cleaned regularly. When finished cooking disassemble rotisserie components, wash thoroughly with warm soapy water and store indoors. Flame Side Burner Use (if equipped): The side burner can be used like any stove top burner, for gravies, soups etc. For best performance, the gas grill should be located with the side burner protected from the wind. The recommended pan diameter is 60mm to 220mm. WARNING! Never grill food directly on the side burner grate. It is designed for use with pots and pans only. WARNING! Do not close the side burner lid while it is operating or hot. WARNING! Do not use side burner to deep fry foods as cooking with oil can create a dangerous situation.
8 EN 8 Maintenance / Cleaning Instructions We recommend this gas grill be thoroughly inspected and serviced annually by a qualified service person. At all times keep the gas grill area free from combustible materials, gasoline and other flammable vapors and liquids. Do not obstruct the flow of ventilation and combustion air. Keep the cylinder enclosure ventilation openings (located on the cart sides and at the front and back of the bottom shelf) free and clear from debris. WARNING! Always wear protective gloves and safety glasses when servicing your grill. WARNING! To avoid the possibility of burns, maintenance should be done only when the grill is cool. Avoid unprotected contact with hot surfaces. Ensure all burners are turned off. Clean grill in an area where cleaning solutions will not harm decks, lawns, or patios. Do not use oven cleaner to clean any part of this gas grill. Do not use a self-cleaning oven to clean cooking grids or any other parts of the gas grill. Barbecue sauce and salt can be corrosive and will cause rapid deterioration of the gas grill components unless cleaned regularly. Note: Stainless steel tends to oxidize or stain in the presence of chlorides and sulfides, particularly in coastal areas and other harsh environments, such as the warm, highly humid atmosphere around pools and hot tubs. These stains could be perceived as rust, but can be easily removed or prevented. To provide stain prevention and removal, wash all stainless steel surfaces every 3-4 weeks or as often as required with fresh water and/or stainless steel cleaner. WARNING! Turn off the gas at the source and disconnect the unit before servicing. To avoid the possibility of burns, maintenance should be done only when the grill is cool. A leak test must be performed annually and whenever any component of the gas train is replaced or gas smell is present. Grids And Warming Rack: The grids and warming rack are best cleaned with a brass wire brush during the pre-heating period. Steel wool can be used for stubborn stains. It is normal that stainless grids (if equipped) will discolor permanently from regular usage due to the high temperature of the cooking surface. Cast Iron Cooking Grids: The cast iron cooking grids supplied with your new grill offer superior heat retention and distribution. By regularly seasoning your grids you are adding a protective coating, which will aid in resisting corrosion and increase your grids non-stick capabilities. First Time Use: Wash the cooking grids by hand with mild dish soap and water to remove any residue from the manufacturing process (never wash in a dish washer). Rinse thoroughly with hot water and dry completely with a soft cloth. This is important to avoid moisture from entering the cast iron. Seasoning: Using a soft cloth, spread VEGETABLE SHORTENING over the entire grid surface ensuring all grooves and corners are covered. Do not use salted fats such as butter or margarine. Pre-heat your grill for 15 minutes, then place the seasoned cooking grids in the grill. Turn the burner control knobs to medium with the lid closed. Allow the cooking grids to heat for approximately one-half hour. Turn all the burners to the OFF position and turn the gas off at the source. Let the cooking grids stand until cool. This procedure should be repeated several times throughout the season, although it is not required for daily use (follow daily usage procedure below). Daily Usage: Before pre-heating, and cleaning with a brass wire grill brush, coat the entire top surface of the cooking grids with VEGETABLE SHORTENING. Pre-heat the grill and then brush away any unwanted residue with a brass wire brush. Stainless Steel Cooking Grids: (upgrade kit available - see replacement parts list). Stainless steel cooking grids are durable and corrosion resistant. They require less seasoning and maintenance than cast iron cooking grids. It is recommended that you follow the daily usage procedure listed above although you may find pre-heating and cleaning your grids with a wire brush is sufficient for your grilling needs. Control Panel: The control panel text is printed directly on the stainless steel and with proper maintenance will remain dark and legible. To clean the panel, use only warm soapy water or stainless steel cleaner available from your Napoleon dealer. Never apply abrasive cleaners on any stainless surfaces, especially the printed portion of the control panel or the printing will gradually rub off. Cleaning Inside The Gas Grill: Remove the cooking grids. Use a brass wire brush to clean loose debris from the casting sides and underneath the lid. Scrape the sear plates with a putty knife or scraper, and use a wire brush to remove the ash. Remove the sear plates and brush debris from the burners with the brass wire brush. Sweep all debris from inside the gas grill into the drip pan.
9 Lights: To remove the lens from the light housing, insert a flat screwdriver tip between the lens and the housing and rock it gently. Do not touch the halogen bulb. The oil from your fingertips will reduce the life of the bulb. To clean the lens, first soak it in hot soapy water, then clean with a rag and non abrasive cleaner. To reinstall the lens, simply snap it back into the housing. 9 EN WARNING! Accumulated grease is a fire hazard. Drip Pan: Clean the drip pan frequently (every 4 5 uses or as often as required) to avoid grease buildup. Grease and excess drippings pass through to the drip pan, located beneath the gas grill and accumulate in the disposable grease tray below the drip pan. To access the disposable grease tray or to clean the drip pan, slide the drip pan free of the grill. Never line the drip pan with aluminum foil, sand or any other material as this could prevent the grease from flowing properly. The pan should be scraped out with a putty knife or scraper. Replace the disposable grease tray every 2 4 weeks, depending on gas grill usage. For supplies, see your Napoleon Gas Grill dealer. Cleaning The Outer Grill Surface: Do not use abrasive cleaners or steel wool on any painted, porcelain or stainless steel parts of your Napoleon Grill. Doing so will scratch the finish. Exterior grill surfaces should be cleaned with warm soapy water while the metal is still warm to the touch. To clean stainless surfaces, use a stainless steel or a non-abrasive cleaner. Always wipe in the direction of the grain. Over time, stainless steel parts discolor when heated, usually to a golden or brown hue. This discoloration is normal and does not affect the performance of the grill. Porcelain enamel components must be handled with additional care. The baked-on enamel finish is glass-like, and will chip if struck. Touch-up enamel is available from your Napoleon Grill dealer. WARNING! Hose: Check for abrasions, melting, cuts, and cracks in the hose. If any of these conditions exist, do not use the gas grill. Have the part replaced by your Napoleon Gas Grill dealer or qualified gas installer. Tube Burner: The burners are made from heavy wall 304 stainless steel, but extreme heat and a corrosive environment can cause surface corrosion to occur. This can be removed with a brass wire brush. CAUTION! Beware of Spiders. Spiders and insects are attracted to the smell of propane and natural gas. The burner is equipped with an insect screen on the air shutter, which reduces the likelihood of insects building nests inside the burner but does not entirely eliminate the problem. A nest or web can cause the burner to burn with a soft yellow or orange flame or cause a fire (flashback) at the air shutter beneath the control panel. To clean the inside of the burner, it must be removed from the gas grill: Remove the screw that attaches the burner to the back wall. Slide the burner back and upwards to remove. Cleaning: Use a flexible venturi tube brush to clean the inside of the burner. Shake any loose debris from the burner through the gas inlet. Check the burner ports and valve orifices for blockages. Burner ports can close over time due to cooking debris and corrosion, use an opened paperclip or the supplied port maintenance bit to clean them. Drill out blocked ports using this drill bit in a small cordless drill. The ports are easier to clean if the burner is removed from the grill, but it can also be done with the burner installed. Do not flex the drill bit when drilling the ports, as this will cause the drill bit to break. This drill is for burner ports only, not for the brass orifices (jets) which regulate the flow into the burner. Take care not to enlarge the holes. Ensure the insect screen is clean, tight, and free of any lint or other debris. Reinstallation: Reverse the procedure to reinstall the burner. Check that the valve enters the burner when installing. WARNING! When reinstalling the burner after cleaning it is very important that the valve/orifice enters the burner tube before lighting your gas grill. If the valve is not inside the burner tube a fire or explosion could occur. Aluminum Castings: Clean castings periodically with warm soapy water. Aluminum will not rust, but high temperatures and weathering can cause oxidation to occur on aluminum surfaces. This appears as white spots on the castings. To refinish these areas, clean first and sand lightly with fine sandpaper. Wipe the surface to remove any residue and paint with high temperature barbecue paint. Protect surrounding areas from over-spray. Follow the manufacture s directions for curing.
10 EN 10 Troubleshooting Problem Possible Causes Solution Low heat / Low flame when valve turned to high. For propane - improper lighting procedure. Ensure lighting procedure is followed carefully. All gas grill valves must be in the off position when the tank valve is turned on. Turn tank on slowly to allow pressure to equalize. See lighting instructions. Excessive flare-ups/uneven heat. Burners burn with yellow flame, accompanied by the smell of gas. For natural gas - undersized supply line. For both gases - improper preheating. Improper preheating. Excessive grease and ash build on sear plates and in drip pan. Possible spider web or other debris, or improper air shutter adjustment. Pipe must be sized according to installation code. Preheat grill with both main burners on high for 10 to 15 minutes. Preheat grill with both main burners on high for 10 to 15 minutes. Clean sear plates and drip pan regularly. Do not line pan with aluminum foil. Refer to cleaning instructions. Thoroughly clean burner by removing. See general maintenance instructions. Humming regulator. Normal occurrence on hot days. This is not a defect. It is caused by internal vibrations in the regulator and does not affect the performance or safety of the gas grill. Humming regulators will not be replaced. Burners will not cross light each other. Paint appears to be peeling inside lid or hood. Plugged ports at back of burner. Grease build-up on inside surfaces. Clean burner ports. See burner maintenance instructions. This is not a defect. The finish on the lid and hood is porcelain, and will not peel. The peeling is caused by hardened grease, which dries into paint-like shards, that flake off. Regular cleaning will prevent this. See cleaning instructions.
11 KEEP YOUR RECEIPT AS PROOF OF PURCHASE TO VALIDATE YOUR WARRANTY. Ordering Replacement Parts Warranty Information 11 EN MODEL: DATE OF PURCHASE: SERIAL NUMBER: (Record information here for easy reference) Before contacting the Customer Care Department, check the NAC Website for more extensive cleaning, maintenance, troubleshooting and parts replacement instructions at. Contact the factory directly for replacement parts and warranty claims. Our Customer Care Department is available between 9 AM and 5 PM (Eastern Standard Time) at or fax at To process a claim, we must be provided with the following information: 1. Model and serial number of the unit. 2. Part number and description. 3. A concise description of the problem ( broken is not sufficient). 4. Proof of purchase (photocopy of the invoice). In some cases the Customer Care Representative could request to have the parts returned to the factory for inspection before providing replacement parts. These parts must be shipped prepaid to the attention of the Customer Care Department with the following information enclosed: 1. Model and serial number of the unit. 2. A concise description of the problem ( broken is not sufficient). 3. Proof of purchase (photocopy of the invoice). 4. Return Authorization Number - provided by the Customer Care Representative. Before contacting customer care, please note that the following items are not covered by the warranty: Costs for transportation, brokerage or export duties. Labor costs for removal and reinstallation. Costs for service calls to diagnose problems. Discoloration of stainless steel parts. Part failure due to lack of cleaning and maintenance, or use of improper cleaners (oven cleaner).
12 12 EN CAUTION! During unpacking and assembly we recommended you wear work gloves and safety glasses for your protection. Although we make every effort to make the assembly process as problem free and safe as possible, it is characteristic of fabricated steel parts that the edges and corners might be sharp and could cause cuts if handled incorrectly. Getting Started 1. Remove all cart panels, hardware, and grill head from carton. Raise lid and remove any components packed inside. Use the parts list to ensure all necessary parts are included. 2. Do not destroy packaging until the grill has been fully assembled and operates to your satisfaction. 3. Assemble the grill where it is to be used, lay down cardboard or a towel to protect parts from being lost or damaged while assembling. 4. Most stainless steel parts are supplied with a protective plastic coating that must be removed prior to using grill. 5. Follow all instructions in the order that they are laid out in this manual. 6. Two people are required to lift the grill head onto the assembled cart. If you have any questions about assembly or grill operation, or if there are damaged or missing parts please call our Customer Care Department at between 9 AM and 5 PM (Eastern Standard Time). TOOLS REQUIRED FOR ASSEMBLY (tools not included) 3/8 (10mm) Flat and Philips Wrench, screwdrivers ratchet or driver Pliers Hammer
13 Ce gril doit être utilisé uniquement à l extérieur, dans un endroit bien aéré et ne doit jamais être utilisé à l intérieur d un bâtiment, d un garage, un gazebo, une véranda avec paramoustique, ou de tout autre endroit fermé. APPOSEZ LÉTIQUETTE DU NUMERO DE SERIE DU CARTON FR N O de série XXXXXX N O DE MODÈLE 410, 410SB DANGER SI VOUS DÉTECTEZ UNE ODEUR DE GAZ : Fermez l alimentation en gaz à l appareil. Éteignez toute flamme nue. Ouvrez le couvercle. Si l odeur persiste, éloignez-vous de l appareil et appelez immédiatement votre fournisseur de gaz ou le service des incendies. AVERTISSEMENT Ne tentez pas d allumer cet appareil avant d avoir lu la section INSTRUCTIONS D ALLUMAGE de ce manuel. Pour votre sécurité n entreposez pas et n utilisez pas d essence ou autres liquides et vapeurs inflammables à proximité de cet ou tout autre appareil. Une bonbonne de propane de propane non branchée ne devrait pas être entreposée à proximité de cet ou de tout autre appareil. Si ces instructions ne sont pas suivies à la lettre, un feu ou une explosion pourraient s ensuivre, causant des dommages à la propriété, des blessures corporelles ou des pertes de vie. Note à l installateur : Laissez ces instructions au propriétaire du gril pour consultation ultérieure. Napoleon Group of Companies 214 Bayview Dr., Barrie, Ontario, Canada L4N 4Y8 Phone: Fax: (705) Customer Solutions: or grills@napoleonproducts.com

14 14 MERCI D AVOIR CHOISI NAPOLÉON Les produits NAPOLÉON sont conçus avec des composants et des matériaux de qualité supérieure, assemblés par des artisans qualifiés qui sont fiers de leur travail. Le brûleur et le montage de la soupape subissent un test de détection de fuites et d allumage à une station de test de qualité. Ce gril a été soigneusement inspecté par un technicien qualifié avant d être emballé et expédié pour garantir que vous, le client, recevez le produit de qualité dont vous vous attendez de NAPOLÉON. Chez Napoléon, notre priorité c est vous, «notre important client». Notre objectif est de vous fournir les outils nécessaires pour rendre inoubliable cette expérience de cuisson sur le gril. Ce manuel vous est fourni pour vous aider lors de l assemblage, l installation et l entretien de votre nouveau gril. Il est important de lire et de comprendre ce manuel en entier avant d utiliser votre nouveau gril afin de vous assurer de comprendre parfaitement toutes les consignes de sécurité et toutes les caractéristiques de votre gril. En suivant attentivement les instructions de ce manuel, vous profiterez de votre gril pendant de nombreuses années, et ce, sans tracas. Si nous ne répondons pas à vos attentes pour quelque raison que ce soit, veuillez contacter notre département du service aux consommateurs au entre 9 h et 17 h (heure normale de l Est) ou visitez notre site Web. Garantie à Vie Limitée du Président des grils à gaz Napoléon NAPOLÉON garantit que les composants de votre nouveau produit NAPOLÉON seront exempts de défauts de matériau ou de fabrication à compter de la date de l achat, et ce, pour la durée suivante : Pièces en fonte d aluminium/base en acier inoxydable À vie Couvercle en acier inoxydable À vie Couvercle en porcelaine émaillée À vie Grilles de cuisson en acier inoxydable À vie Brûleurs tubulaires en acier inoxydable 10 ans plus5 Plaques de brûleur en acier inoxydable 5 ans plus5 Grilles de cuisson en fonte émaillée 5 ans plus5 Brûleur arrière infrarouge en acier inoxydable 5 ans Brûleur arrière infrarouge en céramique (excluant le grillage) 3 ans Brûleurs de cuve et latéral infrarouge en céramique (excluant le grillage) 2 ans Toutes les autres pièces 2 ans plus5 indique une période de garantie prolongée de cinq ans durant laquelle la pièce de rechange sera offerte au client à la moitié du prix de détail courant. Conditions et limitations NAPOLÉON garantit ses produits contre les défauts de fabrication à l acheteur d origine seulement, à condition que l achat ait été fait par l entremise d un détaillant NAPOLÉON autorisé et sous réserve des conditions et limitations suivantes : Cette garantie du fabricant n est pas transférable et ne peut être prolongée ou étendue par aucun de nos représentants, quelle qu en soit la raison. Le gril à gaz doit être installé par un installateur ou entrepreneur qualifié. L installation doit être faite conformément aux instructions d installation incluses avec le produit et à tous les codes d incendie et de construction locaux et nationaux. Cette garantie limitée ne couvre pas les dommages causés par un mauvais usage, un manque d entretien, des feux de graisse, un environnement inadéquat, un accident, des altérations, des abus ou de la négligence, et l installation de pièces d autres fabricants annulera cette garantie. La décoloration des composants de plastique causée par des produits d entretien chimiques ou l exposition aux rayons UV n est pas couverte par cette garantie. Cette garantie limitée ne couvre pas non plus les égratignures, les bossellements, les surfaces peintes, la corrosion ou la décoloration causés par la chaleur ou les produits d entretien chimiques et abrasifs ni l écaillage des pièces en porcelaine émaillée ni les composants utilisés dans l installation du gril à gaz. Dans le cas d une détérioration des composants causant un mauvais fonctionnement de l appareil (perforation par la rouille ou la surchauffe) pendant la période couverte par la garantie, les pièces de rechange seront fournies par Napoléon. Au cours de la première année seulement, cette garantie s étend au remplacement des pièces garanties dont les matériaux ou la fabrication sont défectueux sous condition que le produit ait été utilisé conformément aux instructions de fonctionnement et dans des conditions normales. Après la première année, concernant cette Garantie à Vie Limitée du Président, NAPOLÉON peut, à sa discrétion, se libérer entièrement de toute obligation en ce qui concerne cette garantie en remboursant à l acheteur d origine le prix de gros de toute pièce garantie qui est défectueuse. NAPOLÉON ne sera pas responsable de l installation, de la main-d oeuvre ou autres coûts et dépenses relatifs à la réinstallation d une pièce garantie et de telles dépenses ne sont pas couvertes par cette garantie. Nonobstant toutes les dispositions contenues dans la Garantie à Vie Limitée du Président, la responsabilité de NAPOLÉON sous cette garantie est définie comme ci-dessus et elle ne s étendra à aucun dommage accidentel, consécutif ou indirect. Cette garantie définit l obligation et la responsabilité de NAPOLÉON en ce qui concerne le gril à gaz NAPOLÉON. Toute autre garantie énoncée ou implicite concernant ce produit, ses composants ou accessoires est exclue. NAPOLÉON n endosse ni n autorise aucun tiers à assumer en son nom, toute autre responsabilité concernant la vente de ce produit. NAPOLÉON ne sera pas responsable d une surchauffe ou d une explosion causée par des conditions environnementales telles que des vents forts ou une ventilation inadéquate. Tous dommages causés au gril à gaz par les intempéries, la grêle, un usage abusif ou l utilisation de produits d entretien chimiques ou abrasifs ne seront pas la responsabilité de NAPOLÉON. La facture ou une copie sera requise ainsi que le numéro de série et le numéro de modèle lors d une réclamation auprès de NAPOLÉON. NAPOLÉON se réserve le droit de demander à son représentant d inspecter tous produits ou pièces avant d honorer toute réclamation. NAPOLÉON n assumera aucuns frais de transport, de main-d oeuvre ou taxes d exportation. FR
15 15 FR AVERTISSEMENT! Si ces instructions ne sont pas suivies, des dommages matériels, des blessures corporelles ou des pertes de vie pourraient s ensuivre. Lisez et respectez tous les avertissements et les instructions de ce manuel avant de faire fonctionner le gril. Pratiques Sécuritaires D utilisation Ce gril à gaz doit être assemblé conformément aux instructions du manuel. Si le gril a été assemblé en magasin, vous devez réviser les instructions d assemblage afin de confirmer que le gril ait été assemblé correctement et aussi pour effectuer un test de détection de fuite avant d utiliser le gril. Lisez le manuel d instructions en entier avant d utiliser le gril. Ce gril ne devra être modifié en aucun cas. Suivez attentivement les instructions d allumage lorsque vous faites fonctionner le gril. Lorsque le gril n est pas utilisé, l alimentation en gaz doit être fermée à la bonbonne de propane ou à la soupape d alimentation du gaz naturel. Tenez les enfants et les animaux éloignés du gril chaud; NE laissez PAS les enfants grimper dans le cabinet. Il convient de surveiller les enfants pour s assurer qu ils ne jouent pas avec l appareil. Cet appareil n est pas prévu pour être utilisé par des personnes (y compris les enfants) dont les capacités physiques, sensorielles ou mentales sont réduites, ou des personnes dénuées d expérience ou de connaissance, sauf si elles ont pu bénéficier, par l intermédiaire d une personne responsable de leur sécurité, d une surveillance ou d instructions préalables concernant l utilisation de l appareil. Ne laissez pas le gril sans surveillance lorsqu il est utilisé. Ne déplacez pas le gril lorsqu il est chaud ou qu il fonctionne. Ce gril est pour usage domestique seulement. Ce gril à gaz ne doit pas être installé dans ou sur des véhicules récréatifs et/ou des bateaux. Ce gril doit être utilisé uniquement à l extérieur, dans un endroit bien aéré et ne doit jamais être utilisé à l intérieur d un bâtiment, d un garage ou de tout autre endroit fermé. Respectez les dégagements recommandés aux matériaux combustibles (16 (410mm) à l arrière du gril et 7 (180mm) sur les côtés). Un dégagement plus grand 24 (610mm) est recommandé à proximité d un recouvrement de vinyle ou d une surface vitrée. En tout temps, gardez les ouvertures d aération du cabinet de la bonbonne libres et exemptes de débris. Ne fonctionnez pas le gril sous une construction combustible. N installez pas le gril dans un endroit venteux. Les vents forts nuiront à la performance de cuisson de votre gril. Lorsque le gril doit être entreposé à l intérieur, la bonbonne de propane doit être débranchée du gril et entreposée à l extérieur dans un endroit bien aéré. Les bonbonnes de propane débranchées ne doivent en aucun temps être entreposées à l intérieur d un bâtiment, d un garage ou de tout autre endroit fermé. Inspectez le boyau d alimentation en gaz avant chaque utilisation. S il montre des signes de fendillement excessif ou d usure, il doit être remplacé par un ensemble de rechange spécifié par le fabricant avant d utiliser le gril. N entreposez pas de bonbonne de propane supplémentaire sous ce gril ou à proximité. Ne remplissez jamais la bonbonne à plus de 80 % de sa pleine capacité. Faites un test de détection de fuites avant la première utilisation, même si le gril a été acheté déjà assemblé, annuellement et à chaque fois qu une pièce du système de gaz est remplacée. N utilisez pas de gaz naturel avec un appareil conçu pour le propane liquide. N utilisez jamais d essence pour briquets dans un gril à gaz. Les boutons de contrôle du brûleur doivent être fermés lorsque vous ouvrez la soupape d alimentation en gaz. N allumez pas le brûleur avec le couvercle fermé. N utilisez pas le brûleur arrière en même temps que le brûleur principal. Le couvercle doit être fermé lors de la période de préchauffage du gril. Ne passez pas le boyau d alimentation sous le tiroir d égouttement - le dégagement requis entre le boyau et le fond de la cuve doit être maintenu. Nettoyez le tiroir d égouttement et les plaques du brûleur régulièrement pour éviter les feux de graisse. Enlever la grille-réchaud avant d allumer le brûleur arrière. La chaleur intense pourrait l endommager. Assurez-vous que les plaques de brûleur sont installées de façon adéquate, conformément aux instructions d installation. N utilisez pas les tablettes latérales pour entreposer des briquets, des allumettes ou autres matières inflammables. Gardez les boyaux d alimentation en gaz éloignés des surfaces chauffantes. Gardez les fils électriques éloignés de l eau ou des surfaces chauffantes. Inspectez les tubes de venturi des brûleurs infrarouges pour des toiles d araignées ou toutes autres obstructions régulièrement. Nettoyez les tubes si vous découvrez des obstructions. Cet gril de cuisson extérieur au gaz et sa soupape d arrêt doivent être débranchés de la ligne d alimentation en gaz pendant les essais de pression de ce système lorsque les pressions d essai excèdent 1/2 lb/po² (3,5 kpa). Cet gril de cuisson extérieur au gaz doit être séparé de la ligne d alimentation en gaz en fermant la soupape d arrêt manuelle pendant tout essai de pression du système d alimentation en gaz lorsque la pression est de 1/2 lb/po² (3,5 kpa) ou moins.
16 16 Mise au rebut du produit À travers l UE, ce symbole indique que le produit ne doit pas être mis au rebut avec les autres ordures ménagères. Afin de protéger l environnement et la santé publique contre les déchets non contrôlés, veuillez recycler l appareil de manière responsable afin d encourager la réutilisation durable de ressources de matériaux. Afin de retourner votre appareil usagé, veuillez utiliser les systèmes de retour ou de récupération ou contactez le revendeur auprès duquel l appareil a été acheté. Ils peuvent reprendre l appareil afin de le faire recycler et ainsi protéger l environnement. Bonbonne De Gaz N utilisez que des réservoirs qui répondent aux exigences des codes régionaux et nationaux. La grandeur minimale du réservoir pour le butane est de 13 kg et de 6 kg pour le propane. Assurez-vous que la bonbonne puisse fournir suffisamment de combustible pour faire fonctionner l appareil. Si vous êtes incertain, consultez votre fournisseur de gaz. Soyez prudent lorsque vous manipulez la soupape de la bonbonne. Ne branchez jamais une bonbonne qui ne rencontre pas les exigences des normes locales. Tous les réservoirs doivent être placés à l extérieur du cabinet (sous la tablette droite) sur une surface de niveau. Seuls les réservoirs branchés à l appareil peuvent être rangés dans le cabinet ou à proximité de l appareil. Les réservoirs de rechange ne doivent pas être rangés dans le cabinet ou à proximité d un appareil allumé. Les réservoirs ne doivent pas être exposés à des chaleurs extrêmes ni au soleil direct. AVERTISSEMENT! Assurez-vous que le boyau ne touche à aucune surface à haute température sinon il risque de fondre, de provoquer une fuite et causer un feu. Branchement De La Bonbonne : Assurez-vous que le tuyau du régulateur de gaz est sans anomalie. Enlevez le bouchon sur la soupape de gaz de la bonbonne. Serrez le régulateur sur la soupape de la bonbonne. Faites un test de détection de fuites sur tous les raccords avant d utiliser le gril. Un test de détection de fuites doit être fait annuellement et à chaque fois qu une bonbonne est branchée ou qu une pièce du système de gaz est remplacée. AVERTISSEMENT! Ne pas passer le tuyau d alimentation sous le tiroir d égouttement. Ne passez pas le boyau entre l espace dans la tablette inférieure et le panneau arrière. N acheminez pas le boyau par-dessus le panneau arrière. Assurez-vous que tous les raccordements de boyaux sont serrés à l aide de deux clés. N utilisez pas de ruban de Téflon ou de composé pour raccord de tuyau sur les raccordements. Assurez-vous que le boyau ne touche à aucune surface à haute température sinon il risque de fondre, de provoquer une fuite et causer un feu. Vérifiez pour des fuites de gaz en appliquant une solution d eau savonneuse selon les instructions de détection de fuites dans de manuel. Ne rangez pas le surplus de boyau dans le cabinet, il y a un plus grand risque que le boyau fasse contact avec une surface chaude, le boyau peut fondre et une fuite peut se produire, causant ainsi un feu. Tuyau De Gaz Si le tuyau et le régulateur ne sont pas fournis par le fabricant, seuls les tuyaux et les régulateurs se conformant aux exigences des normes nationales et régionales peuvent être utilisés. Ne branchez pas l appareil à une source d alimentation en gaz installée en permanence. Assurez-vous que le tuyau n entre pas en contact avec de la graisse, d autres jus de cuisson chauds ou toute surface chaude sur l appareil. Inspectez le tuyau régulièrement. Si le tuyau montre des signes de fendillement, de fonte ou d usure, remplacez le tuyau avant d utiliser l appareil. La longueur recommandée du tuyau est de 0,5 m. Le tuyau ne doit pas dépasser 1,5 m de longueur. Assurez-vous que le tuyau ne soit pas plié ou tordu lorsque installé. Remplacez le tuyau avant la date d expiration imprimée sur celui-ci. FR
17 FR Données Techniques Le tableau ci-dessous affiche les valeurs d entrée de l appareil. Brûleur Taille De L injecteur (Brut) Entrée De Chaleur (Total) Utilisation De Gaz (Total) Principal Latéral 1.07mm (#58) 12.0 kw 870 g/hr 0.82mm 2.4 kw 174 g/hr Gaz certifiés / pressions - Vérifiez la plaque d homologation pour vous assurer qu elle corresponde avec la liste suivante. Catégorie de gaz I 3B/P(30) I 3+(28-30/37) I 3B/P(37) I 3B/P(50) Gaz / pressions Butane 30mbar Butane 28-30mbar Butane 37mbar Butane 50mbar Propane 30mbar Propane 37mbar Propane 37mbar Propane 50mbar Pays BE, BG, CY, DK, EE, FI, FR, GB, BE, CH, CY, CZ, ES, FR, GB, GR, IE, IT, PL AT, CH, DE, SK HR, HU, IS, IT, LT, LT, LU, LV, PT, SK, SI LU, MT, NL, NO, RO, SE, SI, SK, TR 17 Ne démontez pas et ne modifiez pas le régulateur. N utilisez que des régulateurs fournissant les pressions affichées dans le tableau ci-dessus. Vous devez utiliser un régulateur mbar pour le butane ou un régulateur 37 mbar pour le propane. Le gril est muni d un régulateur interne. La pression de sortie de ce régulateur interne est de 24.5 mbar propane/butane et ne doit pas être modifiée ni ajustée. Pour un remplacement, n utilisez que le régulateur indiqué par le fabricant. Cet appareil est muni d un régulateur interne qui stabilise la pression du gaz et qui améliore la performance du gril. Ce régulateur ne peut être ajusté. Une prise de pression se trouve sur le côté du régulateur. Elle peut être utilisée par un technicien qualifié lors de l'entretien du gril afin de déterminer si le régulateur fonctionne correctement. La vis de la prise de pression doit demeurer serrée en tout temps, sauf en cas d'un essai de pression du régulateur (effectué par un technicien qualifié seulement). Test De Détection De Fuites AVERTISSEMENT! Il doit être fait avant la première utilisation, annuellement et à chaque fois qu une pièce du système de gaz est remplacée ou réparée AVERTISSEMENT! N utilisez pas une flamme nue pour vérifier pour des fuites de gaz. Assurez-vous qu il n y ait aucune étincelle ni flamme nue à proximité de l endroit à vérifier. Les étincelles ou les flammes nues provoqueront un feu ou une explosion, causant des dommages matériels, des blessures graves ou des pertes de vie. Test De Fuites: Il doit être fait avant la première utilisation, annuellement et à chaque fois qu une pièce du système de gaz est remplacée ou réparée. Ne fumez pas et enlevez toutes sources d allumage lorsque vous faites ce test. Consultez le schéma de test de fuites pour voir les endroits à tester. 1 - Fermez tous les boutons des brûleurs. Ouvrez la soupape de la bonbonne. 2 - Appliquez une solution de deux parts égales de savon liquide et d eau sur tous les joints du régulateur, le tuyau et ses raccords. 3 - Des bulles indiqueront une fuite de gaz. Resserrez le joint ou remplacez la pièce avec une autre recommandée par le détaillant. 4 - Si la fuite ne peut être réparée, fermez l alimentation de gaz à la bonbonne, enlevez-la et faites inspecter votre gril par votre fournisseur de gaz ou détaillant. N utilisez pas l appareil jusqu à ce que la fuite soit réparée. 5 - Fermez la soupape de la bonbonne.
18 18 Instruction D allumage Brûleur de latéral FR Brûleur de gauche Brûleur de Centre Brûleur de droite AVERTISSEMENT! Ouvrez le couvercle. AVERTISSEMENT! Assurez-vous que tous les boutons de contrôle sont à «off». Ouvrez ensuite la soupape d alimentation en gaz. Allumage Du Brûleur Principal Allumage Du Brûleur Rotissérie Allumage Du Brûleur Latéral (si équipé) (si équipé) 1. Ouvrez le couvercle. 1. Ouvrez le couvercle. 1. Ouvrez le couvercle du brûleur latéral. 2. Enfoncez et tournez lentement l un des boutons de contrôle du brûleur principal à la position «hi». Ceci allumera la veilleuse, qui allumera à son tour le brûleur choisi. Si la veilleuse s allume, maintenez enfoncé le bouton de contrôle jusqu à ce que le brûleur s allume, puis relâchez-le. 3. Si la veilleuse ne s allume pas, tournez immédiatement le bouton de contrôle en position «off» et répétez l étape 1 plusieurs fois. 4. Si la veilleuse ou le brûleur ne s allument pas après 5 secondes, tournez le bouton de contrôle en position «off» et attendez 5 minutes pour que le gaz en excès puisse se dissiper. Ensuite, répétez les étapes 1 et 2 ou allumez avec une allumette. 5. Si vous allumez l appareil avec une allumette, fixez-la dans la tige d allumage fournie. Tenez l allumette allumée et abaissez-la dans le gril jusqu en dessous des plaques de brûleur et tournez la soupape du brûleur correspondant à HIGH. 2. Enlevez la grille de réchaud. 2. Enfoncez et tournez lentement le bouton del contrôle du brûleur latéral à la position «hi». Ceci allumera le brûleur latéral. 3. Appuyez et tournez lentement le bouton de contrôle du brûleur rotissérie à hi. Ceci allumera la veilleuse qui allumera ensuite le brûleur. Si la veilleuse s allume, continuez de garder le bouton de contrôle enfoncé jusqu à ce que le brûleur s allume puis relâchez-le. 4. Si la veilleuse ne s allume pas, tournez immédiatement le bouton de contrôle à «off» puis répétez l étape 2 à plusieurs reprises. 5. Si la veilleuse et brûleur ne s allume pas en moins de 5 secondes, tournez le bouton de contrôle à «off» et attendez 5 minutes pour permettre au surplus de gaz de se dissiper. Répétez les étapes 2 et 3 ou allumez avec une allumette. Fermez 3. Si le brûleur ne s allume pas, tournez immédiatement le bouton de contrôle en position «off» et répétez l étape 2 plusieurs fois. 4. Si le brûleur ne s allume pas après 5 secondes, tournez le bouton de contrôle en position «off» et attendez 5 minutes pour que le gaz en excès puisse se dissiper. Ensuite, répétez les étapes 2 et 3 ou allumez avec une allumette.
19 FR Instructions D opération Éclairage initial: Lorsqu il est allumé pour la première fois, le gril dégagera une légère odeur. Ceci est un phénomène normal et temporaire causé par l évaporation des peintures et lubrifiants internes utilisés dans le processus de fabrication et ne se reproduira plus. Allumez simplement les brûleurs de cuve à high pendant une demi-heure. Utilisation Du Brûleur Principal: Avant de cuire les aliments il est recommandé de préchauffer le gril à high avec le couvercle fermé pendant environ 10 minutes. Les aliments à cuisson courte (poisson, légumes) peuvent être grillés avec le couvercle ouvert. Une cuisson avec le couvercle fermé procurera des températures plus élevées et plus constantes qui réduiront la période de cuisson et cuiront la viande de façon plus égale. Les aliments qui requièrent un temps de cuisson de plus de 30 minutes, tels que les rôtis, peuvent être cuits en utilisant la méthode indirecte (avec le brûleur allumé du côté opposé à l emplacement de la viande). Lorsque vous faites cuire des viandes très maigres, comme une poitrine de poulet ou du porc maigre, il est à conseiller de huiler les grilles de cuisson avant le préchauffage ce qui aura pour effet d empêcher la viande de trop coller aux grilles. Le fait de cuire de la viande avec beaucoup de gras, peut causer des flambées soudaines. Il suffit alors d enlever le gras avant la cuisson ou de réduire la température pour remédier à ce problème. En cas de flambées, éloignez les aliments de la flamme et réduisez la température. Gardez le couvercle ouvert. Pour des instructions plus détaillées, veuillez consulter le Livre de recettes toutes saisons de NAPOLEON. Cuisson Directe: Placez les aliments à cuire sur la grille de cuisson, directement au-dessus de la chaleur. Cette méthode est habituellement utilisée pour faire saisir les aliments ou pour la nourriture nécessitant une courte cuisson - les hamburgers, les steaks, le poulet, les légumes, etc. La nourriture est d abord saisie afin d emprisonner les jus et la saveur, puis la température est réduite afin de terminer la cuisson selon vos préférences. Cuisson Indirecte: Avec un ou plusieurs brûleurs en fonction, placez la nourriture à cuire sur la grille au-dessus d un brûleur inactif. La chaleur circule autour de l aliment, ce qui le fait cuire lentement et de façon égale. Ce type de cuisson ressemble à la cuisson dans un four et est généralement utilisé pour les plus grosses pièces de viande telles que les rôtis, les poulets ou les dindes, mais il peut aussi être utilisé pour cuire la nourriture ayant tendance à produire des poussées de flamme. Ce type de cuisson diminuera la température; le ralentissement de la cuisson donnera une viande plus tendre à chaque fois. Utilisation Du Brûleur Arrière: (si équipé) Enlevez la grille-réchaud avant de l allumer. Les grilles de cuisson doivent également être enlevées si elles interfèrent avec l utilisation de la rôtissoire. Le brûleur arrière est conçu pour être utilisé avec l ensemble de rôtissoire. Consultez les instructions de montage de l ensemble rôtissoire pour plus de détails. Pour placer le contre-poids au bon endroit enlevez le moteur de la rôtissoire de son support. Placez la broche qui supporte la viande sur les deux supports à l intérieur du gril. Le morceau de viande se placera naturellement avec son côté le plus pesant vers le bas. Fixez le contre-poids en place en plaçant le bras vers le haut. Vous devez ensuite glisser le poids vers le haut ou vers le bas afin de contrebalancer le poids de la viande puis serrez- le en place. Replacez le moteur et commencez la cuisson. Placez la lèchefrite sous la viande pour récupérer le jus de cuisson qui servira pour arroser la viande et créer ainsi une délicieuse sauce naturelle. On peut également ajouter un peu d eau si nécessaire pour favoriser l arrosage. Afin de capturer le jus à l intérieur de la viande, réglez le brûleur arrière à high jusqu au brunissement puis, réduisez ensuite la chaleur pour une cuisson complète. Gardez le couvercle fermé pour obtenir de meilleurs résultats. Vos rôtis et volailles seront parfaitement dorés à l extérieur tout en restant tendres et juteux à l intérieur. Par exemple, un poulet de 3 livres sur la rôtissoire sera cuit dans approximativement 1h30 à une température entre moyenne et haute. Consultez votre Livre de recettes toutes saisons de NAPOLEON pour de plus amples informations. AVERTISSEMENT! La sauce BBQ et le sel sont corrosifs et causeront une détérioration rapide des composantes de votre gril à gaz à moins de les nettoyer régulièrement. Une fois la cuisson terminée, démontez les composantes de la rôtissoire, lavez-les bien à l eau chaude savonneuse et rangez-les à l intérieur. Utilisation Des Flamme Brûleurs Latéraux (si équipé) : Les brûleurs latéraux peuvent être utilisés comme un rond de cuisinière normal pour chauffer les sauces, les soupes etc. Le gril doit être placé de manière à ce que le vent n affecte pas le fonctionnement des brûleurs latéraux car il en réduirait la performance. Le diamètre recommandé du chaudron ou de la poêle est de 60 à 220 mm. AVERTISSEMENT! Ne faites jamais cuire des aliments sur les grilles des brûleurs latéraux. Elles Sont spécifiquement conçues pour les chaudrons et les casseroles. 19 AVERTISSEMENT! Ne fermez pas le couvercle du brûleur latéral pendant que celui-ci fonctionne ou est chaud. AVERTISSEMENT! N utilisez PAS le brûleur latéral pour faire frire la nourriture, car le fait de cuire avec de l huile peut créer une situation dangereuse.
20 20 Instructions D entretien et de Nettoyage Nous vous conseillons de faire inspecter ce gril à gaz annuellement par un technicien de service qualifié. L emplacement du gril à gaz doit être gardé libre de tous matériaux combustibles, essence ou autres liquides et vapeurs inflammables en tout temps. Les apports d air comburant et d air de ventilation ne doivent pas être obstrués. Les ouvertures d aération du compartiment de la bonbonne (situées sur les côtés du chariot, et à l avant et à l arrière de la tablette inférieure) doivent être libres de débris en tout temps. AVERTISSEMENT! Portez toujours des gants protecteurs et des lunettes de sécurité lorsque vous l'entretien votre gril. FR AVERTISSEMENT! Assurez-vous que les brûleurs sont éteints avant de nettoyer. Éviter tout contact avec les surfaces chaudes. Nettoyez votre gril dans un endroit où les produits de nettoyage n endommageront pas votre patio, terrain ou terrasse. N utilisez pas de produit de nettoyage à fourneau pour nettoyer votre gril. La sauce BBQ et le sel sont très corrosifs et causeront une détérioration très rapide de votre gril à moins que vous ne fassiez un nettoyage régulier. Note : L acier inoxydable a tendance à s oxyder ou à tacher en présence de chlorures et de sulfures que l on retrouve particulièrement dans les zones côtières ainsi que dans les environnements chauds et humides tels que les piscines et les spas. Ces taches peuvent être prises pour de la rouille mais il peuvent être facilement enlevées et même évitées. Afin de prévenir les taches, nettoyez toutes les surfaces en acier inoxydable à toutes les trois à quatre semaines ou au besoin avec de l eau douce et un nettoyant à acier inoxydable. AVERTISSEMENT! Fermez le gaz à la source et débranchez l appareil avant l entretien. L entretien devrait être effectué seulement lorsque le gril est froid pour éviter toutes possibilités de brûlure. Un test de détection de fuites devrait être effectué annuellement ou à chaque fois qu une composante de gaz est remplacée. Grilles de cuisson et grille de réchaud : Les grilles de cuisson et la grille de réchaud sont plus faciles à nettoyer durant la période de préchauffage en utilisant une brosse en laiton. Une laine d acier peut être utilisée pour les taches les plus tenaces. Il est normal que les grilles de cuisson en acier inoxydable (s il y a lieu) décolorent de façon permanente à l usage en raison des températures élevées de la surface de cuisson. Grilles de cuisson en fonte : Les grilles de cuisson en fonte incluses avec votre nouveau gril offrent une rétention et une distribution supérieures de la chaleur. En huilant vos grilles de cuisson, vous vous trouvez à ajouter une couche de protection qui aidera les grilles à mieux résister contre la corrosion et à augmenter les caractéristiques antiadhésives. Première utilisation : Nettoyez les grilles de cuisson à la main avec un savon à vaisselle doux et de l eau afin d enlever tout résidu provenant du procédé de fabrication (ne jamais laver au lave-vaisselle). Rincez bien avec de l eau chaude et séchez complètement avec un linge doux. Ceci est important pour éviter que de l humidité pénètre la fonte. Entretien : À l aide d un linge doux, appliquez une couche de SHORTENING VÉGÉTAL sur toute la surface de la grille en vous assurant de couvrir toutes les encoches et les coins. N utilisez pas de corps gras salés comme du beurre ou de la margarine. Préchauffez votre gril pendant 15 minutes, puis placez les grilles de cuisson dans le gril. Tournez les boutons de commande à feu moyen puis fermez le couvercle. Laissez les grilles de cuisson chauffer environ une demi-heure. Éteignez le brûleur et fermez l alimentation en gaz à la source. Laissez refroidir les grilles de cuisson. Cette procédure devrait être répétée plusieurs fois durant la saison, bien qu elle ne soit pas requise à chaque utilisation du gril (suivez la procédure d utilisation quotidienne ci-dessous). Utilisation quotidienne : Avant de préchauffer et de nettoyer avec une brosse en laiton, appliquez une couche de SHORTENING VÉGÉTAL sur toute la surface des grilles. Préchauffez le gril et enlevez tous les résidus avec une brosse en laiton. Grilles de cuisson en acier inoxydable : (ensemble de remplacement disponible consulter la liste des pièces de rechange). Les grilles de cuisson en acier inoxydable sont durables et à l épreuve de la corrosion. Elles nécessitent moins d entretien que les grilles de cuisson en fonte. Nous vous recommandons de suivre la procédure d utilisation quotidienne décrite plus haut, bien que le préchauffage et le nettoyage avec une brosse en laiton puissent s avérer suffisants pour vos besoins. Nettoyage Du Panneau De Contrôle : Le texte sur le panneau de contrôle est imprimé directement sur l acier inoxydable. Avec un entretien adéquat, le texte demeurera toujours foncé et lisible. N utilisez pas de détergents abrasifs (Ajax, Vim, Old Dutch etc.) pour nettoyer les surfaces en acier inoxydable, spécialement la partie imprimée du panneau de contrôle. Le texte disparaîtra graduellement si vous utilisez ces produits. Utilisez seulement le nettoyant d acier inoxydable Napoléon, disponible chez votre détaillant Napoléon.
21 FR Nettoyage De L intérieur Du Gril: Enlevez les grilles de cuisson. Utilisez une brosse en laiton pour enlever les débris non-incrustés sur les côtés de la cuve et à l intérieur du couvercle. Grattez les plaques de brûleur avec un couteau à mastic ou un grattoir puis utilisez une brosse en laiton pour enlever la suie. Enlevez les plaques de brûleur et nettoyez les débris sur le brûleur à l aide de la brosse. Nettoyez tous les débris qui se trouvent à l intérieur du gril en les faisant tomber dans le tiroir d égouttement. Le tiroir d égouttement devrait être gratté à l aide d un couteau à mastic ou d un grattoir en jetant les débris dans le récipient à graisse jetable. Le récipient jetable devrait être remplacé entre deux et quatre semaines selon la fréquence d utilisation du gril. Pour vous procurer des récipients de rechange informez-vous à votre représentant. Assurez-vous de replacer les plaques de brûleur dans la bonne position. (Consultez les instructions de montage si nécessaire pour un positionnement correct). Lumières : Retirez le verre de protection de la hotte à l aide d un tournevis à lame plate. Insérez la lame du tournevis entre le verre de protection et la hotte, et faites pivoter le tournevis. Ceci fera sauter le verre hors de la hotte. Pour nettoyer, trempez le verre de protection dans de l eau savonneuse chaude. Nettoyez ensuite à l aide d un chiffon et d un nettoyant non abrasif. Pour réinstaller, appuyez sur le verre de protection jusqu à ce qu il s engage dans la hotte. Ne touchez pas à l ampoule halogène, car le sébum de votre peau réduira la durée de vie de l ampoule. AVERTISSEMENT! L accumulation de graisse peut créer un risque de feu. Tiroir d égouttement : Nettoyez le tiroir d égouttement fréquemment (à toutes les 4 ou 5 utilisations ou au besoin) afin d éviter une accumulation de graisse. La graisse et les jus de cuisson tombent dans le tiroir d égouttement qui se trouve sous la cuve du gril et s accumulent dans le récipient à graisse jetable qui se situe sous le tiroir d égouttement. Pour accéder au récipient à graisse jetable ou pour nettoyer le tiroir d égouttement, glissez ce dernier hors du gril. Ne tapissez jamais votre tiroir d égouttement de papier d aluminium, de sable ou de tout autre matériau, car ceci aurait pour effet de nuire au bon écoulement de la graisse. Le tiroir d égouttement devrait être gratté à l aide d un couteau à mastic ou d un grattoir. Remplacez le récipient à graisse jetable toutes les deux à quatre semaines selon la fréquence d utilisation du gril. Pour vous procurer des récipients de rechange, consultez votre détaillant de gril Napoléon. Nettoyage De L extérieur Du Gril: N utilisez pas de produits abrasifs pour nettoyer les pièces peintes, de fini porcelaine ou en acier inoxydable. Les éléments en porcelaine émaillée doivent être manipulés avec soin. Le fini émaillée étant cuit il devient comme du verre; il s ébrèchera au moindre choc. Vous pouvez vous procurer de la peinture émaillée pour les retouches chez votre détaillant NAPOLEON. Utilisez une solution d eau savonneuse chaude pour nettoyer l extérieur du gril pendant qu il est encore tiède au toucher. Pour nettoyer les surfaces en acier inoxydable utilisez un produit de nettoyage à acier inoxydable ou un produit de nettoyage tout usage sans abrasif. Frottez toujours dans le sens du grain. N utilisez pas de laine d acier car elle égratignerait le fini. Les pièces en acier inoxydable vont décolorer sous l effet de la chaleur pour habituellement prendre une couleur dorée ou brune. Cette décoloration est normale et n affectera pas la performance du gril. AVERTISSEMENT! Boyau: Vérifiez l usure, coupures, craquelures ou s il est fondu. Si vous découvrez une de ces défectuosités, n utilisez pas votre gril. Faites remplacer la pièce par votre détaillant NAPOLEON ou par un installateur qualifié. Brûleur De Cuve : Le brûleurs soyez fabriqué en acier inoxydable 304 de calibre épais, mais puisqu il est soumis à des chaleurs extrêmes et à un environnement corrosif, la corrosion superficielle finit par survenir. Utilisez une brosse en laiton pour enlever la corrosion superficielle. Nettoyez tous les orifices obstrués à l aide d un trombone déplié. N agrandissez pas les orifices du brûleur. ATTENTION! Aux Araignées Les araignées et les insectes sont attirés par l odeur du propane et du gaz naturel. Le brûleur est équipé d un protecteur contre les insectes sur les venturis, ce qui réduira la possibilité que des insectes fassent leur nid à l intérieur du brûleur, mais il n élimine pas complètement le problème. Le nid ou la toile aura pour effet que le brûleur produira une flamme lâche de couleur jaune ou orange, ou causera un feu (retour de flamme) au niveau du venturi sous le panneau de contrôle. Pour nettoyer l intérieur du brûleur vous devez le retirer du gril. Enlevez la vis située au centre de chaque brûleur. Soulevez l arrière du brûleur pour enlever. Utilisez une brosse flexible de tube de venturi pour nettoyer l intérieur du brûleur. Faites sortir tous les débris qui se trouvent à l intérieur du brûleur en le brossant. En raison des débris de cuisson et de la corrosion, les orifices de brûleur peuvent se boucher avec le temps. Nettoyez les orifices bouchés à l aide de ce foret inséré dans une petite perceuse sans fil. Les orifices du brûleur peuvent être nettoyés si le brûleur est en place. Toutefois, le nettoyage sera plus facile si le brûleur est retiré du gril. Ne pliez pas le foret en nettoyant les orifices, car le foret casserait. Ce foret doit être utilisé pour les orifices de brûleur seulement. Ne l utilisez pas pour les orifices en laiton (jets) qui servent à régulariser le débit vers le brûleur. Assurez-vous que le protecteur contre les insectes est propre, serré et exempt de fibres ou autres débris. Vérifiez également que les orifices de la soupape sont propres. N agrandissez surtout pas les orifices. Réinstallez le brûleur. 21

22 22 Moulages En Aluminium: Nettoyez les moulages périodiquement à l aide d une solution d eau savonneuse chaude. L aluminium ne rouillera pas mais dû aux chaleurs élevées et aux effets climatiques, une oxydation se produira sur les surfaces d aluminium. Ceci apparaîtera comme des taches blanches sur les moulages. Pour réparer le fini des moulages, sablez-les à l aide d un papier émeri fin. Essuyez la surface et peinturez avec de la peinture à gril haute température. Protégez les alentours des vapeurs de peinture. Suivez les directives de séchage inscrites sur la bonbonne de peinture. AVERTISSEMENT! Lors de la réinstallation du brûleur après le nettoyage, il est très important que la soupape / l orifice entre dans le brûleur avant que vous allumiez votre gril à gaz. Si la soupape n est pas à l intérieur du brûleur, un feu ou une explosion pourrait survenir. FR Guide De Dépannage Problème Causes possibles Solutions Faible chaleur/petite flamme lorsque le bouton de contrôle est à «high». Pour le propane - procédure d allumage incorrecte. Pour le gaz naturel - tuyau d alimentation trop petit. Pour les deux sortes de gaz - mauvais préchauffage. Assurez-vous que la procédure d allumage est suivie à la lettre. Tous les boutons de contrôle du gril doivent être fermés lorsque vous ouvrez la soupape de la bonbonne. Tournez la soupape de la bonbonne lentement pour assurer l équilibre de la pression. Voir les instructions d allumage. La grosseur du tuyau doit être conforme au code d installation. Préchauffez le gril en allumant les brûleurs de cuve à «high» pendant 5 à 10 minutes. Poussées de flamme excessives/ chaleur inégale. Les flammes produites par les brûleurs sont jaunes et vous détectez une odeur de gaz. Le régulateur murmure lorsque l appareil fonctionne. Les brûleurs ne s allument pas les uns aux autres. Mauvais préchauffage. Accumulation excessive de graisse et de cendres sur les plaques de brûleur et dans le tiroir d égouttement. Possibilité de toiles d araignées ou autres débris, ou d un mauvais ajustement des volets d air. Problème normal par temps chaud. Les orifices sont bouchés à l arrière du brûleur. Préchauffez le gril en allumant les brûleurs de cuve à «high» pendant 5 à 10 minutes. Nettoyez les plaques de brûleur et le tiroir d égouttement régulièrement. Ne tapissez pas le tiroir d égouttement avec du papier d aluminium ou tout autre matériau. Consultez les instructions de nettoyage. Retirez le brûleur et nettoyez-le complètement. Consultez les instructions d entretien. Ceci n est pas un défaut. Le murmure est causé par une vibration à l intérieur du régulateur et n affecte en rien la performance et la sécurité du gril à gaz. Les régulateurs émettant un murmure ne seront pas remplacés. Nettoyez les orifices du brûleur. Consultez les instructions d entretien. La peinture semble peler à l intérieur du couvercle ou de la hotte. Accumulation de graisse sur les surfaces internes. Ceci n est pas un défaut. Le fini du couvercle et de la hotte est en acier inoxydable et ne pèlera pas. Le pelage est causé par la graisse qui durcit et sèche comme des éclats de peinture qui pèlent. Un nettoyage régulier préviendra ce problème. Consultez les instructions de nettoyage.
23 GARDEZ VOTRE REÇU COMME PREUVE D ACHAT POUR VALIDER VOTRE Commande De Pièces De Rechange Information Sur La Garantie 23 FR MODÈLE: DATE D ACHAT: NUMÉRO DE SÉRIE: (Inscrivez l information ici pour y avoir accès facilement.) Avant de contacter le département du service aux consommateurs, consultez le site Web de NAC pour obtenir plus d instructions sur le nettoyage, l entretien, le dépannage et le remplacement des pièces à com. Contactez le fabricant directement pour obtenir des pièces de rechange et faire des réclamations au titre de la garantie. Le département du service aux consommateurs est à votre disposition entre 9 h et 17 h (heure normale de l Est) au ou par télécopieur au Pour qu une réclamation soit traitée, l information suivante est nécessaire : 1. Modèle et numéro de série de l appareil. 2. Numéro de la pièce et description. 3. Description concise du problème («brisé» n est pas suffisant). 4. Preuve d achat (copie de la facture). Dans certains cas, le département du service aux consommateurs peut demander de retourner la pièce pour des fins d inspection avant de fournir une pièce de rechange. Les pièces doivent être expédiées port payé à l attention du département du service aux consommateurs avec l information suivante : 1. Modèle et numéro de série de l appareil. 2. Description concise du problème («brisé» n est pas suffisant). 3. Preuve d achat (copie de la facture). 4. Numéro d autorisation de retour - fourni par le représentant du département du service aux con sommateurs. Avant de contacter le service aux consommateurs, veuillez prendre note que les items suivants ne sont pas couverts par la garantie : coûts de transport, de courtage et frais d exportation; coûts de main-d oeuvre pour l enlèvement et l installation de la pièce; coûts des appels de service pour diagnostiquer le problème; décoloration des pièces en acier inoxydable; bris des pièces causé par un manque d entretien et de nettoyage, ou par l utilisation de nettoyants inappropriés (nettoyant à fourneau).
24 24 ATTENTION! Lors du déballage et de l assemblage, nous vous conseillons de porter des gants de travail et des lunettes de sécurité pour votre protection. Malgré tous nos efforts pour assurer que l assemblage soit aussi sécuritaire et sans problème que possible, il se peut que les bords et les coins des pièces usinées en acier soient coupants et qu ils causent des coupures si les pièces ne sont pas manipulées correctement. Pour Commencer 1. Retirez tous les panneaux, le matériel et le gril du carton d emballage. Soulevez le couvercle et enlevez les composants qui se trouvent à l intérieur. Servez-vous de la liste de pièces pour vous assurer que toutes les pièces nécessaires sont incluses. 2. Ne détruisez pas l emballage jusqu à ce que le gril ait été complètement assemblé et qu il fonctionne à votre satisfaction. 3. Assemblez le gril là où il sera utilisé et posez un carton ou une serviette afin d éviter de perdre ou d endommager les pièces lors de l assemblage. 4. La plupart des pièces en acier inoxydable possèdent un revêtement de plastique protecteur qui doit être enlevé avant d utiliser le gril. 5. Suivez toutes les instructions dans l ordre donné dans ce manuel. Deux personnes sont requises pour soulever la cuve de gril et la placer sur le chariot assemblé. Si vous avez des questions à propos de l assemblage ou du fonctionnement du gril, ou si des pièces sont manquantes ou endommagées, veuillez appeler notre département du Service aux Consommateurs au entre 9 h et 17 h (heure normale de l Est). FR OUTILS REQUIS POUR L ASSEMBLAGE (outils non inclus) Tournevis ou clé, cliquet de Tournevis phillips Pinces Marteau 3/8 and 5/8

25 Dieser Gasgrill darf nur an einem gut belüfteten Ort im Freien benutzt werden, nicht jedoch in einem Gebäude, einer Garage oder einem anderen geschlossenen Bereich. APPLY SERIAL NUMBER LABEL FROM CARTON Serial No. XXXXXX MODEL NO. DE 410, 410SB GEFAHR WENN ES NACH GAS RIECHT: Gaszufuhr zum Gerät absperren. Flammen löschen. Haube öffnen. Wenn es weiterhin nach Gas riechen sollte, dem Gerät fernbleiben und unverzüglich den Gaslieferanten oder die Feuerwehr benachrichtigen. ACHTUNG Vor dem Zünden dieses Geräts bitte unbedingt den Abschnitt ZÜNDANLEITUNG lesen. In der Nähe dieses oder anderer Geräte dürfen weder Benzin noch andere brennbaren Flüssigkeiten oder Gase gelagert werden. Dies gilt auch für nicht angeschlossene Gasflaschen. Ein Nichtbefolgen dieser Anleitung kann durch Brände oder Explosionen zu Sachschäden und Körperverletzungen, auch zu tödlichen, führen. Bitte Bewahren Sie Diese Anleitung Auf Napoleon Group of Companies 214 Bayview Dr., Barrie, Ontario, Canada L4N 4Y8 Phone: Fax: (705) Customer Solutions: or
26 DE 26 VIELEN DANK, DASS SIE SICH FÜR NAPOLEON ENTSCHIEDEN HABEN! NAPOLEON-Produkte werden ausschließlich mit Komponenten und Materialien von höchster Qualität hergestellt, die von unseren geschulten und qualitätsorientierten Technikern montiert werden. Die Brenner und Ventile werden vor Auslieferung auf Dichtigkeit getestet und einem Zündtest unterzogen. Dieser Grill wurde vor Verpackung und Auslieferung gründlich von unserem geschulten Personal geprüft, um sicherzustellen, dass unsere Kunden die hohe Qualität erhalten, die sie von allen Napoleon-Produkten erwarten können. Das höchste Ziel aller Napoleon-Mitarbeiter ist höchste Kundenzufriedenheit und wir möchten Ihnen die notwendigen Werkzeuge zur Verfügung zu stellen, um ein unvergessliches Grillerlebnis zu erzielen. In diesem Handbuch finden Sie die nötigen Anweisungen für die sichere und ordnungsgemäße Montage, Installation, Wartung und Pflege Ihres Grills. Lesen Sie diese Bedienungsanleitung vollständig durch und machen Sie sich mit allen Sicherheitshinweisen und den Gerätefunktionen vertraut, bevor Sie Ihren neuen Grill in Betrieb nehmen. Bei genauer Befolgung aller Anweisungen in dieser Bedienungsanleitung werden Sie Ihren Grill über viele Jahre genießen können. Falls Sie aus irgendeinem Grund nicht mit unserem Produkt zufrieden sein sollten, wenden Sie sich bitte an unseren Kundendienst unter der Telefonnummer zwischen 9 Uhr und Uhr Eastern Standard Time oder besuchen Sie unsere Website. President s Limited Lifetime Warranty der Napoleon-Gasgrills Die Firma NAPOLEON garantiert, dass ab Kaufdatum an den Komponenten Ihres neuen NAPOLEON-Produkts weder Material- noch Verarbeitungsmängel für die folgende Dauer auftreten: Alugussteile / Edelstahlrahmen Lebenszeit Edelstahl Deckel Lebenszeit Porzellan- lierter Deckel Lebenszeit Edelstahl-Grillroste Lebenszeit Edelstahl-Rohrbrenner 10 Jahre plus5 Edelstahl-Flammenschutzeinsätze 5 Jahre plus5 Grillroste aus porzellanbeschichtetem Gusseisen 5 Jahre plus5 Edelstahl-Infrarotbrenner für Drehspieß 5 Jahre Keramik-Infrarotbrenner für Drehspieß (ausgenommen Gitter) 3 Jahre Unterer Keramik-Infrarotbrenner oder Keramik-Infrarot-Seitenbrenner (ausgenommen Gitter) 2 Jahre Sonstige Teile 2 Jahre plus5 bedeutet eine erweiterte Garantiefrist, wonach das Ersatzteil dem Käufer für zusätzliche 5 Jahre zu 50% des aktuellen Einzelhandelspreises zur Verfügung gestellt wird. Bedingungen und Beschränkungen NAPOLEON garantiert ausschließlich gegenüber dem Erstkäufer und unter der Voraussetzung, dass der Kauf über einen offiziellen NAPOLEON-Vertragshändler erfolgt ist, eine Mängelfreiheit seiner Produkte. Dabei gelten die folgenden Bedingungen und Beschränkungen: Die vorliegende Herstellergarantie ist nicht übertragbar und kann auf keinen Fall von einem unserer Vertreter verlängert werden. Der Gasgrill muss von einem lizenzierten, autorisierten Servicetechniker oder Vertragspartner installiert werden. Die Installation muss gemäß den mitgelieferten Installationsanweisungen sowie sämtlichen regionalen und nationalen Bau- und Brandschutzvorschriften erfolgen. Diese beschränkte Garantie umfasst keine Schäden, die durch unsachgemäße Bedienung, mangelhafte Wartung, Fettbrand, Umwelteinflüsse, Unfälle, Modifikationen, missbräuchliche Verwendung oder Nachlässigkeit verursacht werden. Im Falle der Installation von Ersatzteilen anderer Hersteller erlischt die vorliegende Garantie. Verfärbungen von Plastikteilen durch den Einsatz von chemischen Reinigungsmitteln oder die Einwirkung von Sonnenlicht sind in dieser Garantie nicht abgedeckt. Von dieser Garantie sind ferner ausgenommen: Kratzer, Dellen, Lackschäden, Beschichtungen, Korrosion oder Verfärbungen durch Hitzeeinwirkung oder scheuernde und chemische Reinigungsmittel sowie Absplitterungen auf porzellanbeschichteten Teilen und Komponenten, die bei der Installation des Gasgrills verwendet werden. Sollte sich der Zustand eines Teils innerhalb der Garantiefrist so sehr verschlechtern (Durchrosten oder Durchbrennen), dass es nicht mehr funktionstüchtig ist, wird dem Kunden ein Ersatzteil zur Verfügung gestellt. Nach dem ersten Jahr ist NAPOLEON gemäß der vorliegenden President s Limited Lifetime Warranty befugt, sich nach eigenem Ermessen von sämtlichen Garantieverpflichtungen zu entbinden, indem sie dem Erstkäufer den Großhandelspreis eines mangelhaften Garantieteils rückerstattet. NAPOLEON übernimmt keine Verantwortung für Installations-, Arbeits- oder andere Kosten bzw. Ausgaben, die im Zusammenhang mit der Neuinstallation eines Garantieteils entstehen. Diese Kosten sind von der vorliegenden Garantie ausgenommen. Ungeachtet der in dieser der President s Limited Lifetime Warranty enthaltenen Bestimmungen entspricht die Haftung von NAPOLEON gemäß dieser Garantie dem oben Dargelegten und erstreckt sich in keinem Fall auf etwaige Neben-, Folge- oder indirekte Schäden. Die vorliegende Garantie definiert die Verpflichtung und Haftung von NAPOLEON im Hinblick auf den NAPOLEON-Gasgrill. Sonstige ausdrückliche oder implizierte Gewährleistungen hinsichtlich dieses Produkts, seiner Komponenten oder Zubehörteile sind ausgeschlossen. NAPOLEON übernimmt im Zusammenhang mit dem Verkauf dieses Produkts keine weiteren Haftungen und befugt auch Dritte nicht dazu, in ihrem Namen weitere Haftungen zu übernehmen. NAPOLEON übernimmt keine Verantwortung für: Überhitzung, Ausblasen durch Umwelteinflüsse wie starke Winde oder inadäquate Belüftung. Etwaige Schäden am Gasgrill durch Wettereinflüsse, Hagel, grobe Behandlung, aggressive Chemikalien oder Reinigungsmittel liegen nicht in der Verantwortung von NAPOLEON. Im Falle eines Garantieanspruchs ist der Kaufbeleg oder eine Kopie davon unter Angabe der Serien- und Modellnummer vorzulegen. NAPOLEON behält sich das Recht vor, vor Erfüllung der Garantiepflicht das Produkt oder ein Teil davon von einem ihrer Vertreter begutachten zu lassen. NAPOLEON übernimmt keine Transport- und Arbeitskosten oder Ausfuhrzölle.
27 27 ACHTUNG! Ein Nichtbefolgen dieser Anleitung kann durch Brände oder Explosionen zu Sachschäden und Körperverletzungen, auch zu tödlichen, führen. Vorsichtsmassnahmen Bei der Montage dieses Gasgrills müssen die Anweisungen im Handbuch genau befolgt werden. Falls der Grill vollständig montiert aufbewahrt wurde, müssen die Montageanweisungen erneut überprüft und die erforderlichen Prüfungen auf Gaslecks durchgeführt werden, bevor der Grill in Betrieb genommen wird. Vor dem ersten Gebrauch des Grasgrills die gesamte Anleitung lesen. Auf keinen Fall darf dieser Gasgrill modifiziert werden. Grill stets genau nach Anleitung zünden. Wenn der Gasgrill nicht benutzt wird, muss die Gaszufuhr an der Gasflasche oder die Erdgaszuleitung abgesperrt werden. Kinder und Haustiere vom heißen Grill fernhalten, Kinder NICHT in den Unterschrank klettern lassen. Kinder vom Grill fernhalten oder beaufsichtigen - dieses Gerät ist kein Spielzeug! Dieses Gerät ist für den Gebrauch durch Personen (einschließlich Kindern) mit eingeschränkten physischen, sensorischen oder psychischen Fähigkeiten bzw. ohne jegliche Erfahrung oder Vorwissen nur dann geeignet, wenn eine angemessene Aufsicht oder ausführliche Anleitung zur Benutzung des Geräts durch eine verantwortliche Person sichergestellt ist. Den Grill niemals unbeaufsichtigt lassen, wenn er in Betrieb ist. Den Grill nicht bewegen, solange er heiß oder in Betrieb ist. Dieser Grill ist nur für den Privatgebrauch bestimmt. Dieser Gasgrill ist nicht zum Einbau in Wohnwagen/Wohnmobilen und/oder Booten vorgesehen. Diesen Gasgrill nur im Freien an einer gut belüfteten Stelle lagern. Niemals in einem Gebäude, einer Garage odereinem geschlossenen Bereich/Raum benutzen. Ausreichenden Abstand zu brennbaren Materialien einhalten (410 mm zur Geräterückseite, 180 mm zu den Seitenteilen). Zusätzlicher Abstand (610 mm) ist empfehlenswert, wenn das Gerät in der Nähe von Vinyl-Verkleidungen oder großen Fensterscheiben aufgestellt wird. Stellen Sie sicher, dass die Lüftungslöcher des Zylinders stets frei von Schmutz und Ablagerungen sind. Gerät niemals unter einer ungeschützten brennbaren baulichen Struktur aufstellen. Gerät nur an einem windgeschützten Ort aufstellen. Die Kochleistung des Gasgrills wird durch starke Windeinwirkungbeeinträchtigt. Falls der Gasgrill im Innenbereich gelagert wird, muss die Propangasflasche vom Grill entfernt und im Freien an einergut belüfteten Stelle aufbewahrt werden. Propangasflaschen dürfen nicht in Gebäuden, Garagen oder anderen geschlossenen Räumen gelagert werden. Vor jeder Benutzung muss der Gasschlauch untersucht werden. Wenn der Schlauch stark abgerieben oder eingeschnitten ist, muss er vor Benutzung des Gasgrills mit einem vom Hersteller empfohlenen Schlauch ersetzt werden. Ersatz-Propangasflaschen niemals unter oder in der Nähe des Grills aufbewahren. Die Gasflasche niemals mehr bis als 80 % füllen. Vor der ersten Inbetriebnahme alle Anschlüsse auf Gaslecks prüfen, auch wenn der Grill vollständig montiert geliefert wurde. Führen Sie diesen Test jährlich oder nach dem Austausch einer Gaskomponente aus. Niemals ein für den Gebrauch mit flüssigem Propangas ausgelegtes Gerät mit Erdgas betreiben. Niemals flüssige Grillanzünder zum Anzünden eines Gasgrills verwenden. Vor Öffnen der Gaszufuhr kontrollieren, dass die Brenner-Bedienelemente auf der Position OFF (Aus) stehen. Brenner Niemals bei geschlossener Grillhaube zünden. Rückseitigen Brenner nicht verwenden, wenn der Hauptbrenner in Betrieb ist. Grillhaube während der Vorwärmzeit geschlossen halten. Den Schlauch nicht unter der Auffangschale durchführen stets ausreichenden Abstand des Schlauches zum Geräteboden einhalten. Fett-Auffangbehälter und Glühplatten regelmäßig reinigen, um Fettansammlungen zu vermeiden, die zu Fettbrändenführen können. Vor dem Anzünden des hinteren Brenners den Warmhalterost entfernen. Der Warmhalterost kann durch die extreme Hitze beschädigt werden. Korrekte Position der Glühplatten kontrollieren. Folgen Sie hierzu den Installationsanweisungen für die Glühplatten. Die Seitenablagen nicht für die Aufbewahrung von Feuerzeugen, Streichhölzern oder anderen brennbaren Materialien verwenden. Gasleitung von allen Oberflächen fernhalten, die heiß werden können. Elektrische Kabel von Wasser oder heißen Oberflächen fernhalten. Venturirohrdüsen der Infrarotbrenner periodisch auf Spinnweben und Verstopfungen durch andere Objekte überprüfen. Die Rohrdüsen vollständig reinigen, um alle Verstopfungen zu entfernen. Der Außen-Gasgrill und das entsprechende Sperrventil müssen von Gaszufuhrsystem getrennt werden, wenn das Gassystem aus Gasdrücke von über 0,5 psi (3,5 kpa) geprüft wird. Der Gasgrill für den Gebrauch im Freien und das entsprechende Sperrventil müssen vom Gaszufuhr und den Verbindungsrohren getrennt werden, wenn das Gassystem aus Gasdrücke von über 0,5 psi (3,5 kpa) geprüft wird. DE
28 DE 28 Entsorgung von Altgeräten aus privaten Haushalten in der EU Dieses Symbol auf dem Produkt oder dessen Verpackung gibt an, dass das Produkt innerhalb der EU nicht zusammen mit dem Restmüll entsorgt werden darf. Die separate Sammlung und das Recyceln Ihrer alten Elektrogeräte zum Zeitpunkt ihrer Entsorgung trägt zum Schutz der Umwelt bei und gewährleistet, dass sie auf eine Art und Weise recycelt werden, die keine Gefährdung für die Gesundheit des Menschen und der Umwelt darstellt. Es obliegt daher Ihrer Verantwortung, das Gerät an einer entsprechenden Rücknahmestelle für die Entsorgung oder Wiederverwertung von Elektro- oder Elektronik-Altgeräten aller Art abzugeben oder wenden Sie sich an den Händler, von dem das Produkt erworben wurde. Gemäß den lokalen Bestimmungen gewährleisten diese Stellen, dass das Gerät auf eine Art und Weise recycelt wird, die keine Gefährdung für die Umwelt darstellt. Gasflaschen Es dürfen nur Gasflaschen benutzt werden, die die einschlägigen gesetzlichen Bestimmungen erfüllen. Die Mindestflaschengröße bei Butan ist 13 kg, bei Propan 6 kg. Die Flasche muss eine für den Betrieb ausreichende Gasmenge liefern können. Im Zweifelsfall wird der Gaslieferant mit Informationen helfen. Das Ventil der Gasflasche ist vorsichtig zu behandeln. Eine Flasche, die die gesetzlichen Bestimmungen nicht erfüllt, darf nicht angeschlossen werden. Eine fassende Flasche muss außerhalb der Einfassung (unter der rechten Seitenablage) auf ebenem Boden stehen. Nur angeschlossene Gasflaschen dürfen in der Einfassung oder nahe am Gerät stehen. Reserveflaschen dürfen nicht in der Nähe eines betriebenen Geräts gelagert werden. Gasflaschen dürfen weder großer Hitze noch dem direkten Sonnenlicht ausgesetzt werden. ACHTUNG! Der Schlauch muss den vorgeschriebenen Abstand zum Boden des Geräts haben. Wenn der Schlauch heiße Flächen berührt, kann er schmelzen und undicht werden und einen Brand verursachen. FLASCHENANSCHLUSS: Es ist sicherzustellen, dass der Gasreglerschlauch knickfrei ist. Kappe oder Stöpsel vom Flaschenventil entfernen. Regler an das Flaschenventil anschließen. Vor der Benutzung des Grills alle Verbindungen auf Leckagen überprüfen. Ein Leckagetest muss jährlich, nach jedem Anschließen einer Flasche und nach Auswechseln eines Gasbauteils durchgeführt werden.. ACHTUNG! Schlauch nicht unterhalb der Auffangschale verlegen. Schlauch nicht im Zwischenraum zwischen dem unteren Regal und der hinteren Abdeckung verlegen. Schlauch nicht über die Oberseite der hinteren Abdeckung verlegen. Alle Schlauchanschlüsse mit zwei Rohrschlüsseln fest anziehen. Kein Teflon-Abdichtungsband oder Dichtungskitt für die Rohrverbindungen verwenden. Den Schlauch von heißen Oberflächen fernhalten. Schmelzen des Schlauchs kann zu Bränden führen. Ersatzschläuche nicht im Unterschrank des Grills aufbewahren, da hier größere Gefahr besteht, dass der Schlauch mit einer heißen Oberfläche in Kontakt kommen, schmelzen und zu einem Gasleck und Bränden führen kann. Alle Verbindungen mit Seifenlauge auf Gaslecks überprüfen. Folgen Sie den Anweisungen für die Suche nach Gaslecks in diesem Handbuch. Gasschlauch Gehören Schlauch und Regler nicht zum Lieferumfang, dürfen nur solche Schläuche und Regler verwendet werden, die die einschlägigen gesetzlichen Bestimmungen erfüllen. Gerät nicht an eine permanente Gasversorgung anschließen. Der Schlauch darf nicht mit Fett oder sonstigen heißen Flüssigkeiten oder Bauteilen des Geräts in Berührung kommen. Schlauch regelmäßig überprüfen. Ein Schlauch, der Risse oder Schmelzstellen aufweist oder abgenutzt ist, muss vor der nächsten Benutzung des Geräts ersetzt werden. Es wird eine Schlauchlänge von 0,5 m empfohlen. Der Schlauch darf nicht länger als 1,5 m sein. Beim Anschließen ist darauf zu achten, dass der Schlauch knickfrei und nicht verdreht ist. Der Schlauch ist vor dem aufgedruckten Ablaufdatum auszuwechseln.

29 Regler In der folgenden Tabelle sind die Anschlusswerte des Geräts aufgeführt. Brenner Düsengrösse (Grob)Leistung Gasverbrauch (Insgesamt) (Insgesamt) Haupt Seite 1.07mm (#58) 0.82mm 12.0 kw 2.4 kw 870 g/hr 174 g/hr Zugelassene Gase / Druck - Die Werte Ihres Geräts stehen auf dem Typenschild. 29 Gaskategorie I 3B/P(30) I 3+(28-30/37) I 3B/P(37) I 3B/P(50) Gasdruck Butan 30mbar Butan 28-30mbar Butan 37mbar Butan 50mbar Propane 30mbar Propane 37mbar Propane 37mbar Propane 50mbar Länder BE, BG, CY, DK, EE, FI, FR, GB, HR, HU, IS, IT, LT, LU, MT, NL, NO, RO, SE, SI, SK, TR BE, CH, CY, CZ, ES, FR, GB, GR, IE, IT, LT, LU, LV, PT, SK, SI PL AT, CH, DE, SK Nehmen Sie keinerlei Änderungen am Druckregler vor. Nur Druckregler verwenden, die den in der vorstehenden Tabelle angegebenen Druck bereitstellen. Für Butangas nur mbar-druckregler verwenden oder für Propangas 37 mbar-druckregler. Der Grill ist mit einem internen Druckregler ausgestattet. Der interne Druckregler hat einen Auslassdruck von 24,5 mbar für Propan-/Butangas und erfordert keine Modifizierung oder Anpassung. Ersetzen Sie den Druckregler nur mit vom Hersteller vorgegebenen modellen. DE Diese Einheit ist mit einem internen Druckregler ausgestattet, der den Gasdruck stabilisiert und die Grillleistung verbessert. Dieser Druckregler ist nicht anpassbar. An der Seite des Druckreglers befindet sich ein Druckhahn. Dieser kann von einem entsprechend ausgebildeten Kundendiensttechniker dazu verwendet werden, die Funktion des Druckreglers zu überprüfen. Die Schraube mit dem Druckhahn muss stets fest angezogen sein, außer bei der Durchführung eines Drucktests am Druckregler (nur durch entsprechend geschulten Servicetechniker). Anleitung Für Die Leckageprüfung ACHTUNG! Ein Leckagetest muss vor der ersten Benutzung, jährlich und nach Auswechseln oder Warten eines Gasbauteils durchgeführt werden. ACHTUNG! Während der Prüfung ist Rauchen verboten. Alle Zündquellen sind zu entfernen. Leckageprüfung: Ein Leckagetest muss vor der ersten Benutzung, jährlich und nach Auswechseln oder Warten eines Gasbauteils durchgeführt werden. Während der Prüfung ist Rauchen verboten. Alle Zündquellen sind zu entfernen. Die zu prüfenden Stellen sind auf der Leckageprüfzeichnung aufgeführt. Alle Brenner abstellen. Flaschenventil aufdrehen. Seifenwasser (halb Wasser, halb Flüssigseife) auf alle Anschlüsse und Verbindungen an Regler, Schlauch, Verteiler und Ventile auftragen. Leckagen werden durch Blasenbildung angezeigt. Leckage durch Festdrehen des Anschlusses oder Austausch des Teils durch ein vom Händler empfohlenes Teil beseitigen. Bleibt die Leckage bestehen, Flaschenventil zudrehen, Regler abnehmen und Grill vom Gaslieferanten oder Händler untersuchen lassen. Das Gerät darf erst wieder benutzt werden, wenn die Leckage behoben ist. Gaszufuhr abstellen.
 gestellt sind, und öffnen Sie das Gasventil an der Gasquelle.")
30 30 Zündanleitung Seiten Brenner DE Linker Brenner Mittlerer Brenner Rechter Brenner ACHTUNG! Ausschaltstellung Haube öffnen. ACHTUNG! Stellen Sie sicher, dass alle Brenner- Bedienelemente auf OFF (Aus) gestellt sind, und öffnen Sie das Gasventil an der Gasquelle. Anzünden des Hauptbrenners Anzünden des rückseitigen Brenners (Rotisseriebrenner) (Falls vorhanden) Anzünden der Seitenbrenner (Falls vorhanden) 1. Haube öffnen. 1. Haube öffnen. 1. Haube des Seitenbrenners öffnen. 2. Beliebiges Hauptbrenner- Bedienelement drücken und langsam auf Stufe HI (Hohe Flamme) drehen. Hierdurch wird die Pilotflamme gezündet, welche wiederum den ausgewählten Brenner entzündet. Nach Zünden der Pilot flamme das Bedienelement weiterhin gedrückt halten, bis der Brenner entzündet ist. Lassen Sie das Bedienelement los, wenn das Gas brennt. 2. Warmhalterost abnehmen. 2. Seitenbrenner- Bedienelement drücken und langsam auf Stufe HI (Hohe Flamme) drehen. Hierdurch wird der Seitenbrenner gezündet 3. Wenn der Pilot nicht zündet, das Bedienelement SOFORT wieder auf OFF (Aus) stellen und Schritt 2 mehrmals wiederholen. 4. Falls Pilot und Brenner nicht innerhalb von 5 SEKUNDEN zünden, das Bedienelement auf OFF stellen und 5 Minuten warten, damit sich unverbranntes Gas verflüchtigen kann. Danach die Schritte 2 und 3 wiederholen oder den Brenner mit einem Streichholz entzünden. 5. Falls der Grill mit einem Streichholz angezündet wird, klemmen Sie das Streichholz in den mitgelieferten Streichholzhalter ein. Das brennende Streichholz nach unten halten, durch den Grill und die Glühplatte führen und dabei das entsprechende Brennerventil auf hohe Flamme drehen. 3. Rotisseriebrenner-Bedienelement drücken und langsam auf Stufe HI (Hohe Flamme) drehen. Hierdurch wird die Pilotflamme gezündet, welche wiederum den Brenner entzündet. Nach Zünden der Pilotflamme das Bedienelement weiterhin gedrückt halten, bis der Brenner entzündet ist. Lassen Sie das Bedienelement los, wenn das Gas brennt. 4. Wenn der Brenner nicht zündet, das Bedienelement SOFORT wieder auf OFF (Aus) stellen und Schritt 3 mehrmals wiederholen. 5. Falls der Brenner nicht innerhalb von 5 SEKUNDEN zündet, das Bedienelement auf OFF stellen und 5 Minuten warten, damit sich unverbranntes Gas verflüchtigen kann. Danach die Schritte 3 und 4 wiederholen oder den Brenner mit einem Streichholz entzünden. 3. Wenn der Brenner nicht zündet, das Bedienelement SOFORT wieder auf OFF (Aus) stellen und Schritt 2 mehrmals wiederholen. 4. Falls der Brenner nicht innerhalb von 5 SEKUNDEN zündet, das Bedienelement auf OFF stellen und 5 Minuten warten, damit sich unverbranntes Gas verflüchtigen kann. Danach die Schritte 2 und 3 wiederholen oder den Brenner mit einem Streichholz entzünden.
31 : Betrieb Des Grillgeräts Beim allerersten Erhitzen gibt der Gasgrill einen leichten Geruch ab. Der Geruch wird durch das Einbrennen der Innenlacke und Verdunsten der Schmiermittel aus der Fertigung verursacht, ist ganz normal und tritt später nicht mehr auf. Vor der ersten Benutzung sollten Sie darum die Hauptbrenner etwa eine halbe Stunde mit größter Hitze brennen lassen. Vor dem Grillen von magerem Fleisch wie Hähnchenbrust oder mageres Schweinefleisch ist es am besten, die Roste vor dem Vorwärmen zu ölen, damit das Fleisch nicht anklebt. Beim Grillen von sehr fettem Fleisch kann es zum Aufflammen kommen. Um Aufflammen zu verhindern, können Sie Fett abschneiden oder mit niedrigerer Temperatur grillen. Wenn es zum Aufflammen kommt, legen Sie das Fleisch von der Flamme weg zur Seite und stellen die Temperatur herunter. Lassen Sie die Haube offen. Eine detaillierte Anleitung finden Sie in Napoleons Grill-Kochbuch. Grillen Mit Den Hauptbrennern: Vor dem Anbraten von Grillgut wird 10 Minuten Vorwärmen empfohlen. Dafür werden alle Hauptbrenner auf die höchste Stufe gestellt und die Haube geschlossen. Kurz zu grillende Nahrungsmittel wie Fisch und Gemüse können bei offener Haube gegrillt werden. Beim Grillen bei geschlossener Haube ist die Temperatur gleichmäßiger und höher, sodass die Grillzeit kürzer ist und das Fleisch gleichmäßiger gegrillt wird. Benötigt ein Grillgut länger als 30 Minuten, wie z. B. ein Braten, so kann es indirekt gekocht werden (Braten neben den gezündeten Brenner stellen). Vor dem Grillen von magerem Fleisch wie Hähnchenbrust oder mageres Schweinefleisch ist es am besten, die Roste vor dem Vorwärmen zu ölen, damit das Fleisch nicht anklebt. Beim Grillen von sehr fettem Fleisch kann es zum Aufflammen kommen. Um Aufflammen zu verhindern, können Sie Fett abschneiden oder mit niedrigerer Temperatur grillen. Wenn es zum Aufflammen kommt, legen Sie das Fleisch von der Flamme weg zur Seite und stellen die Temperatur herunter. Lassen Sie die Haube offen. Eine detaillierte Anleitung finden Sie in Napoleons Grill-Kochbuch. Direktes Garen: Grillgut direkt über der Wärmequelle auf den Grill legen. Diese Methode wird üblicherweise zum Braten von Speisen verwendet, die keine langen Kochzeiten erfordern - Hamburger, Steaks, Geflügelstücke, Gemüse usw. Das Grillgut wird zunächst scharf angebraten, um Säfte und Aromen im Grillgut einzusiegeln. Anschließend wird die Temperatur verringert, um das Gericht punktgenau fertig zu garen. Indirektes Garen: Hierbei kann nur einer oder auch mehrere Brenner verwendet werden. Grillgut über einem nicht gezündeten Brenner auf den Grill legen. Die Wärme zirkuliert um das Grillgut und sorgt so für langsames und gleichmäßiges Garen. Diese Kochmethode ist vergleichbar mit dem Garen im Backofen und wird üblicherweise für größere Fleischstücke wie Braten, ganze Hähnchen oder Pute verwendet. Sie eignet sich aber auch für die Zubereitung von Grillgut, das leicht zum Aufflammen führen kann. Aufgrund der niedrigeren Temperaturen und längeren Kochzeiten ist dies die zuverlässigste Garmethode zum Grillen zarter und saftiger Fleischstücke.. Verwendung Des Rückseitigen Brenners: (Falls vorhanden) Warmhalterost vor dem Betrieb entfernen. Grillroste sollten ebenfalls entfernt werden, falls sie die Verwendung des Drehspießes behindern. Der rückseitige Brenner ist für den Einsatz mit dem Drehspieß-Set konzipiert, dass über Ihren Napoleon-Händler bezogen werden kann. Siehe Anweisungen für die Montage des Drehspieß-Sets. Zur Verwendung des Gegengewichts den Drehspießmotor vom Gasgrill entfernen. Den Spieß mit dem Grillgut in die beiden Einhängevorrichtungen an der Innenseite des Grills einlegen. Das Fleischstück wird naturgemäß mit der schwereren Seite nach unten hängen. Arm und Gewicht des Gegengewichts anziehen, bis der Arm nach oben zeigt. Das Gegengewicht nach innen oder außen verschieben, bis das Gewicht auf dem Spieß gleichmäßig verteilt ist und dann festdrehen. Den Motor wieder aufsetzen und mit dem Grillen beginnen. Einen Auffangbehälter unter dem Grillgut platzieren. Der aufgefangene Bratensaft kann zum Bepinseln des Fleisches oder zur Herstellung einer köstlichen Soße verwendet werden. Falls nötig, zusätzliche Flüssigkeit zum Übergießen oder Bepinseln zufügen. Rückseitigen Brenner zunächst auf hoher Flamme betreiben, bis das Fleisch angebräunt ist und dann die Flamme reduzieren, um das Fleisch fertig zu garen. Auf diese Art wird das Grillgut versiegelt und das Fleisch bleibt zart und saftig. Die Grillhaube stets geschlossen halten, um ein optimales Kochergebnis zu erzielen. Braten und Geflügel erhalten eine knusprigbraune Kruste und das Fleisch bleibt zart und saftig. Beispielsweise benötigt ein Brathuhn mit einem Gewicht von 1,5 kg mit dem Drehspieß ca. 1½ Stunden (bei mittlerer bis hoher Flamme). Weitere Anweisungen finden Sie im Napoleon-Grillkochbuch mit exklusiven Rezepten für alle Gelegenheiten. 31 DE VORSICHT! Barbecuesoße und Salz kann korrosiv wirken und schnell zur Korrosion des Grills und einzelner Bauteile führen, wenn keine regelmäßige Reinigung durchgeführt wird. Verwendung der Seitenbrennerflamme: Der Seitenbrenner kann wie ein normales Gaskochfeld verwendet werden und eignet sich zur Zubereitung von Soßen, Suppen usw. Der Gasgrill sollte so positioniert werden, dass der Seitenbrenner möglichst windgeschützt ist, da starke Winde die Leistung des Seitenbrenners beeinträchtigen können. Seitenbrenner NICHT zum Frittieren verwenden, da das Kochen mit Öl zu gefährlichen Bedingungen führen kann. Der empfohlene Durchmesser für Pfannen und Töpfe ist 60 bis 220 mm. ACHTUNG! Niemals Speisen direkt auf den Seitenbrennerring auflegen und grillen. Er ist nur zur Verwendung mit Töpfen und Pfannen vorgesehen.
32 32 ACHTUNG! Seitenbrenner nicht schließen, solange der Grill in Betrieb oder noch heiß ist. ACHTUNG! Seitenbrenner NICHT zum Frittieren verwenden, da das Kochen mit Öl zu gefährlichen Bedingungen führen kann. Wartung, Pflege Und Reinigung Der Gasgrill sollte jährlich von einem zugelassenen Wartungsdienst überprüft und gewartet werden. Brennbare Materialien, Benzin und andere brennbare Dämpfe und Flüssigkeiten müssen entfernt vom Gasgrill gelagert werden. Luftwege zur Belüftung und zum Brenner nicht blockieren. Lüftungslöcher des Gasflaschenschranks (an den Grillwagenseiten und der Vorder- und Rückseite des unteren Regalbodens) stets frei von Schmutz und Ablagerungen halten. DE VORSICHT! Beim reinigungsanleitung sollten Arbeitshandschuhe und eine Schutzbrille getragen werden. VORSICHT! Zum Reinigen müssen die Brenner ausgeschaltet sein. Heiße Flächen nicht ungeschützt berühren. Grill an einen Ort stellen, wo das Reinigungsmittel keinen Schaden anrichten kann (nicht auf die Terrasse oder den Rasen). Kein Teil dieses Gasgrills darf mit Ofenreiniger gesäubert werden. Grillroste oder andere Teile des Gasgrills nicht in einem selbstreinigenden Ofen säubern. Gasgrill regelmäßig reinigen, da Barbecue-Sauce und Salz das Metall angreifen. Hinweis: In chlorid- und sulfidhaltigen Umgebungen kann auch rostfreier Stahl oxidieren oder Flecken aufweisen. Dazu gehören insbesondere Küstenregionen und andere extreme Bedingungen, z. B. die nähere Umgebung von Pools und Whirlpools, die von hoher Wärme und Luftfeuchtigkeit gekennzeichnet ist. Diese Flecken werden manchmal mit Rost verwechselt, aber sie können einfach entfernt und vermieden werden. Reiben Sie alle rostfreien Stahlflächen alle 3 bis 4 Wochen mit Leitungswasser und einem Reinigungsmittel für rostfreien Stahl ab, um die Entstehung von Flecken zu verhindern. VORSICHT! Gaszufuhr vor den Wartungsarbeiten abstellen und Gerät von der Gaszufuhr trennen. Grill vor dem Warten abkühlen lassen, damit es nicht zu Verbrennungen kommt. Jährlich und nach Auswechseln eines Gasbauteils eine Leckageprüfung durchführen. Grill- und Warmhalteroste: Grillroste und Warmhalterost sind am leichtesten während der Vorwärmphase zu reinigen. Verwenden Sie eine Grillbürste mit Messingborsten. Zur Entfernung von hartnäckigen Flecken kann Stahlwolle verwendet werden. Aufgrund der hohen Temperaturen auf der Kochfläche kommt es bei regelmäßigem, normalem Gebrauch zu einer dauerhaften Verfärbung der Edelstahlroste (falls vorhanden). Grillroste aus Gusseisen: Die Grillroste aus Gusseisen, mit denen Ihr neuer Grill standardmäßig ausgeliefert wird, gewährleisten überdurchschnittliche Speicherung und Verteilung von Wärme. Durch regelmäßige Pflege der Grillroste mit Öl bildet sich eine Schutzschicht, die den Grillrost besser vor Korrosion schützt und auch dessen Antihaft-Eigenschaften noch weiter verbessert. Vor der ersten Verwendung: Die Grillroste per Hand mit einem milden Spülmittel und Wasser reinigen, um jegliche herstellungsbedingte Rückstände zu entfernen. (Niemals in die Spülmaschine!) Sorgfältig mit heißem Wasser abspülen und mit einem weichen Tuch vollständig abtrocknen. Dies ist wichtig, um das Eindringen von Feuchtigkeit in das Gusseisen zu verhindern. Einbrennen: Verwenden Sie ein weiches Tuch, um die gesamte Fläche des Grillrostes mit Pflanzenfett einzureiben. Stellen Sie sicher, dass auch alle Aussparungen und Ecken mit einer Ölschicht bedeckt sind. Verwenden Sie keine salzhaltigen Fette, wie beispielsweise Butter oder Margarine. Heizen Sie den Grill 15 Minuten vor, und platzieren Sie dann die mit Öl eingeriebenen Grillroste auf dem Grillgerät. Schließen Sie die Grillhaube, und drehen Sie das Bedienelement auf mittlere Stufe. Lassen Sie die Grillroste für ca. eine halbe Stunde bei dieser Temperatur auf dem Grill einbrennen. Stellen Sie dann alle Brenner auf OFF (Aus), und stellen Sie die Gaszufuhr ab. Lassen Sie die Grillroste auf dem Grillgerät vollständig abkühlen. Während der Grillsaison sollte dieser Vorgang mehrere Male wiederholt werden, um die Grillroste gut einzubrennen. Es ist jedoch nicht nötig, diesen Vorgang bei jedem Gebrauch zu wiederholen (Tipps zur täglichen Pflege vor dem Grillen finden Sie untenstehend). Vor dem Grillen: Reiben Sie die Oberfläche des Grillrostes vor dem Vorwärmen und Reinigen mit einer Messing-Grillbürste vollständig mit Pflanzenfett ein. Den Grill vorwärmen und alle Grillrückstände mit der Grillbürste (Messingborsten) entfernen. Grillroste aus Edelstahl: (Upgrade-Kit zur Nachrüstung erhältlich siehe Ersatzteilliste). Grillroste aus Edelstahl sind von großer Lebensdauer und rostbeständig. Sie erfordern weniger Vorbehandlung und Pflege als Grillroste aus Gusseisen. Sie sollten die obenstehenden Hinweisen zur täglichen Pflege befolgen, obwohl es u. U. ausreichend sein kann, die Grillroste nur vorzuwärmen und mit einer Drahtbürste zu reinigen.

33 Bedienleiste: Die Bedienleistenbeschriftung wird direkt auf die Edelstahloberfläche gedruckt und bei sachgerechter Pflege bleibt der Aufdruck dunkel und lesbar. Zur Reinigung der Bedienleiste warme Seifenlauge oder Edelstahlreiniger verwenden. Edelstahlreiniger ist bei Ihrem Napoleon-Händler erhältlich. Keine scheuernden Reinigungsmittel zur Reinigung von Edelstahlflächen verwenden. Dies kann vor allem auf der Bedienleiste zum Abrieb der aufgedruckten Beschriftung führen. Das Innere Des Gasgrills: Grillroste entfernen. Gusseiserne Seiten und die Innenseite der Haube mit einer weichen Messingdrahtbürste von losem Schmutz befreien. Anbratplatten mit einem Spachtel oder Schaber abkratzen, und die Asche mit einer Drahtbürste beseitigen. Anbratplatten abnehmen, und die Brenner mit einer Messingdrahtbürste reinigen. Den Schmutz aus dem Inneren des Gasgrills in die Tropfpfanne fegen. Anbratplatten wieder einsetzen und auf richtige Positionierung achten (siehe Zusammenbauanleitung). Lampen: Führen Sie die Spitze eines Schlitzschraubendrehers zwischen Leuchte und Fassung und bewegen Sie diese leicht hin und her, um die Leuchte aus der Halterung zu entnehmen. Das Glas der Halogenlampe nicht berühren! Durch Fingerabdrücke können Öle auf der Glasfläche zurückbleiben und die Lebensdauer der Lampe beeinträchtigen. Tauchen Sie das Glas kurz in eine heiße Seifenlauge und reinigen Sie die Leuchte dann mit einem Tuch und nicht scheuerndem Reinigungsmittel. Setzen Sie die Leuchte wieder in die Fassung ein. Die Leuchte sollte einschnappen. WARNUNG! Fettansammlungen können zu Bränden führen. Tropfpfanne: zum Reinigen herausziehen. Sie sollte nach vier- bis fünfmaligem Benutzen des Grills ausgeleert werden. Das Fett läuft durch die unter dem Gasgrill befindliche Tropfpfanne und sammelt sich in einer Einweg-Fettschale unterhalb der Tropfpfanne. Eine zu große Ansammlung von Fett stellt eine Feuergefahr dar. Tropfpfanne nicht mit Alufolie oder Sand auskleiden, da das Fett am Durchfließen gehindert wird. Pfanne mit einem Spachtel oder Schaber auskratzen; Inhalt in die Einweg-Fettschale fegen. Schale je nach Häufigkeit der Benutzung alle zwei bis vier Wochen auswechseln. Ersatzschalen gibt es beim Napoleon-Händler. Reinigen Der Aussenseite Des Gasgrills: Lackierte, Porzellan- oder Rostfreistahlteile nicht mit Scheuermitteln säubern. Die Porzellan le ist besonders vorsichtig zu behandeln. Die lebeschichtung ist wie Glas und platzt beim Anschlagen leicht ab. le-Reparaturmaterial ist von Ihrem Napoleon-Händler erhältlich. Außenflächen am besten in handwarmem Zustand mit warmem Seifenwasser reinigen. Rostfreistahl mit einem entsprechenden Reinigungsmittel oder einem nicht scheuernden Reinigungsmittel säubern. Stets in Strukturrichtung wischen. Keine Stahlwolle verwenden, da sie Kratzspuren hinterlässt. Rostfreistahl verfärbt sich unter Hitze goldfarben oder braun. Diese Verfärbung ist normal und beeinträchtigt die Leistung des Grills nicht. VORSICHT! Schlauch: auf Abrieb, Schmelzstellen, Einschnitte und Risse untersuchen. Wenn einer dieser Defekte vorliegt,darf der Gasgrill nicht benutzt werden. Schlauch von Ihrem Napoleon-Händler oder einem Fachbetrieb auswechseln lassen. 33 DE Brenner: sind aus dickwandigem Rostfreistahl 304 hergestellt. Wegen der extremen Hitze und der Umwelteinflüsse treten trotzdem Korrosionen auf. Korrosion der Oberflächen mit einer Messingdrahtbürste entfernen. Verstopfte Auslässe mit einer geöffneten Heftklammer freimachen. Auslässe dabei nicht vergrößern. VORSICHT! Passen Sie Von Den Spinnen Auf Spinnen und Insekten werden von Propan- und Erdgasgeruch angelockt. Damit sie im Brenner keine Nester bauen, ist der Lufteinlass mit einem Insektengitter versperrt, womit das Problem jedoch nicht 100%ig gelöst ist. Ein Spinnennetz oder Nest verbrennt mit einer weichgelben oder orangefarbenen Flamme, oder es kommt zu einem Feuer (Flammenrückschlag) an der Luftzufuhr unter dem Bedienbrett. Damit das Innere eines Brenners gereinigt werden kann, muss er aus dem Gasgrill ausgebaut werden. Schraube in der Mitte des Brenners lösen. Brenner am hinteren Teil nach oben und herausheben. Innere des Brenners mit einer flexiblen Spezialbürste zum Reinigen von Venturirohren säubern. Den gelösten Schmutz durch den Gaseinlass aus dem Brenner schütteln. Das Insektengitter muss sauber, dicht und frei von Fusseln und sonstigem Schmutz sein. Auch die Ventildüsen müssen sauber sein. Es ist darauf zu achten, dass die Düsen beim Reinigen nicht vergrößert werden. Brenner wieder einbauen. Beim Einbau muss die Düse in den Brenner geführt werden. Brennerabdeckung aufsetzen und Befestigungsschrauben festschrauben. ACHTUNG! Bei der erneuten Installation des gereinigten Brenners unbedingt sicherstellen, dass das Ventil/die Öffnung in das Brennerrohr führt, bevor der Gasgrill angezündet wird. Wenn das Ventil sich nicht innerhalb des Brennerohrs befindet, kann es zu Brand oder Explosion kommen.
34 DE 34 Alugussteile: regelmäßig mit warmem Seifenwasser säubern. Normalerweise rostet Aluminium nicht. Durch die hohen Temperaturen und die Umwelteinflüsse kann es jedoch zu einem Oxidieren der Oberfläche kommen. Dies äußert sich als weiße Flecke auf dem Guss. Gussteile säubern und mit feinem Sandpapier abschmirgeln. Schmirgelstaub abwischen, und Gussteile mit temperaturbeständiger Grillfarbe lackieren. Benachbarte Teile abdecken, damit sie nicht mit Farbe besprüht werden. Gemäß Anweisung auf der Farbdose trocknen lassen. Fehlerbehebung Problem Mögliche Ursache Lösung Bei höchster Brennerstufe zu niedrige Hitze und Flamme. Bei Propangas die Anweisungen für das Anzünden wurden nicht befolgt. Bei Erdgas Leitung für die Gaszufuhr zu klein. Die Anweisungen für das Anzünden genau befolgen. Alle Gasgrillventile müssen sich in der Stellung OFF (Aus) befinden, wenn das Ventil für die Gaszufuhr geöffnet wird. Die Gaszufuhr langsam öffnen, um Druckausgleich zu ermöglichen. Siehe Anweisungen für das Anzünden. Rohrgröße muss den Installationsvorschriften entsprechen. Starkes Aufflammen, ungleichmäßige Hitze. Bei beiden Gasarten ungenügendes Vorheizen. Anbratplatten falsch installiert. Falsches Vorwärmen. Beide Hauptbrenner einschalten und Grill auf hoher Stufe Minuten vorheizen. Anbratplatten müssen mit den Löchern nach vorn und den Schlitzen nach unten installiert sein. Siehe Zusammenbauanleitung. Grill mit beiden Hauptbrennern auf höchster Stufe Minuten lang vorwärmen. Brennerflamme gelblich, und es riecht nach Gas. Regler gibt ein brummendes Geräusch ab. Flamme springt nicht auf andere Brenner über. Auf der Innenseite des Deckels oder der Haube scheint die Farbe abzublättern. Zu viel Fett und Asche auf den Anbratplatten und in der Tropfpfanne. Spinnenweben oder anderweitige Verschmutzung. Ist an heißen Tagen normal. Löcher auf der Brennerrückseite verstopft. Auf der Innenseite hat sich Fett abgesetzt. Anbratplatten und Tropfpfanne regelmäßig reinigen. Tropfpfanne nicht mit Alufolie auslegen. Siehe Reinigungsanleitung. Brenner herausnehmen und gründlich reinigen. Siehe allgemeine Wartungsanleitung. Dies ist kein Defekt. Es wird durch Vibrationen im Regler erzeugt und beeinträchtigt die Leistung und Sicherheit des Grills nicht. Brummende Regler werden nicht ersetzt. Gasaustrittslöcher säubern. Siehe Wartungsanleitung, Abschnitt Brenner. Dies ist kein Defekt. Die Innenseite des Deckels oder der Haube besteht aus einer Porzellanbeschichtung, die nicht abblättern kann. Was abblättert, ist hart getrocknetes Fett. Regelmäßiges Reinigen verhindert dies. Siehe Reinigungsanleitung.
35 BEWAHREN SIE IHRE QUITTING ALS KAUFNACHWEIS AUF, UM IHREN GARANTIEANSPRUCH ZU VALIDIEREN. BESTELLUNG VON ERSATZTEILEN GARANTIE-INFORMATIONEN 35 MODELL: KAUFDATUM: SERIENNUMMER: (Alle für einen Garantieanspruch benötigten Informationen hier aufzeichnen) Bevor Sie sich mit dem Kundendienst in Verbindung setzen, besuchen Sie bitte die NAC-Website unter, um ausführlichere Informationen zu Reinigung, Wartung und Pflege, Fehlerbehebung und Ersatzteile zu erhalten. Setzen Sie sich direkt mit dem Werk in Verbindung, um Ersatzteile zu bestellen und Garantieansprüche geltend zu machen. Unser Kundendienst ist zwischen 9 und 15 Uhr Eastern Standard Time erreichbar. Telefonnummer: , Faxnummer: Zur Bearbeitung eines Garantieanspruchs bitte die folgenden Informationen bereithalten: 1. Modell- und Seriennummer des Geräts 2. Teilenummer und beschreibung 3. Vollständige Beschreibung des Problems ( kaputt ist nicht ausreichend) 4. Kaufnachweis (Fotokopie der Rechnung) In manchen Fällen kann der Kundendienstbeauftragte u. U. die Einsendung der Teile zur Überprüfung im Werk verlangen, bevor Ersatzteile ausgeliefert werden. Die Teile müssen unter Vorauszahlung aller Transportkosten und Angabe der folgenden Informationen an den Kundendienst versandt werden: 1. Modell- und Seriennummer des Geräts 2. Vollständige Beschreibung des Problems ( kaputt ist nicht ausreichend) 3. Kaufnachweis (Fotokopie der Rechnung) 4. Autorisierungscode für die Rücksendung. Diese erhalten Sie vom Kundendienstmitarbeiter. Beachten Sie, dass die folgenden Teile nicht unter die Garantie fallen, bevor Sie den Kundendienst kontaktieren: - Transportkosten, Courtage oder Exportzölle - Arbeitskosten für Aus- und Einbau - Telefonkosten für Anrufe zur Diagnose eines Problems - Verfärbungen von Edelstahlteilen - Teileversagen aufgrund von mangelnder Reinigung und Pflege, oder Verwendung von falschen Reinigungsmitteln (Ofenreiniger) DE

36 36 ACHTUNG! Wir empfehlen beim Entpacken des Geräts und bei der Montage Arbeitshandschuhe und eine Schutzbrille zu tragen. Wir unternehmen alle Anstrengungen, den Montageprozess so problemlos und sicher wie möglich zu machen, doch bearbeitete Stahlteile haben üblicherweise scharfe Kanten und Ecken, die zu Schnittverletzungen führen können, wenn sie während der Montage unsachgemäß gehandhabt werden. DE Erste Schritte 1. Alle Paneele für den Wagen, Hardware und Grilleinsatz aus dem Karton entnehmen. Haube öffnen und alle darin verpackten Komponenten entnehmen. Anhand der Stückliste sicherstellen, dass alle nötigen Teile vorhanden sind. 2. Zerstören Sie die Verpackung nicht, bevor der Grill vollständig montiert ist und zu Ihrer Zufriedenheit funktioniert. 3. Den Grill an der Stelle montieren, wo er verwendet werden soll. Legen Sie Pappe oder ein Handtuch zurecht, um während der Montage keine Teile zu verlegen oder zu beschädigen. 4. Die meisten Edelstahlteile sind ab Werk mit einem schützenden Plastikfilm versehen, der vor Montage des Grills abgezogen werden muss. 5. Folgen Sie allen Anweisungen in diesem Handbuch in der angegebenen Reihenfolge. 6. Zwei Personen sind erforderlich, um den Grillaufsatz auf den montierten Wagen zu setzen. Bei Fragen zur Montage oder zum Betrieb des Grills, oder bei beschädigten oder fehlenden Teilen, wenden Sie sich an unseren Kundendienst unter zwischen 9 Uhr und 15 Uhr Eastern Standard Time. Erforderliche werkzeuge für die montage (werkzeuge nicht enthalten) 3/8 and 5/8 schraubenschlüssel oder ring-maulschlüssel kreuzschlitzschraubendreher Zangen Hamer
 6")


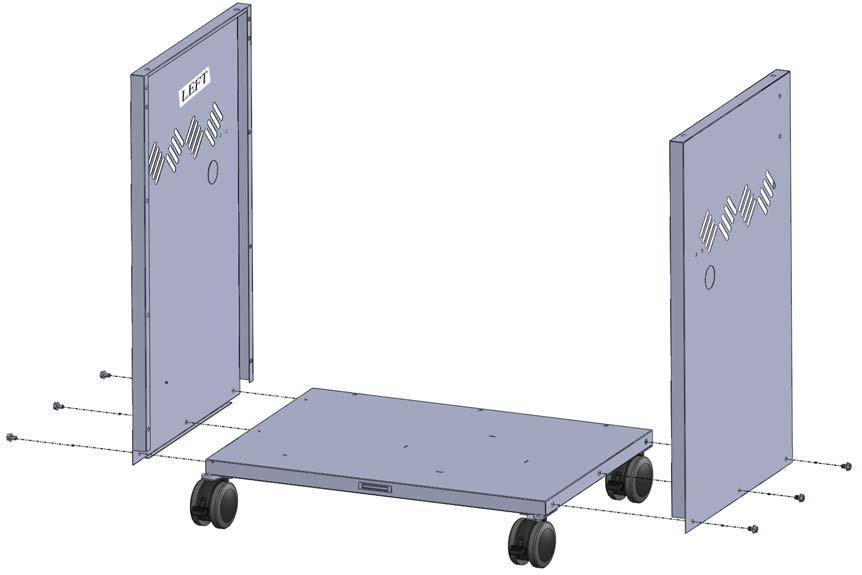
37 37 5/8 (16mm) 6 x Z (1/4-20 x 3/8 ) 3/8 (10mm)


38 38 9 x N (#10-24 x 3/8 ) 4 x N (#10-24 X3/ 8 )
 Z415-0006 MAR 16/11")
39 39 4 x N (10-24 x 3/8 ) Z MAR 16/11
.")

40 40 4 X Z (1/4-20 X 3/8 ) 2 x N (M4 x 8 mm) 3/8 (10mm) WARNING! Propane Only - To avoid assembly difficulties, prior to mounting the grill head, remove zip tie holding regulator. This was installed at the factory to protect the regulator hose during shipping and is no longer required. (Take care when removing the tie not to damage the hose). Ensure the regulator hose does not become pinched between the grill head and the cart. AVERTISSEMENT! Propane Seulement - Pour éviter les difficultés d assemblage, avant d installer la cuve de gril, enlevez l attache retenant le régulateur. Cette attache a été installée en usine afin de protéger le boyau du régulateur lors de l expédition et n est plus nécessaire. (Prenez soin de ne pas endommager le boyau lorsque vous enlevez cette attache.) Prenez garde de ne pas coincer le boyau du régulateur entre la cuve de gril et le chariot. ACHTUNG! Zur Vermeidung von Schwierigkeiten bei der Montage des Grillaufsatzes zunächst den Kabelbinder entfernen, mit dem der Druckregler/Anschluss unterhalb der Bedienleiste befestigt ist. Der Kabelbinder wird vor der Auslieferung ab Werk angebracht, um den Schlauch des Druckreglers vor Beschädigung zu schützen und ist nicht weiter erforderlich. (Den Kabelbinder vorsichtig durchschneiden, um den Schlauch nicht zu beschädigen.) Sicherstellen, dass sich der Druckregler in dem schmalen Raum zwischen dem Tank-Hitzeschild und der rechten Schrankseite befindet. Two people are required for this step. Deux personnes sont requises pour effectuer cette étape. FÜR DIESEN SCHRITT SIND ZWEI PERSONEN ERFORDERLICH. CORRECT Assemblée Correcte Korrekte Montage INCORRECT Assemblée Incorrecte Inkorrekte Montage Fasten regulator to side panel using (2) M4 x 8 screws. Fixez régulateur en utilisant (2) vis de M4 x 8. Druckregler mit zwei M4 x 8 -Schrauben festdrehen.

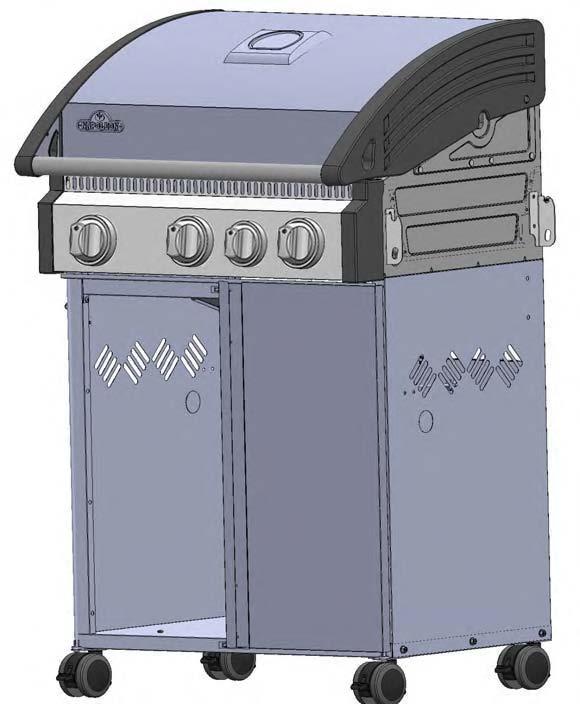

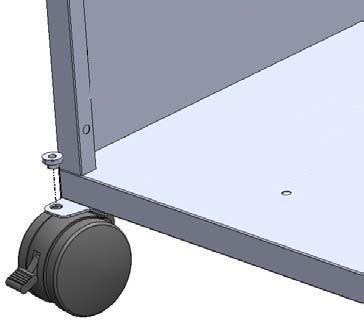
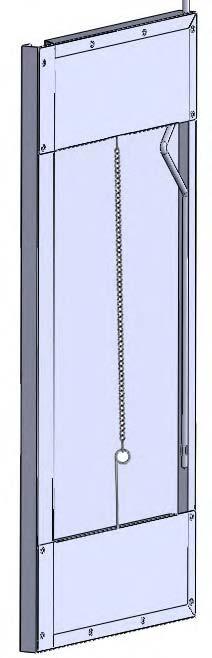
41 41 2 x N


42 42 Insert the shelf pin into the left shelf bracket. Insérer la goupille dans le support de plateau plateau de gauche. Den Zapfen der Seitenablage in die dafür vorgesehene Ausnehmung einhängen. Bend shelf open slightly to insert second pin into bracket. Pliez plateau légèrement ouverte pour insérer second axe dans le support. Die Seitenablage mit leichtem Zug in die Halterung einhängen. WARNING! Do not over bend. AVERTISSEMENT! Ne pas plier trop grande. ACHTUNG! Die Seitenablage vorsichtig. einhängen ohne das Material zu verbiegen.


43 43 Push down and engage top pins to lock shelf in place. Poussez vers le bas et d'engager broches supérieures à verrouiller l 'étagère en place. Die Seitenablage leicht niederdrücken und einrasten lassen. Lift Lever Anheben To disengage shelf, pull up. Pour désengager plateau, trer vers le haut. Zum Abklappen die Seitenablage leicht anheben und runterklappen.
44 44 1 x N SB MODEL Ensure bushing snaps into base as shown. Fit the orifice into the burner tube and secure with the hose retainer clip supplied. Attach the wire from the manifold to the side burner electrode. Shelf safety lock, push to lower shelf To disengage shelf, pull up.
45 45 1 x N SBMODÈLE Assurez-vous que la bague soit insérée dans la base latéral tel qu illustré. Placez l orifice dans le brûleur et fixez à l aide de l attache de retenue fournie. Fixez le fil du collecteur à l électrode du brûleur latéral. Verrouillage de sécurité, appuyer pour abaisser la tablette. Pour désengager plateau, tirer vers le haut.

46 46 1 x N SB MODEL Sichergehen, dass der Schlauch durch die Öffnung geführt ist, siehe Bild. Die Gasleitung in die Gasröhre einführen und mit dem Splint sichern. Das Kabel für die Zündung des Seitenkochers in die dafür vorgesehene Buchse stecken. Die rechte Seitenablage ist durch einen Sicherungsknopf gesperrt. Zum Abklappen den Knopf gedrückt halten. Zum Abklappen die Seitenablage leicht anheben und runterklappen.

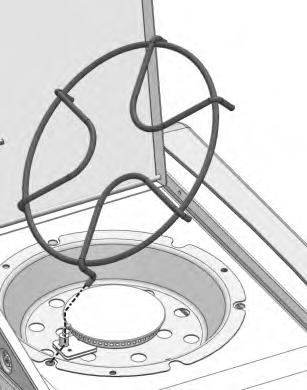
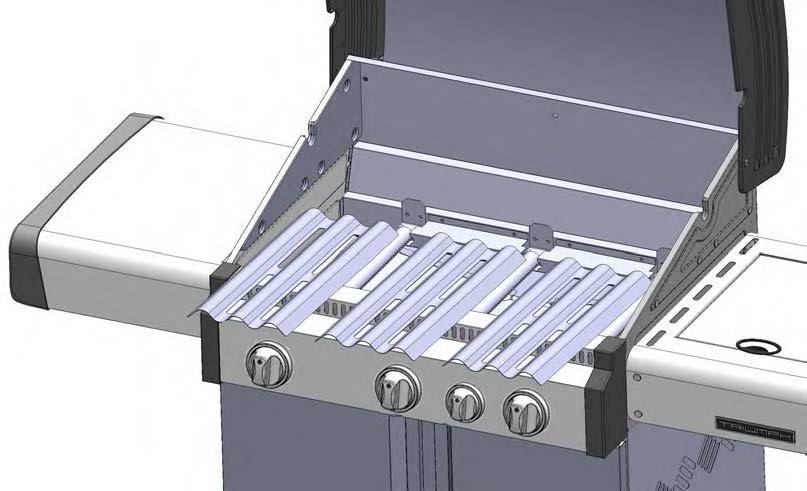

47 47


48 48

49 49
50 50 All cylinders must be placed outside the enclosure (under the right side shelf) on level ground. The hose assembly must be routed through the knock out hole in the right side panel. Toutes les bouteilles de gaz doivent être placées à l extérieur du cabinet (sous la tablette latérale droite) sur une surface plane. Le tuyau doit être passé dans l ouverture poinçonnée du panneau latéral droit. Gasflaschen mit einem außerhalb des Schranks (unter dem rechten Seitenregal) ebenerdig aufstellen. Die Schlauchinstallation muss durch die vorgestanzte Öffnung im rechten Seitenpaneel erfolgen.
51 51 Leak Testing Instructions WARNING! A leak test must be performed annually and each time a cylinder is hooked up or if a part of the gas system is replaced. WARNING! Never use an open flame to check for gas leaks. Be certain no sparks or open flames are in the area while you check for leaks. Sparks or open flames will result in a fire or explosion, damage to property, serious bodily injury, or death. Leak testing: This must be done before initial use, annually, and whenever any gas components are replaced or serviced. Do not smoke while performing this test, and remove all sources of ignition. See Leak Testing Diagram for areas to check. Turn all burner controls to the off position. Turn gas supply valve on. Brush a half-and-half solution of liquid soap and water onto all joints and connections of the regulator, hose, manifolds and valves. Bubbles will indicate a gas leak. Either tighten the loose joint or have the part replaced with one recommended by the Napoleon Customer Care department and have the grill inspected by a certified gas installer. If the leak cannot be stopped, immediately shut off the gas supply, disconnect it, and have the grill inspected by a certified gas installer or dealer. Do not use the grill until the leak has been corrected. All cylinders must be placed outside the enclosure (under the right side shelf) on level ground. The hose assembly must be routed through the knock out hole in the right side panel.
52 52 Test De Détection De Fuites AVERTISSEMENT! Il doit être fait avant la première utilisation, annuellement et à chaque fois qu une pièce du système de gaz est remplacée ou réparée. AVERTISSEMENT! N utilisez pas une flamme nue pour vérifier pour des fuites de gaz. Assurez-vous qu il n y ait aucune étincelle ni flamme nue à proximité de l endroit à vérifier. Les étincelles ou les flammes nues provoqueront un feu ou une explosion, causant des dommages matériels, des blessures graves ou des pertes de vie. Test De Fuites: Il doit être fait avant la première utilisation, annuellement et à chaque fois qu une pièce du système de gaz est remplacée ou réparée. Ne fumez pas et enlevez toutes sources d allumage lorsque vous faites ce test. Consultez le schéma de test de fuites pour voir les endroits à tester. 1 - Fermez tous les boutons des brûleurs. Ouvrez la soupape de la bonbonne. 2 - Appliquez une solution de deux parts égales de savon liquide et d eau sur tous les joints du régulateur, le tuyau et ses raccords. 3 - Des bulles indiqueront une fuite de gaz. Resserrez le joint ou remplacez la pièce avec une autre recommandée par le détaillant. 4 - Si la fuite ne peut être réparée, fermez l alimentation de gaz à la bonbonne, enlevez-la et faites inspecter votre gril par votre fournisseur de gaz ou détaillant. N utilisez pas l appareil jusqu à ce que la fuite soit réparée. 5 - Fermez la soupape de la bonbonne. Toutes les bouteilles de gaz doivent être placées à l extérieur du cabinet (sous la tablette latérale droite) sur une surface plane. Le tuyau doit être passé dans l ouverture poinçonnée du panneau latéral droit.

 auf alle Anschlüsse und Verbindungen an Regler, Schlauch, Verteiler und Ventile auftragen. Leckagen werden durch Blasenbildung angezeigt.")
53 53 Anleitung Für Die Leckageprüfung ACHTUNG! Ein Leckagetest muss vor der ersten Benutzung, jährlich und nach Auswechseln oder Warten eines Gasbauteils durchgeführt werden. ACHTUNG! Während der Prüfung ist Rauchen verboten. Alle Zündquellen sind zu entfernen. Leckageprüfung: Ein Leckagetest muss vor der ersten Benutzung, jährlich und nach Auswechseln oder Warten eines Gasbauteils durchgeführt werden. Während der Prüfung ist Rauchen verboten. Alle Zündquellen sind zu entfernen. Die zu prüfenden Stellen sind auf der Leckageprüfzeichnung aufgeführt. Alle Brenner abstellen. Flaschenventil aufdrehen. Seifenwasser (halb Wasser, halb Flüssigseife) auf alle Anschlüsse und Verbindungen an Regler, Schlauch, Verteiler und Ventile auftragen. Leckagen werden durch Blasenbildung angezeigt. Leckage durch Festdrehen des Anschlusses oder Austausch des Teils durch ein vom Händler empfohlenes Teil beseitigen. Bleibt die Leckage bestehen, Flaschenventil zudrehen, Regler abnehmen und Grill vom Gaslieferanten oder Händler untersuchen lassen. Das Gerät darf erst wieder benutzt werden, wenn die Leckage behoben ist. Gaszufuhr abstellen. Gasflaschen mit einem außerhalb des Schranks (unter dem rechten Seitenregal) ebenerdig aufstellen. Die Schlauchinstallation muss durch die vorgestanzte Öffnung im rechten Seitenpaneel erfolgen.
BULL. ASSEMBLY & OPERATING INSTRUCTIONS
 BULL. Dutdaar Products Inc. "., Ontario, California 91761 ASSEMBLY & OPERATING INSTRUCTIONS Model No. 18038 7-Burner High Grade Commercial Stainless Steel Longhorn, LP Model No. 18039 7- Burner High Grade
GAS BARBECUE MODEL NO: BBQ4 USER GUIDE PART NO: /11
 GAS BARBECUE MODEL NO: BBQ4 PART NO: 6925305 USER GUIDE 2/11 INTRODUCTION Thank you for purchasing this CLARKE product Before attempting to use this product, please read this manual thoroughly and follow
STAINLESS STEEL GAS BARBECUE MODEL NO: SSBBQ4 USER GUIDE PART NO: /11
 STAINLESS STEEL GAS BARBECUE MODEL NO: SSBBQ4 PART NO: 6925310 USER GUIDE 2/11 INTRODUCTION Thank you for purchasing this CLARKE product. Before attempting to use this product, please read this manual
14 ROUND TABLETOP GAS GRILL. Product code: UPC code: Date of purchase: / /
 OWNER S MANUAL 14 ROUND TABLETOP GAS GRILL Product code: 0-03946564-6 UPC code: 0 45774 87562 1 Date of purchase: / / Safety Guidelines... Safety Instructions... 1 2-3 Assembly Instructions... 4-7 Lighting
495, 495SB WARNING DANGER
 This gas grill must be used only outdoors in a well-ventilated space and must not be used inside a building, garage, screened-in porch, gazebo or any other enclosed area. EN APPLY SERIAL NUMBER LABEL FROM
HORIZON BARBECUE ROASTING HOOD OWNERS MANUAL
 HORIZON BARBECUE ROASTING HOOD OWNERS MANUAL 0 IMPORTANT READ ALL INSTRUCTIONS BEFORE ASSEMBLY, INSTALLATION OR OPERATING ROASTING HOOD SAFETY PRECAUTIONS AND WARNINGS Tucker Horizon barbecues and roasting
MARINE KETTLE 2 GAS GRILL OWNER S MANUAL
 OWNER S MANUAL MARINE KETTLE 2 GAS GRILL For questions regarding performance, assembly, operation, parts, or returns, contact the experts at MAGMA by calling (562) 627-0500 7:00 a.m. - 5:00 p.m. Pacific
PRO285 DO NOT DISCARD FR PG.19 DANGER IF YOU SMELL GAS: WARNING
 This gas grill must be used only outdoors in a well-ventilated space and must not be used inside a building, garage, screened-in porch, gazebo or any other enclosed area. APPLY SERIAL NUMBER LABEL FROM
" Table Top Charcoal Grill Model # SRYH1450 Instructions Manual
 259-0011 14" Table Top Charcoal Grill Model # SRYH1450 Instructions Manual WARNING FOR YOUR SAFETY 1. This grill is for outdoor use only, and shall not be used in a building, garage, or any other enclosed
LEX 730 WARNING DANGER
 This gas grill must be used only outdoors in a well-ventilated space and must not be used inside a building, garage, screened-in porch, gazebo or any other enclosed area. EN APPLY SERIAL NUMBER LABEL FROM
TQ285 DO NOT DISCARD FR PG.17 DANGER IF YOU SMELL GAS: WARNING
 This gas grill must be used only outdoors in a well-ventilated space and must not be used inside a building, garage, screened-in porch, gazebo or any other enclosed area. APPLY SERIAL NUMBER LABEL FROM
Folding Grill Stand Manual
 O u t d o o r G r i l l i n g P r o d u c t s Folding Grill Stand Manual MODEL: CFGS-150 IMPORTANT SAFETY INSTRUCTIONS READ AND SAVE THESE SAFETY INSTRUCTION BEFORE USING THIS GRILL STAND m DANGER: m Failure
U405 CART UP405 PEDESTAL
 This gas grill must be used only outdoors in a well-ventilated space and must not be used inside a building, garage, screened-in porch, gazebo or any other enclosed area. APPLY SERIAL NUMBER LABEL FROM
Portable Charcoal Grill
 Portable Charcoal Grill DANGER! WARNING DO NOT use charcoal briquettes for indoor cooking or heating. TOXIC carbon monoxide fumes can accumulate and cause asphyxiation. DO NOT USE on boats or recreational
for Assembly, Operating & Maintenance of THIS CHARCOAL GRILL IS DESIGNED FOR OUTDOOR USE ONLY.
 Owner s Manual for Assembly, Operating & Maintenance of Model M-15AB Charcoal Grill www.bigjohngrills.com YOU MUST READ THIS OWNER S MANUAL BEFORE OPERATING YOUR CHARCOAL GRILL. WARNING: Do not ignite
PRESTIGE 500 DANGER WARNING
 This gas grill must be used only outdoors in a well-ventilated space and must not be used inside a building, garage, screened-in porch, gazebo or any other enclosed area. EN APPLY SERIAL NUMBER LABEL FROM
Assembly & Operation Manual
 Deluxe Outdoor Tabletop Gas Grill Model TT250 Assembly & Operation Manual DANGER 1. Never operate this appliance unattended. 2. Never operate this appliance within 10 ft (3.0 m) of any structure, combustible
BakerBox multi-purpose pizza oven
 BakerBox multi-purpose pizza oven. ASSEMBLY & OPERATING INSTRUCTIONS Important: Read these instructions for use carefully so as to familiarize yourself with the appliance before putting it to your gas
PRO 500 WARNING DANGER
 This gas grill must be used only outdoors in a well-ventilated space and must not be used inside a building, garage, screened-in porch, gazebo or any other enclosed area. EN APPLY SERIAL NUMBER LABEL FROM
Tabletop Charcoal Grill Model # SRCG806 Instructions Manual
 259-0002 Tabletop Charcoal Grill Model # SRCG806 Instructions Manual WARNING FOR YOUR SAFETY 1. This grill is for outdoor use only, and shall not be used in a building, garage, or any other enclosed area.
OWNER S MANUAL. Cabo. Adventurer Series Gas Grill Model A10-703
 OWNER S MANUAL Cabo Adventurer Series Gas Grill Model A10-703 For questions regarding performance, assembly, operation, parts, or returns, contact the experts at MAGMA by calling (562) 627-0500 7:00 a.m.
Assembly Instructions & User s Manual TRITON 6 BURNER GRIDDLE Model #: FSODBG1206
 Assembly Instructions & User s Manual TRITON 6 BURNER GRIDDLE Model #: FSODBG1206 Please keep this instruction manual for future reference Customer Service: (888) 922-2336, 7:00 am to 12:00 am daily CST
21.5 Inch Square Charcoal Grill
 21.5 Inch Square Charcoal Grill Model # OCFLA-2150 OUTDOOR USE ONLY! NEVER USE INDOORS! CARBON MONOXIDE HAZARD Burning charcoal inside may be fatal. It gives off carbon monoxide, which has no odor. NEVER
MARQUE REFERENCE CODIC
 MARQUE REFERENCE CODIC : KALORIK : TKG OT 00BCRL : 50 EN ANGLAIS PROVISOIREMENT NOTICE LOGO 00L ELECTRIC OVEN WITH ROTISSERIE & LAMP & CONVECTION INSTRUCTION MANUAL Model No. TY000BCL 0-0V~ 50/60Hz 800W
OWNERS MANUAL. Installation, Operation & Maintenance Guide MODELS: SO30BQRRL/SO42BQRL
 OWNERS MANUAL Installation, Operation & Maintenance Guide MODELS: SO30BQRRL/SO42BQRL This Page Intentionally Left Blank For Your Safety... 3 Basic Safety Guidelines... 5 Installation... 6 Gas Connection
Contents. Fittings and parts checklist
 JLH2B5 Contents Parts List Exploded Diagram Assembly instructions Safety information Installation Using your barbecue Cooking Maintenance Fittings and parts checklist Ref Description Ref Description 1,
JUMBUCK RONDO MEDIUM CHARCOAL SPIT ROASTER (HS-FP002)
") JUMBUCK RONDO MEDIUM 3180887 CHARCOAL SPIT ROASTER (HS-FP002) SAFETY INSTRUCTIONS FOR OUTDOOR USE ONLY For outdoor use only. Improper installation, adjustment, alteration, service or maintenance can cause
JUMBUCK RONDO MEDIUM 3180887 CHARCOAL SPIT ROASTER (HS-FP002) SAFETY INSTRUCTIONS FOR OUTDOOR USE ONLY For outdoor use only. Improper installation, adjustment, alteration, service or maintenance can cause
PRO 500 DO NOT DISCARD FR PG.21 WARNING DANGER
 This gas grill must be used only outdoors in a well-ventilated space and must not be used inside a building, garage, screened-in porch, gazebo or any other enclosed area. EN APPLY SERIAL NUMBER LABEL FROM
Introduction. No Hassle Guarantee
 Pro Grill MANUAL Introduction Thank you for selecting West Marine s Pro Grill. Your unit has been carefully inspected and tested. The Pro Grill is one of the finest barbecues manufactured for marine use.
IF THERE IS ANY QUESTION ABOUT A CONDITION BEING SAFE OR UNSAFE, DO NOT OPERATE THIS PRODUCT!
 RO18BT 18 Quart Roaster Oven Operating Instructions READ ALL INSTRUCTIONS AND WARNINGS BEFORE USING THIS PRODUCT. This manual provides important information on proper operation & maintenance. Every effort
SUMMIT 4 BURNER & 6 BURNER
 WEBER WEBER WEBER WEBER SUMMIT 4 BURNER & 6 BURNER NATURAL GAS COOKING MODULES Operating Guide Read before assembly WEBER WEBER W E B E R W E B E R Summit 6 Burner NG CANADIAN GAS ASSOCIATION R A P P R
BILEX 485 DE PG.27 WARNING! CABINET FRAME, CABINET AND COUNTER TOP MUST BE MADE FROM NON-COMBUSTIBLE MATERIAL. WARNING DANGER DO NOT DISCARD
 This gas grill must be used only outdoors in a well-ventilated space and must not be used inside a building, garage, screened-in porch, gazebo or any other enclosed area. EN APPLY SERIAL NUMBER LABEL FROM
Assembly and Operating Instructions for Outback Omega 100, Omega 200, and Omega 300 Gas Barbecues
 Gas Barbecues Assembly and Operating Instructions for Outback Omega 100, Omega 200, and Omega 300 Gas Barbecues EN (Europe) Omega 100 Omega 200 Omega 300 Photographs are not to scale. Specifications subject
Oven Toaster Grill with Convection
 READ BEFORE USE Oven Toaster Grill with Convection Visit www.hamiltonbeach.in for our complete line of products and Use and Care Guides as well as delicious recipes, tips, and other useful information!
ASSEMBLY & OPERATION INSTRUCTIONS FOR OUTDOOR GAS BARBECUES
 ASSEMBLY & OPERATION INSTRUCTIONS FOR OUTDOOR GAS BARBECUES FOR MODEL# BBQ / BBQW / BLKBBQW OUTDOOR BBQ GRILL SAFETY INSTRUCTIONS READ THE FOLLOWING INSTRUCTIONS CAREFULLY AND BE SURE YOUR BARBECUE IS
WARNING. Assembly and Operating Instructions for Outback Omega Charcoal 100 and Omega Charcoal 200 Barbecues. Omega Charcoal 100 Omega Charcoal 200
 Assembly and Operating Instructions for Outback Omega Charcoal 100 and Omega Charcoal 200 Barbecues Omega Charcoal 100 Omega Charcoal 200 Photographs are not to scale. Specifications subject to change
485RSIB DANGER WARNING
 This gas grill must be used only outdoors in a well-ventilated space and must not be used inside a building, garage, screened-in porch, gazebo or any other enclosed area. APPLY SERIAL NUMBER LABEL FROM
LOT: PO: 4098_GelCanInsert_JW_ Model # oz Gel Fuel Can Firebox Insert
 LOT: PO: 4098_GelCanInsert_JW_010213 f i r e p l a c e s Model # 4098 13oz Gel Fuel Can Firebox Insert - Gel Fuel is flammable. Failure to follow warnings can result in property damage or serious burns.
BILEX 605 WARNING! CABINET FRAME, CABINET AND COUNTER TOP MUST BE MADE FROM NON-COMBUSTIBLE MATERIAL. WARNING DANGER
 This gas grill must be used only outdoors in a well-ventilated space and must not be used inside a building, garage, screened-in porch, gazebo or any other enclosed area. EN APPLY SERIAL NUMBER LABEL FROM
USE AND CARE MANUAL FOR OUTDOOR USE ONLY
 S o n o m a PLATINUM EDITION Sonoma Platinum Edition Grill: 27 Model with Rear Infrared Burner TM USE AND CARE MANUAL FOR OUTDOOR USE ONLY General Safety Instructions IMPORTANT SAFETY INFORMATION - Read
BILEX485 FR PG.27 WARNING! CABINET FRAME, CABINET AND COUNTER TOP MUST BE MADE FROM NON-COMBUSTIBLE MATERIAL. DANGER IF YOU SMELL GAS: WARNING
 1 This gas grill must be used only outdoors in a well-ventilated space and must not be used inside a building, garage, screened-in porch, gazebo or any other enclosed area. EN APPLY SERIAL NUMBER LABEL
IMPORTANT: READ THESE INSTRUCTIONS CAREFULLY BEFORE STARTING INSTALLATION OR USE. WARNINGS AND SAFETY CODES
 FIREMASTER OUTDOOR COUNTERTOP CHARCOAL GRILL Models 3324 and 3329 INSTALLATION INSTRUCTIONS AND OWNER S MANUAL INSTALLER: Leave these instructions with consumer. CONSUMER: Retain for future reference.
ROGUE 425 DO NOT DISCARD FR PG.19 WARNING DANGER
 This gas grill must be used only outdoors in a well-ventilated space and must not be used inside a building, garage, screened-in porch, gazebo or any other enclosed area. EN APPLY SERIAL NUMBER LABEL FROM
BBQ Grill. Owner s Manual Save These Instructions - For Household Use Only For Sizes: 12 x 18 & 12 x 12
 BBQ Grill Owner s Manual Save These Instructions - For Household Use Only For Sizes: 12 x 18 & 12 x 12 Do not use the Copper Chef TM BBQ Grill until you have read this manual thoroughly. Warranty Information
ROGUE 425 DO NOT DISCARD FR PG.19 WARNING DANGER
 This gas grill must be used only outdoors in a well-ventilated space and must not be used inside a building, garage, screened-in porch, gazebo or any other enclosed area. EN APPLY SERIAL NUMBER LABEL FROM
USE AND CARE MANUAL FOR OUTDOOR USE ONLY MADE IN THE U.S.A.
 S o n o m a PLATINUM EDITION Sonoma Platinum Edition Grill: 30 Model TM USE AND CARE MANUAL FOR OUTDOOR USE ONLY MADE IN THE U.S.A. General Safety Instructions IMPORTANT SAFETY INFORMATION - Read this
BILEX485 WARNING! CABINET FRAME, CABINET AND COUNTER TOP MUST BE MADE FROM NON-COMBUSTIBLE MATERIAL. WARNING DANGER DO NOT DISCARD
 This gas grill must be used only outdoors in a well-ventilated space and must not be used inside a building, garage, screened-in porch, gazebo or any other enclosed area. APPLY SERIAL NUMBER LABEL FROM
LEX 730 DANGER WARNING
 This gas grill must be used only outdoors in a well-ventilated space and must not be used inside a building, garage, screened-in porch, gazebo or any other enclosed area. APPLY SERIAL NUMBER LABEL FROM
ROGUE 525 DO NOT DISCARD FR PG.19 WARNING DANGER
 This gas grill must be used only outdoors in a well-ventilated space and must not be used inside a building, garage, screened-in porch, gazebo or any other enclosed area. EN APPLY SERIAL NUMBER LABEL FROM
17.75 In. Table Top Gas Grill
 17.75 In. Table Top Gas Grill Model #OCTG-1775 OUTDOOR USE ONLY! NEVER USE INDOORS! CARBON MONOXIDE HAZARD Burning propane inside may be fatal. It gives off carbon monoxide, which has no odor. NEVER burn
SAVE THESE INSTRUCTIONS FOR FUTURE REFERENCE. IF YOU ARE ASSEMBLING THIS UNIT FOR SOMEONE ELSE, GIVE THIS MANUAL TO HIM OR HER FOR FUTURE REFERENCE.
 JACKSON GRILLS INC. 106-2480 Mt. Lehman Road Abbotsford, BC V4X 2N3 TELEPHONE: (604)855-6756 FAX: (604)855-5373 EMAIL: info@jacksongrills.com SUPPORT: support@jacksongrills.com WEB SITE: www.jacksongrills.com
 #4187508 Attention! This grill will become very hot. Do not move it during operation. Caution! Do not use alcohol, gasoline or similar fluids for lighting or relighting. Warning! Keep children and pets
G2006-A FOR OUTDOOR USE ONLY - OPERATES ON LPG
 Ranger Barbecue Model No. G2006-A FOR OUTDOOR USE ONLY - OPERATES ON LPG 3716-06/13 General Information Gas Installation Codes Barbecues must be used in accordance with New Zealand Standard 5601 Gas Installations.
WELCOME TO THE PARTY!
 WELCOME TO THE PARTY! Congratulations on your purchase of the Party Grill and welcome to the world of interactive culinary experiences! This unique and versatile grill gives you endless opportunites to
Outdoor Charcoal Barbecue Grill
 OWNER S MANUAL Outdoor Charcoal Barbecue Grill Model No CBT1706W FOR YOUR SAFETY: 1 Do NOT store or use gasoline or other flammable liquids or vapors in the vicinity of this or any other appliance 2 When
22 Kettle Charcoal Grill SAFE USE, CARE AND ASSEMBLY MANUAL
 22 Kettle Charcoal Grill SAFE USE, CARE AND ASSEMBLY MANUAL 85-1448-8 ST22022D Read and save this manual for future reference. If pre-assembled, leave this manual with unit for consumer s future reference.
3 Burner Cabinet Barbecue
 3 Burner Cabinet Barbecue Photograph is not to scale. Specification subject to change without prior notice WARNING For outdoor use only. Read instructions before using the appliance. Failure to follow
Adventurer Barbecue G2727
 Adventurer Barbecue G2727 FEATURES Compact portable unit with generous 460mm x 240mm cooking surface Use at home, picnics or camping Quick and easy set-up Folds down into a compact size - 440mm x 590mm
TQ285 DANGER WARNING IF YOU SMELL GAS:
 This gas grill must be used only outdoors in a well-ventilated space and must not be used inside a building, garage, screened-in porch, gazebo or any other enclosed area. EN APPLY SERIAL NUMBER LABEL FROM
Important: Retain these instructions for future use.
 CATERER 4 & 6 BURNER BBQ Model No. BQ1050 Model No. BQ1051 Ideal heavy duty BBQ for sporting and social clubs or anywhere large groups are entertained Solid 5mm thick steel hotplate Castors for easy moving
X4 50 Barbecue. Universal Innovations WARNING. Photograph is not to scale. Specification subject to change without prior notice.
 X4 50 Barbecue Photograph is not to scale. Specification subject to change without prior notice. WARNING For outdoor use only. Read instructions before using the appliance. Failure to follow instructions
Platinum BBQ Series. 4 burner - BQ burner - BQ 1011
 Platinum BBQ Series 4 burner - BQ 1010 6 burner - BQ 1011 FEATURES Premium gas BBQ Double skinned stainless steel hood with temperature gauge Stainless steel BBQ body, fascia, cabinet and side shelves
Assembly and Operating Instructions for Outback Omega 100, Omega 200 and Omega 300 Gas Barbecues
 Assembly and Operating Instructions for Outback Omega 100, Omega 200 and Omega 300 Gas Barbecues Omega 100 Omega 200 Omega 300 Photographs are not to scale. Specifications subject to change without prior
Coffee Burr Grinder. Model #559. Instructions. Warranty
 Coffee Burr Grinder Model #559 Instructions Warranty IMPORTANT SAFEGUARDS When using electrical appliances, basic safety precautions should always be followed, including the following: 1. Read all instructions.
for Assembly, Operating & Maintenance of THIS GAS GRILL IS DESIGNED FOR OUTDOOR USE ONLY.
 Owner s Manual for Assembly, Operating & Maintenance of Model A2P Portable Gas Grill www.bigjohngrills.com YOU MUST READ THIS OWNER S MANUAL BEFORE OPERATING YOUR GAS GRILL. IF YOU SMELL GAS: DANGER 1.
Tabletop Gas Grill VT280SS1
 Tabletop Gas Grill VT280SS1 Conforms to ANSI Std Z21.89-2013 Outdoor cooking specialty gas appliance DANGER Tools needed for assembly: Phillips screwdriver, Pliers or Adjustable Wrench DANGER If you smell
3-Burner LP Gas Grill
 ITEM # 41590 WARNING Improper installation, adjustment, alteration, service or maintenance can cause injury or property damage. Read the installation, operation and maintenance instructions thoroughly
VCS325SSBI Series and VCS525SSBI Series Assembly Procedures
 VCS325SSBI Series and VCS525SSBI Series Assembly Procedures Model VCS525SSBI Shown Tools Required: Knife or scissors, Phillips or Robertson (square head) screwdriver. WARNING: Some parts may have sharp
Installation & Operation Instructions
 Manufactured by K & W Mfg. Co. Inc., Corona, California Installation & Operation Instructions For Gas Barbecues Models 5453 and 5457 A Note to You Thank you for buying a Flame-Broil barbecue grill. To
INFRARED BURNER KIT INSTRUCTIONS
 3 INFRARED BURNER KIT INSTRUCTIONS (HOT SURFACE IGNITION) 5 1 4 NOTE: This unit has been retrofi tted with an infrared burner. Model # 3050 # 3060 Included parts 2 6* PARTS INCLUDED 1. Infrared burner
Specialist Built-in BBQ
 Specialist Built-in BBQ Model No. BQ8246-P Product Features: Vitreous enamel hood and body Sure-fire rotary ignition Viewing window in hood Timer AGA certified FOR OUTDOOR USE ONLY OPERATES ON LPG Gasmate
WARNING. Assembly and Operating Instructions for Outback Kettle Charcoal 57cm Barbecue. EN (Europe)
") Assembly and Operating Instructions for Outback Kettle Charcoal 57cm Barbecue EN (Europe) Photographs are not to scale. Specifications subject to change without prior notice. WARNING For outdoor use only.
Assembly and Operating Instructions for Outback Kettle Charcoal 57cm Barbecue EN (Europe) Photographs are not to scale. Specifications subject to change without prior notice. WARNING For outdoor use only.
1550W DIGITAL FRENCH DOOR OVEN Instruction Manual MODEL CCFD19
 1550W DIGITAL FRENCH DOOR OVEN Instruction Manual MODEL CCFD19 1 WHAT S INCLUDED French Door Oven & Instruction Manual Rotisserie Hle Two Wire Racks Baking Pan Rotisserie Tray Hle Crumb Tray 2 IMPORTANT
Kettle Charcoal BBQ. Assembly instructions. Please retain this manual for future reference
 Front.pdf 30/0/ ::5 Product size assembled: H88 x W5 X D6cm Ref No.: XZ08B Catalogue No.: 05-579 Tesco 0 Please retain this manual for future reference P.pdf 3/0/ 7:9:3 Assembly Instructions Warnings REMEMBER
ASSEMBLY & OPERATING INSTRUCTIONS
 Rialto, California 92673 ASSEMBLY & OPERATING INSTRUCTIONS Model #54658 5 Burner Stainless Steel Built-In, L.P. (Propane) Gas Model #54659 5 Burner Stainless Steel, Built-In, Natural Gas TABLE OF CONTENTS
Stainless Steel 60,000BTU BBQ TG. assembly instructions and owner s guide. natural gas. natural gas
 natural gas Loblaws Inc., 1 President s Choice Circle, Brampton, Ontario L6Y 5S5 Stainless Steel 60,000BTU BBQ natural gas assembly instructions and owner s guide MODEL NUMBER: 13 01 3008TG SERIAL NUMBER:
IMPORTANT SAFEGUARDS. 3. To protect against fire, electric shock and injury to persons do not immerse cord, plug or unit in water or other liquid.
 IMPORTANT SAFEGUARDS When using electrical appliances, basic precautions should always be followed, including the following: 1. Read all instructions. 2. Make sure that your outlet voltage corresponds
SBG2500-1, SBG and SBG Gas Grill Owner s Manual
 SBG2500-1, SBG2501-1 and SBG2801-1 Gas Grill Owner s Manual SBB00095-2-0407 Page 1 IMPORTANT This manual should be read thoroughly by the person installing the grill and all persons who will use and maintain
INSTRUCTION MANUAL MODELS: RT-30, RT-36, RT-48, RT-60 & RT-72 REVISED APRIL, 2003 *PLEASE RETAIN FOR FUTURE REFERENCE
 INSTRUCTION MANUAL MODELS: RT-30, RT-36, RT-48, RT-60 & RT-72 REVISED APRIL, 2003 *PLEASE RETAIN FOR FUTURE REFERENCE THANK YOU for purchasing this quality product. Your Crown Verity Inc. rotisserie will
FOR OUTDOOR USE ONLY THIS IS YOUR ASSEMBLY, CARE & USE MANUAL WITH IMPORTANT WARNING & SAFETY INFORMATION. PLEASE SAVE THESE INSTRUCTIONS.
 Owner s Manual Tabletop Gas Grill 1-Burner Model VT280B1 FOR OUTDOOR USE ONLY THIS IS YOUR ASSEMBLY, CARE & USE MANUAL WITH IMPORTANT WARNING & SAFETY INFORMATION. PLEASE SAVE THESE INSTRUCTIONS. Manufactured
ASSEMBLY & OPERATING INSTRUCTIONS
 ASSEMBLY & OPERATING INSTRUCTIONS MODEL #21009 UI 5 BURNER STAINLESS STEEL, ROTISSERIE, BUILT-IN, L.P. (PROPANE) MODEL #21011 UI 5 BURNER STAINLESS STEEL, ROTISSERIE, BUILT-IN, N.G. (NATURAL GAS) TABLE
LUCKENBACH MODEL Assembly Instructions Rev
 LUCKENBACH TM MODEL 03301800 Assembly Instructions Rev. 03-27-03 P/N: 42802113 WARNING! CAUTION! This unit is heavy. Tools needed: 2 adjustable wrenches, a flat screwdriver and hammer. DO NOT assemble
WARNING FOR YOUR SAFETY FOR YOUR SAFETY. Assembly and Operating Instructions for Omega 100, Omega 200, and Omega 300 Gas Barbecues.
 Gas Barbecues Assembly and Operating Instructions for Omega 100, Omega 200, and Omega 300 Gas Barbecues Omega 100 Omega 200 Omega 300 Photographs are not to scale. Specifications subject to change without
Assembly and Operating Instructions for Phoenix 4 Burner Black and Phoenix 4 Burner SS Gas Barbecues
 Assembly and Operating Instructions for Phoenix 4 Burner Black and Phoenix 4 Burner SS Gas Barbecues EN (Europe) Photographs are not to scale. Specifications subject to change without prior notice. 0359
Manual Spark Ignition (MSI) Kit For Use only with Thermocouple Manual Safety (TMSI) UL Approved Fire Pit Pans with Burning Spur
 Kit For Use only with Thermocouple Manual Safety (TMSI) UL Approved Fire Pit Pans with Burning Spur") AAA Battery MODEL: MSI-BSTMSI Manual Spark Ignition (MSI) Kit For Use only with Manual Safety (TMSI) UL Approved Fire Pit Pans with Burning Spur Installation and Operating Instructions IF YOU CANNOT READ
AAA Battery MODEL: MSI-BSTMSI Manual Spark Ignition (MSI) Kit For Use only with Manual Safety (TMSI) UL Approved Fire Pit Pans with Burning Spur Installation and Operating Instructions IF YOU CANNOT READ
INTRODUCTION. Your new smoker comes almost completely assembled. You will need to complete the assembly which includes:
 INTRODUCTION Congratulations on your purchase of this Smith & Wesson SMOKER, Model SWS032. With proper set-up, operation and maintenance, this smoker will provide you with years of cooking enjoyment. Your
SUMMITTM450 & 650. LP Gas Barbecues. Operating Guide. Read before assembly
 WEBER WEBER WEBER WEBER SUMMITTM450 & 650 LP Gas Barbecues Operating Guide Read before assembly DANGER If you smell gas: 1. Shut off gas to the appliance. 2. Extinguish any open flames. 3. Open lid. 4.
Deluxe Caterer BBQ Series
 Deluxe Caterer BBQ Series GC22-4T DLX GC22-6T DLX FEATURES Ideal heavy duty BBQ for sporting and social clubs or anywhere large groups are entertained. Solid 5mm thick stainless steel hotplate Fold down
SBB Gas Grill With Surround Owner s Manual
 SBB2804-1 Gas Grill With Surround Owner s Manual GAS-FIRED Page 1 IMPORTANT This manual should be read thoroughly by the person installing the grill and all persons who will use and maintain the grill.
GAS GRILL # Natural Gas Grill Owner s Guide
 GAS GRILL Natural Gas Grill Owner s Guide ESNA Guía del Propietario de la Barbacoa de Gas Natural - Pg. 7 Mode d emploi du Grill à gaz naturel - Pg. 7 670 #5606 YOU MUST READ THIS OWNER S GUIDE BEFORE
Tabletop Gas Grill ITEM # WARNING FOR YOUR SAFETY : For Outdoor Use Only (outside any enclosure) Print in China
 Print in China") ITEM # 41242 WARNING Improper installation, adjustment, alteration, service or maintenance can cause injury or property damage. Read the installation, operation and maintenance instructions thoroughly
ITEM # 41242 WARNING Improper installation, adjustment, alteration, service or maintenance can cause injury or property damage. Read the installation, operation and maintenance instructions thoroughly
Spartan BBQ s User Manuals
 by Spartan BBQ s User Manuals Spartan 4 Burner BBQ s SB4BFS SB4BBI euromaid.com.au 1800 805 300 customerservice@hapl.com.au Masterluxe domestic outdoor gas barbecue Installation and Opera AGS ating SUN
48-Bottle Dual Zone Silent Wine Refrigerator
 48-Bottle Dual Zone Silent Wine Refrigerator INSTRUCTION MANUAL Please read carefully and follow all safety rules and operating instructions. WineEnthusiast.com 800.356.8466 1 Table of Contents Structure......
THE PANCAKE FACTORY. Model: PM-2
 THE PANCAKE FACTORY Model: PM-2 IMPORTANT SAFEGUARDS When using electrical appliances, basic safety precautions should always be followed including the following: 1. Read all instructions. 2. Do not touch
57 Stainless Steel Gas Grill
 57 Stainless Steel Gas Grill 1 Welcome & Congratulations Congratulations on your purchase of a new grill! We at Electrolux Home Products are very proud of our product and we are completely committed to
Owner's Manual: Stainless Steel Rotisserie Kit for Kenmore Elite & Kenmore Premium Grills
 Owner's Manual: Stainless Steel Rotisserie Kit for Kenmore Elite & Kenmore Premium Grills 141.158031 for 3/4 Burner Kenmore and Kenmore Elite Grills: 141.15804 for 5/6 Burner Kenmore and Kenmore Elite
24-Bottle 2-Temp Touchscreen Refrigerator
 24-Bottle 2-Temp Touchscreen Refrigerator INSTRUCTION MANUAL To ensure proper use of this appliance and your safety, please read the following instructions completely before operating this appliance. WineEnthusiast.com
GOURMET GRILLS(PG 2-10) LE GRILS DU GOURMET(PG 11-19)
 LE GRILS DU GOURMET(PG 11-19)") SERIAL / SÉRIE# GOURMET GRILLS(PG 2-10) LE GRILS DU GOURMET(PG 11-19) CSS610RB MANUFACTURED FOR / MANUFACTURE POUR: NAPOLEONAPPLIANCE CORP., 214 BAYVIEW DR., BARRIE, ONTARIO, CANADA L4N 4Y8 PHONE: (705)726-4278
SERIAL / SÉRIE# GOURMET GRILLS(PG 2-10) LE GRILS DU GOURMET(PG 11-19) CSS610RB MANUFACTURED FOR / MANUFACTURE POUR: NAPOLEONAPPLIANCE CORP., 214 BAYVIEW DR., BARRIE, ONTARIO, CANADA L4N 4Y8 PHONE: (705)726-4278
Assembly and Operating Instructions for Outback Meteor Select 3 Burner Gas BBQ
 Assembly and Operating Instructions for Outback Meteor Select 3 Burner Gas BBQ Drawings are not to scale. Specifications subject to change without prior notice. MH3330 0359 WARNING For outdoor use only.
HOT SPOTS COOKING SAFETY
 Many families gather in the kitchen to spend time together, but it can be one of the most hazardous rooms in the house if you don't practice safe cooking behaviors. Cooking equipment, most often a range